
FastChat-Vicuna开放,媲美ChatGPT的90%能力——从下载到安装、部署
前言
- 最近ChatGPT非常火,引爆了整个商业市场以及NLP学术界,但是ChatGPT很多东西都不开放,你也没法个人部署、研究
- 于是很多大语言模型横空出世,在开放的大语言模型中,最近我认为效果很不错的是FastChat上的Vicuna,基于LLaMA做了二次调参训练,据官方称能达到ChatGPT的90%的能力。(具体能否达到这个值,可以直接去他们的Demo上试试)
- 相关链接 - GitHub地址: https://github.com/lm-sys/FastChat- Demo地址: https://chat.lmsys.org/- 博客与相关说明: https://vicuna.lmsys.org/
- 注意 - 安装教程时间为2023年4月8日2023年4月21日,FastChat项目频繁更新,后续可能会有不一致的地方- 删除的部分文字是之前的版本的,现在可以不用管他们了- 如果遇到问题,可以先参考下文末的“安装过程中的异常汇总”
两个前置软件
- Git: https://git-scm.com/- 代码管理工具,用于等会从GitHub安装huggingface的transformers- 直接安装即可,不用改配置
- **Anaconda:**https://www.anaconda.com/ - Python依赖管理工具,用于做Python依赖环境管理,你也可以用其他的管理工具- 直接安装即可,不用改配置
创建FastChat虚拟环境
- 首先,利用Anaconda为FastChat创建一个虚拟环境,执行命令
$ conda create -n fastchat python=3.9 -c conda-forge- 如果是Windows系统,你需要先打开Anaconda Prompt- 官网要求Python版本要>= 3.8,注意不要安装错版本了- 如果Anaconda下载新环境的依赖较慢的话,你可以开加速器,或者切换下清华源,命令如下(按顺序)conda config --add channels https://mirrors.tuna.tsinghua.edu.cn/anaconda/pkgs/mainconda config --add channels https://mirrors.tuna.tsinghua.edu.cn/anaconda/pkgs/freeconda config --add channels https://mirrors.tuna.tsinghua.edu.cn/anaconda/pkgs/rconda config --add channels https://mirrors.tuna.tsinghua.edu.cn/anaconda/pkgs/proconda config --add channels https://mirrors.tuna.tsinghua.edu.cn/anaconda/pkgs/msys2conda config --add channels https://mirrors.tuna.tsinghua.edu.cn/anaconda/cloud/conda-forge/conda config --add channels https://mirrors.tuna.tsinghua.edu.cn/anaconda/cloud/bioconda/conda config --set show_channel_urls yes - 切换到刚才创建好的
fastchat虚拟环境,执行$ conda activate fastchat - 这个时候你就切换到了我们为FastChat准备的Python虚拟环境了,接下来可以开始安装我们需要的一些依赖
安装PyTorch
- 由于FastChat使用的是PyTorch深度学习框架,建议提前安装好PyTorch的依赖 - 因为官方的源文件有申明PyTorch的依赖,虽然等下安装FastChat时会自动安装PyTorch,但是默认安装的不是带CUDA版本的,到时候重新弄麻烦- 而且还不能指定自己需要的PyTorch版本
- 具体怎么安装,请参考官方链接 https://pytorch.org/get-started/locally/ - 根据自己当前的情况选择,官方会给出安装命令- 默认是最新的PyTorch2.0,但如果你想使用早一点的版本,请看这里 https://pytorch.org/get-started/previous-versions/
- 安装命令样例(conda和pip选一个) - conda(有时候会卡住) -
$ conda install pytorch torchvision torchaudio cudatoolkit=11.6 -c pytorch -c conda-forge-$ conda install pytorch==1.13.1 torchvision==0.14.1 torchaudio==0.13.1 pytorch-cuda=11.6 -c pytorch -c nvidia- Pip (这个一般好用点) -$ pip install torch==1.13.1+cu117 torchvision==0.14.1+cu117 torchaudio==0.13.1 --extra-index-url https://download.pytorch.org/whl/cu117-$ pip3 install torch==1.13.1+cu116 torchvision==0.14.1+cu116 torchaudio==0.13.1 --extra-index-url https://download.pytorch.org/whl/cu116(我用的这个) - 安装完成后,建议进入Python命令行测试一下,下面是个样例
(base) PS C:\Users\alion> conda activate fastchat(fastchat) PS C:\Users\alion> pythonPython 3.9.16 (main, Mar 82023, 10:39:24)[MSC v.1916 64 bit (AMD64)] on win32Type "help", "copyright", "credits" or "license"formore information.>>>import torch>>> print(torch.__version__)1.13.1+cu116>>> print(torch.version.cuda)11.6>>>>>> exit()(fastchat) PS C:\Users\alion>
安装 FastChat
- 官方有两种安装方式 1. 直接利用Pip安装 -
$ pip3 install fschat2. 下载官方源码后安装(在解压后的目录下执行) -$ pip3 install --upgrade pip-$ pip3 install -e . - 第二种方式可能会出错,建议先直接用第一种(不过你都可以试试,哈哈) - 第二种的话,可以有更多的控制性,例如在
pyproject.toml文件中移除掉你认为不需要的依赖,或是源码中有错误需要修改- 如果用源码装可能会出现错误- 信息大概是这样git clone --filter=blob:none --quiet https://github.com/huggingface/transformers.git ... exit code: 128- 你先去fastchat项目下,打开pyproject.toml文件,移除掉dependencies中的transformers,等下手动安装pip3 install git+https://github.com/huggingface/transformers- 当然这个也可能会卡住,多试几次吧😁 - 直接执行Pip命令 - 如下
# 安装FastChatpip3 install fschat# 下面这个可以不单独安装了,安装fschat时已自动依赖安装(2023-04-21记录)# 安装 huggingface/transformerspip3 install git+https://github.com/huggingface/transformers- 慢的话可以在Pip命令后面加个清华源后缀-i https://pypi.tuna.tsinghua.edu.cn/simple- 如果github没法访问,请记得开启你的专业工具 - 请确保你已经安装好Git,并在命令行中能使用,否则安装huggingface/transformers时会报错
- 我已经安装好了,可以看看输出样例
(fastchat) C:\Users\alion>pip3 install fschat
Collecting fschat
  Downloading fschat-0.2.3-py3-none-any.whl (79 kB)
     ---------------------------------------- 80.0/80.0 kB 371.0 kB/s eta 0:00:00
Collecting accelerate (from fschat)
  Using cached accelerate-0.18.0-py3-none-any.whl (215 kB)
Collecting fastapi (from fschat)
  Using cached fastapi-0.95.1-py3-none-any.whl (56 kB)
Collecting gradio==3.23(from fschat)
  Using cached gradio-3.23.0-py3-none-any.whl (15.8 MB)......
Collecting pyrsistent!=0.17.0,!=0.17.1,!=0.17.2,>=0.14.0 (from jsonschema>=3.0->altair>=4.2.0->gradio==3.23->fschat)
  Using cached pyrsistent-0.19.3-cp39-cp39-win_amd64.whl (62 kB)
Collecting uc-micro-py (from linkify-it-py<3,>=1->markdown-it-py[linkify]>=2.0.0->gradio==3.23->fschat)
  Using cached uc_micro_py-1.0.1-py3-none-any.whl (6.2 kB)
Installing collected packages: wcwidth, tokenizers, sentencepiece, pytz, pydub, pathtools, ffmpy, appdirs, zipp, websockets, uc-micro-py, tzdata, toolz, svgwrite, sniffio, smmap, six, shortuuid, setproctitle, sentry-sdk, semantic-version, regex, pyyaml, python-multipart, pyrsistent, pyparsing, pygments, pydantic, psutil, protobuf, prompt-toolkit, packaging, orjson, multidict, mdurl, markupsafe, markdown2, kiwisolver, h11, fsspec, frozenlist, fonttools, filelock, entrypoints, cycler, contourpy, colorama, attrs, async-timeout, aiofiles, yarl, wavedrom, tqdm, python-dateutil, markdown-it-py, linkify-it-py, jsonschema, jinja2, importlib-resources, gitdb, docker-pycreds, click, anyio, aiosignal, accelerate, uvicorn, starlette, rich, pandas, mdit-py-plugins, matplotlib, huggingface-hub, httpcore, GitPython, aiohttp, wandb, transformers, httpx, fastapi, altair, gradio, fschat
Successfully installed GitPython-3.1.31 accelerate-0.18.0 aiofiles-23.1.0 aiohttp-3.8.4 aiosignal-1.3.1 altair-4.2.2 anyio-3.6.2 appdirs-1.4.4 async-timeout-4.0.2 attrs-23.1.0 click-8.1.3 colorama-0.4.6 contourpy-1.0.7 cycler-0.11.0 docker-pycreds-0.4.0 entrypoints-0.4 fastapi-0.95.1 ffmpy-0.3.0 filelock-3.12.0 fonttools-4.39.3 frozenlist-1.3.3 fschat-0.2.3 fsspec-2023.4.0 gitdb-4.0.10 gradio-3.23.0 h11-0.14.0 httpcore-0.17.0 httpx-0.24.0 huggingface-hub-0.13.4 importlib-resources-5.12.0 jinja2-3.1.2 jsonschema-4.17.3 kiwisolver-1.4.4 linkify-it-py-2.0.0 markdown-it-py-2.2.0 markdown2-2.4.8 markupsafe-2.1.2 matplotlib-3.7.1 mdit-py-plugins-0.3.3 mdurl-0.1.2 multidict-6.0.4 orjson-3.8.10 packaging-23.1 pandas-2.0.0 pathtools-0.1.2 prompt-toolkit-3.0.38 protobuf-4.22.3 psutil-5.9.5 pydantic-1.10.7 pydub-0.25.1 pygments-2.15.1 pyparsing-3.0.9 pyrsistent-0.19.3 python-dateutil-2.8.2 python-multipart-0.0.6 pytz-2023.3 pyyaml-6.0 regex-2023.3.23 rich-13.3.4 semantic-version-2.10.0 sentencepiece-0.1.98 sentry-sdk-1.20.0 setproctitle-1.3.2 shortuuid-1.0.11 six-1.16.0 smmap-5.0.0 sniffio-1.3.0 starlette-0.26.1 svgwrite-1.4.3 tokenizers-0.13.3 toolz-0.12.0 tqdm-4.65.0 transformers-4.28.1 tzdata-2023.3 uc-micro-py-1.0.1 uvicorn-0.21.1 wandb-0.15.0 wavedrom-2.0.3.post3 wcwidth-0.2.6 websockets-11.0.2 yarl-1.8.2 zipp-3.15.0

(fastchat) C:\Users\alion>
下载 LLaMA,并转换
- 由于FastChat基于LLaMA做的二次调参训练,所以我们需要先拿到LLaMA模型文件
- 官方的获取方式比较麻烦,需要你先填个表单,然后等他们回复,认为可以了才会给你文件 - hugging face对于LLaMA的说明 https://huggingface.co/docs/transformers/main/model_doc/llama- Meta AI的表单填写地址 https://docs.google.com/forms/d/e/1FAIpQLSfqNECQnMkycAp2jP4Z9TFX0cGR4uf7b_fBxjY_OjhJILlKGA/viewform
- 不过幸运的是,国内有人共享了 LLaMA模型文件 - 百度PaddlePaddle(只找到个7B的模型) https://aistudio.baidu.com/aistudio/datasetdetail/203425/0- 种子链接(包含7B/13B/30B/65B的模型)
magnet:?xt=urn:btih:cdee3052d85c697b84f4c1192f43a2276c0daea0&dn=LLaMA - 下载后,关于解压或是保存文件的路径中 ,请记得不要有中文、特殊符号等
- 接下来,我们还需要转换一下LLaMA的文件,以便于构建FastChat对应的模型Vicuna(我资源不够,用的7B模型) 1. 下载 huggingface/transformers 的源码,访问其GitHub地址2. 点击绿色的Code按钮,选择Download ZIP,完成代码下载3. 解压,进入到项目下
$ cd transformers-main4. 利用 huggingface/transformers 中的代码,完成对于LLaMA的转换,示例$ python src/transformers/models/llama/convert_llama_weights_to_hf.py --input_dir D:/code/model/LLaMA --model_size 7B --output_dir D:/code/model/transformer_model_7b- 参数:--input_dir指定的是刚才你下载好的LLaMA文件地址,这个路径下有个tokenizer.model文件,请仔细核对一下- 参数:--model_size指定用哪个参数数量级的模型,7B代表的是70亿个参数的那个模型(如果你用的种子链接下载的话,还有13B/30B/65B的模型)- 参数:--output_dir是转换后输出的路径,等下要用 - 输出信息样例如下
(fastchat) D:\code\transformers-main>python src/transformers/models/llama/convert_llama_weights_to_hf.py --input_dir D:/code/model/LLaMA --model_size 7B --output_dir D:/code/model/transformer_model_7bFetching all parameters from the checkpoint at D:/code/model/LLaMA\7B.Loading the checkpoint in a Llama model.Loading checkpoint shards: 100%|███████████████████████████████████████████████████████|33/33 [00:04<00:00, 7.76it/s]Saving in the Transformers format.Fetching the tokenizer from D:/code/model/LLaMA\tokenizer.model.(fastchat) D:\code\transformers-main>
生成FastChat对应的模型Vicuna
- 接下来我们需要生成Vicuna模型,将原始的LLaMA weights转为Vicuna weights
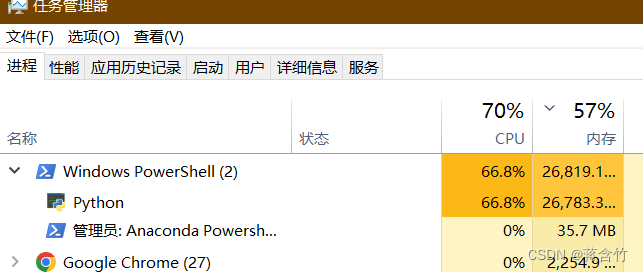
- 这个过程需要消耗大量的内存,CPU也是拉满😁,官方给出的参考值如下 - Vicuna-13B 需要大约60GB内存- Vicuna-7B 需要大约30GB内存
- 确实需要这么多,请准备好足够的内存空间
- 命令样例如
$ python -m fastchat.model.apply_delta --base D:/code/model/transformer_model_7b --target D:/code/model/vicuna-7b --delta lmsys/vicuna-7b-delta-v1.1- 参数:--base指定的是上一步中我们转换好的LLaMA 文件路径- 参数:--target是接下来生成的Vicuna文件要存放的位置,稍后启动FastChat要用- 参数:--delta不用改- 注意:如果内存不够,可以加上--low-cpu-mem,它可以让消耗的内存低于16GB - 这个过程较长,需要等下,下面是我的控制台打印信息样例
(fastchat) D:\code\transformers-main>python -m fastchat.model.apply_delta --base D:/code/model/transformer_model_7b --target D:/code/model/vicuna-7b  --delta lmsys/vicuna-7b-delta-v1.1
Loading the base model from D:/code/model/transformer_model_7b
Loading checkpoint shards: 100%|█████████████████████████████████████████████████████████|2/2 [00:03<00:00,  1.59s/it]
Loading the delta from lmsys/vicuna-7b-delta-v1.1
Downloading (…)lve/main/config.json: 100%|████████████████████████████████████████████|610/610 [00:00<00:00, 50.6kB/s]
Downloading (…)model.bin.index.json: 100%|█████████████████████████████████████████|26.8k/26.8k [00:00<00:00, 192kB/s]
Downloading (…)l-00001-of-00002.bin: 100%|████████████████████████████████████████|9.98G/9.98G [06:34<00:00, 25.3MB/s]
Downloading (…)l-00002-of-00002.bin: 100%|████████████████████████████████████████|3.50G/3.50G [02:15<00:00, 25.9MB/s]
Downloading shards: 100%|███████████████████████████████████████████████████████████████|2/2 [08:54<00:00, 267.12s/it]
Loading checkpoint shards: 100%|█████████████████████████████████████████████████████████|2/2 [00:03<00:00,  1.68s/it]
Downloading (…)neration_config.json: 100%|████████████████████████████████████████████|137/137 [00:00<00:00, 27.6kB/s]
Applying the delta
Applying delta: 100%|████████████████████████████████████████████████████████████████|323/323 [00:22<00:00, 14.09it/s]
Saving the target model to D:/code/model/vicuna-7b

(fastchat) D:\code\transformers-main>
启动FastChat的命令行交互
- 前序工作我们已经准备好了,接下来可以和Vicuna进行命令行式的交流了
- 执行命令
$ python -m fastchat.serve.cli --model-path D:\code\model\vicuna-7b- 如果使用CPU$ python -m fastchat.serve.cli --model-path D:\code\model\vicuna-7b --device cpu- 如果有多张显卡,可通过--num-gpus 2来指定多张显卡- 官方给出的参考值如下 - 使用显卡的情况下:Vicuna-13B大概需要28GB显存,Vicuna-7B大概需要14GB显存- 使用CPU的情况下:Vicuna-13B大概需要60GB内存,Vicuna-7B大概需要30GB内存- 内存不够?在后面添加--load-8bit试试 - 稍等一会,就可以正式和Vicuna交流了
- 下面是一个样例
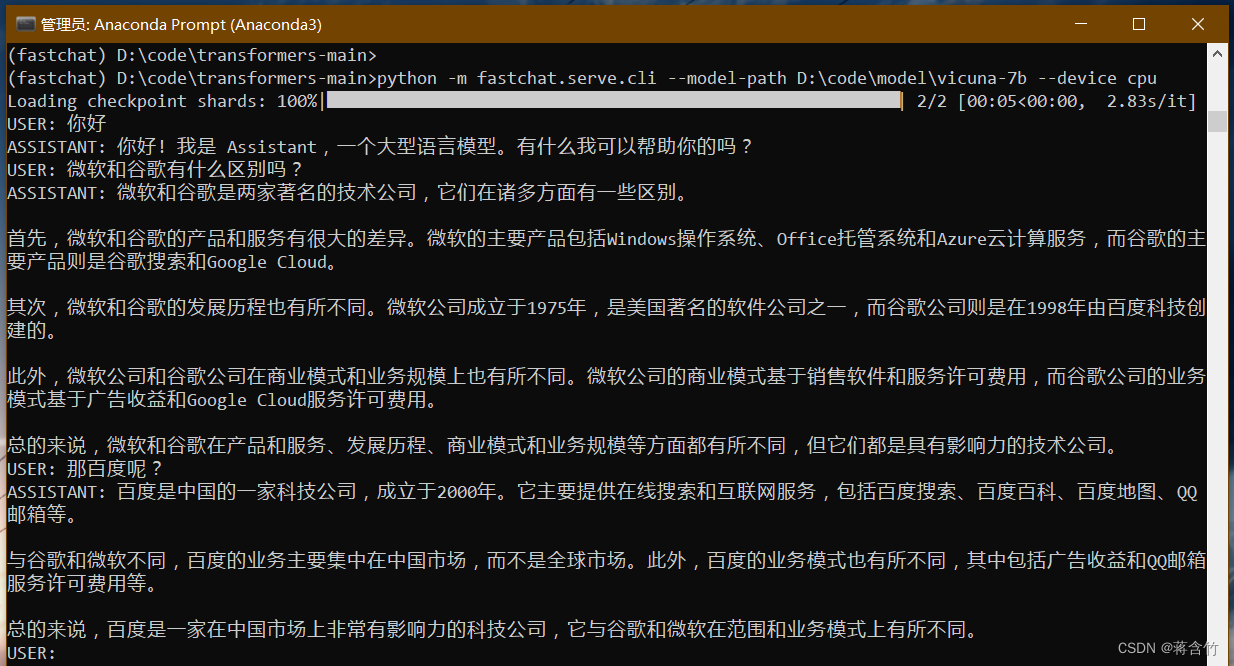
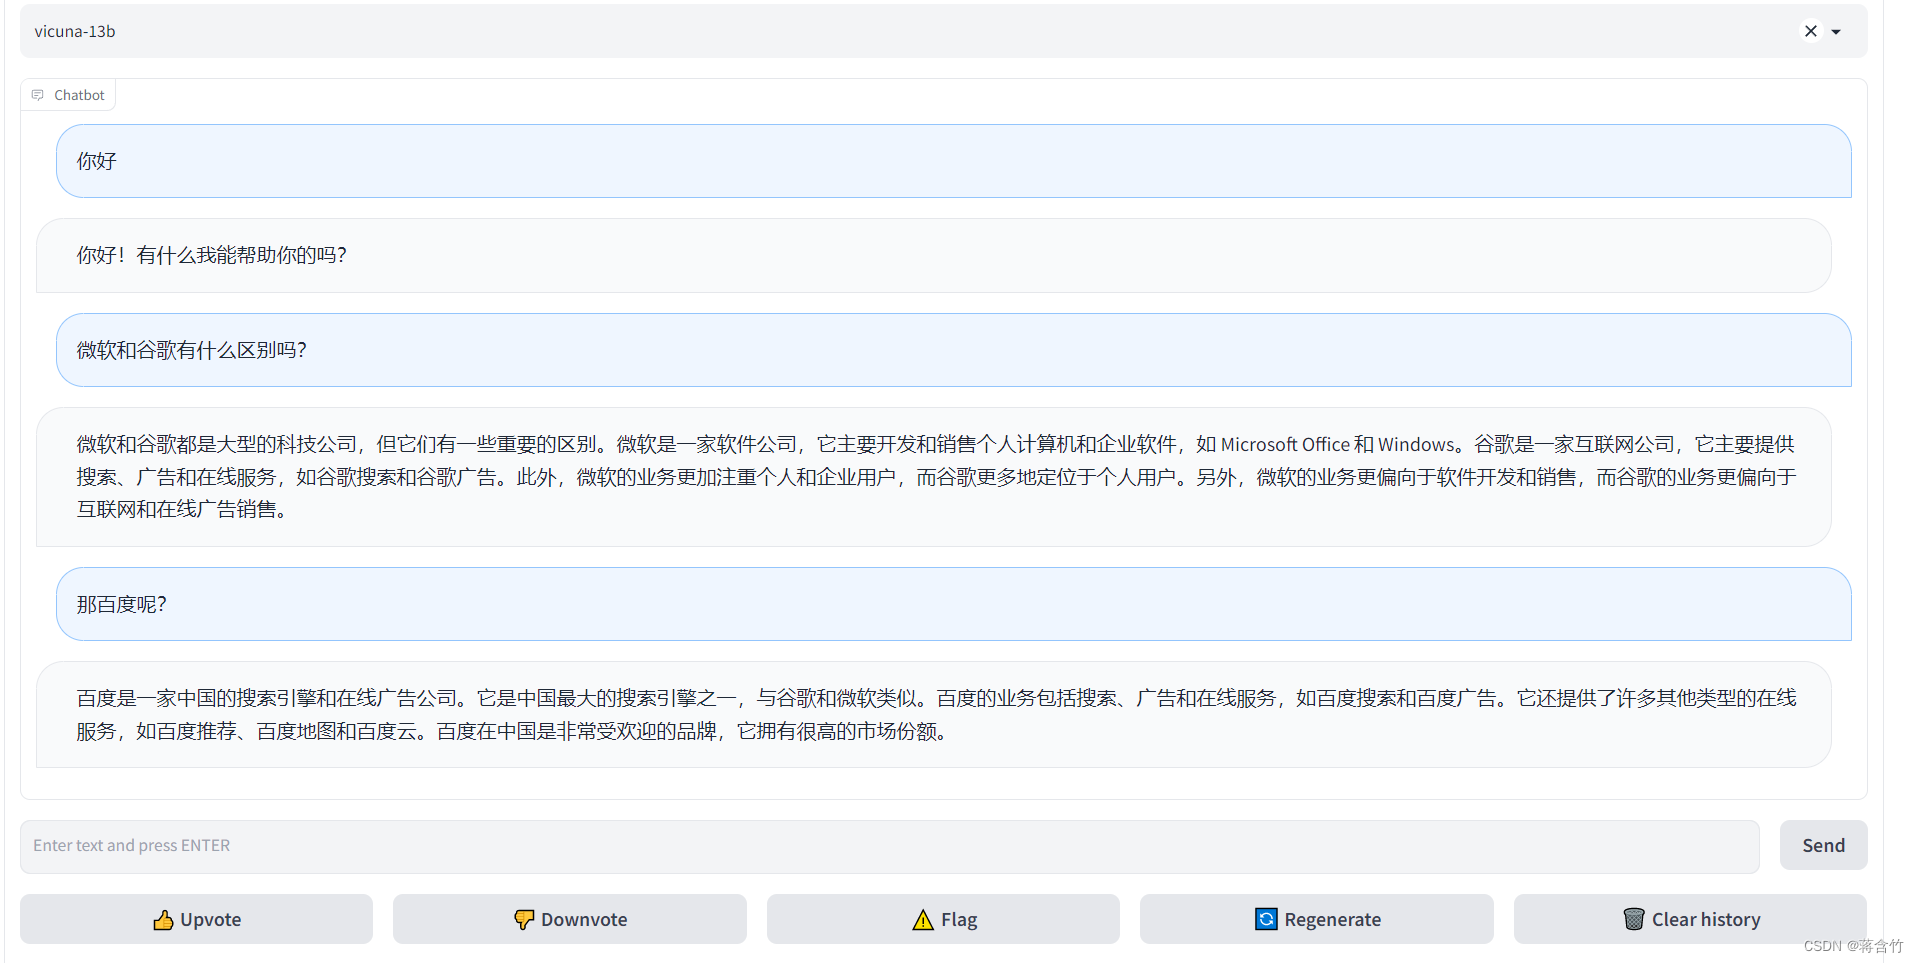
- 可以看出来7B模型还是有较大问题的,你可以到官方Demo地址中,拿这个问题问问13B模型
将模型部署为一个服务,提供Web GUI
- 启动 controller - 新打开命令行,进入到fastchat环境
$ conda activate fastchat- 执行命令$ python -m fastchat.serve.controller - 启动 model worker - 新打开命令行,进入到fastchat环境
$ conda activate fastchat- 执行命令$ python -m fastchat.serve.model_worker --model-path D:\code\model\vicuna-7b- 同样,如果你显卡内存不够,需要使用CPU,在后面加上参数--device cpu - 关于controller和model worker的说明 - controller用来控制协调Webserver的请求,将具体的任务转给model worker- model worker负责执行,可以部署多个,会自动链接到controller
- 启动前可以测试一下 - 新打开命令行,进入到fastchat环境
$ conda activate fastchat- 执行$ python -m fastchat.serve.test_message --model-name vicuna-7b - 最后,启动 web server,执行
$ python -m fastchat.serve.gradio_web_server - 打开浏览器,访问地址 http://127.0.0.1:7860/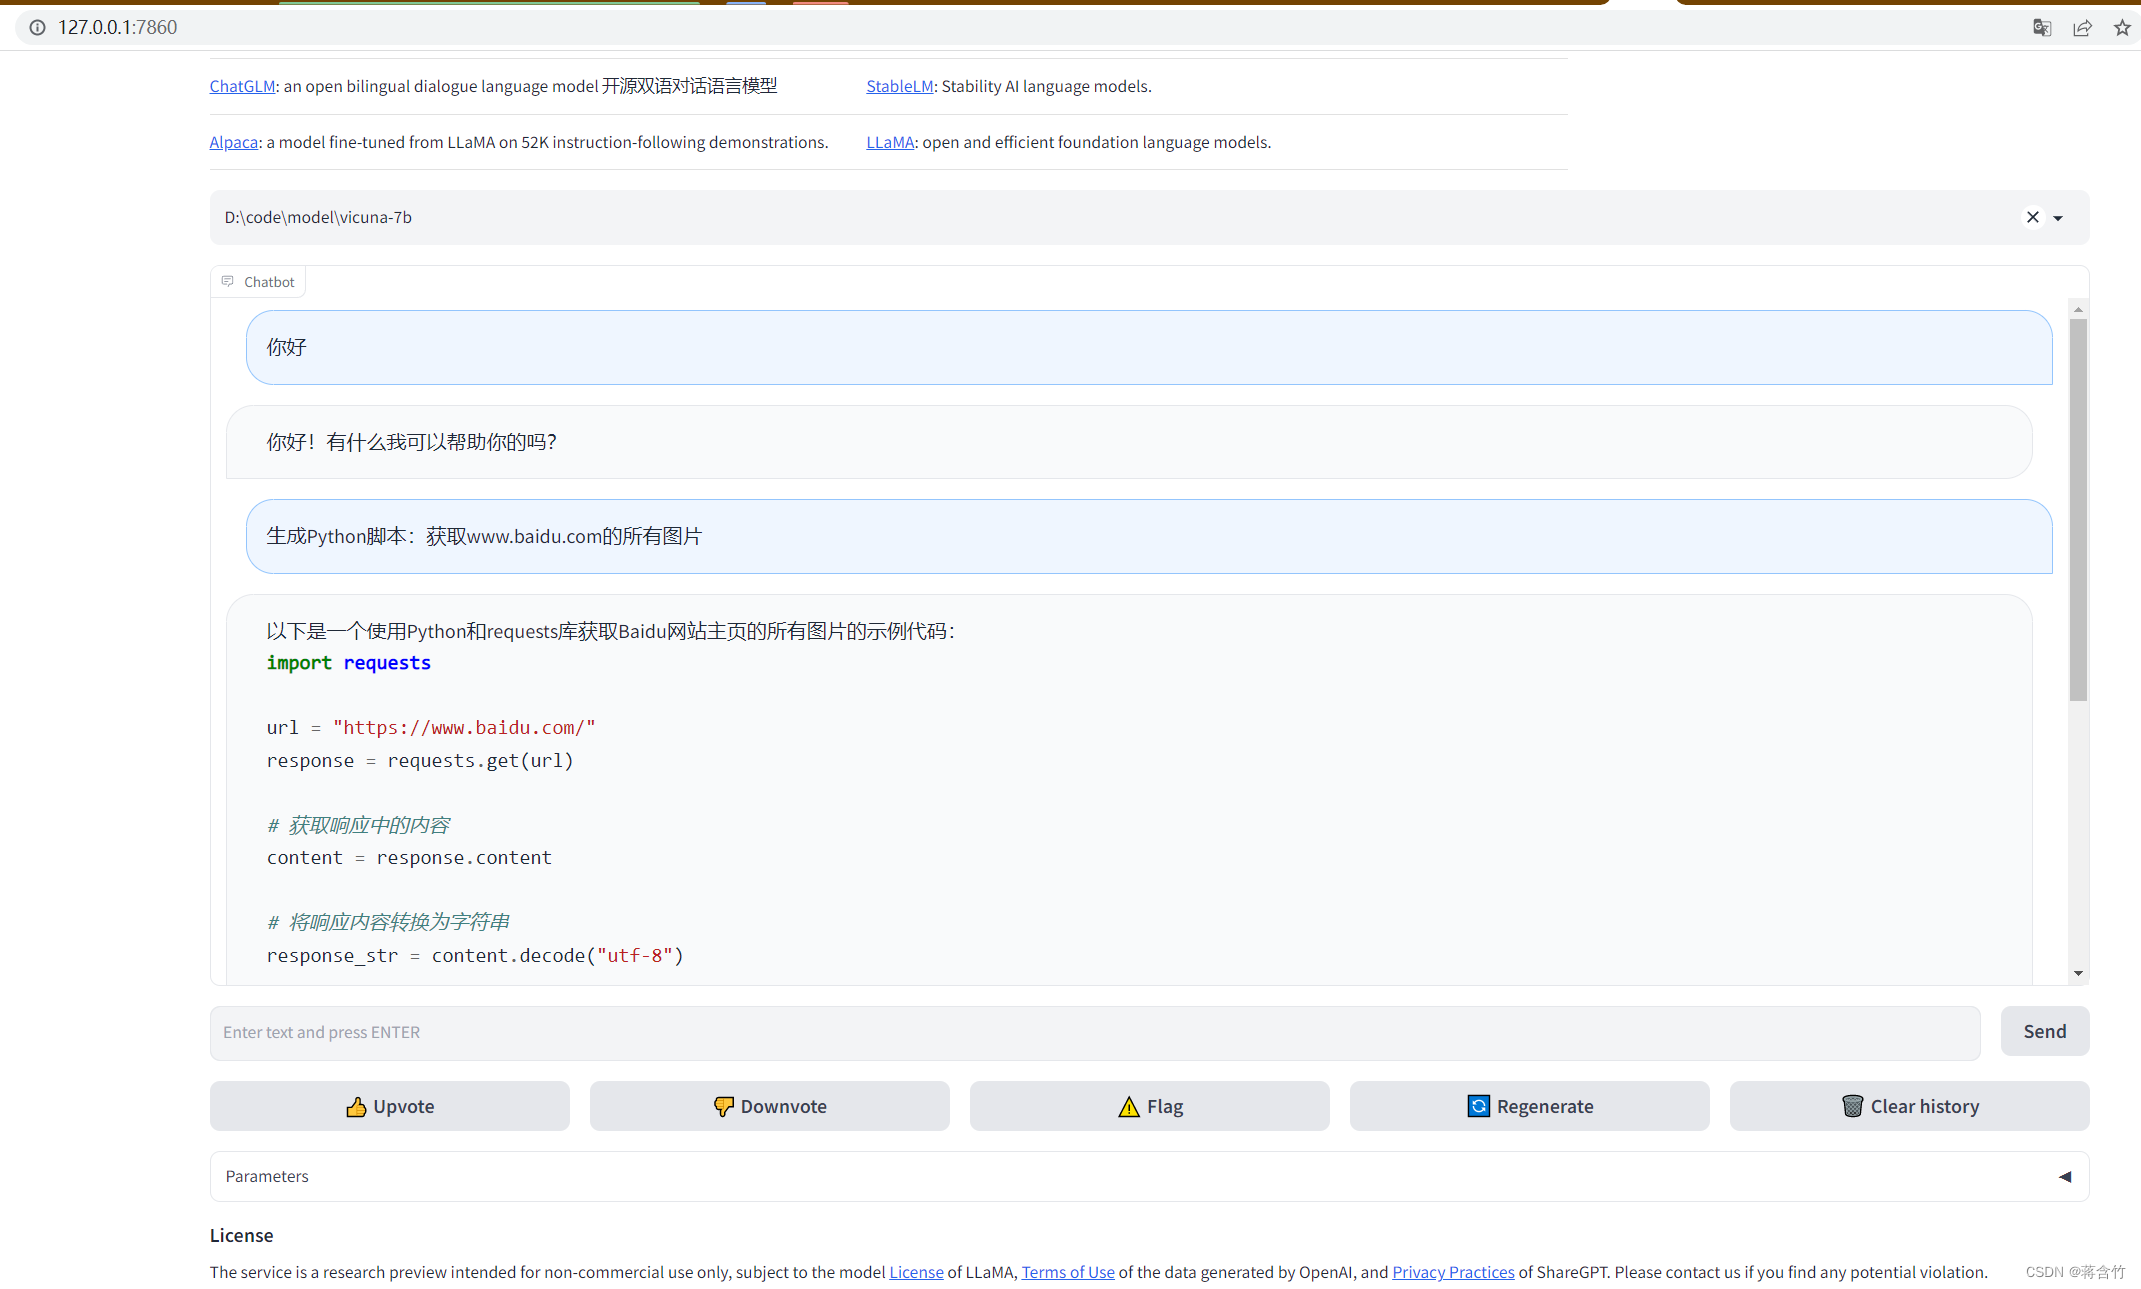
API 的使用
- FastChat官方提供的方式(详见 OpenAI-Compatible RESTful APIs & SDK) - RESTful API Server:启动Server后,利用程序调用Server的HTTP接口即可- Client SDK:安装fastchat后,在python内引入client包使用
不想用FastChat的Web?想自己用代码加载模型?
- 下面是“自己用Python代码加载模型,给出prompt,让AI进行回复”的示例(主要参考
fastchat.serve.cli.py中的代码) - 导包
import torch
from transformers import AutoTokenizer, AutoModelForCausalLM, LlamaTokenizer, AutoModel
- 加载model和tokenizer
# 你生成的vicuna模型的目录
model_name ="D:/code/model/vicuna-7b"
tokenizer = AutoTokenizer.from_pretrained(model_name, use_fast=False)
model = AutoModelForCausalLM.from_pretrained(model_name, low_cpu_mem_usage=True)
- 定义AI生成回复的函数
defgenerate_stream(model, tokenizer, params, device, context_len=2048, stream_interval=2):
    prompt = params["prompt"]
    l_prompt =len(prompt)
    temperature =float(params.get("temperature",1.0))
    max_new_tokens =int(params.get("max_new_tokens",256))
    stop_str = params.get("stop",None)
    input_ids = tokenizer(prompt).input_ids
    output_ids =list(input_ids)
    max_src_len = context_len - max_new_tokens -8
    input_ids = input_ids[-max_src_len:]for i inrange(max_new_tokens):if i ==0:
            out = model(
                torch.as_tensor([input_ids], device=device), use_cache=True)
            logits = out.logits
            past_key_values = out.past_key_values
        else:
            attention_mask = torch.ones(1, past_key_values[0][0].shape[-2]+1, device=device)
            out = model(input_ids=torch.as_tensor([[token]], device=device),
                        use_cache=True,
                        attention_mask=attention_mask,
                        past_key_values=past_key_values)
            logits = out.logits
            past_key_values = out.past_key_values
        last_token_logits = logits[0][-1]if device =="mps":# Switch to CPU by avoiding some bugs in mps backend.
            last_token_logits = last_token_logits.float().to("cpu")if temperature <1e-4:
            token =int(torch.argmax(last_token_logits))else:
            probs = torch.softmax(last_token_logits / temperature, dim=-1)
            token =int(torch.multinomial(probs, num_samples=1))
        output_ids.append(token)if token == tokenizer.eos_token_id:
            stopped =Trueelse:
            stopped =Falseif i % stream_interval ==0or i == max_new_tokens -1or stopped:
            output = tokenizer.decode(output_ids, skip_special_tokens=True)
            pos = output.rfind(stop_str, l_prompt)if pos !=-1:
                output = output[:pos]
                stopped =Trueyield output
        if stopped:breakdel past_key_values
- 给出prompt,让AI进行回复
params ={"prompt":"你好!",# 你发出的话"temperature":0.7,# 模型输出的随机程度"max_new_tokens":100,# AI最大回复的语言长度"stop":"###"}iter= generate_stream(model, tokenizer, params,'cpu',context_len=2048, stream_interval=2)

skip_echo_len =len(params["prompt"])+1
pre =0for outputs initer:
    outputs = outputs[skip_echo_len:].strip()
    outputs = outputs.split(" ")
    now =len(outputs)if now -1> pre:print(" ".join(outputs[pre:now-1]), end=" ", flush=True)
        pre = now -1print(" ".join(outputs[pre:]), flush=True)
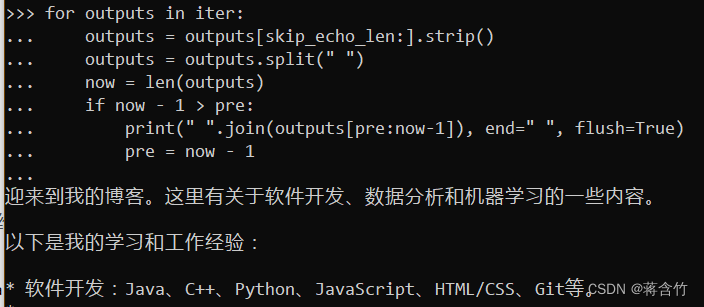
- 下面是个控制台输出的样例截图
安装过程中的异常汇总
问题1
- 出现下面异常提示
Descriptors cannot not be created directly.
If this call came from a _pb2.py file, your generated code is out of date and must be regenerated with protoc >= 3.19.0.
If you cannot immediately regenerate your protos, some other possible workarounds are:
python convert_llama_weights_to_hf.py --input_dir D:\Xunlei\LLaMA7\LLaMAOriginalWeights\LLaMA --model_size 7B --output_dir D:\fastChat\transformer_model_7b
1. Downgrade the protobuf package to 3.20.x or lower.
2. Set PROTOCOL_BUFFERS_PYTHON_IMPLEMENTATION=python (but this will use pure-Python parsing and will be much slower).
- 说明protobuf生成的文件过时了,需要重新生成。你可以换下protobuf的版本,如
$ pip install --upgrade protobuf==3.20.1 -i https://pypi.doubanio.com/simple/
问题2
- 出现下面异常提示
OSError: Not found: "C:/Users/dd/Vicuna/LLaMA\tokenizer.model": No such file or directory Error #2
- 说明在“转换LLaMA”步骤中,
--input_dir指定的路径下没有tokenizer.model文件,请仔细核对你下载的文件,存放层级不要弄错了 - 文中给出的种子和飞浆的下载中都是有tokenizer.model文件的
问题3
- 执行命令时会下载部分东西,下载过程中可能超时,报
Time out - 因为下载的文件在国外,可能网速慢,你可以尝试上个加速器。
- 部分同学使用某些代理工具时(例如Clash),没法对正在使用的命令行工具进行代理,可以在命令行中设置代理的环境变量,例如 - Windows CMD中,执行
set http_proxy=http://127.0.0.1:7890和set https_proxy=http://127.0.0.1:7890- PowerShell中,执行$Env:http_proxy="http://127.0.0.1:7890";$Env:https_proxy="http://127.0.0.1:7890"- 提示:7890是你本地代理服务的端口,请根据自己的代理服务填写
本文转载自: https://blog.csdn.net/alionsss/article/details/130027299
版权归原作者 蒋含竹 所有, 如有侵权,请联系我们删除。
版权归原作者 蒋含竹 所有, 如有侵权,请联系我们删除。