web页面登陆配置
拓扑图

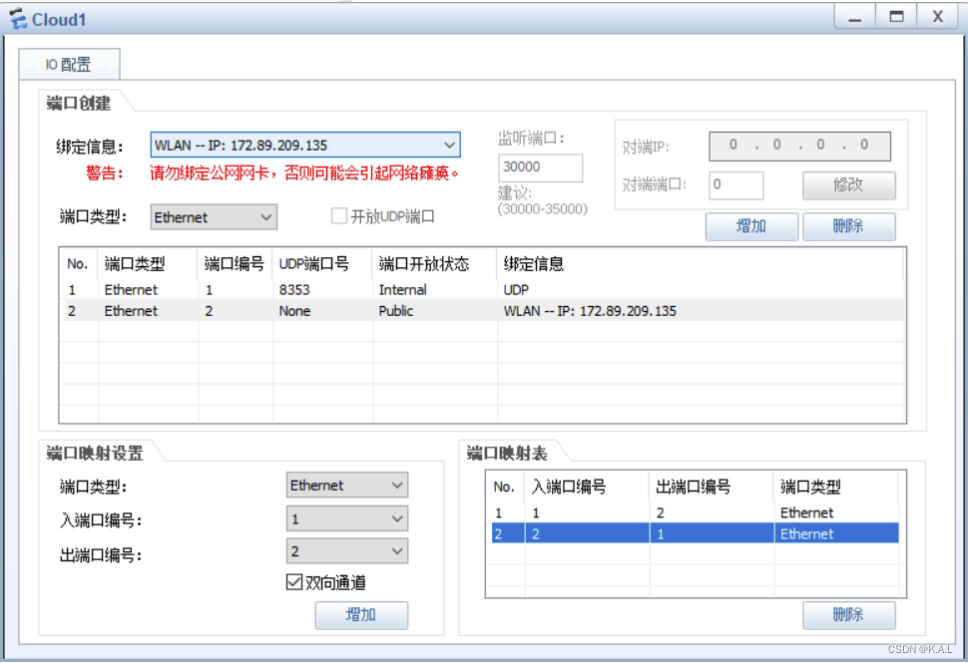
Cloud1相关配置,对出入编号进行配置,我选择WLAN网卡进行配置
<USG6000V1>sys  #进入系统视图
[USG6000V1]sys NGFW   #配置设备名称
[NGFW]dis ip int brief   #显示虚拟接口对应的IP地址与使用状态
[NGFW]int g0/0/0    #进入端口GE0/0/0
[NGFW-GigabitEthernet0/0/0]ip add 172.89.209.137 24  #端口出配置IP地址
[NGFW-GigabitEthernet0/0/0]service-manage  all permit  #开启服务器管理员权限
[NGFW-GigabitEthernet0/0/0]dis ip int brief
在主机上使用PING命令 ( ping 172.89.209.137)

登陆进入网站,需求实现成功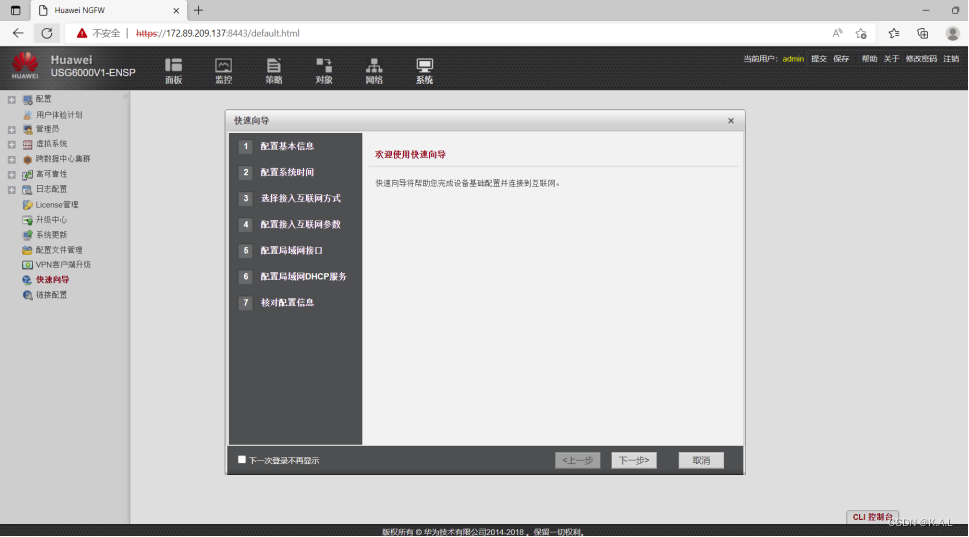
基于IP地址的转发策略
拓展图:
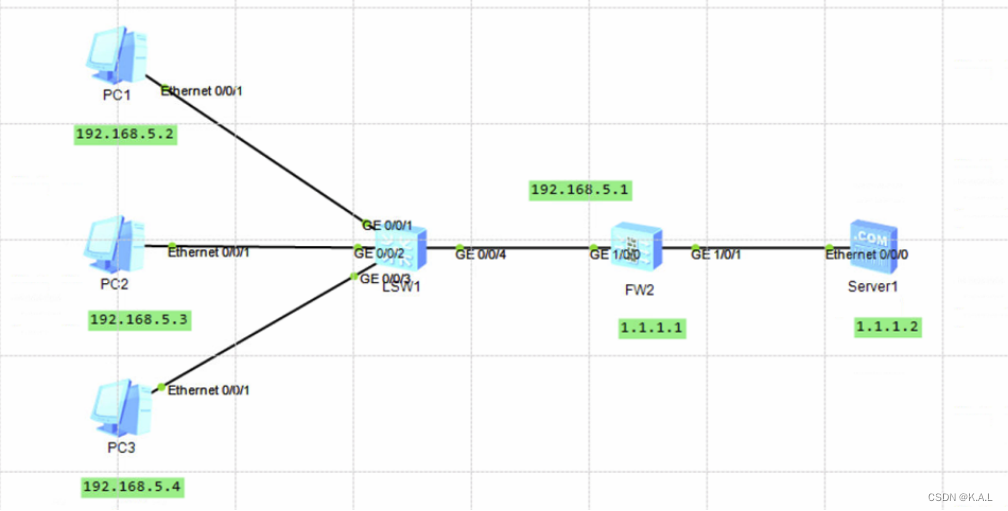
第一步:配置防火墙各接口的IP地址
[USG6000V1-GigabitEthernet1/0/1]int  g1/0/0
[USG6000V1-GigabitEthernet1/0/0]ip address   192.168.5.1 24
[USG6000V1-GigabitEthernet1/0/0]int g1/0/1
[USG6000V1-GigabitEthernet1/0/1]ip address  1.1.1.1  24
[USG6000V1-GigabitEthernet1/0/1]q
第二步:将防火墙的GE1/0/0接口加入Trust区域
[USG6000V1]firewall  zone trust    #进入trust区域
[USG6000V1-zone-trust]add int g1/0/0
[USG6000V1-zone-trust]q
第三步:将防火墙的GE1/0/1接口加入Untrust** **区域
[USG6000V1]firewall  zone untrust    #进入untrust区域
[USG6000V1-zone-untrust]add int g1/0/1
[USG6000V1-zone-untrust]q
配置ip_deny****的地址集
[USG6000V1]ip address-set ip_deny type object
*将不允许通过防火墙的IP地址加入ip_deny的地址集*
[USG6000V1-object-address-set-ip_deny]address 192.168.5.2  0
[USG6000V1-object-address-set-ip_deny]address 192.168.5.3  0
[USG6000V1-object-address-set-ip_deny]address 192.168.5.3  0
[USG6000V1-object-address-set-ip_deny]address 192.168.5.6  0
[USG6000V1-object-address-set-ip_deny]q
创建不允许通过防火墙IP转发策略
[USG6000V1]security-policy  //安全策略
[USG6000V1-policy-security]rule   name   policy_deny
[USG6000V1-policy-security-rule-policy_deny]source-address  address-set   ip_deny
[USG6000V1-policy-security-rule-policy_deny]action   deny
[USG6000V1-policy-security-rule-policy_deny]q
创建允许属于192.168.5.0/24这个网段的IP地址通过防火墙的转发策略
[USG6000V1]security-policy
[USG6000V1-policy-security]rule  name polity_permit
[USG6000V1-policy-security-rule-polity_permit]source-address  192.168.5.0  24
[USG6000V1-policy-security-rule-polity_permit]action permit
[USG6000V1-policy-security-rule-polity_permit]q
双机热备技术实验

防火墙1
配置步骤**-CLI **
① 完成 USG6330-1 上、下行业务接口的配置。配置各接口 IP 地址并加入相应安全区域。
<USG6000V1>sys
[USG6000V1]int G1/0/1
[USG6000V1-GigabitEthernet1/0/1] ip add 10.1.2.1 255.255.255.0
[USG6000V1-GigabitEthernet1/0/1]q
[USG6000V1]int G1/0/4
[USG6000V1-GigabitEthernet1/0/4] ip add 40.1.1.1 255.255.255.0
[USG6000V1-GigabitEthernet1/0/4]q
[USG6000V1] firewall zone trust
[USG6000V1-zone-trust]add interface G1/0/1
[USG6000V1-zone-trust]q
[USG6000V1]firewall zone untrust
[USG6000V1-zone-untrust]add interface G1/0/4
[USG6000V1-zone-untrust]q
②配置接口G1/0/4 的备份组1,并加入到状态Active的VGMP管理组
[USG6000V1]int G1/0/4
[USG6000V1-GigabitEthernet1/0/4]vrrp vrid 1 virtual-ip 2.2.2.1 255.255.255.0 a
ctive
[USG6000V1-GigabitEthernet1/0/4]q
③配置接口 GigabitEthernet 1/0/1 的 VRRP 备份组 2,并加入到状态为 Active 的 VGMP
管理组。
[USG6000V1]int G1/0/1
[USG6000V1-GigabitEthernet1/0/1]vrrp vrid 2 virtual-ip 10.1.2.3 24 active
[USG6000V1-GigabitEthernet1/0/1]q
④完成 USG6330-1 的心跳线配置,配置 GigabitEthernet1/0/3的 IP 地址。
[USG6000V1]int G1/0/3
[USG6000V1-GigabitEthernet1/0/3]ip address 30.1.1.1 255.255.255.0
[USG6000V1-GigabitEthernet1/0/3]q
⑤配置 GigabitEthernet1/0/3 加入 DMZ 区域。
[USG6000V1]firewall zone dmz
[USG6000V1-zone-dmz]add interface G1/0/3
[USG6000V1-zone-dmz]q
指定G1/0/3为心跳口
[USG6000V1]hrp interface G1/0/3 remote 30.1.1.2
⑥配置 Trust 区域和 Untrust 区域的域间转发策略
[USG6000V1]security-policy
[USG6000V1-policy-security]rule name policy_sec
[USG6000V1-policy-security-rule-policy_sec]source-zone trust
[USG6000V1-policy-security-rule-policy_sec]action permit
[USG6000V1-policy-security-rule-policy_sec]q
[USG6000V1-policy-security]q
⑦开启HRP备份功能
[USG6000V1]hrp enable
防火墙二修改对应端口即可
防火墙二层三层通信
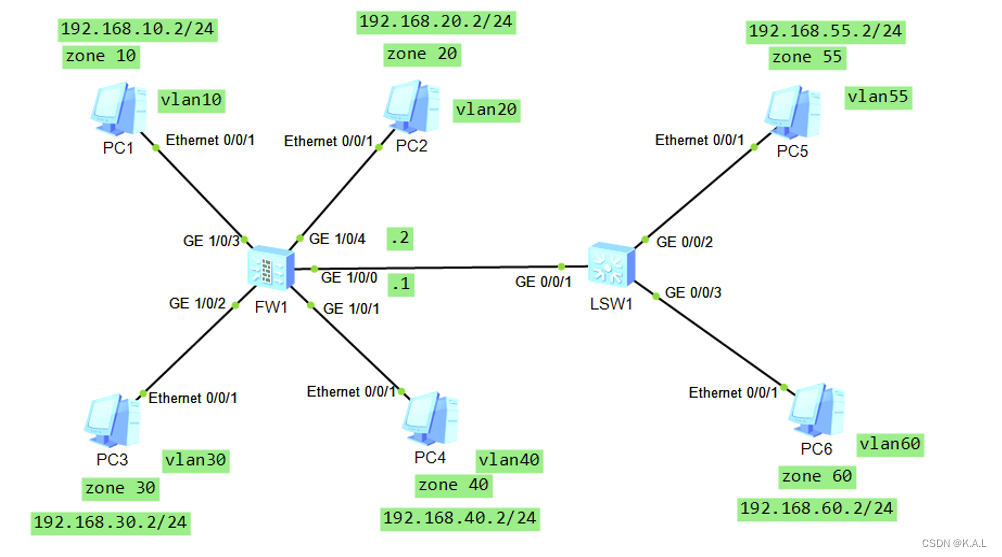
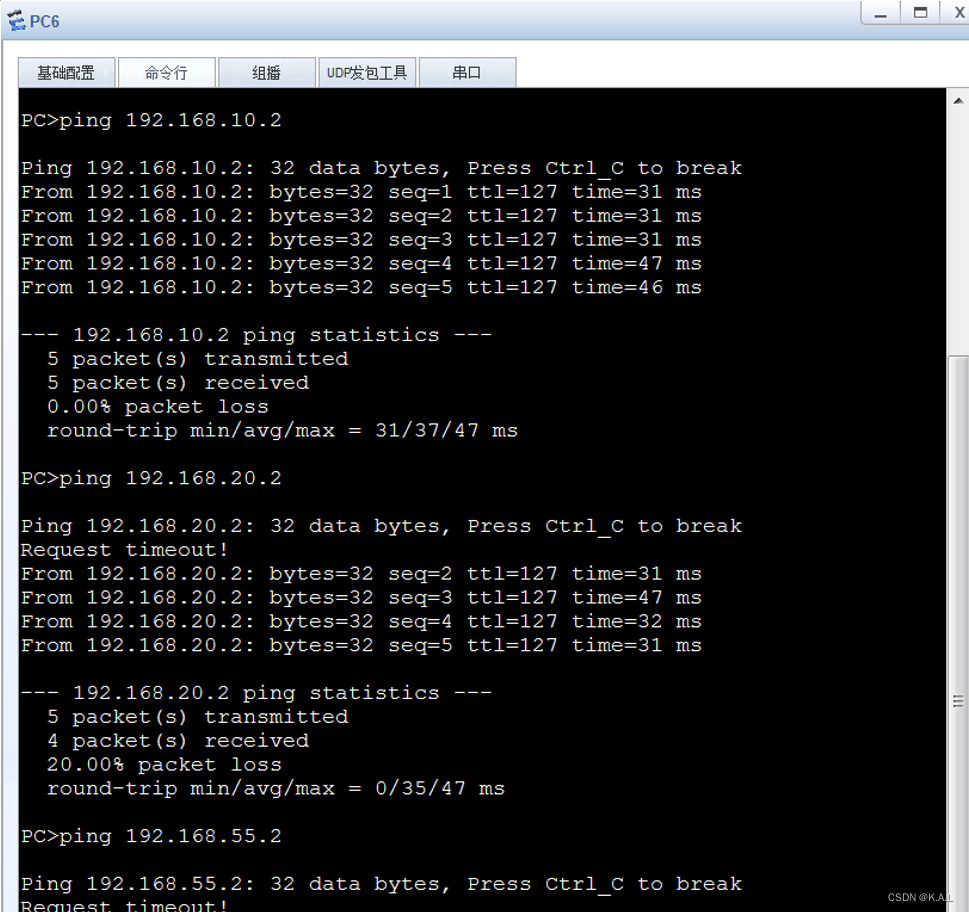
实验需求:
1、6台PC机互通
- 防火墙利用三层vlanif通信功能
- PC5和PC6通过单臂路由技术实现互通
- 防火墙划分6个新的区域并应用
实验配置:
防火墙上:
步骤一:实现二层通信(1/0/0到1/0/4接口通信)
防火墙配置
1、创建vlan
vlan batch 10 20 30 40
2、接口允许VLAN通信
interface GigabitEthernet1/0/1
 portswitch
 undo shutdown
 port link-type access
 port default vlan 40
#
interface GigabitEthernet1/0/2
 portswitch
 undo shutdown
 port link-type access
 port default vlan 30
#
interface GigabitEthernet1/0/3
 portswitch
 undo shutdown
 port link-type access
 port default vlan 10
#
interface GigabitEthernet1/0/4
 portswitch
 undo shutdown
 port link-type access
 port default vlan 20

interface Vlanif10
 ip address 192.168.10.1 255.255.255.0
#
interface Vlanif20
 ip address 192.168.20.1 255.255.255.0
#
interface Vlanif30
 ip address 192.168.30.1 255.255.255.0
#
interface Vlanif40
 ip address 192.168.40.1 255.255.255.0
#
步骤二、实现三层通信(单臂路由)
1、创建子接口
interface GigabitEthernet1/0/0.1
 vlan-type dot1q 60
 ip address 192.168.60.1 255.255.255.0
#
interface GigabitEthernet1/0/0.2
 vlan-type dot1q 55
 ip address 192.168.55.1 255.255.255.0
#
步骤三、接口加区域(注意加区域的是三层接口)
firewall zone trust
 add interface Vlanif10
 add interface Vlanif20
add interface Vlanif30
add interface Vlanif40
add interface GigabitEthernet1/0/0.1
add interface GigabitEthernet1/0/0.2
#
交换机配置
1、创建vlan
vlan batch 55 60
#
interface GigabitEthernet0/0/1
 port link-type trunk
 port trunk allow-pass vlan 55 60
#
interface GigabitEthernet0/0/2
 port link-type access
 port default vlan 55
#vp
interface GigabitEthernet0/0/3
 port link-type access
 port default vlan 60
测试结果
版权归原作者 K.A.L 所有, 如有侵权,请联系我们删除。