
Docker中APISIX集群部署搭建手册
1 集群架构
集群流程如下图所示: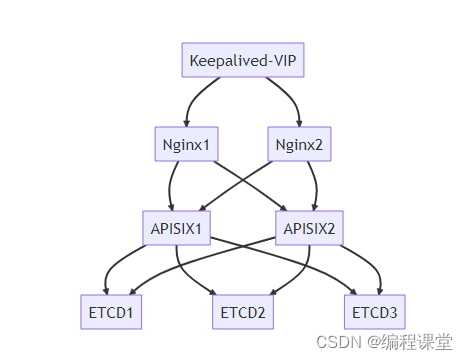
2 基础环境
部署的系统为AlmaLinux,docker版本为23.0.1,docker-compose版本为v2.2.0,apisix版本为3.0.0。
服务器IP需安装服务(红色为必装服务)备注176.16.108.113
docker
、
docker-compose
、apisix(
apisix
、
dashboard
、
etcd
、prometheus、grafana、nginx)、
nginx
、
keepalived
等服务节点1176.16.108.114
docker
、
docker-compose
、apisix(
apisix
、
dashboard
、
etcd
、prometheus、grafana、nginx)、
nginx
、
keepalived
等服务节点2176.16.108.115-虚拟ip
3 搭建ETCD集群
3.1 etcd简介
etcd是一个分布式的、可靠的key-value存储系统,它用于存储分布式系统中的关键数据。apisix采用etcd保存和同步配置信息。
3.2 创建etcd-cluster-compose.yml
在home目录下创建etcd-node目录,用于存放etcd集群配置文件。服务器节点1和服务器节点2均需要执行如下操作:
[root@s113 home]# cd /home/[root@s113 home]# mkdir etcd-node[root@s113 home]# cd etcd-node/[root@s113 etcd-node]# touch etcd-cluster-compose.yml[root@s113 etcd-node]# vim etcd-cluster-compose.yml
服务器节点1 etcd集群配置
version:'3'services:etcd:image: bitnami/etcd:3.4.15
    restart: always
    volumes:- /home/etcd-node/data:/bitnami/etcd
    environment:ETCD_NAME:"etcd1"ETCD_ENABLE_V2:"true"ALLOW_NONE_AUTHENTICATION:"yes"ETCD_ADVERTISE_CLIENT_URLS:"http://176.16.108.113:2379"ETCD_INITIAL_ADVERTISE_PEER_URLS:"http://176.16.108.113:2380"ETCD_LISTEN_CLIENT_URLS:"http://0.0.0.0:2379"ETCD_LISTEN_PEER_URLS:"http://0.0.0.0:2380"ETCD_INITIAL_CLUSTER_STATE:"new"ETCD_INITIAL_CLUSTER_TOKEN:"etcd-cluster"ETCD_INITIAL_CLUSTER:"etcd1=http://176.16.108.113:2380,etcd2=http://176.16.108.114:2380"ETCD_DATA_DIR:"/var/lib/etcd"ports:-"2379:2379/tcp"-"2380:2380/tcp"networks:apisix:networks:apisix:driver: bridge

volumes:etcd_data:driver: local
服务器节点2 etcd集群配置
version:'3'services:etcd:image: bitnami/etcd:3.4.15
    restart: always
    volumes:- /home/etcd-node/data:/bitnami/etcd
    environment:ETCD_NAME:"etcd2"ETCD_ENABLE_V2:"true"ALLOW_NONE_AUTHENTICATION:"yes"ETCD_ADVERTISE_CLIENT_URLS:"http://176.16.108.114:2379"ETCD_INITIAL_ADVERTISE_PEER_URLS:"http://176.16.108.114:2380"ETCD_LISTEN_CLIENT_URLS:"http://0.0.0.0:2379"ETCD_LISTEN_PEER_URLS:"http://0.0.0.0:2380"ETCD_INITIAL_CLUSTER_STATE:"new"ETCD_INITIAL_CLUSTER_TOKEN:"etcd-cluster"ETCD_INITIAL_CLUSTER:"etcd1=http://176.16.108.113:2380,etcd2=http://176.16.108.114:2380"ETCD_DATA_DIR:"/var/lib/etcd"ports:-"2379:2379/tcp"-"2380:2380/tcp"networks:apisix:networks:apisix:driver: bridge

volumes:etcd_data:driver: local
参数详细
ETCD_NAME
:设置成员节点的别名,建议为每个成员节点配置可识别的命名。
ETCD_ADVERTISE_CLIENT_URLS
:广播到集群中本成员的监听客户端请求的地址。
ETCD_INITIAL_ADVERTISE_PEER_URLS
:广播到集群中本成员的Peer监听通信地址。
ETCD_LISTEN_CLIENT_URLS
:客户端请求的监听地址列表。
ETCD_LISTEN_PEER_URLS
:Peer消息的监听服务地址列表。
ETCD_INITIAL_CLUSTER_TOKEN
:启动集群的时候指定集群口令,只有相同token的几点才能加入到同一集群。
ETCD_INITIAL_CLUSTER
:所有集群节点的地址列表。
ETCD_INITIAL_CLUSTER_STATE
:初始化集群状态,默认为new,也可以指定为existing表示要加入到一个已有集群。
3.3 启动并验证集群
在/home/etcd-node目录下执行指令,服务器节点1和服务器节点2均需要执行如下操作:
[root@s113 etcd-node]# docker-compose -f etcd-cluster-compose.yml up -d

[root@s114 etcd-node]# docker-compose -f etcd-cluster-compose.yml up -d

[root@s113 etcd-node]# docker ps

[root@s114 etcd-node]# docker ps

通过上面指令的执行结果,看出两台服务器节点上的etcd已经在docker中成功运行起来了。
查看集群
在服务器节点1上执行
[root@s113 etcd-node]# docker exec -it a8b536f1163c bash
I have no name!@a8b536f1163c:/opt/bitnami/etcd$ etcdctl member list
175f9081790c5dee, started, etcd1, http://176.16.108.113:2380, http://176.16.108.113:2379, false
5eefe34a545763d9, started, etcd2, http://176.16.108.114:2380, http://176.16.108.114:2379, false
I have no name!@a8b536f1163c:/opt/bitnami/etcd$
在服务器节点2上执行
[root@s114 etcd-node]# docker exec -it b5cef18d3687 bash
I have no name!@b5cef18d3687:/opt/bitnami/etcd$ etcdctl member list
175f9081790c5dee, started, etcd1, http://176.16.108.113:2380, http://176.16.108.113:2379, false
5eefe34a545763d9, started, etcd2, http://176.16.108.114:2380, http://176.16.108.114:2379, false
I have no name!@b5cef18d3687:/opt/bitnami/etcd$
进入etcd容器内部查看节点集群情况,看到两个节点都存在,就说明etcd集群成功了。
4 搭建APISIX集群
4.1 下载apisix-docker
下载地址为:https://github.com/apache/apisix-docker/tree/release/apisix-3.0.0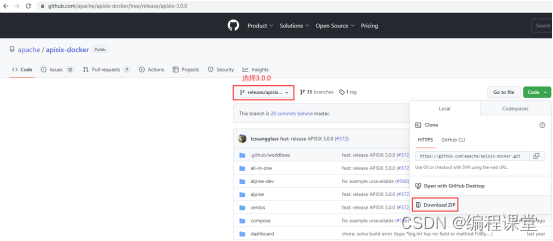

4.2 上传apisix-docker.zip至两台服务器节点
上传apisix-docker-apisix-3.0.0.zip至/home目录,并解压重命名为apisix-docker。
[root@s113 home]# rz[root@s113 home]# unzip apisix-docker-apisix-3.0.0.zip[root@s113 home]# mv apisix-docker-release-apisix-3.0.0 apisix-docker

[root@s114 home]# rz[root@s114 home]# unzip apisix-docker-apisix-3.0.0.zip[root@s114 home]# mv apisix-docker-release-apisix-3.0.0 apisix-docker

4.3 修改docker-compose.yml
由于etcd集群在安装apisix集群之前就已经安装好了,所以在这里的docker-compose.yml中就不需要再配置了,可以选择删除或者注释。
apisix镜像apisix-jdk11:latest是通过自定义插件重新生成的镜像,内嵌apisix镜像为apisix:3.0.0-centos。这里的apisix镜像可以不改,或者改为apisix:3.0.0-centos。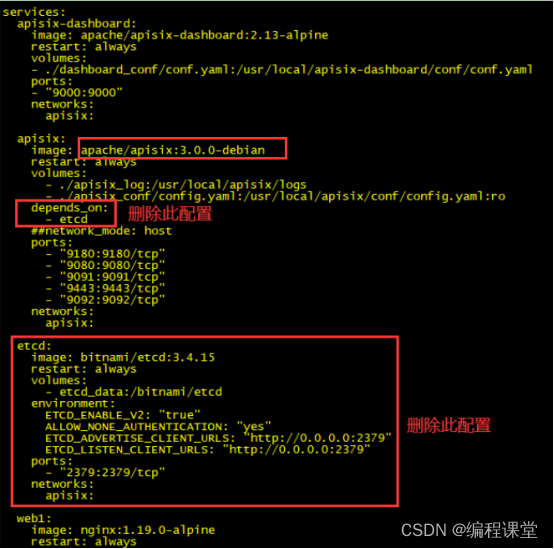
服务器节点1和服务器节点2
[root@s113 /]# cd /home/apisix-docker/example/[root@s114 /]# cd /home/apisix-docker/example/
version:"3"services:apisix-dashboard:image: apache/apisix-dashboard:2.13-alpine
    restart: always
    volumes:- ./dashboard_conf/conf.yaml:/usr/local/apisix-dashboard/conf/conf.yaml
    ports:-"9000:9000"networks:apisix:apisix:image: apisix-jdk11:latest
    restart: always
    volumes:- ./apisix_log:/usr/local/apisix/logs
      - ./apisix_conf/config.yaml:/usr/local/apisix/conf/config.yaml:ro
    ##network_mode: hostports:-"9180:9180/tcp"-"9080:9080/tcp"-"9091:9091/tcp"-"9443:9443/tcp"-"9092:9092/tcp"networks:apisix:web1:image: nginx:1.19.0-alpine
    restart: always
    volumes:- ./upstream/web1.conf:/etc/nginx/nginx.conf
    ports:-"9081:80/tcp"environment:- NGINX_PORT=80
    networks:apisix:web2:image: nginx:1.19.0-alpine
    restart: always
    volumes:- ./upstream/web2.conf:/etc/nginx/nginx.conf
    ports:-"9082:80/tcp"environment:- NGINX_PORT=80
    networks:apisix:prometheus:image: prom/prometheus:v2.25.0
    restart: always
    volumes:- ./prometheus_conf/prometheus.yml:/etc/prometheus/prometheus.yml
    ports:-"9090:9090"networks:apisix:grafana:image: grafana/grafana:7.3.7
    restart: always
    ports:-"3000:3000"volumes:-"./grafana_conf/provisioning:/etc/grafana/provisioning"-"./grafana_conf/dashboards:/var/lib/grafana/dashboards"-"./grafana_conf/config/grafana.ini:/etc/grafana/grafana.ini"networks:apisix:networks:apisix:driver: bridge

volumes:etcd_data:driver: local
4.4 修改apisix_conf/config.yaml
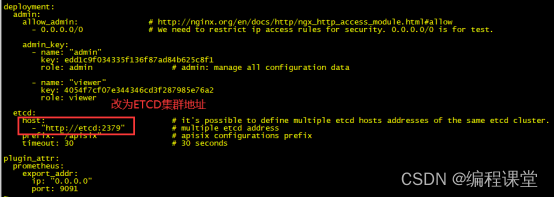
server-info插件需要开启,开启它后面可以看到apisix集群节点情况。
服务器节点1和服务器节点2
[root@s113 /]# cd /home/apisix-docker/example/apisix_conf/[root@s114 /]# cd /home/apisix-docker/example/apisix_conf/
apisix:node_listen:9080# APISIX listening portenable_ipv6:falseenable_control:truecontrol:ip:"0.0.0.0"port:9092plugins:- ext-plugin-pre-req  # 请求前置插件- proxy-rewrite       # 重写插件- server-info         # 服务基本信息插件ext-plugin:cmd:['java','-Dfile.encoding=UTF-8','-jar','/opt/apisix-runner-bin/gateway-1.0-SNAPSHOT.jar']deployment:admin:allow_admin:# http://nginx.org/en/docs/http/ngx_http_access_module.html#allow- 0.0.0.0/0              # We need to restrict ip access rules for security. 0.0.0.0/0 is for test.admin_key:-name:"admin"key: edd1c9f034335f136f87ad84b625c8f1
        role: admin                 # admin: manage all configuration data-name:"viewer"key: 4054f7cf07e344346cd3f287985e76a2
        role: viewer

  etcd:host:-"http://176.16.108.113:2379"-"http://176.16.108.114:2379"prefix:"/apisix"# apisix configurations prefixtimeout:30plugin_attr:prometheus:export_addr:ip:"0.0.0.0"port:9091
4.5 修改dashboard_conf/config.yaml

服务器节点1和服务器节点2
[root@s113 /]# cd /home/apisix-docker/example/dashboard_conf/[root@s114 /]# cd /home/apisix-docker/example/dashboard_conf/
conf:listen:host: 0.0.0.0     # `manager api` listening ip or host nameport:9000# `manager api` listening portallow_list:# If we don't set any IP list, then any IP access is allowed by default.- 0.0.0.0/0
  etcd:endpoints:# supports defining multiple etcd host addresses for an etcd cluster-"http://176.16.108.113:2379"-"http://176.16.108.114:2379"# yamllint disable rule:comments-indentation# etcd basic auth info# username: "root"    # ignore etcd username if not enable etcd auth# password: "123456"  # ignore etcd password if not enable etcd authmtls:key_file:""# Path of your self-signed client side keycert_file:""# Path of your self-signed client side certca_file:""# Path of your self-signed ca cert, the CA is used to sign callers' certificates# prefix: /apisix     # apisix config's prefix in etcd, /apisix by defaultlog:error_log:level: warn       # supports levels, lower to higher: debug, info, warn, error, panic, fatalfile_path:
        logs/error.log  # supports relative path, absolute path, standard output# such as: logs/error.log, /tmp/logs/error.log, /dev/stdout, /dev/stderraccess_log:file_path:
        logs/access.log  # supports relative path, absolute path, standard output# such as: logs/access.log, /tmp/logs/access.log, /dev/stdout, /dev/stderr# log example: 2020-12-09T16:38:09.039+0800    INFO    filter/logging.go:46    /apisix/admin/routes/r1 {"status": 401, "host": "127.0.0.1:9000", "query": "asdfsafd=adf&a=a", "requestId": "3d50ecb8-758c-46d1-af5b-cd9d1c820156", "latency": 0, "remoteIP": "127.0.0.1", "method": "PUT", "errs": []}authentication:secret:
    secret              # secret for jwt token generation.# NOTE: Highly recommended to modify this value to protect `manager api`.# if it's default value, when `manager api` start, it will generate a random string to replace it.expire_time:3600# jwt token expire time, in secondusers:# yamllint enable rule:comments-indentation-username: admin   # username and password for login `manager api`password: admin
    -username: user
      password: user

plugins:# plugin list (sorted in alphabetical order)- api-breaker
  - authz-keycloak
  - basic-auth
  - batch-requests
  - consumer-restriction
  - cors
  # - dubbo-proxy- echo
  # - error-log-logger# - example-plugin- fault-injection
  - grpc-transcode
  - hmac-auth
  - http-logger
  - ip-restriction
  - jwt-auth
  - kafka-logger
  - key-auth
  - limit-conn
  - limit-count
  - limit-req
  # - log-rotate# - node-status- openid-connect
  - prometheus
  - proxy-cache
  - proxy-mirror
  - proxy-rewrite
  - redirect
  - referer-restriction
  - request-id
  - request-validation
  - response-rewrite
  - serverless-post-function
  - serverless-pre-function
  # - skywalking- sls-logger
  - syslog
  - tcp-logger
  - udp-logger
  - uri-blocker
  - wolf-rbac
  - zipkin
  - server-info
  - traffic-split
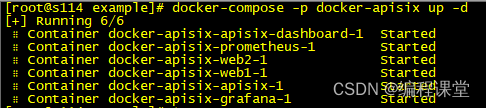
4.6 启动apisix并验证集群
切换到/home/apisix-docker/example目录下,执行启动指令。
[root@s113 example]# docker-compose -p docker-apisix up -d
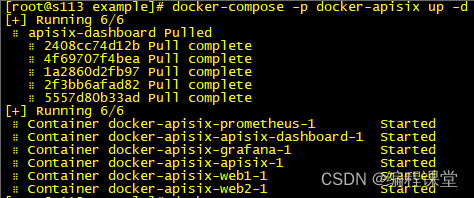

[root@s114 example]# docker-compose -p docker-apisix up -d

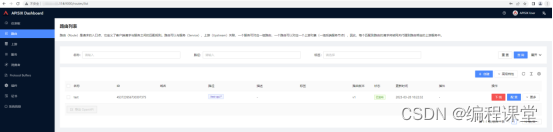
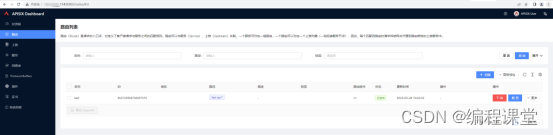
查看集群
访问http://176.16.108.113:9000或者http://176.16.108.114:9000,输入账号admin,密码admin登录到apisix dashboard系统,打开系统信息模块,看到两个apisix节点,就代表apisix集群搭建成功了。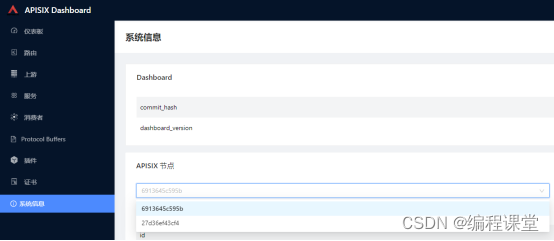
在http://176.16.108.113:9000或者http://176.16.108.114:9000任意一个系统中,添加上游、服务、路由信息,在两个系统中都可以看到添加的数据信息。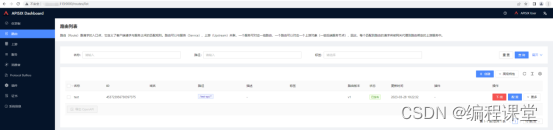
5 搭建NGINX集群
5.1 安装nginx
两台服务器节点做下面同样的指令操作。
拉取镜像
docker pull nginx
临时启动nginx容器,复制容器内的重要配置文件到本机
docker run --name nginx -p 80:80 -d nginx
dockercp nginx:/etc/nginx/nginx.conf /home/nginx/
dockercp nginx:/etc/nginx/conf.d/ /home/nginx/conf/
dockercp nginx:/usr/share/nginx/html/ /home/nginx/html/
dockercp nginx:/var/log/nginx/ /home/nginx/logs/
停止删除临时nginx容器
docker stop nginx
dockerrm nginx
正式运行nginx容器
docker run -p 8080:80 \
-v /home/nginx/nginx.conf:/etc/nginx/nginx.conf \
-v /home/nginx/logs:/var/log/nginx \
-v /home/nginx/html:/usr/share/nginx/html \
-v /home/nginx/conf:/etc/nginx/conf.d \
-v /etc/localtime:/etc/localtime \
--name nginx \
--restart=always \
-d nginx
5.2 nginx配置负载均衡
切换到/home/nginx目录中,修改相关配置文件,服务器节点1和服务器节点2均需要做如下修改。
修改nginx.conf配置文件
[root@s113 /]# cd /home/nginx/[root@s114 /]# cd /home/nginx/
user  nginx;
worker_processes  auto;

error_log  /var/log/nginx/error.log notice;
pid        /var/run/nginx.pid;

events {
    worker_connections  1024;}

http {
    include       /etc/nginx/mime.types;
    default_type  application/octet-stream;

    log_format  main  '$remote_addr - $remote_user [$time_local] "$request" ''$status $body_bytes_sent "$http_referer" ''"$http_user_agent" "$http_x_forwarded_for"';

    access_log  /var/log/nginx/access.log  main;

    sendfile        on;#tcp_nopush     on;

    keepalive_timeout  65;#gzip  on;
    upstream apisix {
        ip_hash;
        server 176.16.108.113:9000 weight=1;
        server 176.16.108.114:9000 weight=1;}

    upstream apisixApi {
        server 176.16.108.113:9080 weight=1;
        server 176.16.108.114:9080 weight=1;}
    include /etc/nginx/conf.d/*.conf;}
修改default.conf配置文件
server {
    listen       80;
    listen  [::]:80;
    server_name  localhost;#access_log  /var/log/nginx/host.access.log  main;# 转发网站
    location / {
        root   /usr/share/nginx/html;
        index  index.html index.htm;
        proxy_pass http://apisix/;}# 转发接口
    location ^~/apisixApi/ {
        proxy_set_header Host $host;
        proxy_set_header X-Real-IP $remote_addr;
        proxy_set_header X-Forwarded-For  $proxy_add_x_forwarded_for;
        proxy_set_header X-NginX-Proxy true;
        rewrite ^/apisixApi/(.*)$ /$1break;
        proxy_pass http://apisixApi/;}#error_page  404              /404.html;# redirect server error pages to the static page /50x.html#
    error_page   500502503504  /50x.html;
    location = /50x.html {
        root   /usr/share/nginx/html;}# proxy the PHP scripts to Apache listening on 127.0.0.1:80##location ~ \.php$ {#    proxy_pass   http://127.0.0.1;#}# pass the PHP scripts to FastCGI server listening on 127.0.0.1:9000##location ~ \.php$ {#    root           html;#    fastcgi_pass   127.0.0.1:9000;#    fastcgi_index  index.php;#    fastcgi_param  SCRIPT_FILENAME  /scripts$fastcgi_script_name;#    include        fastcgi_params;#}# deny access to .htaccess files, if Apache's document root# concurs with nginx's one##location ~ /\.ht {#    deny  all;#}}
修改好配置文件,删除旧nginx容器,重新运行新nginx容器。
5.3 验证nginx负载均衡转发
访问http://176.16.108.113:8080或者http://176.16.108.114:8080,输入账号admin,密码admin登录到apisix dashboard系统。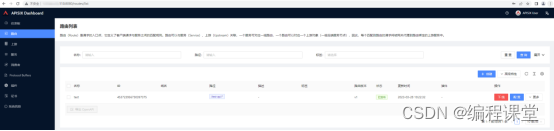
为了验证nginx集群已经生效了,我们将服务器节点 176.16.108.113上apisix停止运行。再次访问http://176.16.108.113:8080,发现访问成功,说明nginx将请求转发到了服务器节点2的apisix http://176.16.108.114:9000。
6 搭建Keepalived集群
6.1 keepalived简介
keepalived是基于VRRP协议实现的保证集群高可用的一个服务软件,主要功能是实现真机的故障隔离和负载均衡器间的失败切换,防止单点故障。VRRP协议保证当主机的下一路由器出现故障时,由另外一台路由器来代替出现故障的路由器进行工作,从而保持网络通信的连续性和可靠性。
6.2 安装keepalived
在两台服务器节点上都安装keepalived,下面是安装步骤。
安装keepalived
yum install -y keepalived
开启keepalived服务
systemctl start keepalived.service
关闭keepalived服务
systemctl stop keepalived.service
查看keepalived服务状态
systemctl status keepalived.service
并对该脚本文件授权:
chmod777 /etc/keepalived/nginx_check.sh
6.3 创建nginx_check.sh
nginx_check.sh就是起到一个nginx宕机以后,自动开启服务。
切换到/home目录下,创建keepalived目录,在keepalived目录中创建nginx_check.sh文件。两个服务器节点都需要创建。
[root@s113 /]# cd /home/[root@s113 home]# mkdir keepalived[root@s113 home]# cd keepalived/[root@s113 keepalived]# touch nginx_check.sh
A=`ps -ef |grep nginx |grep -v grep|wc -l`if[$A -eq 0];then
    nginx
    sleep2if[`ps -ef |grep nginx |grep -v grep|wc -l` -eq 0];then#killall keepalivedps -ef|grep keepalived|grep -v grep|awk'{print $2}'|xargskill -9
    fi

Fi
6.4 修改keepalived.conf
切换到/etc/keepalived目录下,修改配置文件,两台服务器节点都需要修改。
主节点配置文件
! Configuration File for keepalived
vrrp_script chk_nginx {
    script "/home/keepalived/nginx_check.sh"#运行脚本,脚本内容下面有,就是起到一个nginx宕机以后,自动开启服务
    interval 2#检测时间间隔
    weight -20 #如果条件成立的话,则权重 -20}# 定义虚拟路由,VI_1 为虚拟路由的标示符,自己定义名称
vrrp_instance VI_1 {
    state MASTER #来决定主从
    interface ens192 # 绑定虚拟 IP 的网络接口,根据自己的机器填写
    virtual_router_id 121# 虚拟路由的 ID 号, 两个节点设置必须一样
    mcast_src_ip 176.16.108.113 #填写本机ip
    priority 100# 节点优先级,主要比从节点优先级高
    nopreempt # 优先级高的设置 nopreempt 解决异常恢复后再次抢占的问题
    advert_int 1# 组播信息发送间隔,两个节点设置必须一样,默认 1s
    authentication {
        auth_type PASS
        auth_pass 1111}# 将track_script块加入instance 配置块
    track_script {
        chk_nginx #执行Nginx监控的服务}

    virtual_ipaddress {176.16.108.115 #虚拟ip}}
从节点配置文件
! Configuration File for keepalived
vrrp_script chk_nginx {
    script "/home/keepalived/nginx_check.sh"#运行脚本,脚本内容下面有,就是起到一个nginx宕机以后,自动开启服务
    interval 2#检测时间间隔
    weight -20 #如果条件成立的话,则权重 -20}# 定义虚拟路由,VI_1 为虚拟路由的标示符,自己定义名称
vrrp_instance VI_1 {
    state BACKUP #来决定主从
    interface ens192 # 绑定虚拟 IP 的网络接口,根据自己的机器填写
    virtual_router_id 121# 虚拟路由的 ID 号, 两个节点设置必须一样
    mcast_src_ip 176.16.108.114 #填写本机ip
    priority 90# 节点优先级,主要比从节点优先级高
    nopreempt # 优先级高的设置 nopreempt 解决异常恢复后再次抢占的问题
    advert_int 1# 组播信息发送间隔,两个节点设置必须一样,默认 1s
    authentication {
        auth_type PASS
        auth_pass 1111}# 将 track_script 块加入 instance 配置块
    track_script {
        chk_nginx #执行 Nginx 监控的服务}

    virtual_ipaddress {176.16.108.115 # 虚拟ip}}
6.5 启动keepalived并验证集群
上面修改了keepalived配置文件,这里需要先重启一下keepalived服务。重启完成之后,输入http://176.16.108.115:8080,就能访问到nginx,再由nginx转发到apisix dashboard界面。
keepalived的主节点为176.16.108.113,副节点为176.16.108.114,默认使用主节点的keepalived,它的优先级高。当我们模拟将主节故障,把它停掉,虚拟ip就会漂移到副节点上,这时由副节点接手主节点的工作。当主节点恢复正常运行,副节点就会停止工作,进入备份状态。
停止主节点,观察副节点
[root@s113 /]# systemctl stop keepalived.service[root@s113 /]# systemctl status keepalived.service

[root@s113 /]# ip add

[root@s114 /]# systemctl status keepalived.service

[root@s114 /]# ip add

开启主节点,观察副节点
[root@s113 /]# systemctl start keepalived.service[root@s114 /]# systemctl status keepalived.service

至此,在docker中apisix集群部署就搭建完成了!
参考博客
docker如何部署etcd集群:https://www.jb51.net/article/278169.htm
Nacos+ApiSix docker 集群环境搭建(docker-compose方式):https://blog.csdn.net/u013480019/article/details/128633596
Apache APISIX v3.0 中文文档:https://www.bookstack.cn/read/apisix-3.0-zh/2690359772755fd6.md
Docker安装Nginx:https://blog.csdn.net/u010148813/article/details/126172372
nginx 配置接口:https://blog.csdn.net/code12313/article/details/117466261
Nginx 配置根据路径转发:https://blog.csdn.net/m0_67393295/article/details/126062706
nginx配置负载均衡:https://blog.csdn.net/qq_34825514/article/details/124311144
nginx 转发配置:https://www.cnblogs.com/zjhblogs/p/16423751.html
nginx的配置转发到其他网站详解:https://www.jb51.net/article/259831.htm
CentOS7 下配置Keepalived为系统服务,开机自动启动:https://it.cha138.com/php/show-40463.html
Nginx的高可用集群:https://blog.csdn.net/liangmengbk/article/details/128177421
搭建Nginx高可用集群(keepalived+双机热备):https://blog.csdn.net/weixin_59566851/article/details/124957266
版权归原作者 编程课堂 所有, 如有侵权,请联系我们删除。