
HBASE SHELL学习
小白的Hbase学习笔记
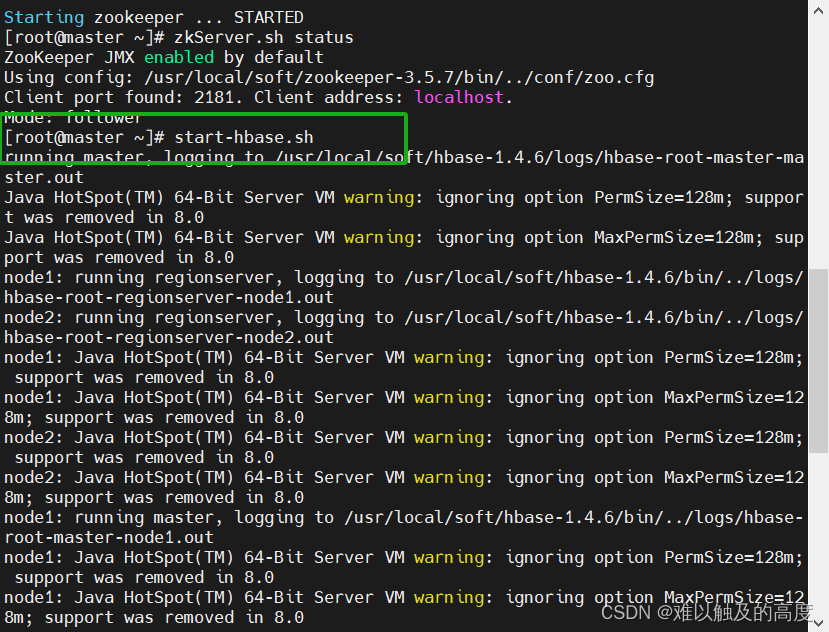
1.启动hbase
start-all.sh

zkServer.sh start (所有节点)

start-hbase.sh

stop-hbase.sh
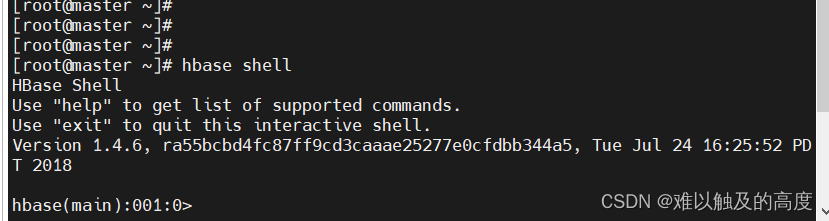
2.进入hbase
hbase shell

quit
3.help (查看HBASE SHELL支持的命令)

  Group name: general
  Commands: processlist, status, table_help, version, whoami

  Group name: ddl
  Commands: alter, alter_async, alter_status, create, describe, disable, disable_all, drop, drop_all, enable, enable_all, exists, get_table, is_disabled, is_enabled, list, list_regions, locate_region, show_filters

  Group name: namespace
  Commands: alter_namespace, create_namespace, describe_namespace, drop_namespace, list_namespace, list_namespace_tables

  Group name: dml
  Commands: append, count, delete, deleteall, get, get_counter, get_splits, incr, put, scan, truncate, truncate_preserve
4.general (普遍的)
  Group name: general
  Commands: processlist, status, table_help, version, whoami
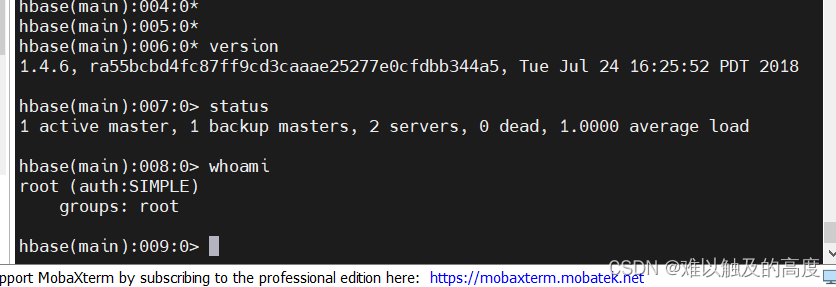
查看版本
version
查看HBASE当前版本号
status
5.ddl - 表操作
  Group name: ddl
  Commands: alter, alter_async, alter_status, create, describe, disable, disable_all, drop, drop_all, enable, enable_all, exists, get_table, is_disabled, is_enabled, list, list_regions, locate_region, show_filters
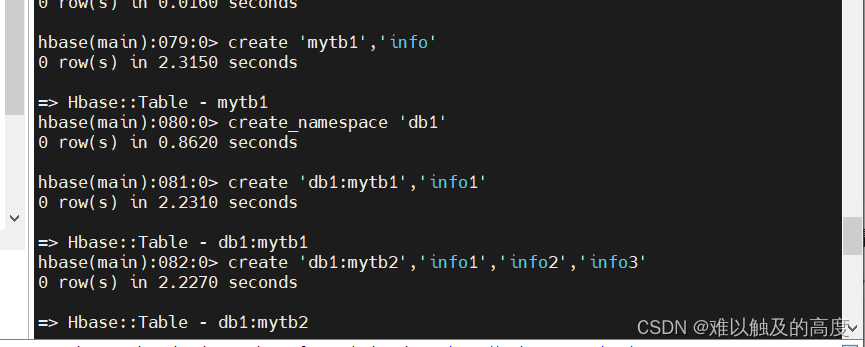
1)create 创建表
样例:
默认命名空间下创建mytb1表 列族为info
create 'mytb1','info'
在db1命名空间下创建表
create_namespace 'db1'
create 'db1:mytb1','info1'
创建表时指定多个列族
create 'db1:mytb2','info1','info2','info3'
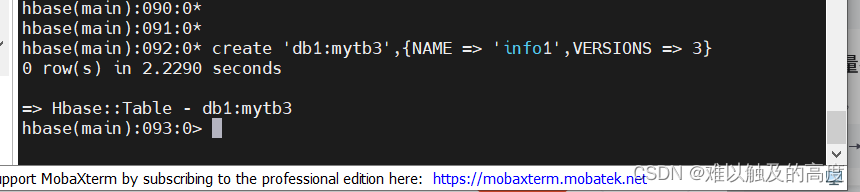
创建表并指定列族版本
create 'db1:mytb3',{NAME => 'info1',VERSIONS => 3}
t1: 表示表名称
f1: 表示列族
ns1:表示命名空间
Create a table with namespace=ns1 and table qualifier=t1
hbase> create 'ns1:t1', {NAME => 'f1', VERSIONS => 5}
help 'create'

Create a table with namespace=ns1 and table qualifier=t1
  hbase> create 'ns1:t1', {NAME => 'f1', VERSIONS => 5}

Create a table with namespace=default and table qualifier=t1
  hbase> create 't1', {NAME => 'f1'}, {NAME => 'f2'}, {NAME => 'f3'}
  hbase> # The above in shorthand would be the following:
  hbase> create 't1', 'f1', 'f2', 'f3'
  hbase> create 't1', {NAME => 'f1', VERSIONS => 1, TTL => 2592000, BLOCKCACHE => true}
  hbase> create 't1', {NAME => 'f1', CONFIGURATION => {'hbase.hstore.blockingStoreFiles' => '10'}}

Table configuration options can be put at the end.
Examples:

  hbase> create 'ns1:t1', 'f1', SPLITS => ['10', '20', '30', '40']
  hbase> create 't1', 'f1', SPLITS => ['10', '20', '30', '40']
  hbase> create 't1', 'f1', SPLITS_FILE => 'splits.txt', OWNER => 'johndoe'
  hbase> create 't1', {NAME => 'f1', VERSIONS => 5}, METADATA => { 'mykey' => 'myvalue' }
  hbase> # Optionally pre-split the table into NUMREGIONS, using
  hbase> # SPLITALGO ("HexStringSplit", "UniformSplit" or classname)
  hbase> create 't1', 'f1', {NUMREGIONS => 15, SPLITALGO => 'HexStringSplit'}
  hbase> create 't1', 'f1', {NUMREGIONS => 15, SPLITALGO => 'HexStringSplit', REGION_REPLICATION => 2, CONFIGURATION => {'hbase.hregion.scan.loadColumnFamiliesOnDemand' => 'true'}}
  hbase> create 't1', {NAME => 'f1', DFS_REPLICATION => 1}

You can also keep around a reference to the created table:

  hbase> t1 = create 't1', 'f1'
2)describe 查看表的具体信息
help 'describe'
Describe the named table. For example:
hbase> describe 't1'
hbase> describe 'ns1:t1'
Alternatively, you can use the abbreviated 'desc' for the same thing.
hbase> desc 't1'
hbase> desc 'ns1:t1'
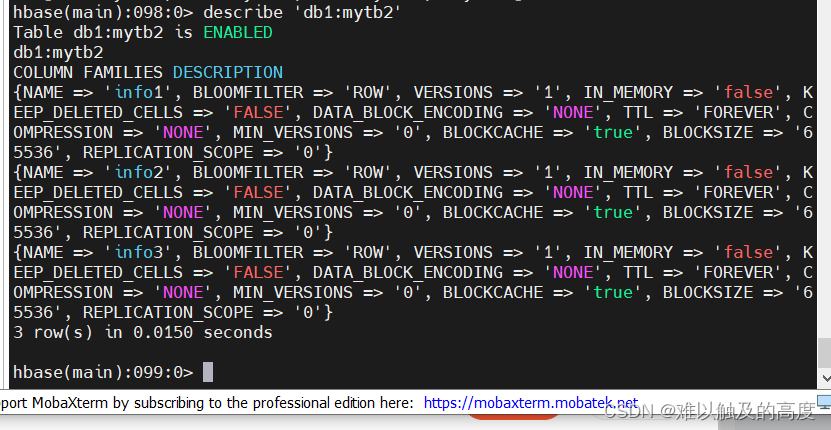
样例:
describe 'db1:mytb2'
表中的列族信息 可以看出 每个列族都维护自己的一个版本信息 一个列族对应一个store
describe 'db1:mytb3'
desc 'db1:mytb3'
3)alter 修改表
help 'alter'
hbase> alter 't1', NAME => 'f1', VERSIONS => 5
hbase> alter 'ns1:t1', 'delete' => 'f1'
样例
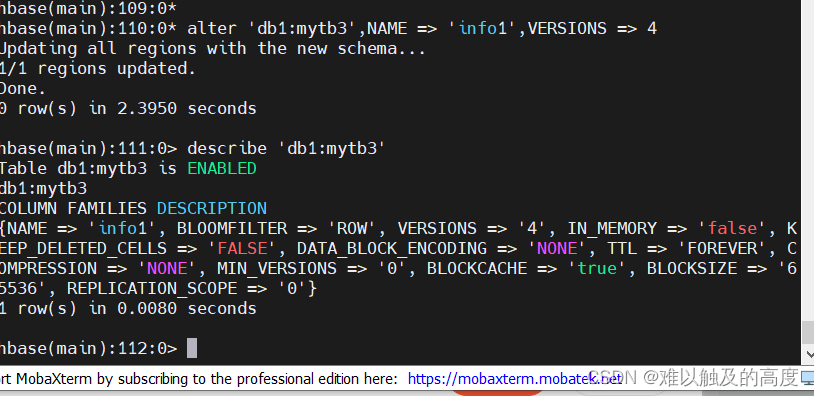
1.修改列族版本号
alter 'db1:mytb3',NAME => 'info1',VERSIONS => 4
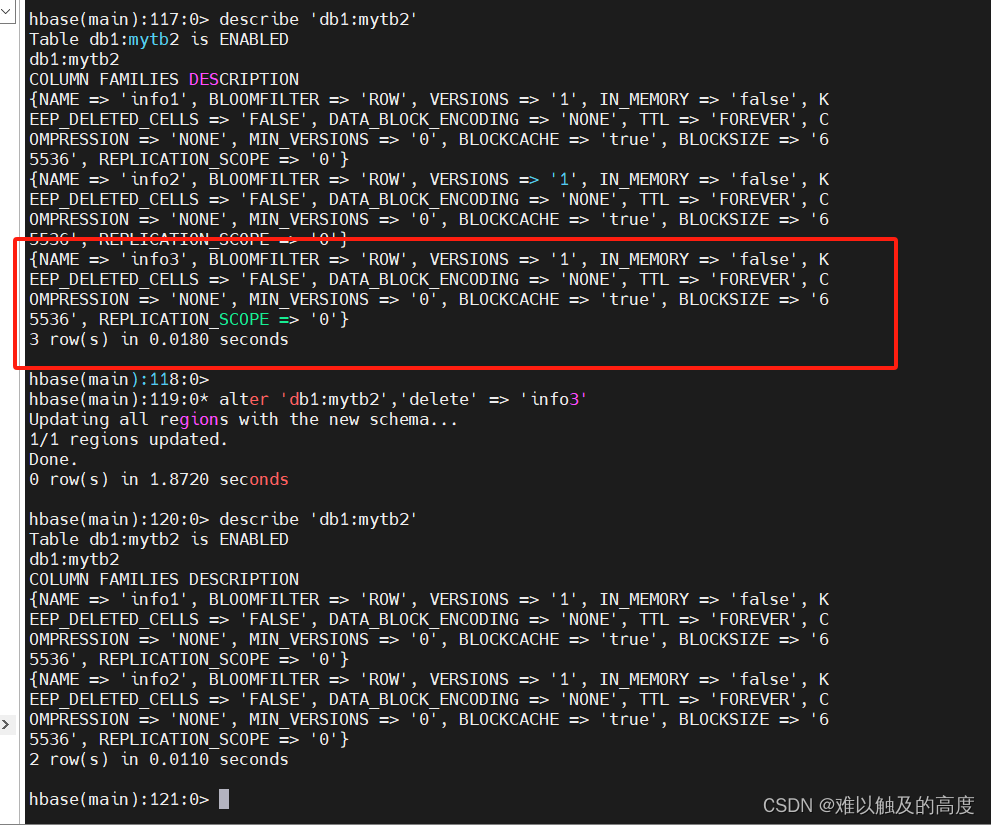
2.删除列族
alter 'db1:mytb2','delete' => 'info3'
4)drop 删除表
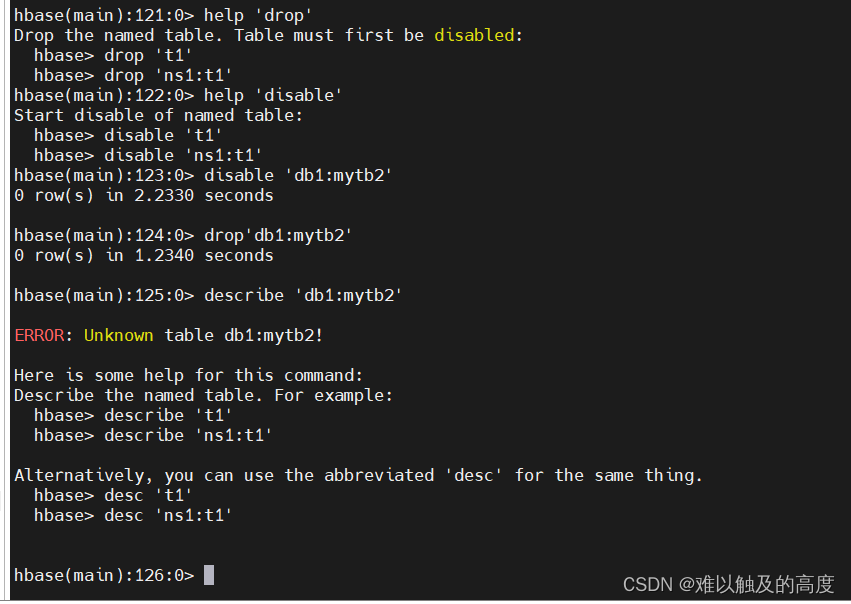
help 'drop'

Drop the named table. Table must first be disabled:
  hbase> drop 't1'
  hbase> drop 'ns1:t1'

注意:使用drop操作时 先需要执行disable

help 'disable'

Start disable of named table:
  hbase> disable 't1'
  hbase> disable 'ns1:t1'

样例:

1.disable 'db1:mytb2'
2.drop'db1:mytb2'
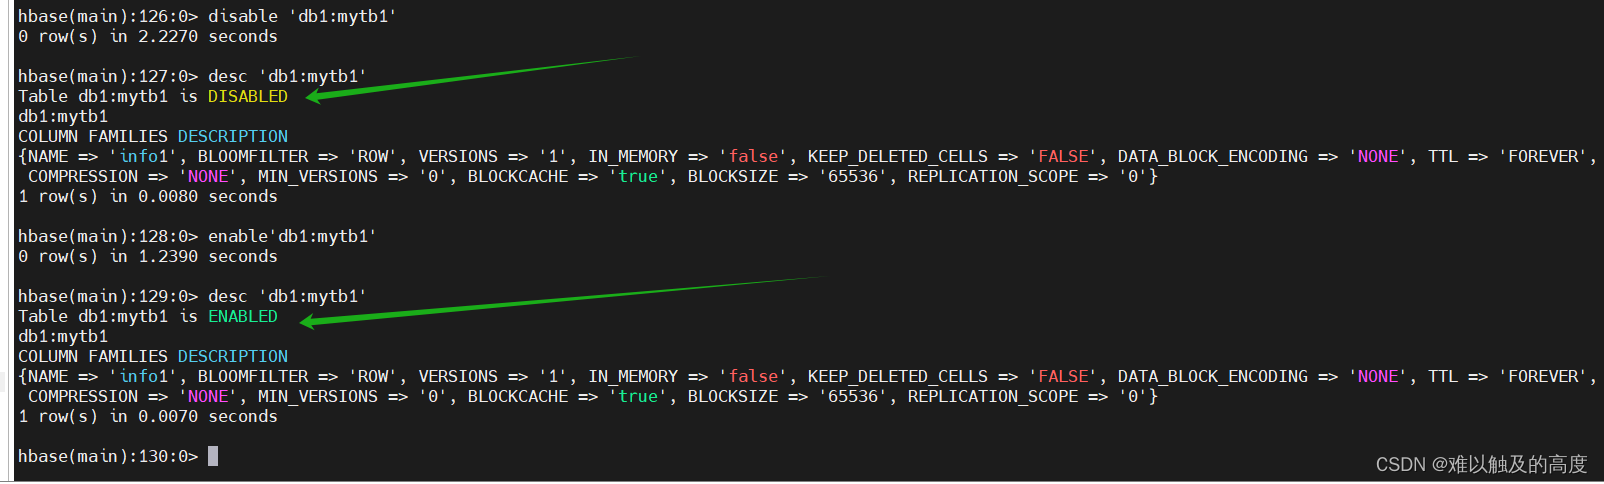
5)关闭及启用表
1.关闭表操作

disable 'db1:mytb1'
desc 'db1:mytb1'

2.启用表操作

enable'db1:mytb1'
desc 'db1:mytb1'
6.namespace (命名空间)
  Group name: namespace
  Commands: alter_namespace, create_namespace, describe_namespace, drop_namespace, list_namespace, list_namespace_tables
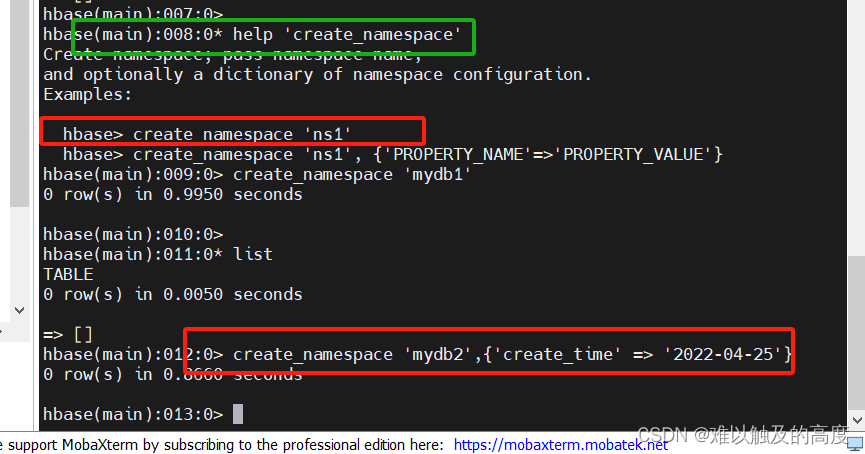
1)create_namespace 创建命名空间
help 'create_namespace'

hbase> create_namespace 'ns1'
hbase> create_namespace 'ns1', {'PROPERTY_NAME'=>'PROPERTY_VALUE'}

样例:

create_namespace 'mydb1'

create_namespace 'mydb2',{'create_time' => '2022-04-25'}
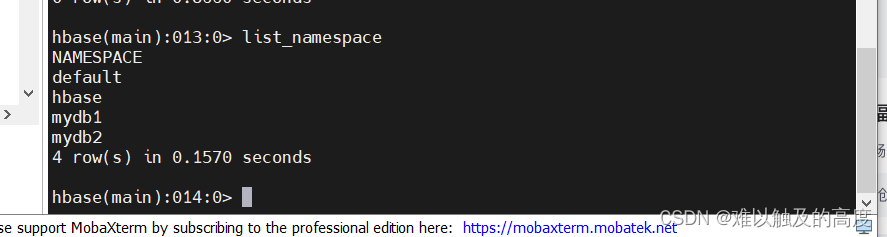
2)list_namespace 查看当前命名空间
样例:list_namespace
结果:
default --用户默认使用的命名空间
hbase --hbase中存放的是HBase内置的表
mydb1 --自己创建的命名空间
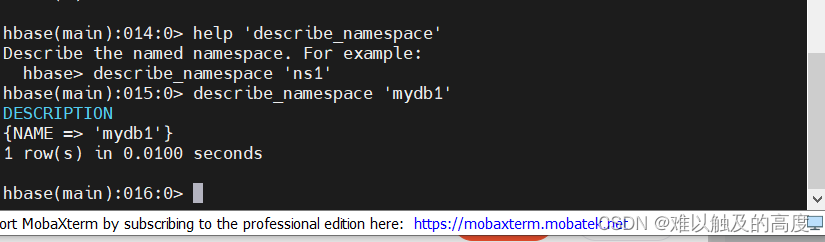
3)describe_namespace 查看命名空间的详细信息
help 'describe_namespace'

hbase> describe_namespace 'ns1'

样例:

describe_namespace 'mydb1'
4)alter_namespace 修改命名空间
help 'alter_namespace'
To add/modify a property:
hbase> alter_namespace 'ns1', {METHOD => 'set', 'PROPERTY_NAME' => 'PROPERTY_VALUE'}
To delete a property:
hbase> alter_namespace 'ns1', {METHOD => 'unset', NAME=>'PROPERTY_NAME'}
样例:
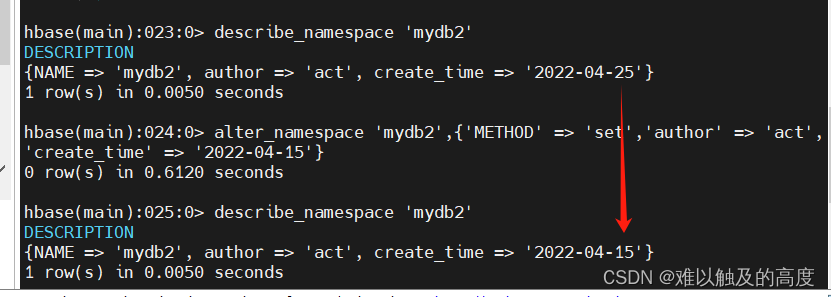
增加author配置并且修改create_time配置
alter_namespace 'mydb2',{METHOD => 'set','author' => 'act','create_time' => '2022-04-25'}
alter_namespace 'mydb2',{'METHOD' => 'set','author' => 'act','create_time' => '2022-04-15'}
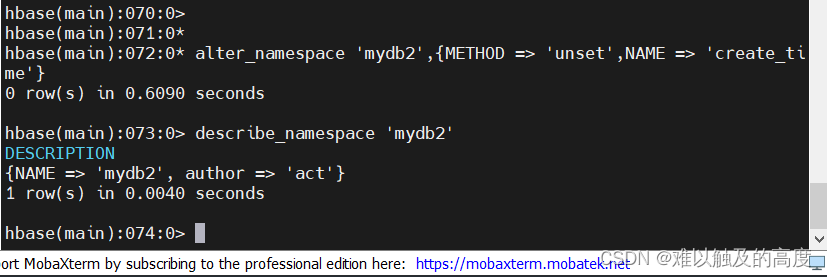
删除create_time配置
alter_namespace 'mydb2',{METHOD => 'unset',NAME => 'author'}

5)drop_namespace 删除空的命名空间
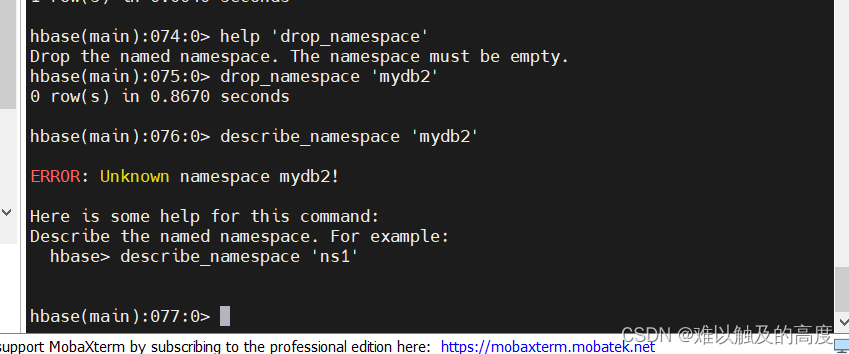
help 'drop_namespace'

Drop the named namespace. The namespace must be empty.

drop_namespace 'mydb2'
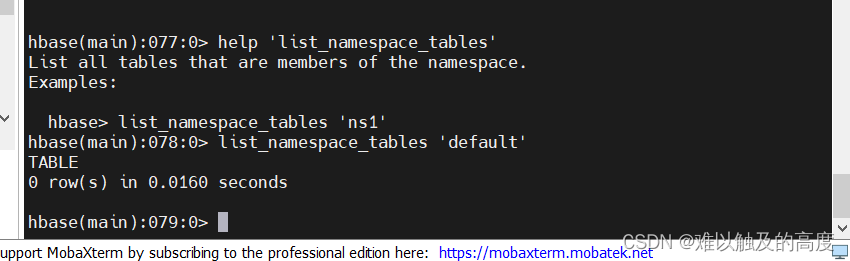
6)list_namespace_tables 查看指定命名空间下的表
help 'list_namespace_tables'

hbase> list_namespace_tables 'ns1'

list_namespace_tables 'default'
7.dml
1)put 上传及修改数据操作
help 'put'
r1 表示 rowKey
c1 表示 列名称
hbase> put 'ns1:t1', 'r1', 'c1', 'value'
hbase> put 't1', 'r1', 'c1', 'value'
hbase> put 't1', 'r1', 'c1', 'value', ts1
hbase> put 't1', 'r1', 'c1', 'value', {ATTRIBUTES=>{'mykey'=>'myvalue'}}
hbase> put 't1', 'r1', 'c1', 'value', ts1, {ATTRIBUTES=>{'mykey'=>'myvalue'}}
hbase> put 't1', 'r1', 'c1', 'value', ts1, {VISIBILITY=>'PRIVATE|SECRET'}
样例:
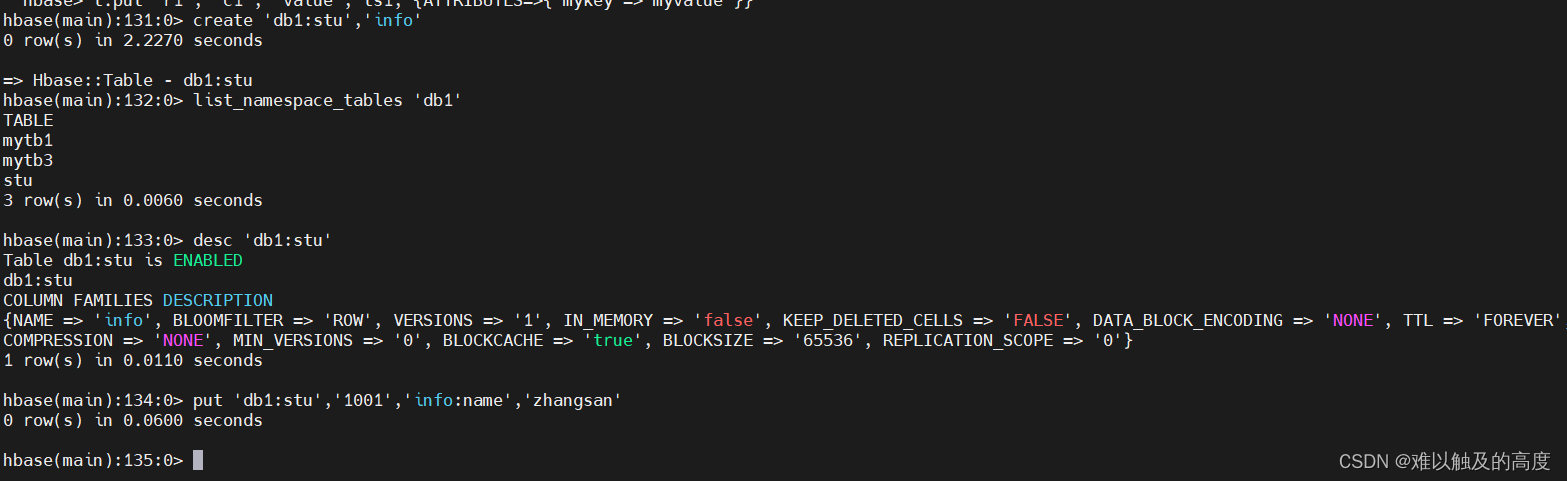
create 'db1:stu','info'
list_namespace_tables 'db1'
desc 'db1:stu'
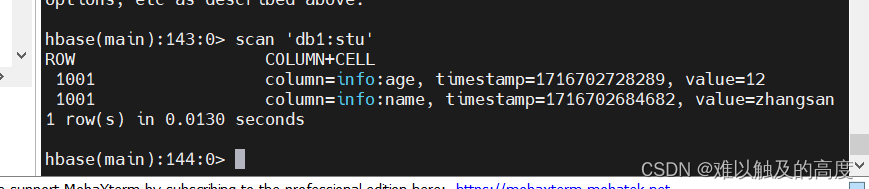
put 'db1:stu','1001','info:name','zhangsan'
注:修改数据可以直接用put上传最新数据进行替换
2)get 获取一行数据操作
help 'get'
hbase> t.get 'r1'
hbase> t.get 'r1', {TIMERANGE => [ts1, ts2]}
hbase> t.get 'r1', {COLUMN => 'c1'}
hbase> t.get 'r1', {COLUMN => ['c1', 'c2', 'c3']}
hbase> t.get 'r1', {COLUMN => 'c1', TIMESTAMP => ts1}
hbase> t.get 'r1', {COLUMN => 'c1', TIMERANGE => [ts1, ts2], VERSIONS => 4}
hbase> t.get 'r1', {COLUMN => 'c1', TIMESTAMP => ts1, VERSIONS => 4}
hbase> t.get 'r1', {FILTER => "ValueFilter(=, 'binary:abc')"}
hbase> t.get 'r1', 'c1'
hbase> t.get 'r1', 'c1', 'c2'
hbase> t.get 'r1', ['c1', 'c2']
hbase> t.get 'r1', {CONSISTENCY => 'TIMELINE'}
hbase> t.get 'r1', {CONSISTENCY => 'TIMELINE', REGION_REPLICA_ID => 1}
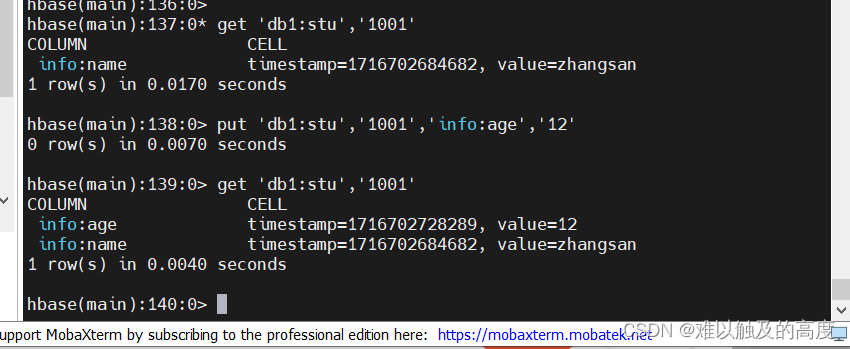
get 'db1:stu','1001'
put 'db1:stu','1001','info:age','12'
get 'db1:stu','1001'
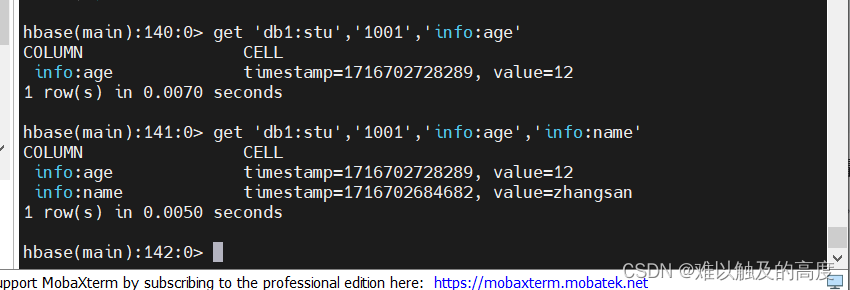
获取指定RowKey中某一列数据
get 'db1:stu','1001','info:age'
获取指定RowKey下的多列数据
get 'db1:stu','1001','info:age','info:name'
3)scan 获取表中所有数据
help 'scan'
scan 'db1:stu'
插入多条数据:
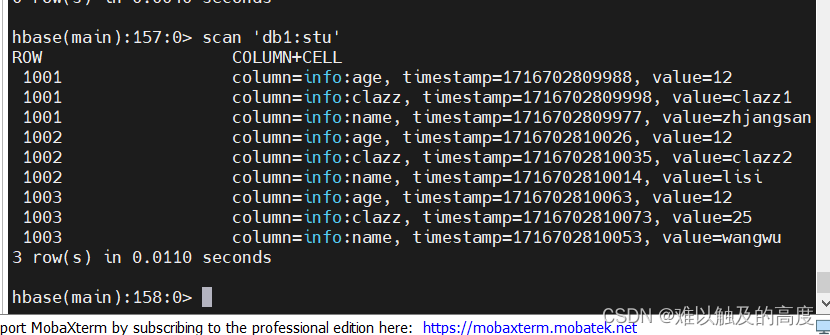
put 'db1:stu','1001','info:name','zhjangsan'
put 'db1:stu','1001','info:age','12'
put 'db1:stu','1001','info:clazz','clazz1'
put 'db1:stu','1002','info:name','lisi'
put 'db1:stu','1002','info:age','12'
put 'db1:stu','1002','info:clazz','clazz2'
put 'db1:stu','1003','info:name','wangwu'
put 'db1:stu','1003','info:age','12'
put 'db1:stu','1003','info:clazz','25'
scan 'db1:stu'
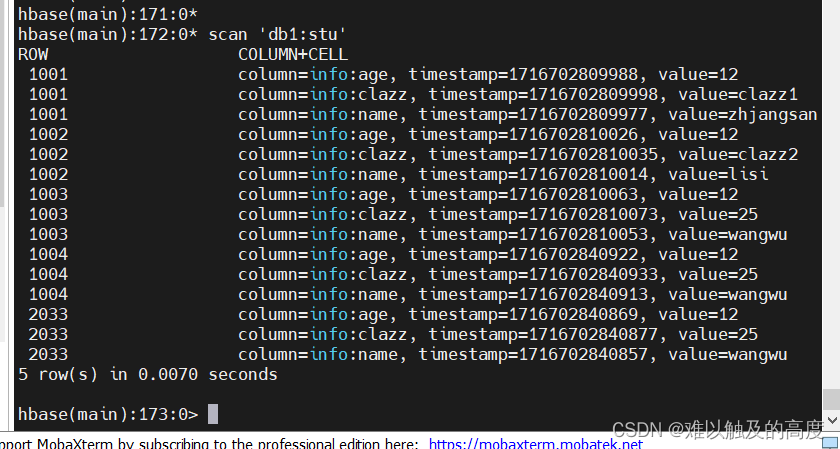
put 'db1:stu','2033','info:name','wangwu'
put 'db1:stu','2033','info:age','12'
put 'db1:stu','2033','info:clazz','25'
scan 'db1:stu'
put 'db1:stu','1004','info:name','wangwu'
put 'db1:stu','1004','info:age','12'
put 'db1:stu','1004','info:clazz','25'
scan 'db1:stu'
发现1004在2033前面 所以说rowKey是按照字典顺序排序的
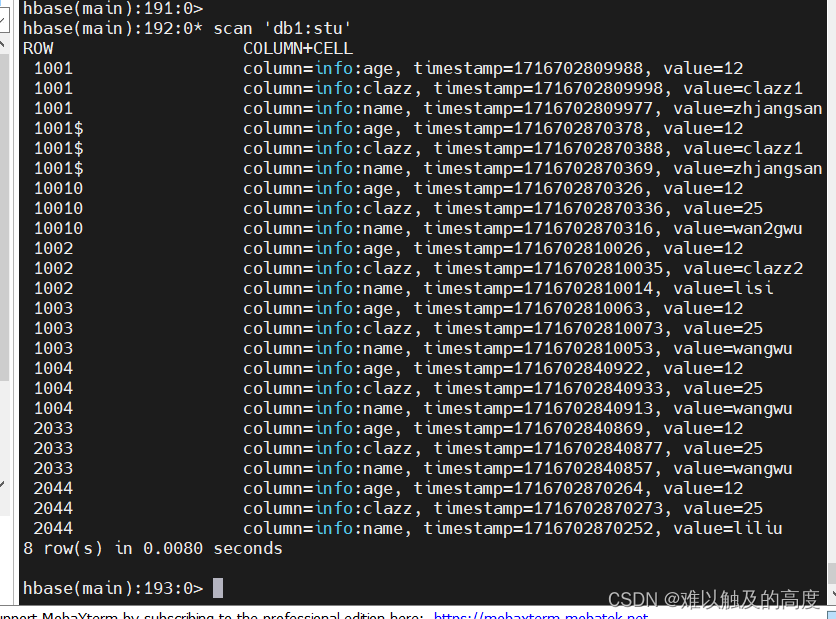
put 'db1:stu','2044','info:name','liliu'
put 'db1:stu','2044','info:age','12'
put 'db1:stu','2044','info:clazz','25'
scan 'db1:stu'
put 'db1:stu','10010','info:name','wan2gwu'
put 'db1:stu','10010','info:age','12'
put 'db1:stu','10010','info:clazz','25'
scan 'db1:stu'
put 'db1:stu','1001$','info:name','zhjangsan'
put 'db1:stu','1001$','info:age','12'
put 'db1:stu','1001$','info:clazz','clazz1'
scan 'db1:stu'
发现10010在1001后面 所以说rowKey是按照字典顺序排序的
ROWKEY是根据字典排序 并且排序的依据是按位比较ASCII码表
help 'scan'
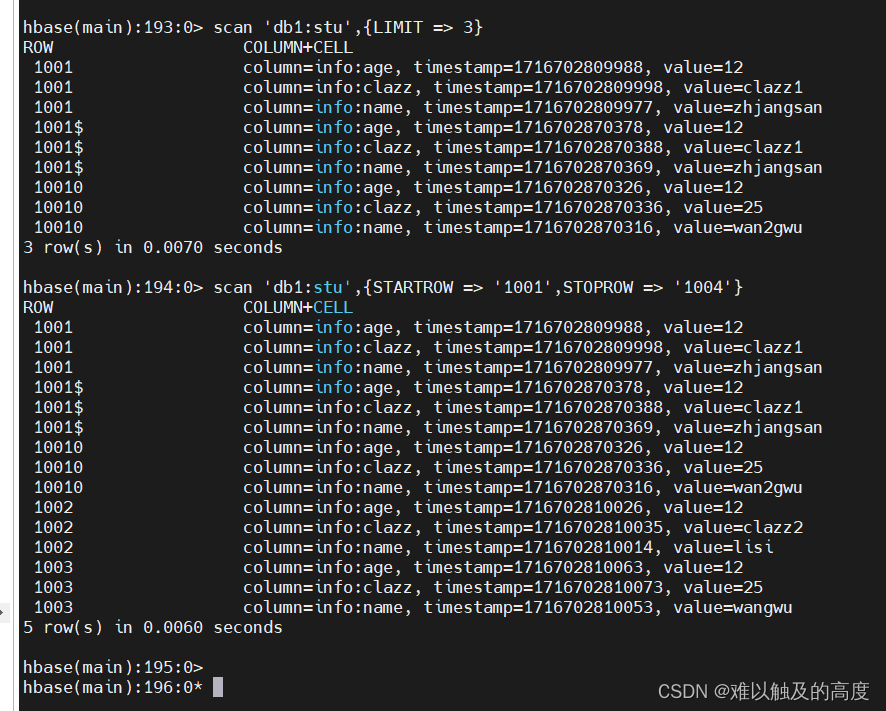
scan 'db1:stu',{LIMIT => 3}
按ROWKEY范围进行取值 左闭右开 取值包含STARTROW 不包含STOPROW
scan 'db1:stu',{STARTROW => '1001',STOPROW => '1004'}
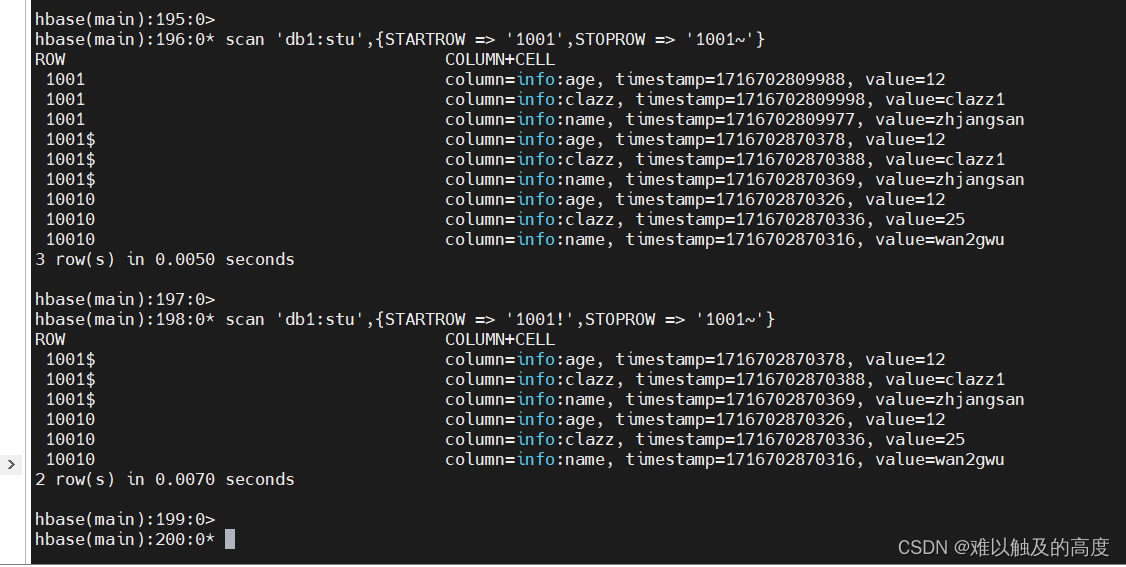
根据ASCII码取值
scan 'db1:stu',{STARTROW => '1001',STOPROW => '1001~'}
scan 'db1:stu',{STARTROW => '1001!',STOPROW => '1001~'}
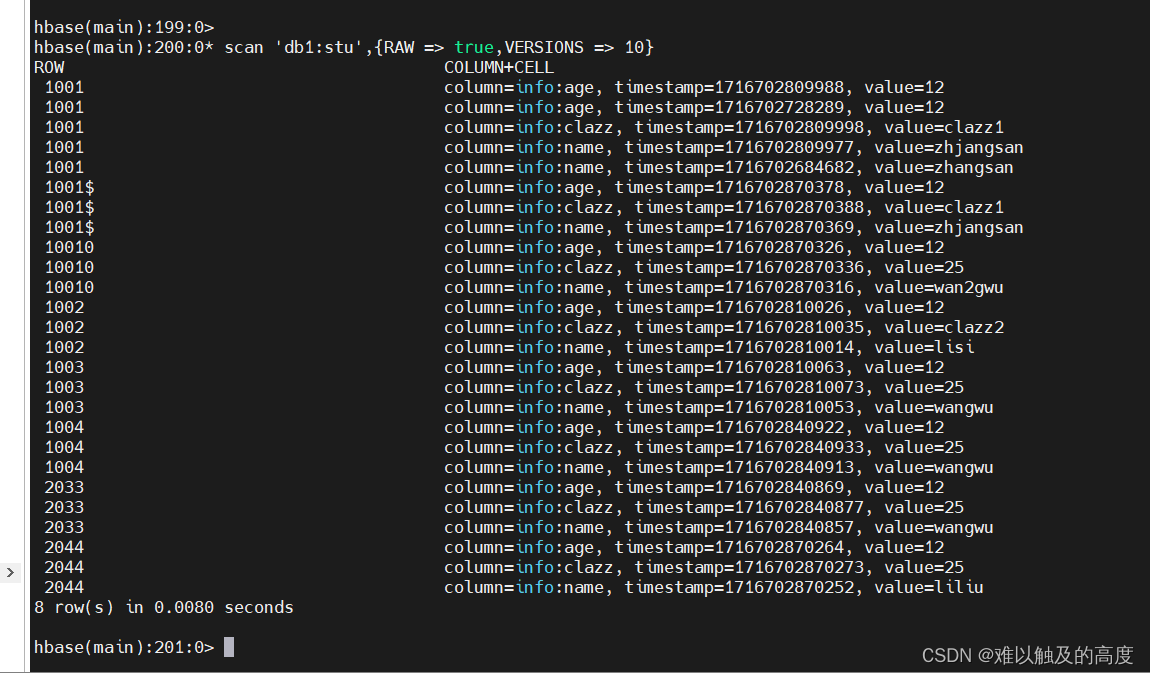
查看表中所有数据并展示所有版本信息
scan 'db1:stu',{RAW => true,VERSIONS => 10}
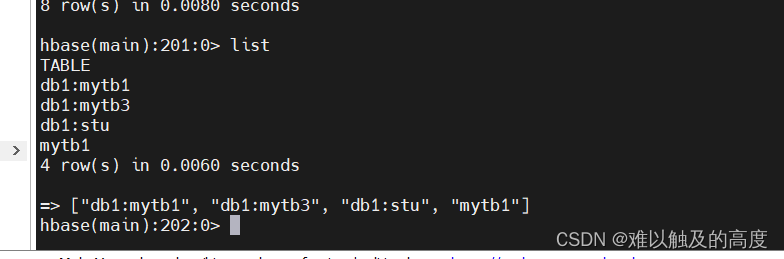
4)list 查看所有表
list
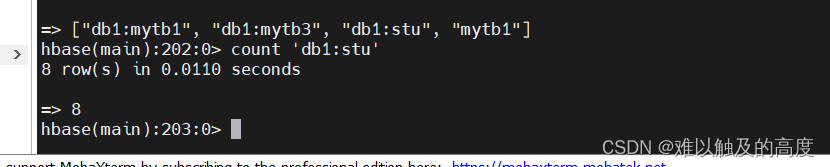
5)count 统计表中数据量
count 'db1:stu'
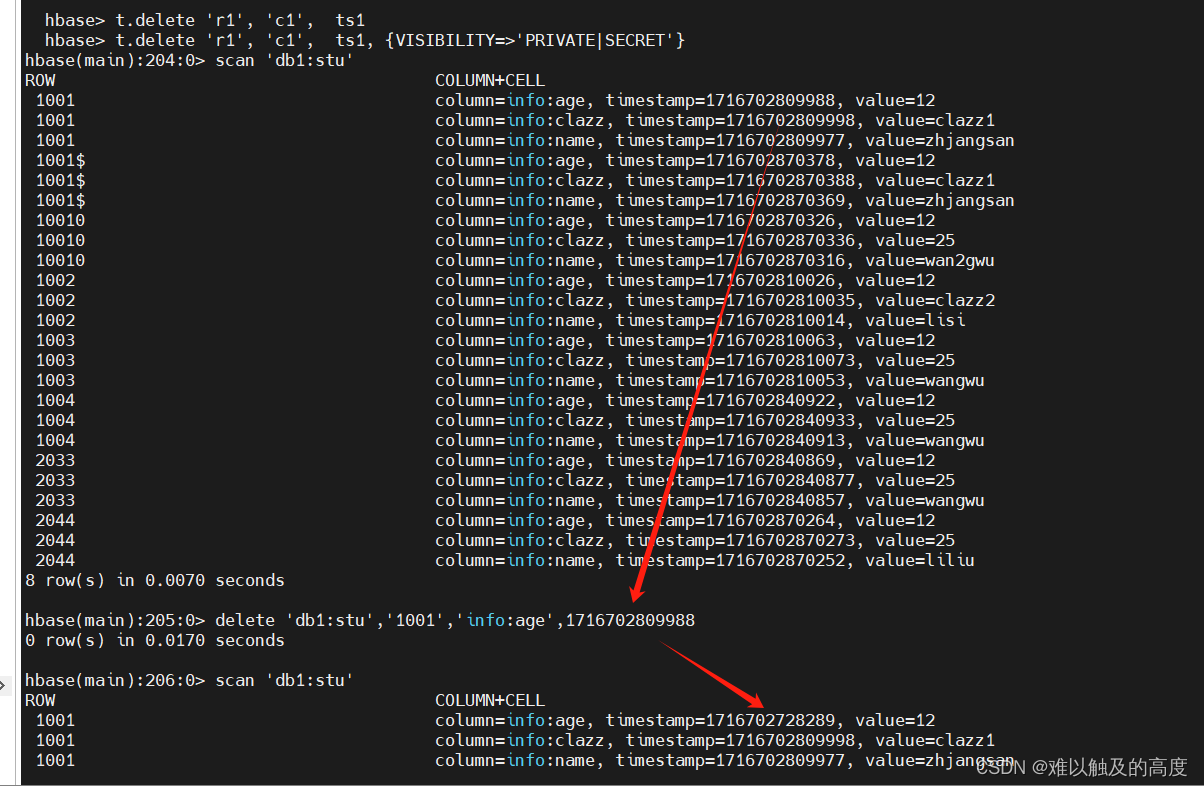
6)删除列操作
help 'delete'

scan 'db1:stu'

delete 'db1:stu','1001','info:age',时间戳
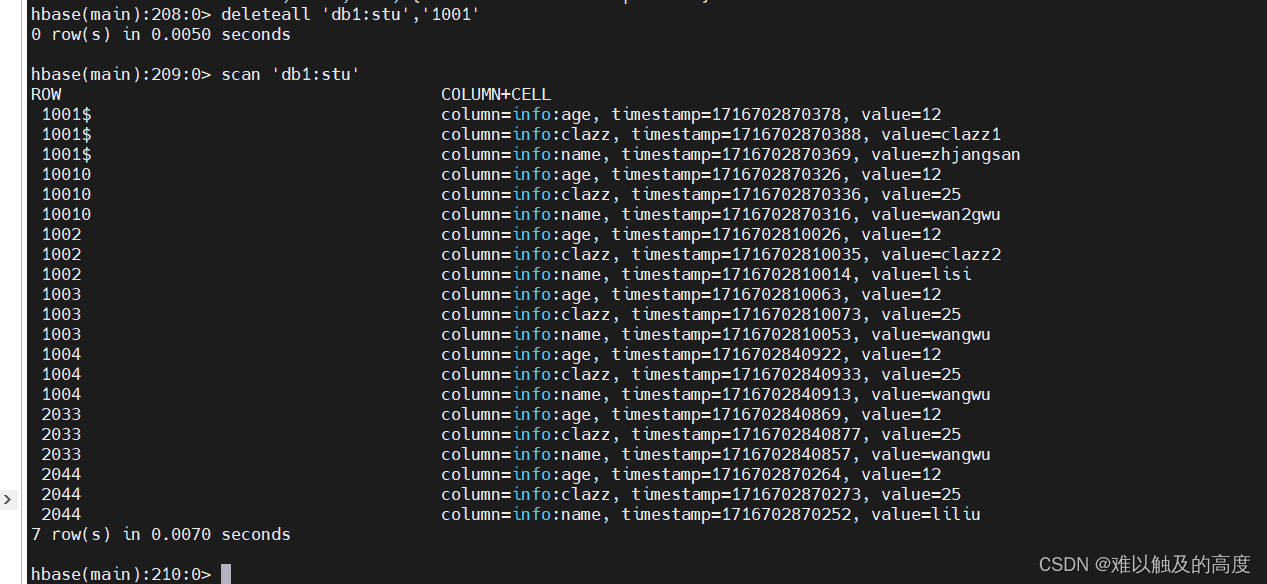
7)删除一个ROWKEY
help 'deleteall'

  hbase> t.deleteall 'r1'
  hbase> t.deleteall 'r1', 'c1'
  hbase> t.deleteall 'r1', 'c1', ts1
  hbase> t.deleteall 'r1', 'c1', ts1, {VISIBILITY=>'PRIVATE|SECRET'}

deleteall 'db1:stu','1001'
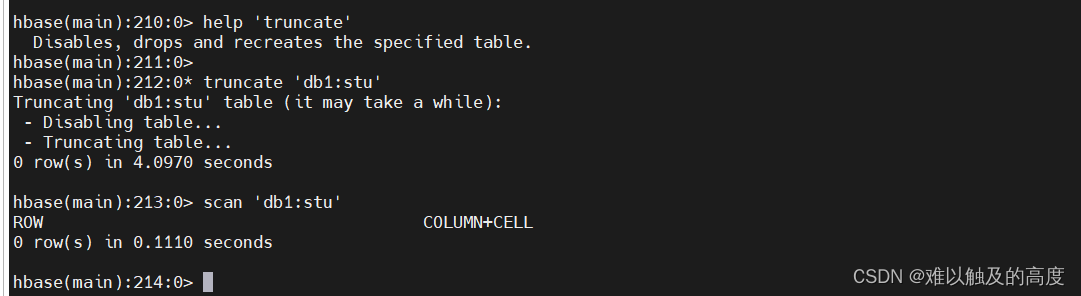
8)清空表
help 'truncate'

Disables, drops and recreates the specified table.

样例:

truncate 'db1:stu'
本文转载自: https://blog.csdn.net/2301_77836489/article/details/139194885
版权归原作者 难以触及的高度 所有, 如有侵权,请联系我们删除。
版权归原作者 难以触及的高度 所有, 如有侵权,请联系我们删除。