前言
安装部署分为以下五个大步骤
1.资源准备
2.操作系统配置
3.数据库配置
4.ambari配置
5.bigtop组件安装
必要说明
all 表示全部主机都要执行
server表示ambari-server安装的主机执行
${key}表示需要根据实际情况修改的变量,例如${server.ip}应替换成server所在主机的ip,所有变量均会标红
资源准备
需要准备3台centos7虚拟机,建议规格4C16G60G;ambari2.8.0、ambari-metrics3.0.0、bigtop3.2.0三类组件
方式一:
按上篇文章的方式自己编译组件
方式二:
echo "编-译-好-的-包-放-在-群-文-件-里-了"
echo "欢-迎-加-Q-Q-群-进-行-交-流"
echo "7-2-2-0-1-4-9-1-2"
操作系统配置
基础配置
检查操作系统版本一致性(all)
cat /etc/redhat-release
设置操作系统默认语言(all)
localectl set-locale LANG=en_US.UTF-8
要求:en_US.UTF-8
设置操作系统时区(all)
cp /usr/share/zoneinfo/Asia/Shanghai /etc/localtime
要求CST +0800
设置机器名(all)
echo "${hostname}" > /etc/hostname
设置域名解析(all)
echo "${ip1} ${hostname1}" >> /etc/hosts
echo "${ip2} ${hostname2}" >> /etc/hosts
echo "${ip3} ${hostname3}" >> /etc/hosts
注意:要将集群每台机器的ip hostname都添加到hosts中
设置网络(all)
echo "NETWORKING=yes" > /etc/sysconfig/network
关闭防火墙(all)
#停止防火墙
systemctl stop firewalld
#关闭防火墙
systemctl disable firewalld
关闭selinux(all)
setenforce 0
echo "SELINUX=disabled" > /etc/selinux/config
echo "SELINUXTYPE=targeted" >> /etc/selinux/config
配置limits参数(all)
echo "* hard nproc 65535" > /etc/security/limits.conf
echo "* soft nproc 65535" >> /etc/security/limits.conf
echo "* hard nofile 65535" >> /etc/security/limits.conf
echo "* soft nofile 65535" >> /etc/security/limits.conf
禁用交换分区(all)
sysctl vm.swappiness=0
echo "vm.swappiness=0" >> /etc/sysctl.conf
设置umask(all)
echo umask 0022 >> /etc/profile
source /etc/profile
磁盘挂载(all)
#1.用lsblk命令查看磁盘挂载情况(以sdb为例)
#2.创建挂载的文件夹(有多少块待挂载的磁盘就在/下建多少个data{i}文件夹,i从1开始)
mkdir ${/data1}#3.修改磁盘分区模式
parted -s ${/dev/sdb} mklabel gpt#4.分区
parted -s ${/dev/sdb} mkpart primary 0% 100%#5.格式化
mkfs.ext4 ${/dev/sdb1}#6.挂载
mount ${/dev/sdb1} ${/data1}#7.开机自动挂载
echo '${/dev/sdb1} ${/data1} ext4 defaults 0 0' >> /etc/fstab
重启(all)
reboot命令重启以确保基础配置生效
免密(server)
生成密钥
ssh-keygen -f ~/.ssh/id_rsa -t rsa -N ''
发送公钥到全部机器 包括自己
ssh-copy-id -i ~/.ssh/id_rsa.pub root@${hostname1}
ssh-copy-id -i ~/.ssh/id_rsa.pub root@${hostname2}
ssh-copy-id -i ~/.ssh/id_rsa.pub root@${hostname3}
基础软件安装(all)
yum -y groupinstall "Infrastructure Server" --setopt=group_package_types=mandatory,default,optional
yum -y groupinstall "Development Tools" --setopt=group_package_types=mandatory,default,optional
配置ntp服务
服务端(server)
echo "server 127.0.0.1" >> /etc/ntp.conf
echo "fudge 127.0.0.1 stratum 10" >> /etc/ntp.conf
systemctl restart ntpd.service
客户端(all)
echo "server ${server.ip}" >> /etc/ntp.conf
systemctl restart ntpd.service
systemctl enable ntpd
关闭chrony自启动,否则ntp服务不会自启动
systemctl disable chronyd
安装离线镜像源(server)
上传软件
将bigdatarepo上传到~目录
复制软件
cp -r ~/bigdatarepo /var/www/html/
启动httpd服务
#启动
systemctl start httpd
#开机自启
systemctl status httpd.service
配置离线镜像源(all)
创建配置文件
cat > /etc/yum.repos.d/ambari.repo <<EOF
[ambari]
name=ambari
baseurl=http://${server.ip}/bigdatarepo
failovermethod=priority
enabled=1
gpgcheck=0EOF
生效
yum clean all
yum makecache
数据库设置(server)
#安装
yum –y install mariadb-server mysql-connector-java
#启动
systemctl start mariadb
#开机自启
systemctl enable mariadb
#设置密码
mysql -uroot -e "set password = password('abcd1234');flush privileges;"
#删除空账户
mysql -uroot -pabcd1234 -e "use mysql;delete from user where User='';flush privileges;"
ambari配置(server)
创建数据库
#创建数据库
mysql -uroot -pabcd1234 -e "create database ambari;create database hive;"
#创建用户并授权
mysql -uroot -pabcd1234 -e "use ambari; create user 'ambari'@'%' identified by 'ambari123' ;GRANT ALL PRIVILEGES on . To 'ambari'@'%' IDENTIFIED BY 'ambari123'; FLUSH PRIVILEGES;"
mysql -uroot -pabcd1234 -e "use hive; create user 'hive'@'%' identified by 'ambari123' ;GRANT ALL PRIVILEGES on . To 'hive'@'%' IDENTIFIED BY 'ambari123'; FLUSH PRIVILEGES;"
安装启动ambari(server)
安装
yum –y install ambari-server
设置
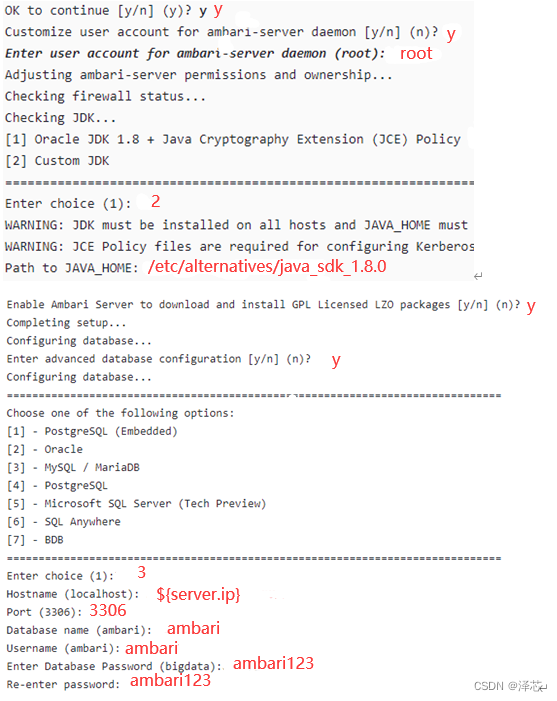
ambari-server setup
初始化ambari-server数据
mysql -uroot -pabcd1234 -e "use ambari;source /var/lib/ambari-server/resources/Ambari-DDL-MySQL-CREATE.sql;show tables;"
启动ambari-server
ambari-server start
至此,ambari已经安装完成
下一篇介绍bigtop大数据组件安装
版权归原作者 泽芯 所有, 如有侵权,请联系我们删除。
