
一、RabbitMQ交换机
1、交换机的由来
在RabbitMQ中,生产者发送信息不会直接将消息投递到队列中,而是将消息投递到交换机中,再由交换机转发到具体的队列中,队列再将消息以推送或者拉取方式给消费进行消费

在交换机诞生了两个概念
1、路由键:

2、绑定键:
** 3、两者中的关系**

2、交换机类型
2.1直连交换机(Direct Exchange)
如图所示:
 2.2主题交换机(Topic Exchange)
 2.3扇形交换机(Fanout Exchange)
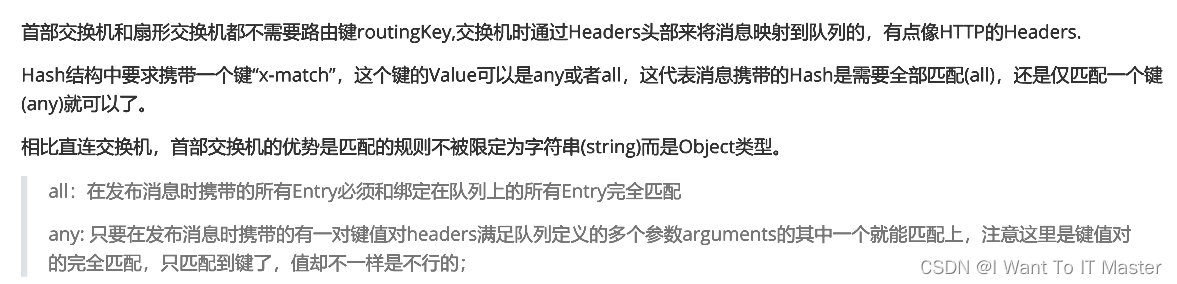
2.4首部交换机(Headers Exchange)
2.5默认交换机(Default Exchange)

二、RabbitMQ交换机实例讲解
一、直连交换机讲解
1、先在生产者中创建一个直连交换机配置类
**DirectQueueConfig:生成队列,交换机,以及路由键,定义三个队列**
package com.zj.provider;

import lombok.With;
import org.springframework.amqp.core.Binding;
import org.springframework.amqp.core.BindingBuilder;
import org.springframework.amqp.core.DirectExchange;
import org.springframework.amqp.core.Queue;
import org.springframework.context.annotation.Bean;
import org.springframework.context.annotation.Configuration;

@Configuration
@SuppressWarnings("all")
public class DirectQueueConfig {

    /**
     * 生成一个队列
     * @return
     */
    @Bean
    public Queue directQueueA(){
        return new Queue("directQueueA",true);
    }

    @Bean
    public Queue directQueueB(){
        return new Queue("directQueueB",true);
    }

    @Bean
    public Queue directQueueC(){
        return new Queue("directQueueC",true);
    }

    @Bean
    public DirectExchange directExchange(){
        return new DirectExchange("directExchange");
    }

    @Bean
    public Binding bindingA(){
        return BindingBuilder.bind(directQueueA()).to(directExchange()).with("AA");
    }

    @Bean
    public Binding bindingB(){
        return BindingBuilder.bind(directQueueB()).to(directExchange()).with("BB");
    }

    @Bean
    public Binding bindingC(){
        return BindingBuilder.bind(directQueueC()).to(directExchange()).with("CC");
    }

}
2、之后创建一个控制类,用来发信息
DirectController:其中rabbitTemplate用来发送信息辅助类
package com.zj.provider;

import org.springframework.amqp.rabbit.core.RabbitTemplate;
import org.springframework.beans.factory.annotation.Autowired;
import org.springframework.context.annotation.Bean;
import org.springframework.web.bind.annotation.RequestMapping;
import org.springframework.web.bind.annotation.RestController;

import java.util.Map;

@RestController
@RequestMapping("/sendDirect")
@SuppressWarnings("all")
public class DirectController {

    @Autowired
    private RabbitTemplate rabbitTemplate;

    @RequestMapping("/sendDirect")
    public String sendDirect(String routerKey) {
        rabbitTemplate.convertAndSend("directExchange", routerKey, "Hello world");
        return "yes";
    }
}
3、在消费者中定义好接受者
**DirectReciverA:再生成连个同样的类但是要注意的是必须要打@RabbitHandler和@RabbitListener(queues = "directQueueA")第一个是对队列处理者,第二个是队列的监听者,监听队列,不加第一个注解,消息将会接收不到**
package com.zj.consumer.mq;

import lombok.extern.slf4j.Slf4j;
import org.springframework.amqp.rabbit.annotation.RabbitHandler;
import org.springframework.amqp.rabbit.annotation.RabbitListener;
import org.springframework.stereotype.Component;

@Component
@SuppressWarnings("all")
@Slf4j
@RabbitListener(queues = "directQueueA")
public class DirectReciverA {

        @RabbitHandler
        public void process(String message){
            log.warn("A接收到了"+message);
        }

}
** 结果运行成功:**

二、主题交换机讲解
1、先在生产者中创建一个直连交换机配置类
**TopicQueueConfig:注意:这里面需要特定指定键**
注意:必须在绑定键前加一个Topic来区分,必须介以区别,不然将会报错,因为加入了bean对象
package com.zj.provider.MQ;

import org.springframework.amqp.core.Binding;
import org.springframework.amqp.core.BindingBuilder;
import org.springframework.amqp.core.Queue;
import org.springframework.amqp.core.TopicExchange;
import org.springframework.context.annotation.Bean;
import org.springframework.context.annotation.Configuration;

@Configuration
@SuppressWarnings("all")
public class TopicQueueConfig {

    private final static String KEY_A="*.orange.*";
    private final static String KEY_B="*.*.rabbit";
    private final static String KEY_C="lazy.#";

    /**
     * 生成一个队列
     * @return
     */
    @Bean
    public Queue topicQueueA(){
        return new Queue("topicQueueA",true);
    }

    @Bean
    public Queue topicQueueB(){
        return new Queue("topicQueueB",true);
    }

    @Bean
    public Queue topicQueueC(){
        return new Queue("topicQueueC",true);
    }

    @Bean
    public TopicExchange topicExchange(){
        return new TopicExchange("topicExchange");
    }

    @Bean
    public Binding topicbindingA(){
        return BindingBuilder.bind(topicQueueA()).to(topicExchange()).with(KEY_A);
    }

    @Bean
    public Binding topicbindingB(){
        return BindingBuilder.bind(topicQueueB()).to(topicExchange()).with(KEY_B);
    }

    @Bean
    public Binding topicbindingC(){
        return BindingBuilder.bind(topicQueueC()).to(topicExchange()).with(KEY_C);
    }

}
2、之后创建一个控制类,用来发信息
  @RequestMapping("/sendTopic")
    public String sendTopic(String routerKey) {
        rabbitTemplate.convertAndSend("topicExchange", routerKey, "Hello world");
        return "yes";
    }
3、在消费者中定义好接受者:
package com.zj.consumer.mq;

import lombok.extern.slf4j.Slf4j;
import org.springframework.amqp.rabbit.annotation.RabbitHandler;
import org.springframework.amqp.rabbit.annotation.RabbitListener;
import org.springframework.stereotype.Component;

@Component
@SuppressWarnings("all")
@Slf4j
@RabbitListener(queues = "topicQueueA")
public class TopicReciverA {

        @RabbitHandler
        public void process(String message){
            log.info("A接收到了"+message);
        }

}
注意:需要进行发信息才能在RabbitMQ发现队列

** 显示出队列:**

** 接收成功:**

三、扇形(广播)交换机讲解
** 扇形交换机和其他两个交换机不一样,扇形交换机不用绑定键,因为他会进行广播,同样的在队列与交换机进行绑定时,需要加上不同的名字来进行区分**
1、先在生产者中创建一个直连交换机配置类
package com.zj.provider.MQ;

import org.springframework.amqp.core.Binding;
import org.springframework.amqp.core.BindingBuilder;
import org.springframework.amqp.core.FanoutExchange;
import org.springframework.amqp.core.Queue;
import org.springframework.context.annotation.Bean;
import org.springframework.context.annotation.Configuration;

@Configuration
@SuppressWarnings("all")
public class FanoutQueueConfig {

    /**
     * 生成一个队列
     * @return
     */
    @Bean
    public Queue fanoutQueueA(){
        return new Queue("fanoutQueueA",true);
    }

    @Bean
    public Queue fanoutQueueB(){
        return new Queue("fanoutQueueB",true);
    }

    @Bean
    public Queue fanoutQueueC(){
        return new Queue("fanoutQueueC",true);
    }

    @Bean
    public FanoutExchange fanoutExchange(){
        return new FanoutExchange("fanoutExchange");
    }

    @Bean
    public Binding fanoutbindingA(){
        return BindingBuilder.bind(fanoutQueueA()).to(fanoutExchange());
    }

    @Bean
    public Binding fanoutbindingB(){
        return BindingBuilder.bind(fanoutQueueB()).to(fanoutExchange());
    }

    @Bean
    public Binding fanoutbindingC(){
        return BindingBuilder.bind(fanoutQueueC()).to(fanoutExchange());
    }

}
2、之后创建一个控制类,用来发信息
**没有绑定键,但是要写空值,不然fanoutExchange会被认为是路由键
@RequestMapping("/sendFanout")
public String sendFanout() {
    rabbitTemplate.convertAndSend("fanoutExchange", "null" ,"Hello world");
    return "yes";
}**
3、在消费者中定义好接受者:
package com.zj.consumer.mq;

import lombok.extern.slf4j.Slf4j;
import org.springframework.amqp.rabbit.annotation.RabbitHandler;
import org.springframework.amqp.rabbit.annotation.RabbitListener;
import org.springframework.stereotype.Component;

@Component
@SuppressWarnings("all")
@Slf4j
@RabbitListener(queues = "fanoutQueueA")
public class FanoutReciverA {

        @RabbitHandler
        public void process(String message){
            log.info("A接收到了"+message);
        }

}
** 生产者运行效果:**

** 消费者接收到信息**
** 今天的知识就分享到这了,希望能够帮助到你! **
本文转载自: https://blog.csdn.net/m0_53151031/article/details/123140428
版权归原作者 落日飞行 所有, 如有侵权,请联系我们删除。
版权归原作者 落日飞行 所有, 如有侵权,请联系我们删除。