
随着人工智能技术的不断发展,图像处理应用已经在医疗影像分析、自动驾驶、视频监控等领域得到广泛应用。
TensorFlow.js
是
Google
开源的机器学习库
TensorFlow
的
JavaScript
版本,能够让开发者在浏览器中运行机器学习模型,在前端应用中轻松实现图像分类、物体检测和姿态估计等功能。本文将介绍如何使用
TensorFlow.js
在纯前端环境中实现这三项任务,并帮助你构建一个智能图像处理应用。
什么是
TensorFlow.js
?
TensorFlow.js 是一个能够让开发者在前端直接运行机器学习模型的 JavaScript 库。它允许你无需将数据发送到服务器,便可以在浏览器中运行模型进行推理,这不仅减少了延迟,还可以更好地保护用户的隐私数据。通过
TensorFlow.js
,前端开发者能够轻松实现图像分类、物体检测和姿态估计等功能。
TensorFlow.js
的应用非常广泛,尤其是在一些实时交互和隐私敏感的场景下,例如 医疗影像分析、自动驾驶 和 智能监控。在这些领域,前端模型推理能够提升响应速度,并且避免将用户的数据上传到服务器,从而保护用户的隐私。
要开始使用
TensorFlow.js
,你需要安装相关的模型库。以下是你需要安装的
npm
包:
npminstall @tensorflow/tfjs
npminstall @tensorflow-models/mobilenet
npminstall @tensorflow-models/coco-ssd
npminstall @tensorflow-models/posenet
加载预训练模型
在
TensorFlow.js
中,加载预训练模型非常简单。首先,确保
TensorFlow.js
已经准备好,然后加载所需的模型进行推理。
// 导入import*as tf from'@tensorflow/tfjs'// 加载
tf.ready();// 确保 TensorFlow.js 准备好
用户上传图片
为了使用这些模型进行推理,我们需要让用户上传一张图片。以下是一个处理图片上传的代码示例:
consthandleImageUpload=async(event)=>{const file = event.target.files[0]if(file){const reader =newFileReader()
    reader.onload=async(e)=>{
      imageSrc.value = e.target.result
      awaitrunModels(e.target.result)}
    reader.readAsDataURL(file)}}
图像分类:识别图片中的物体
图像分类是计算机视觉中的基本任务,目的是将输入图像归类到某个类别中。例如,我们可以用图像分类模型识别图像中的“猫”还是“狗”。

使用预训练模型进行图像分类
TensorFlow.js
提供了多个预训练模型,
MobileNet
是其中一个常用的图像分类模型。它是一个轻量级的卷积神经网络,适合用来进行图像分类。接下来,我们通过
MobileNet
实现一个图像分类功能:
const mobilenetModel =await mobilenet.load()const predictions =await mobilenetModel.classify(image)
classification.value =`分类结果: ${predictions[0].className}, 信心度: ${predictions[0].probability.toFixed(3)}`
这段代码实现了图像分类。我们加载
MobileNet
模型,并对用户上传的图像进行推理,最后返回图像的分类结果。
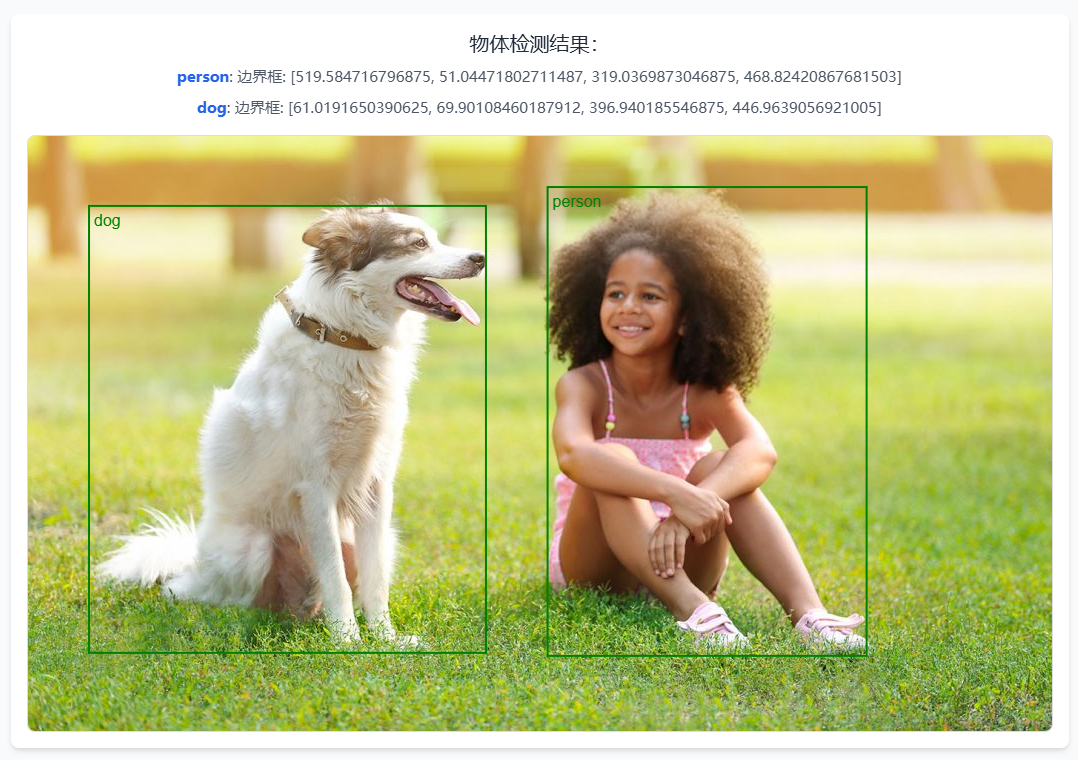
物体检测:找出图像中的所有物体
物体检测不仅仅是识别图像中的物体是什么,还需要标出它们的位置,通常用矩形框来框住物体。
Coco-SSD
是一个强大的物体检测模型,能够在图像中检测出多个物体并标出它们的位置。
使用
Coco-SSD
进行物体检测
const cocoModel =await cocoSsd.load();const detectionResults =await cocoModel.detect(image);
objects.value = detectionResults.map((prediction)=>({class: prediction.class,
  bbox: prediction.bbox,}));
通过
Coco-SSD
模型,我们可以检测图像中的多个物体,并标出它们的位置。
绘制物体的边界框
为了更直观地展示检测结果,我们可以在图像上绘制出物体的边界框:
// 绘制物体检测边界框constdrawObjects=(detectionResults, image)=>{nextTick(()=>{const ctx = objectCanvas.value.getContext('2d')const imageWidth = image.width
    const imageHeight = image.height
    objectCanvas.value.width = imageWidth
      objectCanvas.value.height = imageHeight
      ctx.clearRect(0,0, objectCanvas.value.width, objectCanvas.value.height)
      ctx.drawImage(image,0,0, objectCanvas.value.width, objectCanvas.value.height)// 绘制边界框
      detectionResults.forEach((prediction)=>{const[x, y, width, height]= prediction.bbox
        ctx.beginPath()
        ctx.rect(x, y, width, height)
        ctx.lineWidth =2
        ctx.strokeStyle ='green'
        ctx.stroke()// 添加标签
        ctx.font ='16px Arial'
        ctx.fillStyle ='green'
        ctx.fillText(prediction.class, x +5, y +20)})})}
这段代码通过绘制边界框来标出检测到的物体位置,同时在边界框旁边显示物体类别。
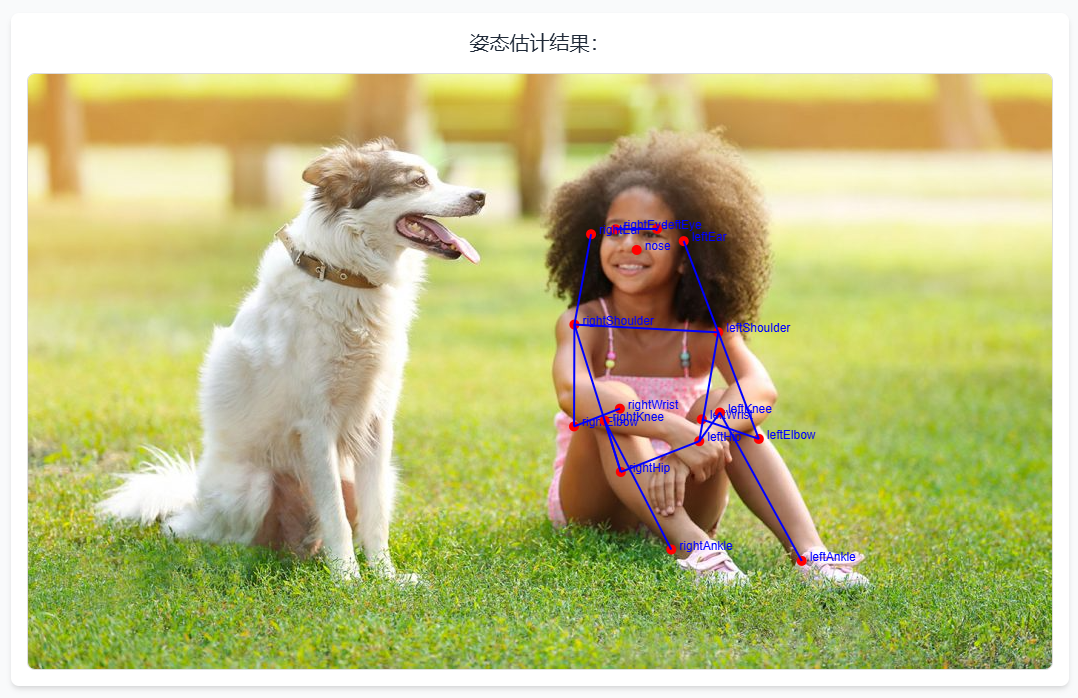
姿态估计:识别人体的关键点
姿态估计主要是识别人类的身体部位,例如头部、手臂、腿部等。通过这些关键点,我们可以了解一个人当前的姿势。
TensorFlow.js
提供了
PoseNet
模型来进行姿态估计。
使用
PoseNet
进行姿态估计
// 加载 PoseNet 模型const posenetModel =await posenet.load()const poseResult =await posenetModel.estimateSinglePose(image,{
  flipHorizontal:false})// 人体关键点
pose.value = poseResult.keypoints.map((point)=>`${point.part}: (${point.position.x.toFixed(2)}, ${point.position.y.toFixed(2)})`)
PoseNet
模型会估计图像中人物的关键点,并返回每个关键点的位置。
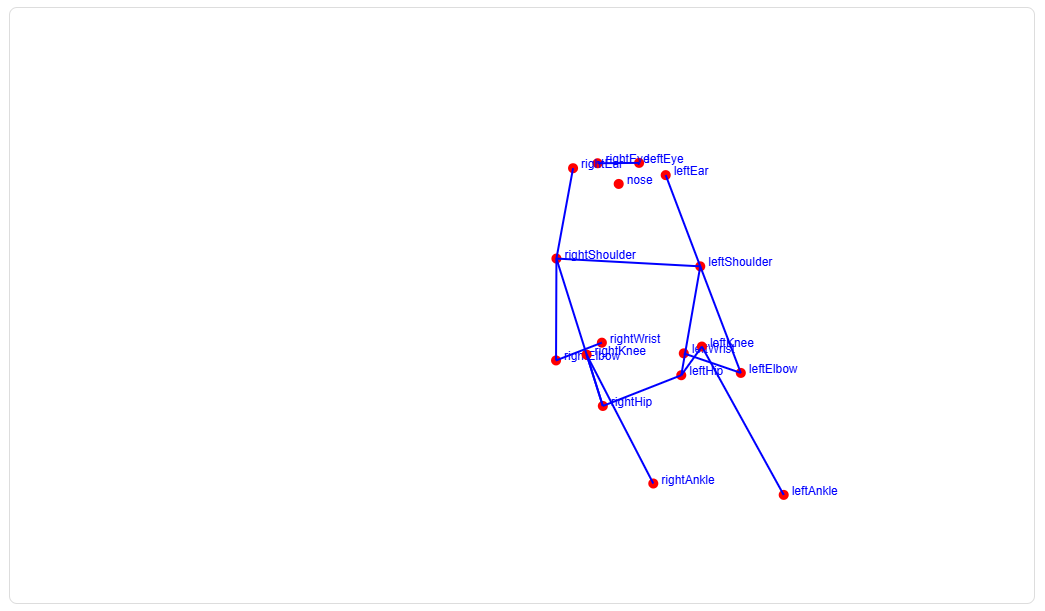
绘制姿态估计骨架图
constdrawPose=(keypoints, image)=>{nextTick(()=>{const ctx = canvas.value.getContext('2d')const imageWidth = image.width
    const imageHeight = image.height
    canvas.value.width = imageWidth
      canvas.value.height = imageHeight
      ctx.clearRect(0,0, canvas.value.width, canvas.value.height)// 绘制图像
      ctx.drawImage(image,0,0, canvas.value.width, canvas.value.height)const scaleX = canvas.value.width / image.width
      const scaleY = canvas.value.height / image.height
      // 绘制关键点并标记名称
      keypoints.forEach((point)=>{const{ x, y }= point.position
        const scaledX = x * scaleX
        const scaledY = y * scaleY
        ctx.beginPath()
        ctx.arc(scaledX, scaledY,5,0,2* Math.PI)
        ctx.fillStyle ='red'
        ctx.fill()// 标记点的名称
        ctx.font ='12px Arial'
        ctx.fillStyle ='blue'
        ctx.fillText(point.part, scaledX +8, scaledY)})// 连接骨架const poseConnections =[['leftShoulder','rightShoulder'],['leftShoulder','leftElbow'],['leftElbow','leftWrist'],['rightShoulder','rightElbow'],['rightElbow','rightWrist'],['leftHip','rightHip'],['leftShoulder','leftHip'],['rightShoulder','rightHip'],['leftHip','leftKnee'],['leftKnee','leftAnkle'],['rightHip','rightKnee'],['rightKnee','rightAnkle'],['leftEye','rightEye'],['leftEar','leftShoulder'],['rightEar','rightShoulder']]
      poseConnections.forEach(([partA, partB])=>{const keypointA = keypoints.find((point)=> point.part === partA)const keypointB = keypoints.find((point)=> point.part === partB)if(keypointA && keypointB && keypointA.score >0.5&& keypointB.score >0.5){const scaledX1 = keypointA.position.x * scaleX
          const scaledY1 = keypointA.position.y * scaleY
          const scaledX2 = keypointB.position.x * scaleX
          const scaledY2 = keypointB.position.y * scaleY
          ctx.beginPath()
          ctx.moveTo(scaledX1, scaledY1)
          ctx.lineTo(scaledX2, scaledY2)
          ctx.lineWidth =2
          ctx.strokeStyle ='blue'
          ctx.stroke()}})})}
这段代码通过
PoseNet
返回的人体关键点信息,绘制人体姿态的骨架图,帮助用户理解图像中的人物姿势。
总结
通过
TensorFlow.js
,我们可以轻松地将图像分类、物体检测和姿态估计等功能集成到前端应用中,无需依赖后端计算,提升了应用的响应速度并保护了用户隐私。在本文中,我们介绍了如何使用
MobileNet
、
Coco-SSD
和
PoseNet
等预训练模型,在前端实现智能图像处理应用。无论是开发图像识别应用还是增强现实应用,
TensorFlow.js
都是一个强大的工具,值得前端开发者深入学习和使用。
版权归原作者 一点一木 所有, 如有侵权,请联系我们删除。