通过Caliper进行压力测试
本文章使用Ubuntu系统进行压力测试,CentOS7以及MacOS仅需修改部分系统命令即可,其余操作步骤一致
官方文档:压力测试指南 — FISCO BCOS 2.0 v2.9.0 文档 (fisco-bcos-documentation.readthedocs.io)
1.1 环境要求
第一步、配置基本环境
操作系统版本需要满足以下要求:Ubuntu >= 16.04、CentOS >= 7或MacOS >= 10.14;
一、先更新系统资源
sudo apt update
二、下载python3、make、curl、g++、gcc及git
sudo apt install python3
sudo apt install make
sudo apt install curl
sudo apt install g++ gcc
sudo apt install git
第二步、安装Node.js
安装指南:建议使用nvm(Node Version Manager)安装,nvm的安装方式如下:
# 安装nvm
curl -o- https://raw.githubusercontent.com/creationix/nvm/v0.33.2/install.sh | bash

# 若出现因网络问题导致长时间下载失败,可尝试以下命令
curl -o- https://gitee.com/mirrors/nvm/raw/v0.33.2/install.sh | bash

# 加载nvm配置
source ~/.$(basename $SHELL)rc
# 安装Node.js 8
nvm install 8
# 使用Node.js 8
nvm use 8
第三步、部署docker
# 更新包索引
sudo apt-get update
# 安装基础依赖库
sudo apt-get install \
    apt-transport-https \
    ca-certificates \
    curl \
    gnupg-agent \
    software-properties-common
# 添加Docker官方GPG key
curl -fsSL https://download.docker.com/linux/ubuntu/gpg | sudo apt-key add -
# 添加docker仓库
sudo add-apt-repository \
"deb [arch=amd64] https://download.docker.com/linux/ubuntu \
$(lsb_release -cs) \
stable"
# 更新包索引
sudo apt-get update
# 安装Docker
sudo apt-get install docker-ce docker-ce-cli containerd.io
# 加入docker用户组
sudo groupadd docker
sudo usermod -aG docker $USER
第四步、安装Docker Compose
sudo curl -L "https://github.com/docker/compose/releases/download/1.24.0/docker-compose-$(uname -s)-$(uname -m)" -o /usr/local/bin/docker-compose
sudo chmod +x /usr/local/bin/docker-compose
1.2 Caliper部署
第一步、创建工作目录
mkdir benchmarks && cd benchmarks
第二步、 对NPM项目进行初始化
npm init
第三步、安装caliper-cli
npm install --only=prod @hyperledger/[email protected]
第四步、验证caliper-cli安装成功
npx caliper --version
若安装成功,则会打印相应的版本信息如:v0.2.0
1.3、快速体验FISCO BCOS基准测试
第一步、在工作目录下下载预定义测试用例
git clone https://gitee.com/vita-dounai/caliper-benchmarks.git
第二步、执行合约测试
在benchmarks目录下执行:
执行HelloWorld合约测试
npx caliper benchmark run --caliper-workspace caliper-benchmarks --caliper-benchconfig benchmarks/samples/fisco-bcos/helloworld/config.yaml --caliper-networkconfig networks/fisco-bcos/4nodes1group/fisco-bcos.json
执行Solidity版转账合约测试
npx caliper benchmark run --caliper-workspace caliper-benchmarks --caliper-benchconfig benchmarks/samples/fisco-bcos/transfer/solidity/config.yaml --caliper-networkconfig networks/fisco-bcos/4nodes1group/fisco-bcos.json
执行预编译版转账合约测试
npx caliper benchmark run --caliper-workspace caliper-benchmarks --caliper-benchconfig benchmarks/samples/fisco-bcos/transfer/precompiled/config.yaml --caliper-networkconfig networks/fisco-bcos/4nodes1group/fisco-bcos.json
测试完成后,会在命令行界面中展示测试结果(TPS、延迟等)及资源消耗情况,同时会在
caliper-benchmarks目录下生成一份包含上述内容的可视化HTML报告。
打开html文件
firefox 文件名
1.4、关于压力测试失败配置文件问题的修改
如果出现下面问题

第一步、修改fiscoBcos.js
#在benchmarks下
vim node_modules/\@hyperledger/caliper-fisco-bcos/lib/fiscoBcos.js
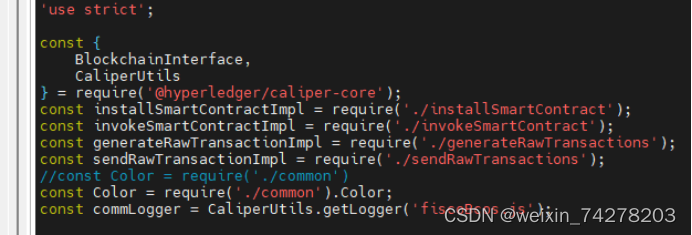
第一次大约在25行左右,修改为下面代码:
const Color = require('./common').Color;

第二处需要改动的地方大约在41行左右:
添加下面代码: if(this.fiscoBcosSettings.network&&this.fiscoBcosSettings.network.authentication) {
for (let k in this.fiscoBcosSettings.network.authentication) { this.fiscoBcosSettings.network.authentication[k]=CaliperUtils.resolvePath(this.fiscoBcosSettings.network.authentication[k], workspace_root); } }

第三处需要修改的地方大约在62行处,修改为下面代码:
const fiscoBcosSettings = this.fiscoBcosSettings;

第二步、修改channelPromise.js
#在benchmarks下
vim node_modules/\@hyperledger/caliper-fisco-bcos/lib/channelPromise.js
在这个配置文件中只需要修改一处即可,大约在文件的49行左右:
let emitter = emitters.get(seq);
if(!emitter) {
return;
}
emitter = emitter.emitter;

第三步、修改web3sync.js
#在benchmarks下
vim node_modules/\@hyperledger/caliper-fisco-bcos/lib/web3lib/web3sync.js
第一处修改大约在27行左右,修改为:
uuid = '0x' + uuid.replace(/-/g, '');

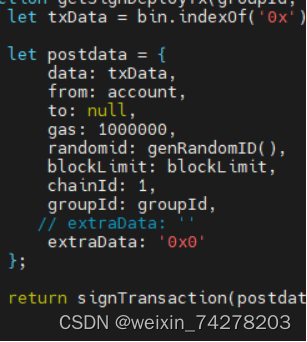
第二处修改大于在91行左右,修改为:
extraData: '0x0'

第三处修改在118行左右,修改为:
extraData: '0x0'

第四步、修改package.json
#在benchmarks下
vim node_modules/\@hyperledger/caliper-fisco-bcos/package.json
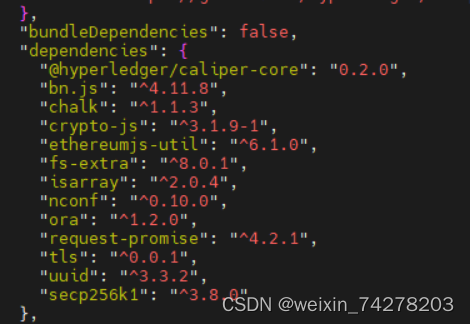
添加一个依赖包:
"secp256k1": "^3.8.0"

最后在该目录执行以下命令:
npm i
最后回到benchmarks目录下再次执行测试命令便可成功!!!
版权归原作者 后端到全栈到全干 所有, 如有侵权,请联系我们删除。