🙊🙊作者主页:🔗 求不脱发
📔📔 精选专栏:🔗SSM直击大厂
📋📋 精彩摘要:JdbcTemplate JdbcTemplate 是 Spring JDBC 核心包(core)中的核心类,它可以通过配置文件、注解、Java 配置类等形式获取数据库的相关信息,实现了对 JDBC 开发过程中的驱动加载、连接的开启和关闭、SQL 语句的创建与执行、异常处理、事务处理、数据类型转换等操作的封装。
💞💞觉得文章还不错的话欢迎大家点赞👍➕收藏⭐️➕评论💬支持博主🤞
📖Spring JdbcTemplate基础详解
📝1️⃣JdbcTemplate概述
它是spring框架中提供的一个对象,是对原始繁琐的Jdbc API对象的简单封装。spring框架为我们提供了很多的操作 模板类。例如:操作关系型数据的JdbcTemplate和HibernateTemplate,操作nosql数据库的RedisTemplate,操 作消息队列的JmsTemplate等等。
📝2️⃣JdbcTemplate开发步骤
① 导入spring-jdbc和spring-tx坐标
② 创建数据库表和实体
③ 创建JdbcTemplate对象
④ 执行数据库操作
📝3️⃣JdbcTemplate快速入门
① 在pom.xml文件中导入spring-jdbc和spring-tx坐标
<!--导入spring的jdbc坐标-->
<dependency>
 <groupId>org.springframework</groupId>
 <artifactId>spring-jdbc</artifactId>
 <version>5.0.5.RELEASE</version>
</dependency>
<!--导入spring的tx坐标-->
<dependency>
 <groupId>org.springframework</groupId>
 <artifactId>spring-tx</artifactId>
 <version>5.0.5.RELEASE</version>
</dependency>
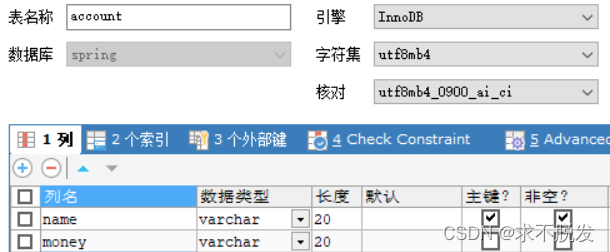
② 创建数据库表和实体
表名称accountnamevarchar(20)moneyvarchar(20)
public class Account {
    private String name;
    private double money;
    //为方便展示省略get和set方法,具体开发中不能省。
}
③ 创建JdbcTemplate对象,执行数据库操作
//1、创建数据源对象
ComboPooledDataSource dataSource = new ComboPooledDataSource();
dataSource.setDriverClass("com.mysql.jdbc.Driver");
dataSource.setJdbcUrl("jdbc:mysql://localhost:3306/test");
dataSource.setUser("root");
dataSource.setPassword("root");
//2、创建JdbcTemplate对象
JdbcTemplate jdbcTemplate = new JdbcTemplate();
//3、设置数据源给JdbcTemplate
jdbcTemplate.setDataSource(dataSource);
//4、执行操作
jdbcTemplate.update("insert into account values(?,?)","tom",5000);
📝4️⃣Spring产生JdbcTemplate对象
我们可以将JdbcTemplate的创建权交给Spring,将数据源DataSource的创建权也交给Spring,在Spring容器内部将数据源DataSource注入到JdbcTemplate模版对象中,applicationContext.xml配置如下:
<!--数据源DataSource-->
<bean id="dataSource" class="com.mchange.v2.c3p0.ComboPooledDataSource">
 <property name="driverClass" value="com.mysql.jdbc.Driver"></property>
 <property name="jdbcUrl" value="jdbc:mysql:///test"></property>
 <property name="user" value="root"></property>
 <property name="password" value="root"></property>
</bean>
<!--JdbcTemplate-->
<bean id="jdbcTemplate" class="org.springframework.jdbc.core.JdbcTemplate">
 <property name="dataSource" ref="dataSource"></property>
</bean>
从容器中获得JdbcTemplate进行添加操作。
@Test
public void testSpringJdbcTemplate() throws PropertyVetoException {
    ApplicationContext applicationContext = new
        ClassPathXmlApplicationContext("applicationContext.xml");
    JdbcTemplate jdbcTemplate = applicationContext.getBean(JdbcTemplate.class);
    jdbcTemplate.update("insert into account values(?,?)","lucy",5000);
}
📝5️⃣JdbcTemplate的常用操作
✨修改操作
@RunWith(SpringJUnit4ClassRunner.class) @ContextConfiguration("classpath:applicationContext.xml")
public class JdbcTemplateCRUDTest {
    @Autowired
    private JdbcTemplate jdbcTemplate;
    @Test
    //测试修改操作
    public void testUpdate(){
    jdbcTemplate.update("update account set money=? where name=?",1000,"tom");
    }
}
✨删除和查询全部操作
@Test
public void testDelete(){
    jdbcTemplate.update("delete from account where name=?","tom");
}
@Test
public void testQueryAll(){
    List<Account> accounts = jdbcTemplate.query("select * from account", new
 BeanPropertyRowMapper<Account>(Account.class));
    for (Account account : accounts) {
        System.out.println(account.getName());
    }
}
✨查询单个数据操作
@Test
//测试查询单个对象操作
public void testQueryOne(){
    Account account = jdbcTemplate.queryForObject("select * from account where name=?", new BeanPropertyRowMapper<Account>(Account.class), "tom");
    System.out.println(account.getName());
}
@Test
//测试查询单个简单数据操作(聚合查询)
public void testQueryCount(){
    Long aLong = jdbcTemplate.queryForObject("select count(*) from account", Long.class);
    System.out.println(aLong);
}
📝6️⃣本章小结
Spring JdbcTemplate开发步骤:
① 导入spring-jdbc和spring-tx坐标
② 创建数据库表和实体
③ 创建JdbcTemplate对象
    JdbcTemplate jdbcTemplate = **new **JdbcTemplate();

     jdbcTemplate.setDataSource(dataSource);
④ 执行数据库操作
    更新操作: dbcTemplate.update(sql,params)

    查询操作: jdbcTemplate.query(sql,Mapper,params)

                       jdbcTemplate.queryForObject(sql,Mapper,params)
版权归原作者 求不脱发 所有, 如有侵权,请联系我们删除。