
安装RabbitMQ
- 首先将镜像包上传到虚拟机,使用命令加载镜像
docker load -i mq.tar
- 运行MQ容器
docker run \
 -e RABBITMQ_DEFAULT_USER=itcast \
 -e RABBITMQ_DEFAULT_PASS=123321 \
 -v mq-plugins:/plugins \
 --name mq \
 --hostname mq \
 -p 15672:15672 \
 -p 5672:5672 \
 -d \
 rabbitmq:3-management
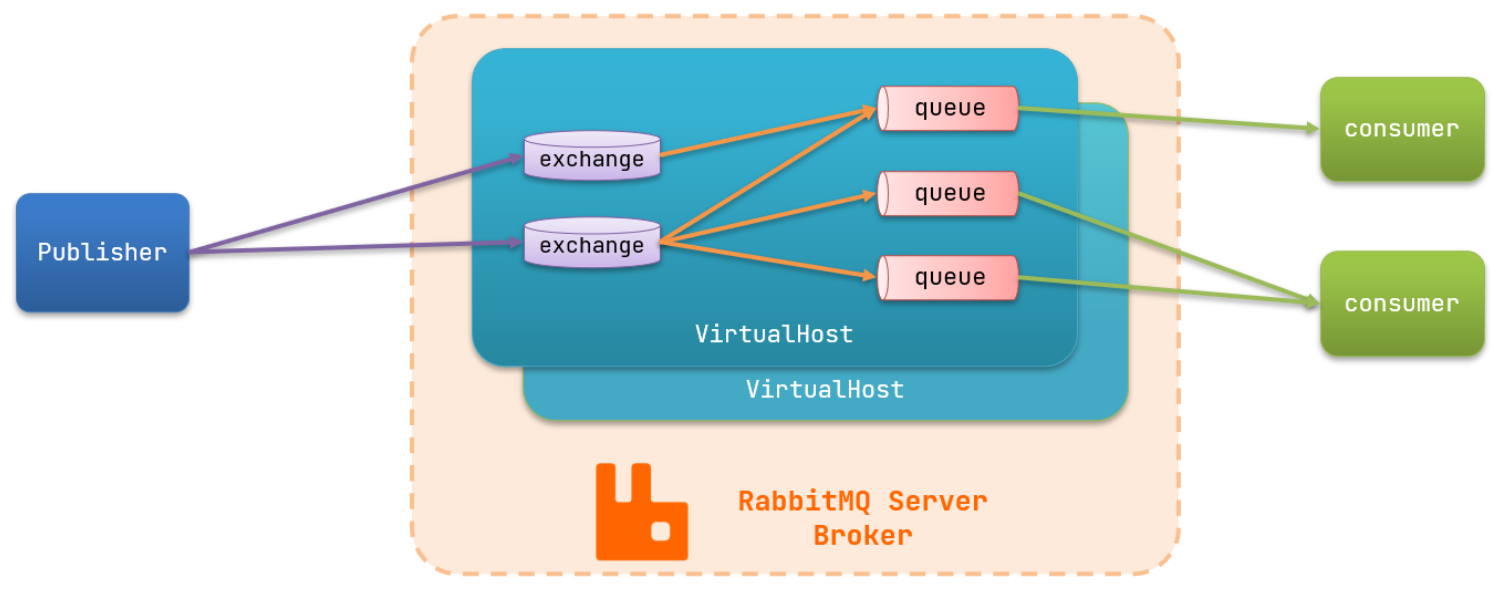
MQ的基本结构
 2. RabbitMQ的一些角色
- publisher:生产者2. consumer:消费者3. exchange:交换机,负责消息路由4. queue:队列,存储消息5. virtualHost:虚拟主机,隔离不同租户的exchange,queue,消息的隔离
- 快速入门

- 快速入门
public class PublisherTest {
    @Test
    public void testSendMessage() throws IOException, TimeoutException {
        // 1.建立连接
        ConnectionFactory factory = new ConnectionFactory();
        // 1.1.设置连接参数,分别是:主机名、端口号、vhost、用户名、密码
        factory.setHost("192.168.150.101");
        factory.setPort(5672);
        factory.setVirtualHost("/");
        factory.setUsername("itcast");
        factory.setPassword("123321");
        // 1.2.建立连接
        Connection connection = factory.newConnection();

        // 2.创建通道Channel
        Channel channel = connection.createChannel();

        // 3.创建队列
        String queueName = "simple.queue";
        channel.queueDeclare(queueName, false, false, false, null);

        // 4.发送消息
        String message = "hello, rabbitmq!";
        channel.basicPublish("", queueName, null, message.getBytes());
        System.out.println("发送消息成功:【" + message + "】");

        // 5.关闭通道和连接
        channel.close();
        connection.close();

    }
}
public class ConsumerTest {

    public static void main(String[] args) throws IOException, TimeoutException {
        // 1.建立连接
        ConnectionFactory factory = new ConnectionFactory();
        // 1.1.设置连接参数,分别是:主机名、端口号、vhost、用户名、密码
        factory.setHost("192.168.150.101");
        factory.setPort(5672);
        factory.setVirtualHost("/");
        factory.setUsername("itcast");
        factory.setPassword("123321");
        // 1.2.建立连接
        Connection connection = factory.newConnection();

        // 2.创建通道Channel
        Channel channel = connection.createChannel();

        // 3.创建队列
        String queueName = "simple.queue";
        channel.queueDeclare(queueName, false, false, false, null);

        // 4.订阅消息
        channel.basicConsume(queueName, true, new DefaultConsumer(channel){
            @Override
            public void handleDelivery(String consumerTag, Envelope envelope,
                                       AMQP.BasicProperties properties, byte[] body) throws IOException {
                // 5.处理消息
                String message = new String(body);
                System.out.println("接收到消息:【" + message + "】");
            }
        });
        System.out.println("等待接收消息。。。。");
    }
}
SpringAMQP
- 功能
- 自动声明队列、交换机及其绑定关系2. 基于注解的监听器模式,异步接收消息3. 封装了RabbitTemplate工具,用于发送消息
- 简化模型 === producer->queue->consumer
- BasicQueue
- 首先在父工程中引入依赖
<!--AMQP依赖,包含RabbitMQ-->
<dependency>
    <groupId>org.springframework.boot</groupId>
    <artifactId>spring-boot-starter-amqp</artifactId>
</dependency>
- 配置MQ地址,在publisher服务的application.yml中添加配置
spring:
  rabbitmq:
    host: 192.168.137.138 # 主机名
    port: 5672 # 端口
    virtual-host: / # 虚拟主机
    username: itcast # 用户名
    password: 123321 # 密码
- 编写队列
@RabbitListener(queues = "simple.queue")
public void listenSimpleQueueMessage(String msg){
    log.info("接受到的消息:{}",msg);
}
- 发送消息
@SpringBootTest
public class SpringAmqpTest {
    @Autowired
    private RabbitTemplate rabbitTemplate;

    @Test
    public void testSimpleQueue(){
    String queueName = "simple.queue";
    String message = "hello,world";
    rabbitTemplate.convertAndSend(queueName,message);
    }

}
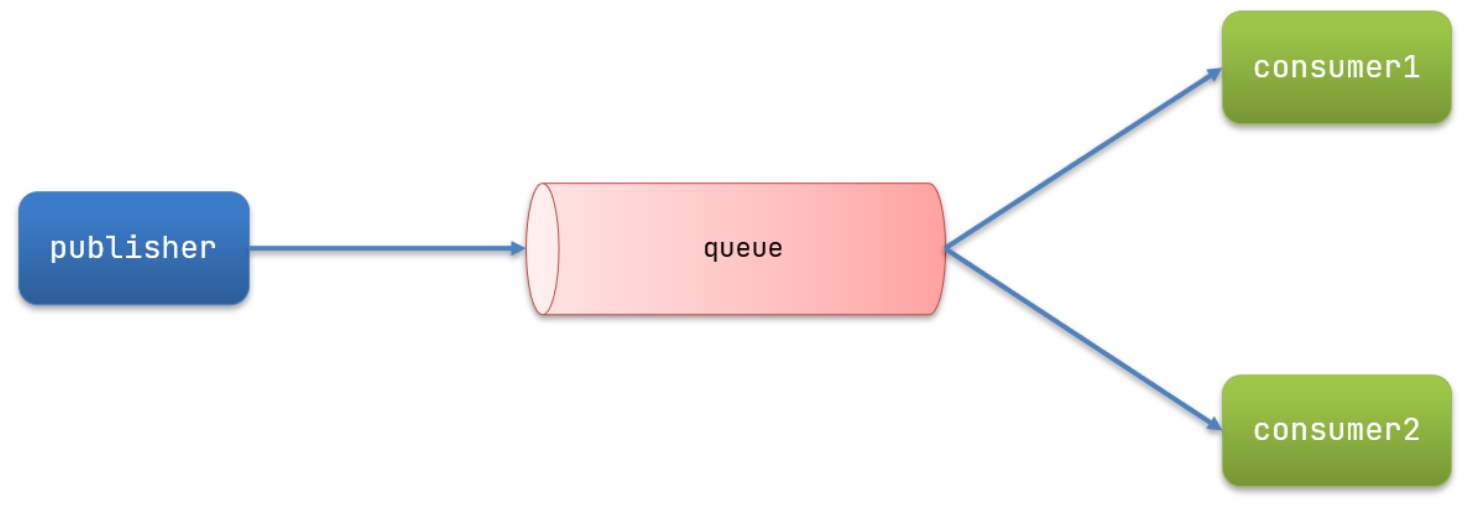
- WorkQueue === 让多个消费者绑定到一个队列,共同消费队列中的消息
- 结构图
 2. 消息发送
- 结构图
@SpringBootTest
public class SpringAmqpTest {
    @Autowired
    private RabbitTemplate rabbitTemplate;
    @Test
    public void testWorkQueue() throws Exception{
        String queueName = "simple.queue";
        String message = "hello,world";
        for (int i = 1; i <= 50; i++) {
            rabbitTemplate.convertAndSend(queueName,"第"+i+"个"+message);
            Thread.sleep(20);
        }
    }
}
- prefetch能者多劳机制
- 原理:mq在收到consumer的ack之前,可以向consumer推送的消息的条数,默认2502. 修改consumer服务的application.yml文件
spring:
  rabbitmq:
    listener:
      simple:
        prefetch: 1 # 每次只能获取一条消息,处理完成才能获取下一个消息
- 消息接受
@Slf4j
@Component
public class SpringRabbitListener {

    @RabbitListener(queues = "simple.queue")
    public void onWorkQueue1(String msg) throws Exception {
        log.info("work1接收到的消息,{}", msg);
        Thread.sleep(20);
    }

    @RabbitListener(queues = "simple.queue")
    public void onWorkQueue2(String msg) throws Exception {
        log.info("work2接收到的消息,{}", msg);
        Thread.sleep(200);
    }

}
- 发布/订阅模型 === producer->exchange(只负责路由,不负责存储)->queue->consumer
- Fanout === 广播给所有的queue
- 结构图
 2. 消息发送流程
- 结构图
- 可以有多个队列2. 每个队列都要绑定到Exchange(交换机)3. 生产者发送的消息,只能发送到交换机,交换机来决定要发给哪个队列,生产者无法决定4. 交换机把消息发送给绑定过的所有队列5. 订阅队列的消费者都能拿到消息
- 在消费者模块中创建一个类,声明队列和交换机
@Configuration
public class FanoutConfig {
    /*
    * 创建一个交换机
    * */
    @Bean
    public FanoutExchange fanoutExchange(){
        return new FanoutExchange("fanout.exchange");
    }
    /*
    * 创建队列1
    * */
    @Bean
    public Queue fanoutQueue1(){
        return new Queue("fanout.queue1");
    }
    /*
    * 创建队列2
    * */
    @Bean
    public Queue fanoutQueue2(){
        return new Queue("fanout.queue2");
    }
    /*
    * 将队列1绑定到交换机
    * */
    @Bean
    public Binding queue1Binding(){
        return BindingBuilder.bind(fanoutQueue1()).to(fanoutExchange());
    }
    /*
    * 将队列2绑定到交换机
    * */
    @Bean
    public Binding queue2Binding(){
        return BindingBuilder.bind(fanoutQueue2()).to(fanoutExchange());
    }

}
- 发送消息
@SpringBootTest
public class SpringAmqpTest {
    @Autowired
    private RabbitTemplate rabbitTemplate;

    @Test
    public void testFanoutExchange() {
        // 队列名称
        String exchangeName = "fanout.exchange";
        // 消息
        String message = "hello world!";
        rabbitTemplate.convertAndSend(exchangeName, "", message);
    }
}
- 消息接受
@Slf4j
@Component
public class SpringRabbitListener {

    @RabbitListener(queues = "fanout.queue1")
    public void fanoutQueue1(String msg){
        log.info("收到了来自fanout.queue1的消息,{}",msg);
    }

    @RabbitListener(queues = "fanout.queue2")
    public void fanoutQueue2(String msg){
        log.info("收到了来自fanout.queue2的消息,{}",msg);
    }
}
- Direct === 路由给exchange绑定的queue
- 结构图
 2. 消息发送流程
- 结构图
- queue与exchange绑定的时候需要设置bindingkey2. 可以设置多个bindingkey,key可以重复3. produce发送的时候需要设置routingkey4. exchange判断消息的routingkey与queue中的bindingkey是否完全一致,一致才会接受到消息
- 基于注解声明队列和交换机
@Slf4j
@Component
public class SpringRabbitListener {

    @RabbitListener(bindings = @QueueBinding(
            value = @Queue(name = "direct.queue1"),
            exchange = @Exchange(name = "direct.exchange"),
            key = {"red","blue"}
    ))
    public void directQueue1(String msg){
        log.info("收到了来自direct.queue1的消息,{}",msg);
    }

    @RabbitListener(bindings = @QueueBinding(
            value = @Queue(name = "direct.queue2"),
            exchange = @Exchange(name = "direct.exchange"),
            key = {"gary","blue"}
    ))
    public void directQueue2(String msg){
        log.info("收到了来自direct.queue2的消息,{}",msg);
    }

}
- 消息发送
@SpringBootTest
public class SpringAmqpTest {
    @Autowired
    private RabbitTemplate rabbitTemplate;
    @Test
    public void testDirectExchange(){
        String exchange = "direct.exchange";
        String routingKey = "gary";
        String message = "hello direct";
        rabbitTemplate.convertAndSend(exchange,routingKey,message);
    }

}
- Direct交换机与Fanout交换机有什么区别?
- Fanout交换机将消息路由给每一个与之绑定的队列2. Direct交换机根据RoutingKey判断路由给哪个队列
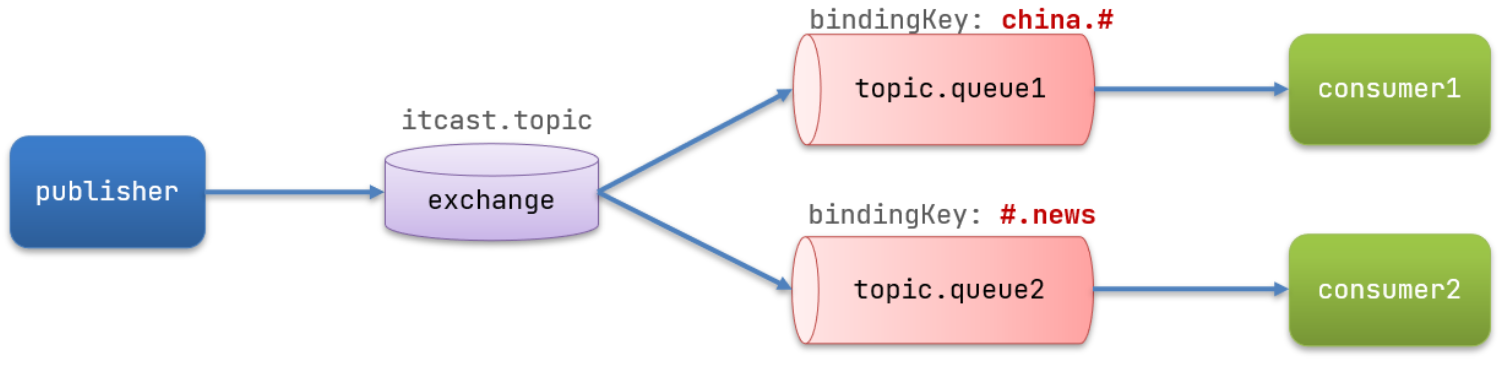
- Topic
- 结构图
 2. 匹配支持通配符
- 结构图
- *:1个单词2. #:1个或者多个单词
- 基于注解声明队列和交换机
@Slf4j
@Component
public class SpringRabbitListener {

    @RabbitListener(bindings = @QueueBinding(
            value = @Queue(name = "topic.queue1"),
            exchange = @Exchange(name = "topic.exchange"),
            key = "china.#"
    ))
    public void topicQueue1(String msg){
        log.info("收到了来自topic.queue1的消息,{}",msg);
    }

    @RabbitListener(bindings = @QueueBinding(
            value = @Queue(name = "topic.queue2"),
            exchange = @Exchange(name = "topic.exchange"),
            key = "#.news"
    ))
    public void topicQueue2(String msg){
        log.info("收到了来自topic.queue2的消息,{}",msg);
    }

}
- 消息发送
@SpringBootTest
public class SpringAmqpTest {
    @Autowired
    private RabbitTemplate rabbitTemplate;

    @Test
    public void testTopicExchange(){
        String exchange = "topic.exchange";
        String routingKey = "china.123";
        String message = "so cool";
        rabbitTemplate.convertAndSend(exchange, routingKey, message);
    }

}
- 消息转换器
- 默认发送String,byte[],Serializable2. 可以自定义序列化
- 在publisher和consumer两个服务中都引入依赖:
<dependency>
    <groupId>com.fasterxml.jackson.dataformat</groupId>
    <artifactId>jackson-dataformat-xml</artifactId>
    <version>2.9.10</version>
</dependency>
- 注入MessageConverter的实现类
@Bean
public MessageConverter jsonMessageConverter(){
    return new Jackson2JsonMessageConverter();
}
- 消息发送
@SpringBootTest
public class SpringAmqpTest {
    @Autowired
    private RabbitTemplate rabbitTemplate;

    @Test
    public void testObjectQueue(){
        String queue = "object.queue";
        User message = new User("蒋浩楠",80);
        rabbitTemplate.convertAndSend(queue,message);
    }
}
- 接收消息
@Slf4j
@Component
public class SpringRabbitListener {
    @RabbitListener(queues = "object.queue")
    public void objectQueue(UserDTO dto){
        log.info("收到了来自topic.queue2的消息,{}",dto.toString());
    }
}
RabbitMQ集群
- 普通集群
- 结构图
 2. 特征
2. 特征
- 结构图
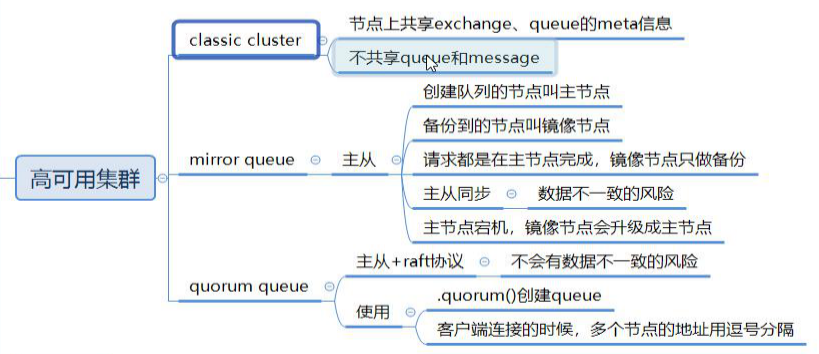
- 会在集群的各个节点间共享部分数据,包括:交换机、队列元信息。不包含队列中的消息。2. 当访问集群某节点时,如果队列不在该节点,会从数据所在节点传递到当前节点并返回3. 队列所在节点宕机,队列中的消息就会丢失
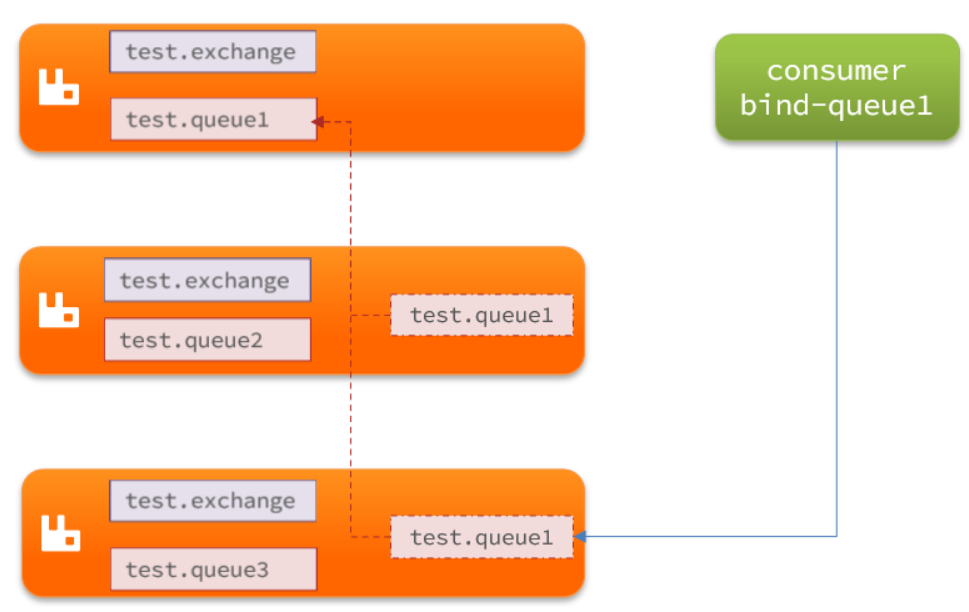
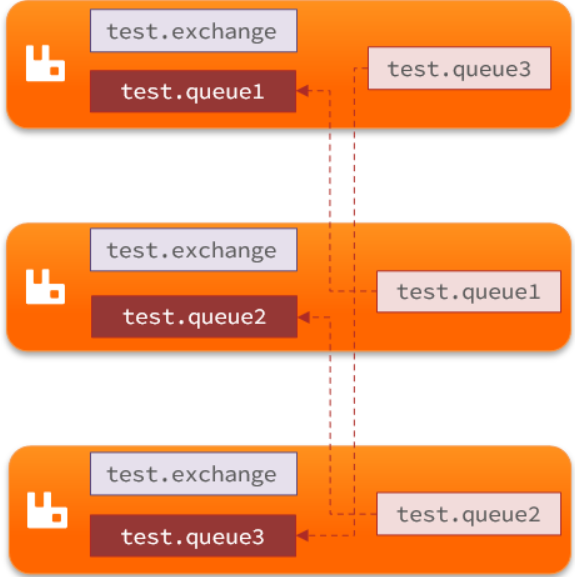
- 镜像集群
- 结构图
 2. 特征
2. 特征
- 结构图
- 交换机、队列、队列中的消息会在各个mq的镜像节点之间同步备份。2. 创建队列的节点被称为该队列的主节点,备份到的其它节点叫做该队列的镜像节点3. 一个队列的主节点可能是另一个队列的镜像节点4. 所有操作都是主节点完成,然后同步给镜像节点5. 主宕机后,镜像节点会替代成新的主
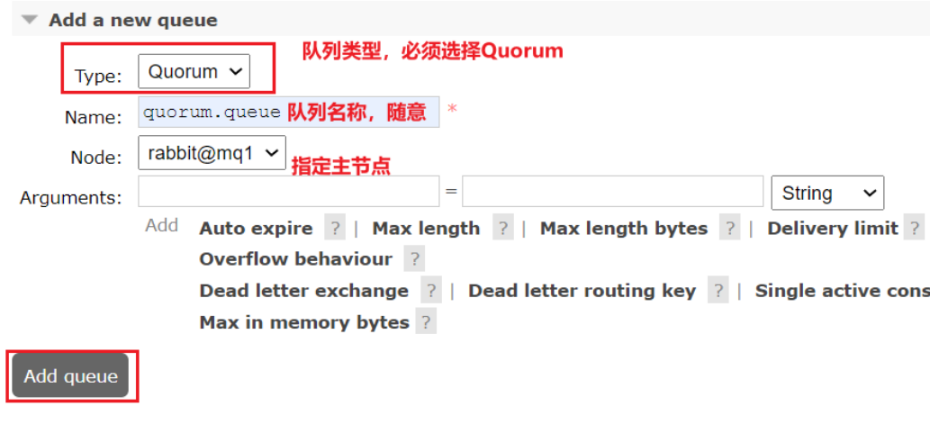
- 仲裁队列
- 特征
- 与镜像队列一样,都是主从模式,支持主从数据同步2. 使用非常简单,没有复杂的配置3. 主从同步基于Raft协议,强一致
- java代码中创建仲裁队列
- 创建队列
@Bean
public Queue quorumQueue() {
    return QueueBuilder
        .durable("quorum.queue") // 持久化
        .quorum() // 仲裁队列
        .build();
}
- SpringAMQP连接MQ集群
spring:
  rabbitmq:
    addresses: 192.168.150.105:8071, 192.168.150.105:8072, 192.168.150.105:8073 #address来代替host、port方式
    username: itcast
    password: 123321
    virtual-host: /
部署集群
- 计划部署3节点的mq集群
 2. 获取cookie,每个集群节点必须具有相同的 cookie。实例之间也需要它来相互通信
- 计划部署3节点的mq集群
docker exec -it mq cat /var/lib/rabbitmq/.erlang.cookie

UTQKOGHXAJPQFJREBLEL #cookie

docker rm -f mq #停止并删除当前的mq容器,我们重新搭建集群
- 准备集群配置
#在/tmp目录新建一个配置文件 rabbitmq.conf
cd /tmp

# 创建文件
touch rabbitmq.conf

#配置文件内容如下
loopback_users.guest = false
listeners.tcp.default = 5672
default_user = itcast
default_pass = 123321
cluster_formation.peer_discovery_backend = rabbit_peer_discovery_classic_config
cluster_formation.classic_config.nodes.1 = rabbit@mq1
cluster_formation.classic_config.nodes.2 = rabbit@mq2
cluster_formation.classic_config.nodes.3 = rabbit@mq3
- 再创建一个文件,记录cookie
cd /tmp

# 创建cookie文件
touch .erlang.cookie

# 写入cookie
echo "UTQKOGHXAJPQFJREBLEL" > .erlang.cookie
# 修改cookie文件的权限
# 修改cookie文件的权限
# 修改cookie文件的权限
chmod 600 .erlang.cookie
- 准备三个目录,mq1、mq2、mq3,然后拷贝rabbitmq.conf、cookie文件到mq1、mq2、mq3:
cd /tmp

# 创建目录
mkdir mq1 mq2 mq3

# 进入/tmp
cd /tmp

# 拷贝
cp rabbitmq.conf mq1
cp rabbitmq.conf mq2
cp rabbitmq.conf mq3
cp .erlang.cookie mq1
cp .erlang.cookie mq2
cp .erlang.cookie mq3

# 或者
echo mq1 mq2 mq3 | xargs -t -n 1 cp rabbitmq.conf
echo mq1 mq2 mq3 | xargs -t -n 1 cp .erlang.cookie
- 启动集群
#创建一个网络
docker network create mq-net

#运行命令
docker run -d --net mq-net \
-v ${PWD}/mq1/rabbitmq.conf:/etc/rabbitmq/rabbitmq.conf \
-v ${PWD}/mq1/.erlang.cookie:/var/lib/rabbitmq/.erlang.cookie \
--name mq1 \
--hostname mq1 \
-p 8071:5672 \
-p 8081:15672 \
rabbitmq:3-management

docker run -d --net mq-net \
-v ${PWD}/mq2/rabbitmq.conf:/etc/rabbitmq/rabbitmq.conf \
-v ${PWD}/mq2/.erlang.cookie:/var/lib/rabbitmq/.erlang.cookie \
--name mq2 \
--hostname mq2 \
-p 8072:5672 \
-p 8082:15672 \
rabbitmq:3-management

docker run -d --net mq-net \
-v ${PWD}/mq3/rabbitmq.conf:/etc/rabbitmq/rabbitmq.conf \
-v ${PWD}/mq3/.erlang.cookie:/var/lib/rabbitmq/.erlang.cookie \
--name mq3 \
--hostname mq3 \
-p 8073:5672 \
-p 8083:15672 \
rabbitmq:3-management
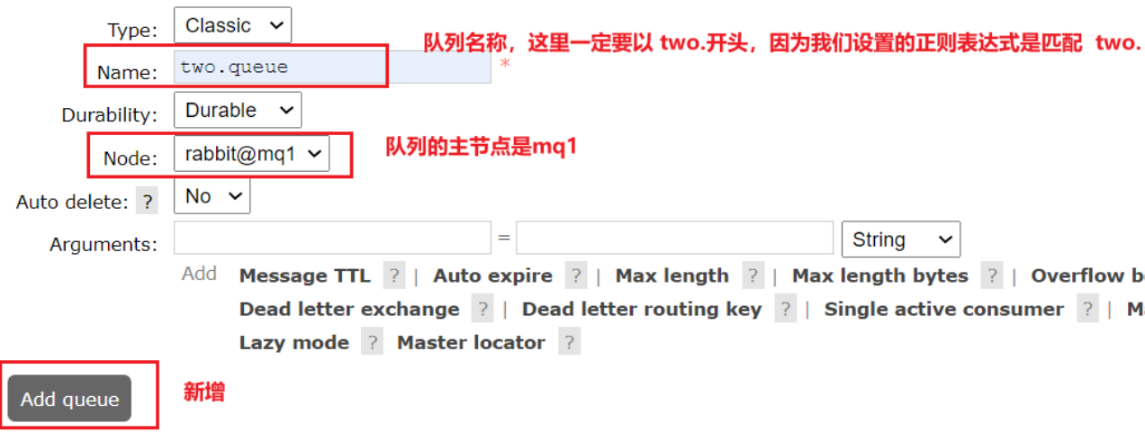
- 添加镜像模式
docker exec -it mq1 rabbitmqctl set_policy ha-two "^two\." '{"ha-mode":"exactly","ha-params":2,"ha-sync-mode":"automatic"}'
- 添加仲裁队列
- 添加仲裁队列
本文转载自: https://blog.csdn.net/m0_63278070/article/details/138461932
版权归原作者 陆焉识_ 所有, 如有侵权,请联系我们删除。
版权归原作者 陆焉识_ 所有, 如有侵权,请联系我们删除。