
Vue2升级Vue3实践
一、升级前准备
在正式升级前,可以提前处理一些已兼容的小修改以及被移除的API。
deep 样式穿透
历史所有的
>>>
||
/deep/
||
::v-deep
样式穿透,更改为
:deep()
。
在 Vue 2.7 中,运行项目会提示
deep
相关问题,虽然项目还能正常启动,但会在控制台报警告信息。
// 历史写法
/deep/ .el-card__body {
  padding: 20px 20px 0;
}

// 新版写法
:deep(.el-card__body){
  padding: 20px 20px 0;
}
inline-template 属性
移除
inline-template
标识,在 Vue 3 中,
inline-tempalte
属性将会被移除,不再支持该用法了,如果必须使用可用
<script>
或者默认
Slot
替代。
slot 插槽
Vue 3 中引入了一个新的指令
v-slot
,用来表示具名插槽和默认插槽(Vue2.6 中已支持)。如果在项目中仍然使用废弃的具名/作用域插槽语法,请先将其更新至最新的语法。
v-bind
在 Vue 2 中,如果一个元素同时定义了
v-bind="object"
和一个相同的单独的属性,那么这个单独的属性总是会覆盖
object
中的绑定。
在 Vue 3 中,
v-bind=“object"
是顺序敏感的,声明绑定的顺序决定了它们如何合并,需确保
v-bind
先定义,再定义各个属性。
// Vue 2
<div id="aaa" v-bind="{ id: 'bbb' }"></div>
<div id="bbb"></div> // 渲染结果

// Vue 3
<div id="aaa" v-bind="{ id: 'bbb' }"></div>
<div id="bbb"></div> // 渲染结果
<div v-bind="{ id: 'bbb' }" id="aaa"></div>
<div id="aaa"></div> // 渲染结果
v-for
筛查所有
v-for
中使用
ref
的地方,将
ref
绑定为一个函数。
在 Vue 2 中,在
v-for
语句中使用
ref
属性时,会生成
refs
数组插入
$refs
属性中。
在 Vue 3 中,在
v-for
语句中使用
ref
属性时,将不再会自动在
$refs
中创建数组。而是将
ref
绑定到一个
function
中,在
function
中可以灵活处理
ref
。
keyCodes
在 Vue 2 中,使用数字 (即键码) 作为
v-on
的修饰符。
在 Vue 3 中,弃用了 keyCodes,可以更改为别名作为
v-on
的修饰符(Web标准中 KeyboardEvent.keyCode 已被废弃)。
<input v-on:keyup.13="submit" /> // 已弃用
<input v-on:keyup.enter="submit" />
Data 选项
在 Vue 2 中 ,声明
data
支持对象形式 || 函数形式。
在 Vue 3 中,对
data
的声明进行了标准化,只支持函数形式声明。
filters 过滤器
在 Vue 3 中,移除且不再支持
filters
,如果之前项目中需要实现过滤功能,可以通过
computed
或
methods
实现。
如果需要使用全局过滤器,可以借助
globalProperties
来注册全局过滤器。
// lib/format.jsexportdefault{formatCooperateStatus(status){const map ={applied:'待支援',assigning:'指派中',partialRefuse:'重新指派',process:'协作中',refuse:'已退回',tested:'协作完成'}return map[status]||''}}// main.js// Vue 2import Format from'./lib/format.js'Vue.prototype.$format = Format
// Vue 3import Format from'./lib/format.js'const app =createApp(App)
app.config.globalProperties.$format = Format
watch 监听器
筛查所有
watch
监听,如果监听参数为数组,需要设置
deep: true
。
在 Vue 3 中,只有当数组被替换时,回调才会触发,如果想要数组在发生改变时被 Vue 识别到,则必须指定
deep
选项。
watch:{checkedMethod:{handler(curValue){this.onChange(curValue)},deep:true,immediate:true}}
$children
在 Vue 3 中,移除了
$children
实例,如果需要访问子组件实例可用
$refs
实现。
$destroy
在 Vue 3 中,移除了
$destroy
实例,不应该手动管理单个
Vue
组件的生命周期。
二、构建工具
从 Vue CLI 迁移为 Vite,Vue 3 推荐使用
Vite
作为构建工具,
Vite
缩短了开发服务器的启动时间,它实现了按需编译,不再需要等待整个应用编译完成。
PS: Vite 需要 Node.js 版本 >= 12.0.0
迁移过程
1. 安装
npm i vite -g
2. 构建新的vite项目
npm create vite@latest
cd xxx
npm install
npm run dev
构建的初始项目结构如下:
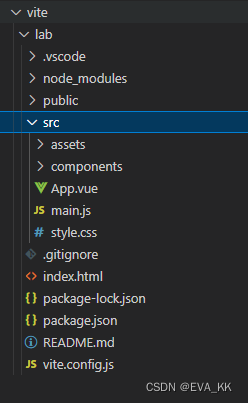
用原始项目的
src
文件替换新构建项目的
src
目录,然后再继续接下来的重构操作。
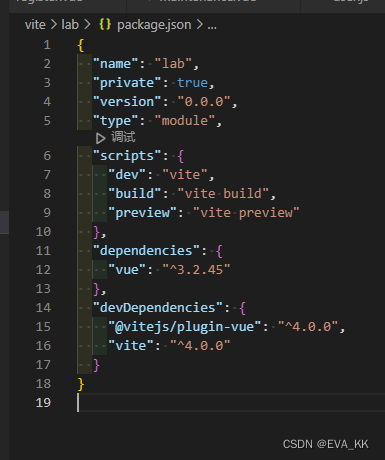
3. 迁移package文件及配置项
根据项目需求迁移
package.json文件
,并移除
Vue CLI
相关依赖项。
初始文件如下,
Vite
默认构建的项目为 Vue 3 项目。
修改
vite.config.js
文件,vue.config.js --> vite.config.js
初始文件配置如下
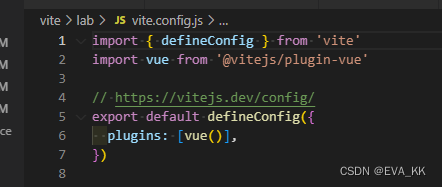
修改文件配置,例:
import{ resolve }from'path'import{ defineConfig }from'vite'import vue from'@vitejs/plugin-vue'// https://vitejs.dev/config/exportdefaultdefineConfig({plugins:[vue()],resolve:{alias:{// 配置路径别名'@':resolve('src')},},server:{open:true,host:XXX,port:XXX,https:false,proxy:{'/api':{target:XXX,secure:false,changeOrigin:true,rewrite:(path)=> path.replace(/^\/api/,''),},},'/casefiles':{target:XXX,secure:false,changeOrigin:true}})
4. 更新环境变量
**
process.env
** --> **
import.meta.env
**
Vite
在一个特殊的
import.meta.env
对象上暴露环境变量。
5. 文件引入
@vue/cli
中支持无扩展名的 vue文件导入,加不加
.vue
后缀都会被正确识别。
在
Vite
的设计中,
import xxx from "./xxx.vue"
才能正确导入,必须确保单个文件组件的所有导入都以扩展名结尾。
6. 修改CommonJS语法
Vite
使用
ES Modules
作为模块化方案,因此不支持使用
require
方式来导入模块。
三、HTML 文件与入口文件
1. index.html
**
./public/index.html
** --> **
./index.html
**
Vite
项目的
HTML文件
是放在项目根目录下的,同时在
Vite
中,
JavaScript
应用程序不再是自动注入的,
main.js
文件需要手动引入。
<!DOCTYPEhtml><htmllang="en"><head><metacharset="UTF-8"/><linkrel="icon"type="image/svg+xml"href="/vite.svg"/><metaname="viewport"content="width=device-width, initial-scale=1.0"/><title>Vite + Vue</title></head><body><divid="app"></div><scripttype="module"src="/src/main.js"></script></body></html>
2. main.js
创建并挂载根实例
创建实例,**
new Vue
** --> **
createApp()
**
挂载方式,**
$mount()
** --> **
mount()
**
添加全局属性和方法,**
Vue.prototype
** --> **
app.config.globalProperties
**
// Vue 2import Vue from'vue'import'element-ui/lib/theme-chalk/index.css'import ElementUI from'element-ui'import App from'./App'import router from'./router'import Vuex from'vuex'import store from'./store'import'@/assets/styles/common.scss'import'@/assets/styles/main.scss'import'@/assets/fonts/iconfont.css'import'./lib/filters.js'import Format from'./lib/format.js'Vue.prototype.$format = Format

Vue.config.productionTip =false

Vue.use(ElementUI)
Vue.use(Vuex)newVue({
  router,
  store,render:h=>h(App)}).$mount('#app')// Vue 3import{ createApp }from'vue'import App from'./App.vue'import'element-plus/dist/index.css'import ElementPlus from'element-plus'import locale from'element-plus/lib/locale/lang/zh-cn'import*as ElementPlusIconsVue from'@element-plus/icons-vue'import router from'./router'import store from'./store'import'@/assets/styles/common.scss'import'@/assets/styles/main.scss'import'@/assets/fonts/iconfont.css'import Format from'./lib/format.js'const app =createApp(App)
app.config.globalProperties.$format = Format

for(const[key, component]of Object.entries(ElementPlusIconsVue)){
  app.component(key, component)}

app.use(ElementPlus,{ locale }).use(router).use(store)
app.mount('#app')
四、语法和API
以下只是简单例举了几个常用的变化,关于语法和API的详细变更可以参见Vue官方文档:Vue2迁移
v-model
排查没有修饰符的
v-model
,分别将
prop
和
event
命名更改为
modelValue
和
update:modelValue
。
v-bind
的
.sync
修饰符和组件的
model
选项已移除,更改为
v-model:value
。
<template>
移除没有指令的
<template>
,Vue 3 对组件的写法做了调整,支持多个根节点。
在 Vue 2 中,
<template>
标签不能添加
key
属性,而是在其子元素上添加
key
。
在 Vue 3 中,
key
应该被设置在
<template>
标签上。
// Vue 2
<template v-for="item in list">
  <span :key="item.value">...</span>
</template>

// Vue 3
<template v-for="item in list" :key="item.id">
  <span>...</span>
</template>
key
在 Vue 2 中,建议在
v-if
/
v-else
/
v-else-if
上添加
key
。
在 Vue 3 中,Vue 会自动生成唯一
key
(依旧接受历史写法,但是不再被推荐使用)。
// Vue 2
<div v-if="isAdmin" key="aaa"> aaa </div>
<div v-else key="bbb"> bbb </div>

// Vue 3
<div v-if="isAdmin"> aaa </div>
<div v-else> bbb </div>
v-if && v-for
v-if
和
v-for
在同一个元素身上使用时的优先级发生了变化。
在 Vue 3 中,如果在一个元素上同时使用
v-if
和
v-for
,
v-if
的优先级高于
v-for
(不推荐这样使用)。
functional
在 Vue 3 中,
{ functional: true }
选项已从通过函数创建的组件中移除,移除配置中
{ functional: true }
和模板中
<template functional>
的
functional
。
defineAsyncComponent 辅助函数
在 Vue 3 中异步组件通过
defineAsyncComponent
方法创建。
// Vue 2constasyncComponent=()=>import('./async-component.vue')// Vue 3const asyncComponent =defineAsyncComponent(()=>import('./async-component.vue'))
defineAsyncComponent
中
component
选项更名为
loader
,同时
loader
函数移除了
resolve
和
reject
参数,必须手动返回
Promise
。
// Vue 2constasyncComponent=(resolve, reject)=>{...}// Vue 3const asyncComponent =defineAsyncComponent(()=>newPromise((resolve, reject)=>{...}))
.native 修饰符
在 Vue 3 中,移除了
v-on: event.native
修饰符。(PS: Vue 3 中新增
emits
选项,所有未在组件
emits
选项中定义的事件作为原生事件添加到子组件的根元素中,除非子组件选项中设置了
inheritAttrs: false
)
// Vue 2
<my-component
  v-on:close="handleComponentEvent"
  v-on:click.native="handleNativeClickEvent"
/>

// Vue 3
<my-component
  v-on:close="handleComponentEvent"
  v-on:click="handleNativeClickEvent"
/>
// MyComponent.vue
<script>
  export default {
    emits: ['close']
  }
</script>
$scopedSlots
在 Vue 3 中,移除了
$scopedSlots
,统一了
$scopedSlots
和
$slots
,所有插槽都通过
$slots
作为函数暴露。
$listeners
在 Vue 3 中,已经弃用
$listeners
对象,将事件监听器并入
$attrs
,作为
$attrs
的一部分。
$attrs
在 Vue 3 中,
$attrs
将包含传递给组件的所有属性,包括
class
和
style
属性 。
$set() 和 $delete()
在 Vue 2 中,修改某一些数据,视图是不能及时重新渲染的,因此提供了一些变异的方法,比如
$set
、
$delete
。
在 Vue 3 中,移除了
$set
和
$delete
,基于代理的变化检测已经不再需要它们了。
<el-input v-model="form.no" placeholder="请输入编号"></el-input>// Vue 2exportdefault{data(){return{form:{no:'11'}}}mounted(){this.form.no ='CaseNo'// 视图不变this.$set(this.form,'no','CaseNo')// 视图更新}}// Vue3exportdefault{data(){return{form:{no:'11'}}}mounted(){this.form.no ='CaseNo'// 视图更新}}
Events API
在 Vue 3 中,移除了
$on
、
$off
和
$once
这三个事件相关的API,不再支持事件发射器接口,可以使用外部库来实现事件总线,例如
mitt
。
// @/lib/bus.jsimport mitt from'mitt'const bus =newmitt()exportdefault bus

// 使用import Bus from'@/lib/bus'exportdefault{mounted(){
    Bus.off('loadMore')
    Bus.on('loadMore',this.initActivity)}}
Mixin
在 Vue 2 中,
data
的合并是深拷贝形式。
在 Vue 3 中,当组件的
data
与
mixin
或
extends
的
data
进行合并时,只进行浅拷贝。
watch 监听器
在 Vue 3 中,
watch
不再支持点分隔字符串路径,可以将监听的参数更改为
computed
。
Composition API
**
Options API
** --> **
Composition API
**
在 Vue 2 中,使用的是
Options API
,代码逻辑比较分散,可读性差,可维护性差。
在 Vue 3 中,使用的是
Composition API
,代码逻辑分明,可维护性更高。
因为涉及到所有页面和组件,修改起来变更过大,同时目前 Vue 3 也是兼容了
Options
写法,所以这部分代码结构可以先不用更改。之后新增的页面和组件可以按照 Vue 3 新增的
composition API
结构来写,其余内容可以后期逐步修改。
详情请参考 Vue 3 官方文档
五、生命周期
vue2vue3 (Options)vue3 (Composition)beforeCreatebeforeCreatesetup()内部createdcreatedsetup()内部beforeMountbeforeMountonBeforeMountmountedmountedonMountedbeforeUpdatebeforeUpdateonBeforeUpdateupdatedupdatedonUpdatedbeforeDestroybeforeUnmountonBeforeUnmountdestroyedunmountedonUnmounted
六、路由
Vue 2 使用的是
router3.x
的API,换成 Vue3 需要用
router4.x
的API。
Vue Router 从 v3 到 v4 在迁移的过程中可能改动地方比较多,这里只是简单例举了几个常见的变化,详情可以参考 官方文档。
1. 安装
npm install vue-router@4
2. new Router 变成 createRouter
**
new Router()
** --> **
createRouter 函数
**
3. 废除了mode选项配置
**
history
** --> **
createWebHistory
**
**
hash
** --> **
createWebHashHistory
**
**
abstract
** --> **
createMemoryHistory
**
// v3import Router from'vue-router'
Vue.use(Router)const router =newRouter({mode:'history',
  routes
})exportdefault router

// v4import{ createRouter, createWebHistory }from'vue-router'const router =createRouter({history:createWebHistory(),
  routes
})exportdefault router
4. 取消(*)通配符路由
// v3{path:'*',name:'404',component: NotFound,meta:{title:'404'}}// v4{path:'/:pathMatch(.*)*',name:'404',component: NotFound,meta:{title:'404'}}
5. 新增useRoute、useRouter
路由信息, **
this.$route
** --> **
useRoute()
**
操作路由, **
this.$router
** --> **
useRouter()
**
// Options写法this.$router.push({path:this.$route.path,query: query })// Composition写法import{ useRoute, useRouter }from'vue-router'exportdefaultdefineComponent({setup(props, ctx){const route =useRoute()const router =useRouter()
    Router.push({path: Route.path,query: query })}})
七、状态管理
1. 安装
npm install vuex@next
2. 创建store对象并导出store
**
new Vuex.Store()
** --> **
createStore()
**
// store/index.jsimport Vuex from'vuex'
Vue.use(Vuex)exportdefaultnewVuex.Store({state:{},mutations:{},actions:{}})import{createStore}from'vuex'exportdefaultcreateStore({state:{},mutations:{},actions:{}})// main.js...import store from'./store'...
app.use(store)
3. 获取 store 实例对象
**
this.$store
** --> **
useStore()
**
// Options写法const user =this.$store.user

// Composition写法import{ useStore }from'vuex'exportdefaultdefineComponent({setup(props, ctx){const Store =useStore()const user = Store.state.user
  }})
八、项目依赖
将项目中所使用到的 UI框架 和 第三方插件 切换成对应的 Vue 3 版本,相应用法可能也需要变更。
Element UI 升级为 Element Plus
PS: Element UI 升级为 Element Plus 后,可能会产生很多破坏性的更改,界面样式需要重新调整。
以下简单例举了几个常见的变化,详情可以参考 官方文档。
Icon 图标
// Element UI
<i class="el-icon-plus"></i>

// Element Plus
<el-icon>
  <Plus />
</el-icon>
Dialog 对话框
**
:visible.sync
** --> **
v-model
**
// Element UI
<el-dialog title="提示" :visible.sync="dialogVisible" :before-close="handleClose">
  ...
</el-dialog>

// Element Plus
<el-dialog v-model="dialogVisible" title="提示" :before-close="handleClose">
  ...
</el-dialog>
Pagination 分页
**
:current-page.sync
** --> **
v-model:currentPage
**
// Element UI
<el-pagination layout="total, sizes, prev, pager, next, jumper" :page-sizes="[10, 20, 50, 100]" @size-change="handleSizeChange" :total="total" :page-size="limit" :current-page.sync="filter.page" @current-change="changePage">
<el-pagination>

// Element Plus
<el-pagination layout="total, sizes, prev, pager, next, jumper" :page-sizes="[10, 20, 50, 100]" @size-change="handleSizeChange" :total="total" :page-size="filter.limit" v-model:currentPage="filter.page" @current-change="changePage">
<el-pagination>
Button 按钮
size:**
medium / small / mini
** --> **
large / default / small
**
text:**
type="text"
** --> **
text: boolean
**
// Element UI
<el-button type="text" disabled>文字按钮</el-button>

// Element Plus
<el-button text disabled>文字按钮</el-button>
Message 消息提示
// Element UIthis.$message.success('添加成功')// Element Plus// 引入import{ ElMessage }from"element-plus"// 使用
ElMessage.success('添加成功')// 使用
Message Box 弹框
// Element UIthis.$confirm('是否确认删除该文件?','提示',{confirmButtonText:'确定',cancelButtonText:'取消',type:'warning'}).then(async()=>{...})// Element Plus// 引入import{ ElMessageBox }from"element-plus"// 使用
ElMessageBox.confirm('是否确认删除该文件?','提示',{confirmButtonText:'确定',cancelButtonText:'取消',type:'warning'}).then(async()=>{...})
九、VS Code 扩展
**
Vetur
** --> **
Volar
**。
十、其他
项目代码编译无误成功启动后,需点击 所有界面 进行测试,在启动的时候,
Vite
并不会打包源码,而是在浏览器请求路由时才会进行打包,而且也仅仅打包当前路由的源码,故当某个子页面出错时可能项目启动、运行时都正常。
同时也需要检查代码中的业务是否正确,升级过后可能会对原有代码逻辑产生影响,例如表单校验等功能,业务逻辑需要逐一比对和测试。
版权归原作者 EVA_KK 所有, 如有侵权,请联系我们删除。