本文章仅供学习
一、青龙面板是什么?
青龙面板可以运行某东脚本,你在某宝、某度等各个渠道搜索“京东代挂”,都是用青龙面板。
二、搭建宝塔面板
1.更新 yum 包
首先下载finalshell通过账号密码连接服务器,然后输入
yum update -y
2.拉取宝塔面板镜像并安装
#CentOS7以上:
yum install -y wget && wget -O install.sh http://download.bt.cn/install/install_6.0.sh && sh install.sh
#CentOS7以下:
#yum install -y wget && wget -O install.sh http://download.bt.cn/install/install.sh && sh install.sh
3.初始化宝塔
finalshell输入bt,按提示修改用户名、密码,然后浏览器输入提示的链接,访问宝塔面板。

关闭安全入口:
rm -f /www/server/panel/data/admin_path.pl
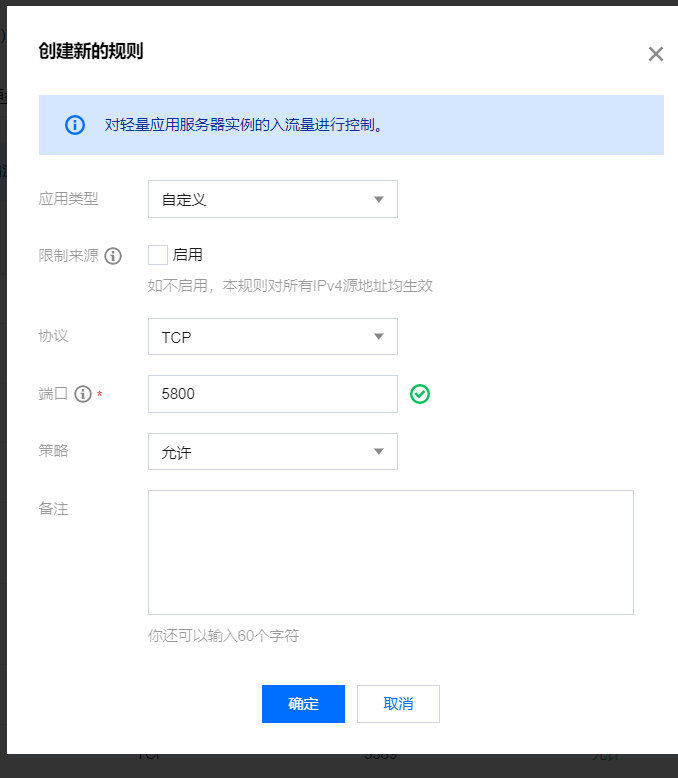
注意:别忘了开放端口
华为云:
腾讯云:
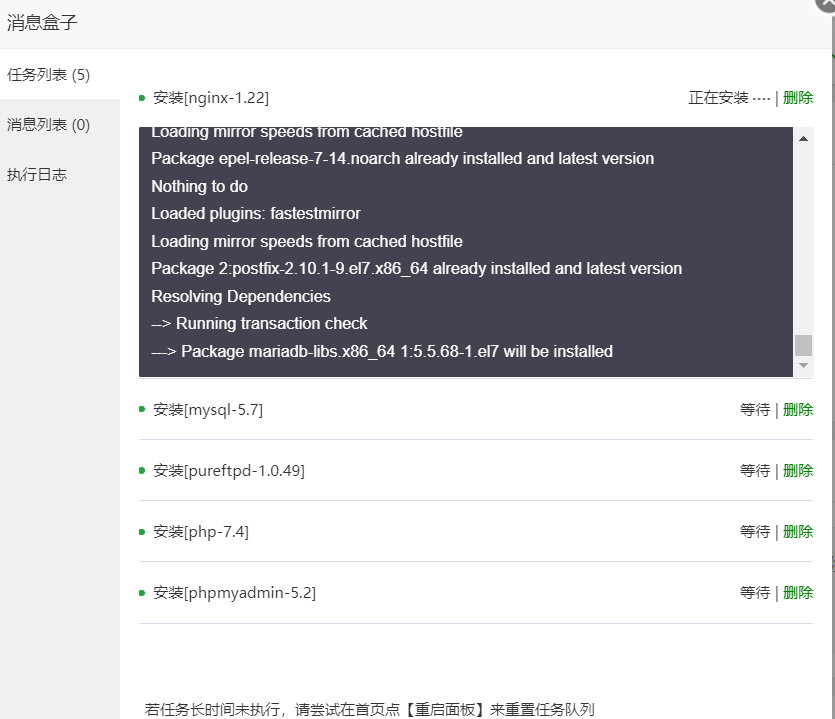
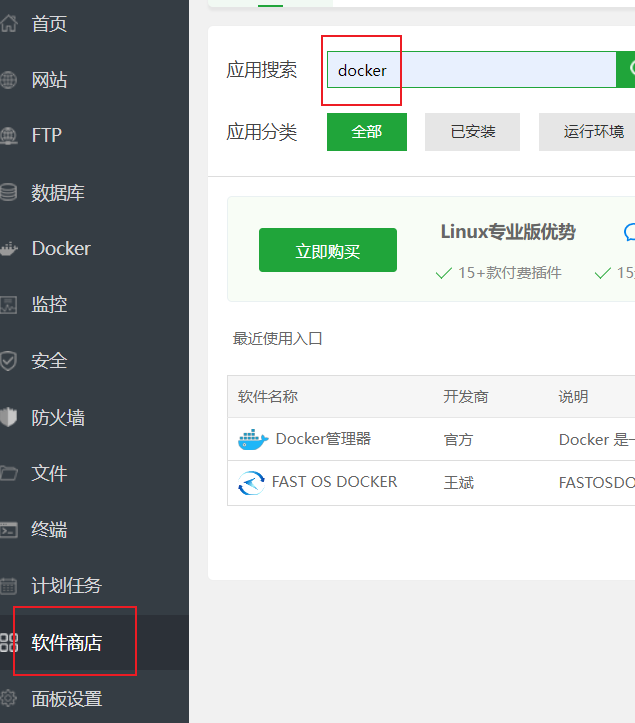
浏览器输入ip:8888(例如192.xxx.xxx.xxx:8888)登录宝塔面板后安装推荐软件Nginx、mysql等,进入软件商城安装docker管理器。


三、安装青龙面板
1.安装
首先服务器开放端口

在finalshell或者宝塔终端输入下面指令
cd
mkdir ql_1 && cd ql_1
docker run -dit \
-v $PWD/ql/config:/ql/config \
-v $PWD/ql/log:/ql/log \
-v $PWD/ql/db:/ql/db \
-v $PWD/ql/repo:/ql/repo \
-v $PWD/ql/raw:/ql/raw \
-v $PWD/ql/scripts:/ql/scripts \
-v $PWD/ql/jbot:/ql/jbot \
-p 5800:5700 \
--name qinglong_1 \
--hostname qinglong_1 \
--restart unless-stopped \
whyour/qinglong:2.10.13
浏览器 输入ip:5800登录宝塔面板。
注意:
也可以把命令中2.10.13改为latest,建议不改,这个版本是稳定的。
如果提示docker未找到命令,那就是没装docker,请在宝塔面板软件商城搜索下载。
多容器
cd
mkdir ql_2 && cd ql_2
docker run -dit \
-v $PWD/ql/config:/ql/config \
-v $PWD/ql/log:/ql/log \
-v $PWD/ql/db:/ql/db \
-v $PWD/ql/repo:/ql/repo \
-v $PWD/ql/raw:/ql/raw \
-v $PWD/ql/scripts:/ql/scripts \
-v $PWD/ql/jbot:/ql/jbot \
-p 5802:5700 \
--name qinglong_2 \
--hostname qinglong_2 \
--restart unless-stopped \
whyour/qinglong:2.10.13
注意:命令里-p左边端口是服务器对外的端口,建议别设置成5700,防止被人扫。右边5700是容器映射端口不能改, 固定是5700.
2.安装依赖、拉库、配置
**安装依赖: **
在ssh或宝塔面板终端输入:
docker exec -it qinglong_1 bash -c "$(curl -fsSL https://ghproxy.com/https://raw.githubusercontent.com/shidahuilang/QL-/main/npm.sh)"
如果卡在正在连接等网络问题,将命令中https://ghproxy.com/ 轮询改成下面每个命令,直到成功:
https://github.91chi.fun/
http://github.yanyuge.workers.dev/
http://github.muzilee.workers.dev/
https://github.zhlh6.cn/
http://toolwa.com/github/
http://ghproxy.com/
https://gh.api.99988866.xyz/
https://git.metauniverse-cn.com/
https://xbkj.298998518.workers.dev/
浏览器输入“ip:你前面设置的青龙端口号(例如192.233.123.322:5800)”进入青龙面板,除了账号密码其他全部跳过。

完成后登录进入面板。
拉库:
新建命令并运行,定时0 * * * *:
ql repo https://github.com/KingRan/KR.git "jd_|jx_|jdCookie" "activity|backUp" "^jd[^_]|USER|utils|function|sign|sendNotify|ql|JDJR"


这里定时是每小时拉一次库。

刷新任务就出来了。
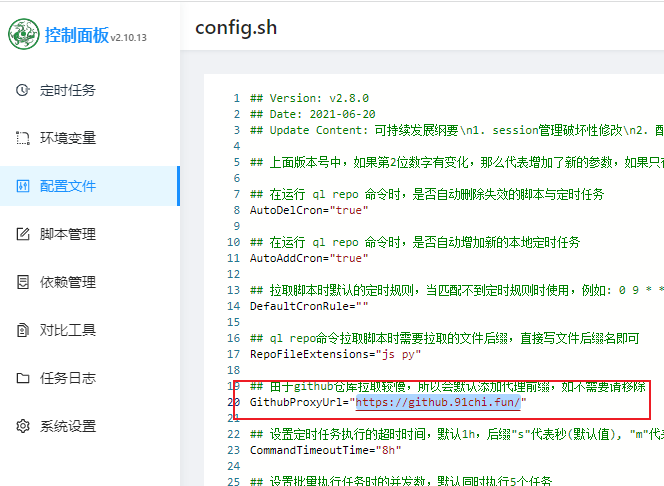
如果运行拉库命令后,提示网络连接失败,请尝试修改代理地址:
GithubProxyUrl="https://github.91chi.fun/"如果使用后还是提示网络连接失败,那就更换其他代理连接:
https://github.91chi.fun/
http://github.yanyuge.workers.dev/
http://github.muzilee.workers.dev/
https://github.zhlh6.cn/
http://toolwa.com/github/
http://ghproxy.com/
https://gh.api.99988866.xyz/
https://git.metauniverse-cn.com/
https://xbkj.298998518.workers.dev/
导入环境变量:
点击左侧“环境变量”,点击右上角“新建变量”:

这里“值”是你抓的京东ck。
安装傻妞机器人
有三种方案: 傻妞+onenode、傻妞+oicq、傻妞+cqhttp
搭建成功后,你可以给qq机器人发送“登录”或者ck进行登录,发送“查询”查看每日资产。
下面是安装旧版傻妞的方法。现在有新傻妞了,貌似不支持芝士了,新增了web面板,需要的话可以参考最近几个月其他博主发的傻妞教程。
【22年2月12日更新】新版傻妞+对接onebot协议+对接青龙教程+常用命令_vincewm的博客-CSDN博客_onebot框架
版权归原作者 vincewm 所有, 如有侵权,请联系我们删除。


