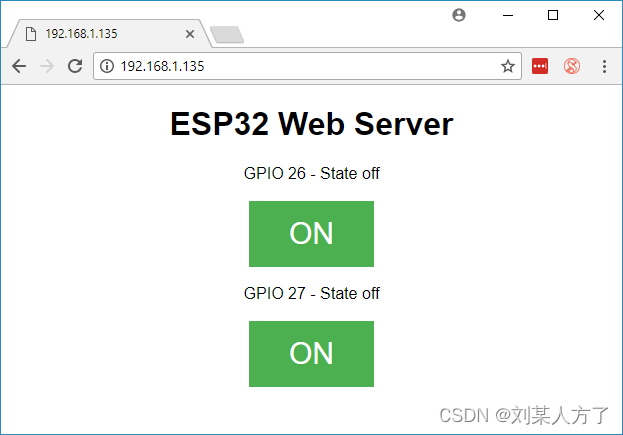
在本项目中,将创建一个带有 ESP32 的独立 Web 服务器,该服务器使用 Arduino IDE 编程环境控制输出(两个 LED)。Web服务器是移动响应式的,可以使用任何设备作为本地网络上的浏览器进行访问。接下来将逐步展示如何创建 Web 服务器以及代码的工作原理。
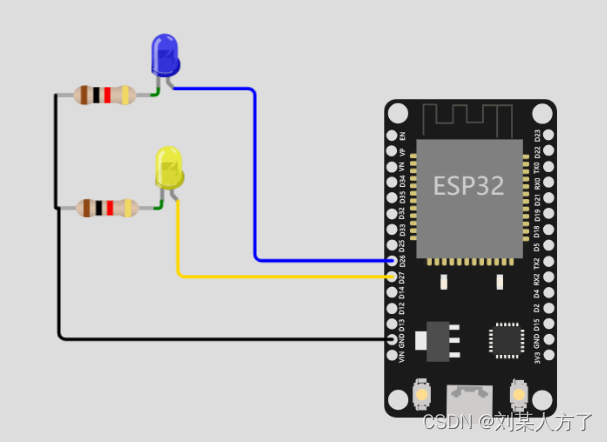
从构建电路开始。将两个 LED 连接到 ESP32,如下图所示 – 一个 LED 连接到GPIO 26,另一个到GPIO 27.

接下来是代码部分
#include<WiFi.h>// WIFI名称及密码constchar* ssid ="名称";constchar* password ="密码";// 将 Web 服务器端口号设置为 80
WiFiServer server(80);// 用于存储 HTTP 请求的变量
String header;// 辅助变量存储当前输出状态
String output26State ="off";
String output27State ="off";// 将输出变量分配给 GPIO 引脚constint output26 =26;constint output27 =27;// 当前时间unsignedlong currentTime =millis();// 前一时刻unsignedlong previousTime =0;// 定义超时时间(以毫秒为单位)(示例:2000ms = 2s)constlong timeoutTime =2000;voidsetup(){
  Serial.begin(115200);// 将输出变量初始化为输出pinMode(output26, OUTPUT);pinMode(output27, OUTPUT);// 将输出设置为低电平digitalWrite(output26, LOW);digitalWrite(output27, LOW);// 使用 SSID 和密码连接到 Wi-Fi 网络
  Serial.print("Connecting to ");
  Serial.println(ssid);
  WiFi.begin(ssid, password);while(WiFi.status()!= WL_CONNECTED){delay(500);
    Serial.print(".");}// 打印本地IP地址并启动Web服务器
  Serial.println("");
  Serial.println("WiFi connected.");
  Serial.println("IP address: ");
  Serial.println(WiFi.localIP());
  server.begin();}voidloop(){
  WiFiClient client = server.available();// 监听数据if(client){// 如果有新客户端连接,
    currentTime =millis();
    previousTime = currentTime;
    Serial.println("New Client.");// 在串行端口中打印一条消息
    String currentLine ="";// 创建一个字符串来保存来自客户端的传入数据while(client.connected()&& currentTime - previousTime <= timeoutTime){// 当客户端连接时循环
      currentTime =millis();if(client.available()){// 如果有字节要从客户端读取,char c = client.read();// 读取一个字节
        Serial.write(c);// 将其打印出串行监视器
        header += c;if(c =='\n'){// 如果该字节是换行符// 如果当前行为空,则连续有两个换行符。// 这就是客户端 HTTP 请求的结束,因此发送响应:if(currentLine.length()==0){// HTTP 标头始终以响应代码开头(例如 HTTP/1.1 200 OK)// 一个内容类型,以便客户端知道接下来会发生什么,然后是一个空行:
            client.println("HTTP/1.1 200 OK");
            client.println("Content-type:text/html");
            client.println("Connection: close");
            client.println();// 打开和关闭 GPIOif(header.indexOf("GET /26/on")>=0){
              Serial.println("GPIO 26 on");
              output26State ="on";digitalWrite(output26, HIGH);}elseif(header.indexOf("GET /26/off")>=0){
              Serial.println("GPIO 26 off");
              output26State ="off";digitalWrite(output26, LOW);}elseif(header.indexOf("GET /27/on")>=0){
              Serial.println("GPIO 27 on");
              output27State ="on";digitalWrite(output27, HIGH);}elseif(header.indexOf("GET /27/off")>=0){
              Serial.println("GPIO 27 off");
              output27State ="off";digitalWrite(output27, LOW);}// 显示 HTML 网页
            client.println("<!DOCTYPE html><html>");
            client.println("<head><meta name=\"viewport\" content=\"width=device-width, initial-scale=1\">");
            client.println("<link rel=\"icon\" href=\"data:,\">");// CSS 设置开/关按钮的样式// 随意更改背景颜色和字体大小属性以满足您的喜好
            client.println("<style>html { font-family: Helvetica; display: inline-block; margin: 0px auto; text-align: center;}");
            client.println(".button { background-color: #4CAF50; border: none; color: white; padding: 16px 40px;");
            client.println("text-decoration: none; font-size: 30px; margin: 2px; cursor: pointer;}");
            client.println(".button2 {background-color: #555555;}</style></head>");// 网页标题
            client.println("<body><h1>ESP32 Web Server</h1>");// 显示 GPIO 26 的当前状态和 ON/OFF 按钮
            client.println("<p>GPIO 26 - State "+ output26State +"</p>");// 如果output26状态为off,则显示ON按钮      if(output26State=="off"){
              client.println("<p><a href=\"/26/on\"><button class=\"button\">ON</button></a></p>");}else{
              client.println("<p><a href=\"/26/off\"><button class=\"button button2\">OFF</button></a></p>");}// 显示 GPIO 27 的当前状态和 ON/OFF 按钮
            client.println("<p>GPIO 27 - State "+ output27State +"</p>");// 如果output27状态为off,则显示ON按钮     if(output27State=="off"){
              client.println("<p><a href=\"/27/on\"><button class=\"button\">ON</button></a></p>");}else{
              client.println("<p><a href=\"/27/off\"><button class=\"button button2\">OFF</button></a></p>");}
            client.println("</body></html>");// HTTP 响应以另一个空行结束
            client.println();// 跳出 while 循环break;}else{// 如果有换行符,则清除 currentLine
            currentLine ="";}}elseif(c !='\r'){// 如果除了回车符之外还有其他字符,
          currentLine += c;// 将其添加到当前行的末尾}}}// 清除头变量
    header ="";// 关闭连接
    client.stop();
    Serial.println("Client disconnected.");
    Serial.println("");}}
串口会打印出IP地址。
在浏览器打开
在浏览器上的操作也可以在串口监视器上显示。
版权归原作者 方圆工作室 所有, 如有侵权,请联系我们删除。