
Spring 更简单的读取和存储对象 - 2
大家新年快乐 , 祝大家新的一年如图
这个专栏给大家介绍一下 Java 家族的核心产品 - SSM 框架
JavaEE 进阶专栏Java 语言能走到现在 , 仍然屹立不衰的原因 , 有一部分就是因为 SSM 框架的存在
接下来 , 博主会带大家了解一下 Spring、Spring Boot、Spring MVC、MyBatis 相关知识点
并且带领大家进行环境的配置 , 让大家真正用好框架、学懂框架
来上一篇文章复习一下吧
点击即可跳转到我的小秘密

本篇文章是基于在上一篇文章的进一步讲解 , 所以需要读者有上一篇文章的基础
三 . 获取 Bean 对象
我们最早的方式是这样的
packagecom.ethan.Controller;importcom.ethan.service.UserService;importorg.springframework.stereotype.Controller;@ControllerpublicclassUserController{// 读取 UserServicepublicvoidsayHello(){UserService userService =newUserService();
        userService.doService();}}
直接通过 new 的方式我们是不推荐的
然后接下来进入了 2.0 时代
我们设置一个启动类 , 在里面首先要得到得到上下文对象 , 然后去使用 getBean 得到 Bean 对象 , 最后再去操作 Bean 对象 , 这种方法还是不太简便
所以迎来了我们的 3.0 时代 : 依赖注入
获取 bean 对象也叫做 对象装配 ,是把对象取出来放到某个类中,有时候也叫对象注入, 也叫做依赖注入(DI)
在程序运行期间 , 将当前类需要的对象动态的引入到当前的类当中 , 这个过程就叫做依赖注入
对象装配(对象注⼊)的实现⽅法以下 3 种:
- 属性注入
- Setter 注入
- 构造方法注入
我们先来看一下他们的使用
3.1 属性注入
3.1.1 原理
我们就在 UserController 里面调用 UserService , 也就是将 UserService 注入到 UserController 里面 , 咱们再去调用 UserController
我们先创建一个私有的属性 , 这个属性就是我们要注入的对象
然后在这个私有属性上面加上 @Autowired 注解 (因为我们想要把 userService 注入到 UserController 里面) , 他的意思是自动装配
为什么叫属性注入呢 ?
其实是这样的 , 我们把 @Autowired 注解去掉 , 其实就剩个私有的属性 , 所以就叫属性注入
接下来我们就可以调用 userService 的方法了
packagecom.ethan.controller;importcom.ethan.service.UserService;importorg.springframework.beans.factory.annotation.Autowired;importorg.springframework.stereotype.Controller;@ControllerpublicclassUserController{@AutowiredprivateUserService userService;//想要注入的属性publicvoiddoUserController(){System.out.println("do UserController");
        userService.doUserService();}}
我们可以去启动类看看效果了
importcom.ethan.controller.UserController;importorg.springframework.context.ApplicationContext;importorg.springframework.context.support.ClassPathXmlApplicationContext;publicclassApp{publicstaticvoidmain(String[] args){// 1. 得到上下文对象ApplicationContext context =newClassPathXmlApplicationContext("spring-config.xml");// 2. 使用 getBean 得到 Bean 对象UserController userController = context.getBean("userController",UserController.class);// 3. 操作对象
        userController.doUserController();}}
运行查看结果
这就说明我们在 UserController 里面成功的把 UserService 注入成功
那么我们把 @Autowired 去掉呢
3.1.2 相关问题
能在启动类里面调用 @Autowired 注解吗
那么这里面有个问题 , 我们的启动类里面还是 2.0 版本的方法 , 那么我们为什么不直接在启动类里面去添加 @Autowired 呢
importcom.ethan.service.UserService;importorg.springframework.beans.factory.annotation.Autowired;publicclassApp{@AutowiredprivateUserService userService;publicstaticvoidmain(String[] args){
        userService.doUserService();}}

给大家分析一下原因
在 Java 里面 , 静态类或者静态方法优先执行
@Autowired 能使用多次吗
我们目前是在 UserController 里面注入了 UserService , 那么我们在 UserComponent 里面注入 UserController
UserComponent.java
packagecom.ethan.component;importcom.ethan.controller.UserController;importorg.springframework.beans.factory.annotation.Autowired;importorg.springframework.stereotype.Component;@ComponentpublicclassUserComponent{@AutowiredprivateUserController userController;publicvoiddoUserComponents(){System.out.println("do UserComponent");
        userController.doUserController();}}
UserController.java
packagecom.ethan.controller;importcom.ethan.service.UserService;importorg.springframework.beans.factory.annotation.Autowired;importorg.springframework.stereotype.Controller;@ControllerpublicclassUserController{@AutowiredprivateUserService userService;//想要注入的属性publicvoiddoUserController(){System.out.println("do UserController");
        userService.doUserService();}}
UserService.java
packagecom.ethan.service;importorg.springframework.stereotype.Service;@ServicepublicclassUserService{publicvoiddoUserService(){System.out.println("do UserService");}}
启动类 :
importcom.ethan.component.UserComponent;importorg.springframework.context.ApplicationContext;importorg.springframework.context.support.ClassPathXmlApplicationContext;publicclassApp{publicstaticvoidmain(String[] args){// 1. 得到上下文对象ApplicationContext context =newClassPathXmlApplicationContext("spring-config.xml");// 2. 使用 getBean 得到 Bean 对象UserComponent userComponent = context.getBean("userComponent",UserComponent.class);// 3. 操作对象
        userComponent.doUserComponents();}}

打印了三句话 , 这就代表 @Autowired 可以多次使用
@Autowired 修饰的私有方法名字可以是其他的吗

那么我们改一下属性名试试看
那么为什么我们之前的名称就有要求 , 这个就没有呢
这个其实也是我们的一道面试题 : @Autowired 和 @Resource 有什么区别
这篇博客写的非常细致
@Autowired 和 @Resource 有什么区别
我们看这张图
我们的 @Autowired 是先通过类型去查找 , 比如我们这个例子
所以我们的 @Autowired 注解 是先根据类型查询 , 之后根据名称查询
3.1.3 属性注入的优点和缺点
优点 : 写法简单
缺点 :
- 最重要的缺点就是 IDEA 不推荐我们使用 ! 我们在 社区版里面看不见 , 去专业版里面给大家看一下 , 学生可以去学生认证使用专业版
 但是比较有意思的是 : Spring 官方放出来的 代码样例 , 自己也这么用 , 因为他真的简单易用
 - 功能缺陷 : 不能注入一个 final 修饰的属性
 这是因为 Java 语法规定 , final 修饰的变量必须要有初始值
可以这样解决
1. final 修饰的变量我们可以初始化<br />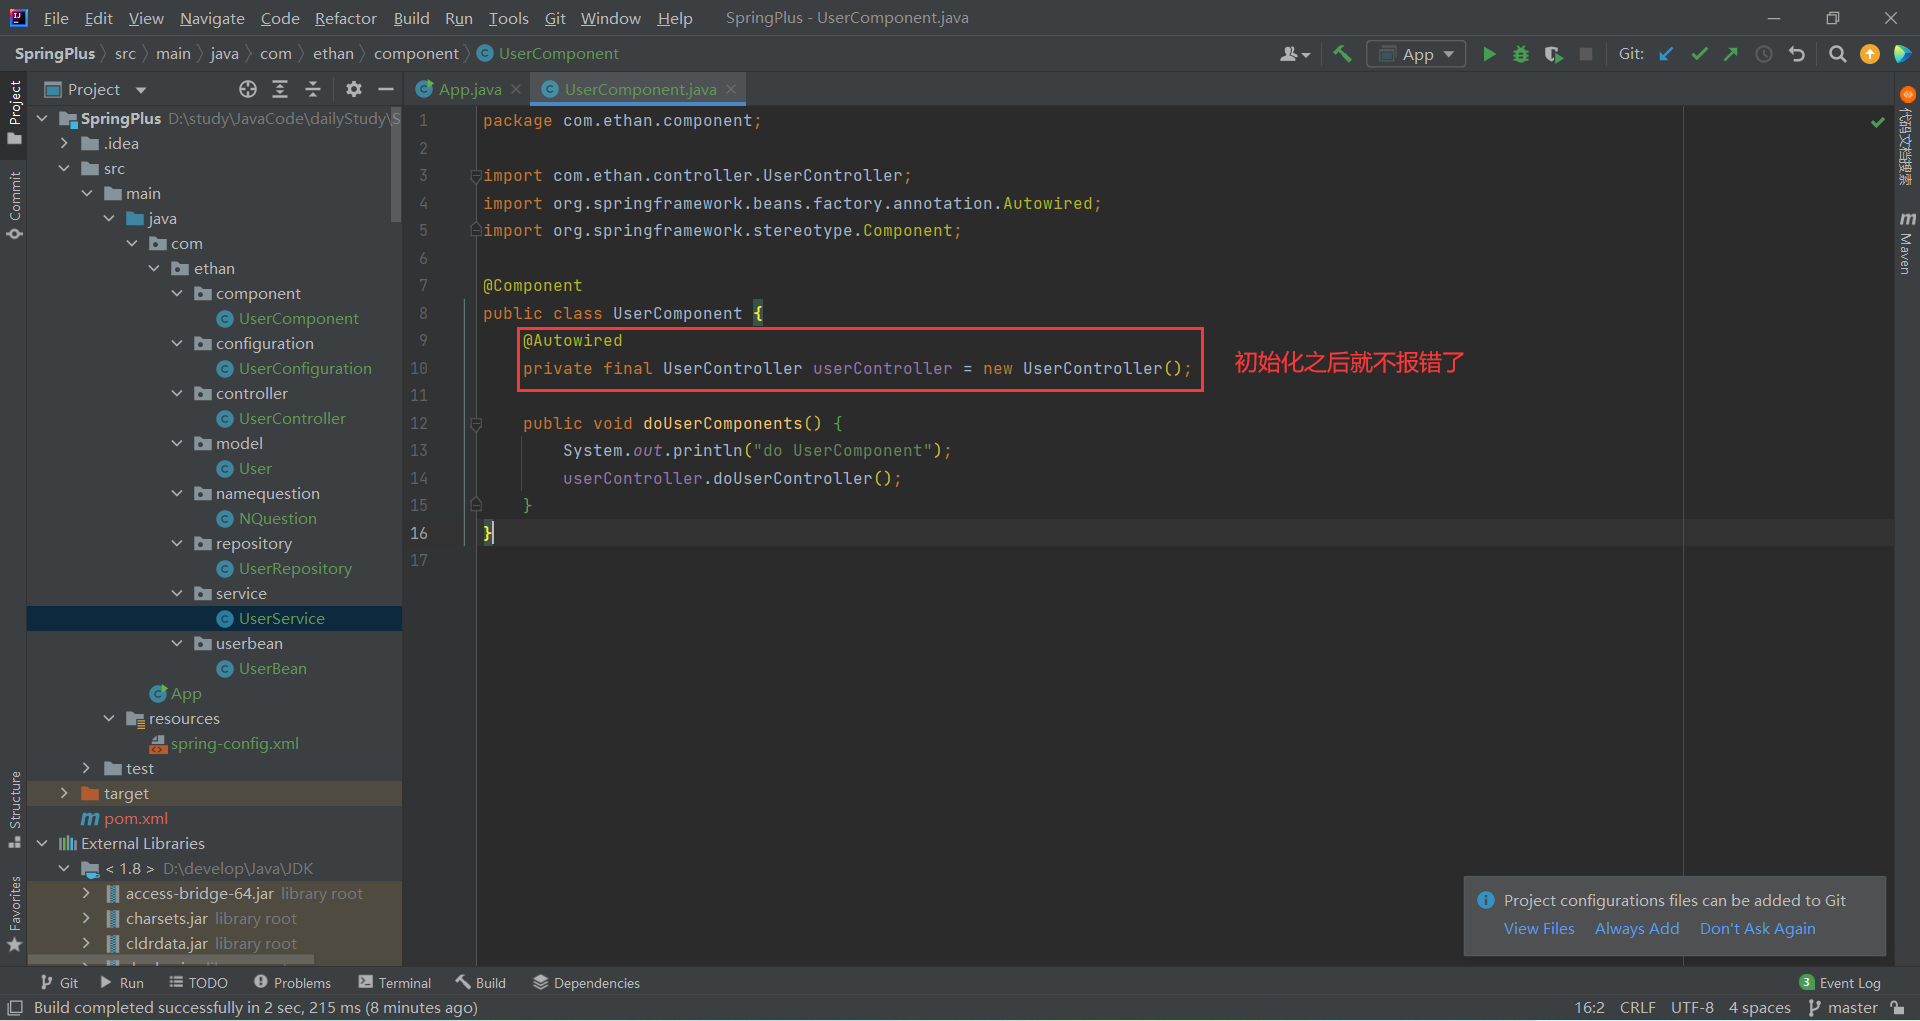
2. 在构造方法里面赋值<br />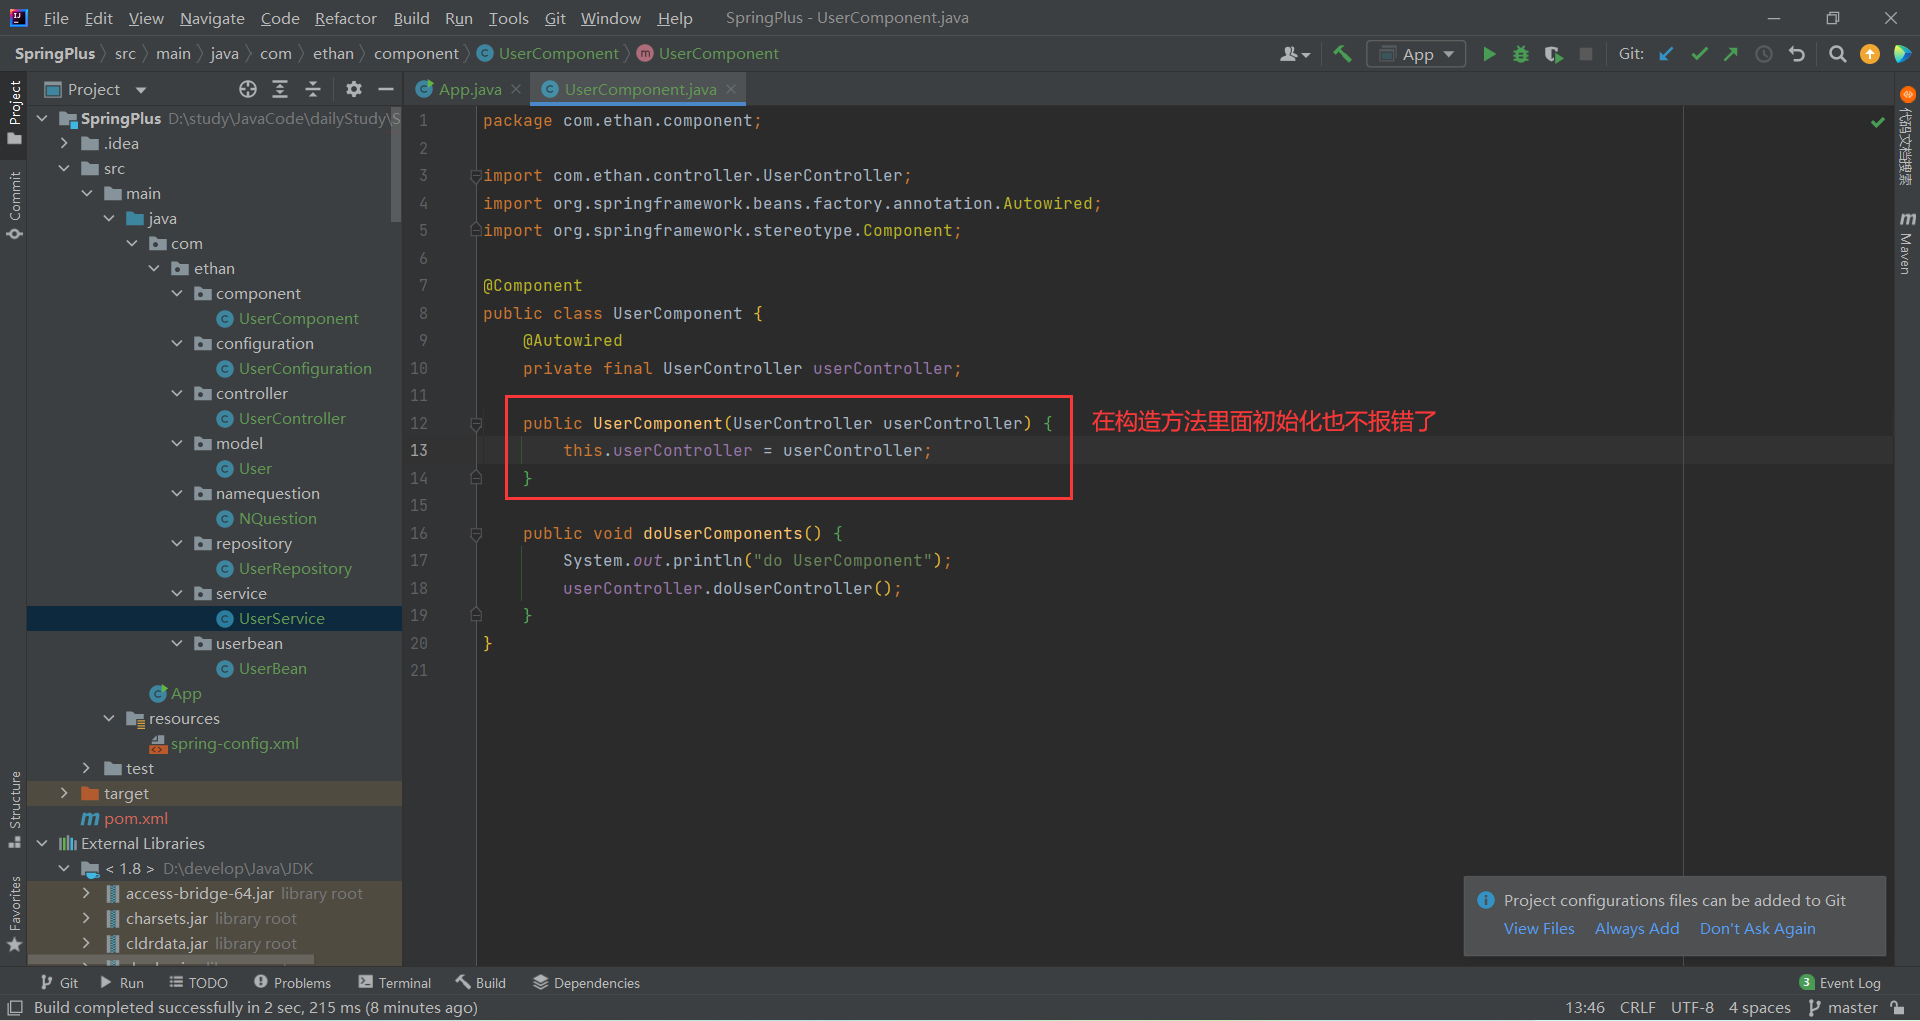
- 通用性问题 : 属性注入这种方式只适用于 IoC 容器(框架) -> 可移植性不高
- 设计原则问题 : 因为这种方式写法比较简单 , 所以就有可能造成滥用 , 更容易违背单一设计原则
单一设计原则 : 这个类设计出来只干一件事
3.2 Setter 注入
3.2.1 用法
还是先写一个私有的属性
然后去生成他的 set 方法


这样我们的 setter 方法就构造好了
接下来 , 我们只需要在 setter 方法上面加上 @Autowired 注解就好了
packagecom.ethan.component;importcom.ethan.controller.UserController;importorg.springframework.beans.factory.annotation.Autowired;importorg.springframework.stereotype.Component;@ComponentpublicclassUserComponent{privateUserController userController;@AutowiredpublicvoidsetUserController(UserController userController){this.userController = userController;}publicvoiddoUserComponents(){System.out.println("do UserComponent");
        userController.doUserController();}}
我们试一下可不可以
去启动类编写代码
importcom.ethan.component.UserComponent;importorg.springframework.context.ApplicationContext;importorg.springframework.context.support.ClassPathXmlApplicationContext;publicclassApp{publicstaticvoidmain(String[] args){// 1. 得到上下文对象ApplicationContext context =newClassPathXmlApplicationContext("spring-config.xml");// 2. 使用 getBean 得到 Bean 对象UserComponent userComponent = context.getBean("userComponent",UserComponent.class);// 3. 操作对象
        userComponent.doUserComponents();}}
运行一下
3.2.2 优点以及缺点
优点 : 符合单一设计原则 , 一个 set 就是针对一个对象的
缺点 :
- 不能注入不可变对象

- 注入对象可能会被改变 因为这个 set 方法可以会被调用多次 , 就有可能造成被修改的风险
3.3 构造方法注入
3.3.1 用法
还是先写一个要注入的私有属性 , 然后生成这个类的构造方法


这样构造方法就自动生成好了 , 构造方法里面的参数就是要注入的属性
最后在构造方法上面添加 @Autowired 注解
UserComponent.java :
packagecom.ethan.component;importcom.ethan.controller.UserController;importorg.springframework.beans.factory.annotation.Autowired;importorg.springframework.stereotype.Component;@ComponentpublicclassUserComponent{privateUserController userController;@AutowiredpublicUserComponent(UserController userController){this.userController = userController;}publicvoiddoUserComponents(){System.out.println("do UserComponent");
        userController.doUserController();}}
启动类
importcom.ethan.component.UserComponent;importorg.springframework.context.ApplicationContext;importorg.springframework.context.support.ClassPathXmlApplicationContext;publicclassApp{publicstaticvoidmain(String[] args){// 1. 得到上下文对象ApplicationContext context =newClassPathXmlApplicationContext("spring-config.xml");// 2. 使用 getBean 得到 Bean 对象UserComponent userComponent = context.getBean("userComponent",UserComponent.class);// 3. 操作对象
        userComponent.doUserComponents();}}
运行一下 :
根据运行结果 , 我们还可以看出 : 构造方法也支持注入多个对象
3.3.2 注意事项
当前类只有一个构造方法的时候 , @Autowired 可以省略
有多个构造方法的时候 , @Autowired 不可以省略

而且要关注的是 : 多个构造方法的时候 , 只会运行加了 @Autowired 的构造方法

那么我们都加上 @Autowired 呢 ?
总结一下 : 在 Spring 中 , 一个类的构造方法可以有多个 , 但是只能有一个构造方法上添加 @Autowired 注解 , 否则会报错
3.3.3 构造方法注入的优点
优点1 : 可以注入 final 修饰的对象
原因 : 遵循了 Java 的规范
final 的用法 :
- 创建时直接赋值
- 在构造方法中赋值
这样就不难理解了 , 在 Java 里面就允许通过构造方法给被 final 修饰的值进行赋值 , 那么我们的 Spring 里面也可以通过构造注入对 final 修饰的值进行赋值


那么我们就来实验一下 :
packagecom.ethan.component;importcom.ethan.controller.UserController;importorg.springframework.beans.factory.annotation.Autowired;importorg.springframework.stereotype.Component;@ComponentpublicclassUserComponent{privatefinalUserController userController;@AutowiredpublicUserComponent(UserController userController){this.userController = userController;}publicvoiddoUserComponents(){System.out.println("do UserComponent");
        userController.doUserController();}}

优点2 : 注入对象不能被修改 (构造方法只会被执行一次)
优点3 : 要注入的对象在使用前一定会被完全初始化 , 因为注入依赖是在类的构造方法中执行的 , 而构造方法是在类创建之初就会执行的方法
优点4 : 通用性更好 , 因为构造方法是 Java (JDK) 所支持的 , 而 JDK 我们可以认为是 Spring 最低层的框架 , 所以更换任何的框架 , 它都是适用的
缺点 : (优点那么多 , 缺点就变得不是那么重要了)
构造方法不满足单一设计原则
Spring 4.2 推荐的注入用法是 Setter 注入 , Setter 更加符合单一设计原则
在 Spring 4.2 之后 , 推荐使用构造方法注入的方式 . 官方给出的回复是 如果你写的代码传递了太多的参数 , 那么此时你要考虑一下你的代码是否符合单一设计原则了
其实就是官方赖你了 , 你自己代码写的不好 , 还赖上我了 .
3.4 同一类型多个Bean报错 -> @Resources
3.4.1 用法
这是另外一个注入关键字 , 是由 Java 官方提供给我们的注解
用法是跟我们 @Autowired 大致是一样的
我们新创建一个 resources 包 , 新建一个 ReSourcesTest 来试验一下 @Resources
然后在 ReSourcesTest.java 编写代码
packagecom.ethan.reSources;importcom.ethan.component.UserComponent;importorg.springframework.stereotype.Controller;importjavax.annotation.Resource;@ControllerpublicclassReSourcesTest{@ResourceprivateUserComponent userComponent;publicvoiddoResource(){System.out.println("do Resource");
        userComponent.doUserComponents();}}
我们 Ctrl + 单击 一下 @Resources
发现 @Resources 是来自于 Java 提供给我们的方法
那么我们就来试试 Java 给我们提供的办法好不好使
启动类 :
importcom.ethan.component.UserComponent;importcom.ethan.reSources.ReSourcesTest;importorg.springframework.context.ApplicationContext;importorg.springframework.context.support.ClassPathXmlApplicationContext;publicclassApp{publicstaticvoidmain(String[] args){// 1. 得到上下文对象ApplicationContext context =newClassPathXmlApplicationContext("spring-config.xml");// 2. 使用 getBean 得到 Bean 对象ReSourcesTest reSourcesTest = context.getBean("reSourcesTest",ReSourcesTest.class);// 3. 操作对象
        reSourcesTest.doResource();}}

那么属性注入可以 , Setter 注入 以及 构造方法注入呢 ?
Setter 注入可以
packagecom.ethan.reSources;importcom.ethan.component.UserComponent;importorg.springframework.stereotype.Controller;importjavax.annotation.Resource;@ControllerpublicclassReSourcesTest{privateUserComponent userComponent;@ResourcepublicvoidsetUserComponent(UserComponent userComponent){this.userComponent = userComponent;}publicvoiddoResource(){System.out.println("do Resource");
        userComponent.doUserComponents();}}

但是构造方法注入不可以 !
packagecom.ethan.reSources;importcom.ethan.component.UserComponent;importorg.springframework.stereotype.Controller;importjavax.annotation.Resource;@ControllerpublicclassReSourcesTest{privateUserComponent userComponent;@ResourcepublicReSourcesTest(UserComponent userComponent){this.userComponent = userComponent;}publicvoiddoResource(){System.out.println("do Resource");
        userComponent.doUserComponents();}}

强行执行仍然会报错的
3.4.2 @Resources 不能在构造方法上使用
那么既然 @Autowired 能用 , 我们为什么还要介绍 @Resources 呢 ?
功能 : 实现对象注入
- 使用1 : 实现属性注入

- 使用2 : 实现 Setter 注入

- **@Resource 注解不能使用在构造方法的实现上 **
 原因是 : Java 实现的时候 , 构造方法是先执行的 , 但是这个注解是在构造方法之后执行的 , 所以目前是不支持这种实现的
3.4.3 @Resources 参数 VS @Autowired 参数
我们直接看源码
先看 @Resources
Ctrl + 单击 @Resources
再看 @Autowired
他们两个支持的参数完全不同 , 就这么一看 , 还是感觉 @Resources 能用的方法多
给大家举个栗子 :
当使用 Bean 注解返回两个类型相同的 Bean 的时候 , 默认使用注入的方式得到对象就会报错 , 这么说大家有点乱 , 用代码来看一下
在之前的 UserBeans 里面有两个方法 , 他们的返回值相同 , 都是 User
UserBean.java :
packagecom.ethan.userbean;importcom.ethan.model.User;importorg.springframework.context.annotation.Bean;importorg.springframework.stereotype.Controller;@ControllerpublicclassUserBean{@Bean("anlingrong")publicUserfunc(){// 构建测试数据User user =newUser();
        user.setName("安陵容");
        user.setAge(18);
        user.setId(1);return user;}@Bean("shenmeizhuang")publicUserfunc2(){User user =newUser();
        user.setName("沈眉庄");
        user.setAge(20);
        user.setId(2);return user;}}

然后新建一个类 UserBean2 , 先试验一下 @Autowired
packagecom.ethan.userbean;importcom.ethan.model.User;importorg.springframework.beans.factory.annotation.Autowired;importorg.springframework.stereotype.Controller;@ControllerpublicclassUserBean2{@AutowiredprivateUser user;publicvoidmethod(){System.out.println(user.getName());}}
然后设置启动类
importcom.ethan.component.UserComponent;importcom.ethan.reSources.ReSourcesTest;importcom.ethan.userbean.UserBean2;importorg.springframework.context.ApplicationContext;importorg.springframework.context.support.ClassPathXmlApplicationContext;publicclassApp{publicstaticvoidmain(String[] args){// 1. 得到上下文对象ApplicationContext context =newClassPathXmlApplicationContext("spring-config.xml");// 2. 使用 getBean 得到 Bean 对象UserBean2 userBean2 = context.getBean("userBean2",UserBean2.class);// 3. 操作对象
        userBean2.method();}}
运行就报错了
@Autowired 是先按照类型去找 , 如果找到了 , 但是找到了不止一个的话 , 就需要按名字去查询 .
如果还没找到 , 那就报错 .
那么我们这个例子 , 类型找到了 , 这种类型对应了两个 Bean 对象 , 那么按名字找 , 没找到名字叫做 user 的方法名 , 就报错了.
我们也可以演示一下按名字能找到的场景
那么其实我们可以使用 @Resources 来避免这种情况
@Resources 就是先按照名字来找
packagecom.ethan.userbean;importcom.ethan.model.User;importorg.springframework.stereotype.Controller;importjavax.annotation.Resource;@ControllerpublicclassUserBean2{@Resource(name="anlingrong")privateUser user;publicvoidmethod(){System.out.println(user.getName());}}
因为 @Resources 是先找名字再找类型 , 所以我们可以指定 @Resources 参数为我们想要的 Bean 对象的名称
那么感觉 @Resources 挺好用的啊 , 但是不要忘了 , @Resources 是不支持构造方法注入的 , 而我们的 Spring 还推荐使用构造方法注入 , 那怎么办呢 ?
那就需要请出我们另外一个注解了 @Qualifier , 翻译成中文就是筛选的意思 .
我们需要结合 @Qualifier 和 @Autowired 来使用了
@Qualifier里面有个 value 参数 , 填写我们想要获取的 Bean 对象即可
UserController3.java
packagecom.ethan.userbean;importcom.ethan.model.User;importorg.springframework.beans.factory.annotation.Autowired;importorg.springframework.beans.factory.annotation.Qualifier;importorg.springframework.stereotype.Controller;importjavax.annotation.Resource;@ControllerpublicclassUserBean2{@Autowired@Qualifier(value="shenmeizhuang")privateUser user;publicvoidmethod(){System.out.println(user.getName());}}
运行一下
3.5 综合练习
在 Spring 项目中 , 通过 main 方法获取到 Controller 类 , 调用 Controller 里面通过注入的方式调用 Service 类 , Service 再通过注入的方式获取到 Repository 类 , Repository 类里面有一个方法构建一个 User 对象 , 返回给 main 方法 . Repository 无需连接数据库 , 使用伪代码即可 .
解释一下 : 首先 , 创建一个 Spring 项目 , 然后创建三个类 Controller类、Service类、Repository类 , 然后在 Controller类 里面注入 Service 对象 , 在 Service类 里面注入 Repository类 , 然后在 Repository类 里面创建一个 User 对象(因为我们还没学连接数据库 , 所以就先通过这种方式凑活用) , 最后写一个启动类 , 调用 Controller 就可以获取到其他相关信息
四 . 总结
- 将对象存储到 Spring 中 : 1. 使用类注解 : 1. @Controller2. @Service3. @Repository4. @Configuration5. @Component2. 使用方法注解 : @Bean (注意 : 必须配合类注解一起使用)
- Bean 的命名规则 1. 首字母大写 , 第二个字母不大写 : 首字母小写获取 Bean2. 首字母 第二个字母都是大写 : 使用原类名获取 Bean
- 从 Spring 中获取对象 1. 属性注入2. Setter 注入3. 构造方法注入(Spring 官方推荐)
- 注入的关键字 : 1. @Autowired2. @Resource3. 区别 : 1. 出身不同 : @Autowired 来自于 Spring , @Resource 来自于 JDK2. 使用时可设置的参数不同
- 解决同一类型多个 Bean 的报错 1. 使用 @Resource(name=“”)2. @Autowired 搭配 @Qualifier(“”) 使用
到此 , 这篇文章就已经结束了 , 欢迎大家的阅读 , 有问题及时私信我 , 欢迎提供错误
点击此链接获得更加好的阅读体验
点击即可跳转到我的小秘密
版权归原作者 加勒比海涛 所有, 如有侵权,请联系我们删除。