文章目录
1.下载ffmpeg
git clone https://git.ffmpeg.org/ffmpeg.git ffmpeg
2.交叉编译
进入下载目录,将ffmpeg编译成arm64平台的版本,编译后的文件存放于./instal_arm64中。
sudo ./configure --prefix=./instal_arm64 --enable-shared --disable-static --enable-cross-compile --arch=arm64 --disable-stripping --target-os=linux --cc=aarch64-linux-gnu-gcc
验证:进入instal_arm64/lib文件夹,使用file命令查看文件格式,若显示为ARM aarch64即成功。
3.修改cmakelist.txt
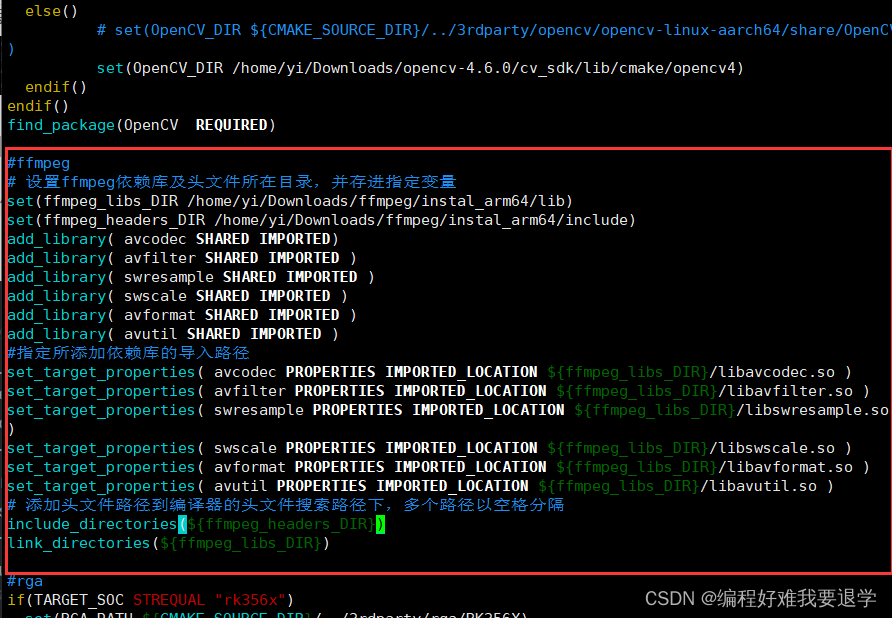
需要将交叉编译好的lib/include 文件夹导入项目中,修改cmakelist.txt如下图所示。

为方便复制这里将改动内容的文字贴在下面,路径需要改成自己的下载路径。
#ffmpeg# 设置ffmpeg依赖库及头文件所在目录,并存进指定变量
set(ffmpeg_libs_DIR /home/yi/Downloads/ffmpeg/instal_arm64/lib)
set(ffmpeg_headers_DIR /home/yi/Downloads/ffmpeg/instal_arm64/include)
add_library( avcodec SHARED IMPORTED)
add_library( avfilter SHARED IMPORTED )
add_library( swresample SHARED IMPORTED )
add_library( swscale SHARED IMPORTED )
add_library( avformat SHARED IMPORTED )
add_library( avutil SHARED IMPORTED )#指定所添加依赖库的导入路径
set_target_properties( avcodec PROPERTIES IMPORTED_LOCATION ${ffmpeg_libs_DIR}/libavcodec.so )
set_target_properties( avfilter PROPERTIES IMPORTED_LOCATION ${ffmpeg_libs_DIR}/libavfilter.so )
set_target_properties( swresample PROPERTIES IMPORTED_LOCATION ${ffmpeg_libs_DIR}/libswresample.so )
set_target_properties( swscale PROPERTIES IMPORTED_LOCATION ${ffmpeg_libs_DIR}/libswscale.so )
set_target_properties( avformat PROPERTIES IMPORTED_LOCATION ${ffmpeg_libs_DIR}/libavformat.so )
set_target_properties( avutil PROPERTIES IMPORTED_LOCATION ${ffmpeg_libs_DIR}/libavutil.so )# 添加头文件路径到编译器的头文件搜索路径下,多个路径以空格分隔
include_directories(${ffmpeg_headers_DIR})
link_directories(${ffmpeg_libs_DIR})

--------省略若干字。。。。。----------------------

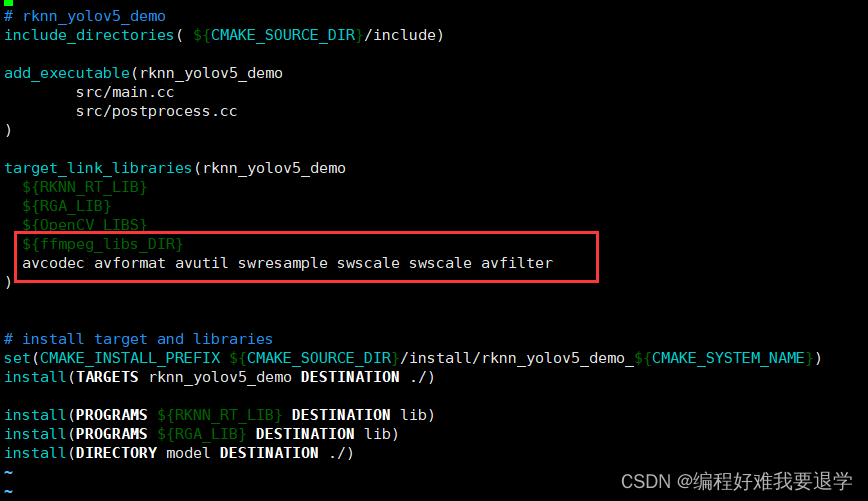
target_link_libraries(rknn_yolov5_demo
  ${RKNN_RT_LIB}${RGA_LIB}${OpenCV_LIBS}${ffmpeg_libs_DIR}
  avcodec avformat avutil swresample swscale swscale avfilter
)
4.将lib文件复制到install目录下的lib目录
这里也许可以只复制项目中需要的lib文件.
sudo cp ~/Downloads/ffmpeg/instal_arm64/lib/* install/rknn_yolov5_demo_Linux/lib/
5.测试文件
这里用一个ffpeg解析rtsp流的案例来测试是否成功。因为源码篇幅过长,放到本文最后。程序大意是:读取rtsp流,将rtsp流解析成帧,并且输入到输出文件,同时统计帧数。
6.运行测试样例
sudo ./build-rk3588…
adb push …
这里省略
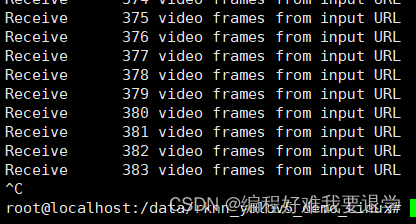
最终可得到如图所示的结果,表示编译运行成功。
7.错误
运行时出现了Failed to resolve hostname …无法解析域名的错误。
解决方案:
有两种可能的原因,1.没有配置域名服务器114.114.114.114 。2.开发板没有网络。
- 配置域名服务器

- 连接网络 可以尝试ping www.baidu.com,若没有问题的话,则不是网络问题。 1、安装nmcli sudo apt-get install nmcli 2、查看网络设备 sudo nmcli dev 3、开启wifi sudo nmcli r wifi on 4、扫描wifi sudo nmcli dev wifi 5、连接wifi sudo nmcli dev wifi connect “wifi名” password “密码”
n.测试文件源码
案例源码:
#ifndefINT64_C #defineINT64_C(c)(c ##LL)#defineUINT64_C(c)(c ##ULL)#endifextern"C"{/*Include ffmpeg header file*/#include<libavformat/avformat.h>#include<libavcodec/avcodec.h>#include<libswscale/swscale.h>#include<libavutil/imgutils.h>#include<libavutil/opt.h>#include<libavutil/mathematics.h>#include<libavutil/samplefmt.h>}#include<iostream>usingnamespace std;intmain(void){
    AVFormatContext* ifmt_ctx =NULL,* ofmt_ctx =NULL;constchar* in_filename,* out_filename;//in_filename = "rtsp://admin:WY@[email protected]/h264/ch1/main/av_stream";
    in_filename="rtsp://wowzaec2demo.streamlock.net/vod/mp4:BigBuckBunny_115k.mp4";
    out_filename ="output.flv";avformat_network_init();

    AVDictionary* avdic =NULL;char option_key[]="rtsp_transport";char option_value[]="tcp";av_dict_set(&avdic, option_key, option_value,0);char option_key2[]="max_delay";char option_value2[]="5000000";av_dict_set(&avdic, option_key2, option_value2,0);

    AVPacket pkt;
    AVOutputFormat* ofmt =NULL;int video_index =-1;int frame_index =0;int i;//打开输入流int ret;if((ret =avformat_open_input(&ifmt_ctx, in_filename,0,&avdic))<0){
        cout<<"Could not open input file."<<endl;goto end;}if((ret =avformat_find_stream_info(ifmt_ctx,0))<0){
        cout<<"Failed to retrieve input stream information"<<endl;goto end;}//nb_streams代表有几路流for(i =0; i < ifmt_ctx->nb_streams; i++){if(ifmt_ctx->streams[i]->codecpar->codec_type == AVMEDIA_TYPE_VIDEO){//视频流
            video_index = i;
            cout <<"get videostream."<< endl;break;}}av_dump_format(ifmt_ctx,0, in_filename,0);//打开输出流avformat_alloc_output_context2(&ofmt_ctx,NULL,NULL, out_filename);if(!ofmt_ctx){printf("Could not create output context\n");
        ret = AVERROR_UNKNOWN;goto end;}
    ofmt = ofmt_ctx->oformat;for(i =0; i < ifmt_ctx->nb_streams; i++){
        AVStream* in_stream = ifmt_ctx->streams[i];
        AVStream* out_stream =avformat_new_stream(ofmt_ctx, in_stream->codec->codec);if(!out_stream){printf("Failed allocating output stream.\n");
            ret = AVERROR_UNKNOWN;goto end;}//将输出流的编码信息复制到输入流
        ret =avcodec_copy_context(out_stream->codec, in_stream->codec);if(ret <0){printf("Failed to copy context from input to output stream codec context\n");goto end;}

        out_stream->codec->codec_tag =0;if(ofmt_ctx->oformat->flags & AVFMT_GLOBALHEADER)
            out_stream->codec->flags |= AV_CODEC_FLAG_GLOBAL_HEADER;}av_dump_format(ofmt_ctx,0, out_filename,1);if(!(ofmt->flags & AVFMT_NOFILE)){
        ret =avio_open(&ofmt_ctx->pb, out_filename, AVIO_FLAG_WRITE);if(ret <0){printf("Could not open output URL '%s'", out_filename);goto end;}}//写文件头到输出文件
    ret =avformat_write_header(ofmt_ctx,NULL);if(ret <0){printf("Error occured when opening output URL\n");goto end;}//while循环中持续获取数据包,不管音频视频都存入文件while(1){
        AVStream* in_stream,* out_stream;//从输入流获取一个数据包
        ret =av_read_frame(ifmt_ctx,&pkt);if(ret <0)break;

        in_stream = ifmt_ctx->streams[pkt.stream_index];
        out_stream = ofmt_ctx->streams[pkt.stream_index];//copy packet//转换 PTS/DTS 时序
        pkt.pts =av_rescale_q_rnd(pkt.pts, in_stream->time_base, out_stream->time_base,(enumAVRounding)(AV_ROUND_NEAR_INF | AV_ROUND_PASS_MINMAX));
        pkt.dts =av_rescale_q_rnd(pkt.dts, in_stream->time_base, out_stream->time_base,(enumAVRounding)(AV_ROUND_NEAR_INF | AV_ROUND_PASS_MINMAX));//printf("pts %d dts %d base %d\n",pkt.pts,pkt.dts, in_stream->time_base);
        pkt.duration =av_rescale_q(pkt.duration, in_stream->time_base, out_stream->time_base);
        pkt.pos =-1;//此while循环中并非所有packet都是视频帧,当收到视频帧时记录一下if(pkt.stream_index == video_index){printf("Receive %8d video frames from input URL\n", frame_index);
            frame_index++;}//将包数据写入到文件。
        ret =av_interleaved_write_frame(ofmt_ctx,&pkt);if(ret <0){if(ret ==-22){continue;}else{printf("Error muxing packet.error code %d\n", ret);break;}}//av_free_packet(&pkt); //此句在新版本中已deprecated 由av_packet_unref代替av_packet_unref(&pkt);}//写文件尾av_write_trailer(ofmt_ctx);

end:av_dict_free(&avdic);avformat_close_input(&ifmt_ctx);//Close inputif(ofmt_ctx &&!(ofmt->flags & AVFMT_NOFILE))avio_close(ofmt_ctx->pb);avformat_free_context(ofmt_ctx);if(ret <0&& ret != AVERROR_EOF){
        cout<<"Error occured."<<endl;return-1;}return0;}
版权归原作者 Sahm5k 所有, 如有侵权,请联系我们删除。