第一次写博客记录自己的学习分享,开始复现一些经典的YOLO系列论文,首先从YOLOV1开始。
1. YOLOV1 (you only look once)介绍
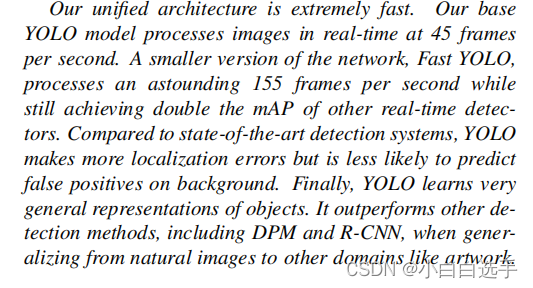
之前的R-CNN, Fast-R-CNN, Faster-R-CNN等都是Two-stage算法的代表,它们将目标检测分解成了两个阶段,首先是候选区域的提取,然后是候选区域目标的识别两大步骤;由于先提取了候选区域进而再进行目标的识别和定位的回归,这使得准确率较高,但所需耗费的推理时间却不如人意;而Yolov1作为Yolo系列的开山之作,它是一个one-stage算法,虽然它牺牲了一定准确度,但大大提高了推理速度,原论文摘要叙述到基础的YOLOV1模型以一秒45帧速度实时处理图像,同时也说明了它做出了更多的定位错误,但不太可能预测出假阳性。

实际上一般可以总结出:
Two-stage算法:优点:精度高;目标定位精度高 、检出率高;
缺点:推理速度慢、训练也慢;背景误检测也高;
One-stage算法:优点:推理速度快,训练快;背景误检测低;
缺点:目标定位差;小物体检测差;
实际上作者对Yolov1的主要想法是,将输入图像分割成一个S * S的网格,如果说一个目标的中心落入其中一个网格,则让该网格负责检测该目标。(如果有多个目标的中心落入怎么办呢,实际上这是一个Yolov1的局限性,有多个目标落入它也只能检测其中一个目标。)
而网格需要预测一些什么呢,实际上我们检测一个目标,需要预测这个网格存不存在目标,如果存在,那么需要预测它的中点,长与宽,以及类别;所以每个网格至少需要预测1+4+class_num维向量,1是前景置信度,4是关于中心坐标与宽高的相关信息(注意这里不会直接预测真正的中心坐标与宽高,详细看后面编码阶段),class_num则是类别的one-hot编码,;在原文中,作者将图像分割成了77,每个网格预测2个预测框,并且使用VOC数据集有20个类别,所以每个网格将预测的结果是7 * 7 30 = 7 * 7 (2(1+4)+ 20)。

2.YOLOV1的网络结构
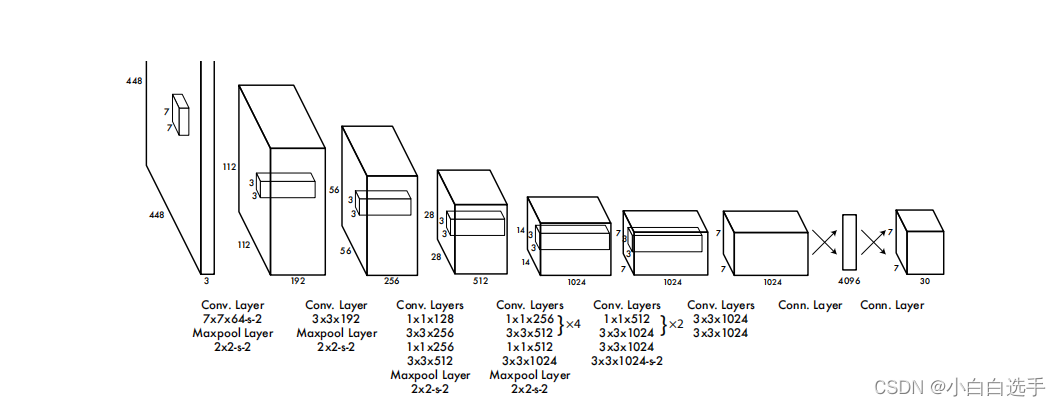
上面说到,YOLOV1的想法实际上就是希望将图像分割成S * S的网络在进行预测,那么如何将图像信息下采样到S * S的网格中,这就需要借助一个网络框架;

如上图,作者受到了当时GoogLeNet模型的启发,构造了该网络结构;具体可见下面代码,应该来说非常的直观,self.conv i(i=1...6) 分别代表着图中前6个长方体。
class yolov1(nn.Module):
    def __init__(self, B=2, class_num=20):
        super(yolov1, self).__init__()
        self.B = B
        self.class_num = class_num

        self.Conv1 = nn.Sequential(Convention(3, 64, 7, 2, 3),
                                   nn.MaxPool2d(2, 2))

        self.Conv2 = nn.Sequential(Convention(64, 192, 3, 1, 1),
                                   nn.MaxPool2d(2, 2))

        self.Conv3 = nn.Sequential(Convention(192, 128, 1, 1, 0),
                                   Convention(128, 256, 3, 1, 1),
                                   Convention(256, 256, 1, 1, 0),
                                   Convention(256, 512, 3, 1, 1),
                                   nn.MaxPool2d(2, 2)
                                   )

        self.Conv4 = nn.Sequential(Convention(512, 256, 1, 1, 0),
                                   Convention(256, 512, 3, 1, 1),
                                   Convention(512, 256, 1, 1, 0),
                                   Convention(256, 512, 3, 1, 1),
                                   Convention(512, 256, 1, 1, 0),
                                   Convention(256, 512, 3, 1, 1),
                                   Convention(512, 256, 1, 1, 0),
                                   Convention(256, 512, 3, 1, 1),
                                   Convention(512, 512, 1, 1, 0),
                                   Convention(512, 1024, 3, 1, 1),
                                   nn.MaxPool2d(2, 2)
                                   )

        self.Conv5 = nn.Sequential(Convention(1024, 512, 1, 1, 0),
                                   Convention(512, 1024, 3, 1, 1),
                                   Convention(1024, 512, 1, 1, 0),
                                   Convention(512, 1024, 3, 1, 1),
                                   Convention(1024, 1024, 3, 1, 1),
                                   Convention(1024, 1024, 3, 2, 1)
                                   )

        self.Conv6 = nn.Sequential(Convention(1024, 1024, 3, 1, 1),
                                   Convention(1024, 1024, 3, 1, 1)
                                   )

        self.Fc7 = nn.Sequential(nn.Linear(7*7*1024, 4096),
                                   nn.LeakyReLU(negative_slope=1e-1, inplace=True),
                                   nn.Linear(4096, 7 * 7 * (self.B * 5 + self.class_num)),
                                   nn.Sigmoid()
                                   )

    def forward(self, x):
        x = self.Conv1(x)
        x = self.Conv2(x)
        x = self.Conv3(x)
        x = self.Conv4(x)
        x = self.Conv5(x)
        x = self.Conv6(x)
        x = x.permute(0, 2, 3, 1)
        x = torch.flatten(x, start_dim=1, end_dim=-1)
        x = self.Fc7(x)
        x = x.view(-1,7,7,(self.B*5 + self.class_num))
        return x
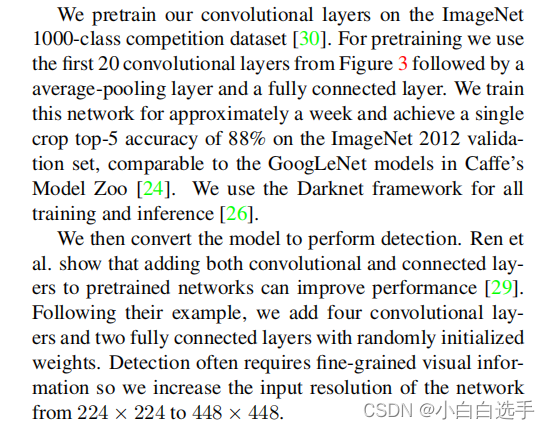
实际上,网络结构只决定了假设空间,决定了空间复杂度,在实际训练中是可以自己根据训练情况修改框架的;而对于数据量不足的情况下,最好是找一些不错的预处理模型用于特征的提取,主要训练全连接层做一个微调训练。作者实际上在训练时,就事先在ImageNet数据1000个类别中做分类的训练用于提取特征。

3.YOLOV1的损失函数
我们知道监督学习,是需要一个“老师”的,定义完了整个提取网络,我们需要定义一个“老师”也就是损失函数来用于反向传播,使其变成一个最优化问题;论文中给出的损失函数如下:

其中,,
为第 i 个网格中的 j 预测框中有目标就等于1,否则为0;同理,
为第 i个 网格中的j 预测框中无目标就等于1,否则为0;
为i网格中有目标就为1,否则为0;
简单来说,函数都采用均方差的形式,且简单分为定位损失,背景置信度损失(注意若有目标,真实标签的置信度不为1,而是定义为它们的IOU),分类置信度损失; 首先,网格中没有目标的,只累计背景置信度损失,而有目标的且负责的预测框,则累计定位损失,背景置信度损失,分类置信度损失损失;有目标且不负责的预测框,一样只计算背景置信度损失;而实际上是权重系数,由于大部分都是没有对象的框,这将使得背景置信度损失在损失函数中占据主要地位,所以增加两个权重系数来调节来避免该情况的出现,具体事先代码可见下方。
class YOLO_V1_LOSS(nn.Module):
    # 有物体的损失权重为l_coord, 无物体的损失权重为l_noobj.
    def __init__(self, S=7, B=2, classes=20, l_coord=5, l_noobj=0.5, epoch_threshold=400):
        super(YOLO_V1_LOSS, self).__init__()
        self.S = S
        self.B = B
        self.classes = classes
        self.l_coord = l_coord
        self.l_noobj = l_noobj
        self.epoch_threshold = epoch_threshold

    def iou(self,bounding_box, ground_coord, gridX, gridY, img_size=448, grid_size=64):
        # 将先验框返回原图大小
        predict_box = np.array([0, 0, 0, 0])
        predict_box[0] = int((bounding_box[0] + gridX) * grid_size)
        predict_box[1] = int((bounding_box[1] + gridY) * grid_size)
        predict_box[2] = int(bounding_box[2] * img_size)
        predict_box[3] = int(bounding_box[3] * img_size)


        # 将xywh改为xmin ymin xmax ymin
        predict_coord = [max(0, predict_box[0] - predict_box[2] / 2),
                         max(0, predict_box[1] - predict_box[3] / 2),
                         min(img_size - 1, predict_box[0] + predict_box[2] / 2),
                         min(img_size - 1, predict_box[1] + predict_box[3] / 2)]


        predict_Area = (predict_coord[2] - predict_coord[0]) * (predict_coord[3] - predict_coord[1])

        ground_Area = ground_coord[9]

        # 计算交集的面积,左边取大者,右边取小,上边取大,下边取小。

        CrossLX = max(predict_coord[0], ground_coord[5])
        CrossRX = min(predict_coord[2], ground_coord[7])
        CrossUY = max(predict_coord[1], ground_coord[6])
        CrossDY = min(predict_coord[3], ground_coord[8])


        if CrossRX < CrossLX or CrossDY < CrossUY:
            return 0

        inter_Area = (CrossRX - CrossLX) * (CrossDY - CrossUY)

        return inter_Area / (predict_Area + ground_Area - inter_Area)

    def forward(self, bounding_boxes, ground_truth):
        # 定义三个计算损失的变量 正样本定位损失 样本置信度损失 样本类别损失
        loss = 0
        loss_coord = 0
        loss_confidence = 0
        loss_classes = 0
        iou_sum = 0
        object_num = 0

        mseloss = nn.MSELoss(size_average=False)
        for batch in range(len(bounding_boxes)):
            # 先行后列
            for indexRow in range(self.S):
                for indexCol in range(self.S):
                    bounding_box = bounding_boxes[batch][indexRow][indexCol]
                    predict_one = bounding_box[:5]
                    predict_two = bounding_box[5:10]
                    ground_box = ground_truth[batch][indexRow][indexCol]
                    # 如果此处不存在ground_box,则为背景,两个预测框都为负样本。
                    if round(ground_box[4].item()) == 0:
                        loss = loss + self.l_noobj * (torch.pow(predict_one[4], 2) + torch.pow(predict_two[4], 2))
                        loss_confidence += self.l_noobj * (math.pow(predict_one[4], 2) + math.pow(predict_two[4], 2))

                    else:
                        object_num += 1
                        predict_one_iou = self.iou(predict_one, ground_box, indexCol, indexRow)
                        predict_two_iou = self.iou(predict_two, ground_box, indexCol, indexRow)
                        # 让两个预测的box与ground box 的iou大的作为正样本,另一个作为负样本。
                        if predict_one_iou > predict_two_iou:
                            predict_box = predict_one
                            iou = predict_one_iou
                            no_predict_box = predict_two
                        else:
                            predict_box = predict_two
                            iou = predict_two_iou
                            no_predict_box = predict_one
                        # 定位损失
                        loss = loss + self.l_coord * (torch.pow((predict_box[0] - ground_box[0]), 2)+
                                                      torch.pow((predict_box[1] - ground_box[1]), 2)+
                                                      torch.pow((torch.sqrt(predict_box[2]) - torch.sqrt(ground_box[2]))
                                                                ,2) + torch.pow((torch.sqrt(predict_box[3]) -
                                                                                 torch.sqrt(ground_box[3])), 2))

                        loss_coord += self.l_coord * (math.pow((predict_box[0] - ground_box[0]), 2)+
                                                      math.pow((predict_box[1] - ground_box[1]), 2)+
                                                      math.pow((torch.sqrt(predict_box[2]) - math.sqrt(ground_box[2]))
                                                                ,2) + math.pow((math.sqrt(predict_box[3]) -
                                                                                math.sqrt(ground_box[3])), 2))


                        # 置信度损失(正样本)
                        loss = loss + torch.pow((predict_box[4] - iou), 2)
                        loss_confidence += math.pow((predict_box[4] - iou), 2)
                        # loss = loss + mseloss(predict_box[4], iou * torch.ones_like(predict_box[4]))
                        # loss_confidence += mseloss(predict_box[4], iou * torch.ones_like(predict_box[4]))
                        iou_sum += iou

                        # 分类损失
                        ground_class = ground_box[10:]
                        predict_class = bounding_box[self.B * 5:]
                        loss = loss + mseloss(ground_class, predict_class)
                        loss_classes += mseloss(ground_class, predict_class)

                        # 置信度损失(负样本)

                        loss = loss + self.l_noobj * torch.pow((no_predict_box[4] - 0), 2)
                        loss_confidence += self.l_noobj * math.pow((no_predict_box[4] - 0), 2)


        return loss,  loss_coord, loss_confidence,  loss_classes,  iou_sum, object_num
4.YOLOV1的编码
有了网络结构和损失函数,还需要准备数据,编码给定数据集的真实标签。该结构需要与网络的输出是一致的,如7730 ,我们的真实标签也应该是7730.;我们拿其中一个30维定义为一个gronud_truth出来介绍,首先,目标在那个网格,则那个网格负责预测,如果有目标则gronud_truth[4]=1,关于中心点与宽高前面说了不会直接预测,直接预测的话,值的范围太大,网络不好收敛,将其控制到0-1之间,将其设置为对于网格的偏移量,则gronud_truth[0] = grid_x - center_x / 448 * 7, gronud_truth[1] = grid_y - center_y / 448 * 7 , gronud_truth[2] = w / 448 , gronud_truth[3] = h / 448 其中 gird_x,gird_y所在的网格坐标,就比如这30维为取了第一个出来,它们的值就为0,而center_x,center_y则为真正的中心坐标,w,h为真正的宽高;448为网络输入图像的大小,而第二个预测框的真实标签也为gronud_truth[5:9] = gronud_truth[0:4],最后gronud_truth[10:]为20个类别的one-hot编码; 如果没目标,则可以直接让gronud_truth全为0就可以了,代码如下。
    def getGroundTruth(self, coords):
        feature_size = self.input_size // self.grid_size
        ground_truth = np.zeros([feature_size, feature_size, 10 + self.class_num])

        for coord in coords:
            xmin, ymin, xmax, ymax, class_id = coord

            ground_width = xmax - xmin
            ground_high = ymax - ymin

            center_x = (xmin + xmax) / 2
            center_y = (ymin + ymax) / 2

            index_row = int(center_y / self.grid_size)
            index_col = int(center_x / self.grid_size)
            # ONE-HOT编码
            class_one_hot = self.One_Hot(class_id)
            # 编码真实标签
            ground_truth[index_row][index_col][:5] = [(center_x / self.grid_size) - index_col,
                                                      (center_y / self.grid_size) - index_row,
                                                      ground_width / self.input_size,
                                                      ground_high / self.input_size,
                                                      1.0]
            # ground_truth[index_row][index_col][5:10] = [xmin, ymin, xmax, ymax, (ymax-ymin)*(xmax-xmin)]
            ground_truth[index_row][index_col][5:10] = [(center_x / self.grid_size) - index_col,
                                                      (center_y / self.grid_size) - index_row,
                                                      ground_width / self.input_size,
                                                      ground_high / self.input_size,
                                                      1.0]
            ground_truth[index_row][index_col][10:30] = class_one_hot
        return ground_truth
5.模型训练;
有了网络结构,真实标签,损失函数,就可以定义优化算法,进行训练了,如果数据不足,尽量采用预处理模型,数据增强等计算,不然一般是容易发生过拟合状况,具体的训练技巧这里就不叙述了,因自己情况而定;这里是使用了resnet50的预处理模型当作主干网络做的,这里只是简单是实验代码,非工程代码;
if torch.cuda.is_available():
    device = torch.device("cuda")
else:
    device = torch.device("cpu")

B = 2
class_num = 20
batch_size = 4
lr = 0.001
lr_mul_factor_epoch_1 = 1.04
lr_epoch_2 = 0.0001
lr_epoch_77 = 0.00001
lr_epoch_107 = 0.000001

weight_decay = 0.0005
momentum = 0.9

epoch_val_loss_min = 1000000000
epoch_interval = 10

epoch_unfreeze = 10
epochs_num = 135

img_path = r'D:\dataset\VOCdevkit\VOC2007\JPEGImages'
img_annotations = r"D:\dataset\VOCdevkit\VOC2007\Annotations"
CLASSES = ['person', 'bird', 'cat', 'cow', 'dog', 'horse', 'sheep',
           'aeroplane', 'bicycle', 'boat', 'bus', 'car', 'motorbike', 'train',
           'bottle', 'chair', 'dining table', 'potted plant', 'sofa', 'tvmonitor']

# -----------------step 1: Dataset-----------------
# Dataset = VocDataset(img_path, img_annotations, CLASSES, is_train=True, class_num=20, input_size=448, grid_size=64)
# train_dataset, val_dataset = random_split(Dataset, [20000, 1503], generator=torch.Generator().manual_seed(0))

train_dataset = VocDataset(img_path, img_annotations, CLASSES, is_train=True, class_num=20, input_size=448, grid_size=64)
val_dataset = VocDataset(img_path, img_annotations, CLASSES, is_train=False, class_num=20, input_size=448, grid_size=64)

# -----------------step 2: Model-------------------
use_resnet = True
use_self_train = False
if use_resnet:
    YOlO = ResNet(Bottleneck, [3, 4, 6, 3])
    if use_self_train:
        YOlO.load_state_dict(torch.load('./weights/YOLO_V1_7.pth')['model'])
    else:
        resnet = models.resnet50(pretrained=True)
        new_state_dict = resnet.state_dict()
        dd = YOlO.state_dict()
        for k in new_state_dict.keys():
            if k in dd.keys() and not k.startswith('fc'):
                dd[k] = new_state_dict[k]
        YOlO.load_state_dict(dd)
    YOlO.to(device=device)
else:
    YOlO = yolov1(B, class_num)
    YOlO.yolo_weight_init()
    YOlO.to(device=device)
#---------------step3: LossFunction------------------
loss_function = YOLO_V1_LOSS().to(device=device)
# loss_function = yoloLoss(7,2,5,0.5).to(device=device)
#---------------step4: Optimizer---------------------
optimizer_SGD = torch.optim.SGD(YOlO.parameters(), lr=lr, momentum=momentum, weight_decay=weight_decay)

#---------------step4: Train-------------------------

if __name__ == "__main__":
    train_log_filename = "train_log.txt"
    train_log_filepath = os.path.join("./logs", train_log_filename)
    epoch = 0
    param_dict = {}
    while epoch <= epochs_num:

        total_loss = 0


        train_loader = DataLoader(train_dataset, batch_size=batch_size, shuffle=True, num_workers=4, pin_memory=False)
        train_len = train_loader.__len__()
        YOlO.train()
        with tqdm(total=train_len) as tbar:
            for batch_index, batch_train in enumerate(train_loader):

                train_data = batch_train[0].float().to(device=device)

                train_label = batch_train[1].float().to(device=device)

                loss = loss_function(YOlO(train_data), train_label)


                batch_loss = loss[0] / batch_size
                total_loss += batch_loss

                optimizer_SGD.zero_grad()
                batch_loss.backward()
                optimizer_SGD.step()


                tbar.set_description( ("train: loss:{} average_loss:{}".format(batch_loss, (total_loss/ batch_index + 1))), refresh=True)

                tbar.update(1)
6.模型推理
训练好模型之后,推理阶段只需要输入图像做与训练相同的预处理输入得到输出就可;得到输出后,实际上会得到许多预测框,这里就需要做一个非极大抑制,再完成预测。
简单来说,非极大抑制,第一步:先选择一个网格中两个预测框置信度大的作为候选框;
第二步;选择一类,筛选出候选框中置信度最高的A作为标准,计算同一类候选框中与A的IOU,将IOU大于一定阈值的给抑制掉,以此循环,最后将剩下的保留下来;
def nms(bounding_boxes, confidence_threshold, iou_threshold):
    # boxRow:x, y, dx, dy, c
    # 1.初步筛选,置信度较高的那个
    boxes = []
    for boxrow in bounding_boxes:
        if boxrow[4].item() < confidence_threshold and boxrow[9].item() < confidence_threshold:
            continue
        classes = boxrow[10:-1].to('cpu').detach().numpy()
        class_probality_index = np.argmax(classes, axis=-1)
        class_probality = classes[class_probality_index]
        print(class_probality)
        # 选择拥有置信度更大的box
        if boxrow[4].item() > boxrow[9].item():
            box = boxrow[0:4].to('cpu').detach().numpy()
        else:
            box = boxrow[5:9].to('cpu').detach().numpy()
        box = np.append(box, class_probality)
        box = np.append(box, class_probality_index)
        boxes.append(box)
    boxes = torch.tensor(sorted(boxes, key=(lambda x: [x[4]]), reverse=True))

    # 2.循环直到待筛选的box集合为空
    predicted_boxed = []
    while len(boxes) != 0:
        choiced_box = boxes[0]
        predicted_boxed.append(choiced_box)
        class_id = choiced_box[5]
        mask = torch.ByteTensor(boxes.size()[0]).bool()
        mask.zero_()
        for index in range(len(boxes)):
            if iou(boxes[index], choiced_box) < iou_threshold and boxes[index][5] != class_id :
                mask[index] = True
        boxes = boxes[mask]
    return predicted_boxed
7.总结
个人测试代码上传了github:GitHub - smallking1/weijch: YOLOV1https://github.com/smallking1/weijch
代码比较简单,不是工程代码,后期有空再修一下,比较乱;需要的可以借鉴一下。
这里感谢之前一篇文章写的也挺好的,我也从中学习到了不少东西,大家有兴趣也可以看看他写的。YOLOv1 代码复现_WALL-SQ的博客-CSDN博客_yolo复现。
写的不好,感谢观看。
版权归原作者 小白白选手 所有, 如有侵权,请联系我们删除。