目前在学习研究针对IOT固件的虚拟化仿真,以及基于虚拟化技术的IOT固件模糊测试。FIRM-AFL作为USENIX安全顶会上发表的IOT固件模糊测试技术,对其进行复现和研究很有学习价值。但是在复现过程中,由于固件仿真本身的复杂性和内核环境的兼容性,遇到了很多困难。同时由于诸如firmadyne这样的上层项目维护缓慢,有很多bug无人修复,出现了很多底层的错误。
作者在参照github上的issues讨论以及网上的一些帖子后,初步完成了FIRM-AFL的复现工作,由于网上还没有关于该工作复现的系统性文章,故作此篇。用以便于之后回顾,以及与同业者交流学习。
项目简介
论文:Yaowen Zheng, Ali Davanian, Heng Yin, Chengyu Song, Hongsong Zhu, Limin Sun, “FIRM-AFL: High-throughput greybox fuzzing of IoT firmware via augmented process emulation,” in USENIX Security Symposium, 2019.
论文项目地址:https://github.com/zyw-200/FirmAFL
项目简介:FIRM-AFL 是物联网固件的第一个高通量灰盒模糊器。FIRM-AFL 解决了物联网固件模糊测试的两个基本问题。首先,它通过启用 posix 兼容固件的模糊处理来解决兼容性问题,这些固件可以在系统仿真器中仿真。其次,采用“增强进程仿真”技术解决了系统模式仿真造成的性能瓶颈。通过将系统模式仿真与用户模式仿真相结合,增强的进程仿真作为系统模式仿真提供了高兼容性,作为用户模式仿真提供了高吞吐量。
项目复现
一、环境搭建
系统:Ubuntu16.04LTS(作者尝试了Ubuntu18.04、20.04,Kali20.04都未成功)
python版本:python2.7和python3.7(注意Ubuntu16.04版本自带的是python3版本是3.5,需自行更新为python3.7)
相关依赖:(参考回答https://github.com/zyw-200/FirmAFL/issues/16)
sudo apt-get install git
sudo apt-get install binutils-dev
sudo apt-get install -y libsdl1.2-dev zlib1g-dev libglib2.0-dev libbfd-dev build-essential binutils qemu libboost-dev git libtool autoconf xorg-dev
二、开始安装
(参考回答https://github.com/zyw-200/FirmAFL/issues/6)
1、获取项目
git clone https://github.com/zyw-200/FirmAFL.git
2、编译用户模式
cd ./FirmAFL/user_mode/
sed -i '40s/static //' util/memfd.c
./configure --target-list=mipsel-linux-user,mips-linux-user,arm-linux-user --static --disable-werror
make
3、编译系统模式
cd ../qemu_mode/DECAF_qemu_2.10/
sed -i '40s/static //' util/memfd.c
./configure --target-list=mipsel-softmmu,mips-softmmu,arm-softmmu --disable-werror
make
2、3过程中若出现如下错误,则进行相应操作:(建议未出错也执行下方指令安装依赖。)
(1)ERROR zlib check failed
sudo apt-get install zlib1g-dev
(2)ERROR: glib-2.12 gthread-2.0 is required to compiler QEMU
sudo apt-get install libglib2.0-dev
(3)/bin/sh: 1:autoreconf: not found
sudo apt-get install autoconf automake libtool
4、安装Firmadyne
cd ../../
sudo apt-get install busybox-static fakeroot git dmsetup kpartx netcat-openbsd nmap python-psycopg2 python3-psycopg2 snmp uml-utilities util-linux vlan
git clone --recursive https://github.com/firmadyne/firmadyne.git
5、安装Binwalk
git clone https://github.com/devttys0/binwalk.git
cd binwalk
sudo ./deps.sh
sudo python ./setup.py install
sudo apt-get install python-lzma
sudo -H pip install git+https://github.com/ahupp/python-magic
sudo -H pip install git+https://github.com/sviehb/jefferson
此处仅安装了python2的binwalk包,Binwalk只能被python2调用,但无法被python3调用,因此还需要安装python3的包。注意别让两个binwalk文件包位置冲突。
(参考firmware-analysis-plus from liyansong2018 - GithubHelp)
cd ../../
git clone https://github.com/liyansong2018/binwalk.git
cd binwalk
sudo ./deps.sh
sudo python3 setup.py install
sudo pip3 install python3-magic
6、编译Firmadyne数据库(自行设置数据库密码)
请自行下载好data.xz(Box)
cd ../FirmAFL/firmadyne
sudo apt-get install postgresql
sudo apt-get install libpq-dev
dropdb -U firmadyne -h 127.0.0.1 firmware #出错就跳过即可
sudo -u postgres createuser -P firmadyne
sudo -u postgres createdb -O firmadyne firmware

cd database
cp /home/churchkm/Downloads/data.xz ./    #此处data.xz的路径请自行更改
xz -d data.xz
mv data schema
chmod +x schema
sudo -u postgres psql -d firmware < ./schema
7、使用Firmadyne仿真固件
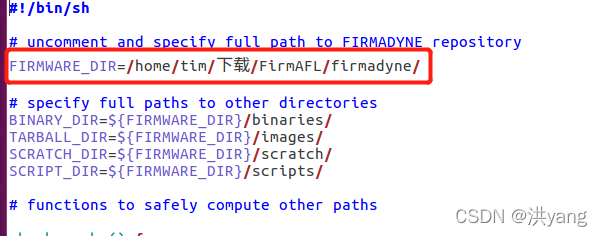
首先自行修改firmadyne.config的如下部分,改为自己firadyne目录的绝对地址

执行以下操作
cd ../
sudo ./download.sh
sed -i '4s/#//' firmadyne.config
cp ../firmadyne_modify/makeImage.sh ./scripts/
sudo ./sources/extractor/extractor.py -b dlink -sql 127.0.0.1 -np -nk "../firmware/DIR-815_FIRMWARE_1.01.ZIP" images
sudo ./scripts/getArch.sh ./images/9050.tar.gz
sudo ./scripts/makeImage.sh 9050
sudo ./scripts/inferNetwork.sh 9050
8、使用FirmAFL对仿真好的固件执行模糊测试
cd ../
python3 FirmAFL_setup.py 9050 mipsel
cp ./FirmAFL_config/9050/run.sh ./image_9050/  #即用FirmAFL_config中的run.sh替换image_9050中的run.sh

cd image_9050
sudo ./run.sh
等待大概一分钟后(固件程序启动后),另外打开一个新的终端,也是在image_9050目录下执行
python3 test.py
最后执行
sudo user.sh
对该固件开始进行模糊测试,效果大致如下图:

9、其他错误补充
1)使用pip3时出现诸如下的SSL模块错误
pip is configured with locations that require TLS/SSL, however the ssl module in Python is not available.
则进行如下操作,
sudo apt-get install openssl
sudo apt-get install libssl-dev
回到安装python3.7的安装包,重新进行python3.7的安装
cd Python-3.7.2
./configure --with-ssl
make
sudo make install
** 2)出现 ModuleNotFoundError: No module named 'CommandNotFound'**
参考此文解决在ubuntu16.04中输入不存在的shell命令时,报错ModuleNotFoundError的(靠谱)解决方案_Goodwillie的博客-CSDN博客
版权归原作者 h0_yang 所有, 如有侵权,请联系我们删除。