前提:你已经安装好了Elasticsearch和Kibana,Elastic分为基础版、白金版和企业版。告警推送通道只有白金版才支持webhook,所以需要进行破解。
1:下载源代码文件
破解Elastic需要修改两个java文件,分别为
LicenseVerifier.java
和
XPackBuild.java
,我们从github上下载对应的源文件,注意你的Elasticsearch版本,修改url中对应的版本号即可,我这里是
8.5
.
curl-o LicenseVerifier.java -s https://raw.githubusercontent.com/elastic/elasticsearch/8.5/x-pack/plugin/core/src/main/java/org/elasticsearch/license/LicenseVerifier.java
curl-o XPackBuild.java -s https://raw.githubusercontent.com/elastic/elasticsearch/8.5/x-pack/plugin/core/src/main/java/org/elasticsearch/xpack/core/XPackBuild.java
2:修改代码
修改XPackBuild.java,在第一个静态方法中的
if、else
是判断jar包有没有被修改的,我们修改这段代码。
importjava.net.URL;importjava.nio.file.Files;importjava.nio.file.Path;importjava.util.jar.JarInputStream;importjava.util.jar.Manifest;/**
 * Information about the built version of x-pack that is running.
 */publicclassXPackBuild{publicstaticfinalXPackBuildCURRENT;static{finalString shortHash;finalString date;Path path =getElasticsearchCodebase();/*if (path.toString().endsWith(".jar")) {
            try (JarInputStream jar = new JarInputStream(Files.newInputStream(path))) {
                Manifest manifest = jar.getManifest();
                shortHash = manifest.getMainAttributes().getValue("Change");
                date = manifest.getMainAttributes().getValue("Build-Date");
            } catch (IOException e) {
                throw new RuntimeException(e);
            }
        } else {
            // not running from a jar (unit tests, IDE)
            shortHash = "Unknown";
            date = "Unknown";
        }*/

        shortHash ="Unknown";
        date ="Unknown";CURRENT=newXPackBuild(shortHash, date);}/**
     * Returns path to xpack codebase path
     */@SuppressForbidden(reason ="looks up path of xpack.jar directly")staticPathgetElasticsearchCodebase(){URL url =XPackBuild.class.getProtectionDomain().getCodeSource().getLocation();try{returnPathUtils.get(url.toURI());}catch(URISyntaxException bogus){thrownewRuntimeException(bogus);}}privateString shortHash;privateString date;XPackBuild(String shortHash,String date){this.shortHash = shortHash;this.date = date;}publicStringshortHash(){return shortHash;}publicStringdate(){return date;}}
然后修改
LicenseVerifier.java
文件,第一个verifyLicense的构造方法就是判断License是否有效的,我们直接返回True即可
packageorg.elasticsearch.license;importorg.apache.lucene.util.BytesRef;importorg.apache.lucene.util.BytesRefIterator;importorg.elasticsearch.common.bytes.BytesReference;importorg.elasticsearch.core.Streams;importorg.elasticsearch.xcontent.ToXContent;importorg.elasticsearch.xcontent.XContentBuilder;importorg.elasticsearch.xcontent.XContentFactory;importorg.elasticsearch.xcontent.XContentType;importjava.io.ByteArrayOutputStream;importjava.io.IOException;importjava.io.InputStream;importjava.nio.ByteBuffer;importjava.security.InvalidKeyException;importjava.security.NoSuchAlgorithmException;importjava.security.PublicKey;importjava.security.Signature;importjava.security.SignatureException;importjava.util.Arrays;importjava.util.Base64;importjava.util.Collections;/**
 * Responsible for verifying signed licenses
 */publicclassLicenseVerifier{/**
     * verifies the license content with the signature using the packaged
     * public key
     * @param license to verify
     * @return true if valid, false otherwise
     */publicstaticbooleanverifyLicense(finalLicense license,PublicKey publicKey){returntrue;/*byte[] signedContent = null;
        byte[] publicKeyFingerprint = null;
        try {
            byte[] signatureBytes = Base64.getDecoder().decode(license.signature());
            ByteBuffer byteBuffer = ByteBuffer.wrap(signatureBytes);
            @SuppressWarnings("unused")
            int version = byteBuffer.getInt();
            int magicLen = byteBuffer.getInt();
            byte[] magic = new byte[magicLen];
            byteBuffer.get(magic);
            int hashLen = byteBuffer.getInt();
            publicKeyFingerprint = new byte[hashLen];
            byteBuffer.get(publicKeyFingerprint);
            int signedContentLen = byteBuffer.getInt();
            signedContent = new byte[signedContentLen];
            byteBuffer.get(signedContent);
            XContentBuilder contentBuilder = XContentFactory.contentBuilder(XContentType.JSON);
            license.toXContent(contentBuilder, new ToXContent.MapParams(Collections.singletonMap(License.LICENSE_SPEC_VIEW_MODE, "true")));
            Signature rsa = Signature.getInstance("SHA512withRSA");
            rsa.initVerify(publicKey);
            BytesRefIterator iterator = BytesReference.bytes(contentBuilder).iterator();
            BytesRef ref;
            while ((ref = iterator.next()) != null) {
                rsa.update(ref.bytes, ref.offset, ref.length);
            }
            return rsa.verify(signedContent);
        } catch (IOException | NoSuchAlgorithmException | SignatureException | InvalidKeyException e) {
            throw new IllegalStateException(e);
        } finally {
            if (signedContent != null) {
                Arrays.fill(signedContent, (byte) 0);
            }
        }*/}privatestaticfinalPublicKeyPUBLIC_KEY;static{try(InputStream is =LicenseVerifier.class.getResourceAsStream("/public.key")){ByteArrayOutputStream out =newByteArrayOutputStream();Streams.copy(is, out);PUBLIC_KEY=CryptUtils.readPublicKey(out.toByteArray());}catch(IOException e){thrownewAssertionError("key file is part of the source and must deserialize correctly", e);}}publicstaticbooleanverifyLicense(finalLicense license){returnverifyLicense(license,PUBLIC_KEY);}}
3:编译文件
我们在服务器使用javac编译修改后的java文件为class文件,-cp后面跟着的是elasticsearch安装目录下的jar包,是编译时需要的依赖。
/usr/share/elasticsearch/jdk/bin/javac  -cp"/usr/share/elasticsearch/lib/*:/usr/share/elasticsearch/modules/x-pack-core/*" LicenseVerifier.java
/usr/share/elasticsearch/jdk/bin/javac  -cp"/usr/share/elasticsearch/lib/*:/usr/share/elasticsearch/modules/x-pack-core/*" XPackBuild.java
注意jdk的版本,如果版本低于官方编译的版本,编译会出现类似
类文件具有错误的版本 55.0, 应为 52.0
的错误。版本号对应如下:
JDK 1.4/1.4.2 对应的编译版本是 45.3F
JDK 5.0 对应的编译版本是 49.0
JDK 6.0 对应的编译版本是 50.0
JDK 7.0 对应的编译版本是 51.0
JDK 8.0 对应的编译版本是 52.0
JDK 9.0 对应的编译版本是 53.0
JDK 10.0 对应的编译版本是 54.0
JDK 11.0 对应的编译版本是 55.0
JDK 12.0 对应的编译版本是 56.0
JDK 13.0 对应的编译版本是 57.0
JDK 14.0 对应的编译版本是 58.0
JDK 15.0 对应的编译版本是 59.0
JDK 16.0 对应的编译版本是 60.0
JDK 17.0 对应的编译版本是 61.0
JDK 18.0 对应的编译版本是 62.0
4:替换class文件。
OK,编译完成我们得到了两个class文件,现在要做的就是替换对应的jar中的原生class文件。
#停止es服务
systemctl stop elasticsearch
#解压原生jar包cp/usr/local/elasticsearch-8.5.3/modules/x-pack-core/x-pack-core-8.5.3.jar /tmp/x-pack
cd /tmp/x-pack && jar -xvf x-pack-core-8.5.3.jar
#替换class文件cp/home/admin/XPackBuild.class/tmp/x-pack/org/elasticsearch/xpack/core/
cp/home/admin/LicenseVerifier.class/tmp/x-pack/org/elasticsearch/license/
#重新打包jar包
cd /tmp/x-pack/
rm-rf x-pack-core-8.5.3.jar # 删除临时拷贝过来的源文件
jar cvf x-pack-core-8.5.3.jar .#得到新的破解jar包#启动es服务cp/tmp/x-pack/x-pack-core-8.5.3.jar /usr/local/elasticsearch-8.5.3/modules/x-pack-core/ 替换官网的jar包为自己编译后的
systemctl start elasticsearch
5:申请License证书
Elastic官网申请证书,申请完成之后邮件会收到一个下载地址,下载后会得到一个json文件,我们需要修改License中的type改为platinum,将expiry_date_in_millis延长N年时间。
{"license":{"uid":"cd5c2258-7422-4f9a-a7c9-cb8d29a25361","type":"platinum","issue_date_in_millis":1678665600000,"expiry_date_in_millis":3207746200000,"max_nodes":10000,"issued_to":"azi","issuer":"Web Form","signature":"AAAAAwAAAA1a8PJsIPdFZHe4WLkDAAABmC9ZN0hjZDBGYnVyRXpCOW5Bb3FjZDAxOWpSbTVoMVZwUzRxVk1PSmkxaktJRVl5MUYvUWh3bHZVUTllbXNPbzBUemtnbWpBbmlWRmRZb25KNFlBR2x0TXc2K2p1Y1VtMG1UQU9TRGZVSGRwaEJGUjE3bXd3LzRqZ05iLzRteWFNekdxRGpIYlFwYkJiNUs0U1hTVlJKNVlXekMrSlVUdFIvV0FNeWdOYnlESDc3MWhlY3hSQmdKSjJ2ZTcvYlBFOHhPQlV3ZHdDQ0tHcG5uOElCaDJ4K1hob29xSG85N0kvTWV3THhlQk9NL01VMFRjNDZpZEVXeUtUMXIyMlIveFpJUkk2WUdveEZaME9XWitGUi9WNTZVQW1FMG1DenhZU0ZmeXlZakVEMjZFT2NvOWxpZGlqVmlHNC8rWVVUYzMwRGVySHpIdURzKzFiRDl4TmM1TUp2VTBOUlJZUlAyV0ZVL2kvVk10L0NsbXNFYVZwT3NSU082dFNNa2prQ0ZsclZ4NTltbU1CVE5lR09Bck93V2J1Y3c9PQAAAQA+fZ30LicFouBamUw0wXUkbOsUP8p1bevJ+JsC4hWsed4ouqqJFipCa0bJJFISWzssU8BpxWQcnNE4WSSbZlSNuxzo2kGUuyE4wWyJyI7kfVpg8dm8POG0ugsIFLfgQISaFxI0MukpmGVyaukQONC9nqKSGgQ7xX2mOrnEC1tRwvBuiJT4aGulM2yMNxOB49DufwfR6w6KVZtpbbC/9BQtRVLl5Vyy/2I8F/il9q+U2J9EdGS4Gt6bW8N2GvZK4rqaPVSTxyh7YNar4IzErpfea9nYkdcgCJ9yOcZw4dCcwaTC90RTYqDIyIQ5h7ET+1Gpr9NemrrbYqfxUR2oIEmX","start_date_in_millis":1678665600000}}
6:更新License证书
点击Stack-许可管理-更新许可证。上传我们修改后的JSON文件,提示更新成功,许可证为platinum(白金版),有效期为2055年。到此就破解成功了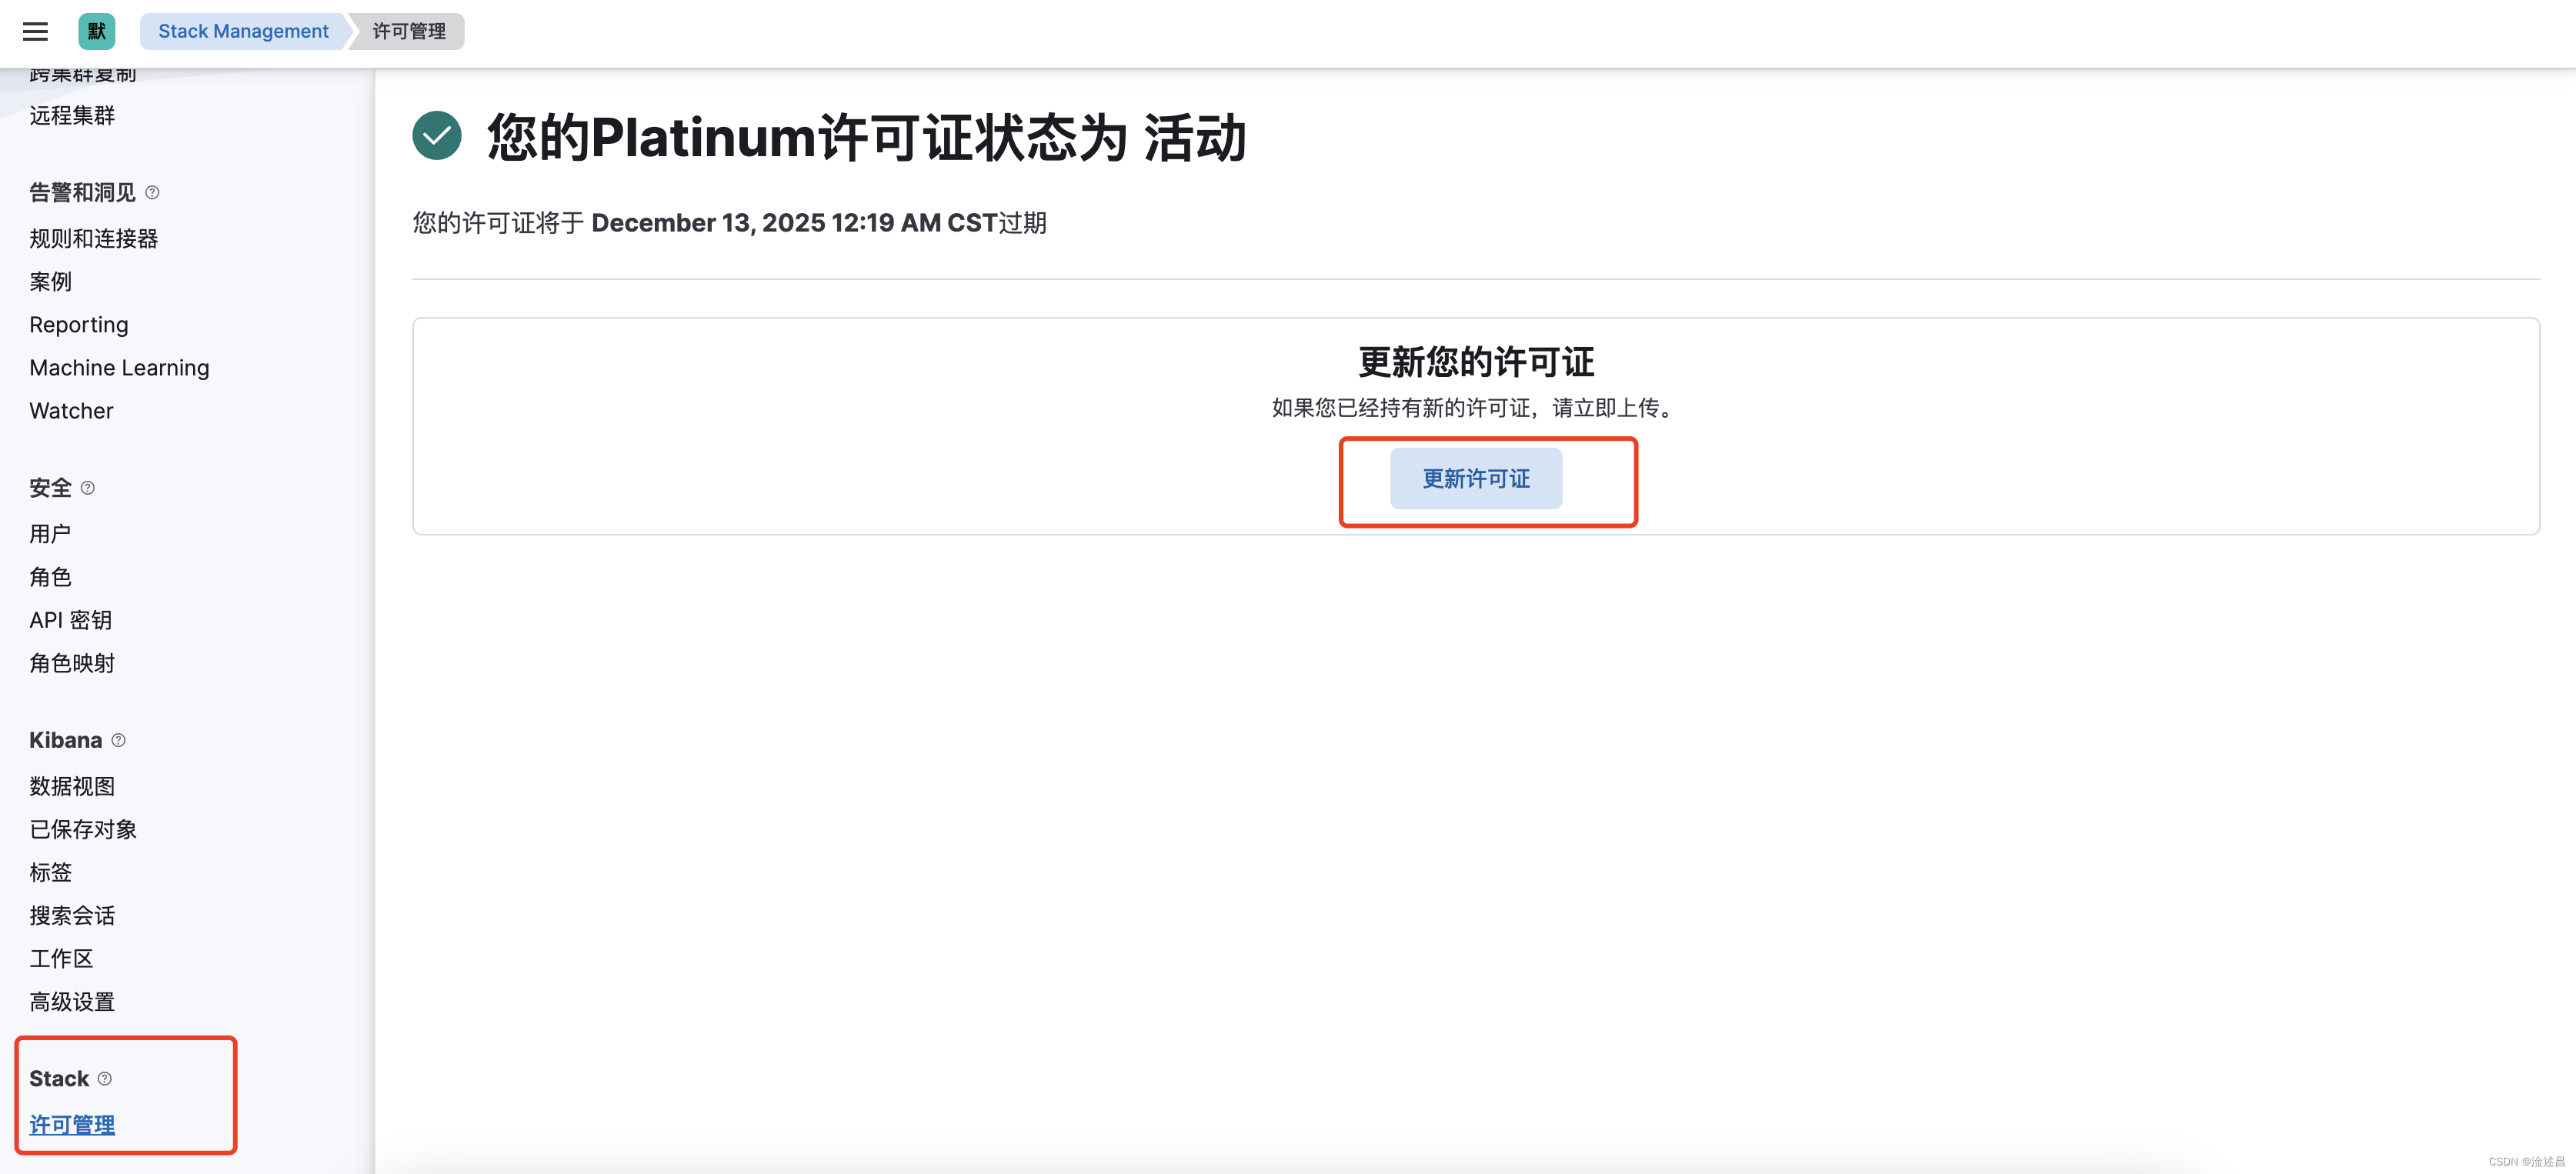
7:配置encryptionKey
使用Kibana的告警显示我们需要在kibana.yml中设置xpack.encryptedSavedObjects.encryptionKey。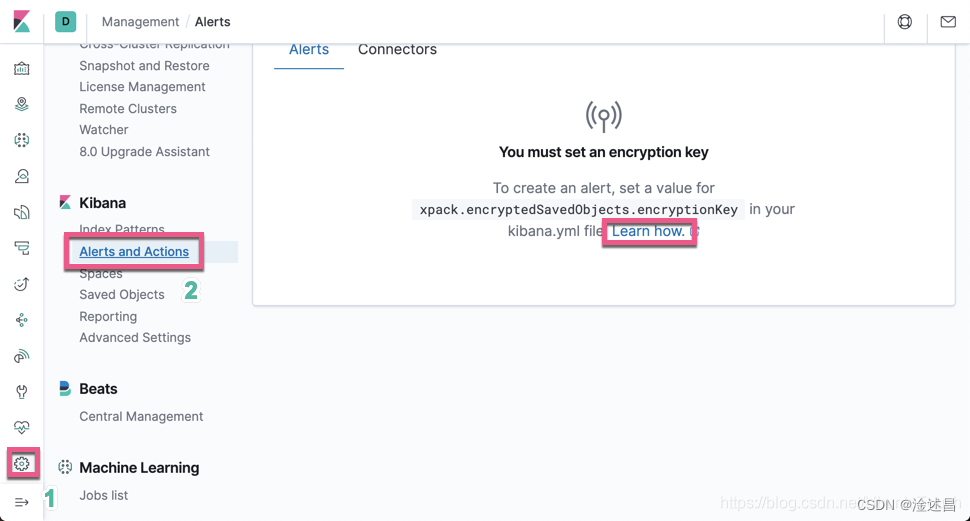
修改kibana.yml配置文件,在最后面添加
xpack.encryptedSavedObjects.encryptionKey: "11112222333344445555666677778888"
重启服务
systemctl restart kibana
再次点击,OK可以创建了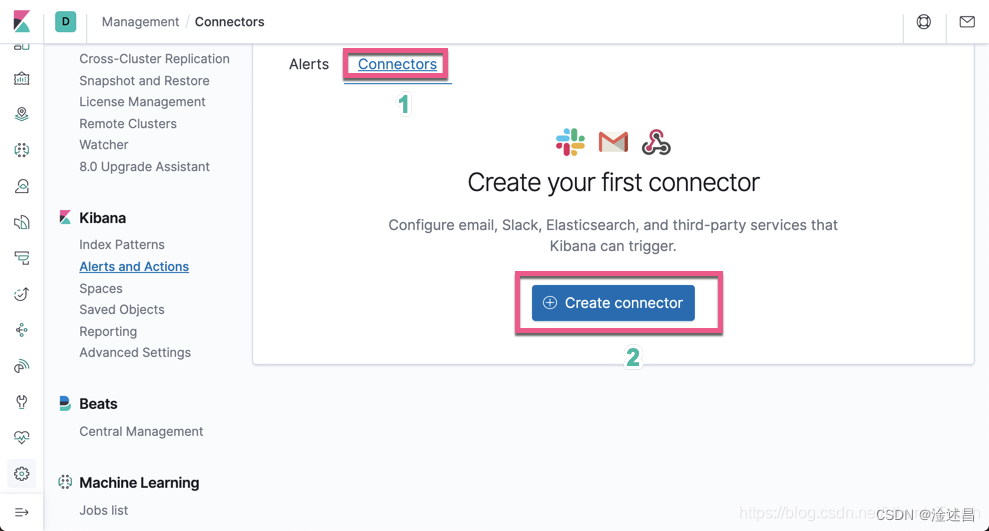
8:创建webhook连接器
点击创建连接器,选择webhook类型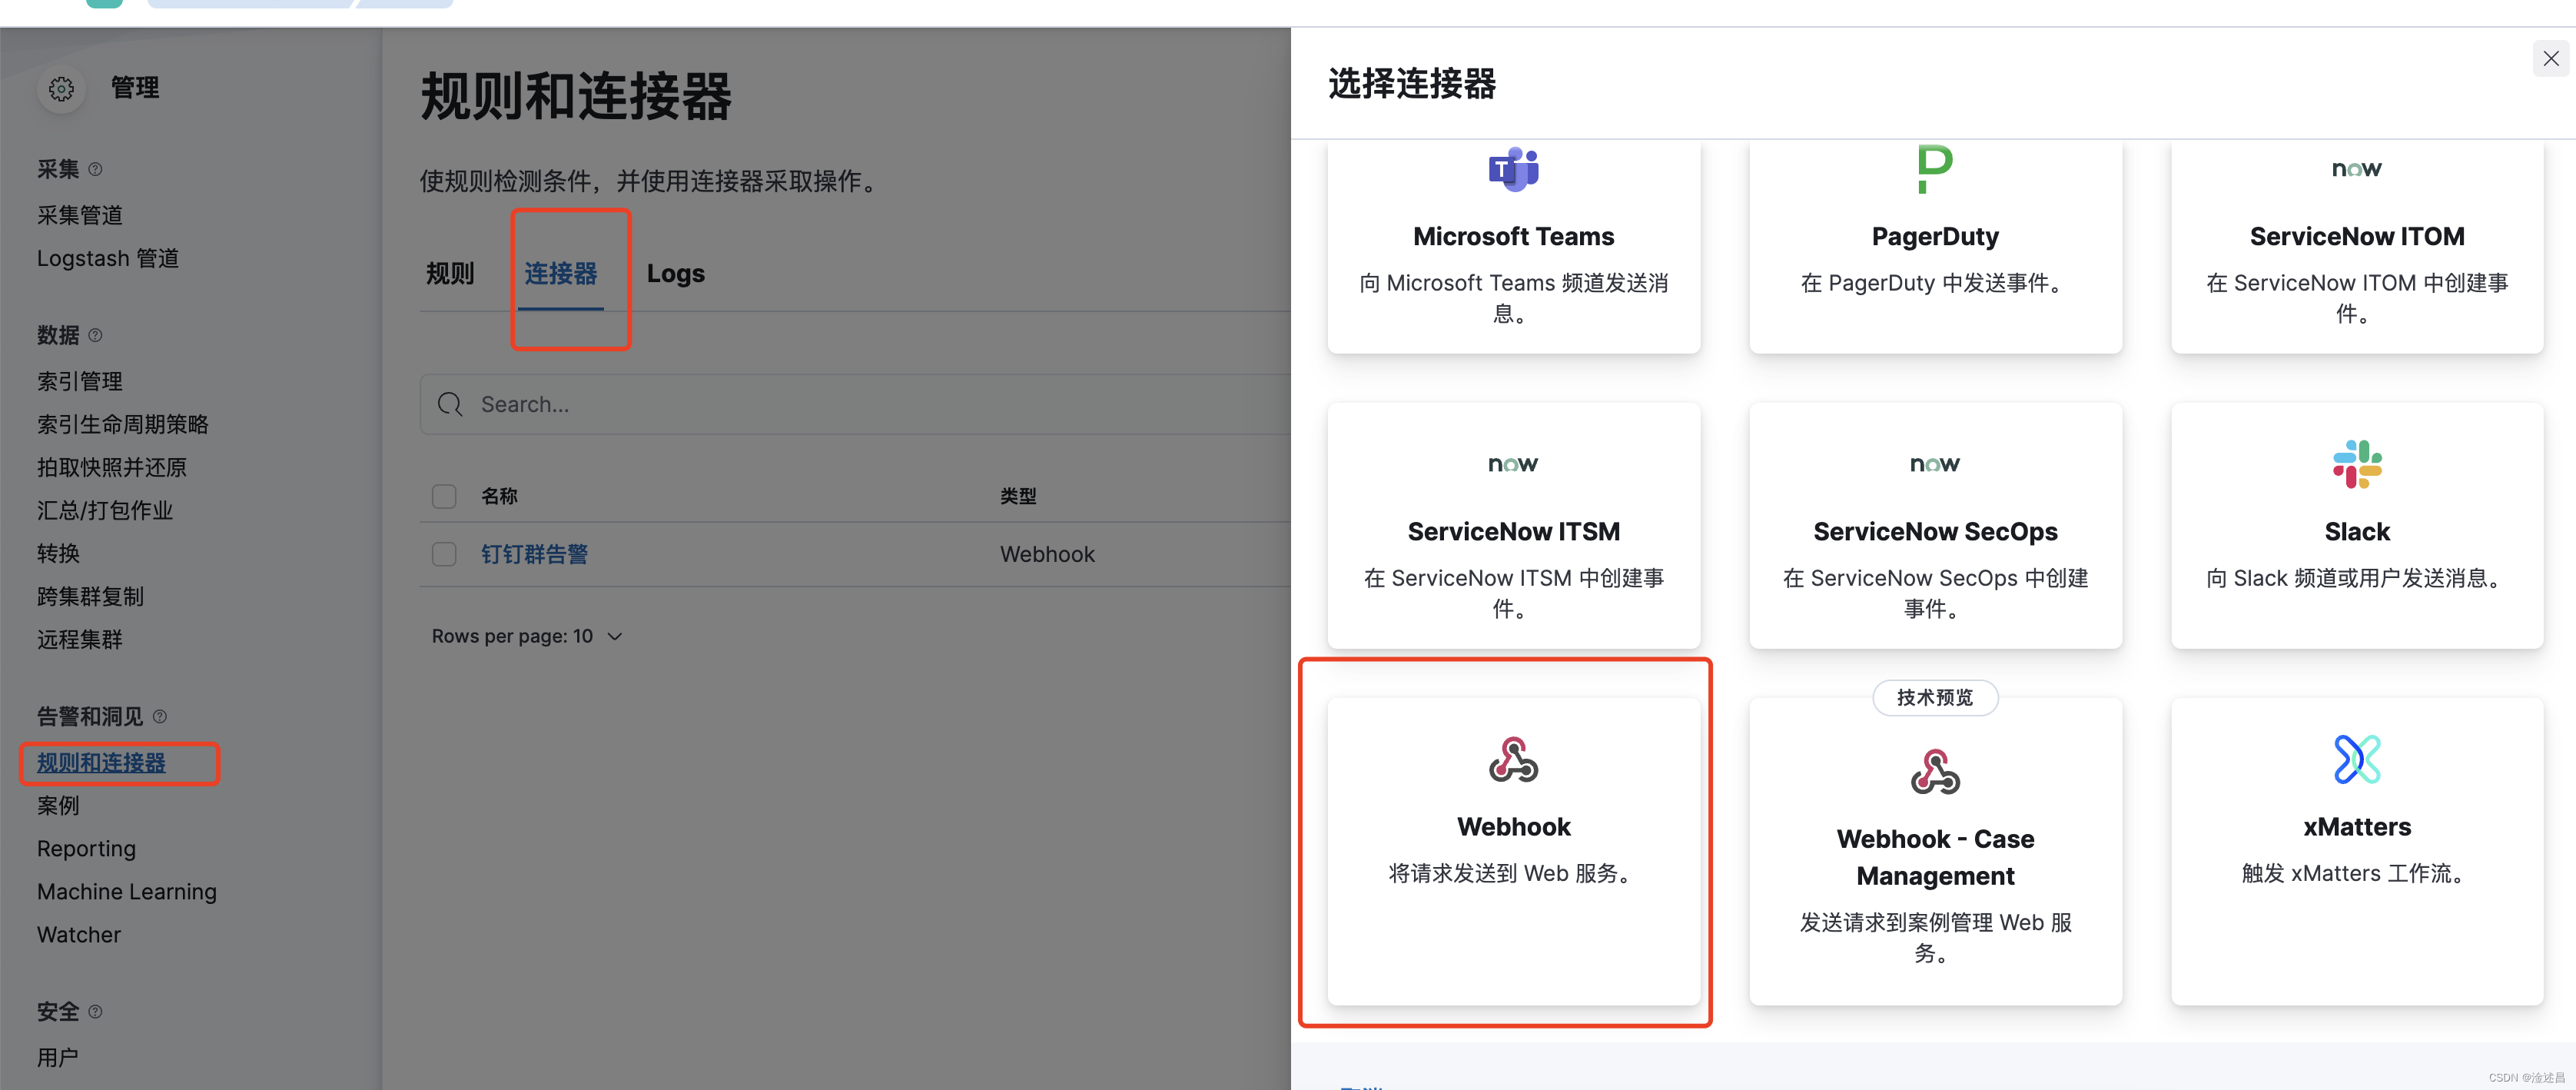
填写好通道名称,机器人的api,请求头,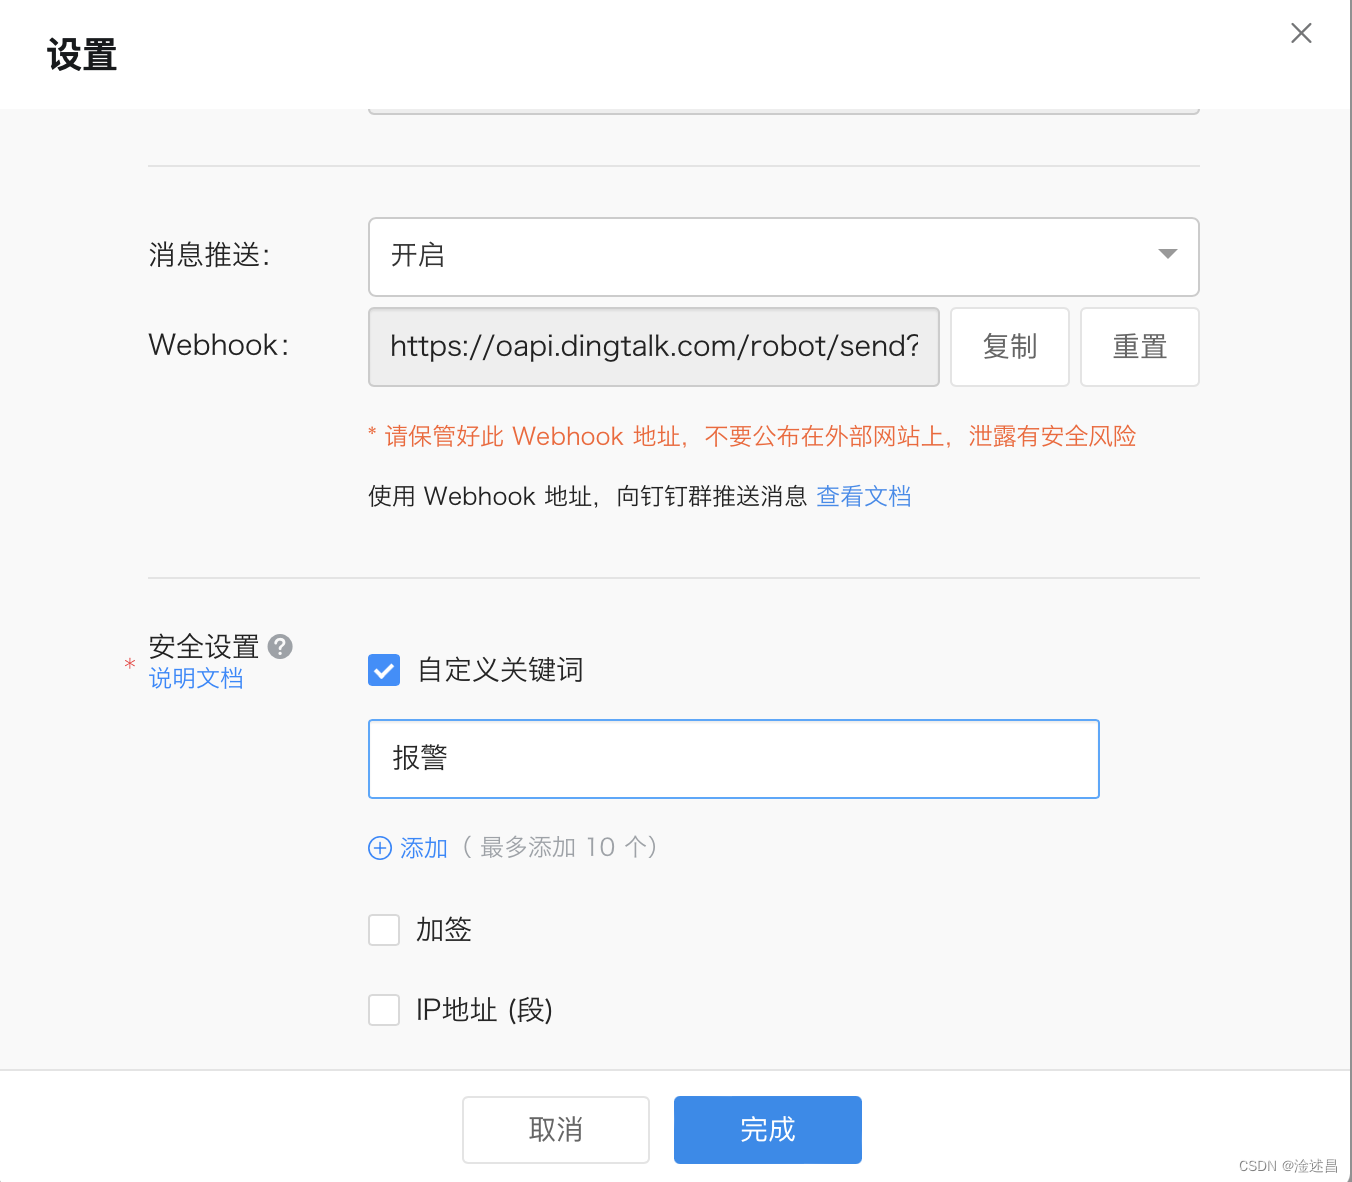
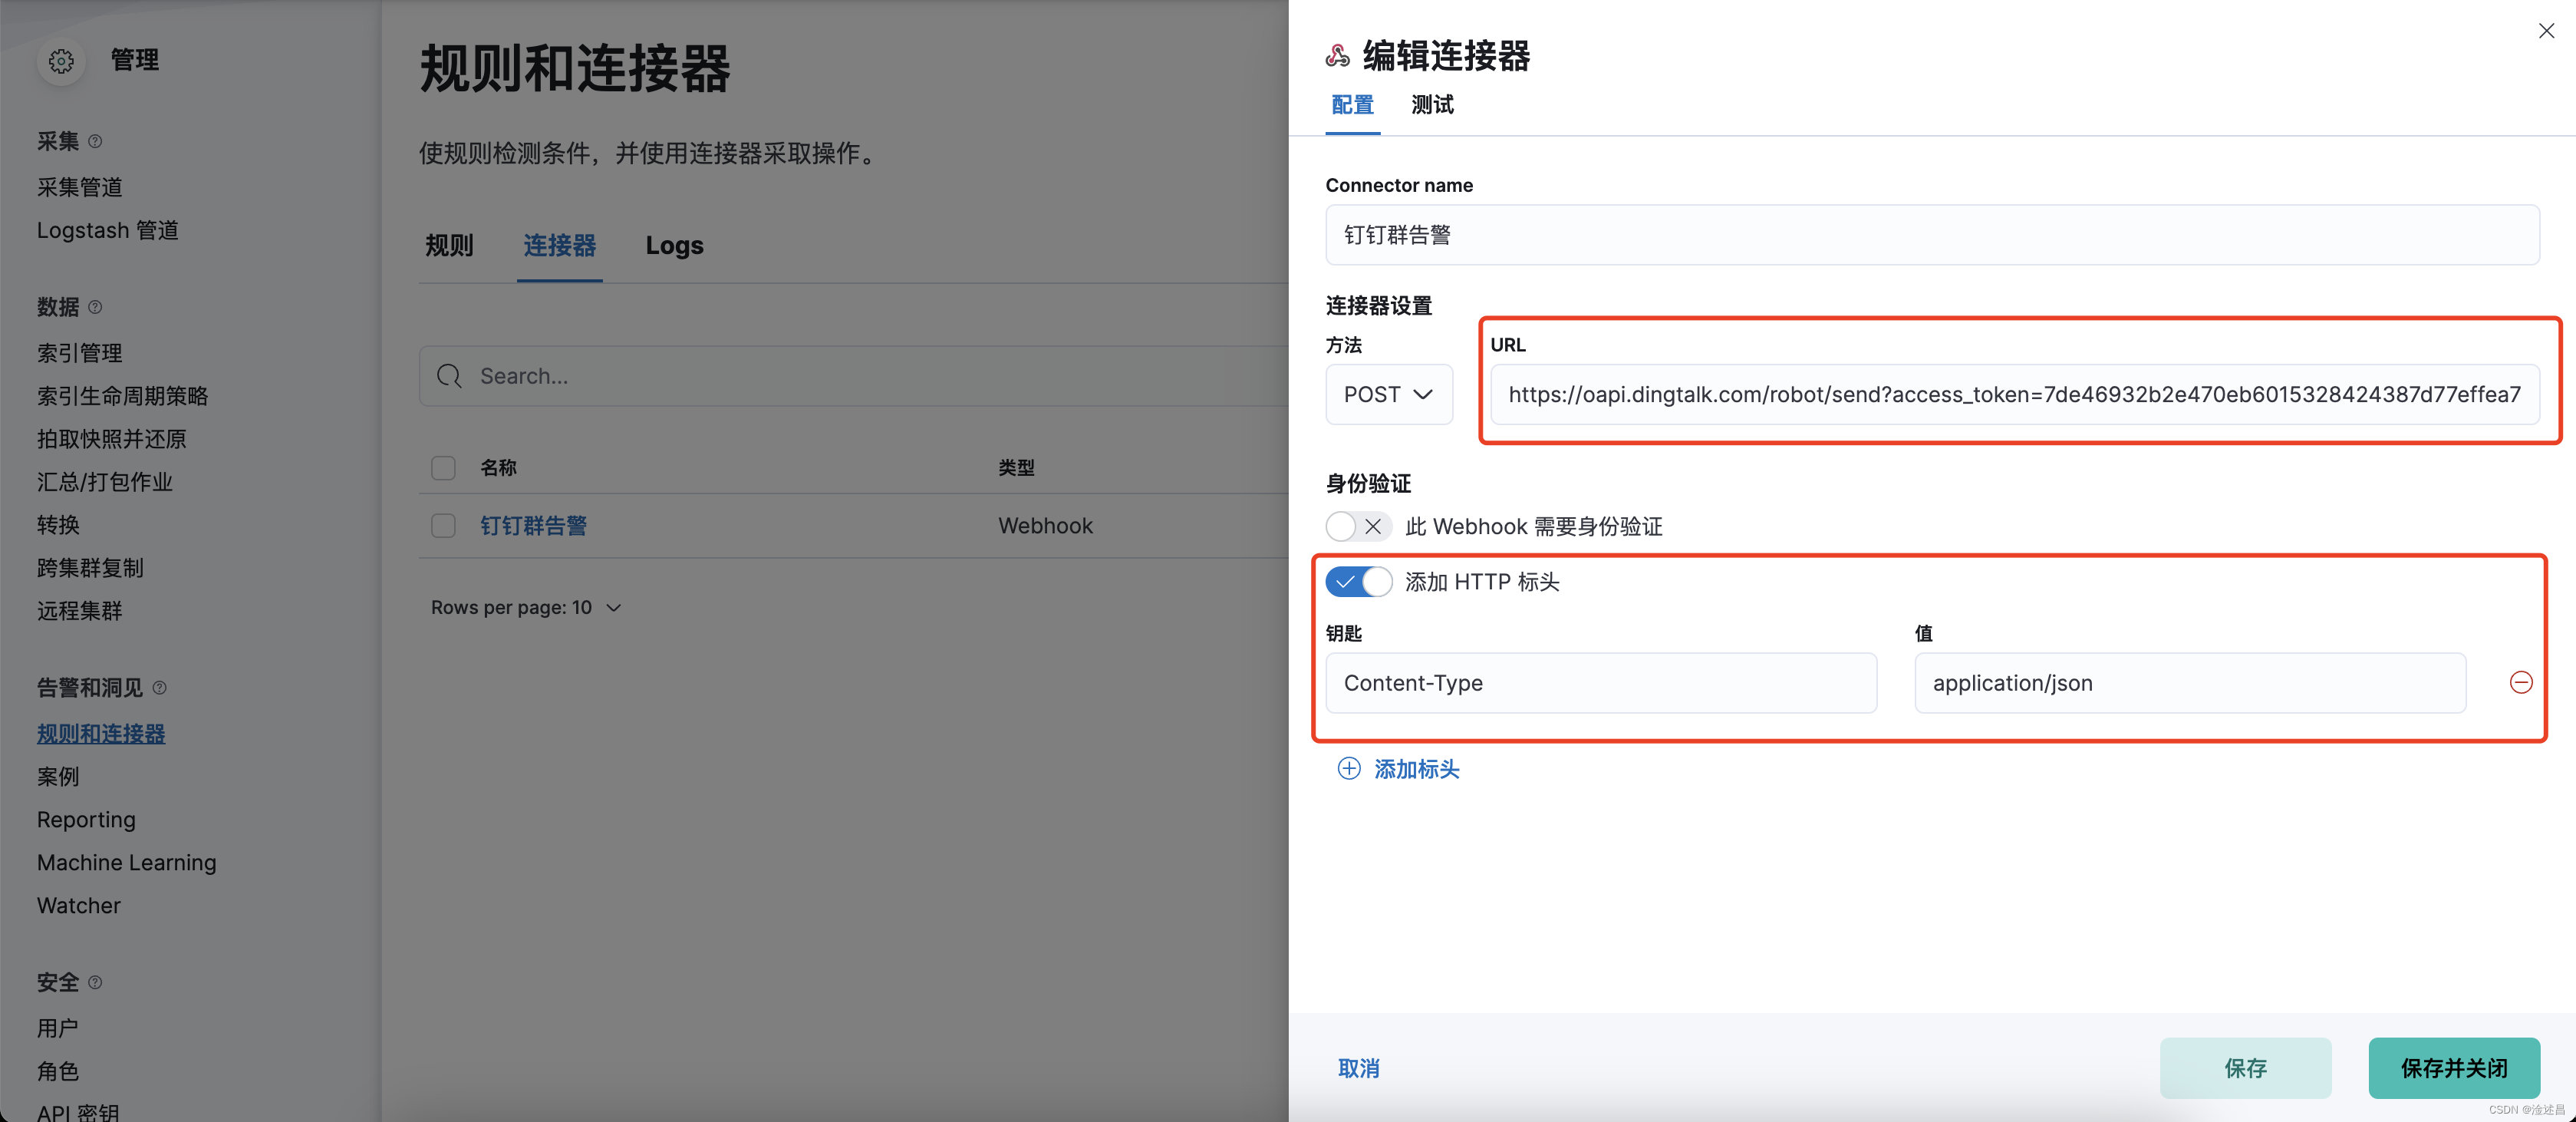
然后我们发送一条测试消息,测试通道的连通性。推送的消息格式可以参考钉钉机器人文档,如果发送失败,则需要排查服务器是否能够访问
https://oapi.dingtalk.com
。
{"msgtype": "markdown","markdown": {"title":"杭州天气","text": "#### 杭州天气 @150XXXXXXXX \n> 9度,西北风1级,空气良89,相对温度73%\n> \n> ###### 10点20分发布 [天气](https://www.dingtalk.com) \n"},"at": {"atMobiles": ["150XXXXXXXX"],"atUserIds": ["user123"],"isAtAll": false
}}
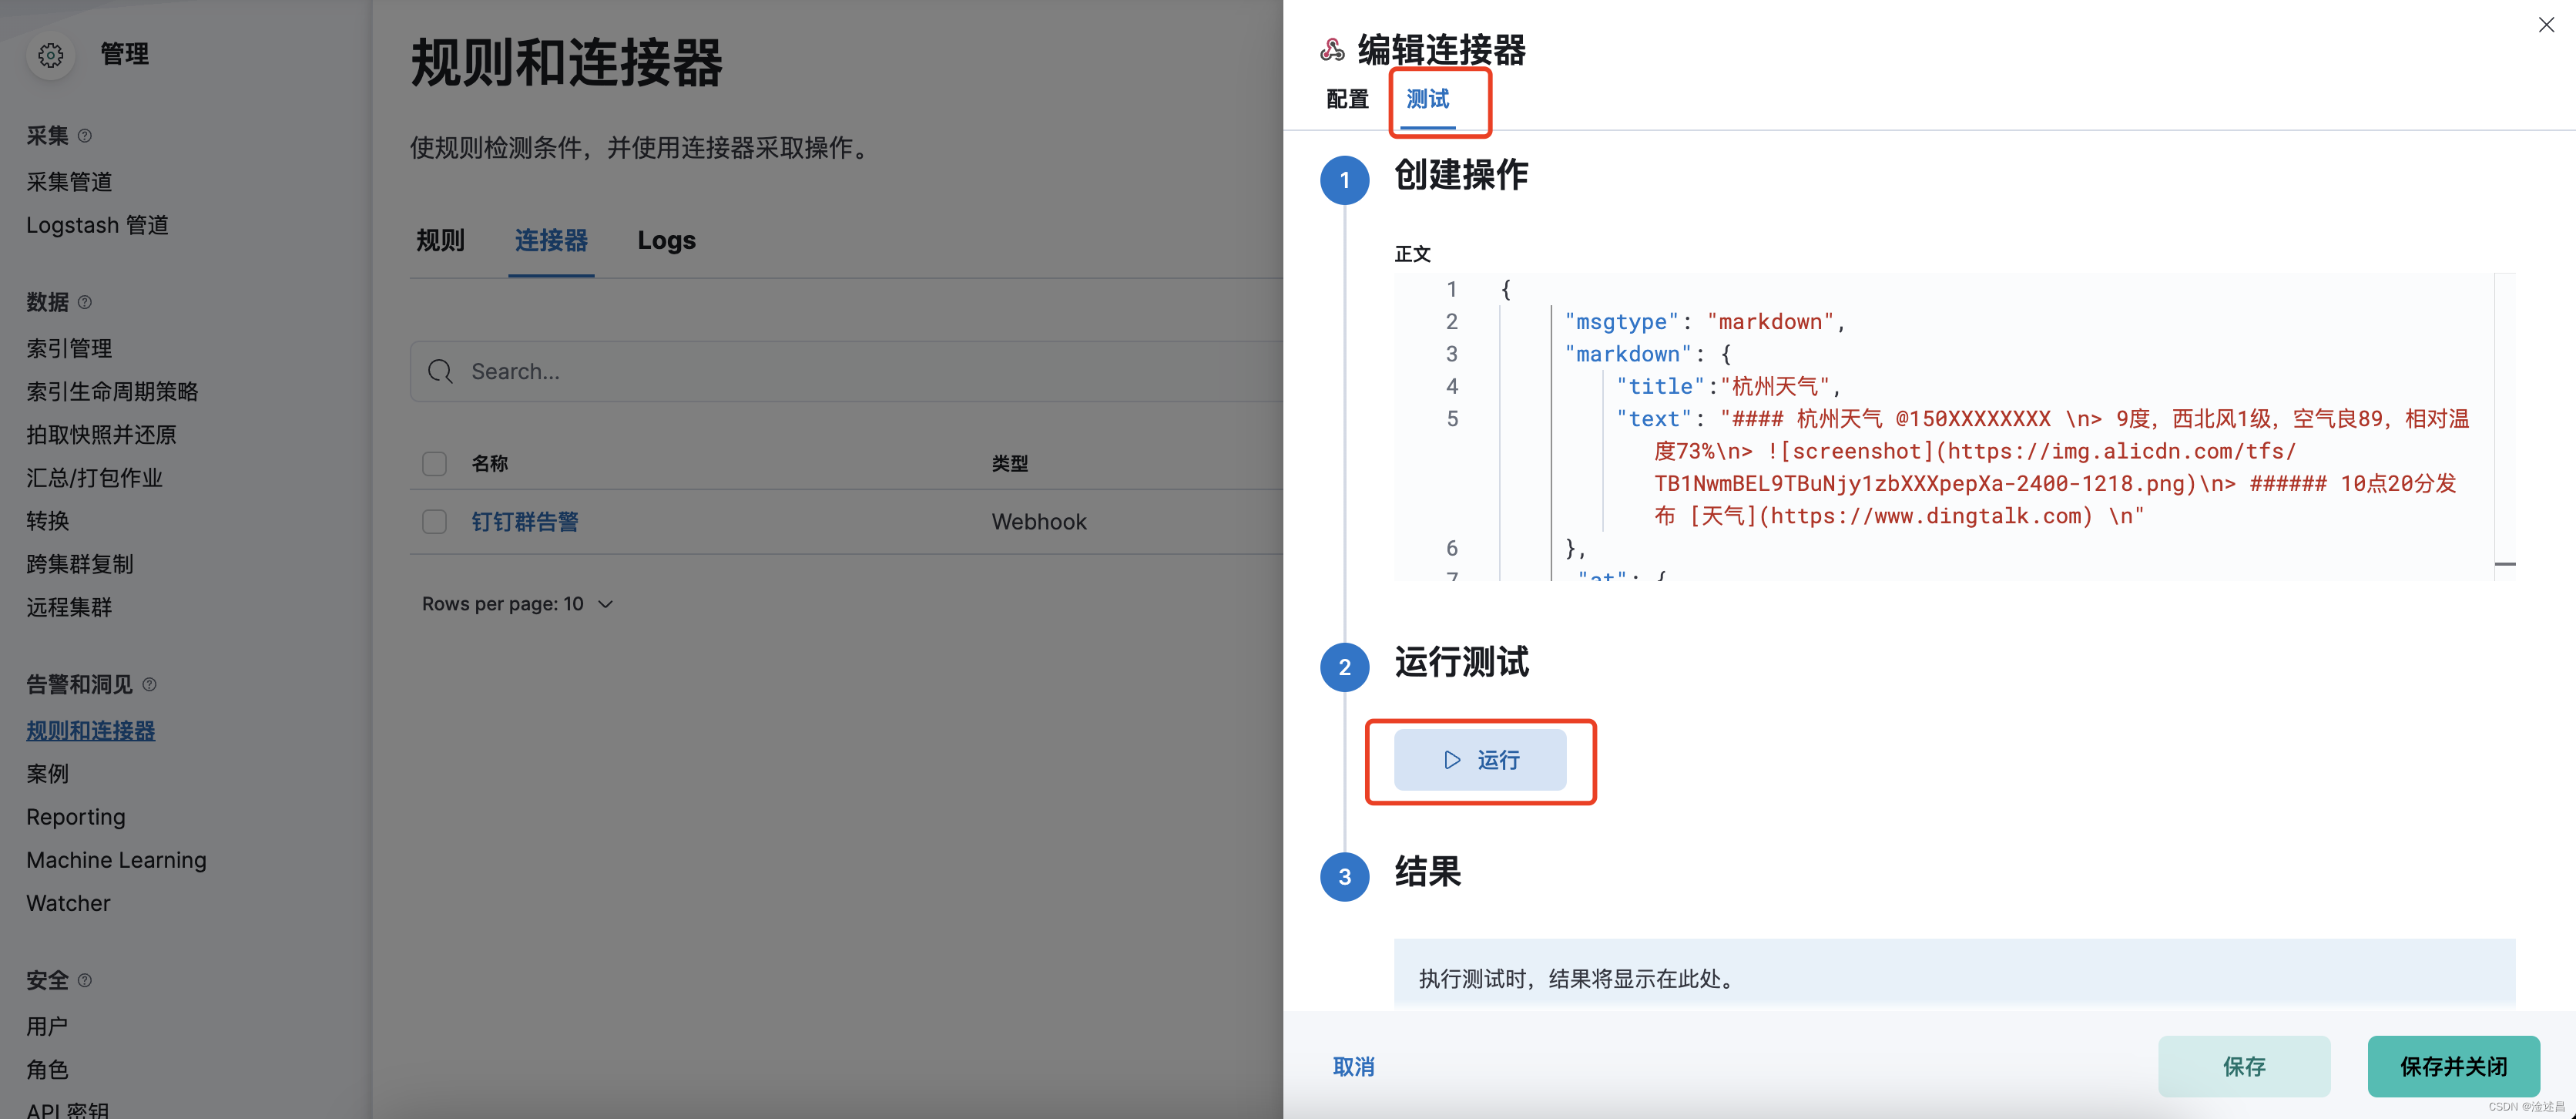
OK,测试成功
9:创建告警规则
选择创建规则,填写好规则名称、通知的时机,告警规则的类型。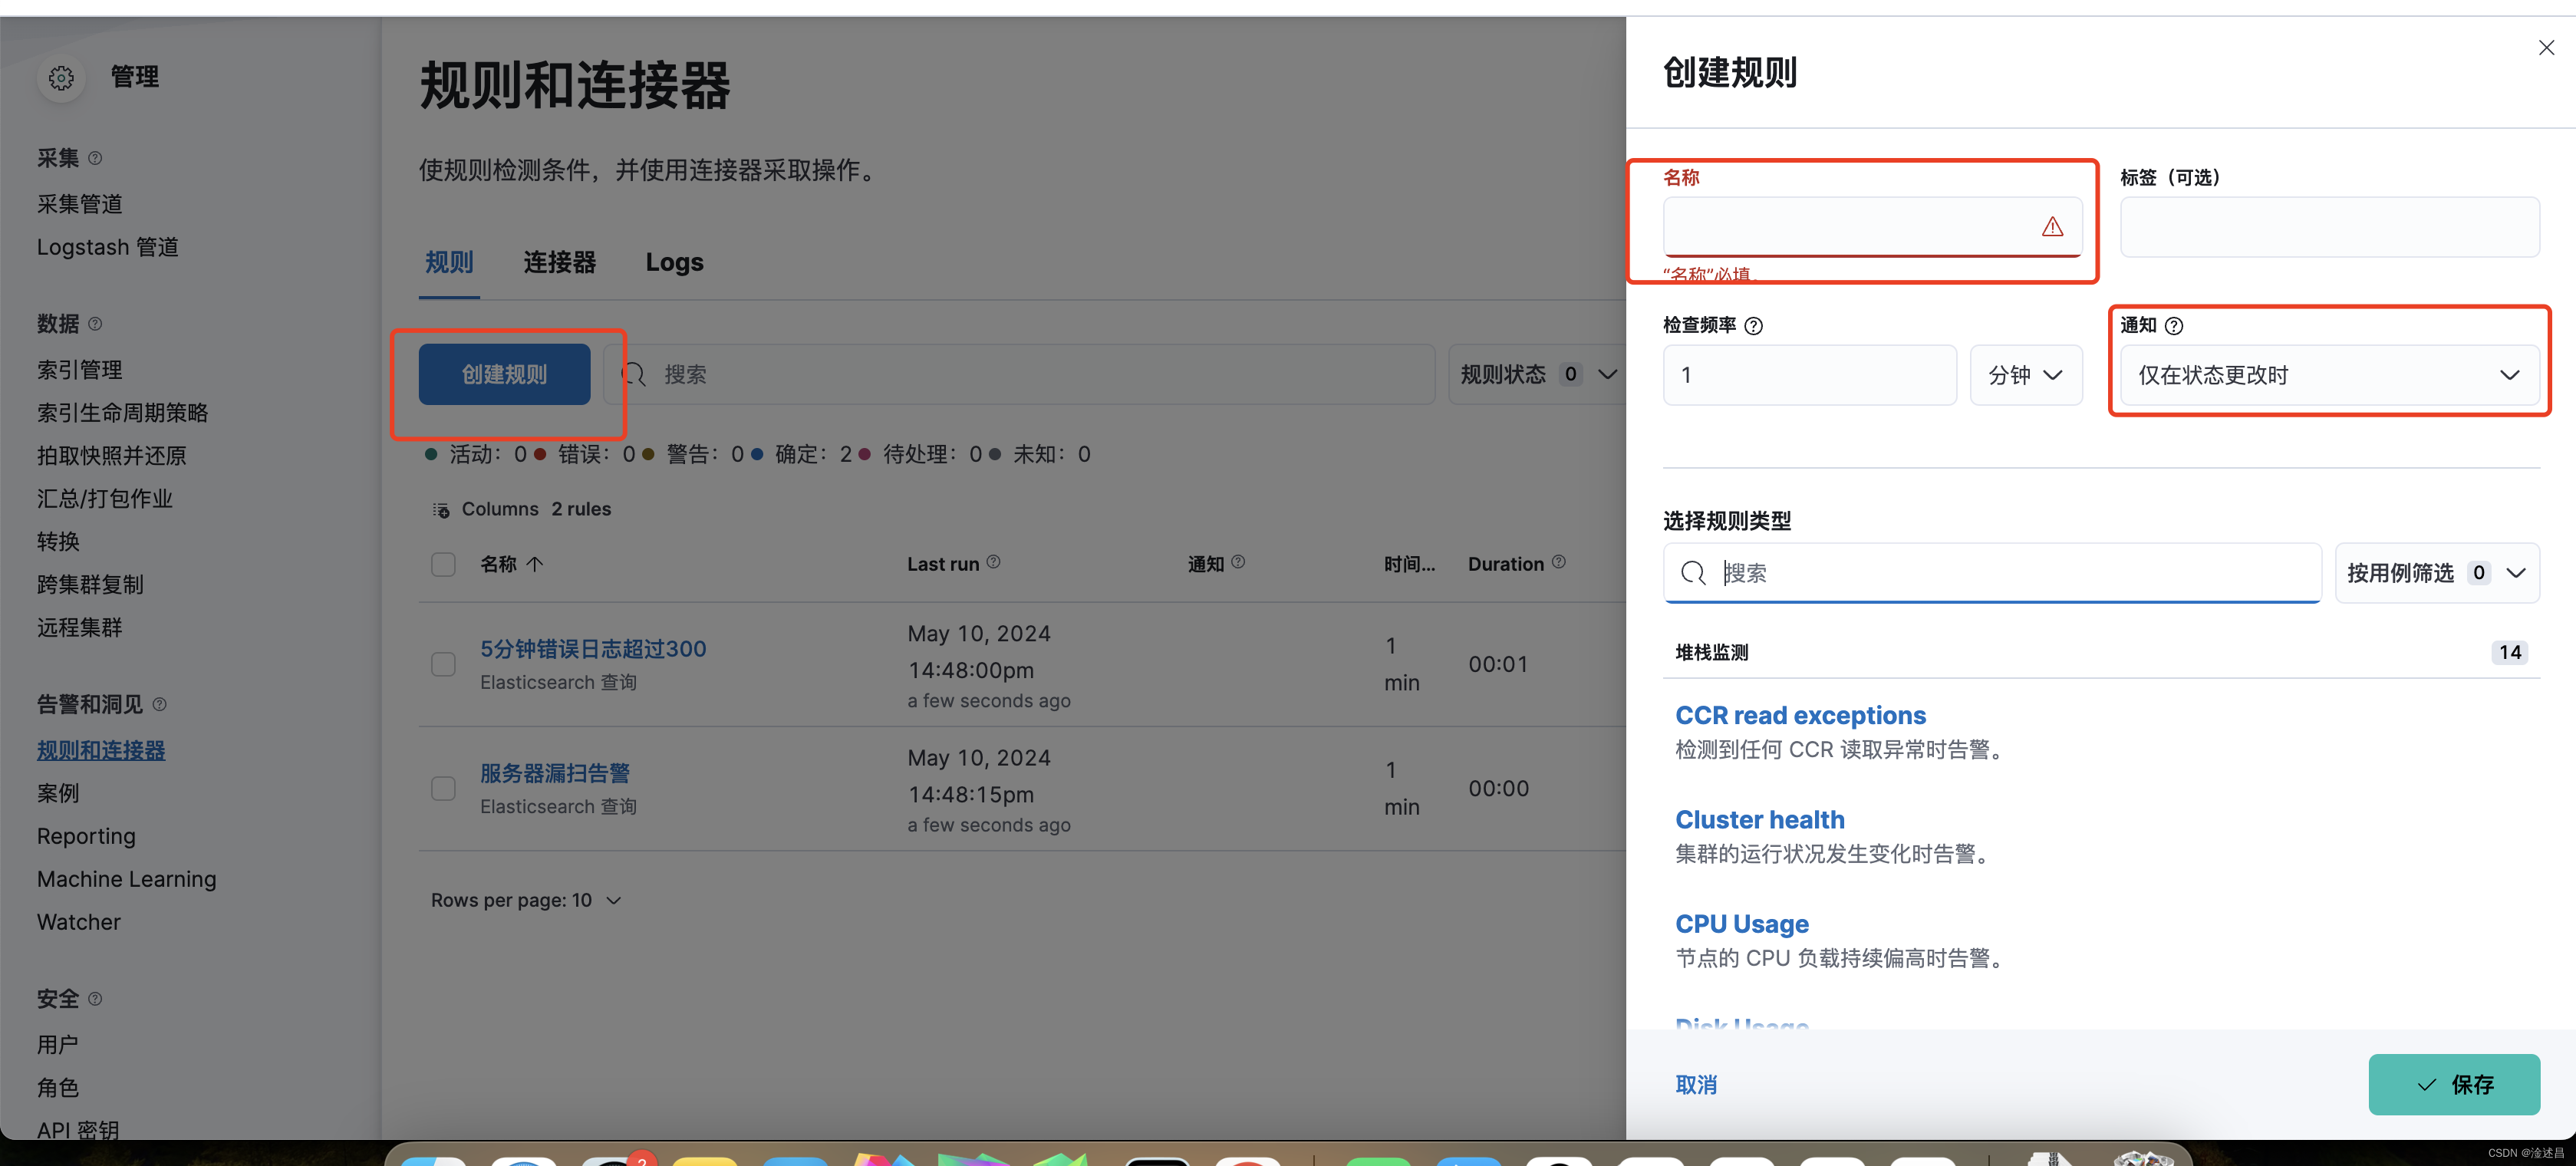
这里我们选择Elasticsearch查询,语法选择KQL,然后选择数据视图,查询规则,阈值等设置。发送的文档数目是吧匹配到的原始文档存储到变量里面去,下面会用到。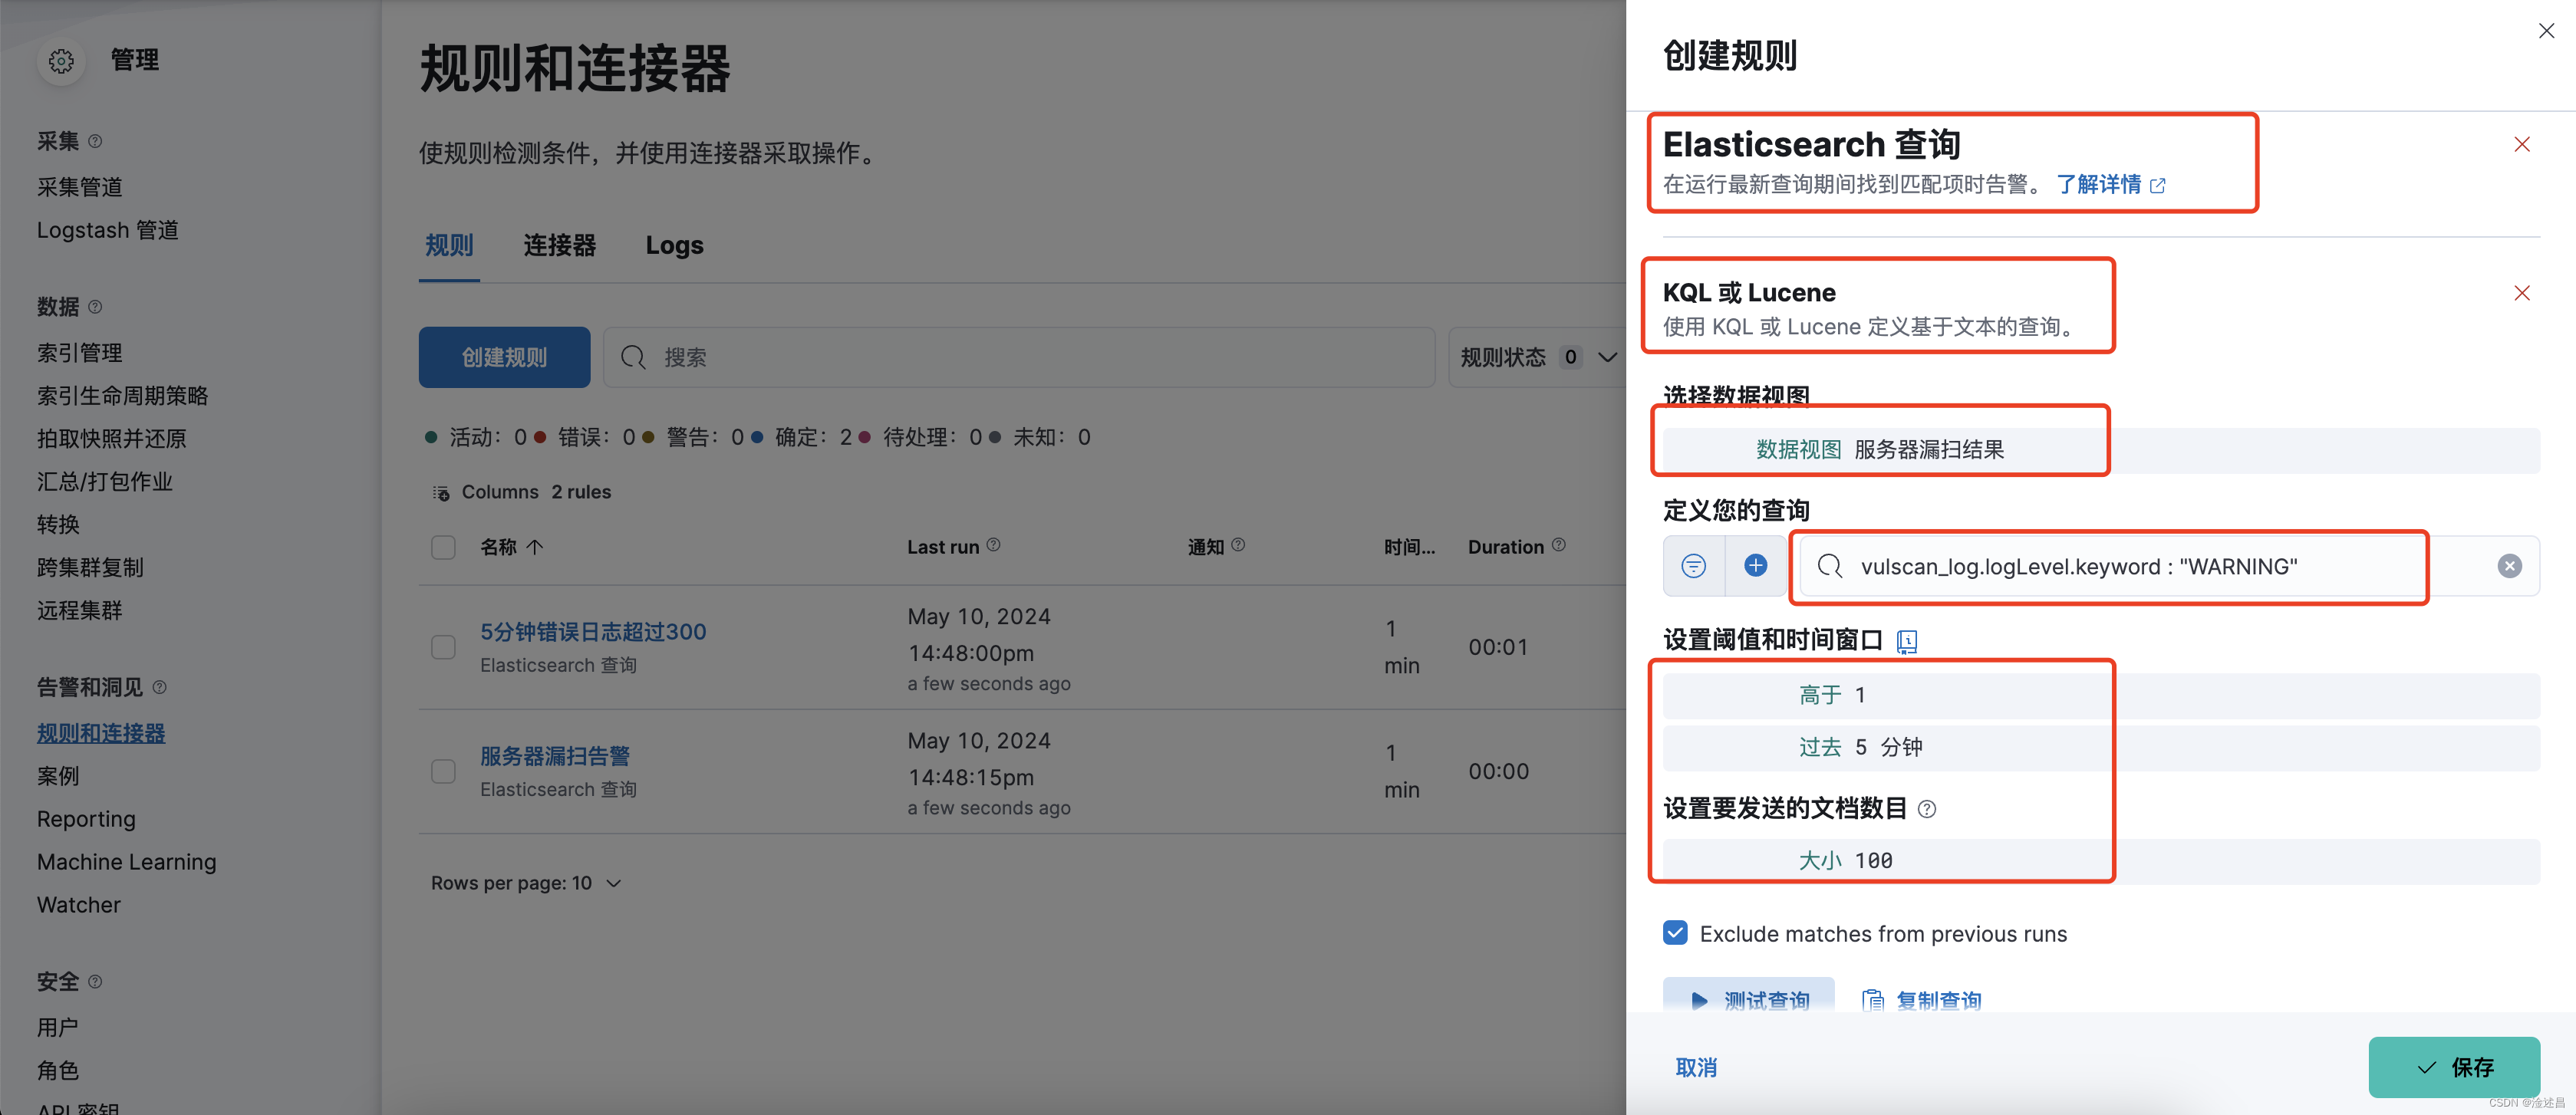
填写完成之后我们可以点击测试查询,看看规则是否能匹配到文档。如果匹配成功了我们添加一个操作,选择Webhook,选择我们开始创建的连接器。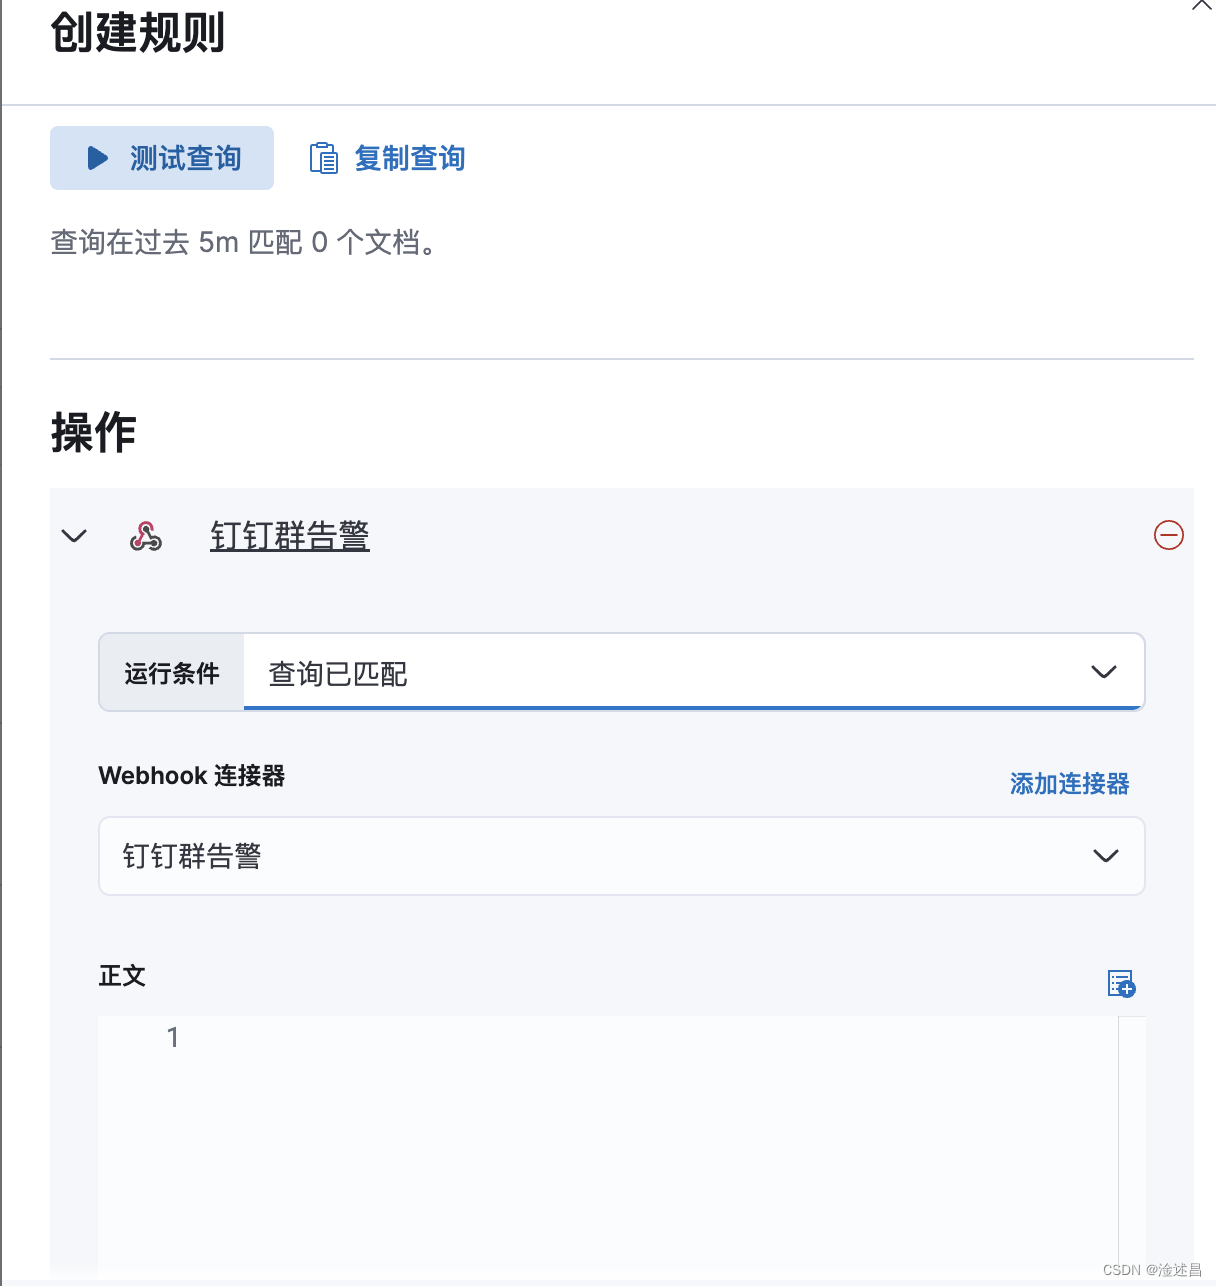
在正文里面可以参考我写的文档,变量的引用可以参考Kibana官网文档。
context.hits
代表匹配到的原始文档,但是有很多信息我们没必要咋告警中体现出来,所以使用
{{#context.hits}}
和
{{/context.hits}}
语法,把需要展示的字段信息,写在中间就可以遍历出文档里面的内容了。
{"msgtype": "markdown","markdown": {"title":"日志告警","text": """### <font color="#FF0000">告警触发 - 日志告警</font>----**告警名称**: {{rule.name}}-**告警规则**: {{context.conditions}}-**触发时值**: {{context.value}}-**触发时间**: {{context.date}}{{#context.hits}}-**告警IP**: {{_source.agent_hostname}}-**原始日志**: <font color="#FF0000">{{_source.message}}</font>
{{/context.hits}}-**日志查询规则**: {{params.searchConfiguration}}"""
     }}
看看最终的效果,搞定!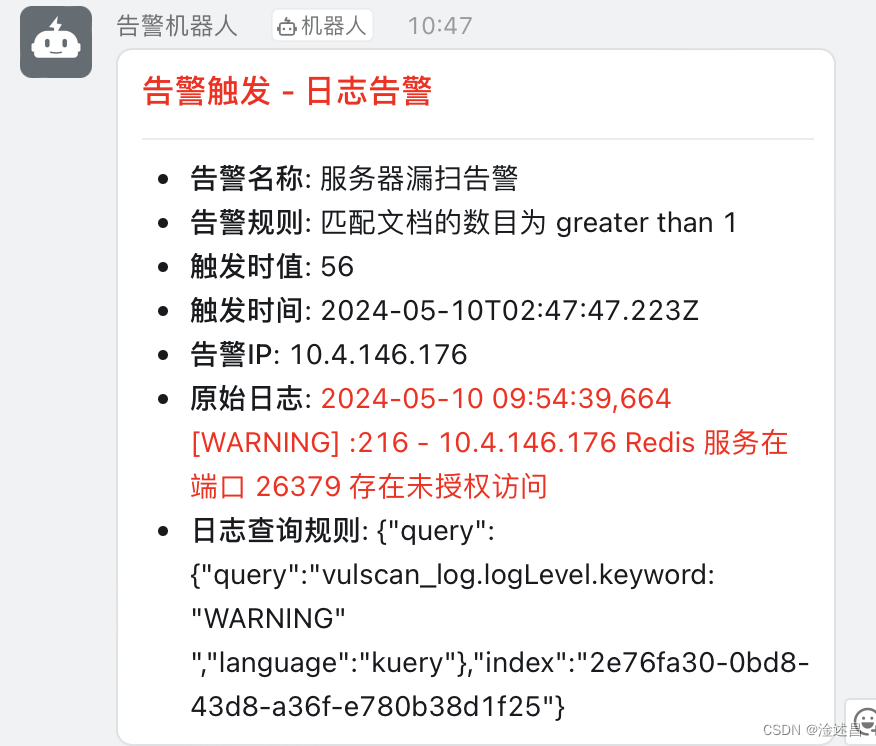
版权归原作者 淦述昌 所有, 如有侵权,请联系我们删除。