
目录
欢迎大家回到《Java教程之Spring30天快速入门》,本教程所有示例均基于Maven实现,如果您对Maven还很陌生,请移步本人的博文《如何在windows11下安装Maven并配置以及 IDEA配置Maven环境》,本文的上一篇为《SpringMVC入门案例总结与SpringMVC工作流程分析》
1 问题分析
入门案例的内容已经做完了,在入门案例中我们创建过一个SpringMvcConfig的配置类,再回想前面咱们学习Spring的时候也创建过一个配置类SpringConfig。这两个配置类都需要加载资源,那么它们分别都需要加载哪些内容?
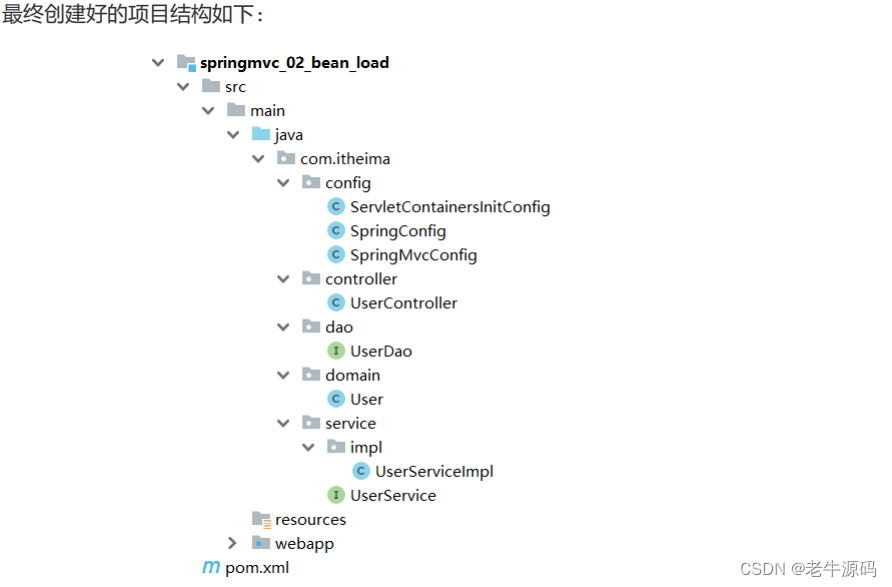
我们先来看下目前我们的项目目录结构: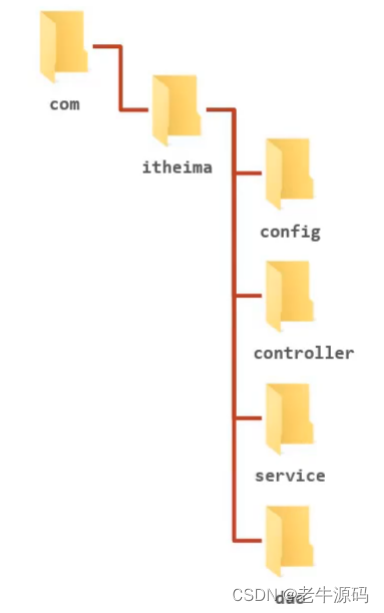
- config目录存入的是配置类,写过的配置类有: - ServletContainersInitConfig- SpringConfig- SpringMvcConfig- JdbcConfig- MybatisConfig
- controller目录存放的是SpringMVC的controller类
- service目录存放的是service接口和实现类
- dao目录存放的是dao/Mapper接口
controller、service和dao这些类都需要被容器管理成bean对象,那么到底是该让SpringMVC加
载还是让Spring加载呢?
- SpringMVC加载其相关bean(表现层bean),也就是controller包下的类
- Spring控制的bean - 业务bean(Service)- 功能bean(DataSource,SqlSessionFactoryBean,MapperScannerConfigurer等)
分析清楚谁该管哪些bean以后,接下来要解决的问题是如何让Spring和SpringMVC分开加载各自的内容。
在SpringMVC的配置类SpringMvcConfig中使用注解@ComponentScan,我们只需要将其扫描范围设置到controller即可,如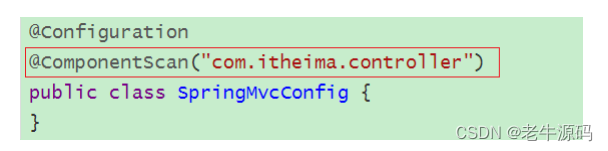
在Spring的配置类SpringConfig中使用注解@ComponentScan ,当时扫描的范围中其实是已经包含
了controller,如:
从包结构来看的话,Spring已经多把SpringMVC的controller类也给扫描到,所以针对这个问题
该如何解决,就是咱们接下来要学习的内容。
概况的描述下咱们现在的问题就是
因为功能不同,如何避免Spring错误加载到SpringMVC的bean
?
2 思路分析
针对上面的问题,解决方案也比较简单,就是:
- 加载Spring控制的bean的时候排除掉SpringMVC控制的备案
具体该如何排除,有两种方式来解决:
- 方式一:Spring加载的bean设定扫描范围为com.itheima,排除掉controller包中的bean
- 方式二:Spring加载的bean设定扫描范围为精准范围,例如service包、dao包等
- 方式三:不区分Spring与SpringMVC的环境,加载到同一个环境中[了解即可]
3 环境准备
- 创建一个Web的Maven项目
- pom.xml添加Spring依赖
<?xml version="1.0" encoding="UTF-8"?><projectxmlns="http://maven.apache.org/POM/4.0.0"xmlns:xsi="http://www.w3.org/2001/XMLSchema-instance"xsi:schemaLocation="http://maven.apache.org/POM/4.0.0
http://maven.apache.org/xsd/maven-4.0.0.xsd"><modelVersion>4.0.0</modelVersion><groupId>com.itheima</groupId><artifactId>springmvc_02_bean_load</artifactId><version>1.0-SNAPSHOT</version><packaging>war</packaging><dependencies><dependency><groupId>javax.servlet</groupId><artifactId>javax.servlet-api</artifactId>
16 <version>3.1.0</version>
17 <scope>provided</scope>
18 </dependency>
19 <dependency>
20 <groupId>org.springframework</groupId>
21 <artifactId>spring-webmvc</artifactId>
22 <version>5.2.10.RELEASE</version>
23 </dependency>
24 <dependency>
25 <groupId>com.alibaba</groupId>
26 <artifactId>druid</artifactId>
27 <version>1.1.16</version>
28 </dependency>
29
30 <dependency>
31 <groupId>org.mybatis</groupId>
32 <artifactId>mybatis</artifactId>
33 <version>3.5.6</version>
34 </dependency>
35
36 <dependency>
37 <groupId>mysql</groupId>
38 <artifactId>mysql-connector-java</artifactId>
39 <version>5.1.47</version>
40 </dependency>
41
42 <dependency>
43 <groupId>org.springframework</groupId>
44 <artifactId>spring-jdbc</artifactId>
45 <version>5.2.10.RELEASE</version>
46 </dependency>
47
48 <dependency>
49 <groupId>org.mybatis</groupId>
50 <artifactId>mybatis-spring</artifactId>
51 <version>1.3.0</version>
52 </dependency>
53 </dependencies>
54
55 <build>
56 <plugins>
57 <plugin>
58 <groupId>org.apache.tomcat.maven</groupId>
59 <artifactId>tomcat7-maven-plugin</artifactId>
60 <version>2.1</version>
61 <configuration><port>80</port>
63 <path>/</path>
64 </configuration>
65 </plugin>
66 </plugins>
67 </build>
68 </project>
- 创建对应的配置类
publicclassServletContainersInitConfigextendsAbstractDispatcherServletInitializer{2protectedWebApplicationContextcreateServletApplicationContext(){3AnnotationConfigWebApplicationContext ctx =newAnnotationConfigWebApplicationContext();4 ctx.register(SpringMvcConfig.class);5return ctx;6}7protectedString[]getServletMappings(){8returnnewString[]{"/"};9}10protectedWebApplicationContextcreateRootApplicationContext(){11returnnull;12}13}1415@Configuration16@ComponentScan("com.itheima.controller")17publicclassSpringMvcConfig{18}1920@Configuration21@ComponentScan("com.itheima")22publicclassSpringConfig{23}
- 编写Controller,Service,Dao,Domain类
@Controller2publicclassUserController{34@RequestMapping("/save")5@ResponseBody6publicStringsave(){7System.out.println("user save ...");8return"{'info':'springmvc'}";}}publicinterfaceUserService{publicvoidsave(User user);}@ServicepublicclassUserServiceImplimplementsUserService{publicvoidsave(User user){System.out.println("user service ...");}}publicinterfaceUserDao{@Insert("insert into tbl_user(name,age)values(#{name},#{age})")publicvoidsave(User user);}publicclassUser{privateInteger id;privateString name;privateInteger age;//setter..getter..toString略}
4 设置bean加载控制
方式一:修改Spring配置类,设定扫描范围为精准范围。
@Configuration@ComponentScan({"com.itheima.service","comitheima.dao"})publicclassSpringConfig{}
说明:
上述只是通过例子说明可以精确指定让Spring扫描对应的包结构,真正在做开发的时候,因为Dao最终是交给MapperScannerConfigurer对象来进行扫描处理的,我们只需要将其扫描到service包即可。
方式二:修改Spring配置类,设定扫描范围为com.itheima,排除掉controller包中的bean
@Configuration@ComponentScan(value="com.itheima",
    [email protected](
        type =FilterType.ANNOTATION,
        classes =Controller.class))publicclassSpringConfig{}
- excludeFilters属性:设置扫描加载bean时,排除的过滤规则
- type属性:设置排除规则,当前使用按照bean定义时的注解类型进行排除 - ANNOTATION:按照注解排除- ASSIGNABLE_TYPE:按照指定的类型过滤- ASPECTJ:按照Aspectj表达式排除,基本上不会用- REGEX:按照正则表达式排除- CUSTOM:按照自定义规则排除
大家只需要知道第一种ANNOTATION即可
- classes属性:设置排除的具体注解类,当前设置排除@Controller定义的bean
如何测试controller类已经被排除掉了
publicclassApp{publicstaticvoid main (String[] args){AnnotationConfigApplicationContext ctx =newAnnotationConfigApplicationContext(SpringConfig.class);System.out.println(ctx.getBean(UserController.class));}}
如果被排除了,该方法执行就会报bean未被定义的错误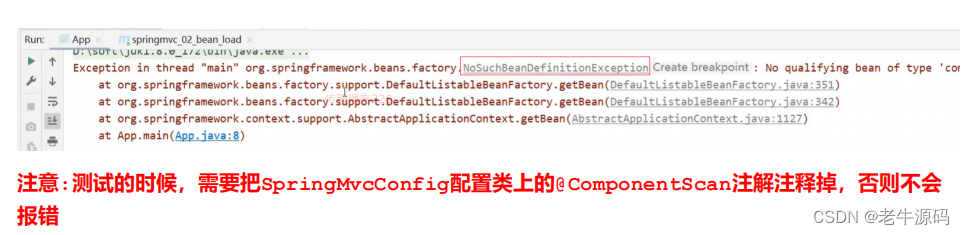
出现问题的原因是,
- Spring配置类扫描的包是com.itheima
- SpringMVC的配置类,SpringMvcConfig上有一个@Configuration注解,也会被Spring扫描到
- SpringMvcConfig上又有一个@ComponentScan,把controller类又给扫描进来了
- 所以如果不把@ComponentScan注释掉,Spring配置类将Controller排除,但是因为扫描到SpringMVC的配置类,又将其加载回来,演示的效果就出不来
- 解决方案,也简单,把SpringMVC的配置类移出Spring配置类的扫描范围即可。
最后一个问题,有了Spring的配置类,要想在tomcat服务器启动将其加载,我们需要修改ServletContainersInitConfig
1publicclassServletContainersInitConfigextendsAbstractDispatcherServletInitializer{2protectedWebApplicationContextcreateServletApplicationContext(){3AnnotationConfigWebApplicationContext ctx =newAnnotationConfigWebApplicationContext();4 ctx.register(SpringMvcConfig.class);5return ctx;6}7protectedString[]getServletMappings(){8returnnewString[]{"/"};9}10protectedWebApplicationContextcreateRootApplicationContext(){11AnnotationConfigWebApplicationContext ctx =newAnnotationConfigWebApplicationContext();12 ctx.register(SpringConfig.class);13return ctx;14}15}
对于上述的配置方式,Spring还提供了一种更简单的配置方式,可以不用再去创建AnnotationConfigWebApplicationContext对象,不用手动register对应的配置类,如何实现?
publicclassServletContainersInitConfigextendsAbstractAnnotationConfigDispatcherServletInitializer{protectedClass<?>[]getRootConfigClasses(){returnnewClass[]{SpringConfig.class};}protectedClass<?>[]getServletConfigClasses(){returnnewClass[]{SpringMvcConfig.class};}protectedString[]getServletMappings(){returnnewString[]{"/"};}}
5 知识点1:@ComponentScan
名称@ComponentScan类型类注解位置类定义上方作用设置spring配置类扫描路径,用于加载使用注解格式定义的bean相关属性excludeFilters:排除扫描路径中加载的bean,需要指定类别(type)和具体项(classes)includeFilters:加载指定的bean,需要指定类别(type)和具体项(classes)
版权归原作者 老牛源码 所有, 如有侵权,请联系我们删除。