适用版本
redhat5.x,6.x,7.x
centos5.x,6.x,7.x
suse9、10、11、12
加固要求
检查口令生存周
加固方法
在文件/etc/login.defs中设置 PASS_MAX_DAYS 不大于标准值,PASS_MAX_DAYS 90,如果该文件不存在,则创建并按照要求进行编辑。
检查方法
使用命令:
cat /etc/login.defs |grep PASS_MAX_DAYS
结果中PASS_MAX_DAYS不大于90为符合。
centos6.5:

centos7.7:

redhat7:

SUSE Linux Enterprise Server 11 SP4:

SUSE 12 SP4:

加固要求
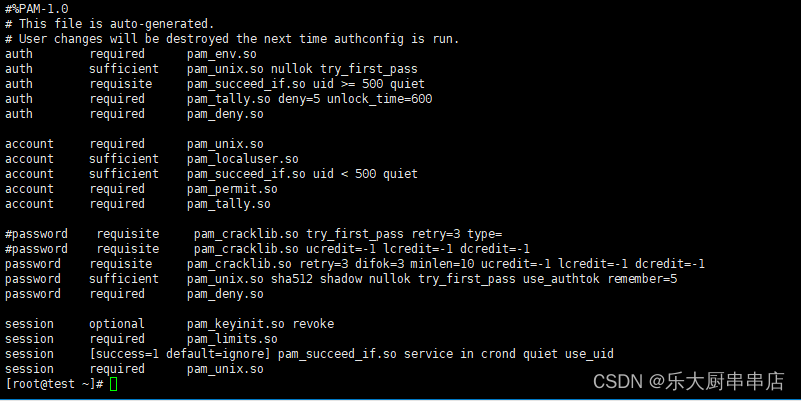
所有的系统账户,口令长度应至少8位,并包括:数字、小写字母、大写字母和特殊符号4类中至少3类,配置须通过堡垒机实现,所有账户均应纳入堡垒机管理
加固方法
centos6.x系统:
修改/etc/pam.d/system-auth文件, 在ucredit=-1 lcredit=-1 dcredit=-1 ocredit=-1 选3种,追加到password requisite pam_cracklib.so后面,添加到配置文件中。
centos7.x系统:
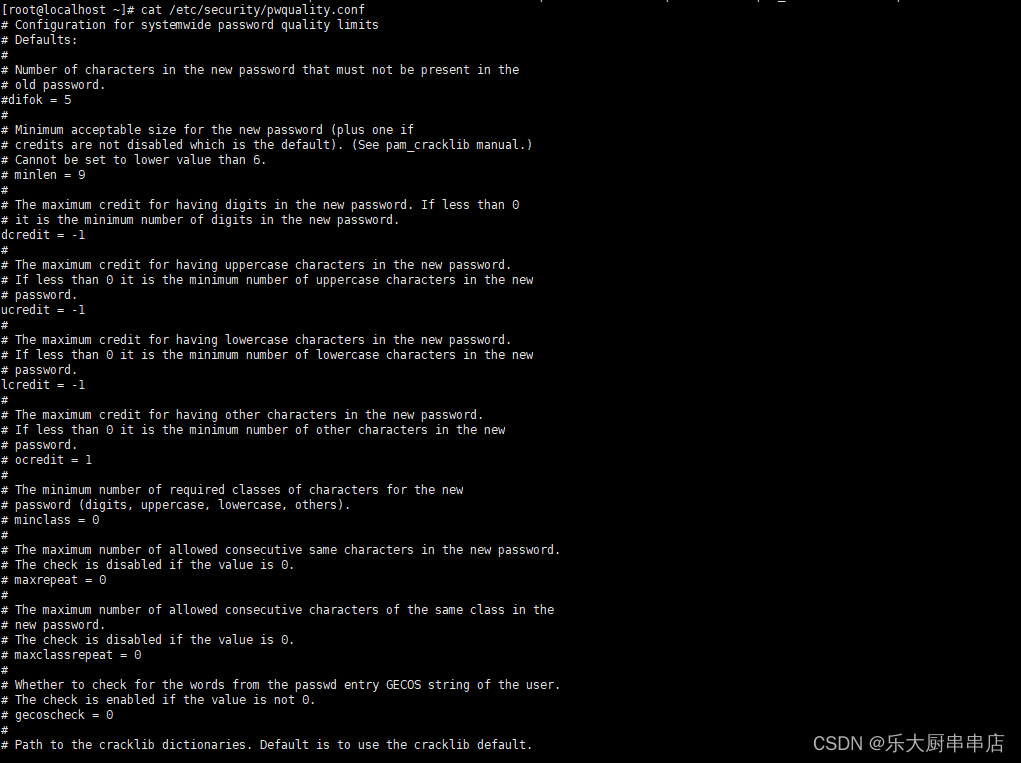
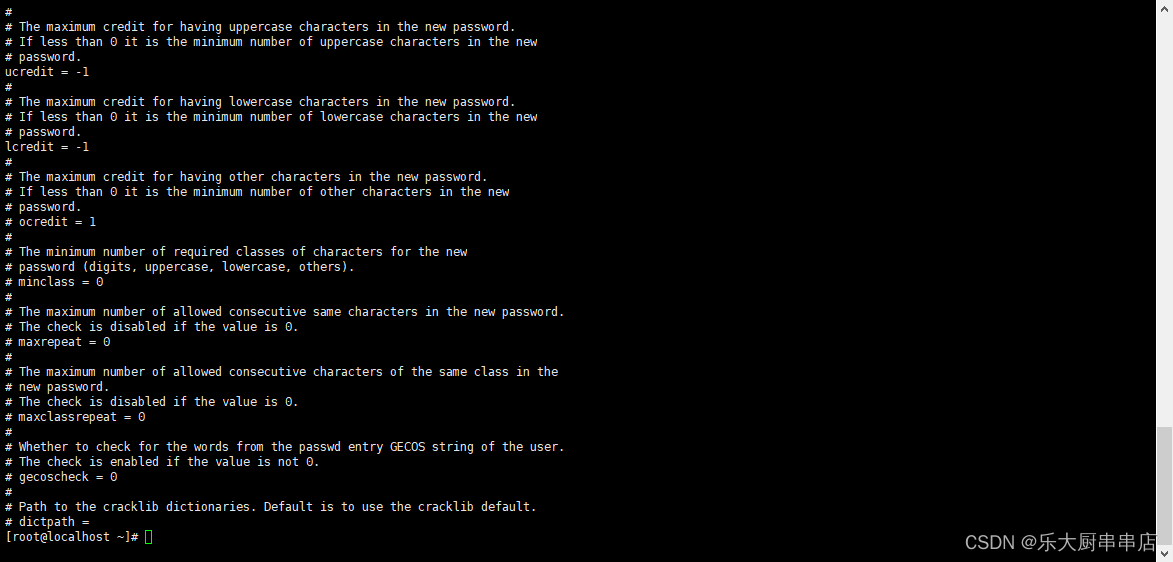
修改/etc/security/pwquality.conf 配置文件,将ucredit、 lcredit、dcredit、ocredit四个参数中至少任意三项的注释去掉并且将对应的值修改为“-1”
Suse9:
修改/etc/pam.d/passwd文件, 在ucredit=-1 lcredit=-1 dcredit=-1 ocredit=-1 选3种,追加到password requisite pam_cracklib.so后面,添加到配置文件中。
Suse10,Suse11:
修改/etc/pam.d/common-password文件, 在ucredit=-1 lcredit=-1 dcredit=-1 ocredit=-1 选3种,追加到password requisite pam_cracklib.so后面,添加到配置文件中。
例如:password requisite pam_cracklib.so ucredit=-1 lcredit=-1 dcredit=-1
注:ucredit:大写字母个数;lcredit:小写字母个数;dcredit:数字个数;ocredit:特殊字符个数。
检查方法
centos7.x、Redhat7 使用命令:
cat /etc/security/pwquality.conf
centos6.x、redhat版本使用命令:
cat /etc/pam.d/system-auth
Suse9操作系统使用命令:
cat /etc/pam.d/passwd
Suse10,Suse11操作系统:
cat /etc/pam.d/common-password
结果中包含ucredit=-1 lcredit=-1 dcredit=-1 ocredit=-1中任意三种或以上为符合。
centos6.5:
centos7.7:
redhat7:
SUSE Linux Enterprise Server 11 SP4:

SUSE 12 SP4:

加固要求
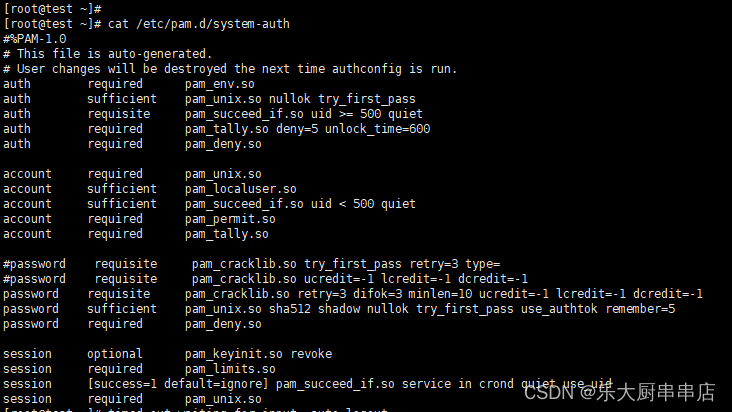
密码重复使用次数限制不超过5次
加固方法
centos/redhat:
运行 authconfig --help 查看相关帮助并配置
Suse9:编辑/etc/pam.d/passwd文件,修改设置如下 password sufficient pam_unix.so md5 shadow nullok try_first_pass use_authtok remember=5
Suse10,Suse11,Suse12:编辑/etc/pam.d/common-password文件, 修改设置如下 password sufficient pam_unix.so md5 shadow nullok try_first_pass use_authtok remember=5
检查方法
centos7.x、Redhat7 使用命令:
cat /etc/security/pwquality.conf
centos6.x、redhat版本使用命令:
cat /etc/pam.d/system-auth
Suse9操作系统使用命令:
cat /etc/pam.d/passwd
Suse10,Suse11,Suse12操作系统:
cat /etc/pam.d/common-password
结果中包含ucredit=-1 lcredit=-1 dcredit=-1 ocredit=-1中任意三种或以上为符合
centos6.5:
centos7.7:
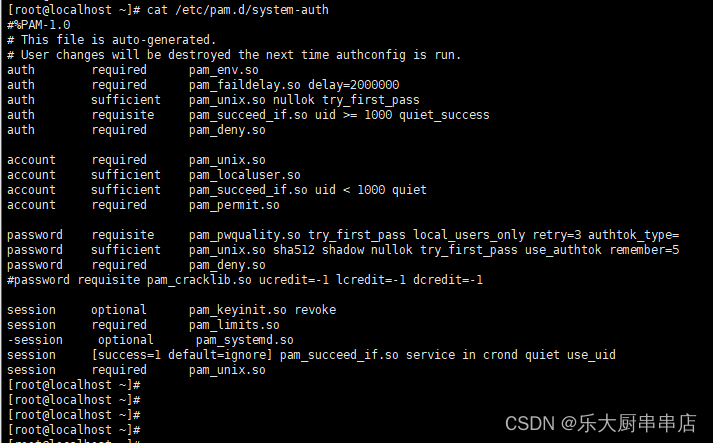
redhat7:
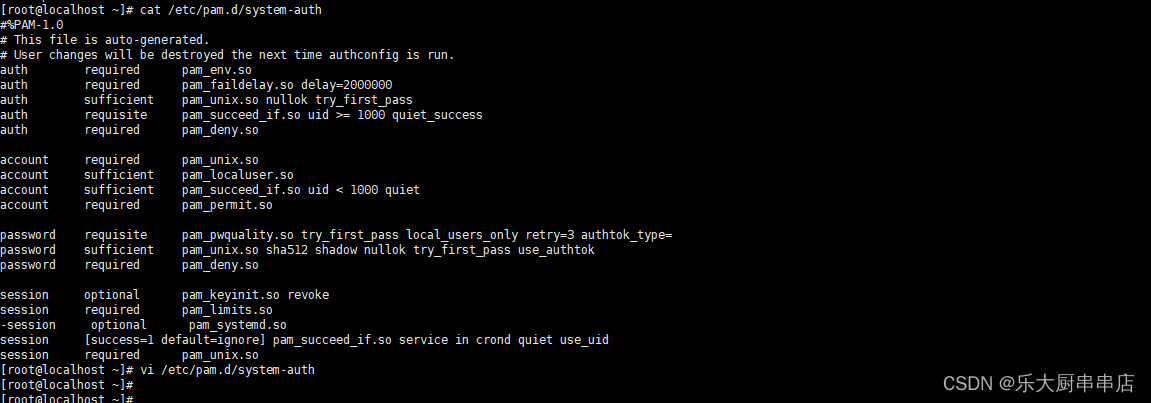
SUSE Linux Enterprise Server 11 SP4:

SUSE 12 SP4:
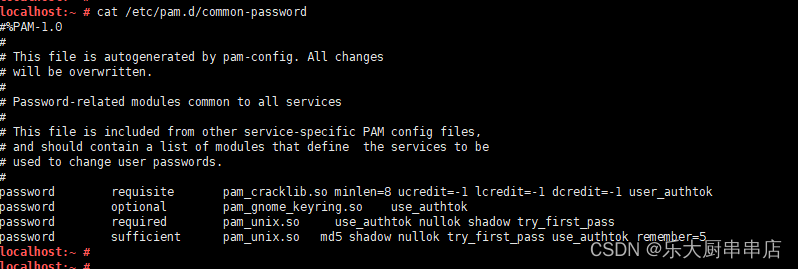
加固要求
口令更改最小间隔天数大于30
加固方法
在文件/etc/login.defs中设置 PASS_MIN_DAYS 不小于标准值30。
检查方法
使用命令:
cat /etc/login.defs |grep PASS_MIN_DAYS
结果中 PASS_MIN_DAYS 值不小于30为符合
centos6.5:

centos7.7:

redhat7:

SUSE Linux Enterprise Server 11 SP4:

SUSE 12 SP4:

加固要求
检查口令最小长度
加固方法
在文件/etc/login.defs中设置 PASS_MIN_LEN 不小于标准值8。
检查方法
使用命令:
cat /etc/login.defs |grep PASS_MIN_LEN
结果中PASS_MIN_LEN 结果不小于8即为符合。
centos6.5:

centos7.7:

redhat7:

SUSE Linux Enterprise Server 11 SP4:

SUSE 12 SP4:

加固要求
超出规定时间进行账户退出操作,避免系统被恶意操纵
加固方法
以root账户执行,vi /etc/profile,增加 export TMOUT=600(单位:秒,可根据具体情况设定超时退出时间,要求不小于600秒),注销用户,再用该用户登录激活该功能。
检查方法
使用命令:
cat /etc/profile |grep "export TMOUT"
结果中包含export TMOUT=600为符合。
centos6.5:

centos7.7:

redhat7:

SUSE Linux Enterprise Server 11 SP4:

SUSE 12 SP4:

加固要求
远程登录时采用更加安全的SSH协议,并禁用telnet协议
加固方法
- 对于使用IP协议进行远程维护的设备,应配置使用SSH协议:
在网站上免费获取OpenSSH http://www.openssh.com/,并根据安装文件说明执行安装步骤;
- 对于使用IP协议进行远程维护的设备,应禁止使用telnet协议:
在/etc/services文件中,注释掉 telnet 23/tcp 一行(如不生效重启telnetd服务或xinetd服务或系统,例如,Red Hat 上重启xinetd:service xinetd restart,根据实际情况操作)。
检查方法
使用命令:
service telnet status
结果中显示“telnet: 未被识别的服务”或者“telnet.service could not be found”为符合。
centos6.5:

centos7.7:

redhat7:

SUSE Linux Enterprise Server 11 SP4:

SUSE 12 SP4:
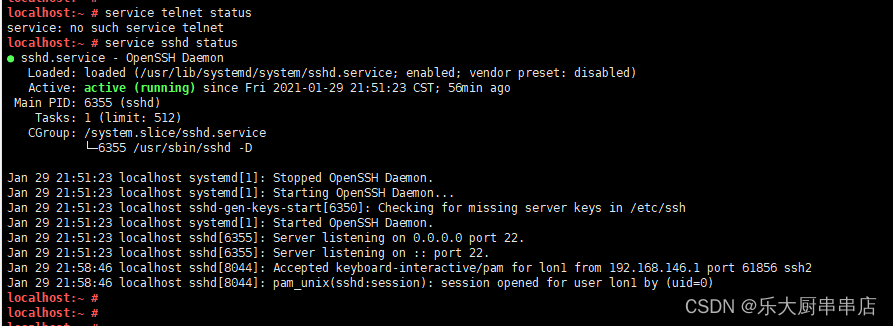
加固要求
配置openssh安全选项,保证openssh安全
加固方法
1.确保/etc/ssh/sshd_config或/etc/ssh2/sshd2_config文件存在。如果不存在,则忽略下面配置步骤。
2.在sshd_config或sshd2_config中配置:Protocol 2。
3.在sshd_config或sshd2_config中配置:PermitRootLogin no或PermitRootLogin NO。
检查方法
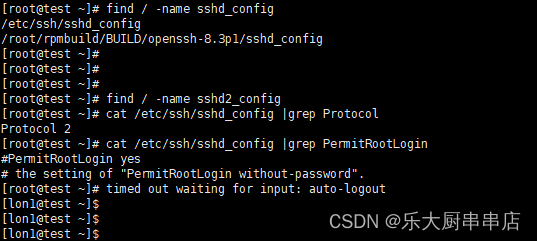
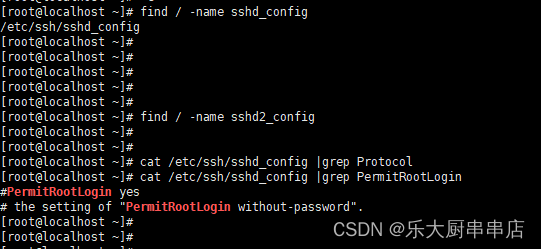
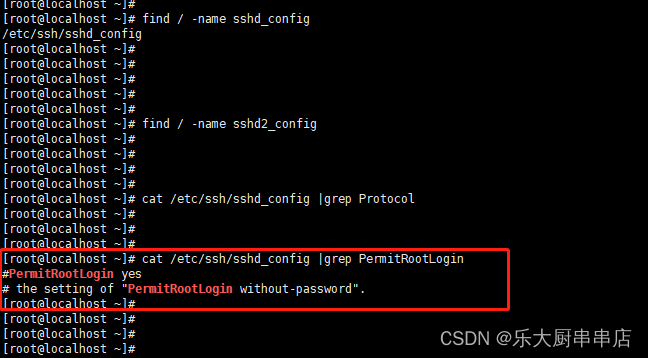
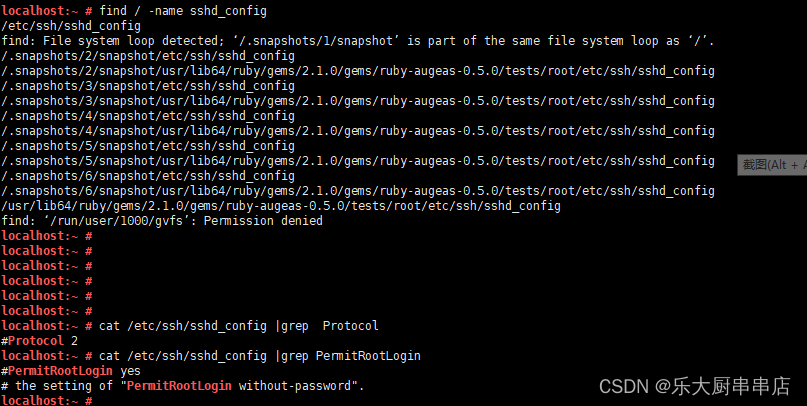
使用命令:find / -name sshd_config 和
find / -name sshd2_config查找sshd_config、sshd2_config配置文件路径
使用命令
cat /etc/ssh/sshd_config |grep Protocol
cat /etc/ssh/sshd_config |grep PermitRootLogin
cat /etc/ssh/sshd2_config |grep Protocol
cat /etc/ssh/sshd2_config |grep PermitRootLogin
查看Protocol 和PermitRootLogin参数对应的值
结果中sshd_config、sshd2_config文件中包含PermitRootLogin配置为no则符合。
centos6.5:
centos7.7:
redhat7:
SUSE Linux Enterprise Server 11 SP4:

SUSE 12 SP4:
加固要求
检查口令过期前警告天数不小于标准值30
加固方法
在文件/etc/login.defs中设置 PASS_WARN_AGE 不小于标准值30。
检查方法
使用命令:
cat /etc/login.defs|grep PASS_WARN_AGE
结果中PASS_WARN_AGE值不小于30即为符合。
centos6.5:

centos7.7:

redhat7:

SUSE Linux Enterprise Server 11 SP4:

SUSE 12 SP4:

加固要求
禁止系统有用户的口令为空
加固方法
按照密码设置策略设置非空密码 命令:
passwd [OPTION...] <accountName>
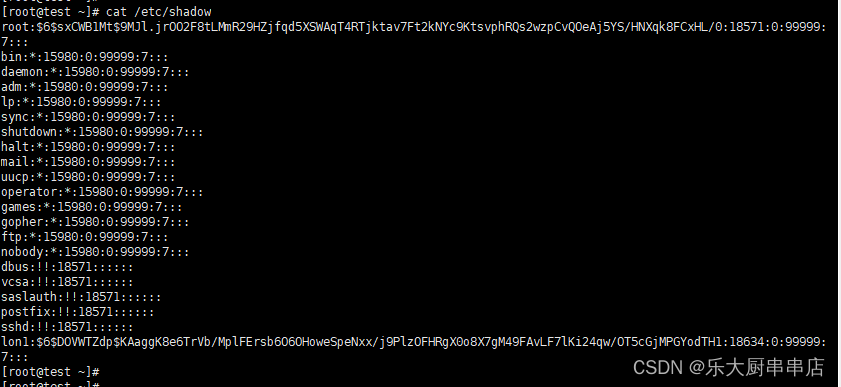
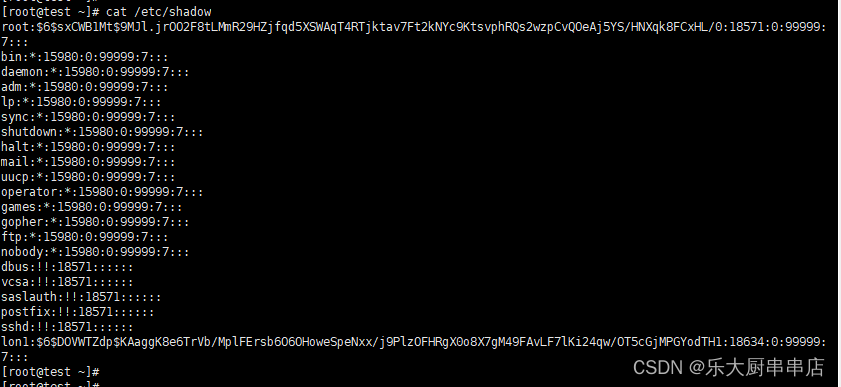
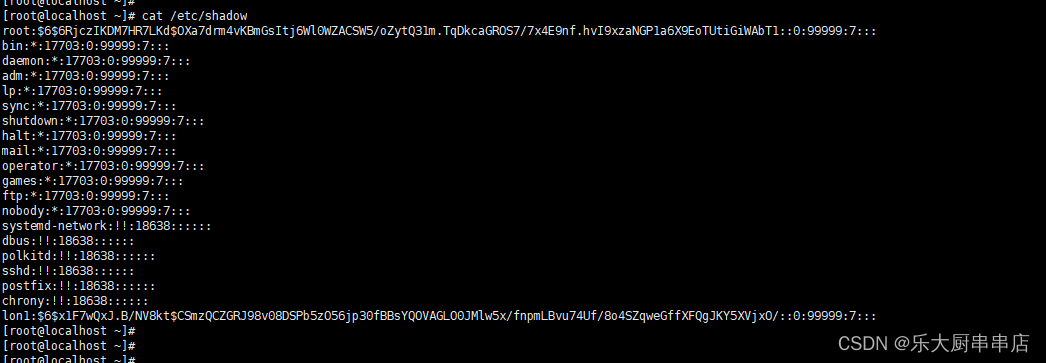
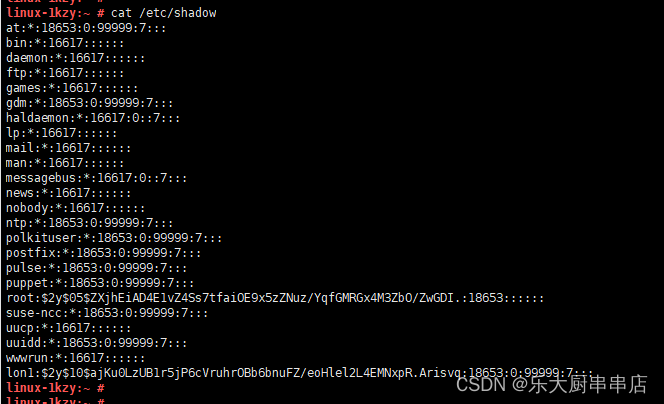
检查方法
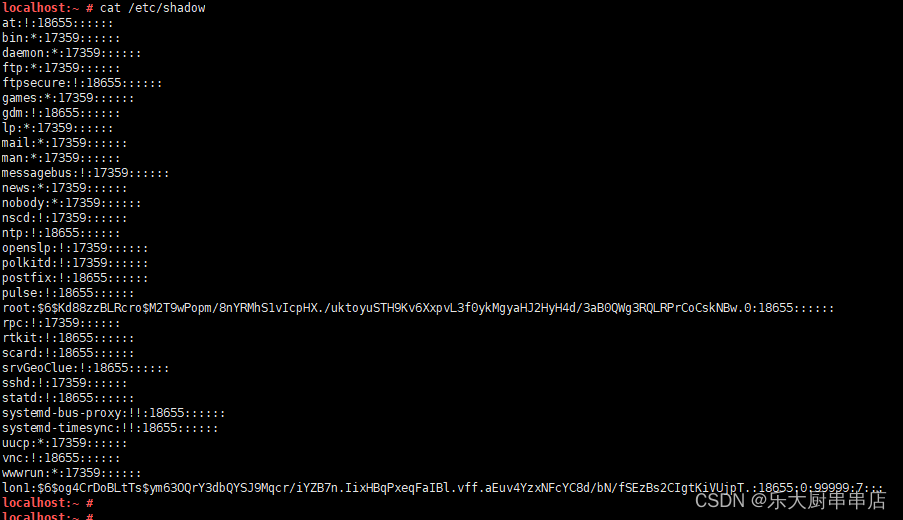
使用命令:
cat /etc/shadow
结果中不包含空口令的账户为符合。
centos6.5:
centos7.7:
redhat7:
SUSE Linux Enterprise Server 11 SP4:
SUSE 12 SP4:
加固要求
配置屏幕超时自动锁定时间,超过规定时间无操作,屏幕自动锁定
加固方法
suse11:
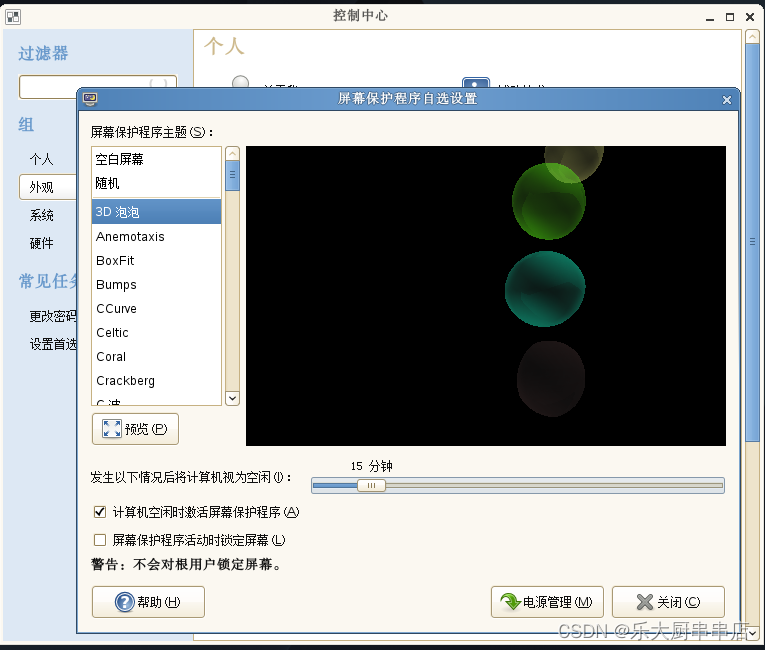
在屏幕的点击左下角“计算机”,打开“系统”->"控制中心"->"屏幕保护程序"选择屏幕保护程序主题,设置空闲时间为15分钟,勾选计算机空闲时激活屏幕保护程序和屏幕保护程序活动时锁定屏幕。
suse12:
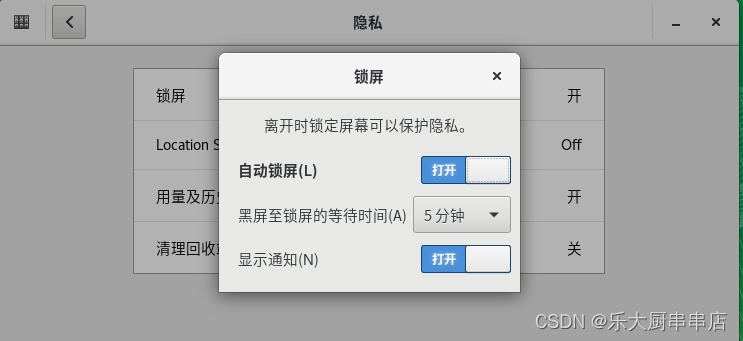
在屏幕的点击在左下角“应用程序” 打开“系统工具”->"设置"->"隐私"->"锁屏",开启自动锁屏开,设置从黑屏至锁屏的等待时间为15分钟。
其他操作系统:
- 启用空闲激活:
在屏幕上面的面板中,打开“系统”-->“首选项”-->“屏幕保护程序”;
或用命令方式:
gconftool-2 --direct \ 此处为回车换行
--config-source xml:readwrite:/etc/gconf/gconf.xml.mandatory \ 此处为回车换行;
--type bool \ 此处为回车换行;
--set /apps/gnome-screensaver/idle_activation_enabled true
- 启用空闲激活时间:
在屏幕上面的面板中,打开“系统”-->“首选项”-->“屏幕保护程序”;
或使用命令:
gconftool-2 --direct \ 此处为回车换行;
--config-source xml:readwrite:/etc/gconf/gconf.xml.mandatory \ 此处为回车换行;
--type int \ 此处为回车换行;
--set /apps/gnome-screensaver/idle_delay 15 根据具体情况设置时间;
- 启用屏保:
在屏幕上面的面板中,打开“系统”-->“首选项”-->“屏幕保护程序”;
或使用命令:
gconftool-2 --direct \ 此处为回车换行;
--config-source xml:readwrite:/etc/gconf/gconf.xml.mandatory \ 此处为回车换行;
--type string \ 此处为回车换行;
--set /apps/gnome-screensaver/mode blank-only
- 启用屏幕锁定:
在屏幕上面的面板中,打开“系统”-->“首选项”-->“屏幕保护程序”;
或使用命令:
gconftool-2 --direct \ 此处为回车换行;
--config-source xml:readwrite:/etc/gconf/gconf.xml.mandatory \ 此处为回车换行
--type bool \ 此处为回车换行;
--set /apps/gnome-screensaver/lock_enabled true
检查方法
在屏幕上面的面板中,打开“系统”-->“首选项”-->“屏幕保护程序”。
查看“计算机空闲时激活屏幕保护程序”“屏幕保护程序激活时屏幕锁定”两项是否被勾选,勾选则符合。
SUSE Linux Enterprise Server 11 SP4:
SUSE 12 SP4:
加固要求
配置账户认证失败次数限制以及SSH方式账户认证失败次数限制
加固方法
1、配置SSH方式账户认证失败次数限制
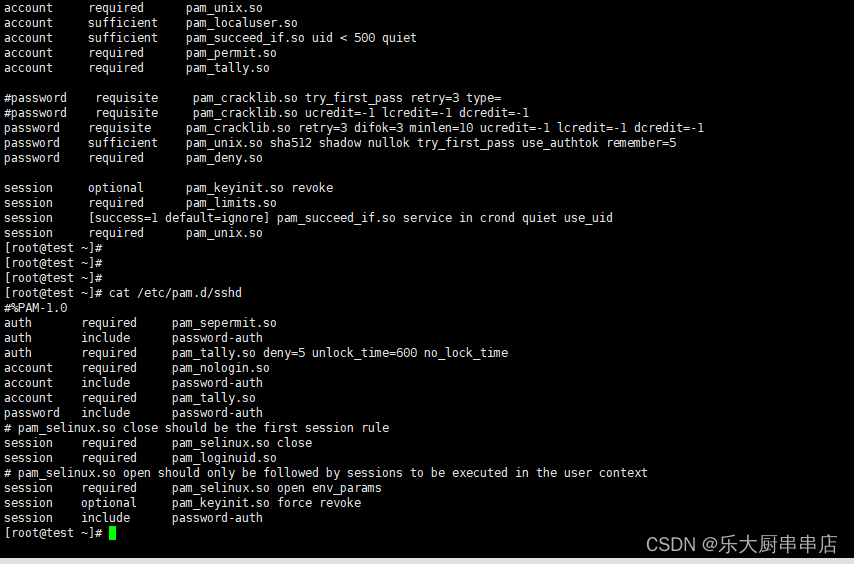
编辑/etc/pam.d/sshd文件 在auth行下方添加: auth required pam_tally.so deny=5 unlock_time=600 no_lock_time
在account行下方添加: account required pam_tally.so
参数说明: deny #连续认证失败次数超过的次数 unlock_time #锁定的时间,单位为秒 如果系统版大于等于centos 6 在auth行下方添加: auth required pam_tally2.so deny=5 unlock_time=600 在account行下方添加: account required pam_tally2.so
注:在#%PAM-1.0的下面,即第二行,添加内容,一定要写在前面,如果写在后面,虽然用户被锁定,但是只要用户输入正确的密码,还是可以登录的!
2、配置账户认证失败次数限制
centos5.x:编辑/etc/pam.conf文件 配置:auth required pam_tally2.so deny=5 unlock_time=600 even_deny_root root_unlock_time=600
centos6.x、centos7.x、Redhat7:编辑cat /etc/pam.d/login 配置:auth required pam_tally2.so deny=5 ulock_time=600 even_deny_root root_unlock_time=600
Redhat: 编辑/etc/pam.d/system-auth文件 配置: auth required pam_tally.so deny=5 unlock_time=600 account requiredn pam_tally.so
Suse9: 编辑/etc/pam.d/passwd文件 配置: auth required pam_tally.so deny=5 unlock_time=600 account required pam_tally.so
Suse10,Suse11: 编辑/etc/pam.d/common-auth文件 配置:auth required pam_tally.so deny=5 unlock_time=600 no_lock_time 编辑/etc/pam.d/common-account文件 配置:account required pam_tally.so
参数说明: deny #连续认证失败次数超过的次数 unlock_time #锁定的时间,单位为秒
注:在#%PAM-1.0的下面,即第二行,添加内容,一定要写在前面,如果写在后面,虽然用户被锁定,但是只要用户输入正确的密码,还是可以登录的。
检查方法
centos5.x、redhat6操作系统使用命令:
cat /etc/pam.d/sshd
cat /etc/pam.d/system-auth
centos6.x、centos7、redhat7操作系统使用命令:
cat /etc/pam.d/sshd
cat /etc/pam.d/login
Suse9使用命令:
cat /etc/pam.d/sshd
cat /etc/pam.d/passwd
suse10、suse11、suse12使用命令:
cat /etc/pam.d/sshd
cat /etc/pam.d/common-auth
结果中配置文件中包含auth required pam_tally.so deny=5 unlock_time=600 相关配置且unlock_time不大于30分钟为符合。
centos6.5:
centos7.7:
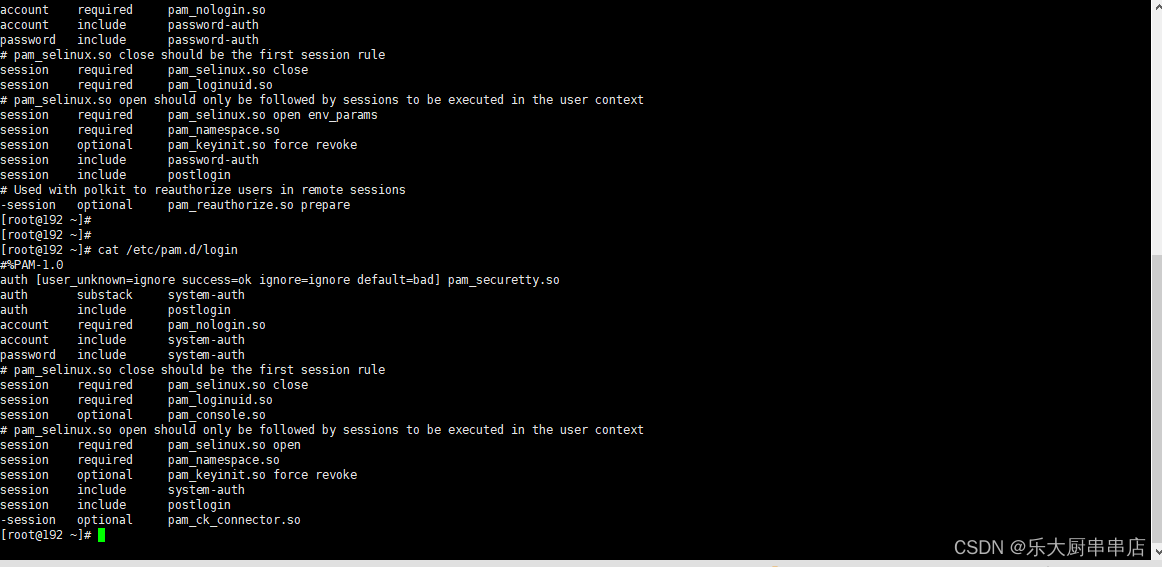
redhat7:
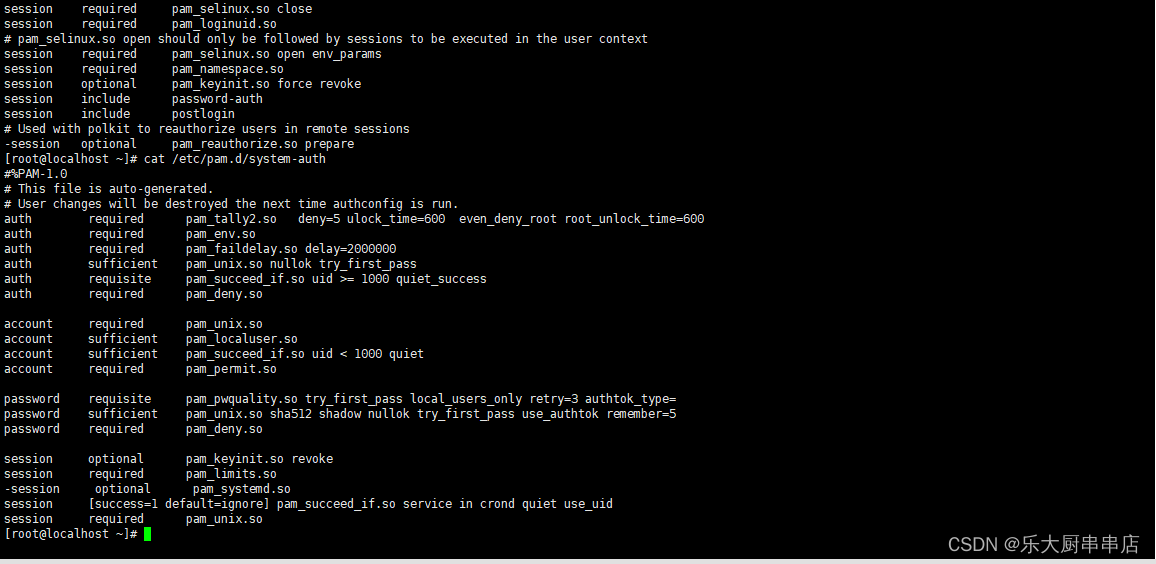
SUSE Linux Enterprise Server 11 SP4:
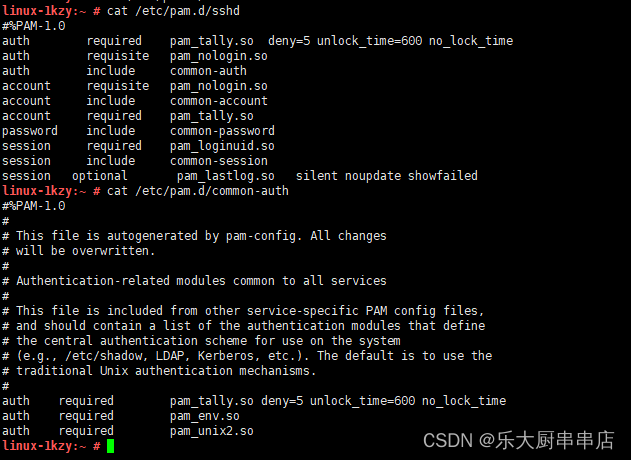
SUSE 12 SP4:
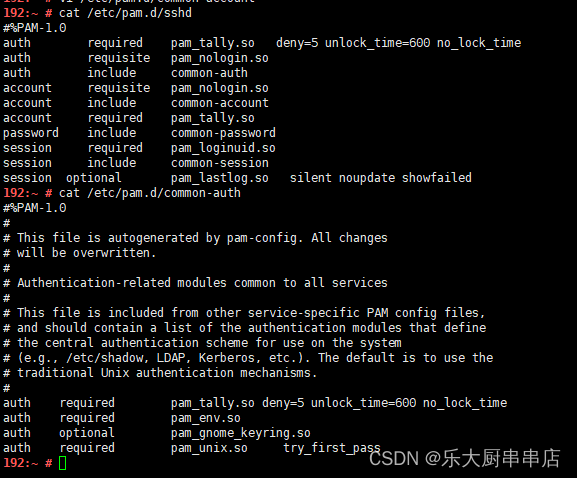
加固情况
备注
加固要求
设置引导管理器密码,设置的密码需符合口令复杂度要求
加固方法
- 引导管理器类型为lilo:
(1)请确认系统引导器的类型为lilo,如果不为lilo,则忽略此检查点。
(2)如果/etc/lilo.conf文件存在,编辑/etc/lilo.conf文件,设置password=(为需要设置的密码。
(3)如果不存在,请检查lilo是否正确安装,或/etc/lilo.conf文件是否被更名。
- 引导管理器类型为grub:
(1)请确认系统引导器的类型为grub,如果不为grub,则忽略此检查点。
(2)如果/boot/grub/menu.lst文件存在,编辑/boot/grub/menu.lst文件,设置password=(为需要设置的密码。
(3)如果不存在,请检查grub是否正确安装,或/boot/grub/menu.lst文件是否被更名。
- centos6.x操作系统配置GRUB引导密码:
(1)用grub-md5-crypt成生GRUB的md5密码;
[root@localhost ~]# /sbin/grub-md5-crypt
Password: 在这里输入123456
Retype password: 再输入一次123456
$1$rm.Us/$DJEzioGO8DbZEaPcI0cpB0 就是通过grub-md5-crypt进行加密码后产生的值。这个值我们要记下来。
(2)更改/etc/grub.conf
在配置文件grub.conf中的第五行添加:
password --md5 $1$rm.Us/$DJEzioGO8DbZEaPcI0cpB0 这里就是我们通过grub-md5-crypt进行加密码后产生的值
- centos 7.x、redhat7操作系统配置GRUB引导密码:
(1).备份grub.cfg文件与头部文件
[root@localhost ~]# cp /boot/grub2/grub.cfg /boot/grub2/grub.cfg.bak
[root@localhost ~]# cp /etc/grub.d/00_header /etc/grub.d/00_header.bak
(2). 生成密文
[root@localhost ~]# grub2-mkpasswd-pbkdf2 #执行后输入
输入口令:123456
Reenter password: 123456
PBKDF2 hash of your password is grub.pbkdf2.sha512.10000.A65A3A3F15BFA68254BA2B63018376ADF5802F530F23C00AF3FE2AFF3D9A6AF359B46FAAA28F402B3D0204959E0B4BFE241FE1595359D89D79B1F7EFF216227A.C78D9859CDC6F4C61D93585017F6F9CC34980CA3ED5E9AA774C77E76216301D7261A5BF75D3BF87C1266756CAC0289C57B418BA7B88CA5DEDE2B8C9DA6F2D881
(3). .编辑文件并在其中添加密文:
编辑/etc/grub.d/00_header
##添加以下内容,并将刚才生成的密匙添加进去
cat << EOF
set superusers="root"
password_pbkdf2 root grub.pbkdf2.sha512.10000.A65A3A3F15BFA68254BA2B63018376ADF5802F530F23C00AF3FE2AFF3D9A6AF359B46FAAA28F402B3D0204959E0B4BFE241FE1595359D89D79B1F7EFF216227A.C78D9859CDC6F4C61D93585017F6F9CC34980CA3ED5E9AA774C77E76216301D7261A5BF75D3BF87C1266756CAC0289C57B418BA7B88CA5DEDE2B8C9DA6F2D881
(4). 重新创建grub配置文件
[root@localhost ~]# grub2-mkconfig -o /boot/grub2/grub.cfg
检查方法
centos6.x****使用命令:
cat /etc/grub.conf|grep "password"
centos7.x、redhat7、suse12****使用命令:
cat /boot/grub2/grub.cfg |grep "password"
suse11****使用命令:
cat /etc/lilo.con
cat /boot/grub/menu.ls
结果配置文件中包含password语句为符合。
centos6.5:

centos7.7:

redhat7:

SUSE Linux Enterprise Server 11 SP4:

SUSE 12 SP4:

加固情况
备注
加固要求
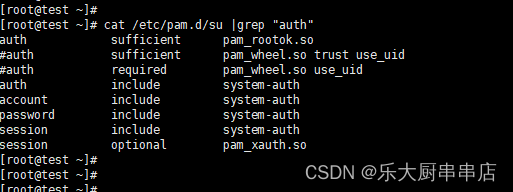
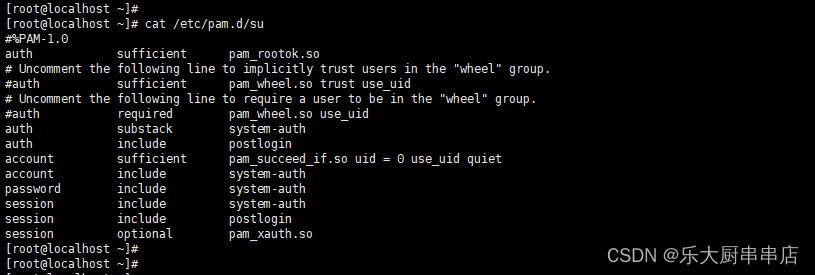
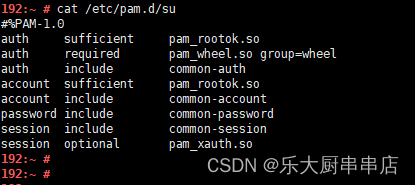
不在wheel组内的用户不能su到root账户中
加固方法
编辑su文件(vi /etc/pam.d/su),在开头添加下面两行:
auth sufficient pam_rootok.so
auth required pam_wheel.so group=wheel
这表明只有wheel组的成员可以使用su命令成为root用户。 你可以把用户添加到wheel组,以使它可以使用su命令成为root用户。
添加方法为:usermod –G wheel username 。
检查方法
使用命令:
cat /etc/pam.d/su
结果中包含 auth sufficient pam_rootok.so 和 auth required pam_wheel.so group=wheel语句为符合。
centos6.5:
centos7.7:

redhat7:
SUSE Linux Enterprise Server 11 SP4:

SUSE 12 SP4:
加固情况
备注
加固要求
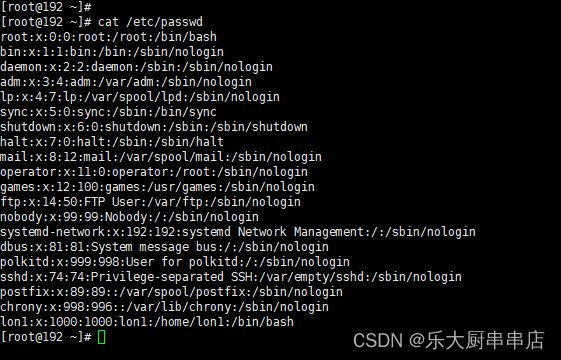
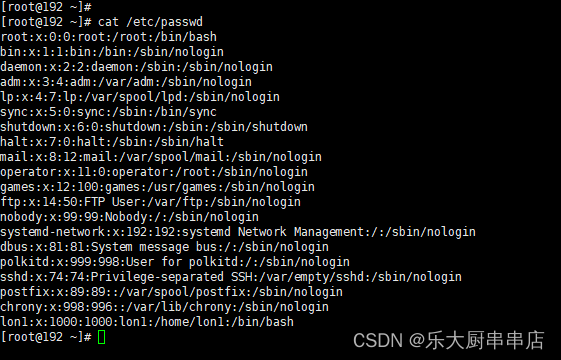
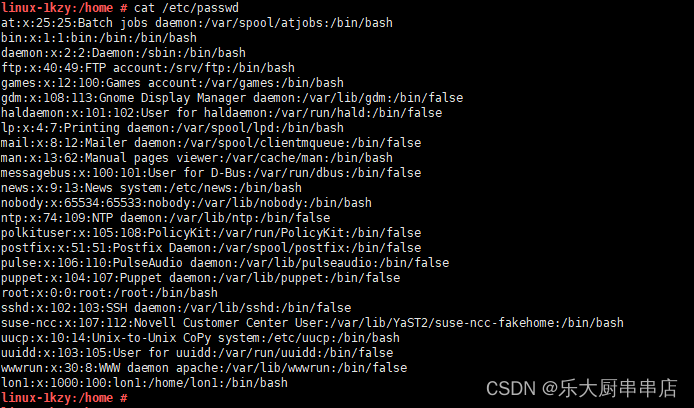
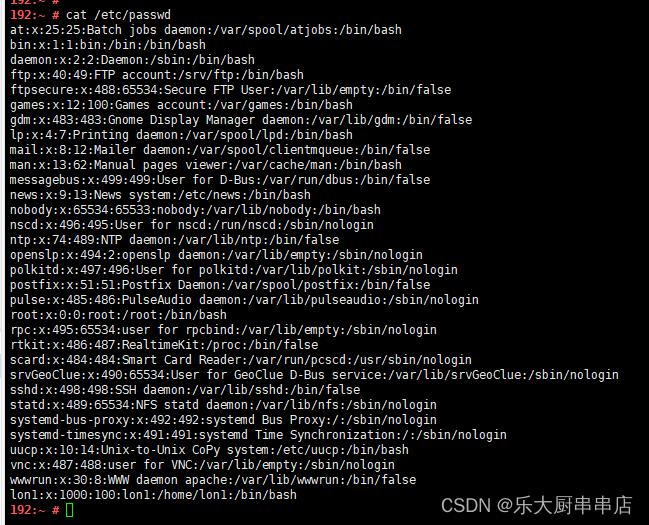
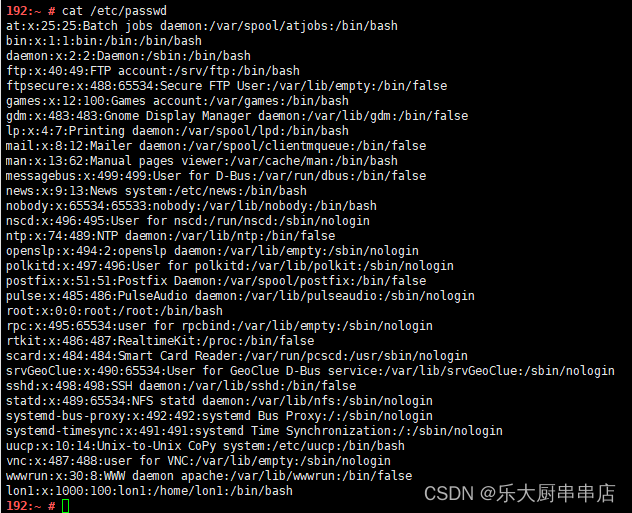
除root权限用户UID值为0之外,其他用户不允许UID值为0,即不允许拥有root权限
加固方法
文件/etc/passwd中除root所在行外所有行第二个与第三个冒号之间UID不应设置为0。例如:mail:x:8:12:mail
检查方法
使用命令:
cat /etc/passwd
结果中除root外不存在其他uid为0的账户为符合。
centos6.5:
centos7.7:
redhat7:

SUSE Linux Enterprise Server 11 SP4:
SUSE 12 SP4:
加固情况
备注
加固要求
修改snmp协议默认的团体字public和private
加固方法
编辑/etc/snmp/snmpd.conf,修改public默认团体字为用户自定义团体字;
如果系统未安装snmp服务,则认为合规;
检查配置文件/etc/snmp/snmpd.conf是否存在,如果系统安装了snmp服务,请确保该文件存在。如果不存在,则在/etc/snmp/目录下创建该文件;
编辑/etc/snmp/snmpd.conf,修改private默认团体字为用户自定义团体字。
检查方法
使用命令:
service snmp status 查看snmp服务运行状态
find / -name snmpd.conf 查看配置文件路径
cat /查询到文件路径/snmpd.conf 查看配置文件团体字public和private
结果中service snmp status命令返回结果为空为符合或者查看snmpd.conf文件中,已无团体字public和private为符合。
centos6.5:

centos7.7:

redhat7:

SUSE Linux Enterprise Server 11 SP4:

SUSE 12 SP4:

加固情况
备注
加固要求
禁止匿名用户登录FTP,登录FTP的用户必须是经过认证的用户
加固方法
- 禁止匿名WU-FTP用户登录:
在/etc/passwd文件中,删除ftp用户。
- 禁止匿名VSFTP用户登录:
编辑vsftpd.conf文件,设置:anonymous_enable=NO。
检查方法
使用命令:
ps -ef|grep vsftpd 查看vsftp进程是否存在,并查看vsftpd.conf的文件目录
cat /etc/passwd
cat /文件路径/vsftpd.conf|grep "anonymous_enable" 。
结果中vsftp进程不存在为符合或者
查看/etc/passwd文件内不包含ftp用户已禁用且vsftpd.conf文件中包含anonymous_enable=NO语句为符合。
加固情况
备注
加固要求
禁止root权限的用户登录FTP
加固方法
- 禁止root登录WU-FTP:
在/etc/ftpusers文件中加入下列行
root
- 禁止root登录VSFTP:
编辑/etc/ftpusers(或/etc/vsftpd/ftpusers)文件
添加root
注:上述文件目录属于默认的目录,具体情况还需根据实际的安装目录。
检查方法
使用命令:
ps -ef|grep ftp
查看ftpusers的文件目录
cat /文件目录/ftpusers查看ftpusers文件
结果中包含root字段为符合。
加固情况
备注
加固要求
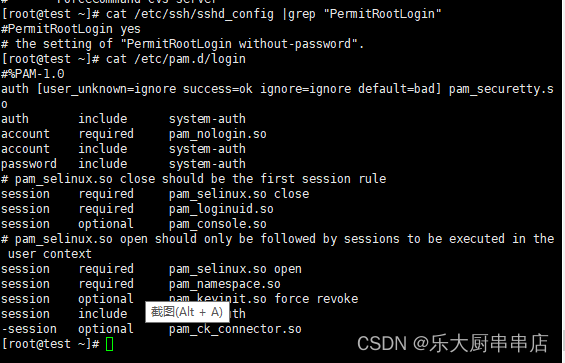
禁止root权限用户直接远程登录,可先登录普通用户,再通过su命令登录root用户
加固方法
- 禁止root用户远程ssh登录:
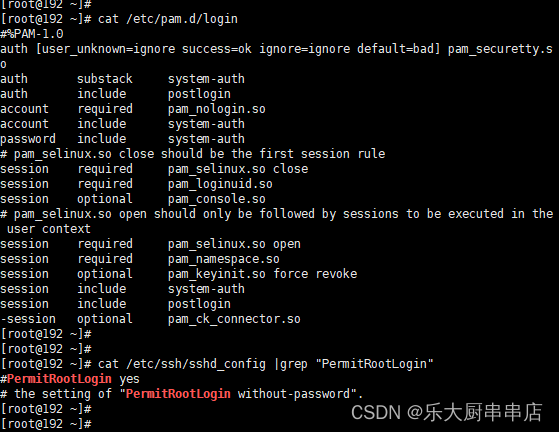
修改/etc/ssh/sshd_config文件,配置PermitRootLogin no。
重启服务,/etc/init.d/sshd restart 。
- 禁止root用户远程telnet登录:
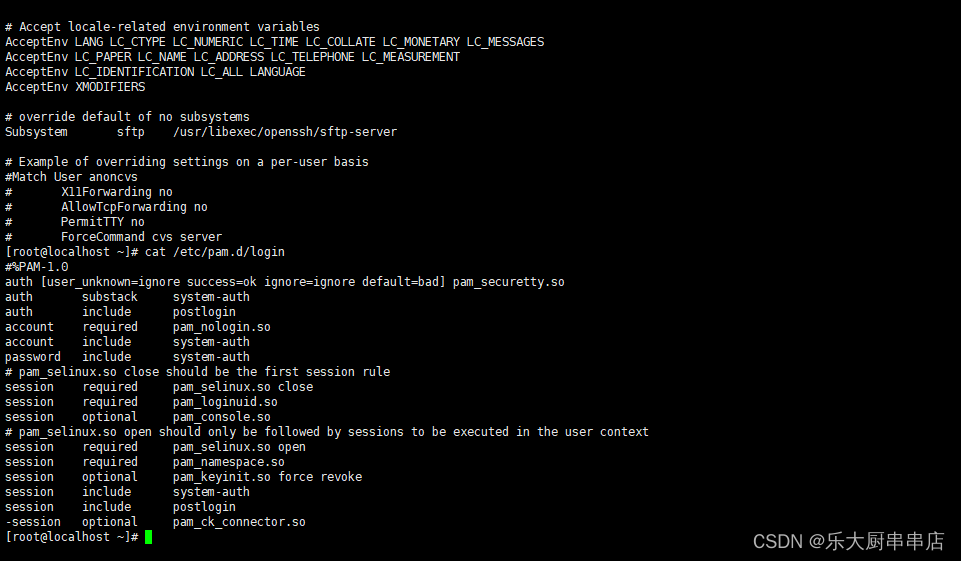
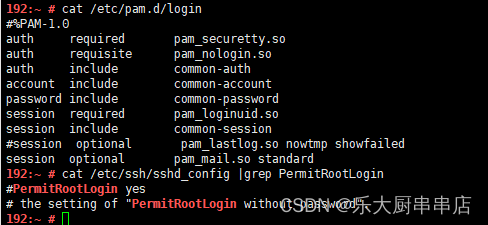
编辑 /etc/pam.d/login文件,配置auth required pam_securetty.so。
检查方法
使用命令:
cat /etc/ssh/sshd_config
cat /etc/pam.d/login
cat /etc/ssh/sshd_config执行结果中包含PermitRootLogin no语句且cat /etc/pam.d/login 执行结果中包含auth required pam_securetty.so语句为符合。
centos6.5:
centos7.7:
redhat7:
SUSE Linux Enterprise Server 11 SP4:

SUSE 12 SP4:
加固情况
备注
加固要求
对系统用户的权限进行最小化处理
加固方法
- 配置/etc/group文件权限:
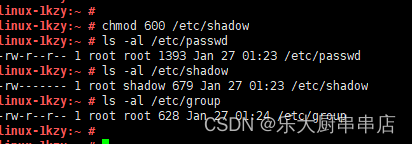
chmod 644 /etc/group
- 配置/etc/shadow文件权限:
chmod 600 /etc/shadow
- 配置/etc/passwd文件权限:
chmod 644 /etc/passwd
检查方法
使用命令:
ls -al /etc/passwd
ls -al /etc/shadow
ls -al /etc/group
结果中passwd、group文件权限不大于644,shadow文件权限不大于600为符合。centos6.5:

centos7.7:

redhat7:

SUSE Linux Enterprise Server 11 SP4:
SUSE 12 SP4:

加固情况
备注
加固要求
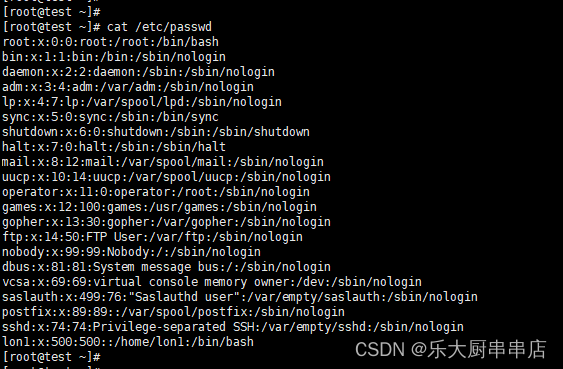
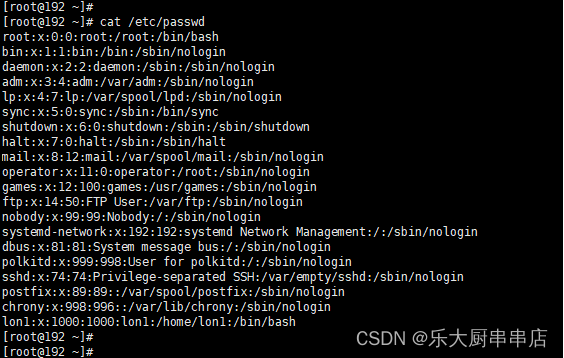
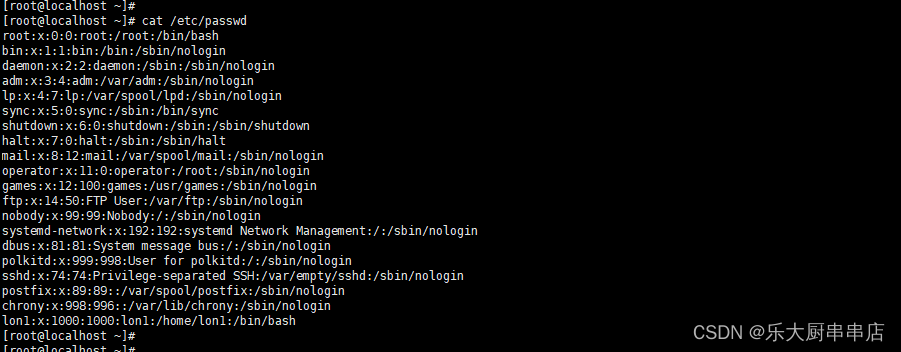
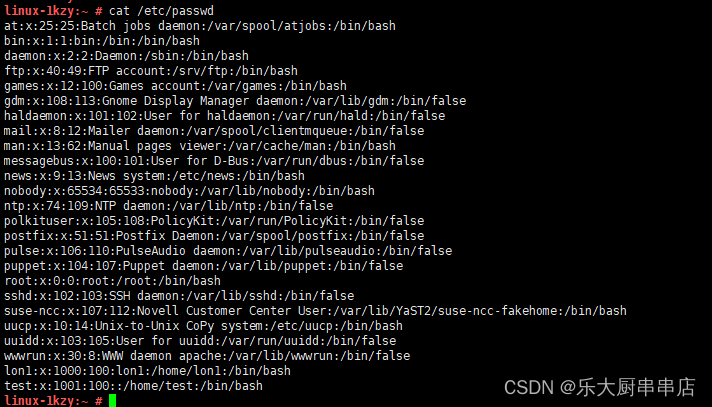
按照用户需求及权限为用户设置相关账号,避免共享账号和不符合访问权限的账号出现
加固方法
为用户创建账号:
#useradd username #创建账号
#passwd username #设置密码
修改权限:
#chmod 750 directory #其中755为设置的权限,可根据实际情况设置相应的权限,directory是要更改权限的目录)
使用该命令为不同的用户分配不同的账号,设置不同的口令及权限信息等。
检查方法
使用命令:
cat /etc/passwd
结果中不存在多余账号为符合。
centos6.5:
centos7.7:
redhat7:
SUSE Linux Enterprise Server 11 SP4:
SUSE 12 SP4:
加固情况
备注
加固要求
限制FTP用户登录后上传文件的属性
加固方法
- 如果系统使用vsftp:
修改/etc/vsftpd.conf(或者为/etc/vsftpd/vsftpd.conf)
vi /etc/vsftpd.conf
确保以下行未被注释掉,如果没有该行,请添加:
write_enable=YES //允许上传。如果不需要上传权限,此项可不进行更改。
ls_recurse_enable=YES
local_umask=022 //设置用户上传文件的属性为755
anon_umask=022 //匿名用户上传文件(包括目录)的 umask
重启网络服务
/etc/init.d/vsftpd restart
- 如果系统使用pure-ftp
修改/etc/pure-ftpd/pure-ftpd.conf
vi /etc/pure-ftpd/pure-ftpd.conf
确保以下行未被注释掉,如果没有该行,请添加:
Umask 177:077
重启ftp服务
#/etc/init.d/pure-ftpd restart 。
检查方法
使用命令:
ps -ef|grep ftp 查看ftp相关的程序进程,并且查看ftp服务的配置文件存放位置,若安装的是vsftp程序使用以下命令查看配置文件:
cat /配置文件存放路径/vsftpd.conf
若安装的是pure-ftpd程序使用一下命令查看配置文件
cat /配置文件存放路径/pure-ftpd.conf 。
结果中如无ftp服务相关进程为合规或者若安装的vsftp程序在vsftpd.conf配置文件中包含 write_enable=YES、ls_recurse_enable=YES、local_umask=022、anon_umask=022为符合若安装的是pure-ftp程序pure-ftpd.conf文件中包含了Umask 177:077为符合。
加固情况
备注
加固要求
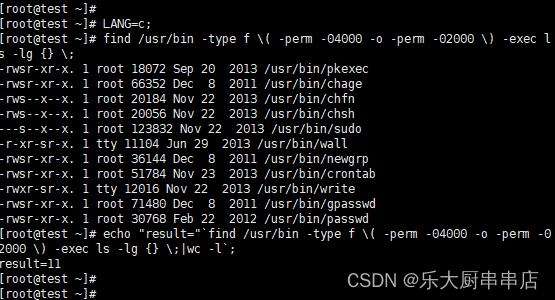
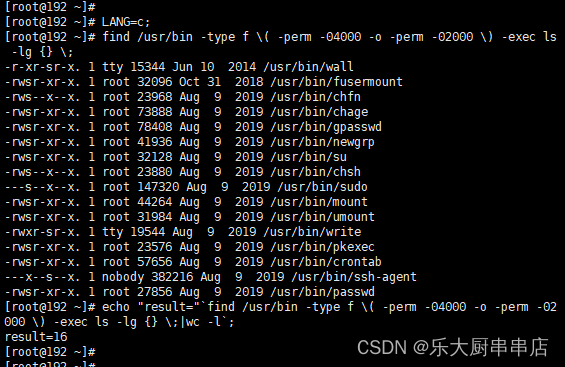
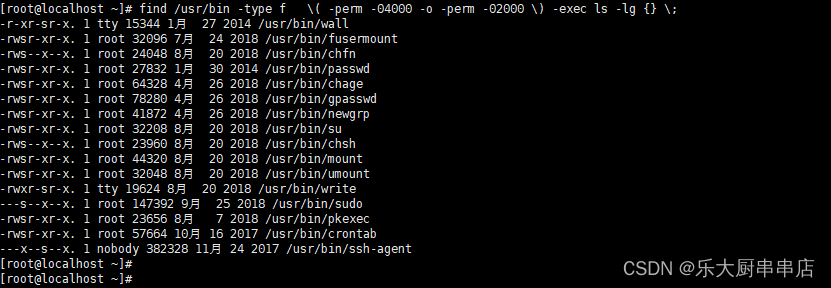
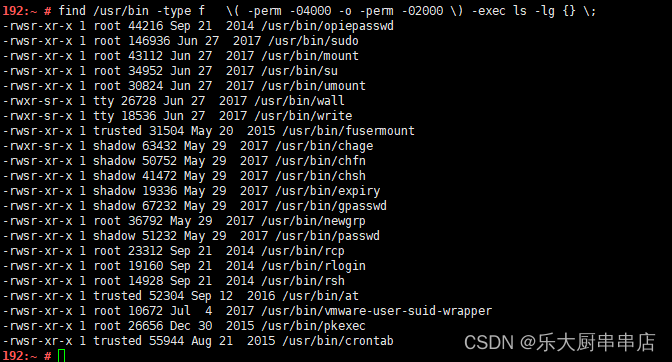
设置/usr/bin/目录下可执行文件的拥有者属性,防止某一用户拥有在系统中对于任何文件及目录的读写权限
加固方法
找出系统中所有含有“s”属性的文件,把不必要的“s”属性去掉,或者把不用的直接删除。
find /usr/bin -type f ( -perm -04000 -o -perm -02000 ) -exec ls -lg {} ;
chmod a-s filename
检查方法
使用命令:
find /usr/bin -type f ( -perm -04000 -o -perm -02000 ) -exec ls -lg {} ; 。
结果中无含有“s”属性的文件为符合。
centos6.5:
centos7.7:
redhat7:
SUSE Linux Enterprise Server 11 SP4:

SUSE 12 SP4:
加固情况
备注
加固要求
对目录默认的访问权限进行设置
加固方法
设置用户目录默认权限,执行命令vi /etc/login.defs,编辑文件;
在文件中设置umask 027或UMASK 027,将缺省访问权限设置为750,如果文件中含有umask参数,则需要在最前面设置该参数。
检查方法
使用命令:
cat /etc/login.defs 。
结果中包含umask 或UMASK且对应的参数值不小于027为符合 。
centos6.5:

centos7.7:

redhat7:

SUSE Linux Enterprise Server 11 SP4:

SUSE 12 SP4:

加固情况
备注
加固要求
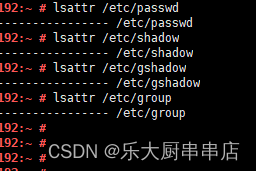
检查/etc/passwd文件属性
检查/etc/shadow文件属性
检查/etc/gshadow文件属性
检查/etc/group文件属性
加固方法
执行chattr +i /etc/shadow 如果不支持chattr,编辑/etc/fstab 在相应的reiserfs系统的选项中添加"user_xattr,attrs"这两个选项,然后重启主机。
执行chattr +i /etc/group 如果不支持chattr,编辑/etc/fstab 在相应的reiserfs系统的选项中添加"user_xattr,attrs"这两个选项,然后重启主机。
执行chattr +i /etc/gshadow 如果不支持chattr,编辑/etc/fstab 在相应的reiserfs系统的选项中添加"user_xattr,attrs"这两个选项,然后重启主机。
执行chattr +i /etc/passwd 如果不支持chattr,编辑/etc/fstab 在相应的reiserfs系统的选项中添加"user_xattr,attrs"这两个选项,然后重启主机。
检查方法
使用命令:
lsattr /etc/passwd
lsattr /etc/shadow
lsattr /etc/gshadow
lsattr /etc/group
检查结果中含有“i”文件属性为符合 。
centos6.5:

centos7.7:

redhat7:

SUSE Linux Enterprise Server 11 SP4:

SUSE 12 SP4:
加固情况
备注
gshadow文件可能不存在,不存在则忽略
加固要求
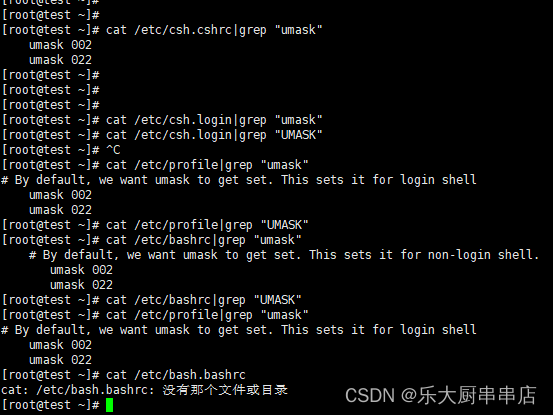
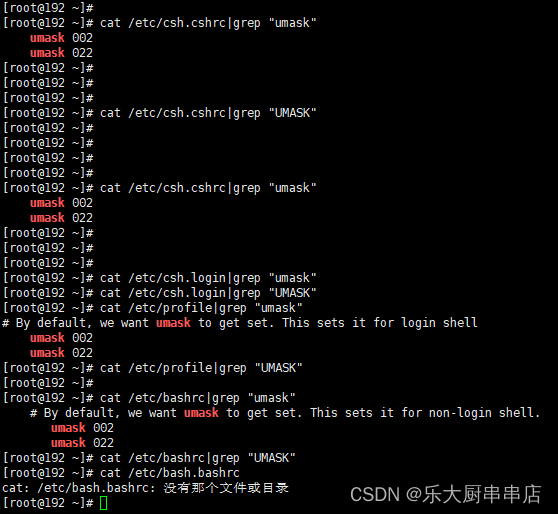
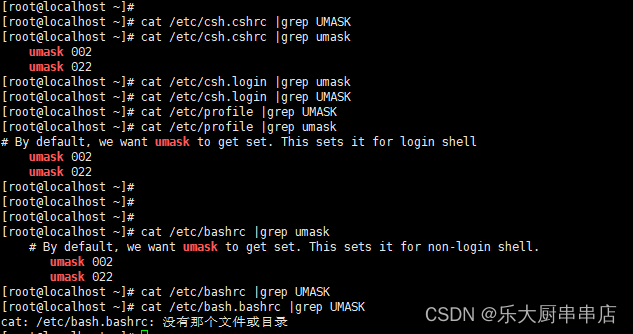
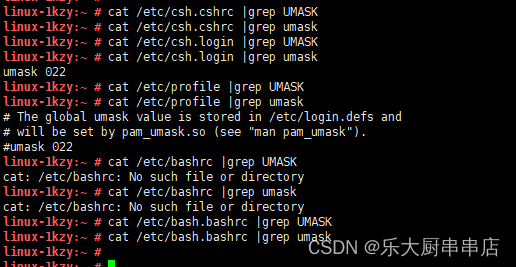
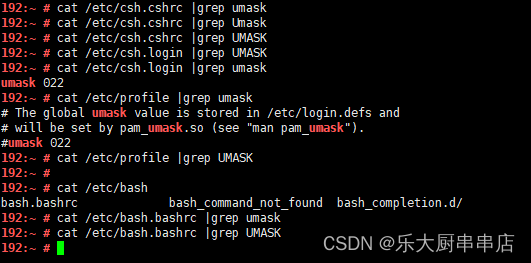
umask设置了用户创建文件的默认权限
加固方法
- 检查文件/etc/csh.cshrc中umask设置:
在文件/etc/csh.cshrc中设置 umask 077或UMASK 077;
- 检查文件/etc/csh.login中umask设置:
在文件/etc/csh.login中设置 umask 077或UMASK 077;
- 检查文件/etc/profile中umask设置:
在文件/etc/profile中设置umask 077或UMASK 077;
- 检查文件/etc/bashrc(或/etc/bash.bashrc)中umask设置:
检查文件/etc/bashrc(或/etc/bash.bashrc)中设置 umask 077或UMASK 077 。
检查方法
使用命令:
cat /etc/csh.cshrc
cat /etc/csh.login
cat /etc/profile
cat /etc/bashrc
cat /etc/bash.bashrc
结果中包含umask 077或UMASK 077为符合 。
centos6.5:
centos7.7:
redhat7:
SUSE Linux Enterprise Server 11 SP4:
SUSE 12 SP4:
加固情况
备注
加固要求
设置root用户的path环境变量,删除无关路径
加固方法
修改文件/etc/profile或/root/.bash_profile 在环境变量$PATH中删除包含(.和..)的路径。
检查方法
使用命令:
echo $PATH
结果中$PATH环境变量下不包含包含(.和..)的路径为符合。
centos6.5:

centos7.7:

redhat7:

SUSE Linux Enterprise Server 11 SP4:

SUSE 12 SP4:

加固情况
备注
加固要求
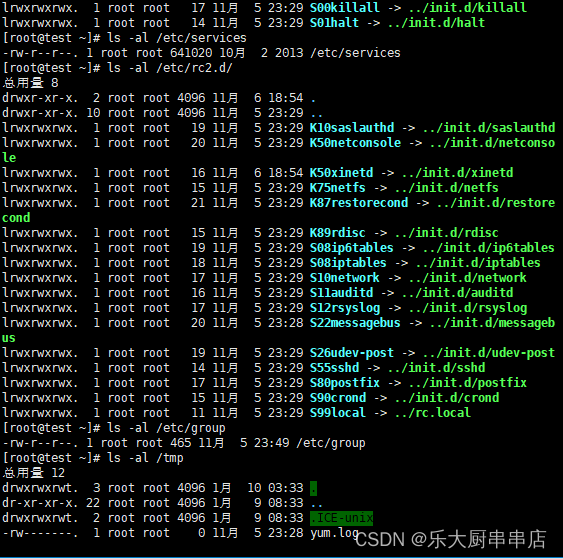
对重要文件及目录进行权限管理,指定权限
加固方法
1.配置/etc/rc.d/init.d/文件权限
chmod 750 /etc/rc.d/init.d/
2.配置/etc/rc3.d文件权限
chmod 750 /etc/rc3.d
3.配置/etc/rc6.d文件权限
chmod 750 /etc/rc6.d
4.配置系统引导器配置文件权限
如果/etc/grub.conf文件存在,且非链接文件,则执行chmod 600 /etc/grub.conf;
如果/boot/grub/grub.conf文件存在,则执行chmod 600 /boot/grub/grub.conf;
如果/etc/lilo.conf文件存在,则执行chmod 600 /etc/lilo.conf;
如果/etc/grub2.cfg文件存在,且非链接文件,则执行chmod 600 /etc/grub2.cfg;
如果/boot/grub2/grub.cfg件存在,则执行chmod 600 /boot/grub2/grub.cfg。
5.配置/etc/xinetd.conf文件权限
chmod 600 /etc/xinetd.conf
补充说明:低版本的Linux系统采用inetd.conf配置文件,执行命令:chmod 600 /etc/inetd.conf
6.配置/etc/rc5.d文件权限
chmod 750 /etc/rc5.d/
7.配置/etc/rc1.d/文件权限
chmod 750 /etc/rc1.d/
8.配置/etc/security目录权限
chmod 600 /etc/security
9.配置/etc/rc4.d文件权限
chmod 750 /etc/rc4.d
10.配置/etc/passwd文件权限
chmod 644 /etc/passwd
11.配置/etc/rc0.d文件权限
chmod 750 /etc/rc0.d/
12.配置/etc/services文件权限
chmod 644 /etc/services
13.配置etc/rc2.d文件权限
chmod 750 /etc/rc2.d/
14.配置/etc/group文件权限
chmod 644 /etc/group
15.配置/tmp文件权限
chmod 750 /tmp
16.配置/etc/shadow文件权限
chmod 600 /etc/shadow
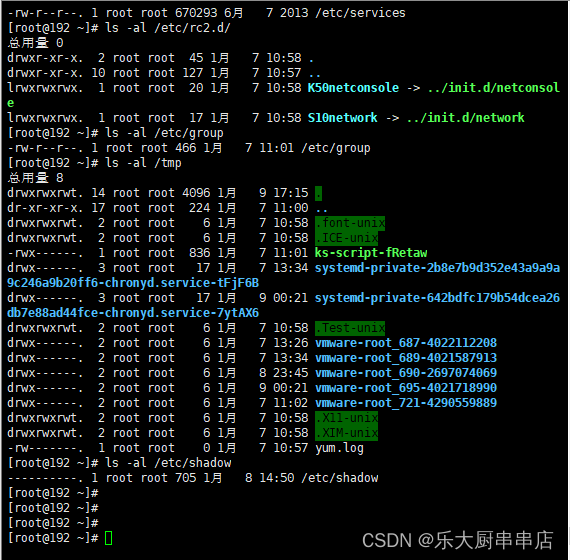
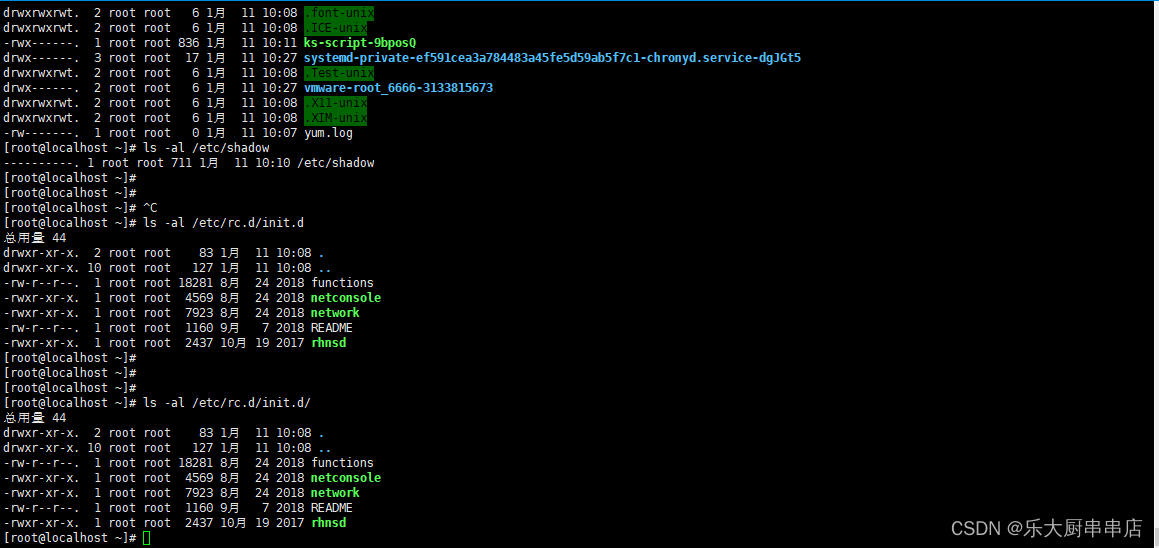
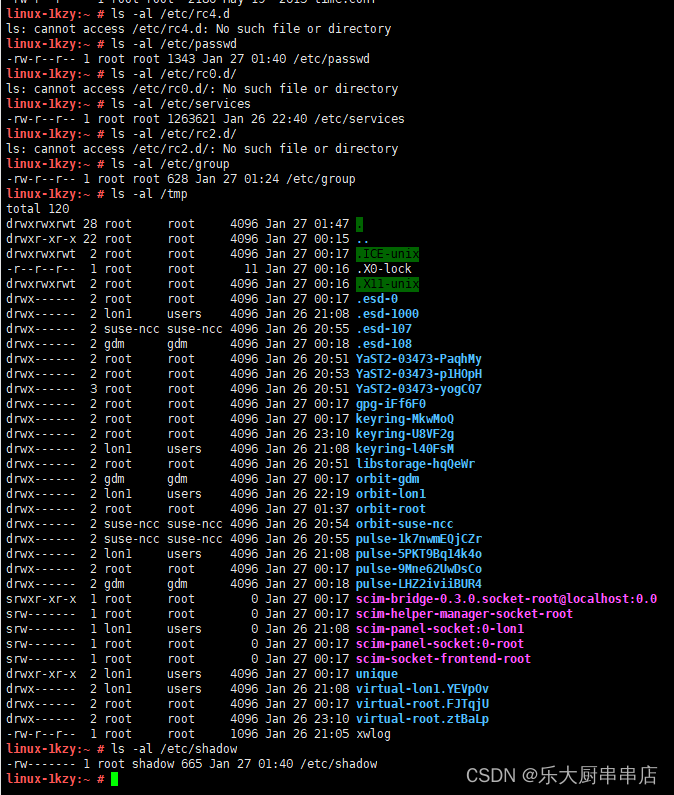
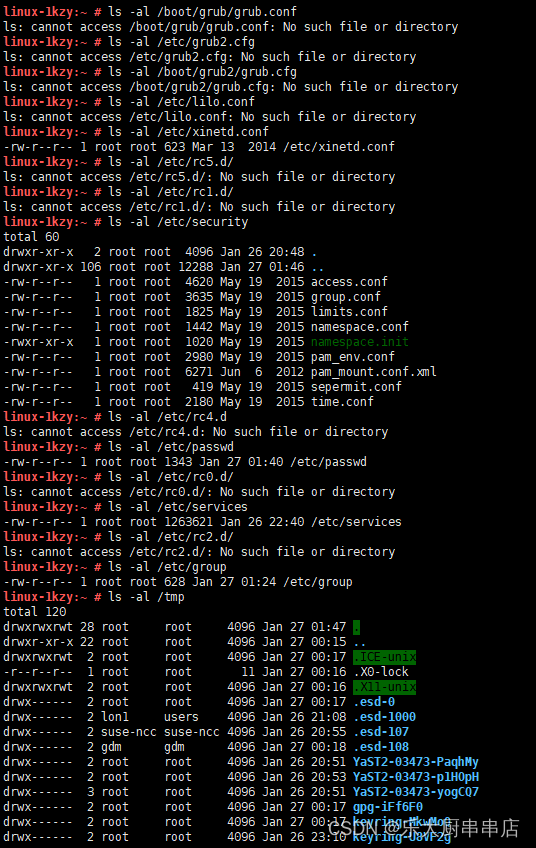
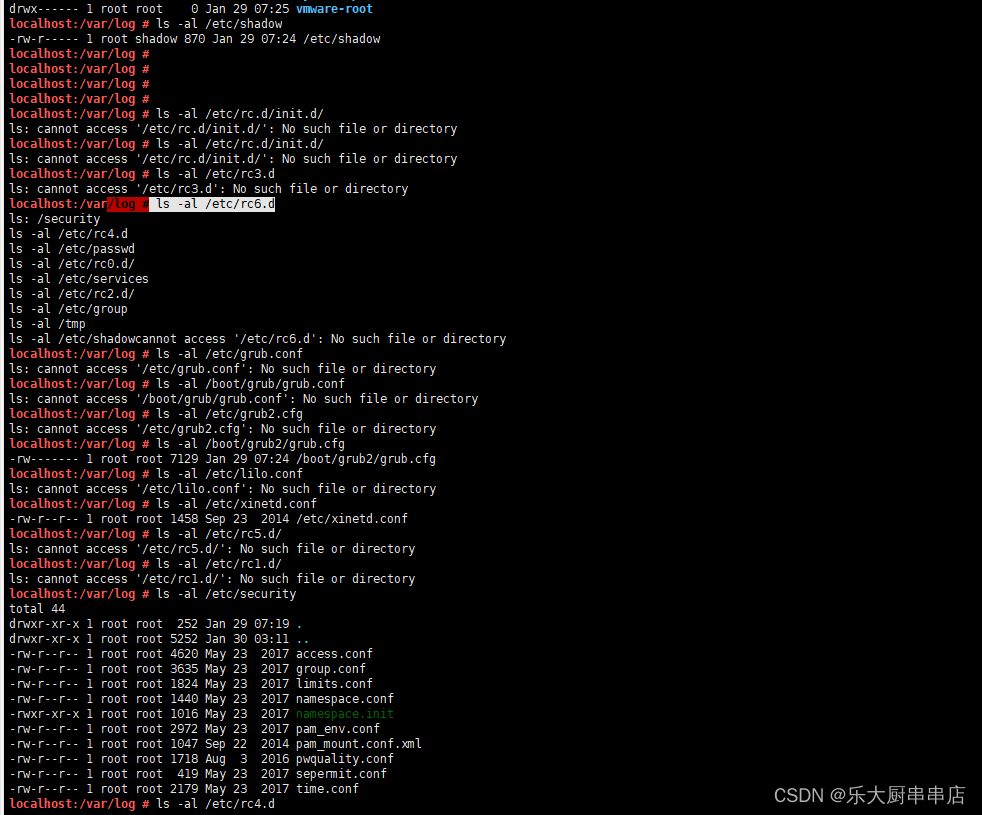
检查方法
使用命令:
ls -al /etc/rc.d/init.d/
ls -al /etc/rc3.d
ls -al /etc/rc6.d
ls -al /etc/grub.conf
ls -al /boot/grub/grub.conf
ls -al /etc/grub2.cfg
ls -al /boot/grub2/grub.cfg
ls -al /etc/lilo.conf
ls -al /etc/xinetd.conf
ls -al /etc/rc5.d/
ls -al /etc/rc1.d/
ls -al /etc/security
ls -al /etc/rc4.d
ls -al /etc/passwd
ls -al /etc/rc0.d/
ls -al /etc/services
ls -al /etc/rc2.d/
ls -al /etc/group
ls -al /tmp
ls -al /etc/shadow
结果中/etc/rc.d/init.d/、/etc/rc3.d、/etc/rc6.d、/etc/rc5.d/、/etc/rc1.d/、/etc/rc4.d、/etc/rc0.d/、/etc/rc2.d/、/tmp文件的权限值不大于750,/etc/group、/etc/services、/etc/passwd文件权限值不大于644,/etc/shadow、 /etc/xinetd.conf、/etc/security目录、/etc/lilo.conf权限值不大于600,系统引导器配置文件/etc/grub.conf、/boot/grub/grub.conf、/etc/grub2.cfg、/boot/grub2/grub.cfg、/etc/lilo.conf权限值不大于600 为符合。
centos6.5:
centos7.7:
redhat7:
SUSE Linux Enterprise Server 11 SP4:

SUSE 12 SP4:
加固情况
备注
若文件目录不存在,请忽略。
加固要求
设置FTP用户登录后能够访问的目录,禁止权限不足的用户访问敏感目录
加固方法
限制FTP用户登录后能访问的目录
1.vsftp
修改/etc/vsftpd.conf(或者/etc/vsfptd/vsftpd.conf)
#vi /etc/vsftpd.conf
确保以下行未被注释掉,如果没有该行,请添加:
chroot_local_user=YES
重启网络服务
#/etc/init.d/vsftpd restart
2.pure-ftp
修改/etc/pure-ftpd/pure-ftpd.conf
#vi /etc/pure-ftpd/pure-ftpd.conf
确保以下行未被注释掉(并且值为以下值),如果没有该行,请添加:
ChrootEveryone yes
AllowUserFXP no
AllowAnonymousFXP no
重启ftp服务
#/etc/init.d/pure-ftpd restart
检查方法
使用命令:
ps -ef|grep ftp 查看ftp相关的程序进程,并且查看ftp服务的配置文件存放位置,若安装的是vsftp程序使用以下命令查看配置文件:
cat /配置文件存放路径/vsftpd.conf
若安装的是pure-ftpd程序使用一下命令查看配置文件
cat /配置文件存放路径/pure-ftpd.conf
结果中未安装ftp程序为符合或者若安装的是vsftp程序vsftpd.conf文件中包含chroot_local_user=YES且未被注释为符合
若安装了pure-ftp程序,pure-ftpd.conf配置文件中包含ChrootEveryone yes
AllowUserFXP no
AllowAnonymousFXP no且未被注释为符合
加固情况
备注
加固要求
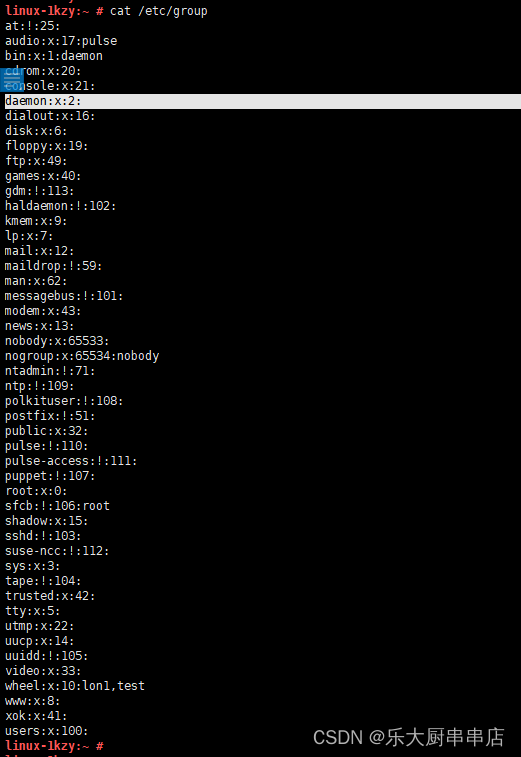
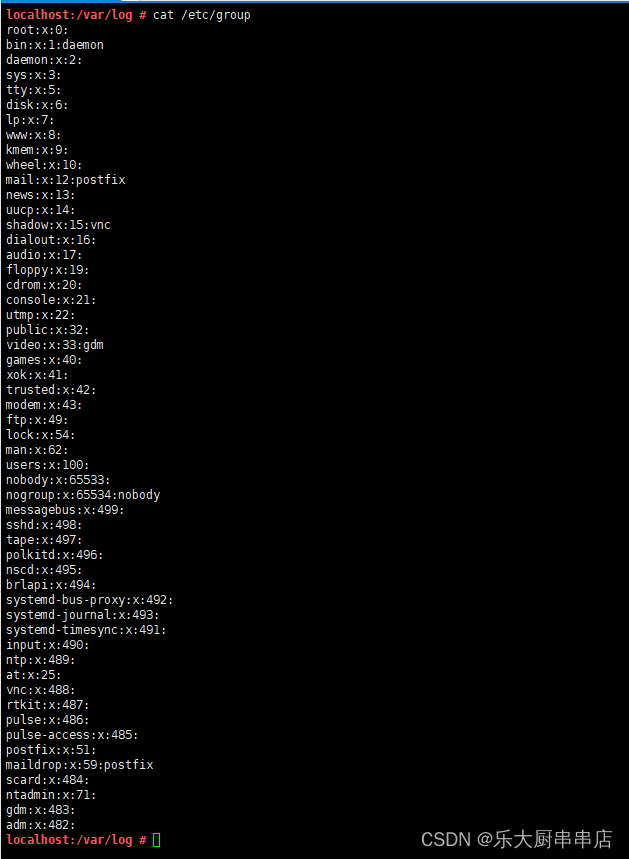
通过管理组的形式管理组内的所有账户,对每个用户组进行权限设置及访问限制等,便于进行账户的管理
加固方法
1.执行备份:
#cp -p /etc/group /etc/group.bak
2.创建新的用户组:
#groupadd 组名
#usermod -g 组名 -d 用户目录 -m 用户名
把用户添加进入某个组(s)或参考usermod --help说明进行设置。
检查方法
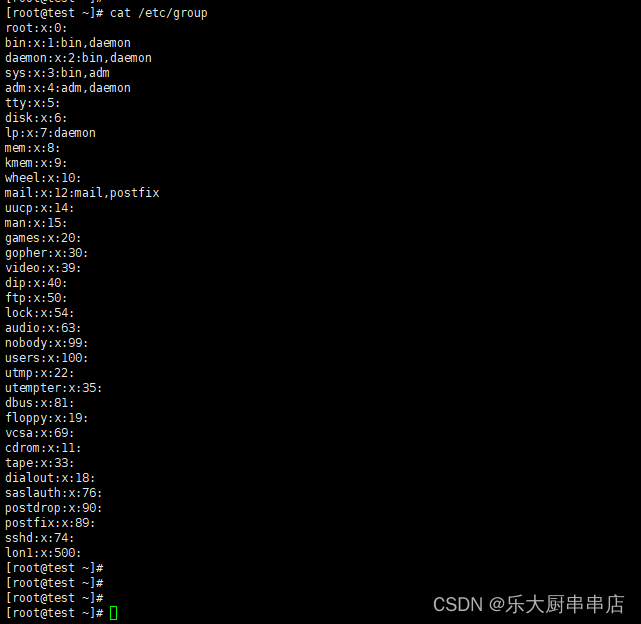
执行命令:
cat /etc/group
结果中用户所属组别均与用户自身权限相符为符合。
centos6.5:
centos7.7:
redhat7:
SUSE Linux Enterprise Server 11 SP4:
SUSE 12 SP4:
加固情况
备注
加固要求
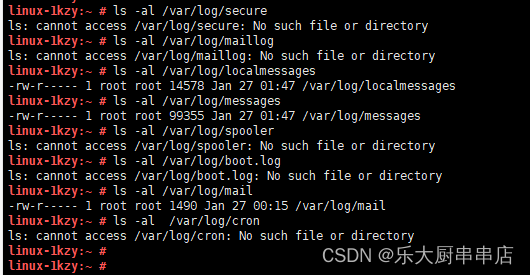
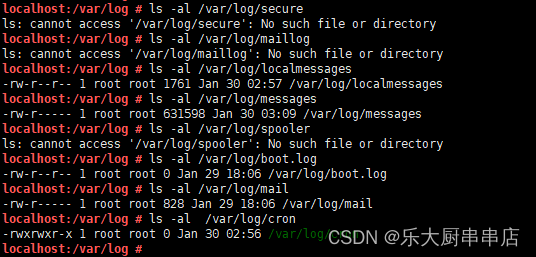
日志文件的权限设置为非全局可写,即限制相关用户访问日志文件的权限
加固方法
1.配置/var/log/maillog文件其他用户不可写
chmod 775 /var/log/maillog
2.配置/var/log/messages文件不可被其他用户修改
chmod 755 /var/log/messages
3.配置/var/log/localmessages文件其他用户不可写
chmod 775 /var/log/localmessages
4.配置/var/log/spooler文件其他用户不可写
chmod 775 /var/log/spooler
5配置./var/log/boot.log其他用户不可写
chmod 775 /var/log/boot.log
6.配置/var/log/mail文件其他用户不可写
chmod 775 /var/log/mail
7.配置/var/log/cron日志文件其他用户不可写
chmod 775 /var/log/cron
8.配置/var/log/secure文件其他用户不可写
chmod 775 /var/log/secure
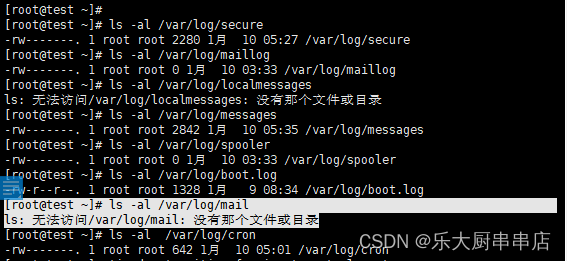
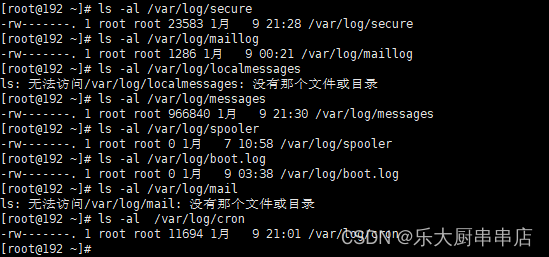
检查方法
使用命令:
ls -al /var/log/secure
ls -al /var/log/maillog
ls -al /var/log/localmessages
ls -al /var/log/messages
ls -al /var/log/spooler
ls -al /var/log/boot.log
ls -al /var/log/mail
ls -al /var/log/cron
结果中/var/log/secure、/var/log/cron、/var/log/mail、/var/log/boot.log、/var/log/spooler、/var/log/localmessages、/var/log/maillog文件权限值不大于775并且/var/log/messages文件权限值小于755为符合。
centos6.5:
centos7.7:
redhat7:

SUSE Linux Enterprise Server 11 SP4:
SUSE 12 SP4:
加固情况
备注
若文件目录不存在,请忽略。
加固要求
设置日志文件的相关权限,包括读写执行等权限
加固方法
1.如果为centos,redhat,suse9,suse12,则备份/etc/syslog.conf(或/etc/rsyslog.conf)文件中配置的日志文件,如果为suse10,suse11,则备份/etc/syslog-ng文件中配置的日志文件。
2.如果日志服务为syslogd,则执行:
LOGDIR=`cat /etc/syslog.conf 2>/dev/null | grep -v "^[[:space:]]*#"|sed '/^#/d' |sed '/^$/d' |awk '(($2!~/@/) && ($2!~/*/) && ($2!~/-/)) {print $2}';`;ls -l $LOGDIR 2>/etc/null | grep "^-";跳转至步骤3。
如果日志服务为syslog-ng,则执行:
LOGDIR=`cat /etc/syslog-ng/syslog-ng.conf 2>/dev/null | grep -v "^[[:space:]]*#"|grep "^destination"|grep file|cut -d\" -f2`;ls -l $LOGDIR 2>/dev/null | grep "^-";跳转至步骤3。
如果日志服务为rsyslogd,则执行:
LOGDIR=`cat /etc/rsyslog.conf | grep -v "^[[:space:]]*#" |sed '/^#/d' |sed '/^$/d' |awk '(($2!~/@/) && ($2!~/*/) && ($2!~/-/)) {print $2}'`;ls -l $LOGDIR 2>/etc/null | grep "^-";跳转至步骤3。
3.步骤2列出的文件中,同组用户、其他用户权限中不能出现r-x,rw-,rwx。
执行下列命令,修改步骤2中列出出来的不符合标准值的文件权限。
例如修改权限为640
#chmod 640 <filename>
或者修改权限为600
#chmod 600 <filename>
注:权限值没有限定,只要满足同组用户、其他用户不出现r-x,rw-,rwx即可。
检查方法
使用命令:
ps -ef|grep syslog
查看运行的日志服务
1.日志服务为syslogd,则执行:
LOGDIR=`cat /etc/syslog.conf 2>/dev/null | grep -v "^[[:space:]]*#"|sed '/^#/d' |sed '/^$/d' |awk '(($2!~/@/) && ($2!~/*/) && ($2!~/-/)) {print $2}';`;ls -l $LOGDIR 2>/etc/null | grep "^-";
2.日志服务为syslog-ng,则执行:
LOGDIR=`cat /etc/syslog-ng/syslog-ng.conf 2>/dev/null | grep -v "^[[:space:]]*#"|grep "^destination"|grep file|cut -d\" -f2`;ls -l $LOGDIR 2>/dev/null | grep "^-";
3.日志服务为rsyslogd,则执行:
LOGDIR=`cat /etc/rsyslog.conf | grep -v "^[[:space:]]*#" |sed '/^#/d' |sed '/^$/d' |awk '(($2!~/@/) && ($2!~/*/) && ($2!~/-/)) {print $2}'`;ls -l $LOGDIR 2>/etc/null | grep "^-";
结果中日志服务已启动并且
列出来的文件权限,同组用户、其他用户权限中不能出现r-x,rw-,rwx为符合。
centos6.5:

centos7.7:

redhat7:

SUSE Linux Enterprise Server 11 SP4:

SUSE 12 SP4:

加固情况
备注
加固要求
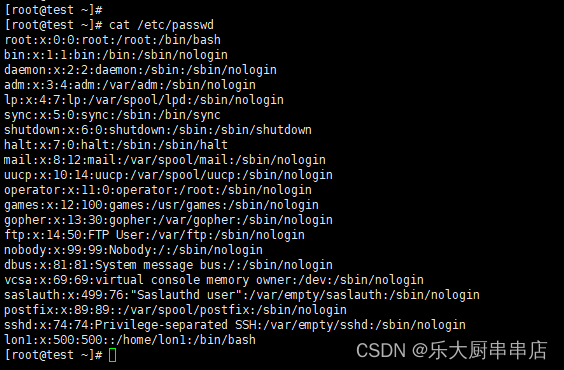
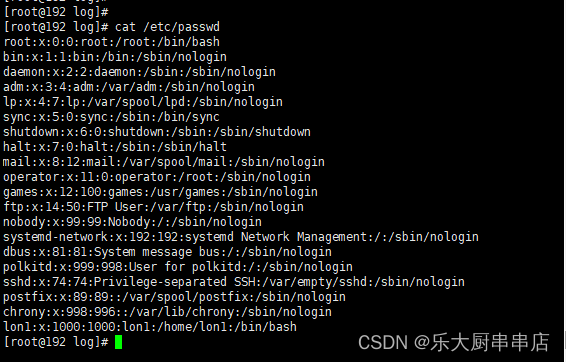
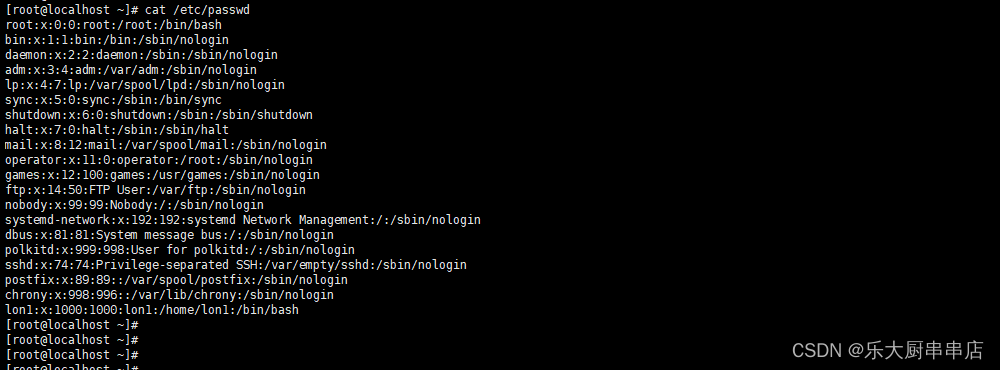
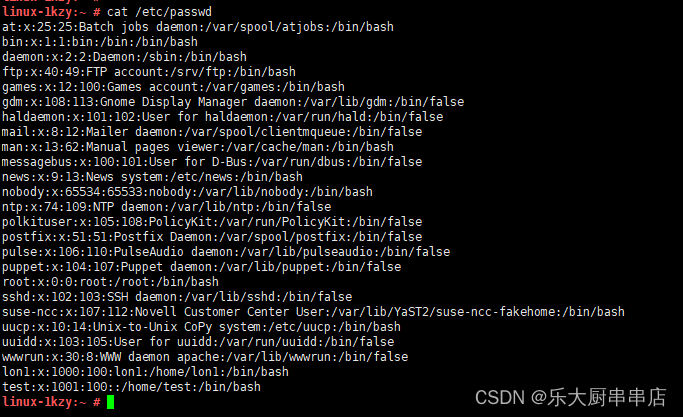
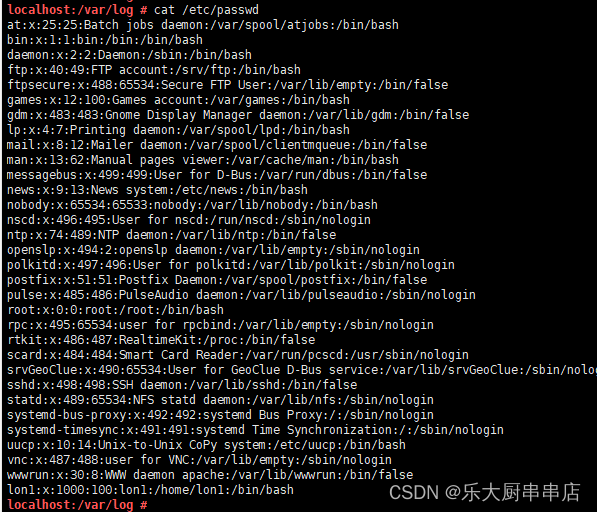
删除无关账号,将系统权限最小化处理
加固方法
删除用户:#userdel username
锁定用户:
#usermod -L username
只有具备超级用户权限的使用者方可使用。
#usermod –U username可以解锁。
补充操作说明
需要锁定的用户:
adm,lp,mail,uucp,operator,games,gopher,ftp,nobody,nobody4,noaccess,listen,webservd,rpm,dbus,avahi,mailnull,smmsp,nscd,vcsa,rpc,rpcuser,nfs,sshd,pcap,ntp,haldaemon,distcache,apache,webalizer,squid,xfs,gdm,sabayon,named
检查方法
使用命令:
cat /etc/passwd
结果中不包含adm,lp,mail,uucp,operator,games,gopher,ftp,nobody,nobody4,noaccess,listen,webservd,rpm,dbus,avahi,mailnull,smmsp,nscd,vcsa,rpc,rpcuser,nfs,sshd,pcap,ntp,haldaemon,distcache,apache,webalizer,squid,xfs,gdm,sabayon,named用户,或用户为不可登录状态为符合。
centos6.5:
centos7.7:
redhat7:
SUSE Linux Enterprise Server 11 SP4:
SUSE 12 SP4:
加固情况
备注
加固要求
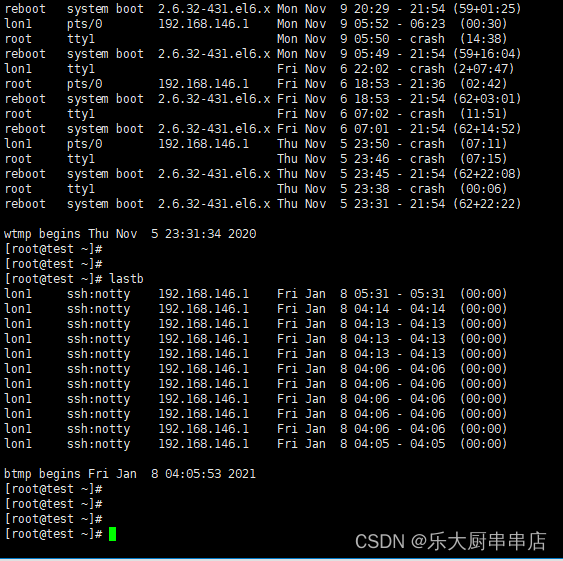
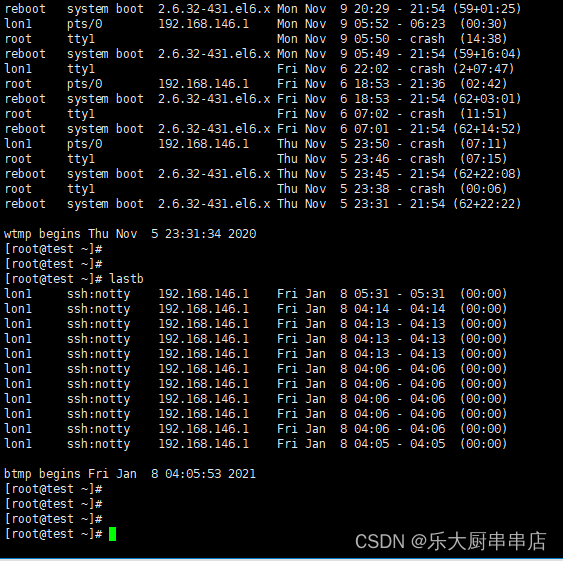
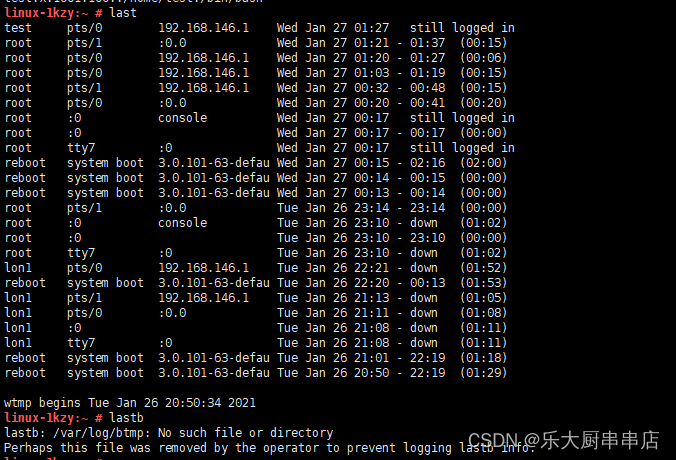
记录登录系统的登录操作日志,所有登录系统日志都需被记录,日志应至少保存6个月以上
加固方法
登录日志文件为/var/log/wtmp,/var/log/utmp.这2个文件中记录着所有登录过主机的用户,时间,来源等内容,这个文件不具可读性,可用last命令来看。
检查方法
使用命令:
last
lastb
结果中记录着所有登录过主机的用户,时间,来源等内容为符合。
centos6.5:
centos7.7:
redhat7:

SUSE Linux Enterprise Server 11 SP4:
SUSE 12 SP4:

加固情况
备注
加固要求
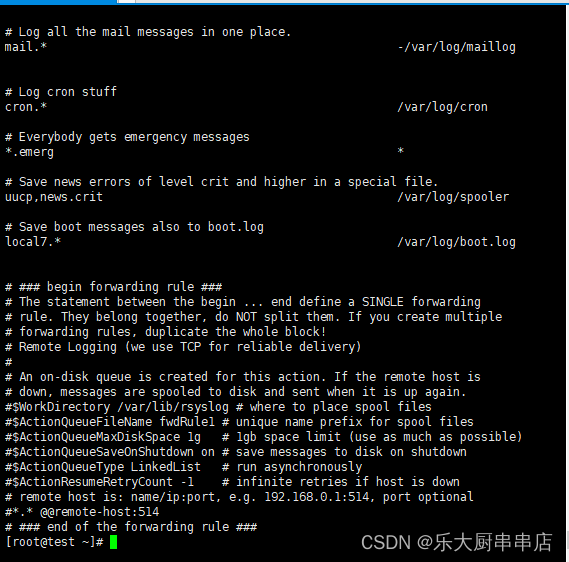
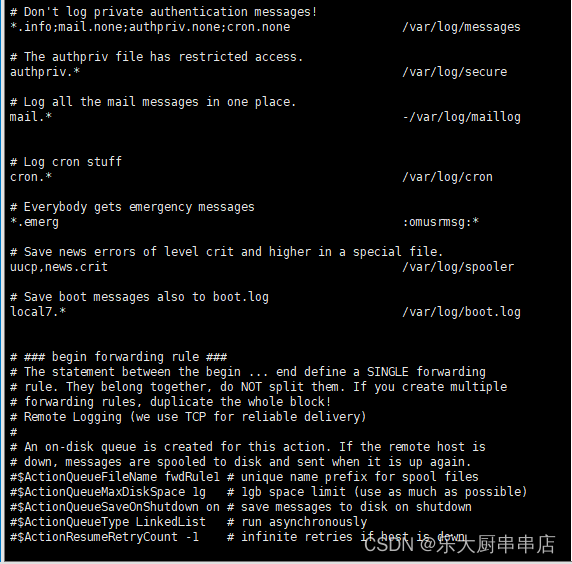
系统应配置完备日志记录,记录对与系统相关的安全事件,日志应至少保存6个月以上
加固方法
1、syslog-ng日志服务配置安全事件日志:
编辑/etc/syslog-ng/syslog-ng.conf
配置:
filter f_msgs { level(err) or facility(kern) and level(debug) or facility(daemon) and level(notice); };
destination msgs { file("/var/adm/msgs"); };
log { source(src); filter(f_msgs); destination(msgs); };
其中/var/adm/msgs为日志文件。
如果该文件不存在,则创建该文件,命令为:
touch /var/adm/msgs,并修改权限为666.命令为:chmod 666 /var/adm/msgs.
重启日志服务:
#/etc/init.d/syslog restart
2、syslog日志服务配置安全事件日志:
编辑/etc/syslog.conf
配置:
*.err;kern.debug;daemon.notice /var/adm/messages
其中/var/adm/messages为日志文件。
如果该文件不存在,则创建该文件,命令为:
touch /var/adm/messages,并修改权限为666.命令为:chmod 666 /var/adm/messages.
重启日志服务:
#/etc/init.d/syslog restart
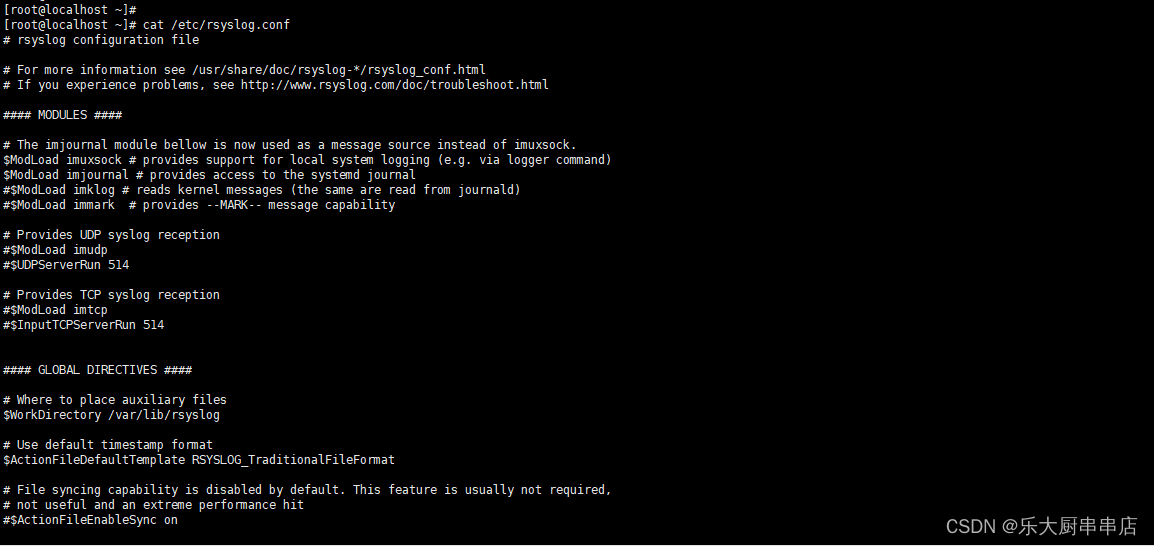
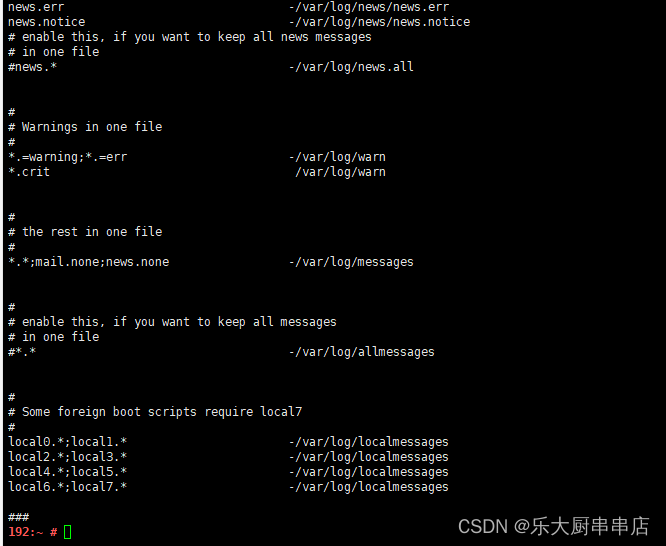
3、rsyslog日志服务配置安全事件日志
编辑/etc/rsyslog.conf
配置:
*.err;kern.debug;daemon.notice /var/adm/messages
其中/var/adm/messages为日志文件。
如果该文件不存在,则创建该文件,命令为:
touch /var/adm/messages,并修改权限为666.命令为:chmod 666 /var/adm/messages.
重启日志服务:
#/etc/init.d/rsyslog restart
检查方法
使用命令:
ps -ef|grep syslog查询运行中的日志服务
syslog-ng服务使用以下命令查看配置文件:
cat /etc/syslog-ng/syslog-ng.conf
syslog服务使用以下命令查看配置文件:
cat /etc/syslog.conf
rsyslog服务使用以下命令查看配置文件:
cat /etc/rsyslog.conf
ls -al /日志文件存放路径/
结果中在运行的日志服务对应的配置文件中,已配置了日志的存放路径,且已对日志存储路径进行授权为符合。
centos6.5:
centos7.7:
redhat7:
SUSE Linux Enterprise Server 11 SP4:

SUSE 12 SP4:
加固情况
备注
加固要求
记录su命令使用情况,日志应至少保存6个月以上
加固方法
Redhat5.x、centos5.x、suse12之前(包括5.x):
1、编辑/etc/syslog.conf, 配置: authpriv.* /var/log/secure ;
2、创建/var/log/secure文件 touch /var/log/secure
3、重启syslog服务 #/etc/init.d/syslog restart
Redhat 6.x、centos6.x、centos7:
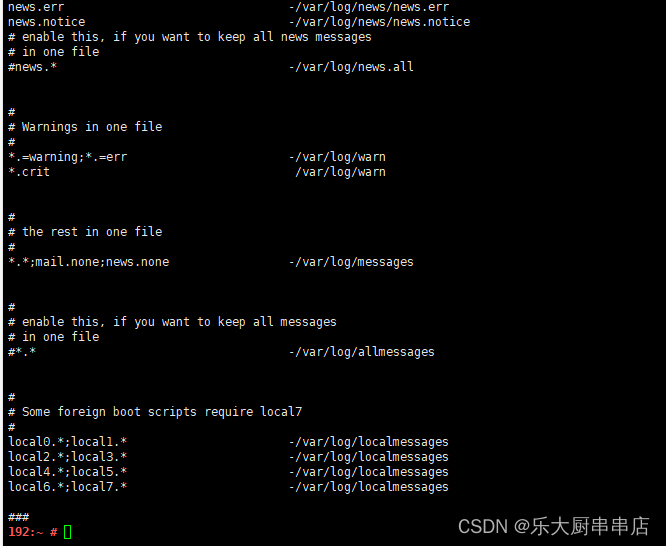
1、编辑/etc/rsyslog.conf, 配置: authpriv.* /var/log/secure ;
2、创建/var/log/secure文件 touch /var/log/secure
3、重启syslog服务 #/etc/init.d/syslog restart
Suse 9:
1、编辑/etc/syslog.conf, 配置: authpriv.* /var/log/secure ;
2、创建/var/log/secure文件 touch /var/log/secure;
3、重启syslog服务 #/etc/init.d/syslog restart;
Suse10, 11:
1、编辑:/etc/syslog-ng/syslog-ng.conf,配置: filter f_secure { facility(authpriv); }; destination priverr { file("/var/log/secure"); }; log { source(src); filter(f_secure); destination(priverr); };;
2、创建/var/log/secure文件 touch /var/log/secure ;
3、重启syslog服务 #/etc/init.d/syslog restart。
检查方法
使用命令:
centos5.x、Redhat 5.x、Suse 9操作系统适配syslog日志服务
syslog服务使用以下命令查看配置文件:
cat /etc/syslog.conf
Suse10, 11操作系统适配syslog-ng日志服务
syslog-ng服务使用以下命令查看配置文件:
cat /etc/syslog-ng/syslog-ng.conf ()
Centos6.x、centos 7.x\Redhat 6.x及之后版本适配rsyslog日志服务
rsyslog服务使用以下命令查看配置文件:
cat /etc/rsyslog.conf
centos5.x、Redhat 5.x操作系统适配syslog日志服务:
cat /etc/syslog.conf执行结果中包含authpriv.* /var/log/secure语句为符合;
Centos6.x、centos 7.x、Redhat 6.x、Suse12及之后版本适配:
cat /etc/rsyslog.conf执行结果中包含authpriv.* /var/log/secure语句为符合;
Suse 9操作系统适配syslog日志服务:
cat /etc/syslog.conf执行结果中包含authpriv.* /var/log/secure语句为符合;
Suse10, 11操作系统适配syslog-ng日志服务:
cat /etc/rsyslog-ng/syslog-ng.conf执行结果中包含 filter f_secure { facility(authpriv); }; destination priverr { file("/var/log/secure"); }; log { source(src); filter(f_secure); destination(priverr); }语句为符合。
centos6.5:

centos7.7:

redhat7:

SUSE Linux Enterprise Server 11 SP4:

SUSE 12 SP4:
加固情况
备注
加固要求
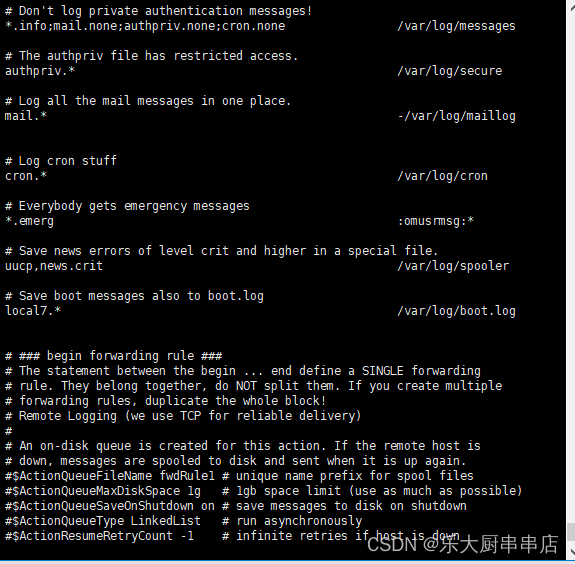
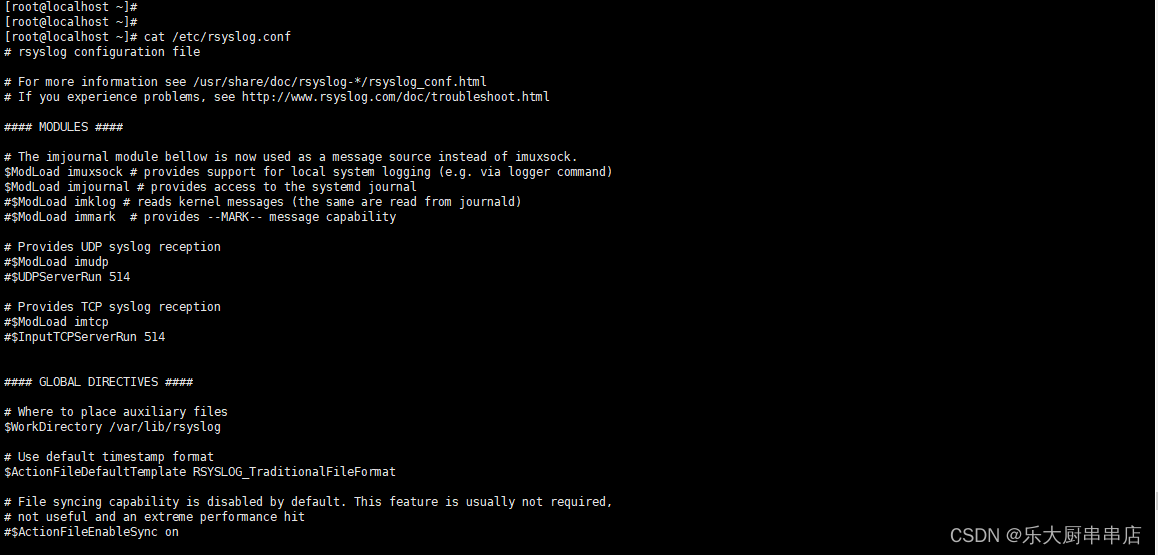
syslog应配置远程日志功能,日志应至少保存6个月以上
syslog-ng应配置远程日志功能
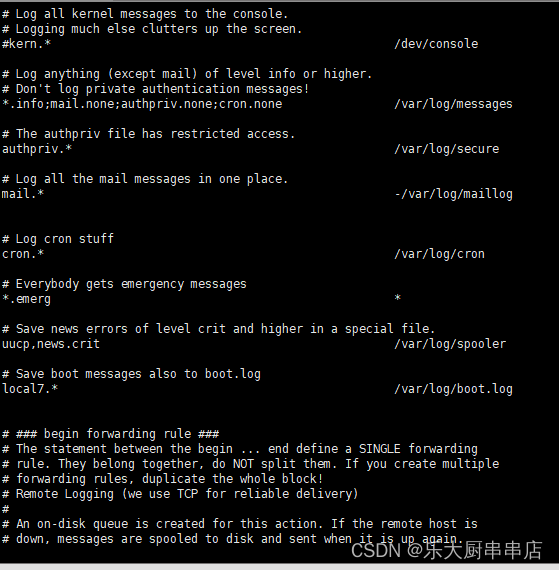
rsyslog应配置远程日志功能
加固方法
rsyslog是否配置远程日志功能:
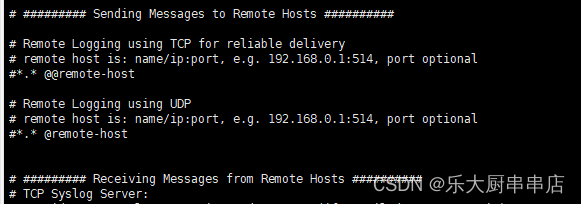
修改配置文件vi /etc/rsyslog.conf, 加上这一行: . @192.168.0.1 可以将"."替换为你实际需要的日志信息。比如:kern.* ; mail.* 等等。 可以将此处192.168.0.1替换为实际的IP或域名(域名格式形如:www.nsfocus.com,根据具体情况填写)。
suse12系统中支持运行rsyslog配日志远程日志:
修改配置文件vi /etc/rsyslog.d/remote.conf 配置*.* @192.168.0.1:514 可以将此处192.168.0.1替换为实际的IP或域名(域名格式形如:www.nsfocus.com,根据具体情况填写)。
syslog-ng是否配置远程日志功能:
在/etc/syslog-ng/syslog-ng.conf中配置destination logserver { udp("10.10.10.10" port(514)); }; log { source(src); destination(logserver); }; 可以将此处10.10.10.10替换为实际的IP。
syslog是否配置远程日志功能:
修改配置文件vi /etc/syslog.conf, 加上这一行: . @192.168.0.1 可以将"."替换为你实际需要的日志信息。比如:kern.* ; mail.* 等等。 可以将此处192.168.0.1替换为实际的IP或域名(域名格式形如:www.nsfocus.com,根据具体情况填写)。
检查方法
使用命令:
ps -ef|grep syslog查询运行中的日志服务
syslog-ng服务使用以下命令查看配置文件:
cat /etc/syslog-ng/syslog-ng.conf
syslog服务使用以下命令查看配置文件:
cat /etc/syslog.conf
rsyslog服务使用以下命令查看配置文件:
cat /etc/rsyslog.conf
cat /etc/rsyslog.conf执行结果包含*.* @192.168.0.1相同作用语句或者cat /etc/syslog-ng/syslog-ng.conf执行结果中包含destination logserver { udp("10.10.10.10" port(514)); }; log { source(src); destination(logserver); };相同作用语句;或者cat /etc/syslog.conf执行结果中包含*.* @192.168.0.1相同作用语句,上述情况满足其一为符合。
centos6.5:
centos7.7:
redhat7:
SUSE Linux Enterprise Server 11 SP4:

SUSE 12 SP4:
加固情况
备注
加固要求
关闭系统中默认的但是并不在使用的服务和端口
加固方法
centos5.x或6.x中:
1.关闭discard服务
chkconfig [--level levels] discard off
chkconfig [--level levels] discard-udp off
2.关闭kshell服务
chkconfig [--level levels] kshell off
3.关闭daytime服务
chkconfig [--level levels] daytime off
4.关闭echo服务
chkconfig [--level levels] echo off
chkconfig [--level levels] echo-udp off
5.关闭sendmail服务
chkconfig [--level levels] sendmail off
6.关闭ntalk服务
chkconfig [--level levels] ntalk off
7.关闭ident服务
chkconfig [--level levels] ident off
8.关闭printer服务
chkconfig [--level levels] printer off
9.关闭time服务
chkconfig [--level levels] time off
chkconfig [--level levels] time-udp off
10.关闭nfslock服务
chkconfig [--level levels] nfslock off
11.关闭lpd服务
chkconfig [--level levels] lpd off
12.关闭nfs服务
chkconfig [--level levels] nfs off
13.关闭chargen服务
chkconfig [--level levels] chargen off
chkconfig [--level levels] chargen-udp off
14.关闭ypbind服务
chkconfig [--level levels] ypbind off
15.关闭tftp服务
chkconfig [--level levels] tftp off
16.关闭klogin服务
chkconfig [--level levels] klogin off
在centos7中:
17.查看所有已安装的服务
systemctl list-unit-files
18.查看所有安装的*.service项目
systemctl list-units --type=service --all
19.开启httpd服务
systemctl start httpd
20.重启httpd服务
systemctl restart httpd
21.关闭httpd服务
systemctl stop httpd
22.查看httpd启动的状态
systemctl status httpd
检查方法
使用命令:
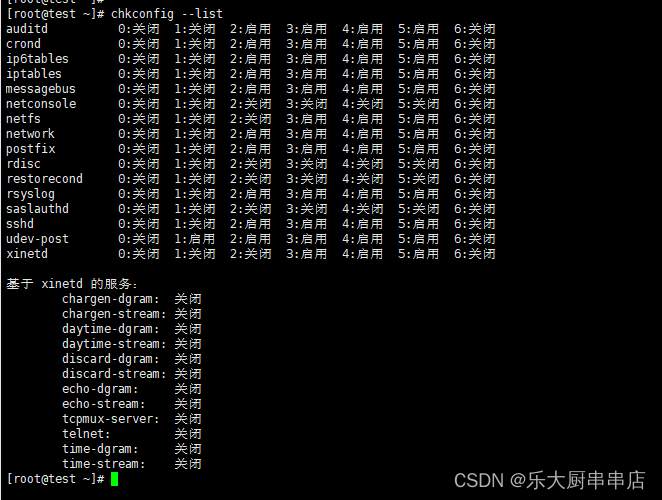
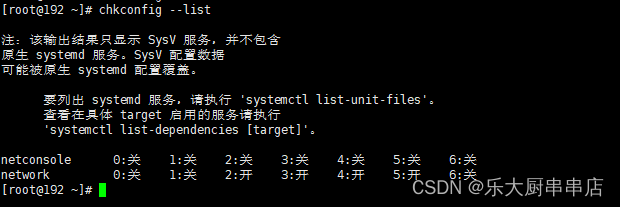
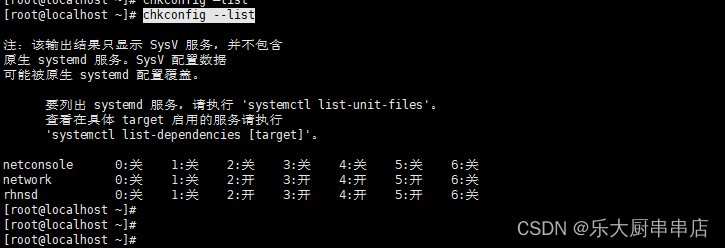
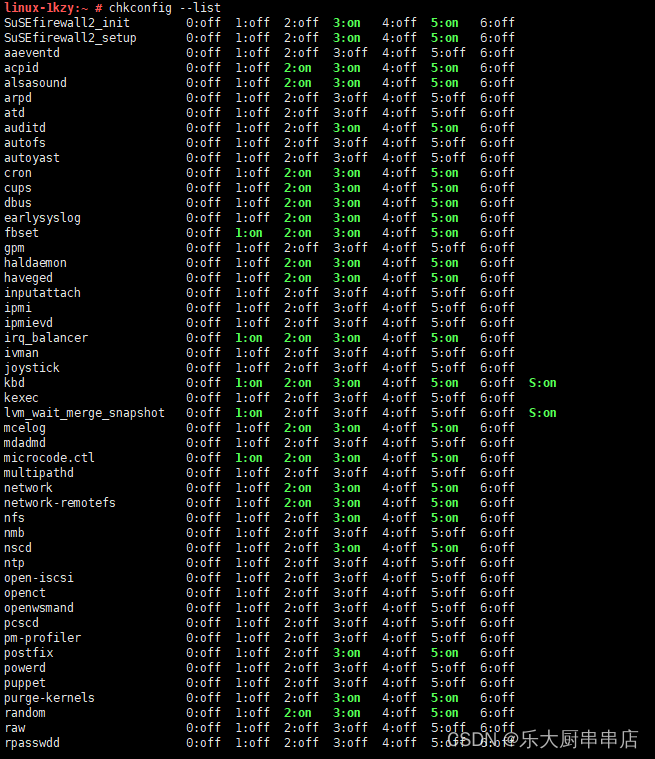
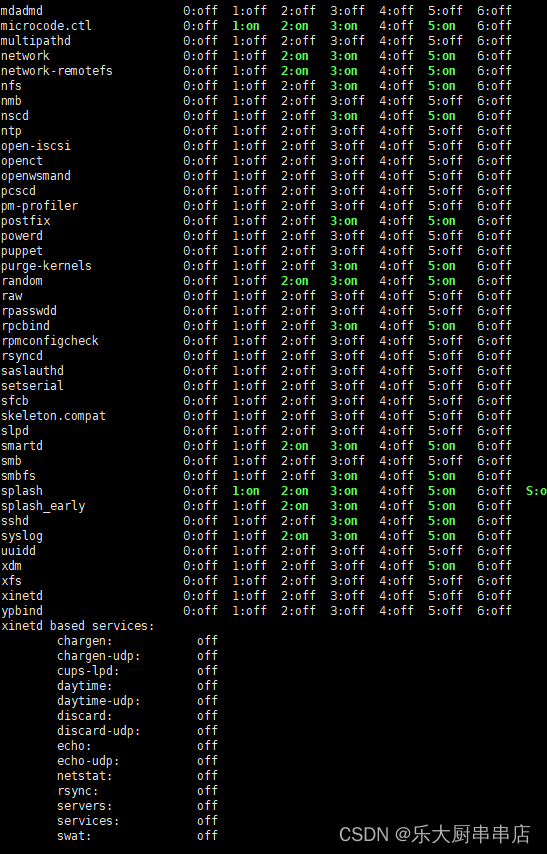
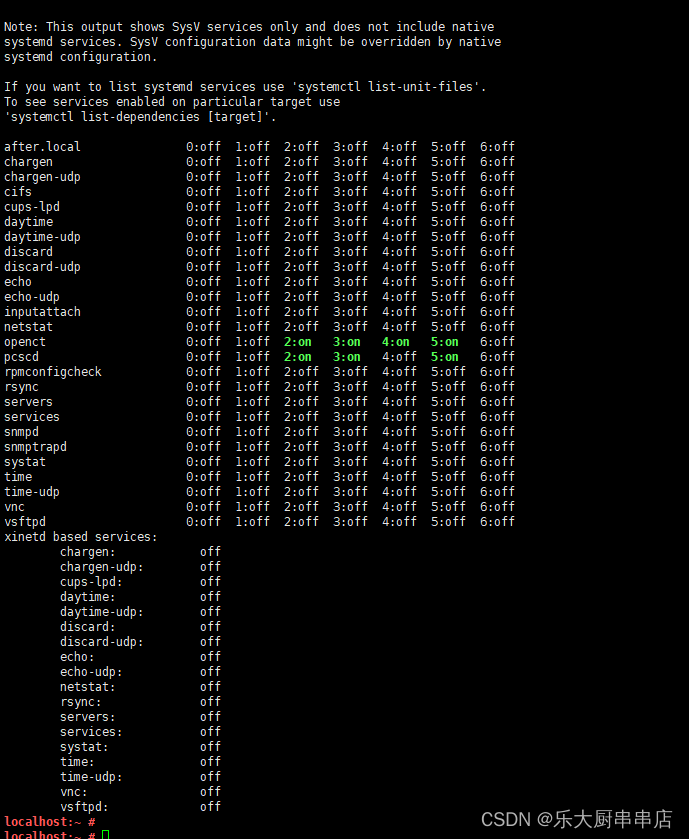
chkconfig --list
结果中daytime、time、echo、discard、chargen、sendmail、ntalk、ident、printer、bootps、tftp、kshell、klogin、lpd、nfs、nfslock、ypbind服务均为关闭状态。
centos6.5:
centos7.7:
redhat7:
SUSE Linux Enterprise Server 11 SP4:
SUSE 12 SP4:
加固情况
备注
根据实际需求对不必要的服务进行关闭。
版权归原作者 乐大厨串串店 所有, 如有侵权,请联系我们删除。