文章目录
前言
在日常开发的过程中,对自己的代码进行单元测试是个非常重要的过程,一方面可以最小范围的针对一个方法进行测试,提高测试的简便性以及测试的成本,不用启动这个项目。另一方面,做好单元测试能降低代码的BUG率。本篇文章主要是为了总结一下如何优雅的在Springboot项目中使用单元测试去测试功能。
一、SpringBoot单元测试的使用
1.1 引入依赖
<dependency>
   <groupId>org.springframework.boot</groupId>
   <artifactId>spring-boot-starter-test</artifactId>
   <scope>test</scope>
</dependency>
1.2 创建单元测试类
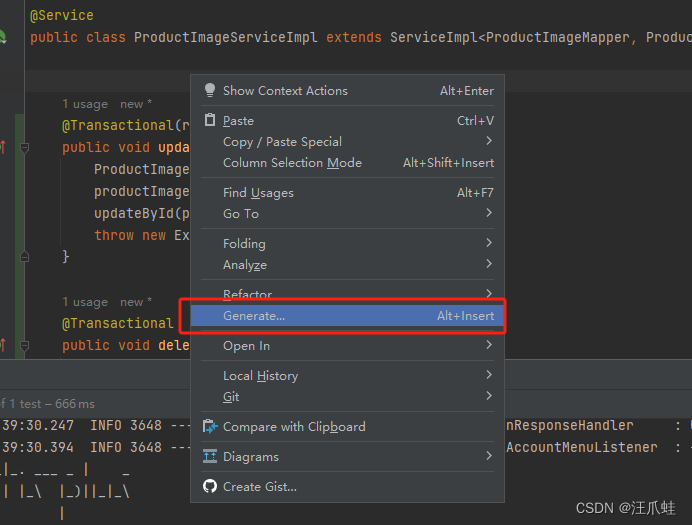
如果使用的开发工具为IntelliJ IDEA,点击进入方法,鼠标右键

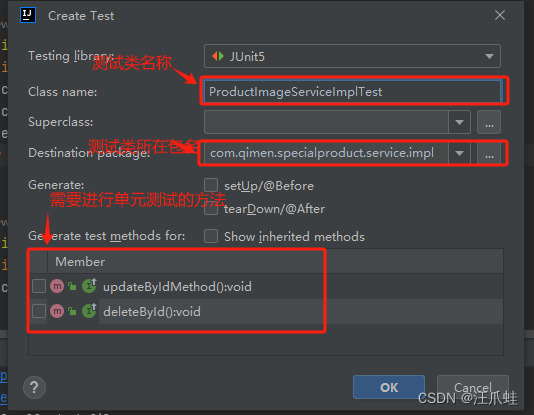
点击Generate然后选择Test

选择好之后点击Ok就创建好一个测试类了。

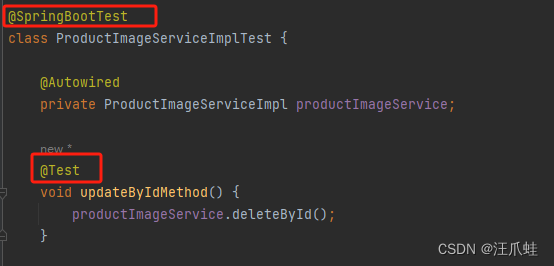
然后在测试类上添加**@SpringBootTest注解,需要测试的方法上已经有@Test**注解了 。点击方法左侧的三角形即可运行单元测试方法。
二、Spring Boot使用Mockito进行单元测试
Mockito可以模拟一个类或者方法,使用Mockito进行单元测试的话就可以只关注这一个待测试的方法而不用去启动整个项目。项目依赖很多环境,比如中间件、数据库等,如果使用第一种方法进行测试的话,则这些环境都要准备好。
2.1 Mockito中经常使用的注解以及注解的作用
- @Mock:用于创建被mock的对象实例。添加了@Mock注解的对象中的方法都需要mock出来,而不是调用对象本来的方法
- @Spy:创建保留原对象中的方法的对象。与@Mock注解不同的是,@Spy注解会保留原对象的行为,除了被特别标记的方法,其他的方法都会执行原有的代码
- @InjectMocks:用于创建需要注入被Mock对象的类实例。例如:Service中注入了一个Dao,需要测试的Service中的方法使用了Dao,这个Dao上面添加了@Mock注解。则测试类中的Service就需要添加@InjectMocks注解。
- @Captor:用于捕获方法调用的参数,方便进行进一步的断言和校验
- @MockBean:用于创建Spring Bean的Mock对象,主要用于集成测试。在进行集成测试时,有时需要使用Spring容器中的Bean进行测试,但是又不希望与其他服务产生依赖关系。这时可以使用@MockBean注解,创建一个Spring Bean的Mock对象。
- @MockitoSettings:用于设置Mockito框架的全局设置。在进行单元测试时,有时需要设置Mockito框架的一些全局设置,例如默认的返回值等。这时可以使用@MockitoSettings注解来设置这些全局配置。
了解完了Mockito常使用的一些注解之后,下面就开始对各种情况的Mock
2.2 使用Mockito测试类中的方法
@SpringBootTest
public class ProductImageServiceImplMockito {

    @Mock
    private ProductImageMapper productImageMapper;

    @InjectMocks
    private ProductImageServiceImpl productImageService;

    @BeforeEach
    public void setup() {
        MockitoAnnotations.openMocks(this);
    }

    @Test
    public void testGet() {
        ProductImage productImage = new ProductImage();
        productImage.setId(1l);
        productImage.setImageUrl("mockUrl");
        // mock方法的逻辑
        when(productImageMapper.selectById(1l)).thenReturn(productImage);
        ProductImage image = productImageService.getByImageId(1l);
        assertEquals("mockUrl", image.getImageUrl());
    }
}
在Mapper上面添加了@Mock注解,则Mapper中的方法都是mock的,这里mock了selectById方法。
2.3 使用Mockito测试Controller层的方法
// Controller层代码
@RestController
@RequestMapping("/test")
public class ProductImageController {

    @Autowired
    private ProductImageServiceImpl productImageService;

    @GetMapping("/productImage/{id}")
    public ProductImage getProductById(@PathVariable("id") Long id) {
        return productImageService.getByImageId(id);
    }
}

// 测试方法代码
@WebMvcTest(ProductImageController.class)
public class ProductImageServiceImplMockitoV2 {

    @MockBean
    private ProductImageServiceImpl productImageService;

    @Autowired
    private MockMvc mockMvc;

    @Test
    public void test() throws Exception {
        ProductImage productImage = new ProductImage();
        productImage.setId(1l);
        productImage.setImageUrl("mockUrl");
        when(productImageService.getByImageId(1l)).thenReturn(productImage);
        MvcResult mvcResult = mockMvc.perform(MockMvcRequestBuilders.get("/test/productImage/1"))
                .andExpect(status().isOk())
                .andReturn();
        String contentAsString = mvcResult.getResponse().getContentAsString();
    }
}
直接模拟发送http请求到Controller的API接口,并调用@MockBean中mock出来的方法
2.4 mock测试其它场景
还有很多场景,这里就不一一列举了,直接参考大神文章《在Spring Boot环境中使用Mockito进行单元测试》
总结
本文介绍了一些单元测试的方法,在日常开发中应该避免使用main方法测试的方式进行测试,因为main方法既无法模拟项目的环境,而且又受静态方法的影响只能调用静态方法。还有一些其它的测试工具,录入yapi、easymock等也可以进行测试使用。
版权归原作者 汪爪蛙 所有, 如有侵权,请联系我们删除。