

** 🏡浩泽学编程:个人主页
** 🔥 推荐专栏:《深入浅出SpringBoot》《java对AI的调用开发》
《RabbitMQ》《Spring》《SpringMVC》🛸学无止境,不骄不躁,知行合一
文章目录
前言
本篇文章主要讲诉多环境注入适应不同场景问题和Spring EL。
一、@Profile
- 在企业开发的过程中,项目往往要面临开发环境、测试环境、准生产环境(用于模拟真实生产环境部署所用〉和生产环境等的切换,所以在企业开发中往往需要有多套环境,而每一套环境的上下文是不一样的。例如,它们会有各自的数据库资源,这样就要求我们在不同的数据库之间进行切换。为了方便, Spring还提供了 Profile机制, 使我们可以很方便地实现各个环境之间的切换。在使用DI来依赖注入的时候,能够根据@profile标明的环境,将注入符合当前运行环境的相应的bean。
- 使用要求: - @Component或@Configuration注解的类可以使用@profile- @Profile中需要指定一个字符串,约定生效的环境
注解使用
(1) @Prifile修饰类
@Configuration@Profile("dev")publicclassMyConfig{@Bean(destroyMethod="destory")publicDataSource getDevDataSource (){Properties props =newProperties();
         props.setProperty("driver","com.mysql.jdbc.Driver");
        props.setProperty("url","jdbc:mysql://localhost:3306/dev_spring_boot");
        props.setProperty("sername","root");
        props.setProperty ("password","root");DataSource dataSource =null;try{
            dataSource =BasicDataSourceFactory.createDataSource(props);}catch(Exception e){
            e.printStackTrace();}return dataSource;}}
(2)@Profile修饰方法
现在有两个数据库,使用注解@Profile 定义两个Bean
@Bean(name ="dataSource", destroyMethod ="close")@Profile("dev")publicDataSource getDevDataSource (){Properties props =newProperties();
     props.setProperty("driver","com.mysql.jdbc.Driver");
    props.setProperty("url","jdbc:mysql://localhost:3306/dev_spring_boot");
    props.setProperty("sername","root");
    props.setProperty ("password","root");DataSource dataSource =null;try{
        dataSource =BasicDataSourceFactory.createDataSource(props);}catch(Exception e){
        e.printStackTrace();}return dataSource;}@Bean(name ="dataSource",destroyMethod ="close")@Profile("test")publicDataSource getTestDataSource (){Properties props=newProperties();
    props.setProperty("driver","com.mysql.jdbc.Driver");
    props.setProperty("url","jdbc:mysql://localhost:3306/test_spring_boot");
    props.setProperty("username","root");
    props.setProperty("password","root");DataSource dataSource =null;try{
        dataSource =BasicDataSourceFactory.createDataSource(props);}catch(Exception e){
        e.printStackTrace();}return dataSource;}
(3)@Profile修饰注解
了一个注解实现自定义场景,该注解可以使注入的bean使用dev的这个场景,后续就不再需要使用@Profile(“dev”)的方式,只需要在使用@Dev。
@Target(ElementType.TYPE)@Retention(RetentionPolicy.RUNTIME)@Profile("dev")public@interfaceDev{}
(4)启动激活
在 Spring 中存在两个参数可以提供给我们配置,以修改启动 Profile 机制, 一个是spring.profiles.active, 另一个是 spring.profiles.default。在这两个属性都没有配置的情况下, Spring 将不会启动Profile 机制,这就意味着被@Profile 标注的 Bean 将不会被 Spring装配到 roe 容器中。Spring是先判定是否存在spring.profiles.active 配置后 , 再去查找 spring.profiles.default 配置的,所以spring.profiles.active 的优先级要大于 spring.profiles.default。
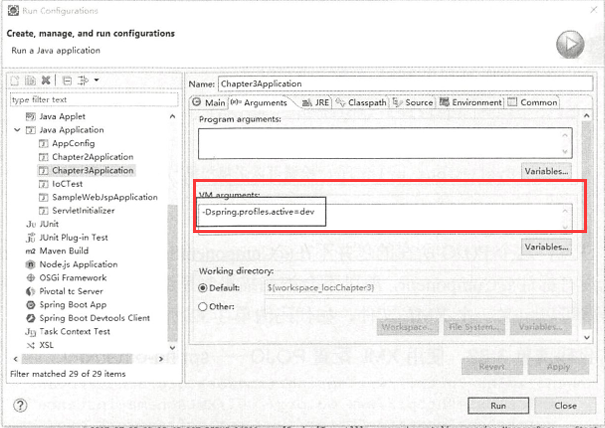
在Java 启动项目中,使用dev环境,我们只需要如下配置就能够启动Profile机制(idea和eclipse的配置):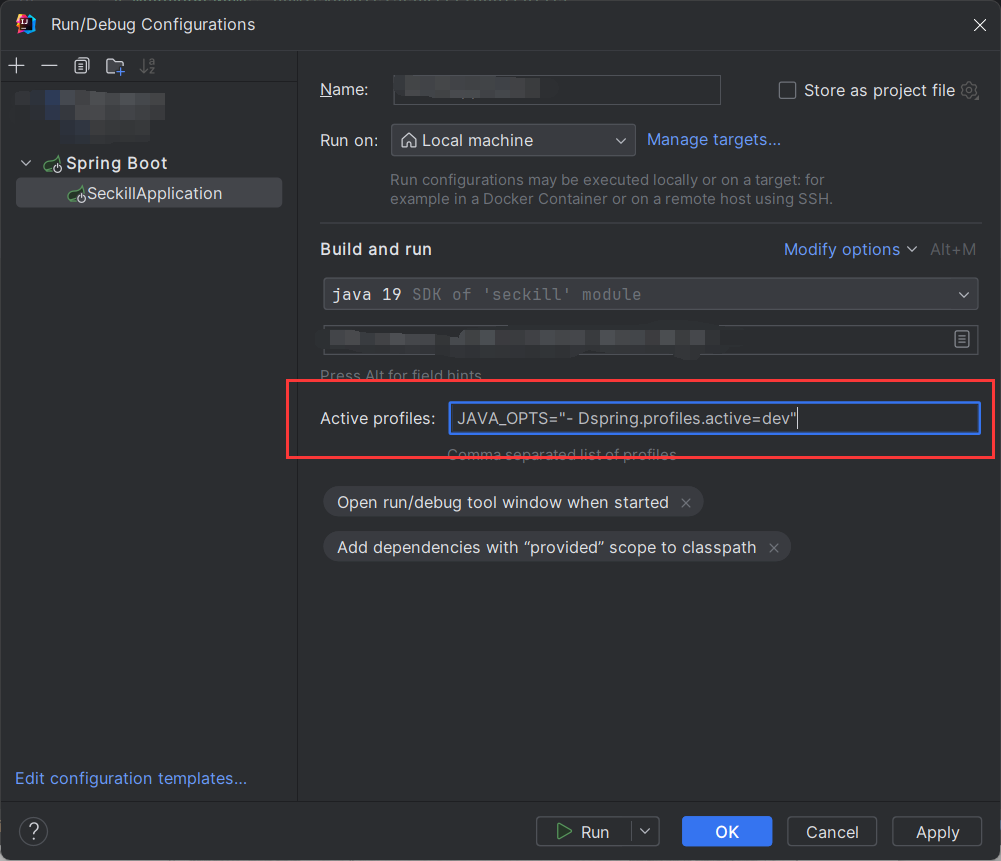
也可以打包后运行:
java -jar spring-boot-02-config-0.0.1-SNAPSHOT.jar --spring.profiles.active=dev;
资源配置文件
- springboot的环境隔离还可以使用多资源文件的方式,进行一些参数的配置。
- Springboot的资源配置文件除了application.properties之外,还可以有对应的资源文件application-{profile}.properties。 假设,一个应用的工作环境有:dev、test、prod 那么,我们可以添加 4 个配置文件:- applcation.properties : 公共配置- application-dev.properties : 开发环境配置- application-test.properties : 测试环境配置- application-prod.properties : 生产环境配置
- 不同的properties配置文件也可以是在 applcation.properties 文件中来激活 profile:
spring.profiles.active = dev- 这个时候请注意,按照 Spring Boot 的规则,假设把选项-Dspring.profiles.active 配置的值记为{profile},则它会用 application-{profile}.properties 文件去代替原来默认的 application.properties 文件,然后启动Spring Boot 的程序。
例如:
application.properties:
spring.profiles.active=prod
application-prod.properties:
server.port=2222

#定义一些自己使用的属性,然后通过@Value("${属性名}}")注解来加载对应的配置属性
com.name=Prod
com.location=Hubei
application-dev.properties:
# 服务端口
server.port=1111

#定义一些自己使用的属性,然后通过@Value("${属性名}}")注解来加载对应的配置属性
com.name=DEV
com.location=HeNan
控制层:
@Controller@RequestMapping("/test")publicclass test {@Value("${com.name}")privateString name;@Value("${com.location}")privateString location;@RequestMapping("hello")@ResponseBodypublicStringtest1(){System.out.println(name +"hello Spring Boot, "+location);return name +",hello Spring Boot! "+location;}}
启动Springboot后,访问http://localhost:2222/test/hello如下:
访问http://localhost:1111/test/hello是报错的,因为此时激活的是prod环境,使用的是application-dev.properties配置文件。
二、Spring EL
为了更加灵活, Spring还提供了表达式语言Spring EL。通过 Spring EL 可以拥有更为强大的运算规则来更好地装配Bean。
最常用的当然是读取属性文件的值, 例如
@Value("${database.driverName}")String driver
这里的@Value 中的${......}代表占位符,它会读取上下文的属性值装配到属性中,这便是一个最简单的Spring 表达式。 除此之外,它还能够调用方法,例如,我们记录一个Bean 的初始化时间:
@Value("#{T(System).currentTimeMillis()}")privateLong initTime =null;
- 这里采用 #{.....}代表启用 Spring 表达式,它将具有运算的功能;
- T(…)代表的是引入类:System 是java.lang.*包的类, 这是 Java 默认加载的包,因此可以不必写全限定名,如果是其他的包,则需要写出全限定名才能引用类: currentTimeMillis 是它的静态(static)方法,也就是我们调用一次System.currentTimeMillis()方法来为这个属性赋值。
此外还可以给属性直接进行赋值:
//赋值字符串@Value("#{'使用 Spring EL 赋值字符串'}")
privateString str =null;//科学计数法赋值@Value("#(9.3E3}")privatedouble d;//赋值浮点数@Value("#(3.14 }")privatefloat pi;
还可以获取其他Spring Bean 的属性来给当前的Bean属性赋值:
@Value("#{beanName.str}")privateString otherBeanProp =null;
- beanName 是 Spring IoC 容器 Bean 的名称。
- str 是其属性,代表引用对应的 Bean的属性给当前属性赋值。
有时候, 我们还希望这个属性的宇母全部变为大写,这个时候就可以写成:
@Value("#{beanName.str?.toUpperCase()}")privateString otherBeanProp =null;
再次注意这里的Spring EL。这里引用由属性后跟着是一个?,这个符号的含义是判断这个属性是否为空。如果不为空才会去执行toUppercase 方法,进而把引用到的属性转换为大写,赋予当前属性。
还可以使用 Spring EL进行一定的运算:
# 数学运算
@Value("#{1+2}")privateint run;
# 浮点数比较运算
@Value("#{beanName.pi == 3.14f}")privateboolean piFlag;
# 字符串比较运算
@Value("#{beanName.str eq 'Spring Boot'}")
pri. vate boolean strFlag;
# 字符串连接
@Value("#{beanName.str + ' 连接字符串 '}")
privateString strApp =null;
# 三元运算
@Value("#{beanName.d > 1000 ? '大子' : '小子'}")
privateString resultDesc =null;
从上面的代码可以看出, SpringEL 能够支持的运算还有很多,其中等值比较如果是数字型的可以使用=比较符,如果是字符串型的可以使用 eq 比较符。
总结
以上就是多环境注入和Spring EL的全部讲解。
版权归原作者 浩泽学编程 所有, 如有侵权,请联系我们删除。