
Windows 11 设置 wsl-ubuntu 使用桥接网络
0. 背景
在 Windows 11 下的 wsl-ubuntu 系统下学习 AI,内网的其他机器访问 wsl-ubuntu 中启动的服务非常麻烦,所以设置wsl-ubuntu 使用桥接网络,方便内网中其他机器进行访问。
1. Windows 11 下启用 Hyper-V
如下图所示,启用 Hyper-V。
2. 使用 Hyper-V 虚拟交换机管理器创建虚拟网络
如下图所示。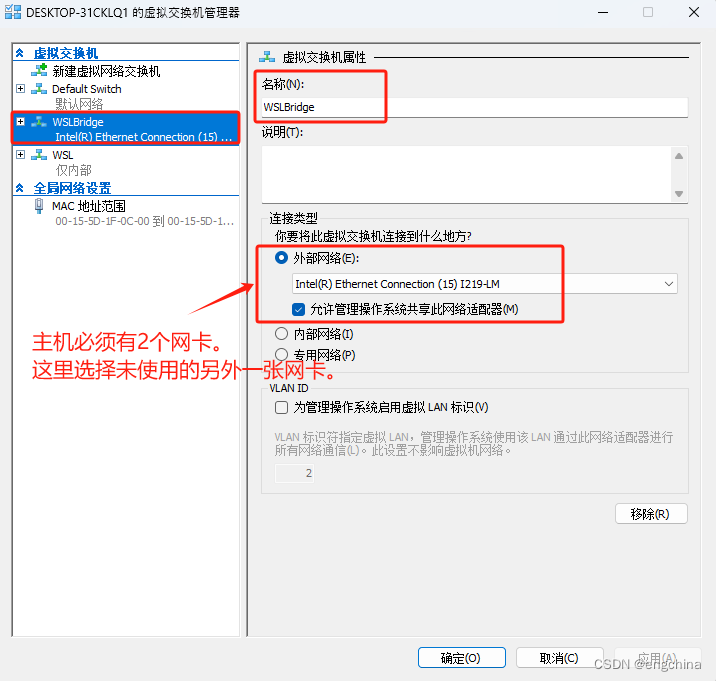
3. 创建 .wslconfig 文件
使用快捷键Win+R唤出运行窗口,在打开栏内填入%USERPROFILE%并在打开的文件夹内创建配置文件".wslconfig",并在该配置文件内输入以下内容。
[wsl2]
networkingMode=bridged
vmSwitch=WSLBridge
ipv6=true
dhcp=false
4. 配置 wsl.conf 文件
进入wsl的Ubuntu子系统,打开/etc/wsl.conf,若文件不存在则创建,
vi /etc/wsl.conf
在wsl.conf配置文件内填入以下内容,
[boot]
systemd = true
[network]
generateHosts = false
generateResolvConf = false
5. 配置 wsl-network.conf 文件和 resolv.conf
检查/etc/systemd/network/,若文件夹下没有文件则创建一个配置文件my-network.conf,若文件夹下有文件则忽略此步骤。
vi /etc/systemd/network/my-network.conf
在my-network.conf文件内填入以下内容,
[Match]
Name=et*
#Name=en*

[Network]
DHCP=ipv4
vi /etc/resolv.conf

---
nameserver 192.168.31.2
---
重启networkd,
systemctl restart systemd-networkd
6. 创建 00-wsl2.yaml
打开配置文件/etc/netplan/00-wsl2.yaml,如果不存在就创建。
vi /etc/netplan/00-wsl2.yaml
在00-wsl2.yaml文件内填入以下格式的内容,
network:
  version: 2
  renderer: networkd
  ethernets:
    eth0:
      dhcp4: no
      addresses: [192.168.31.15/24]
      routes:
      - to: default
        via: 192.168.31.2
      nameservers:
        addresses: [192.168.31.2]
apt install mininet
然后使用
sudo netplan apply
应用新的网络设置,重启WSL2子系统即可。
重启后,wsl子系统的IP地址将不再随机变化,且直接桥接到外部局域网,可更方便地用于进行网络调试以及嵌入式开发。(用这个方案可永久生效,只需配置一次)
7. 安装 net-tools 和 openssh-server
apt install net-tools openssh-server
确认 ip,
ifconfig

---
eth0: flags=4163<UP,BROADCAST,RUNNING,MULTICAST>  mtu 1500
        inet 192.168.31.15  netmask 255.255.255.0  broadcast 192.168.31.255
        inet6 fe80::5cbb:f6ff:fe9e:eefa  prefixlen 64  scopeid 0x20<link>
        ether 5e:bb:f6:9e:ee:fa  txqueuelen 1000  (Ethernet)
        RX packets 1694  bytes 260513 (260.5 KB)
        RX errors 0  dropped 541  overruns 0  frame 0
        TX packets 248  bytes 40750 (40.7 KB)
        TX errors 0  dropped 0 overruns 0  carrier 0  collisions 0

lo: flags=73<UP,LOOPBACK,RUNNING>  mtu 65536
        inet 127.0.0.1  netmask 255.0.0.0
        inet6 ::1  prefixlen 128  scopeid 0x10<host>
        loop  txqueuelen 1000  (Local Loopback)
        RX packets 528  bytes 47784 (47.7 KB)
        RX errors 0  dropped 0  overruns 0  frame 0
        TX packets 528  bytes 47784 (47.7 KB)
        TX errors 0  dropped 0 overruns 0  carrier 0  collisions 0
---
完结!
本文转载自: https://blog.csdn.net/engchina/article/details/134432146
版权归原作者 engchina 所有, 如有侵权,请联系我们删除。
版权归原作者 engchina 所有, 如有侵权,请联系我们删除。