一、 开发环境和工具
1、 WIN10系统
2、 Visual Studio社区版 2019(C#)
二、 创建自定义控件窗体
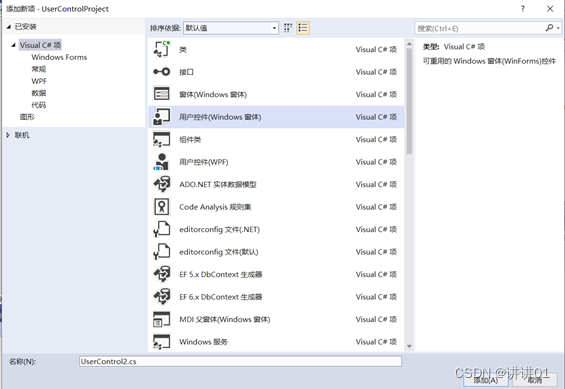
① 添加一个自定义控件,右键解决方案,点击添加,然后点击用户控件
② 选择用户控件(Windows窗体)
③ 得到如下图所示控件

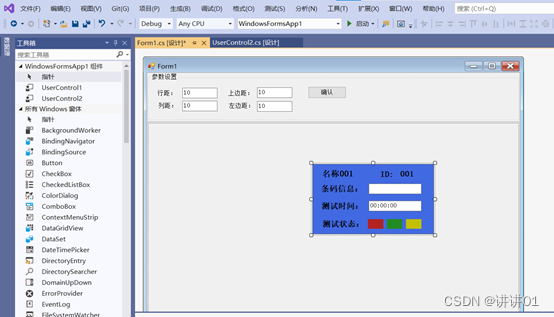
④ 从左侧工具箱拖曳控件并布局,如下图所示

⑤ 查看工具箱就能够看见我们的自定义控件已经在工具箱生成了
三、 添加相应函数
① 设置名称
public void SetName(string Name)
{
       this.lab_Name.Text = Name;
       return;
}
② 更新测试时间
     public void UpdateTimer(int Sec)
     {
         string StrHour;
         string StrMin;
         string StrSec;

         if ((Sec / 3600) < 10)
             StrHour = "0" + (Sec / 3600).ToString();
         else
             StrHour=(Sec / 3600).ToString();

         if (((Sec % 3600) / 60) < 10)
             StrMin = "0" + ((Sec % 3600) / 60).ToString();
         else
             StrMin= ((Sec % 3600) / 60).ToString();

         if (((Sec % 3600) % 60) < 10)
            StrSec = "0" + ((Sec % 3600) % 60).ToString();
         else
            StrSec= ((Sec % 3600) % 60).ToString();
         this.textBox_TestTimer.Text = StrHour + ":" + StrMin + ":" + StrSec;
         return;
     }
③ 更新测试状态
   public void UpdateTestState(bool LedRed,bool LedGreen, bool LedYellow)
    {
         if (!LedRed)
            this.lab_LedRed.BackColor = System.Drawing.Color.Firebrick;
         else
            this.lab_LedRed.BackColor = System.Drawing.Color.Red;

         if (!LedGreen)
            this.lab_LedGreen.BackColor = System.Drawing.Color.ForestGreen;
         else
            this.lab_LedGreen.BackColor = System.Drawing.Color.Lime;

        if (!LedYellow)
            this.lab_LedYellow.BackColor = System.Drawing.Color.ForestGreen;
        else
            this.lab_LedYellow.BackColor = System.Drawing.Color.Yellow;

        return;
    }
④设置ID
public void SetID(int IDIndex)
{
      if(IDIndex<10)
           this.lab_IDValue.Text ="00" + IDIndex.ToString();
       else if(IDIndex < 100)
           this.lab_IDValue.Text = "0" + IDIndex.ToString();
       else if (IDIndex < 1000)
           this.lab_IDValue.Text = IDIndex.ToString();

       return;
 }
四、 控件应用
using System;
using System.Collections.Generic;
using System.Data;
using System.Drawing;
using System.Linq;
using System.Text;
using System.Threading.Tasks;
using System.Windows.Forms;

namespace WindowsFormsApp1
{
    public partial class Form1 : Form
    {
        public Form1()
        {
            InitializeComponent();
        }
        int Sec = 0;
        UserControl2[] userControl1 = new UserControl2[1024]; //创建控件数组
        private Layout layout = new Layout();

        /// <summary>
        /// 更新测试时间
        /// </summary>
        /// <param name="count"></param>
        /// <param name="Sec"></param>
        private void UpdataTimer(int count,int Sec)
        {
            for (int i = 0; i < count; i++)
            {
                 userControl1[i].UpdateTimer(Sec) ;
            }
        }
        /// <summary>
        /// 添加控件,count为添加控件数量
        /// </summary>
        /// <param name="count"></param>
        private void AddControl(int count)
        {
            int PanelWidth;
            int PanelHeight;
            int ColCount = 0;


            this.panel1.Controls.Clear();//清除面板控件
            PanelWidth = this.panel1.Width;
            PanelHeight = this.panel1.Height;
            layout.RowGap = Convert.ToInt32(textBox_RowGap.Text);
            layout.ColGap = Convert.ToInt32(textBox_ColGap.Text);
            layout.LeftGap = Convert.ToInt32(textBox_LeftGap.Text);
            layout.TopGap = Convert.ToInt32(textBox_TopGap.Text);

            layout.Height = 134;
            layout.Width =218;
            //根据面板宽度,计算多少列
            ColCount = (PanelWidth - layout.LeftGap - layout.RightGap) / (layout.Width + layout.ColGap);

            for (int i = 0; i < count; i++)
            {
                userControl1[i] = new UserControl2(); //实例化控件
                 //根据列距,行距,计算控件位置
                 userControl1[i].Location = new System.Drawing.Point((i % ColCount) * (layout.Width + layout.ColGap) +layout.LeftGap,(i / ColCount) * (layout.Height + layout.RowGap) + layout.TopGap);
                //更新测试状态
                userControl1[i].UpdateTestState(true, true,true);
               //设置名称
                userControl1[i].SetName("名称" + (i + 1).ToString());
                //设置ID
                userControl1[i].SetID(i + 1);
                //设置控件宽度和高度
                userControl1[i].Width = layout.Width;
                userControl1[i].Height = layout.Height;
                //添加相应控件
                this.panel1.Controls.Add(userControl1[i]);
            }
            this.timer1.Start();

        }

        private void button1_Click_2(object sender, EventArgs e)
        {
            AddControl(32);
        }

        private void timer1_Tick(object sender, EventArgs e)
        {
            Sec++;
            UpdataTimer(32, Sec); //更新测试时间
        }
    }
}
五、效果演示
C#自定义控件-CSDN直播C#自定义控件https://live.csdn.net/v/247427
版权归原作者 讲讲01 所有, 如有侵权,请联系我们删除。