1. 🍓🍓🍓🍓准备工作
- 创建测试数据库
- 准备好后台服务接口,Moudel查询,和Book查询(支持分页)
- 后台单元测试
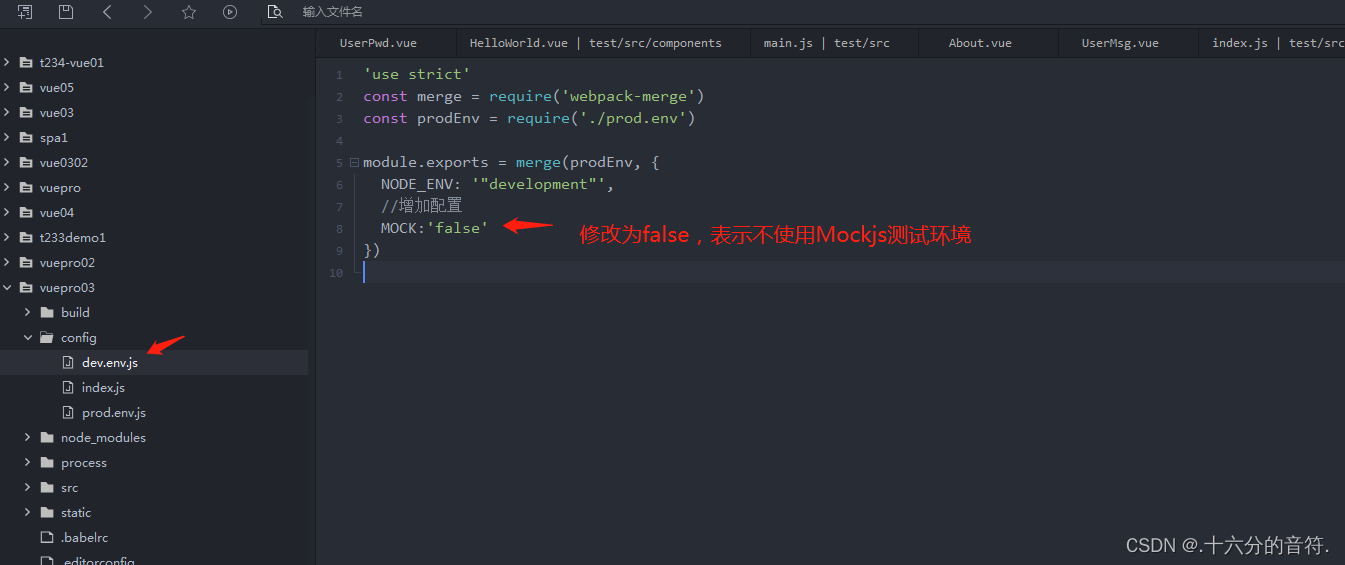
- 修改vue配置,使用真实环境
2. 🍓🍓🍓🍓动态树
2.1 🥭🥭在配置请求路径
在src/api/action.js中配置获取动态树数据的请求路径
export default {
    //服务器
    'SERVER': 'http://localhost:8080/webserver',

    //登陆请求
    'SYSTEM_USER_DOLOGIN': '/userMsg/userAction!login.action', //登陆

    //获取动态树数据请求
    'SYSTEM_MODULE_REQ': '/sysMsg/sysMsgAction!getModules.action',

    //获取完整的请求地址
    'getFullPath': k => { //获得请求的完整地址,用于mockjs测试时使用
        return this.SERVER + this[k];
    }

}
2.2 🥭🥭使用动态数据构建导航菜单
2.2.1 🥭🥭通过接口获取数据
LeftAside.vue:
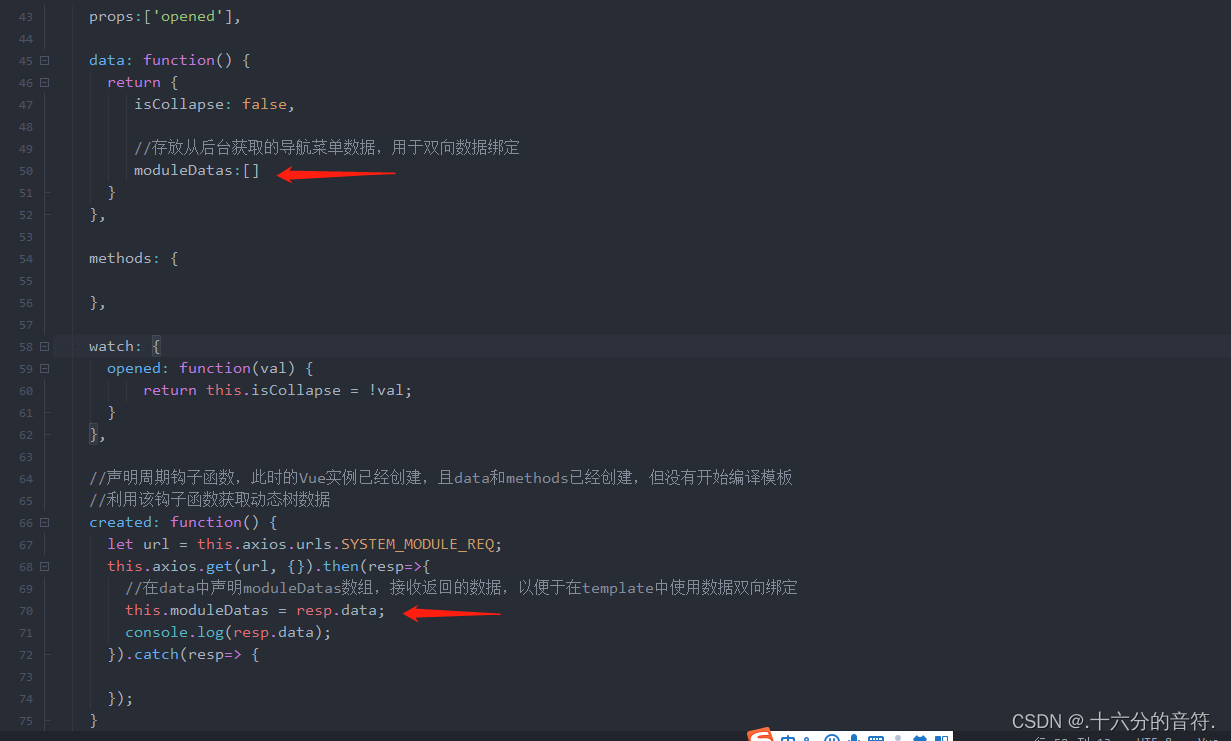
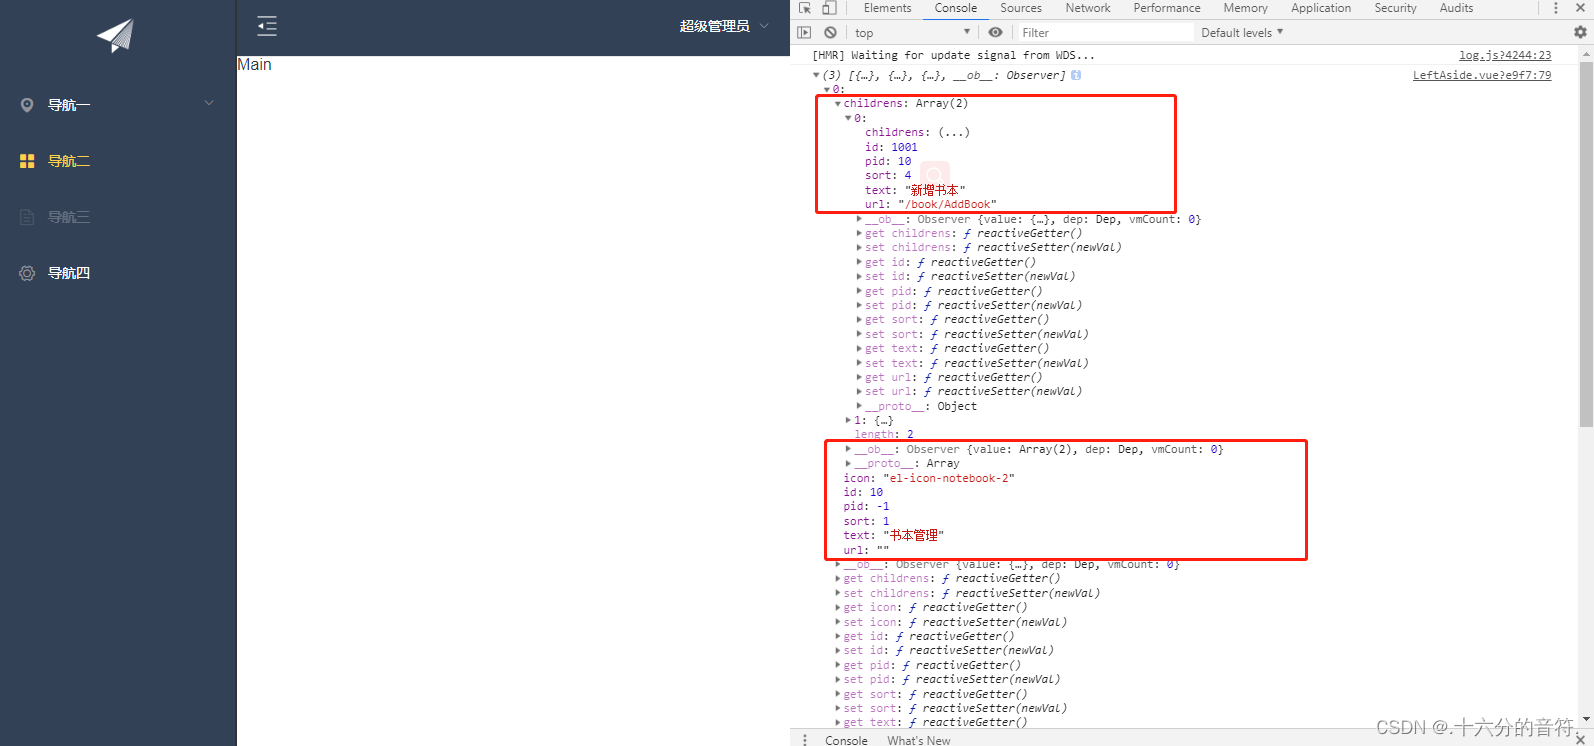
🚀🚀测试,通过控制台查看数据是否正常获取:
🥭🥭2.2.3 通过后台获取的数据构建菜单导航
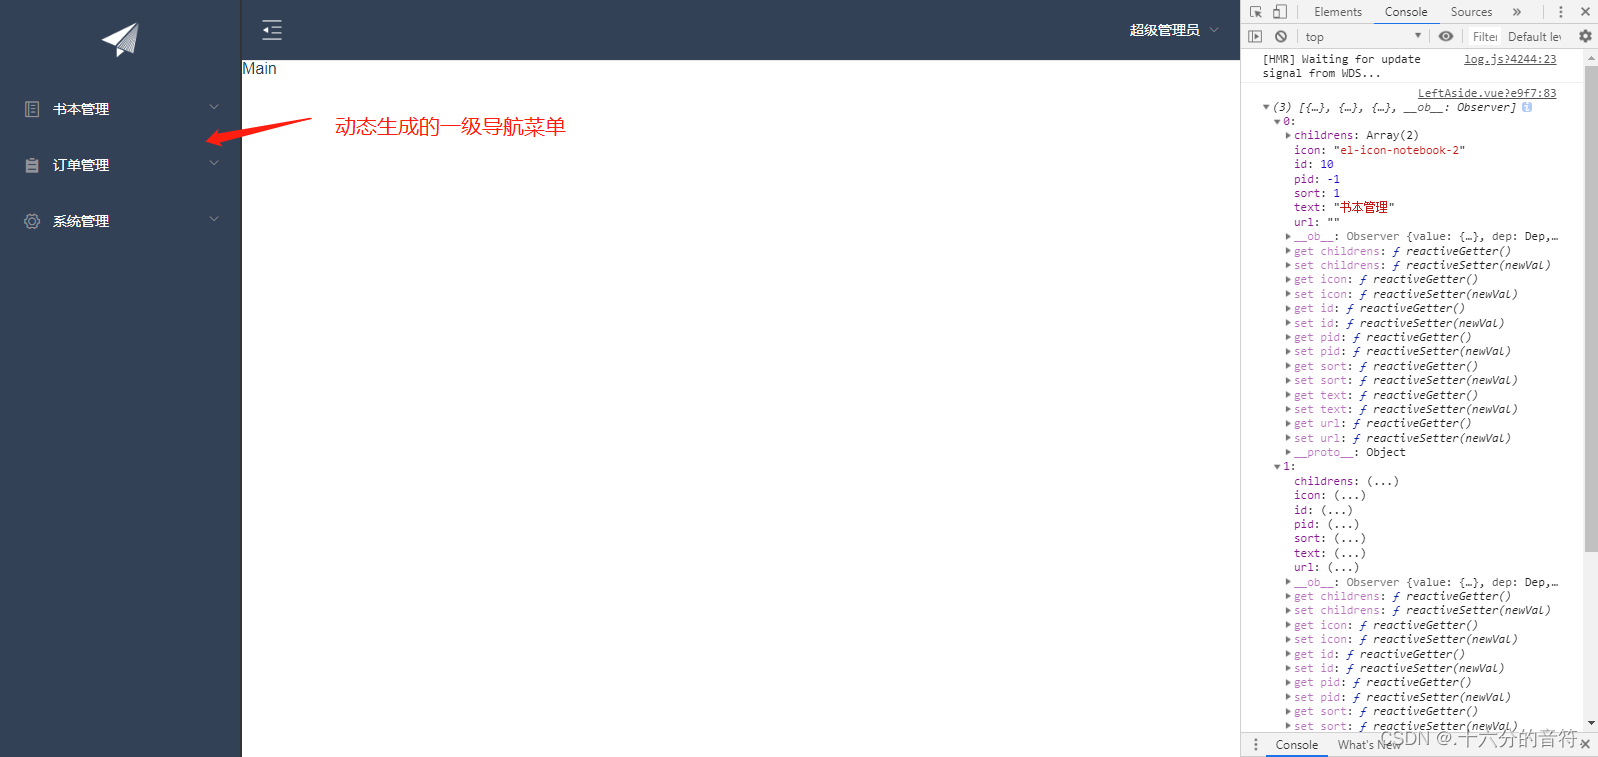
🥭🥭2.2.3.1 先构建一级导航菜单
LeftAside.vue:

页面效果:
🥭🥭2.2.3.2 构建二级导航菜单
LeftAside.vue:

🚀🚀页面效果:
2.3 🥭🥭点击菜单实现路由跳转
2.3.1🥭创建书本管理组件
t_module_vue表中已经配置了功能url,为方便,将书本管理组件定义为BookList。如果使用其他名字则需要修改功能url配置,保持一致。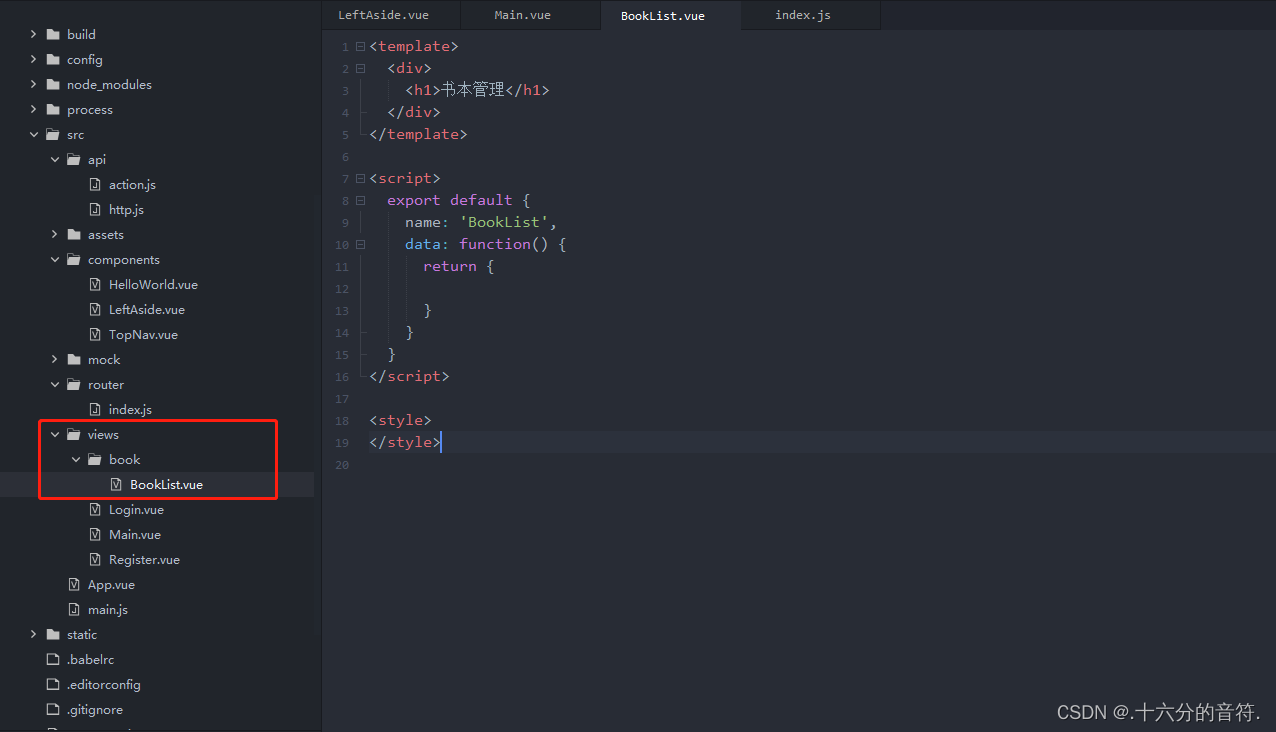
2.3.2🥭 配置路由
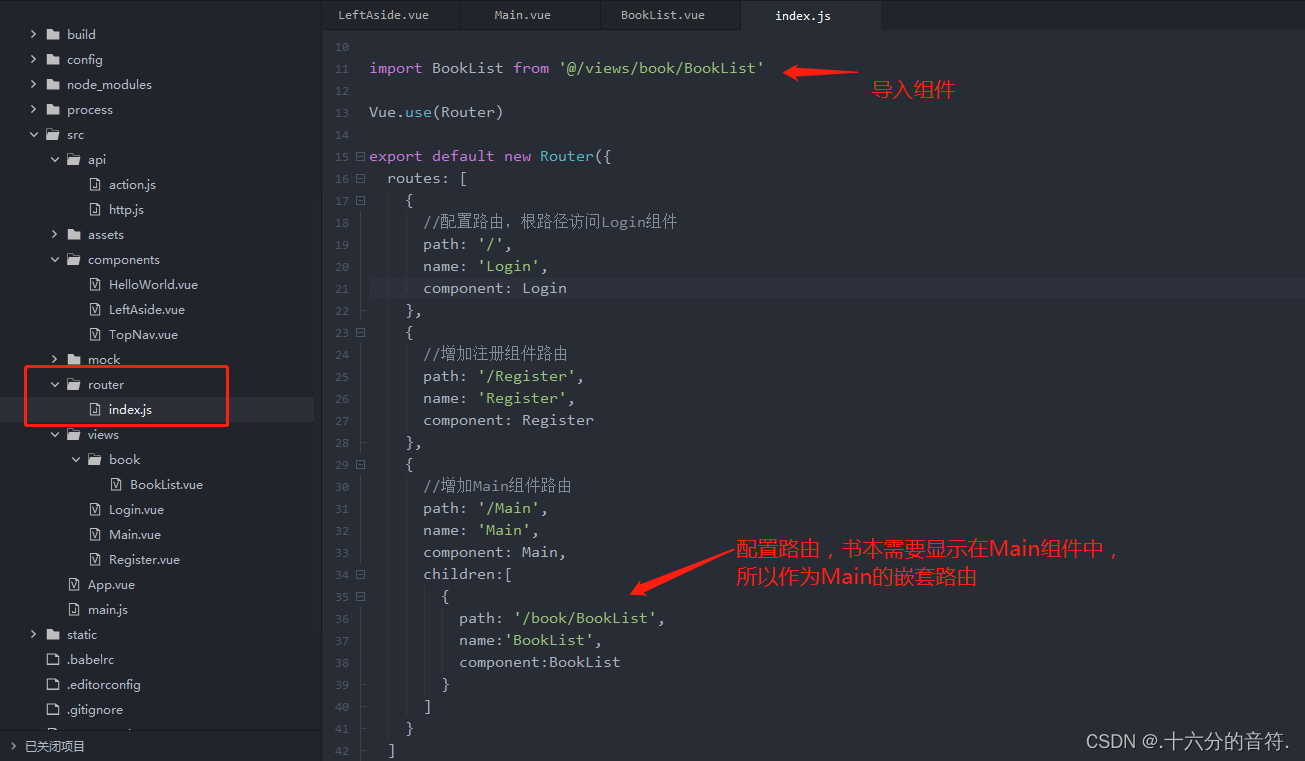
2.3.3🥭 修改LeftAside组件

2.3.4 🥭修改Main组件

3. 🍓🍓🍓🍓系统首页配置
🚀🚀首先创建一个首页组件
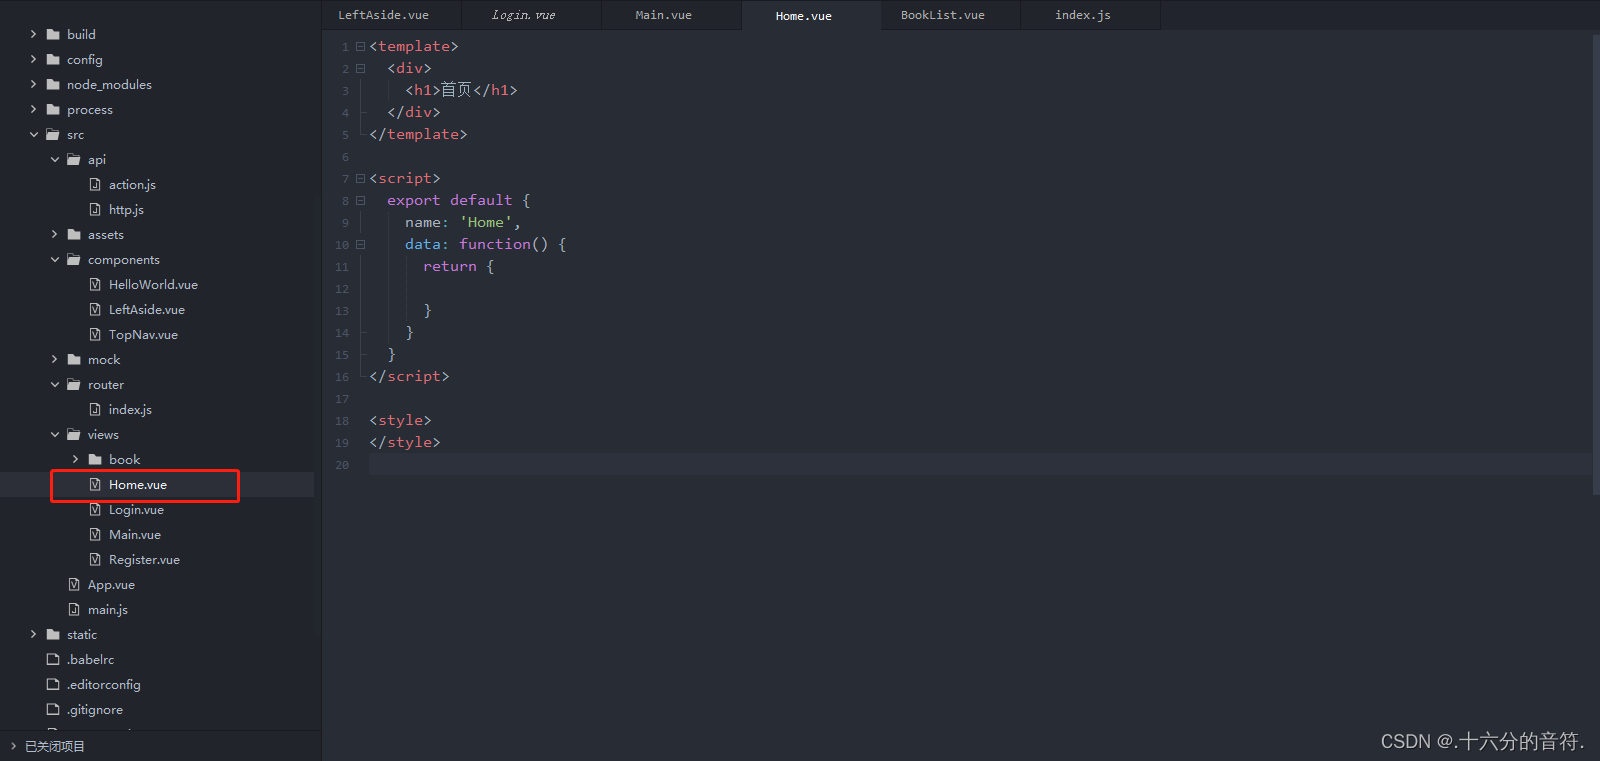
配置路由:

配置首页菜单:

🚀🚀菜单图标可以到官网去查找。
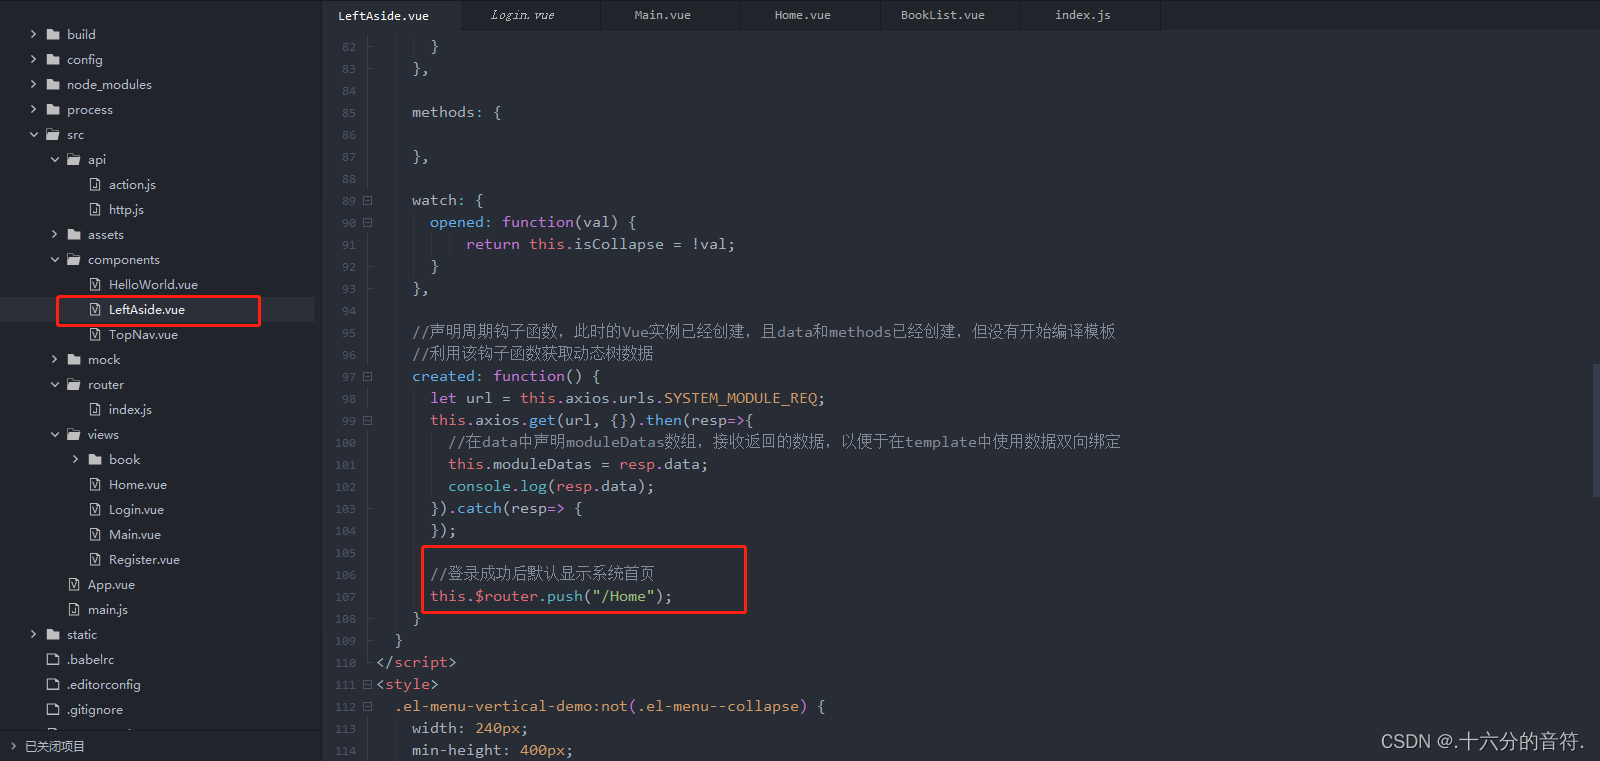
🚀🚀设置登录成功后默认显示系统首页:
4.🍓🍓🍓🍓 表格数据显示
4.1 🥭🥭页面布局
页面上使用的面包屑,查询条件,表格,分页等空间,可以查看element-ui官网。该步骤主要关注页面布局,并没有绑定数据,编写完成后,观察页面效果。
BookList.vue:
<template>
  <div style="margin-left: 15px; margin-right: 15px;">

    <!--面包屑-->
    <el-breadcrumb style="margin-top:15px;" separator="/">
      <el-breadcrumb-item :to="{path: '/Home'}">首页</el-breadcrumb-item>
      <el-breadcrumb-item>书本管理</el-breadcrumb-item>
    </el-breadcrumb>

    <!--查询条件-->
    <el-form style="margin-top: 15px;" :inline="true" class="demo-form-inline">
      <el-form-item label="书名">
        <el-input placeholder="书名"></el-input>
      </el-form-item>
      <el-form-item>
        <el-button type="primary">查询</el-button>
        <el-button type="primary">新增</el-button>
      </el-form-item>
    </el-form>

    <!--表格-->
    <el-table style="width: 100%;" :border="true" max-height="550">
      <el-table-column prop="id" label="编号" min-width="40" align="center"></el-table-column>
      <el-table-column prop="bookname" label="名称" min-width="100" align="center"></el-table-column>
      <el-table-column prop="price" label="价格" min-width="70" align="center"></el-table-column>
      <el-table-column prop="booktype" label="类型" min-width="70" align="center"></el-table-column>
    </el-table>

    <!--分页-->
    <div class="block" style="text-align:right;margin-top:10px;">
      <el-pagination
        :page-sizes="[10, 20, 30, 40]"
        :page-size="100"
        layout="total, sizes, prev, pager, next, jumper"
        :total="400">
      </el-pagination>
    </div>
  </div>
</template>
4.2 🥭🥭查询并在表格中显示数据
先不考虑分页,从后台接口获取数据并绑定到表格显示。
- 🥭将查询书本信息的接口配置到api/action.js中
//获取书本信息
 'BOOKMSG_BOOKINFO_REQ':'/bookMsg/bookAction!getBooks.action',
BookList.vue组件 图一: 🚀🚀template部分:

图二: 🚀🚀script部分
 export default {
    name: 'BookList',

    data: function() {
      return {
        bookname: '',
        books: []
      }
    },

    methods: {
      qry: function() {
        let url = this.axios.urls.BOOKMSG_BOOKINFO_REQ;
        this.axios.post(url, {
          bookname: this.bookname
        }).then(resp => {
          console.log(resp);
          this.books = resp.data.data;

        }).catch(error => {
          console.log(error);
        });
      }
    }
  }
4.3 🥭🥭实现分页
🚀🚀template部分:
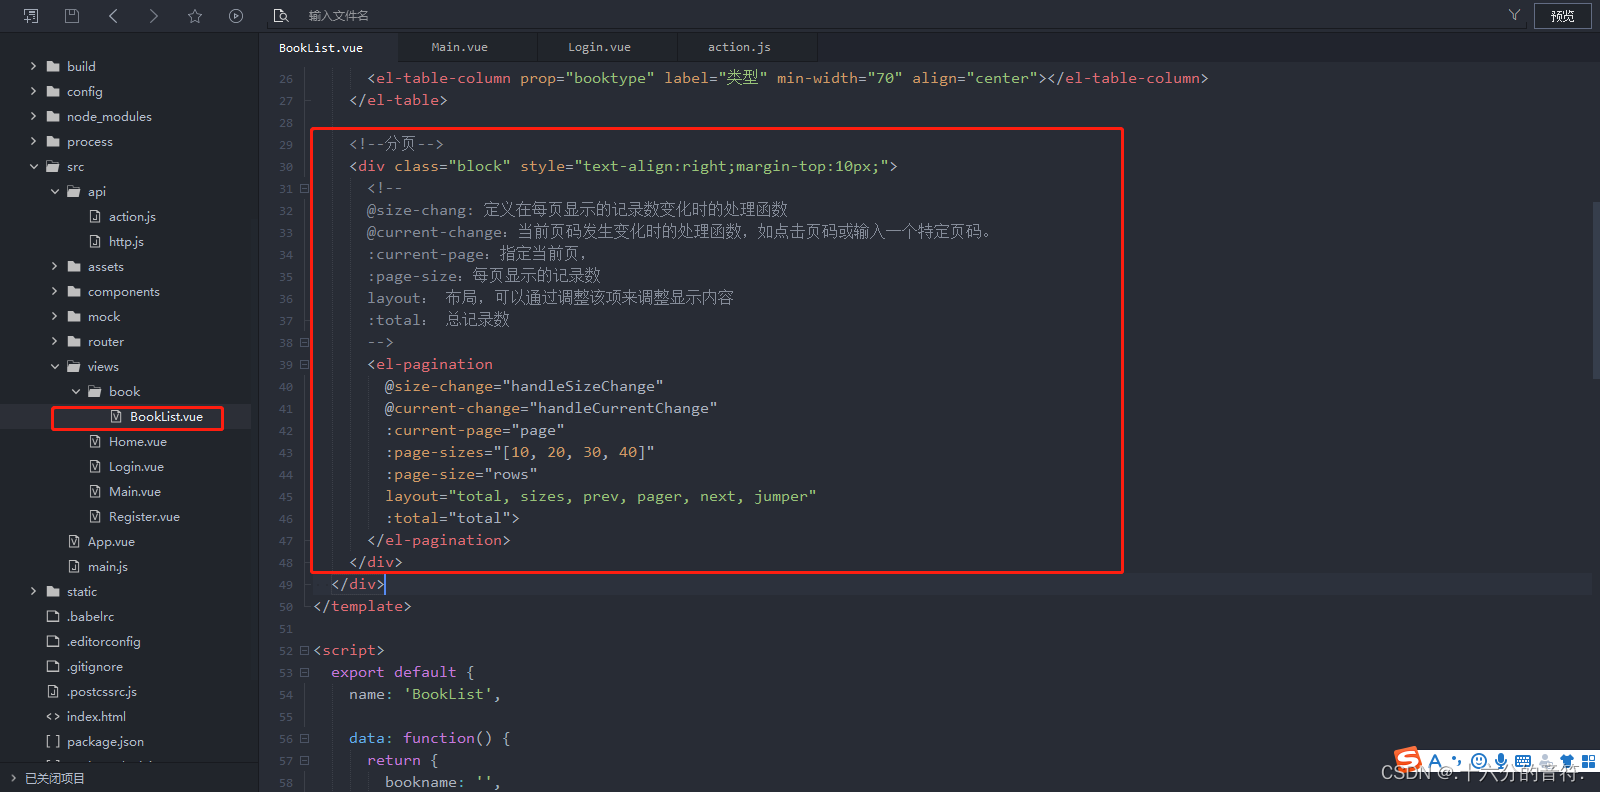
    <!--分页-->
    <div class="block" style="text-align:right;margin-top:10px;">
      <!--
      @size-chang: 定义在每页显示的记录数变化时的处理函数
      @current-change:当前页码发生变化时的处理函数,如点击页码或输入一个特定页码。
      :current-page:指定当前页,
      :page-size:每页显示的记录数
      layout: 布局,可以通过调整该项来调整显示内容
      :total: 总记录数
      -->
      <el-pagination background
        @size-change="handleSizeChange"
        @current-change="handleCurrentChange"
        :current-page="page"
        :page-sizes="[10, 20, 30, 40]"
        :page-size="rows" layout="total, sizes, prev, pager, next, jumper"
        :total="total">
      </el-pagination>
    </div>
🚀🚀script部分,图一
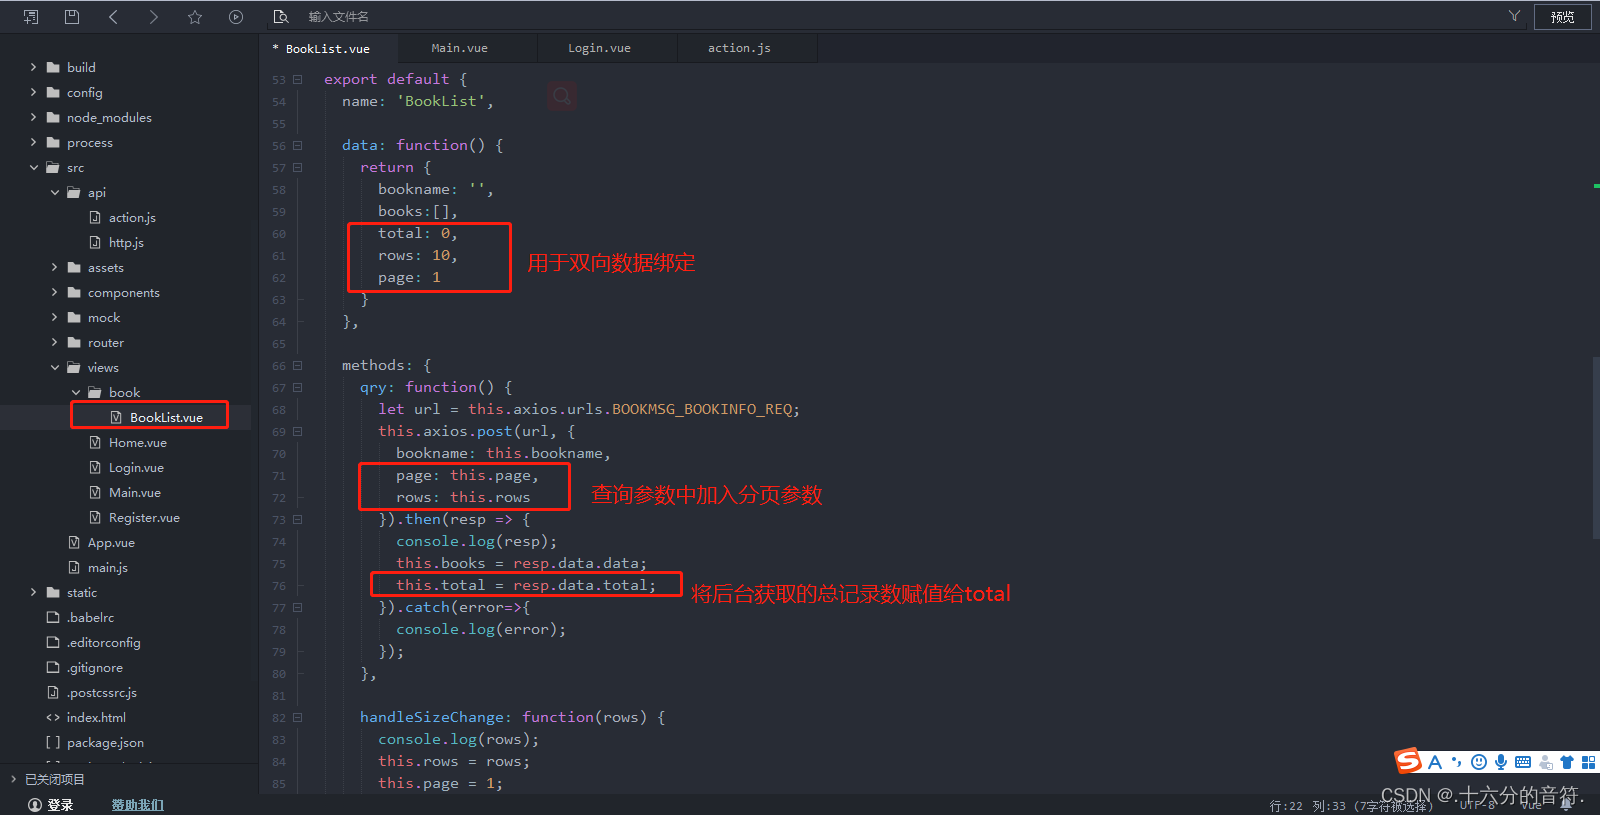
     qry: function() {
        let url = this.axios.urls.BOOKMSG_BOOKINFO_REQ;
        this.axios.post(url, {
          bookname: this.bookname,
          //分页参数
          page: this.page,
          rows: this.rows
        }).then(resp => {
          console.log(resp);
          this.books = resp.data.data;
          //获取总页数
          this.total = resp.data.total;
        }).catch(error => {
          console.log(error);
        });
      }
🚀🚀script部分,图二:
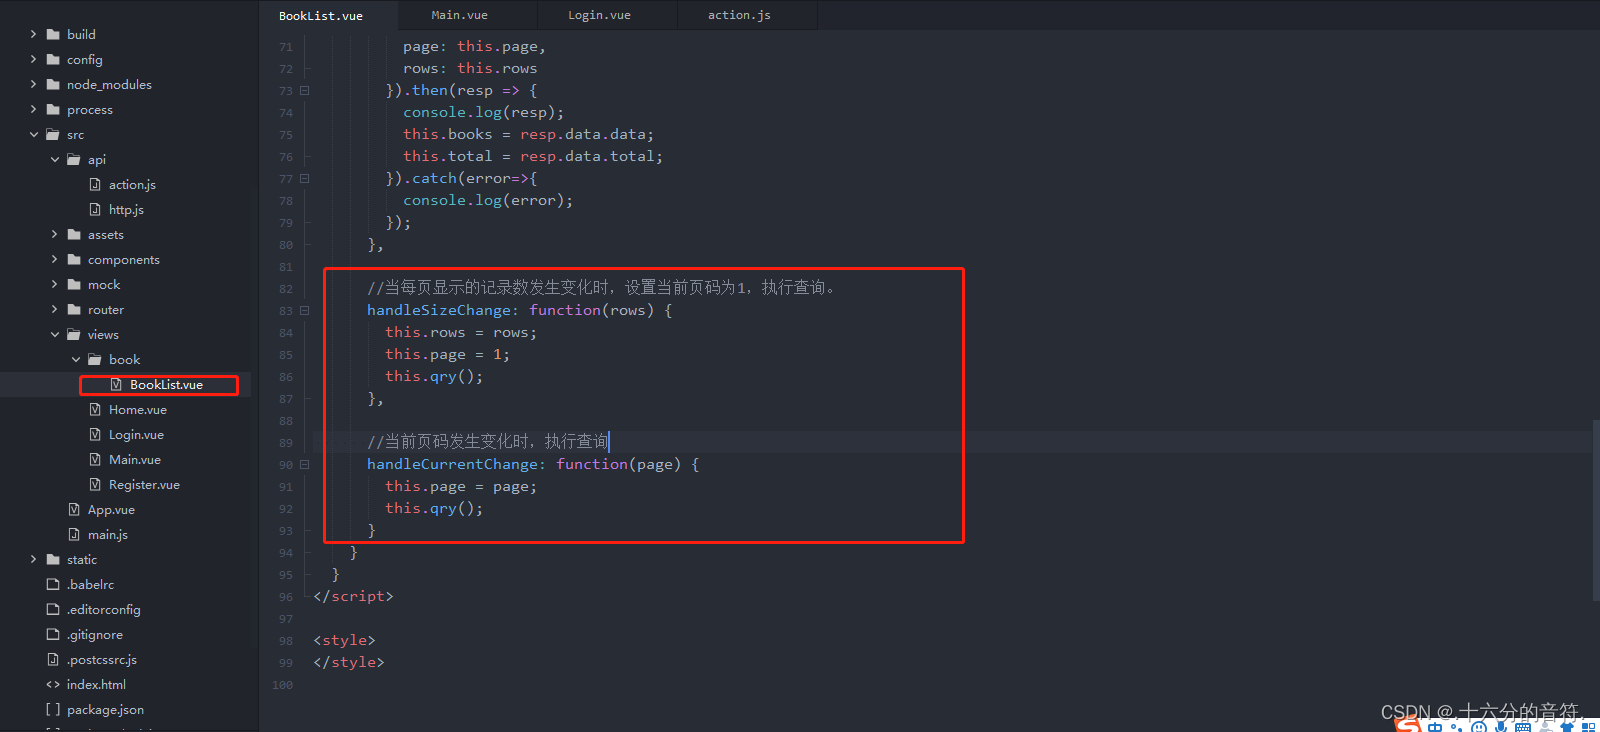
//当每页显示的记录数发生变化时,设置当前页码为1,执行查询。
      handleSizeChange: function(rows) {
        this.rows = rows;
        this.page = 1;
        this.qry();
      },

      //当前页码发生变化时,执行查询
      handleCurrentChange: function(page) {
        this.page = page;
        this.qry();
      }
VUE3.0有兴趣的小伙伴可以去看看

以上就是一个简单的首页导航+左侧菜单的介绍,欢迎各位大佬给点建议!
本文转载自: https://blog.csdn.net/m0_62019369/article/details/127602893
版权归原作者 .十六分的音符. 所有, 如有侵权,请联系我们删除。
版权归原作者 .十六分的音符. 所有, 如有侵权,请联系我们删除。