
ES
一、简介
1、Elastic Stack
ES技术栈:
- ElasticSearch:存数据+搜索;QL;
- Kibana:Web可视化平台,分析。
- LogStash:日志收集,Log4j:产生日志;log.info(xxx)
- 。。。。

使用场景:
- metrics:指标监控
- …
2、基本概念
- Index(索引)- 动词:保存(插入)- 名词:类似MySQL数据库,给数据
- Type(类型)- 已废弃,以前类似MySQL的表- 现在用索引对数据分类
- Document(文档)- 真正要保存的一个JSON数据-
{name:"tcx"}
二、入门实战
{"name":"DESKTOP-1TSVGKG","cluster_name":"elasticsearch","cluster_uuid":"PFpgHGhaTZiajHD4xvRPkg","version":{"number":"7.14.0","build_flavor":"default","build_type":"zip","build_hash":"dd5a0a2acaa2045ff9624f3729fc8a6f40835aa1","build_date":"2021-07-29T20:49:32.864135063Z","build_snapshot":false,"lucene_version":"8.9.0","minimum_wire_compatibility_version":"6.8.0","minimum_index_compatibility_version":"6.0.0-beta1"},"tagline":"You Know, for Search"}
1、索引CRUD
1.创建索引
put http://localhost:9200/person

{"acknowledged":true, #响应结果
    "shards_acknowledged":true,  #分片
    "index":"person"   #索引名称
}
2.删除索引
deletehttp://localhost:9200/person

{"acknowledged":true}
3.修改索引
# 在修改时,需要先删掉索引
put http://localhost:9200/person

{"settings":{"index":{"number_of_shards":"3"}}}
4.查询索引
gethttp://localhost:9200/person

{"person":{"aliases":{},"mappings":{},"settings":{"index":{"routing":{"allocation":{"include":{"_tier_preference":"data_content"}}},"number_of_shards":"3","provided_name":"person","creation_date":"1664357188860","number_of_replicas":"1","uuid":"GOyDifOJTQi8yBzKHk5zNQ","version":{"created":"7140099"}}}}}
2、文档CRUD
1、保存-POST(非幂等性)
POST/person/_doc
{"id":"1","name":"田","age":"19"}

# 结果
{"_index":"person",//保存到的索引"_type":"_doc",//"_id":"BcKKg4MBcNCrjSmlWbAK",//刚才那条数据的唯一id"_version":1,//版本号"result":"created",//创建了数据"_shards":{//分片工作"total":2,"successful":1,"failed":0},"_seq_no":0,//乐观锁机制"_primary_term":1//乐观锁机制}
以上是:非幂等操作
- 幂等:同一个操作执行无数遍的结果都是一样的 - select- insert: 幂等
- 非幂等: - insert: 自增主键就是非幂等
2、保存-PUT(幂等性)
保存更新 二合一
PUT/person/_doc/1{"id":"1","name":"田","age":"19"}PUT/person/_doc/1{"id":"1","name":"田","age":"19","note":"做个小笔记"}

# 也可以任意扩展/缩减字段;(会覆盖)
3、POST-增量字段更新
POST person/_doc/1/_update
{"doc":{"name":"张三"}}
4、查询
# 查看所有
GET/person/_search

# 根据ID查询
GET/person/_doc/ID号
5、乐观锁
CAS
三、进阶检索
#  DSL 查询条件以Json
POST person/_search
{"query":{"match_all":{}}}
1、导入基本数据
POST/student/_doc/1001{"name":"李白","age":"18"}POST/student/_doc/1002{"name":"诗仙","age":"19"}POST/student/_doc/1003{"name":"杜甫","age":"20"}POST/student/_doc/1004{"name":"诗圣","age":"21"}POST/student/_doc/1005{"name":"诗圣 厉害","age":"21"}
2、查询所有文档
POST/student/_search
{"query":{"match_all":{}}}POST/student/_search
{"query":{"match_all":{}}}{"took":1,"timed_out":false,"_shards":{"total":1,"successful":1,"skipped":0,"failed":0},"hits":{"total":{"value":4,"relation":"eq"},"max_score":1.0,"hits":[{"_index":"student","_type":"_doc","_id":"1001","_score":1.0,"_source":{"name":"李白","age":"18"}},{"_index":"student","_type":"_doc","_id":"1002","_score":1.0,"_source":{"name":"诗仙","age":"19"}},{"_index":"student","_type":"_doc","_id":"1003","_score":1.0,"_source":{"name":"杜甫","age":"20"}},{"_index":"student","_type":"_doc","_id":"1004","_score":1.0,"_source":{"name":"诗圣","age":"21"}}]}}
3、match-全文索引精确查询
POST/student/_search
{"query":{"match":{"name.keyword":"诗圣"}}}
multi_match-多个字段查询
POST/student/_search
{"query":{"multi_match":{"query":"诗圣","fields":["name"]}}}
4、term-精确查询
POST/student/_search
{"query":{"term":{"name":{"value":"shixian"}}}}
5、terms-查询
# 查询age是20,18的
POST/student/_search
{"query":{"terms":{"age":["20","18"]}}}
6、多个字段查询
7、查询部分字段
POST/student/_search
{"query":{"match":{"name":"诗圣"}},"_source":["name"]}
8、区间查询
POST/student/_search
{"query":{"range":{"age":{"gte":18,"lte":20}}}}
9、复合查询
# must

POST/student/_search
{"query":{"bool":{"must":[{"range":{"age":{"gte":18,"lte":20}}},{"match":{"name":"诗圣"}}]}}}
must和filter执行的结果是一样的,但是must会有分数,filter没有分数
10、过滤查询
POST/student/_search
{"query":{"bool":{"filter":[{"range":{"age":{"gte":18,"lte":20}}},{"match":{"name":"诗圣"}}]}}}
- 模糊匹配用match
- 精确查询用term
- 多条件组合是bool
- must,filter相配合
- should非强制要求
11、判断文档是否存在
#判断文档是否存在
HEAD/student/_doc/1001
12、exists查询
POST/student/_search
{"query":{"exists":{"field":"hello"}}}

# 找到有hello属性的文档
{"took":739,"timed_out":false,"_shards":{"total":1,"successful":1,"skipped":0,"failed":0},"hits":{"total":{"value":1,"relation":"eq"},"max_score":1.0,"hits":[{"_index":"student","_type":"_doc","_id":"1006","_score":1.0,"_source":{"name":"白居易","hello":"word"}}]}}
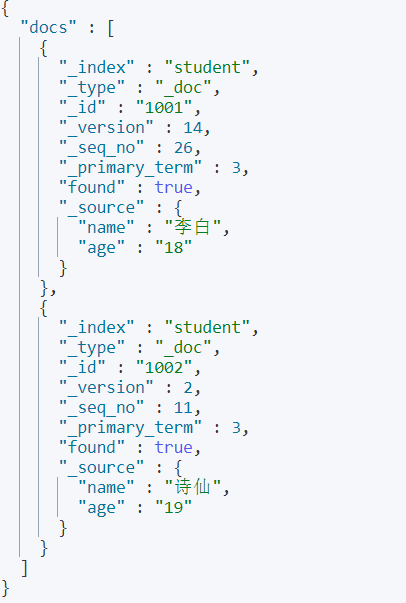
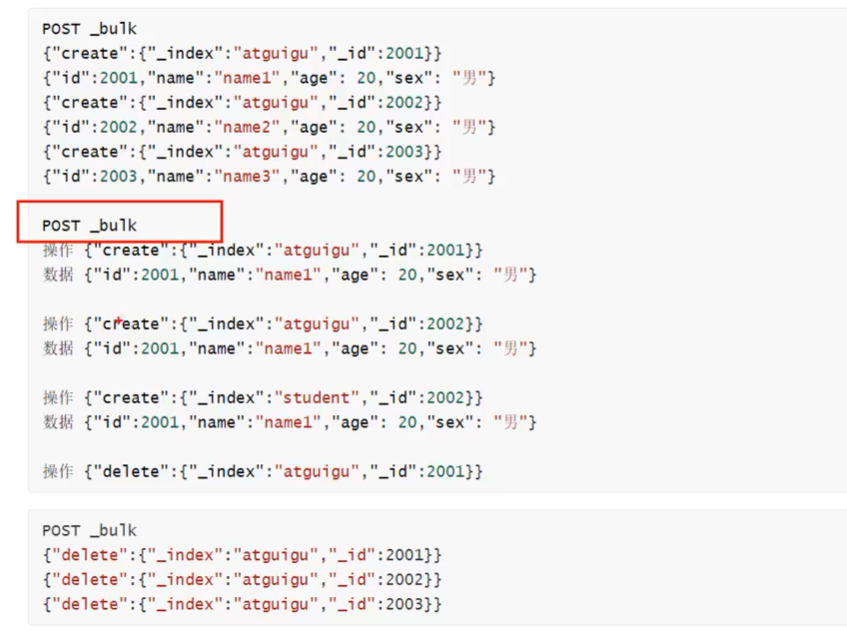
13、批量
#批量查询IDPOST student/_doc/_mget
{"ids":["1001","1002"]}
四、其他功能
1、排序
POST student/_search
{"query":{"match_all":{}},"sort":[{"age":{"order":"asc"}}]}
2、高亮
#高亮
GET student/_search
{"query":{"match":{"age":"21"}},"highlight":{"fields":{"age":{"pre_tags":"<span style='color:res'>","post_tags":"</span>"}}}}
3、_source-部分字段
POST/student/_search
{"query":{"match":{"name":"诗圣"}},"_source":["name"]}
4、分页
#分页

POST student/_search
{"query":{"match_all":{}},"from":0,"size":2}
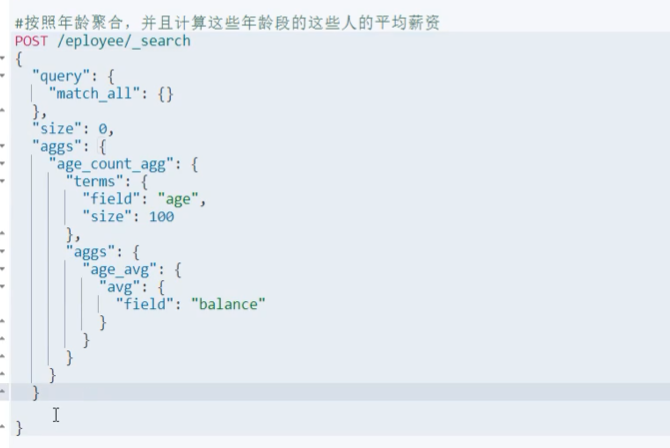
聚合
五、映射与分词
1、Mapping
- ES里面保存是JSON
- 第一次保存了以后,每个索引的数据模型就确定好了,es在第一次保存一个json文档的时候就自动确定了。
- 在自动确定阶段,所有文本数据都会被确定为text,默认就可以全文检索,这个文本值在存储的时候分词,利用倒排索引存储
- Mappings第一次已经确定好的属性就不能修改了,但是未知的属性随便添加
自定义的数据类型(text,keyword),一定告诉es,这个属性的精确类型
2、分词
- 分词发生在text字段
- 保存text类型的数据 - 把这个值先分词(英文:空格为分割 中文:词库 比较麻烦)- 存储利用倒排索引,会记录这些单词都在哪些文档出现
- 检索 - 搜索“我是中国人”- 把要搜索的”我是中国人“分词(利用词库对比) - 中国人: 看那些文档里有- 中国 看那些文档里有- 我 看那些文档里有- 是 看那些文档里有
GET/_analyze
{"analyzer":"standard","text":"Offer收割机"}
必须使用中文分词器
ik分词器
2.1安装ik分词器
下载当前对应版本;
没下载到对应版本的话,可以在ik分词器解压后,在
plugin-descriptor.properties
文件中,修改成对应的ES版本
GET/_analyze
{"analyzer":"ik_smart","text":"Offer收割机"}
PUT world
{"mappings":{"properties":{"name":{"type":"keyword"},"song":{"type":"text","analyzer":"ik_smart"}}}}
3 Nested嵌入式
PUT/test_nested
{"mappings":{"properties":{"user":{"type":"nested"}}}}
六、Springboot整合ES
6.1 引依赖
<!-- https://mvnrepository.com/artifact/org.elasticsearch.client/elasticsearch-rest-high-level-client --><dependency><groupId>org.elasticsearch.client</groupId><artifactId>elasticsearch-rest-high-level-client</artifactId><version>7.14.0</version></dependency><dependency><groupId>org.elasticsearch</groupId><artifactId>elasticsearch</artifactId><version>7.14.0</version></dependency><dependency><groupId>org.elasticsearch.client</groupId><artifactId>elasticsearch-rest-client</artifactId><version>7.14.0</version><exclusions><exclusion><artifactId>commons-logging</artifactId><groupId>commons-logging</groupId></exclusion></exclusions></dependency>
6.2 写配置文件
spring.elasticsearch.rest.uris[0]=http://localhost:9200
6.3 写测试代码
6.3.1 索引操作
@ResourceRestHighLevelClient restHighLevelClient;@TestpublicvoidcontextLoads(){System.out.println("restHighLevelClient = "+ restHighLevelClient);}@TestpublicvoidcreateIndex()throwsIOException{CreateIndexRequest request =newCreateIndexRequest("google");
        request.settings(Settings.builder().put("index.number_of_shards","1").put("index.number_of_replicas","1").build());CreateIndexResponse response = restHighLevelClient.indices().create(request,RequestOptions.DEFAULT);System.out.println("response = "+ response.isAcknowledged());}@TestpublicvoiddeleteIndex()throwsIOException{DeleteIndexRequest request =newDeleteIndexRequest("hello");AcknowledgedResponse delete = restHighLevelClient.indices().delete(request,RequestOptions.DEFAULT);boolean b = delete.isAcknowledged();System.out.println(b?"删除成功":"删除失败");}
6.3.2 待更新 ,嘻嘻
谢谢你的阅读
,现在学会了吧,赶快去你的朋友圈中秀一波吧😎
秀归秀,但是由于作者水平还是有限,也难免有不足之处,若读者发现问题,还请批评,在留言区留言或者私信告知,我一定会尽快修改的。若各位大佬有什么好的解法,或者有意义的解法都可以在评论区展示额,万分谢谢。
写作不易,各位老板的肯定和关注都是我坚持下去的动力,欢迎来”骚扰“额😘
标签:
elasticsearch
大数据
本文转载自: https://blog.csdn.net/m0_46833224/article/details/128393841
版权归原作者 后端小知识 所有, 如有侵权,请联系我们删除。
版权归原作者 后端小知识 所有, 如有侵权,请联系我们删除。