
SpringBoot项目配置Swagger
1、Swagger简介
根据在代码中使用自定义的注解来生成接口文档,这样做的好处是 在开发接口时可以通过swagger 将接口文档定义好提供给前端查询具体参数信息,同时也方便以后的维护。
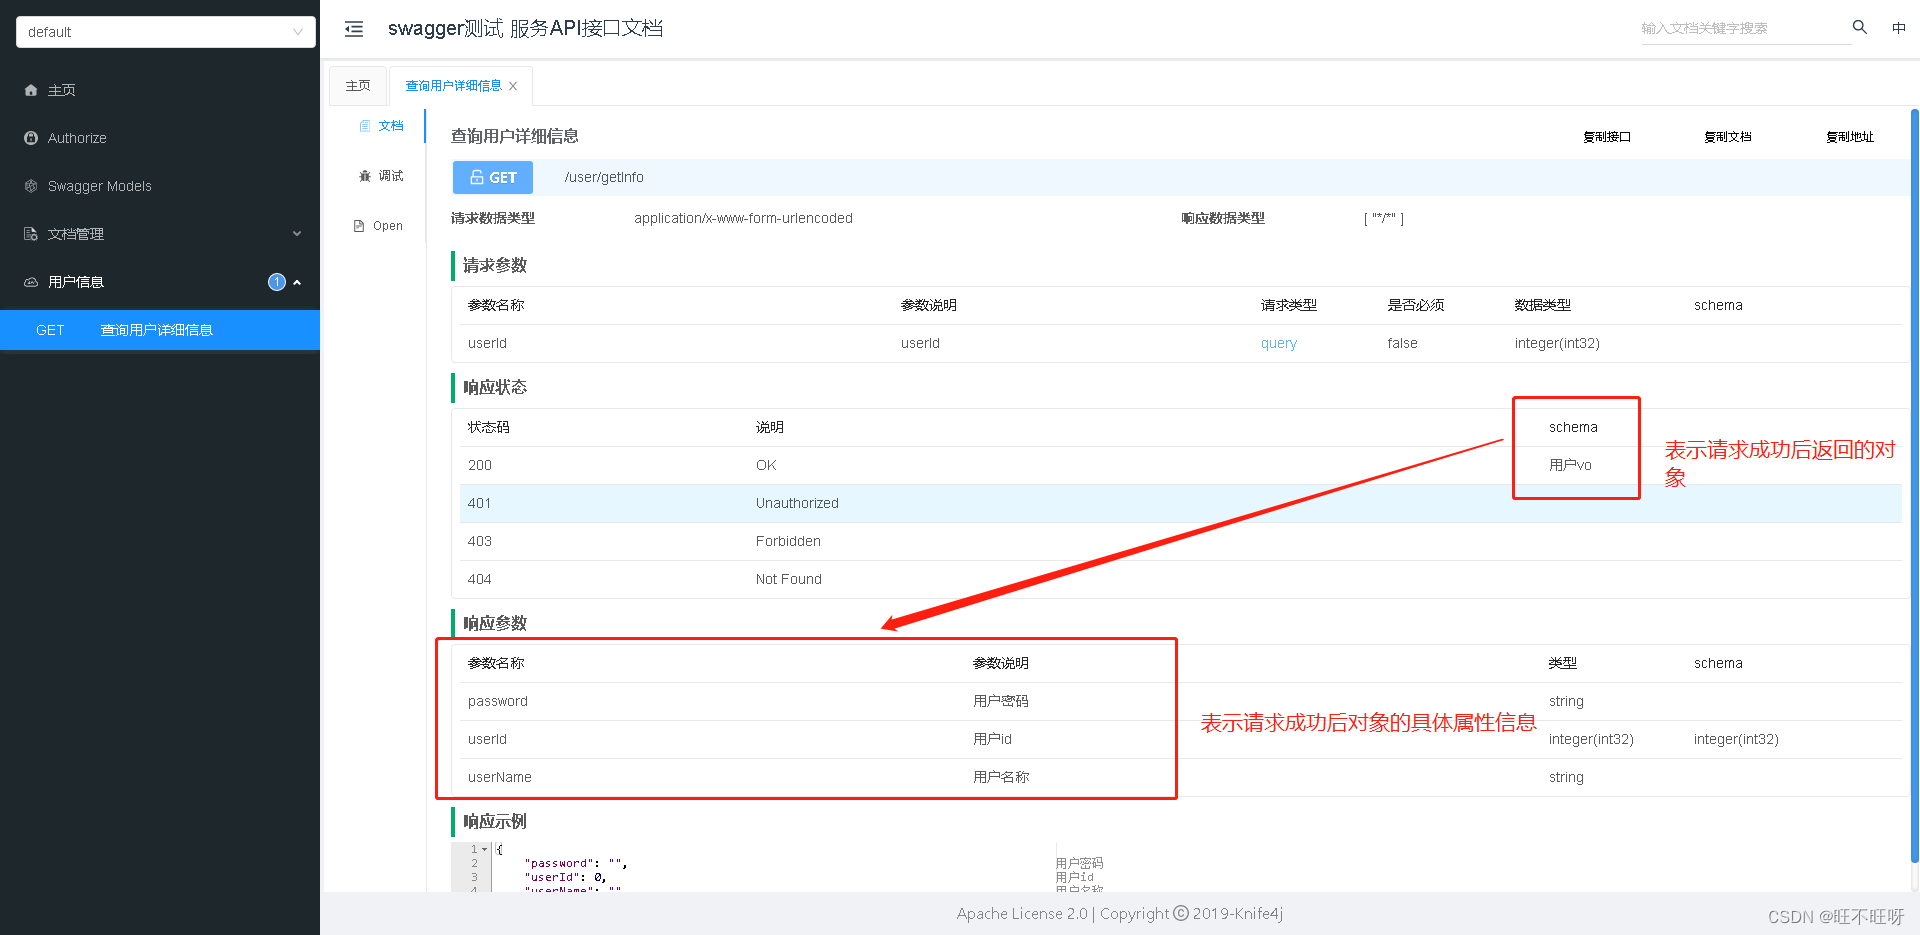
当前项目配置好以后的Swagger原型:
2、Boot整合Swagger案例(复制可直接使用)
2.1、Pom文件依赖配置
<?xml version="1.0" encoding="UTF-8"?><project xmlns="http://maven.apache.org/POM/4.0.0" xmlns:xsi="http://www.w3.org/2001/XMLSchema-instance"
         xsi:schemaLocation="http://maven.apache.org/POM/4.0.0 https://maven.apache.org/xsd/maven-4.0.0.xsd"><modelVersion>4.0.0</modelVersion><parent><groupId>org.springframework.boot</groupId><artifactId>spring-boot-starter-parent</artifactId><version>2.7.5</version><relativePath/><!-- lookup parent from repository --></parent><groupId>com.example</groupId><artifactId>BootSwagger</artifactId><version>0.0.1-SNAPSHOT</version><name>BootSwagger</name><description>BootSwagger</description><properties><java.version>1.8</java.version></properties><dependencies><dependency><groupId>org.springframework.boot</groupId><artifactId>spring-boot-starter-web</artifactId></dependency><dependency><groupId>org.projectlombok</groupId><artifactId>lombok</artifactId><optional>true</optional></dependency><dependency><groupId>org.springframework.boot</groupId><artifactId>spring-boot-starter-test</artifactId><scope>test</scope></dependency><!--Swagger-UI API文档生产工具--><dependency><groupId>com.github.xiaoymin</groupId><artifactId>knife4j-spring-boot-starter</artifactId><version>3.0.3</version></dependency><dependency><groupId>com.github.xiaoymin</groupId><artifactId>knife4j-annotations</artifactId><version>3.0.3</version></dependency></dependencies><build><plugins><plugin><groupId>org.springframework.boot</groupId><artifactId>spring-boot-maven-plugin</artifactId><configuration><excludes><exclude><groupId>org.projectlombok</groupId><artifactId>lombok</artifactId></exclude></excludes></configuration></plugin></plugins></build></project>
2.2、application.properties配置信息
#设置端口号
server.port=8088

#swagger配置
spring.mvc.pathmatch.matching-strategy=ant_path_matcher
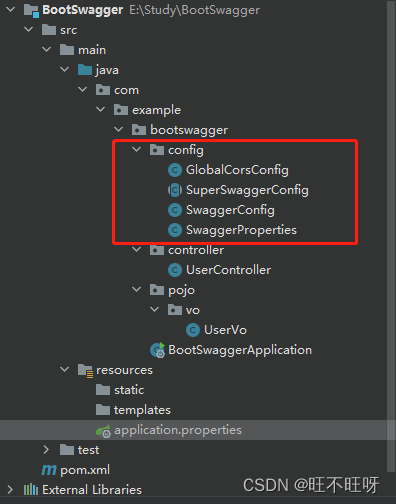
2.3、在启动类同级别创建Config包
2.4、Swagger配置信息
2.4.1、配置跨域
packagecom.example.bootswagger.config;importorg.springframework.context.annotation.Bean;importorg.springframework.context.annotation.Configuration;importorg.springframework.web.cors.CorsConfiguration;importorg.springframework.web.cors.UrlBasedCorsConfigurationSource;importorg.springframework.web.filter.CorsFilter;@ConfigurationpublicclassGlobalCorsConfig{/**
     * 跨域处理
     */@BeanpublicCorsFiltercorsFilter(){CorsConfiguration config =newCorsConfiguration();
        config.setAllowCredentials(true);// 设置访问源地址
        config.addAllowedOriginPattern("*");// 设置访问源请求头
        config.addAllowedHeader("*");// 设置访问源请求方法
        config.addAllowedMethod("*");// 有效期 1800秒
        config.setMaxAge(1800L);// 添加映射路径,拦截一切请求UrlBasedCorsConfigurationSource source =newUrlBasedCorsConfigurationSource();
        source.registerCorsConfiguration("/**", config);// 返回新的CorsFilterreturnnewCorsFilter(source);}}
2.4.2、Swagger自定义配置
packagecom.example.bootswagger.config;importlombok.Builder;importlombok.Data;/**
 * Swagger自定义配置
 */@Data@BuilderpublicclassSwaggerProperties{/**
     * API文档生成基础路径
     */privateString apiBasePackage;/**
     * 是否要启用登录认证
     */privateboolean enableSecurity;/**
     * 文档标题
     */privateString title;/**
     * 文档描述
     */privateString description;/**
     * 文档版本
     */privateString version;/**
     * 文档联系人姓名
     */privateString contactName;/**
     * 文档联系人网址
     */privateString contactUrl;/**
     * 文档联系人邮箱
     */privateString contactEmail;}
2.4.3、Swagger API文档相关配置(Swagger名称,控制层包扫描)
注意.apiBasePackage(“com.example.bootswagger.controller”)是用来设置你的Controller所在包路径!
packagecom.example.bootswagger.config;importcom.github.xiaoymin.knife4j.spring.annotations.EnableKnife4j;importorg.springframework.context.annotation.Configuration;importorg.springframework.context.annotation.Import;importspringfox.bean.validators.configuration.BeanValidatorPluginsConfiguration;importspringfox.documentation.swagger2.annotations.EnableSwagger2;/**
 * Swagger API文档相关配置
 *
 * @author mac
 */@Configuration@EnableSwagger2@EnableKnife4j@Import(BeanValidatorPluginsConfiguration.class)publicclassSwaggerConfigextendsSuperSwaggerConfig{@OverridepublicSwaggerPropertiesswaggerProperties(){returnSwaggerProperties.builder()//设置Swagger扫描的Controller路径,只有扫描到了才会生成接口文档.apiBasePackage("com.example.bootswagger.controller").title("swagger测试").description("后台接口文档").contactName("wranglings").version("1.0").enableSecurity(true).build();}}
2.4.4、Swagger基础配置
packagecom.example.bootswagger.config;importorg.springframework.context.annotation.Bean;importspringfox.documentation.builders.ApiInfoBuilder;importspringfox.documentation.builders.PathSelectors;importspringfox.documentation.builders.RequestHandlerSelectors;importspringfox.documentation.service.*;importspringfox.documentation.spi.DocumentationType;importspringfox.documentation.spi.service.contexts.SecurityContext;importspringfox.documentation.spring.web.plugins.Docket;importjava.util.Collections;importjava.util.List;/**
 * Swagger基础配置
 * @author mac
 */publicabstractclassSuperSwaggerConfig{/**
     * 自定义Swagger配置
     */publicabstractSwaggerPropertiesswaggerProperties();@BeanpublicDocketdocket(){SwaggerProperties swaggerProperties =swaggerProperties();Docket docket =newDocket(DocumentationType.SWAGGER_2).apiInfo(apiInfo(swaggerProperties)).select().apis(RequestHandlerSelectors.basePackage(swaggerProperties.getApiBasePackage())).paths(PathSelectors.any()).build();if(swaggerProperties.isEnableSecurity()){
            docket.securitySchemes(Collections.singletonList(securitySchemes())).securityContexts(Collections.singletonList(securityContexts()));}return docket;}privateApiInfoapiInfo(SwaggerProperties swaggerProperties){returnnewApiInfoBuilder().title(swaggerProperties.getTitle()+" 服务API接口文档").description(swaggerProperties.getDescription()).version(swaggerProperties.getVersion()).contact(newContact(swaggerProperties.getContactName(), swaggerProperties.getContactUrl(), swaggerProperties.getContactEmail())).version(swaggerProperties.getVersion()).build();}privateApiKeysecuritySchemes(){//设置请求头信息returnnewApiKey("token","accessToken","header");}privateSecurityContextsecurityContexts(){returnSecurityContext.builder().securityReferences(defaultAuth()).operationSelector(operationContext ->true).build();}privateList<SecurityReference>defaultAuth(){AuthorizationScope authorizationScope =newAuthorizationScope("xxx","描述信息");AuthorizationScope[] authorizationScopes =newAuthorizationScope[1];
        authorizationScopes[0]= authorizationScope;returnCollections.singletonList(newSecurityReference("Authorization", authorizationScopes));}}
2.4.5、创建测试VO 和 Controller
创建用户Vo
packagecom.example.bootswagger.pojo.vo;importio.swagger.annotations.ApiModel;importio.swagger.annotations.ApiModelProperty;importlombok.AllArgsConstructor;importlombok.Data;importlombok.NoArgsConstructor;importjava.io.Serializable;@Data@AllArgsConstructor@NoArgsConstructor@ApiModel("用户vo")publicclassUserVoimplementsSerializable{@ApiModelProperty(value ="用户id")privateInteger userId;@ApiModelProperty(value ="用户名称")privateString userName;@ApiModelProperty(value ="用户密码")privateString password;}
创建Controller层
packagecom.example.bootswagger.controller;importcom.example.bootswagger.pojo.vo.UserVo;importio.swagger.annotations.Api;importio.swagger.annotations.ApiOperation;importorg.apache.commons.lang3.ObjectUtils;importorg.springframework.web.bind.annotation.GetMapping;importorg.springframework.web.bind.annotation.RequestMapping;importorg.springframework.web.bind.annotation.RestController;@Api(tags ="用户信息")@RestController@RequestMapping("/user")publicclassUserController{@ApiOperation(value ="查询用户详细信息")@GetMapping("/getInfo")publicUserVogetInfo(Integer userId){UserVo userVo =newUserVo();if(ObjectUtils.isNotEmpty(userId)){
            userVo.setUserId(userId);
            userVo.setUserName("admin");
            userVo.setPassword("root");}return userVo;}}
2.4.6、启动Swagger,重点菜单说明
链接: http://localhost:8088/doc.html
主页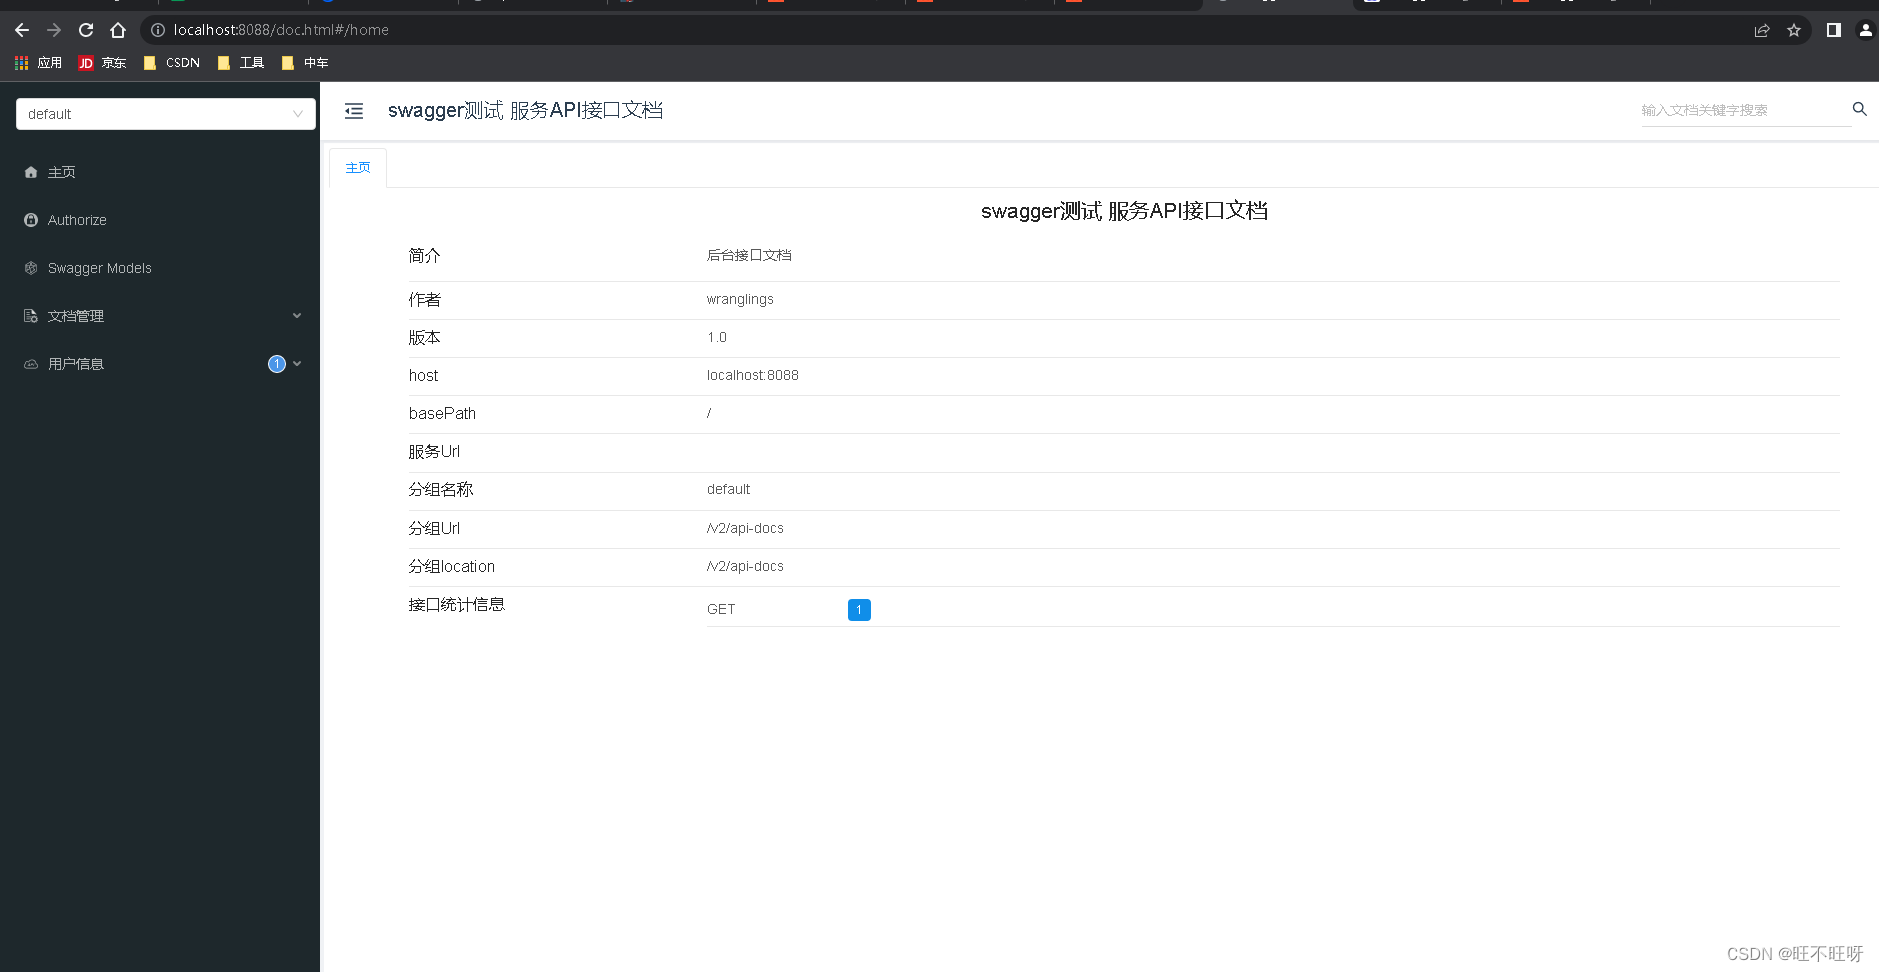
授权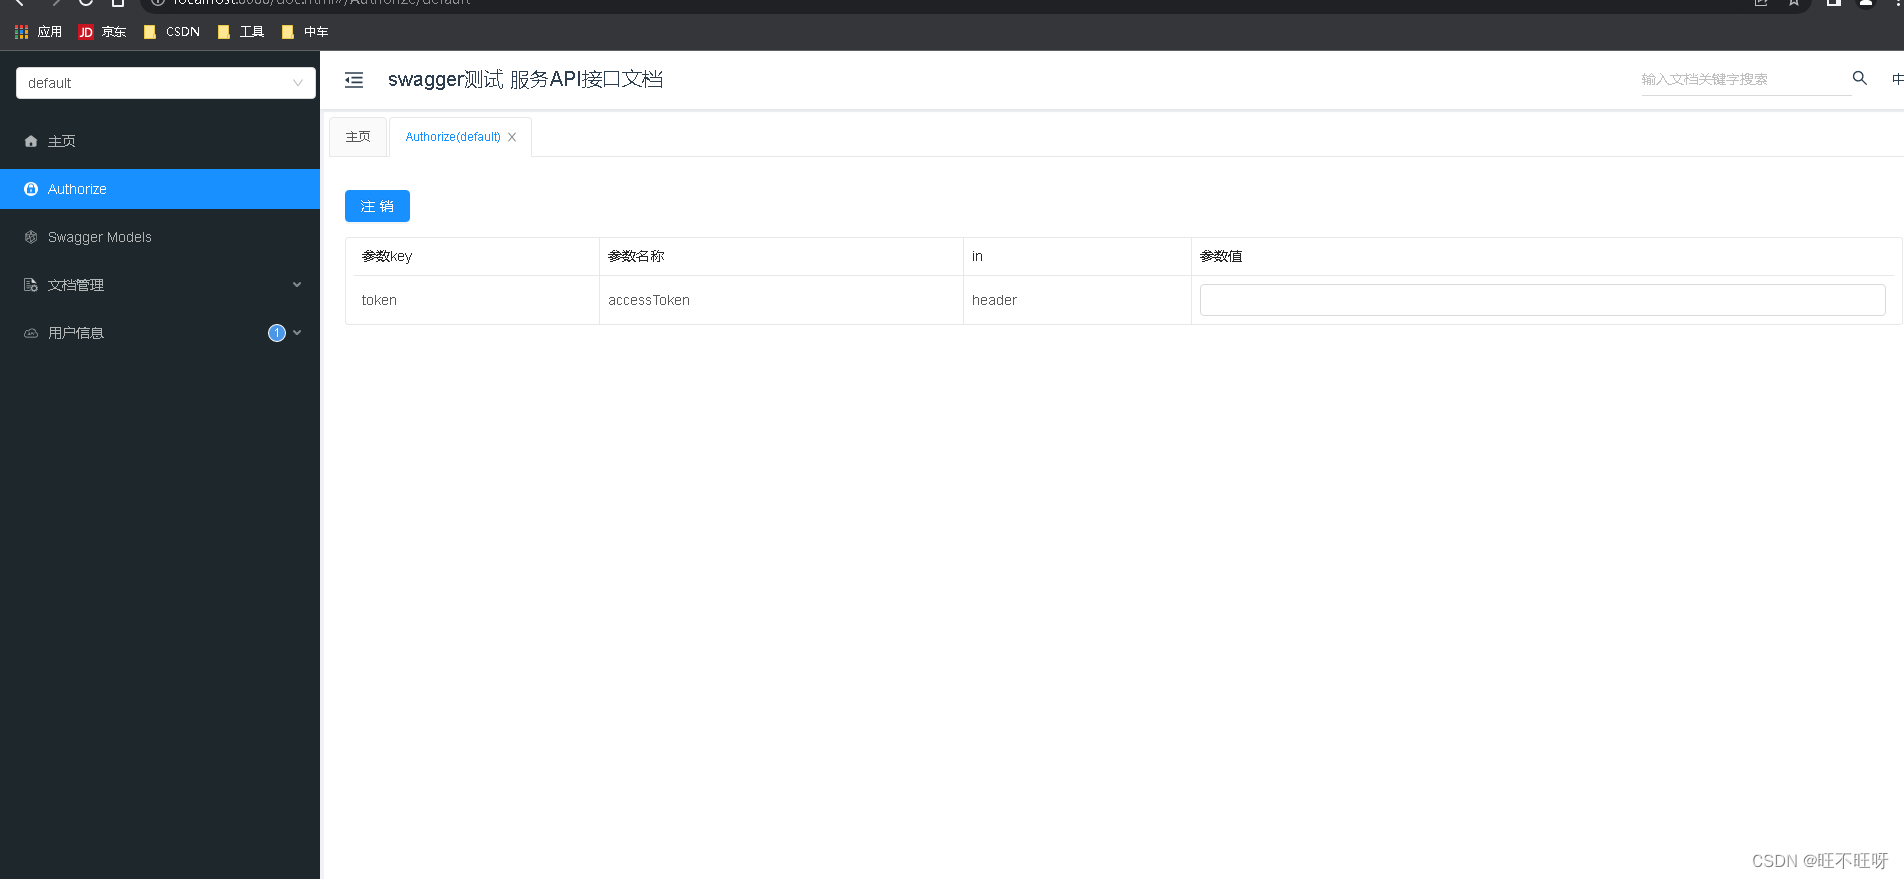
文档管理
这里可以配置一些消息头和一些查询参数,可以添加多个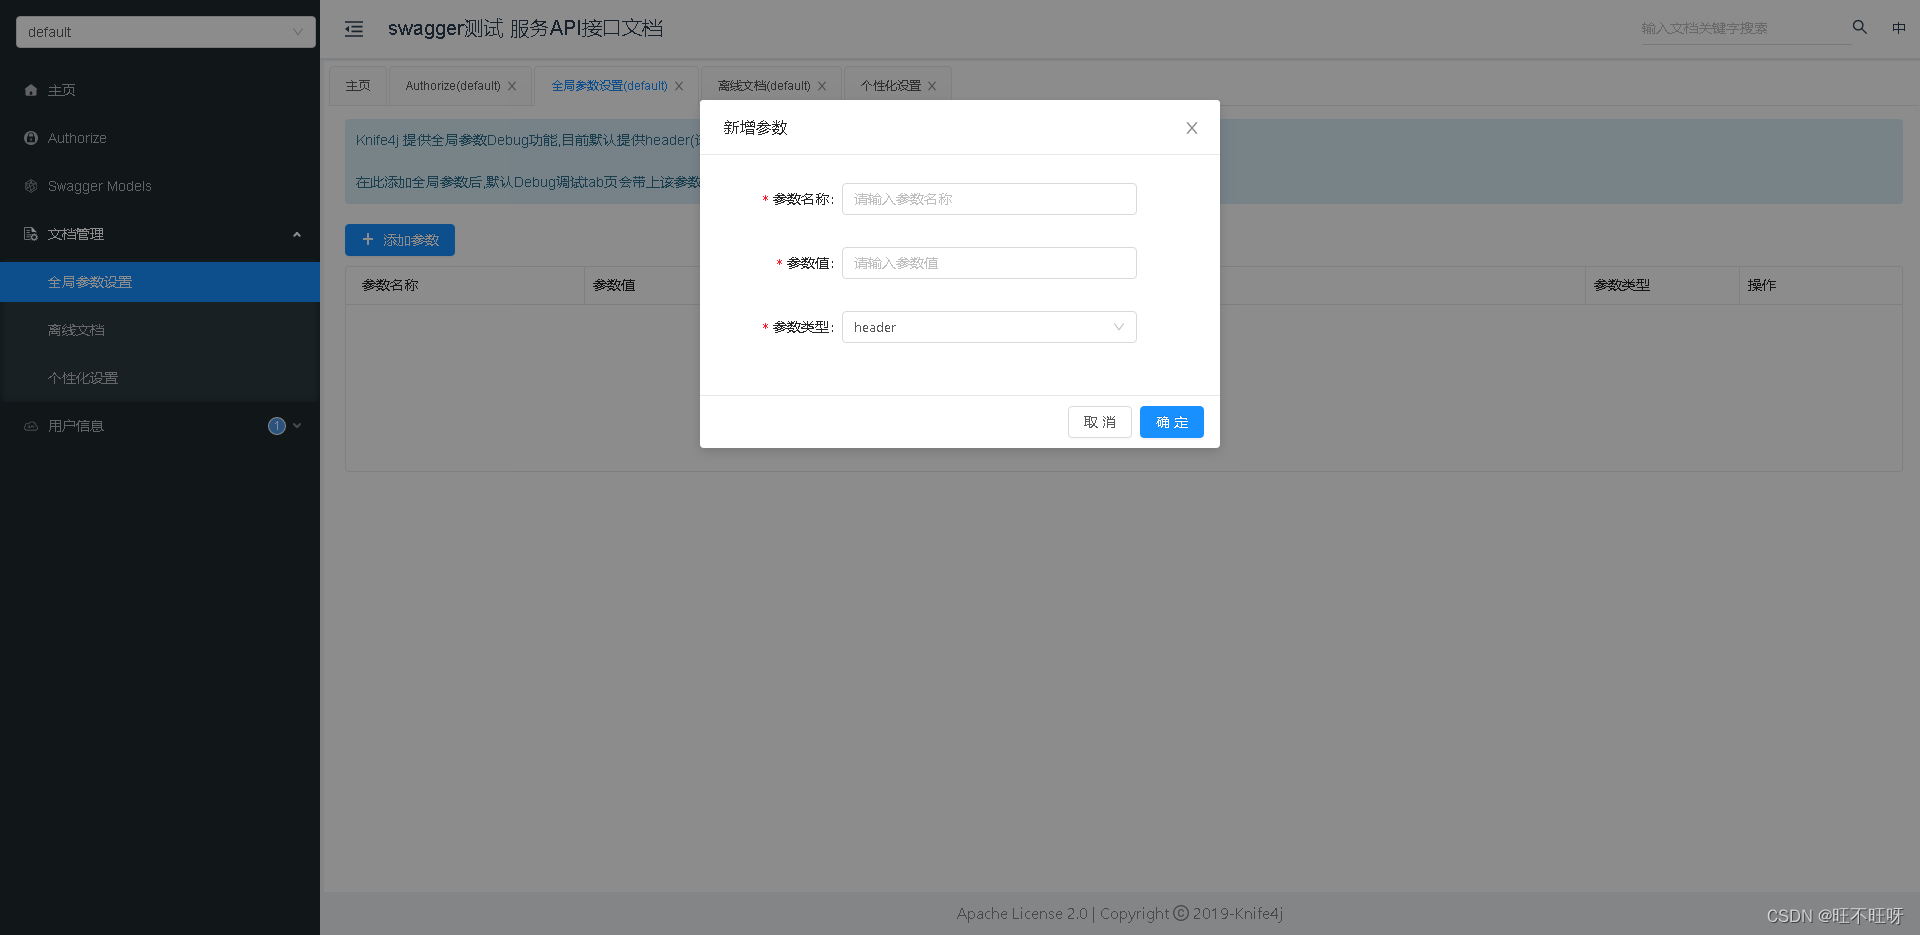
剩下的菜单就是读取的Controller的信息
这里是测试案例中配置的用户信息接口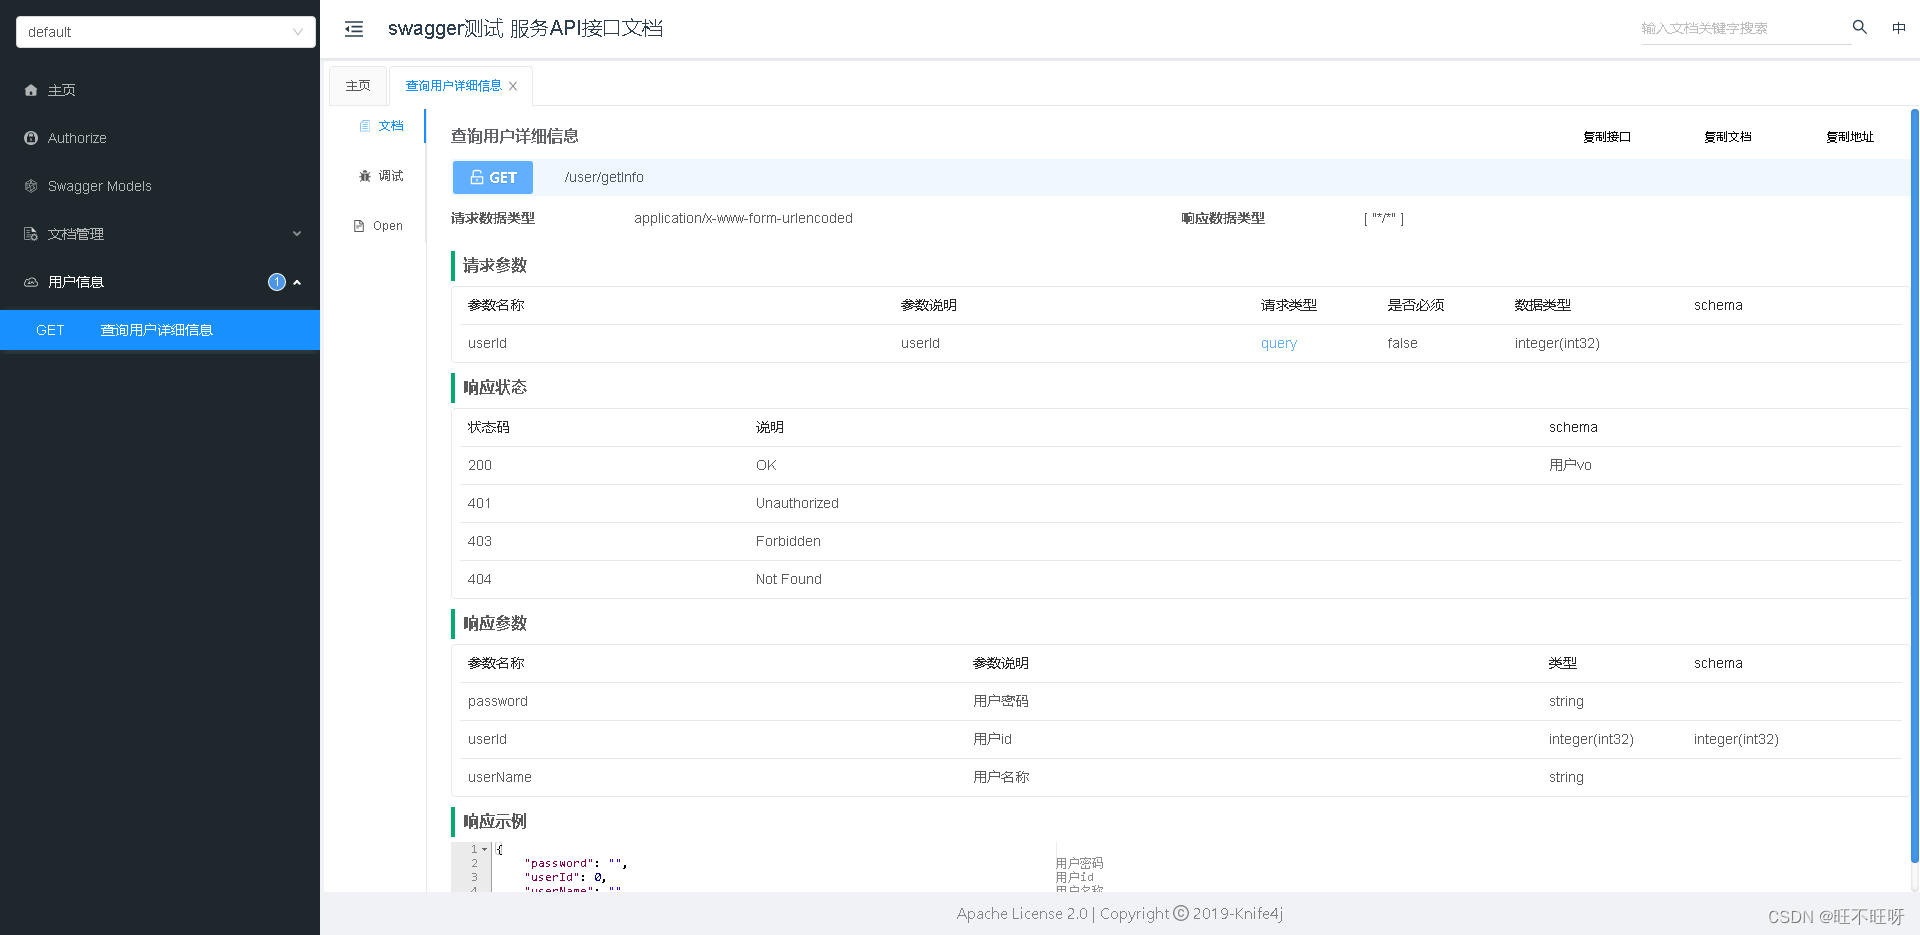
3、Swagger常用注解说明
3.1、@ApiModel(“用户vo”)
@ApiModel注解,用来配置Swagger文档中返回的对象名称,常用在实体类中;
如下图: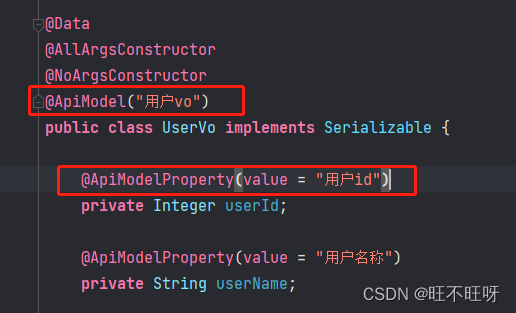
3.2、@ApiModelProperty(value = “用户id”)
@ApiModelProperty,用来配置Swagger文档中返回的对象的属性名称,如上图!
用户id、用户名称这些都是通过该注解配置的。
3.3、@Api(tags = “用户信息”)
@Api(tags = “”),用来配置控制层,在Swagger文档的菜单项可以体现!如下图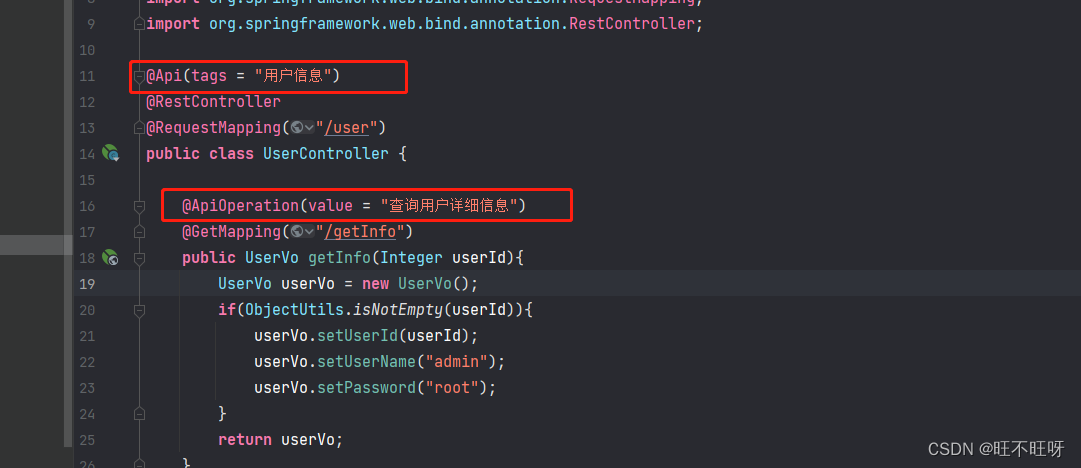
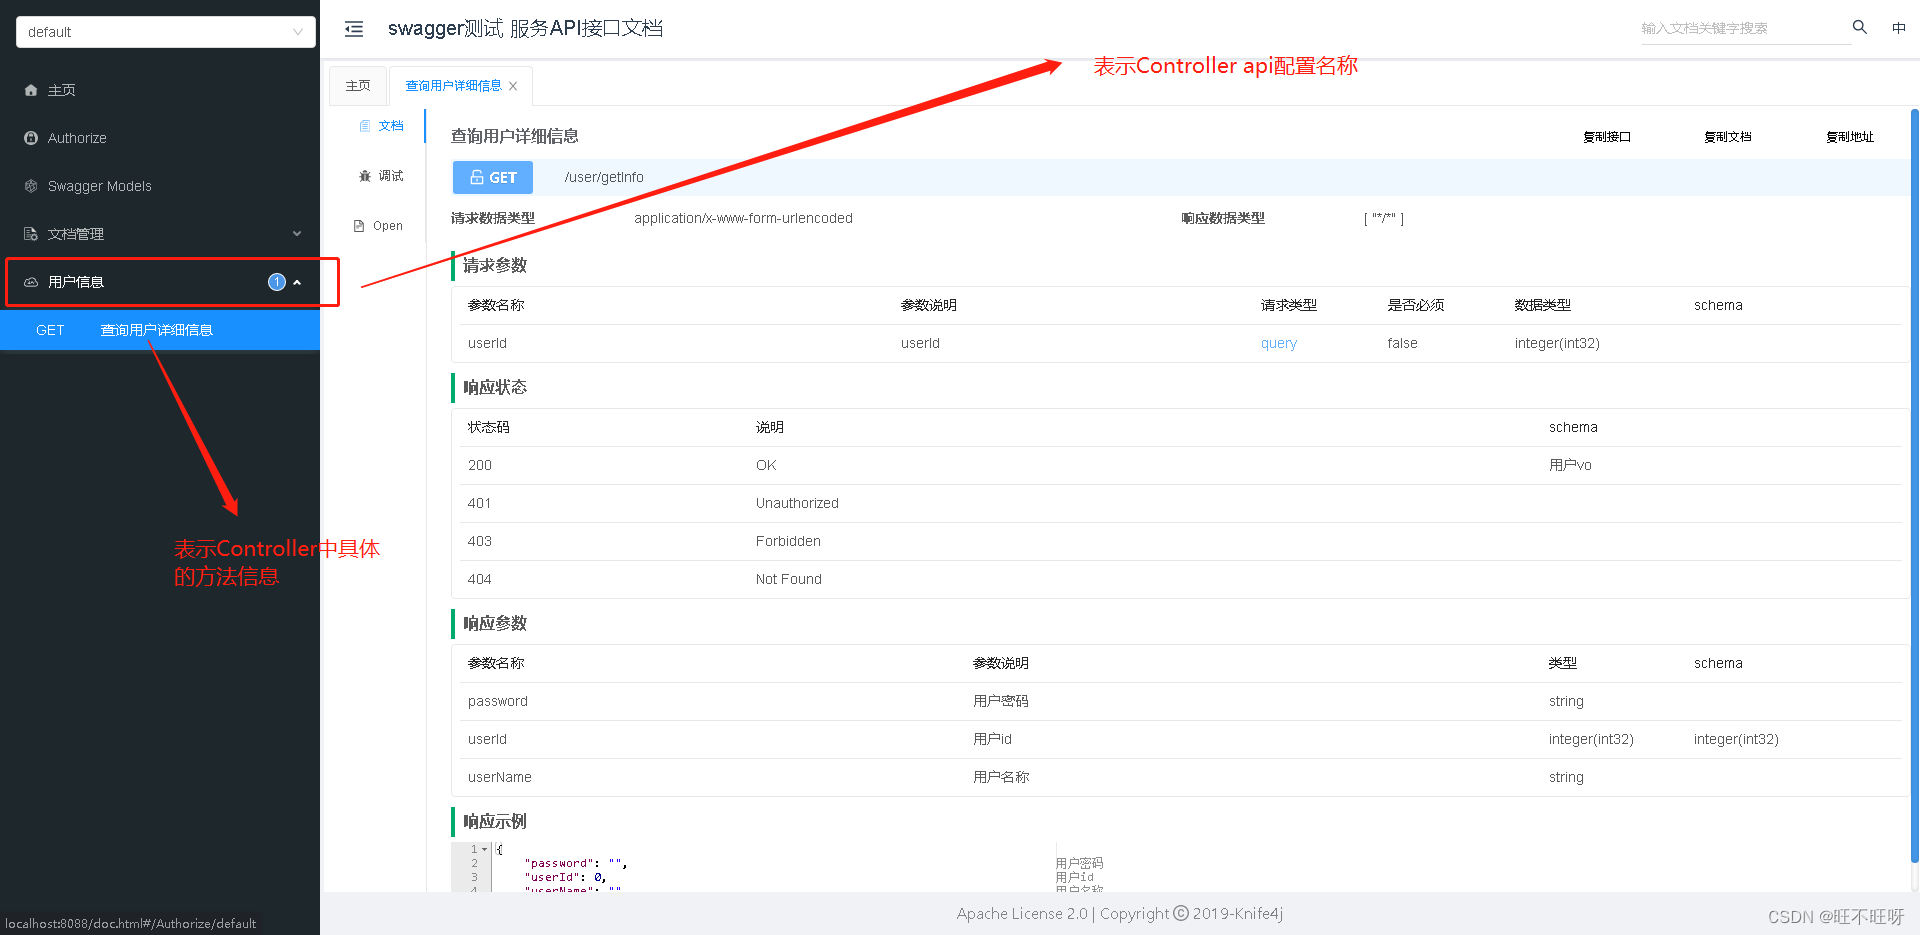
3.4、@ApiOperation(value = “查询用户详细信息”)
@ApiOperation(value = “”),用来配置控制层中具体的方法,在Swagger文档的菜单项可以体现!如上图
本文转载自: https://blog.csdn.net/adminwxc/article/details/127744816
版权归原作者 ㅤㅤ 诚ㅤㅤ 所有, 如有侵权,请联系我们删除。
版权归原作者 ㅤㅤ 诚ㅤㅤ 所有, 如有侵权,请联系我们删除。