
目录
一、C++中的断言机制
这部分内容网上已经有很多人讲了,我就不做重复性工作,制造垃圾了,大家看看下面两个链接就可以了,因为我的专栏除了分享自己学习的知识,主要想为大家提供完整学习路线,让大家的知识体系更加完善!
1、传统的运行时断言
(1)参考:https://www.cnblogs.com/lvchaoshun/p/7816288.html
2、C++11编译时断言
(1)参考:https://winsoft666.blog.csdn.net/article/details/78521458
(2)更深层:https://blog.csdn.net/weixin_39956356/article/details/111482530
二、单元测试和gtest介绍
1、单元测试介绍
(1)测试是对软件的功能、可靠性、兼容性等要求所做的检验
(2)测试有多种分类和概念,譬如白盒和黑盒,自动化测试等
    白盒测试又称结构测试、透明盒测试、逻辑驱动测试或基于代码的测试。白盒测试是
一种测试用例设计方法,盒子指的是被测试的软件,白盒指的是盒子是可视的,即清楚盒
子内部的东西以及里面是如何运作的。
    "白盒"法全面了解程序内部逻辑结构、对所有逻辑路径进行测试。"白盒"法是穷举
路径测试。在使用这一方案时,测试者必须检查程序的内部结构,从检查程序的逻辑着手,
得出测试数据。贯穿程序的独立路径数是天文数字。

    原则:
    (1)一个模块中的所有独立路径至少被测试一次。
    (2)所有逻辑值均需测试true和false两种情况。
    (3)检査程序的内部数据结构,保证其结构的有效性。
    (4)在取值的上、下边界及可操作范围内运行所有循环。
    黑盒测试,它是通过测试来检测每个功能是否都能正常使用。在测试中,把程序看作
一个不能打开的黑盒子,在完全不考虑程序内部结构和内部特性的情况下,在程序接口进
行测试,它只检查程序功能是否按照需求规格说明书的规定正常使用,程序是否能适当地
接收输入数据而产生正确的输出信息。黑盒测试着眼于程序外部结构,不考虑内部逻辑结
构,主要针对软件界面和软件功能进行测试。

    黑盒测试是以用户的角度,从输入数据与输出数据的对应关系出发进行测试的。很明
显,如果外部特性本身设计有问题或规格说明的规定有误,用黑盒测试方法是发现不了的。

    黑盒测试又叫功能测试、数据驱动测试或基于需求规格说明书的功能测试。该类测试
注重于测试软件的功能性需求。

    在软件测试的各个阶段,如单元测试、集成测试、系统测试及验收测试等阶段中,黑
盒测试都发挥着重要作用,尤其在系统测试和确认测试中,其作用是其他测试方法无法取
代的。
    自动化测试一般是指软件测试的自动化,软件测试就是在预设条件下运行系统或应用
程序,评估运行结果,预先条件应包括正常条件和异常条件。

    自动化测试是把以人为驱动的测试行为转化为机器执行的一种过程。通常,在设计了
测试用例并通过评审之后,由测试人员根据测试用例中描述的规程一步步执行测试,得到
实际结果与期望结果的比较。在此过程中,为了节省人力、时间或硬件资源,提高测试效
率,便引入了自动化测试的概念。

    有自动化测试软件工具进行测试,也可编写脚本进行测试
(3)测试是一种独立的学问,在软件行业中和开发是并列的,我们并不深究
(4)单元测试,unittest,是模块开发者自己编写的测试模块的用例,目的是保证模块符合开发要求,可以与其他开发人员的开发的模块可以协同工作
(5)测试驱动开发(开发方法)
测试驱动开发,英文全称Test-Driven Development,简称TDD,是一种不同于传统软件开发流程的新型的开发方法。它要求在编写某个功能的代码之前先编写测试代码,然后只编写使测试通过的功能代码,通过测试来推动整个开发的进行。这有助于编写简洁可用和高质量的代码,并加速开发过程。
如今,一些公司将自己的一些业务外包给第三方公司就使用了这种思想,自己提供测试用例以及测试标准,让第三方公司去开发软件,如果不符合自己的测试程序就去修改,直至第三方开发出符合自己测试程序以及测试标准的软件才算达到自己的要求!
2、常见单元测试介绍(测试框架)
(1)Java的Junit
(2)C++的CppUnit和CxxUnit
(3).net的Nunit
.NET是一种用于构建多种应用的免费开源开发平台,可以使用多种语言,编辑器和库
开发Web应用、Web API和微服务、云中的无服务器函数、云原生应用、移动应用、桌面应
用、Windows WPF、Windows窗体、通用 Windows平台 (UWP)、游戏、物联网 (IoT)、
机器学习、控制台应用、Windows服务。.NET类库在不同应用和应用类型中共享功能,无
论构建哪种类型的应用,代码和项目文件看起来都一样,可以访问每个应用的相同运行时、
API和语言功能。

2022年6月,微软承认 Visual Studio、NET 在 Win11 上存在问题,正努力修复。
(4)google 的 gtest(目前C++开发常用的)和 gmock(gtest的升级版,用于有依赖的模块进行单元测试,该模块依赖于其他模块方可工作)
3、gtest介绍
(1)gtest是google开发和开源的单元测试套件,是C++单元测试的最佳选择
(2)gtest主页:https://github.com/google/googletest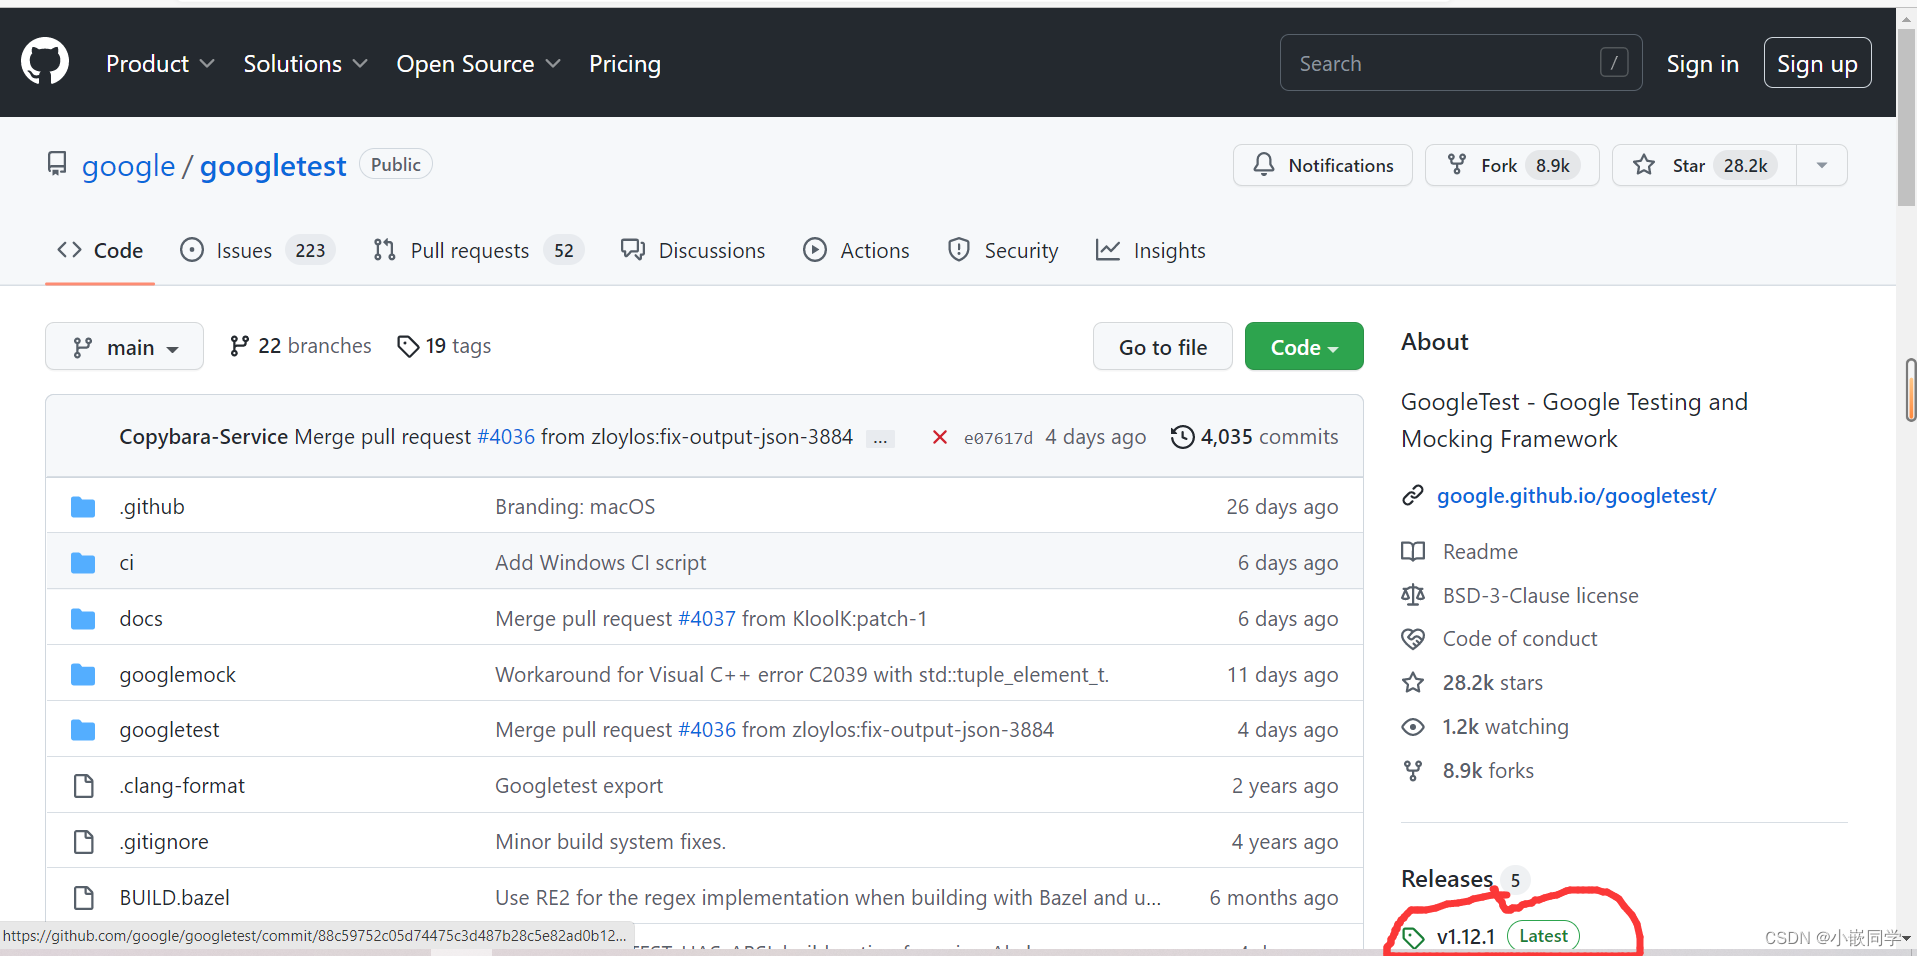
(3)gtest大多情况下已经够用,gmock额外提供了有依赖情况下的单元测试能力,需要时再去学习了解其的使用。
三、gtest的安装和使用
1、ubuntu 20.04 安装 gtest v1.10.0版本
(1)参考:https://www.cnblogs.com/Jessica-jie/p/6704388.html

test:gtest自己的一些测试文件
samples:提供的一些示例代码
CMakeLists.txt:管理gtest项目的cmake工程文件
(2)需要camke,可能还有其他依赖,按需安装
$ sudo apt-get install cmake
2、sample编译
(1)全编译,按readme操作。编译完运行测试体验。
https://github.com/google/googletest/blob/main/googletest/README.md

.cc:C++源代码文件

sample1.cc、sample1.h:待测试的功能文件

sample1_unittest.cc:进行单元测试的文件

编译命令:
摘录自V1.10.0版本的gtest中的README.md文件(googletest\googletest\README.md)
#### Standalone CMake Project

When building Google Test as a standalone project, the typical workflow
starts with:
    mkdir mybuild       # Create a directory to hold the build output.
    cd mybuild
    cmake ${GTEST_DIR}# Generate native build scripts.If you want to build Google Test's samples, you should replace the last
command with
    cmake -Dgtest_build_samples=ON ${GTEST_DIR}#########################################################################

cmake -Dgtest_build_samples=ON ..# ".." 表示我的CMakeLists.txt所在的目录

(2)手工编译,sample2编译(操作步骤如下图所示):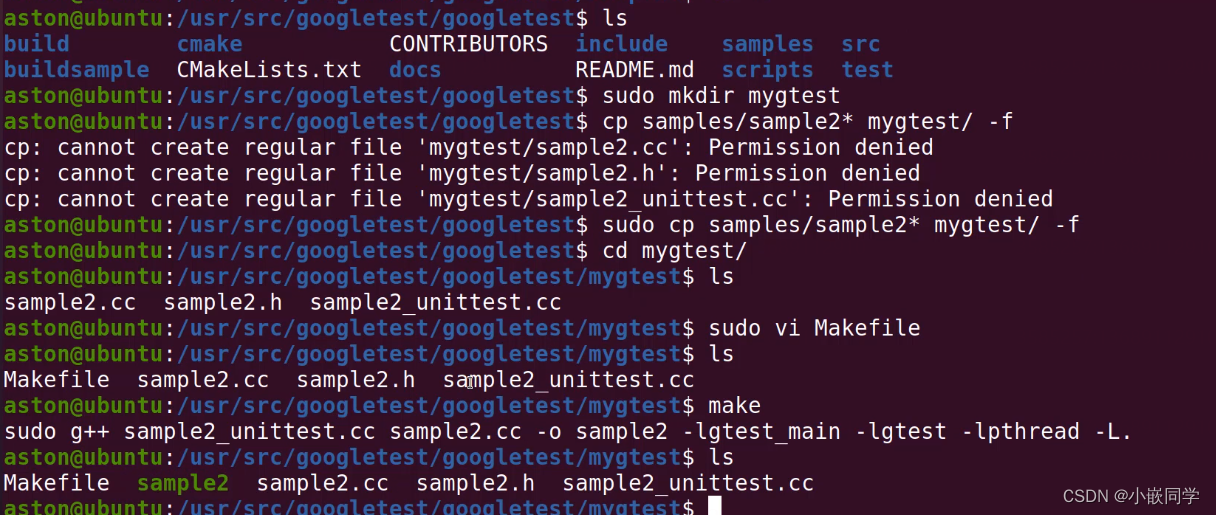
将下面的命令放到一个Makefile文件中,可使用make一键编译程序,具体步骤如上图所示:

sudo g++ sample2_unittest.cc sample2.cc -o sample2 -lgtest_main -lgtest -lpthread
四、gtest 的 sample1 解读
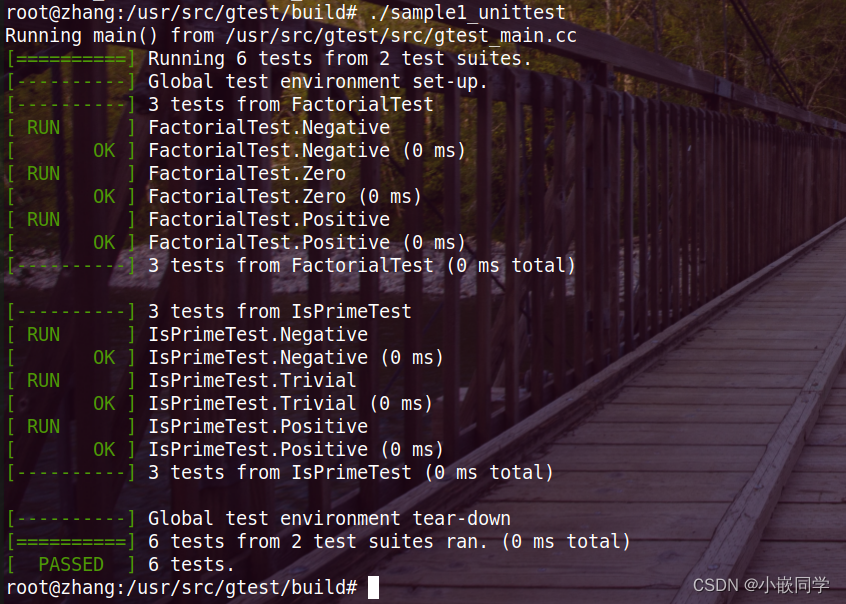
(1)编译文件命令:
sudo g++ sample1_unittest.cc sample1.cc -o sample1 -lgtest_main -lgtest -lpthread

(2)执行编译得到的sample1 ,看看执行效果

(3)使用SourceInsight或者VScode软件分析源码,sample1是一个用来测试函数功能的
示例
//sample1.cc 需要被测试的功能//演示使用Google C++测试框架的示例程序。#include"sample1.h"// 返回n!(n的阶乘)。对于n小于0,n!定义为1。intFactorial(int n){int result =1;for(int i =1; i <= n; i++){
    result *= i;}return result;}// 当且仅当n是素数时返回true//“素数一般指质数。质数是指在大于1的自然数中,//除了1和它本身以外不再有其他因数的自然数。boolIsPrime(int n){// Trivial case 1: small numbersif(n <=1)returnfalse;// Trivial case 2: even numbersif(n %2==0)return n ==2;// Now, we have that n is odd and n >= 3.// Try to divide n by every odd number i, starting from 3for(int i =3;; i +=2){//我们只需要把i试到n的平方根if(i > n/i)break;// Now, we have i <= n/i < n.// If n is divisible by i, n is not prime.if(n % i ==0)returnfalse;}// n在范围(1,n)内没有整数因子,因此是素数。returntrue;}
//sample1_unittest.cc 具有测试功能的代码//演示使用Google C++测试框架的示例程序。//此示例演示如何为函数编写简单的单元测试,//使用Google C++测试框架编写单元测试很简单,如1-2-3所示://步骤1.包括必要的头文件//声明测试逻辑需求。//别忘了gtest.h文件,它声明了测试框架。#include<limits.h>#include"sample1.h"#include"gtest/gtest.h"namespace{//步骤2.使用TEST宏定义测试。//TEST有两个参数:测试用例名称 和 测试名称。//您可以使用一堆宏来指示测试的成功或失败。//EXPECT_TRUE和EXPECT_EQ是此类宏的示例。有关完整列表,请参见gtest.h。//有关完整列表,请参见gtest.h。////<技术细节>////在Google测试中,测试被分组为测试用例。这就是我们//保持测试代码的有序性。你应该进行逻辑相关的测试//进入同一测试用例。////测试用例名称和测试名称都应该是有效的C++//标识符。而且你不应该在名字中使用下划线(_)。////谷歌测试保证您定义的每个测试都准确运行//一次,但不能保证测试的顺序执行。//因此,您应该以这样的方式编写测试//他们的结果并不取决于他们的顺序。////</技术细节>// Tests Factorial().// Tests factorial of negative numbers.TEST(FactorialTest, Negative){// This test is named "Negative", and belongs to the "FactorialTest"// test case.FactorialTest 是测试用例名称,Negative是测试名称EXPECT_EQ(1,Factorial(-5));EXPECT_EQ(1,Factorial(-1));EXPECT_GT(Factorial(-10),0);// <TechnicalDetails>//// EXPECT_EQ(expected, actual) is the same as// EXPECT_TRUE((expected) == (actual))////只是当断言失败时,它将打印预期值和实际值。这对调试非常有帮助。//因此,在这种情况下,首选EXPECT_EQ。////另一方面,EXPECT_TRUE接受任何布尔表达式,因此更通用。////</技术细节>}// Tests factorial of 0.TEST(FactorialTest, Zero){EXPECT_EQ(1,Factorial(0));}// Tests factorial of positive numbers.TEST(FactorialTest, Positive){EXPECT_EQ(1,Factorial(1));EXPECT_EQ(2,Factorial(2));EXPECT_EQ(6,Factorial(3));EXPECT_EQ(40320,Factorial(8));}// Tests IsPrime()// Tests negative input.TEST(IsPrimeTest, Negative){// This test belongs to the IsPrimeTest test case.EXPECT_FALSE(IsPrime(-1));EXPECT_FALSE(IsPrime(-2));EXPECT_FALSE(IsPrime(INT_MIN));}// Tests some trivial cases.TEST(IsPrimeTest, Trivial){EXPECT_FALSE(IsPrime(0));EXPECT_FALSE(IsPrime(1));EXPECT_TRUE(IsPrime(2));EXPECT_TRUE(IsPrime(3));}// Tests positive input.TEST(IsPrimeTest, Positive){EXPECT_FALSE(IsPrime(4));EXPECT_TRUE(IsPrime(5));EXPECT_FALSE(IsPrime(6));EXPECT_TRUE(IsPrime(23));}}// namespace//步骤3.在main()中调用RUN_ALL_TESTS()。////我们通过链接src/gtest_main来实现这一点。cc文件,其中包括//一个为我们调用RUN_ALL_TESTS()的main()函数。////这将运行您定义的所有测试,并打印结果,//如果成功,则返回0,否则返回1。////你注意到我们没有注册test吗?这个//RUN_ALL_TESTS()宏神奇地知道我们定义的所有测试//定义。这不方便吗?
五、gtest 的 sample2 解读
sample2是一个测试类的示例
// sample2.h// A sample program demonstrating using Google C++ testing framework.#ifndefGTEST_SAMPLES_SAMPLE2_H_#defineGTEST_SAMPLES_SAMPLE2_H_#include<string.h>// A simple string class.classMyString{private:constchar* c_string_;const MyString&operator=(const MyString& rhs);public:// Clones a 0-terminated C string, allocating memory using new.staticconstchar*CloneCString(constchar* a_c_string);//// C'tors// The default c'tor constructs a NULL string.MyString():c_string_(nullptr){}// Constructs a MyString by cloning a 0-terminated C string.explicitMyString(constchar* a_c_string):c_string_(nullptr){Set(a_c_string);}// Copy c'torMyString(const MyString& string):c_string_(nullptr){Set(string.c_string_);}//// D'tor.  MyString is intended to be a final class, so the d'tor// doesn't need to be virtual.~MyString(){delete[] c_string_;}// Gets the 0-terminated C string this MyString object represents.constchar*c_string()const{return c_string_;}

  size_t Length()const{return c_string_ ==nullptr?0:strlen(c_string_);}// 设置此MyString对象表示的以0(\0的ascii 码是0)结尾的C字符串voidSet(constchar* c_string);};#endif// GTEST_SAMPLES_SAMPLE2_H_
// sample2.cc// A sample program demonstrating using Google C++ testing framework.#include"sample2.h"#include<string.h>// 克隆以0结尾的C字符串,使用new分配内存constchar*MyString::CloneCString(constchar* a_c_string){if(a_c_string ==nullptr)returnnullptr;const size_t len =strlen(a_c_string);char*const clone =newchar[ len +1];memcpy(clone, a_c_string, len +1);return clone;}//设置此MyString对象表示的以0结尾的C字符串voidMyString::Set(constchar* a_c_string){// Makes sure this works when c_string == c_string_constchar*const temp =MyString::CloneCString(a_c_string);delete[] c_string_;
  c_string_ = temp;}
// sample2_unittest.cc// A sample program demonstrating using Google C++ testing framework.//此示例演示如何为具有多个成员函数的类编写更复杂的单元测试。////通常,最好为类中的每个方法进行一次测试。您不必完全这样做,//但这有助于保持测试的有序性。您还可以根据需要进行额外的测试。#include"sample2.h"#include"gtest/gtest.h"namespace{// In this example, we test the MyString class (a simple string).//下面将是一个测试用例,测试这个类,但有多个测试名称,测试类的不同功能特性// Tests the default c'tor.TEST(MyString, DefaultConstructor){const MyString s;// Asserts that s.c_string() returns NULL.//// <TechnicalDetails>//// If we write NULL instead of////   static_cast<const char *>(NULL)////在这个断言中,它将在gcc 3.4上生成一个警告//原因是EXPECT_EQ需要知道其类型//参数,以便在失败时打印它们。由于NULL是//#define 0,编译器将使用格式化程序函数//int打印。然而,gcc认为NULL应该用作//指针,而不是int,因此会警告////问题的根源是C++没有区分//整数0和空指针常量。不幸地//我们必须接受这个事实。////</技术细节>EXPECT_STREQ(nullptr, s.c_string());EXPECT_EQ(0u, s.Length());}constchar kHelloString[]="Hello, world!";// Tests the c'tor that accepts a C string.TEST(MyString, ConstructorFromCString){const MyString s(kHelloString);EXPECT_EQ(0,strcmp(s.c_string(), kHelloString));EXPECT_EQ(sizeof(kHelloString)/sizeof(kHelloString[0])-1,
            s.Length());}// Tests the copy c'tor.TEST(MyString, CopyConstructor){const MyString s1(kHelloString);const MyString s2 = s1;EXPECT_EQ(0,strcmp(s2.c_string(), kHelloString));}// Tests the Set method.TEST(MyString, Set){
  MyString s;

  s.Set(kHelloString);EXPECT_EQ(0,strcmp(s.c_string(), kHelloString));// Set should work when the input pointer is the same as the one// already in the MyString object.
  s.Set(s.c_string());EXPECT_EQ(0,strcmp(s.c_string(), kHelloString));// Can we set the MyString to NULL?
  s.Set(nullptr);EXPECT_STREQ(nullptr, s.c_string());}}// namespace
六、gtest 的其他sample解读
sample3-sample10也是不同的示例,学习时应该按照顺序学习,后边的示例会用到前边示例的知识。学习每个示例时,可以参考文件中的注释内容来理解。
//sample3_unittest.cc//在这个例子中,我们使用了谷歌测试的一个更高级的特性,称为测试夹具(test fixture)//测试夹具是保存测试用例中所有测试共享的对象和函数的地方。使用测试夹具可以避免//重复初始化和清理每个测试的公共对象所需的测试代码。它对于定义测试需要调用的子//程序也很有用。//测试在代码共享的意义上共享测试夹具,而不是数据共享。每个测试都有自己的夹具//新副本。您不能期望由一个测试修改的数据传递到另一个测试,这是一个坏主意。////这种设计的原因是测试应该是独立的和可重复的。特别是,一个测试不应该因为另//一个测试的失败而失败。如果一个测试依赖于另一个测试产生的信息,那么这两个//测试真的应该是一个大测试。////用于指示测试成功/失败的宏(EXPECT_TRUE、FAIL等)需要知道当前测试是什么//(当Google测试打印测试结果时,它会告诉您每个失败属于哪个测试)。从技术上//讲,这些宏调用Test类的成员函数。因此,不能在全局函数中使用它们。这就是为//什么您应该将测试子例程放在测试夹具中。#include"sample3-inl.h"#include"gtest/gtest.h"namespace{// To use a test fixture, derive a class from testing::Test.classQueueTestSmpl3:public testing::Test{protected:// You should make the members protected s.t. they can be// accessed from sub-classes.// virtual void SetUp() will be called before each test is run.  You// should define it if you need to initialize the variables.// Otherwise, this can be skipped.voidSetUp()override{
    q1_.Enqueue(1);
    q2_.Enqueue(2);
    q2_.Enqueue(3);}// virtual void TearDown() will be called after each test is run.// You should define it if there is cleanup work to do.  Otherwise,// you don't have to provide it.//// virtual void TearDown() {// }// A helper function that some test uses.staticintDouble(int n){return2*n;}// A helper function for testing Queue::Map().voidMapTester(const Queue<int>* q){// Creates a new queue, where each element is twice as big as the// corresponding one in q.const Queue<int>*const new_q = q->Map(Double);// Verifies that the new queue has the same size as q.ASSERT_EQ(q->Size(), new_q->Size());// Verifies the relationship between the elements of the two queues.for(const QueueNode<int>*n1 = q->Head(),*n2 = new_q->Head();
         n1 !=nullptr; n1 = n1->next(), n2 = n2->next()){EXPECT_EQ(2* n1->element(), n2->element());}delete new_q;}// Declares the variables your tests want to use.
  Queue<int> q0_;
  Queue<int> q1_;
  Queue<int> q2_;};// When you have a test fixture, you define a test using TEST_F// instead of TEST.// Tests the default c'tor.TEST_F(QueueTestSmpl3, DefaultConstructor){// You can access data in the test fixture here.EXPECT_EQ(0u, q0_.Size());}// Tests Dequeue().TEST_F(QueueTestSmpl3, Dequeue){int* n = q0_.Dequeue();EXPECT_TRUE(n ==nullptr);

  n = q1_.Dequeue();ASSERT_TRUE(n !=nullptr);EXPECT_EQ(1,*n);EXPECT_EQ(0u, q1_.Size());delete n;

  n = q2_.Dequeue();ASSERT_TRUE(n !=nullptr);EXPECT_EQ(2,*n);EXPECT_EQ(1u, q2_.Size());delete n;}// Tests the Queue::Map() function.TEST_F(QueueTestSmpl3, Map){MapTester(&q0_);MapTester(&q1_);MapTester(&q2_);}}// namespace
注:本文章参考了《朱老师物联网大讲堂》课程笔记,并结合了自己的实际开发经历、百度百科以及网上他人的技术文章,综合整理得到。如有侵权,联系删除!水平有限,欢迎各位在评论区交流。
版权归原作者 小嵌同学 所有, 如有侵权,请联系我们删除。