
Spring Boot整合OAuth2,实现GitHub第三方登录
1、第三方登录原理
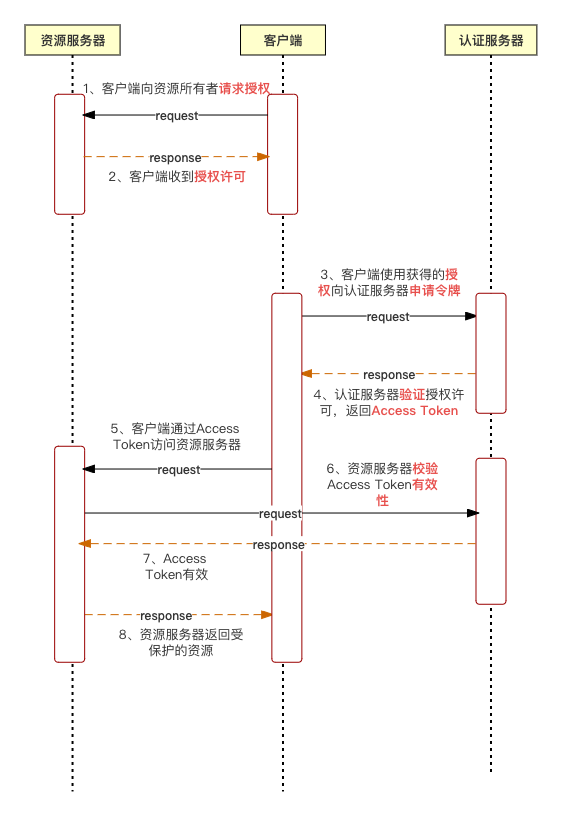
第三方登录的原理是借助OAuth授权来实现,首先用户先向客户端提供第三方网站的数据证明自己的身份获取授权码,然后客户端拿着授权码与授权服务器建立连接获得一个Access Token,之后客户端就可以通过Access Token来与资源服务器进行交互。
使用OAuth的好处是提供给用户一个特定的密钥,用户持有这个密钥可以访问应用中的任何信息,而不需要向网站提供用户名&密码,可以实现跨系统共享用户授权协议。
通过控制用户持有的密钥,可以很方便的控制用户可以访问的资源,以及控制密钥的过期时间。
以下是来自维基百科对于OAuth的介绍
开放授权(OAuth)是一个开放标准,允许用户让第三方应用访问该用户在某一网站上存储的私密的资源(如照片,视频,联系人列表),而无需将用户名和密码提供给第三方应用。
OAuth允许用户提供一个令牌,而不是用户名和密码来访问他们存放在特定服务提供者的数据。每一个令牌授权一个特定的网站(例如,视频编辑网站)在特定的时段(例如,接下来的2小时内)内访问特定的资源(例如仅仅是某一相册中的视频)。这样,OAuth让用户可以授权第三方网站访问他们存储在另外服务提供者的某些特定信息,而非所有内容。
OAuth是OpenID的一个补充,但是完全不同的服务。
交互流程如下:
2、GitHub实现第三方登录
首先需要在github中对应用进行登记,让Github知道谁在发送请求。
访问这个网址,填写登记表
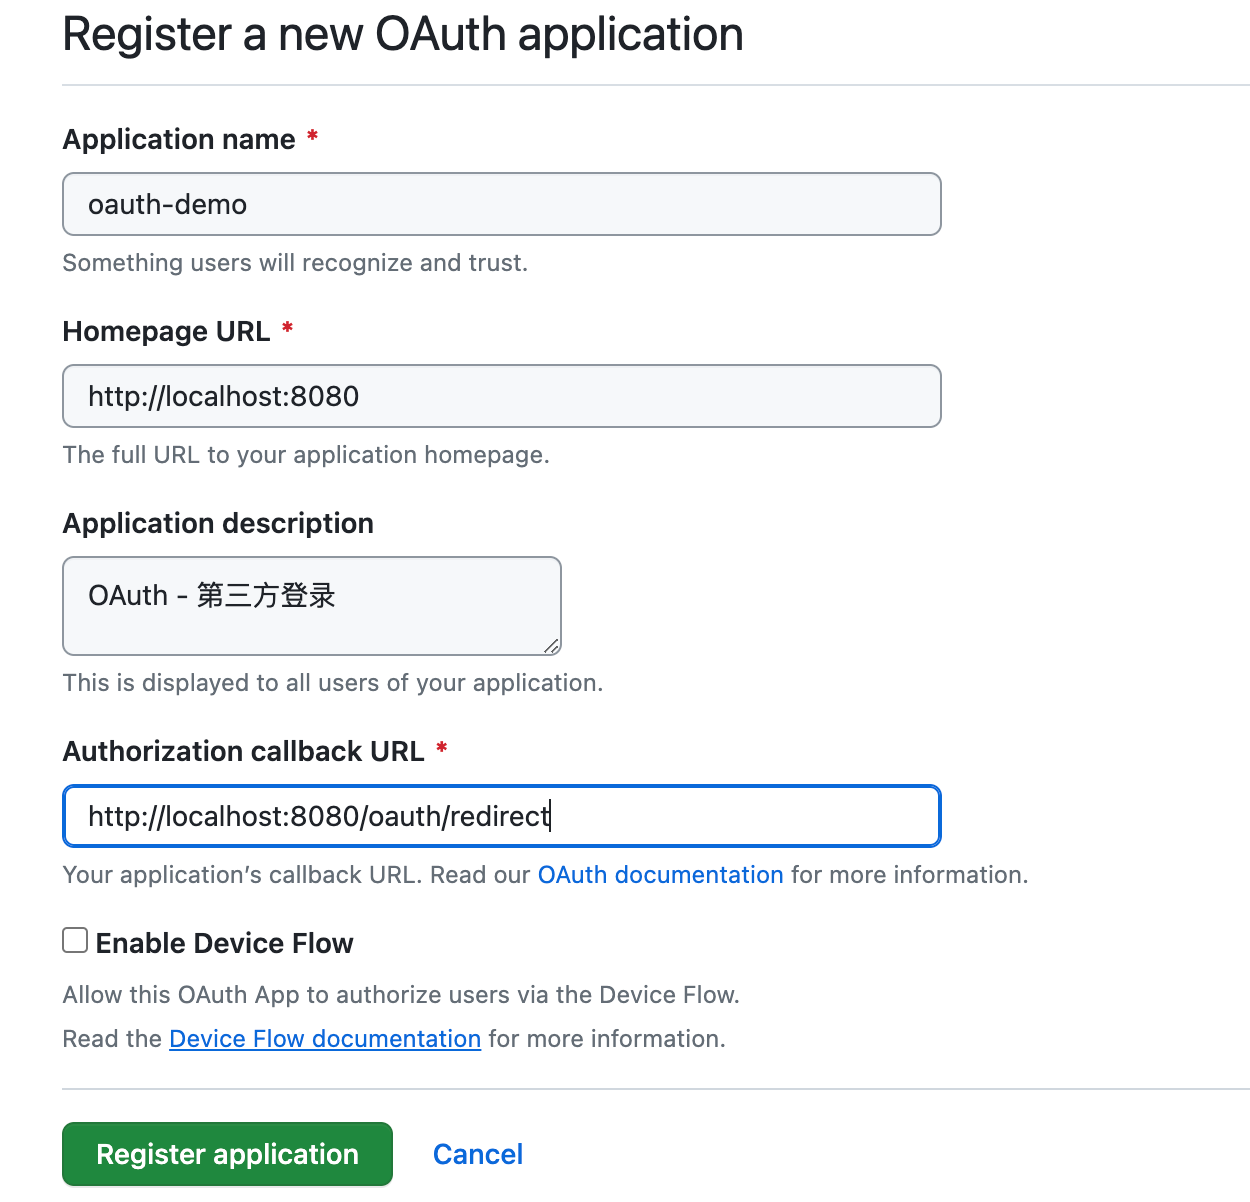
提交成功之后,GitHub会返回Client ID & Client Secrets ,这是应用的身份识别码

创建一个SpringBoot工程,pom.xml文件内容如下:
<?xml version="1.0" encoding="UTF-8"?><projectxmlns="http://maven.apache.org/POM/4.0.0"xmlns:xsi="http://www.w3.org/2001/XMLSchema-instance"xsi:schemaLocation="http://maven.apache.org/POM/4.0.0 https://maven.apache.org/xsd/maven-4.0.0.xsd"><modelVersion>4.0.0</modelVersion><parent><groupId>org.springframework.boot</groupId><artifactId>spring-boot-starter-parent</artifactId><version>2.7.17</version><relativePath/><!-- lookup parent from repository --></parent><groupId>org.pp</groupId><artifactId>springboot-oauth2-api</artifactId><version>0.0.1-SNAPSHOT</version><name>springboot-oauth2-api</name><description>springboot整合oauth2,实现GitHub第三方登录</description><properties><java.version>1.8</java.version></properties><dependencies><dependency><groupId>org.springframework.boot</groupId><artifactId>spring-boot-starter-web</artifactId></dependency><dependency><groupId>org.springframework.boot</groupId><artifactId>spring-boot-starter-thymeleaf</artifactId></dependency></dependencies><build><plugins><plugin><groupId>org.springframework.boot</groupId><artifactId>spring-boot-maven-plugin</artifactId><configuration><excludes><exclude><groupId>org.projectlombok</groupId><artifactId>lombok</artifactId></exclude></excludes></configuration></plugin></plugins></build></project>
将ID和密钥添加到配置文件application.yml中:
# 项目端口号server:port:8080#  GitHub认证相关参数github:client:id: xxx
      secret: xxx
创建一个实体类,用于映射授权成功产生的Token令牌:
importcom.fasterxml.jackson.annotation.JsonProperty;/**
 *
 * Token令牌 - 响应参数
 *
 * @author supanpan
 * @date 2023/10/25
 */publicclassAccessTokenResponse{@JsonProperty("access_token")privateString accessToken;publicStringgetAccessToken(){return accessToken;}publicvoidsetAccessToken(String accessToken){this.accessToken = accessToken;}}
OAuthController如下:
***@author supanpan
 *@date2023/10/25*/@ControllerpublicclassOAuthController{@Value("${github.client.id}")privateString clientId;@Value("${github.client.secret}")privateString clientSecret;@GetMapping("/oauth/redirect")publicStringhandleRedirect(@RequestParam("code")String requestToken,Model model){// 使用RestTemplate来发送HTTP请求RestTemplate restTemplate =newRestTemplate();// 获取Token的UrlString tokenUrl ="https://github.com/login/oauth/access_token"+"?client_id="+ clientId +"&client_secret="+ clientSecret +"&code="+ requestToken;// 使用restTemplate向GitHub发送请求,获取TokenAccessTokenResponse tokenResponse = restTemplate.postForObject(tokenUrl,null,AccessTokenResponse.class);// 从响应体中获取Token数据String accessToken = tokenResponse.getAccessToken();// 携带Token向GitHub发送请求String apiUrl ="https://api.github.com/user";HttpHeaders headers =newHttpHeaders();
        headers.set("Authorization","token "+ accessToken);HttpEntity<String> entity =newHttpEntity<>("parameters", headers);ResponseEntity<String> response = restTemplate.exchange(apiUrl,HttpMethod.GET, entity,String.class);
        model.addAttribute("userData", response.getBody());return"welcome";}}
SpringBoot启动器
importorg.springframework.boot.SpringApplication;importorg.springframework.boot.autoconfigure.SpringBootApplication;@SpringBootApplicationpublicclassSpringbootOauth2ApiApplication{publicstaticvoidmain(String[] args){SpringApplication.run(SpringbootOauth2ApiApplication.class, args);}}
还需要编写两个html页面,index.html和welcome.html
index.html
<!DOCTYPEhtml><html><head><metacharset="utf-8"/><metahttp-equiv="X-UA-Compatible"content="IE=edge"><title>OAuth2 Demo</title><metaname="viewport"content="width=device-width, initial-scale=1"></head><body><aid="login">Login with GitHub</a><script>const client_id ='xxxx';const authorize_uri ='https://github.com/login/oauth/authorize';const redirect_uri ='http://localhost:8080/oauth/redirect';const link = document.getElementById('login');
    link.href =`${authorize_uri}?client_id=${client_id}&redirect_uri=${redirect_uri}`;</script></body></html>
welcome.html
<!DOCTYPEhtml><htmllang="en"xmlns:th="http://www.thymeleaf.org"><head><metacharset="UTF-8"><metaname="viewport"content="width=device-width, initial-scale=1.0"><metahttp-equiv="X-UA-Compatible"content="ie=edge"><title>Hello</title></head><body><h1>Welcome</h1><divth:text="${userData}"></div></body></html>
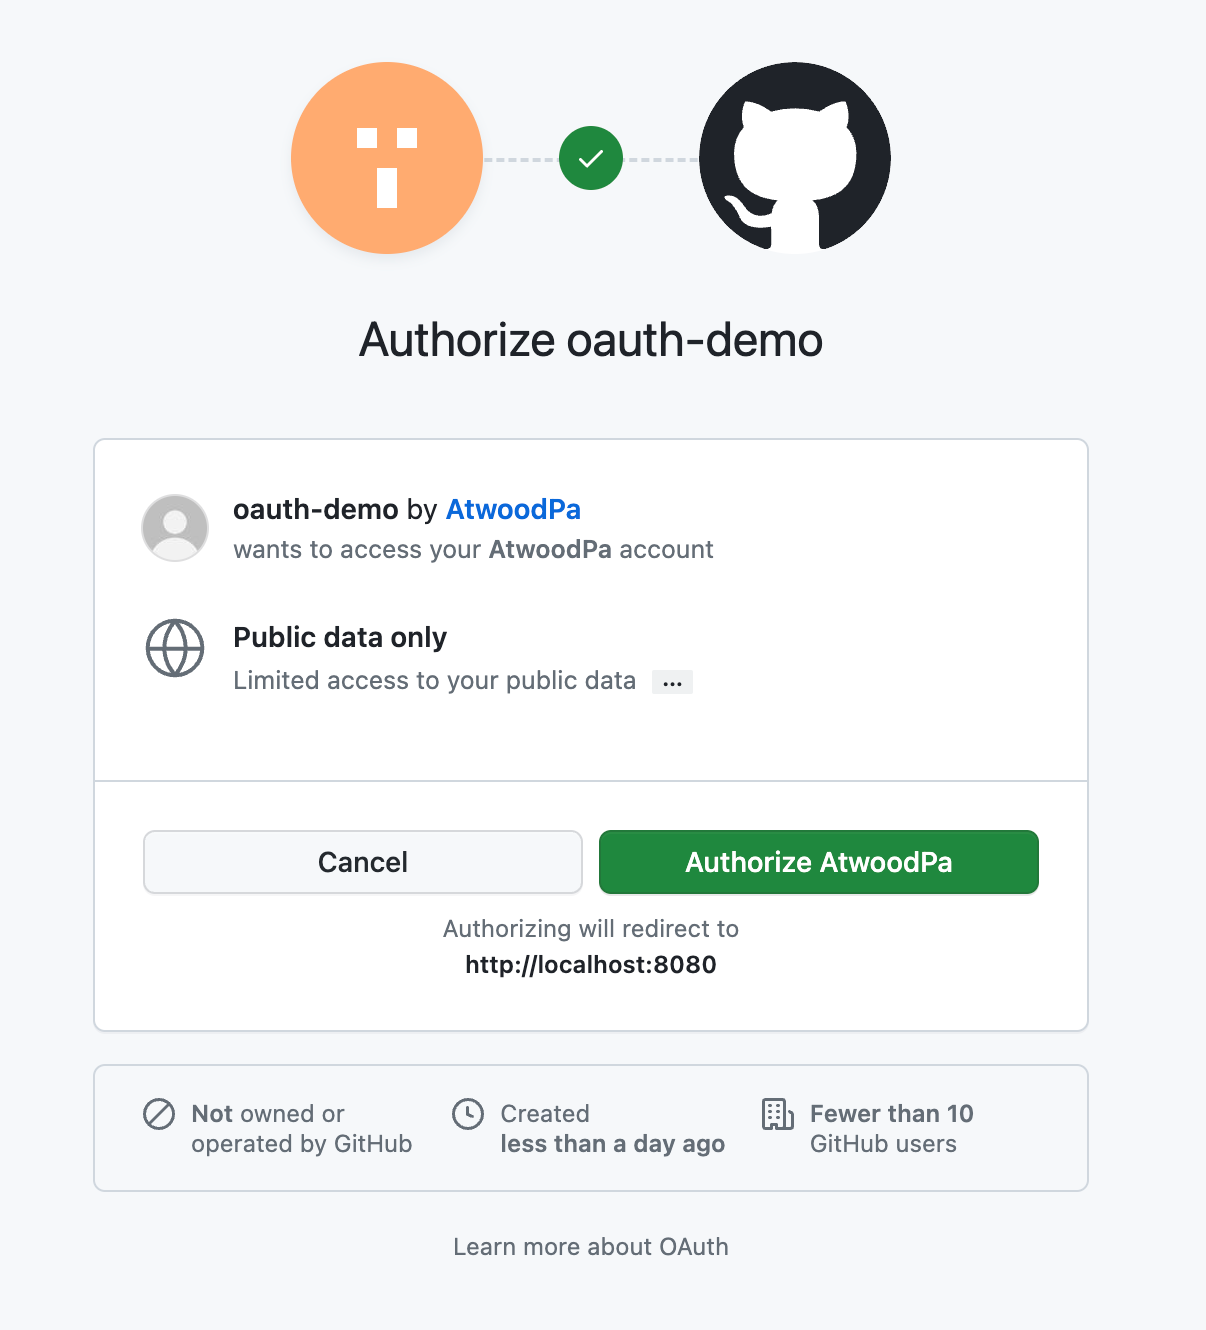
启动项目,浏览器访问localhost:8080,会跳转到index页面,点击链接会跳转到GitHub应用授权页面
点击跳转到GitHub授权之后,GitHub会询问示例代码正在请求数据,您是否同意授权。
用户同意授权, GitHub 就会跳转到
redirect_uri
指定的跳转网址,并且带上授权码,跳转回来的 URL 就是下面的样子
// code参数就是授权码
http://localhost:8080/oauth/redirect?code:4ea423f2ec1e04c6376a
如下是服务的响应数据:
access token: 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
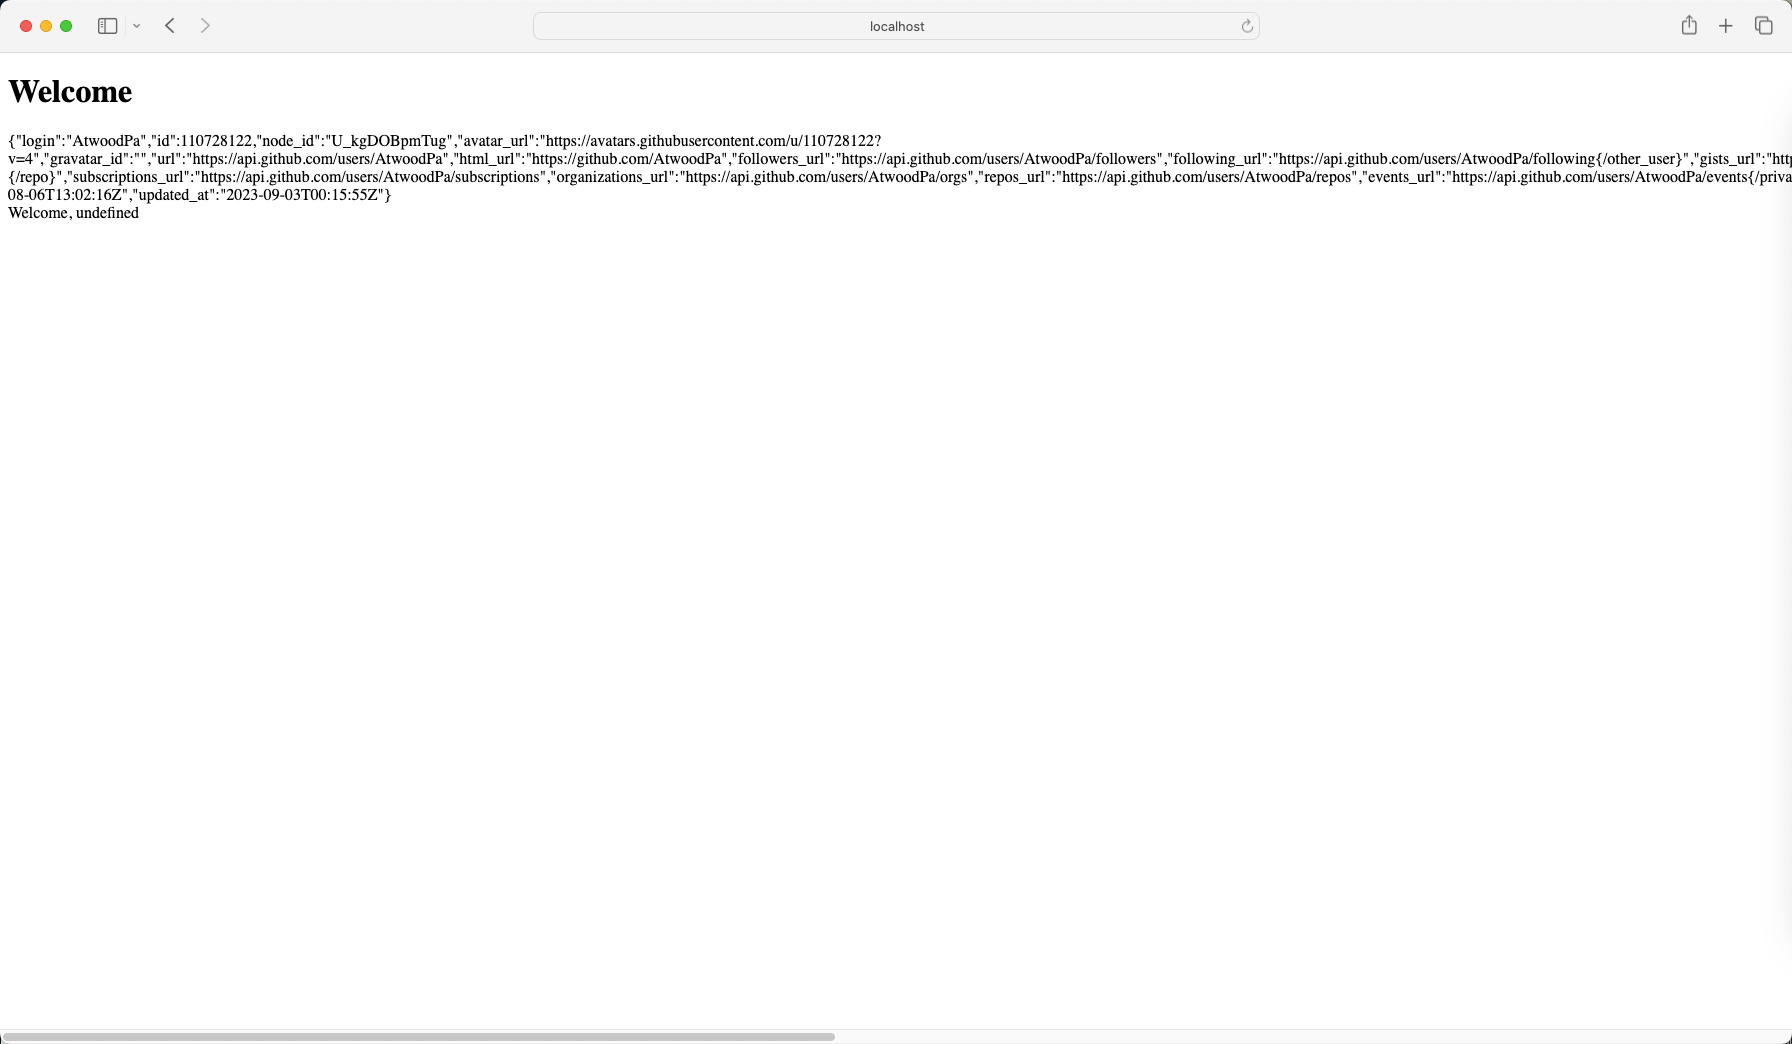
{login:'AtwoodPa',id:110728122,node_id:'U_kgDOBpmTug',avatar_url:'https://avatars.githubusercontent.com/u/110728122?v=4',gravatar_id:'',url:'https://api.github.com/users/AtwoodPa',html_url:'https://github.com/AtwoodPa',followers_url:'https://api.github.com/users/AtwoodPa/followers',following_url:'https://api.github.com/users/AtwoodPa/following{/other_user}',gists_url:'https://api.github.com/users/AtwoodPa/gists{/gist_id}',starred_url:'https://api.github.com/users/AtwoodPa/starred{/owner}{/repo}',subscriptions_url:'https://api.github.com/users/AtwoodPa/subscriptions',organizations_url:'https://api.github.com/users/AtwoodPa/orgs',repos_url:'https://api.github.com/users/AtwoodPa/repos',events_url:'https://api.github.com/users/AtwoodPa/events{/privacy}',received_events_url:'https://api.github.com/users/AtwoodPa/received_events',type:'User',site_admin:false,name:null,company:null,blog:'',location:null,email:null,hireable:null,bio:null,twitter_username:null,public_repos:6,public_gists:0,followers:0,following:3,created_at:'2022-08-06T13:02:16Z',updated_at:'2023-09-03T00:15:55Z'}
authorization code: 4ea423f2ec1e04c6376a
成功执行上述流程,最终展示示例的welcome页面
到这里,Spring Boot整合GitHub实现第三方登录的实现就结束了,以此类推其他厂商的第三方登录实现流程也大概是这样。
版权归原作者 七七r 所有, 如有侵权,请联系我们删除。