在VSCode上运行Jupyter Notebook
目录
一、 安装Anaconda3 (x64)
Anaconda下载链接
可参考:Anaconda 的安装教程(图文)_anaconda安装-CSDN博客
二、安装VSCode (x64)
VSCode下载链接
启动VSCode
三、在VSCode配置Jupyter Notebook
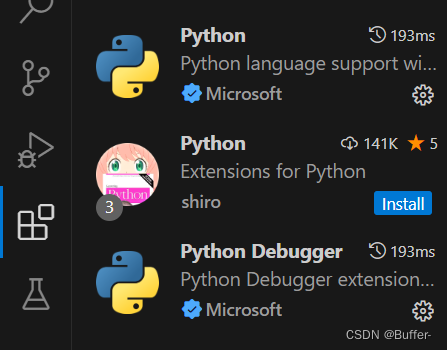
1、在Extensions中安装Python和Jupyter
侧边栏那个四个小方块是Extensions


2、配置 PowerShell 以启用 Conda 环境管理器
上侧导航栏中,点击Terminal - New Terminal输入
conda init powershell
重新打开一个Terminal,如果有报错说什么无法加载文件之类的,就以管理员身份运行PowerShell
输入
set-executionpolicy remotesigned
有提示信息出现后输入A并回车
然后关闭之前打开的所有Terminal,再打开一个新的Terminal,应该就没有报错了。
3、更换软件源
(1)在VSCode的Terminal中输入以下指令,快速打开.condarc
code .\.condarc
在打开的界面,填入https://mirrors.tuna.tsinghua.edu.cn/help/anaconda/这个镜像里面的内容
channels:
  - defaults
show_channel_urls: true
default_channels:
  - https://mirrors.tuna.tsinghua.edu.cn/anaconda/pkgs/main
  - https://mirrors.tuna.tsinghua.edu.cn/anaconda/pkgs/r
  - https://mirrors.tuna.tsinghua.edu.cn/anaconda/pkgs/msys2
custom_channels:
  conda-forge: https://mirrors.tuna.tsinghua.edu.cn/anaconda/cloud
  msys2: https://mirrors.tuna.tsinghua.edu.cn/anaconda/cloud
  bioconda: https://mirrors.tuna.tsinghua.edu.cn/anaconda/cloud
  menpo: https://mirrors.tuna.tsinghua.edu.cn/anaconda/cloud
  pytorch: https://mirrors.tuna.tsinghua.edu.cn/anaconda/cloud
  pytorch-lts: https://mirrors.tuna.tsinghua.edu.cn/anaconda/cloud
  simpleitk: https://mirrors.tuna.tsinghua.edu.cn/anaconda/cloud
  deepmodeling: https://mirrors.tuna.tsinghua.edu.cn/anaconda/cloud/
(2)配置Pypi
https://mirrors.bfsu.edu.cn/help/pypi/
这里根据个人需求选择一个或多个配置方式就行,个人建议如果暂时只用pip进行后续安装,就先配置pip一个就行,不用三个都弄。
以下是官方提供了三种:
pip
在Terminal中输入:
python -m pip install --upgrade pip

pip config set global.index-url https://mirrors.bfsu.edu.cn/pypi/web/simple
这样的话,后续使用 pip 安装 Python 包时能够从指定的镜像源下载,从而加快下载速度。
pdm
pip install pdm

pdm config pypi.url https://mirrors.bfsu.edu.cn/pypi/web/simple
poetry
pip install --user poetry

pip install --user pipx

python -m pipx install poetry

python -m pipx ensurepath

poetry --version

poetry new my_project

cd my_project

poetry source add --priority=primary mirrors

poetry install

poetry source add --priority=supplemental mirrors https://mirrors.bfsu.edu.cn/pypi/web/simple/

poetry lock

poetry install
4、创建一个开发环境
(1)打开一个新的Terminal执行:
conda create --name en python=3.7

conda activate en
(2)安装ipykernel和依赖包
这里建议以管理员身份打开命令提示符,执行下面的命令
conda activate en

pip install -i https://pypi.tuna.tsinghua.edu.cn/simple ipykernel

conda install numpy pandas matplotlib
5、新建一个Jupyter Notebook
在Code中打开一个固定的Folder,使用 Ctrl + Shift + P 快捷键,
搜索到Jupyter: Create New Jupyter Notebook,新建一个Jupyter Notebook
右上角会显示正在使用base环境,更改为你新建的en
尝试运行Python代码
版权归原作者 Buffer- 所有, 如有侵权,请联系我们删除。