
【全网最细致】SpringBoot整合Spring Security + JWT实现用户认证
登录和用户认证是一个网站最基本的功能,在这篇博客里,将介绍如何用SpringBoot整合Spring Security + JWT实现登录及用户认证
文章目录
前置知识:Session、Cookie与Token
session与cookie
在一些传统项目中,我们或许会用session来保存用户信息,进行用户认证。而现在基本上都用token来代替session,为什么会出现这样的变化,我们来聊聊session、cookie以及token
在谈session和cookie前,首先我们来谈谈会话。http本身是无状态协议,服务器无法识别每一次HTTP请求的出处(不知道来自于哪个终端),它只会接受到一个请求信号,所以就存在一个问题:将用户的响应发送给相应的用户,必须有一种技术来让服务器知道请求来自哪,这就是会话技术。
会话就是客户端和服务器之间发生的一系列连续的请求和响应的过程。会话状态指服务器和浏览器在会话过程中产生的状态信息,借助于会话状态,服务器能够把属于同一次会话的一系列请求和响应关联起来。
实现会话有两种方式:session和cookie。Session通过在服务器端记录信息确定用户身份,相应的也增加了服务器的存储压力。客户端浏览器访问服务器的时候,服务器把客户端信息以某种形式记录在服务器上,这就是Session。属于同一次会话的请求都有一个相同的标识符,sessionID,客户端浏览器再次访问时只需要通过sessionID从Session中查找该客户的状态就可以了。那么后端是怎么把sessionID返回给客户端的?可以通过设置cookie的方式返回给客户端,若浏览器禁止cookie,则可以通过URL重写的方式发送。
刚刚提到了cookie,Cookie是服务端在HTTP响应中附带传给浏览器的一个小的文本文件,一旦浏览器保存了某个Cookie,在之后的请求和响应过程中,会将此Cookie来回传递,这样就可以通过Cookie这个载体完成客户端和服务端的数据交互。
使用Session进行用户认证时,当用户第一次通过浏览器使用用户名和密码访问服务器时,服务器会验证用户数据,验证成功后在服务器端写入session数据,向客户端浏览器返回sessionid,浏览器将sessionid保存在cookie中,当用户再次访问服务器时,会携带sessionid,服务器会拿着sessionid从服务器获取session数据,然后进行用户信息查询,查询到,就会将查询到的用户信息返回,从而实现状态保持,流程如下图: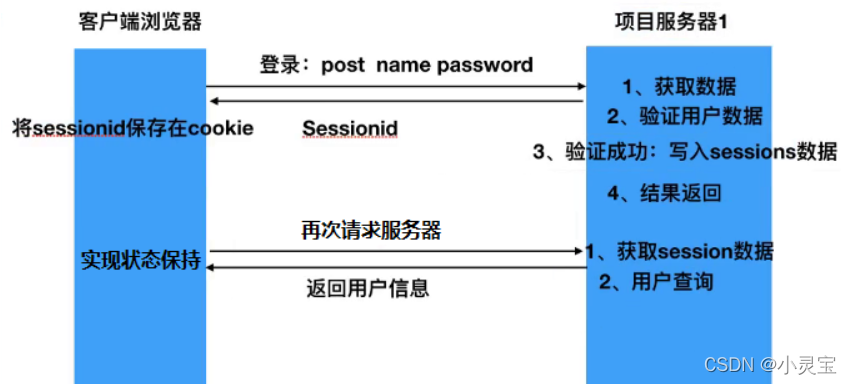
session的弊端
- 服务器压力增大 通常session是存储在内存中的,每个用户通过认证之后都会将session数据保存在服务器的内存中,而当用户量增大时,服务器的压力增大。
- CSRF跨站伪造请求攻击 一般session是基于cookie进行用户识别的, cookie如果被截获,用户就会很容易受到跨站请求伪造的攻击。即使不用cookie,用重写url方式发送sessionId,那就更容易被截获信息了
- 扩展性不强 想象这么一个场景,若项目在多个服务器上部署,那我再其中一台登录了,称为A,session也保存到A中,万一下次我访问到另外一台服务器B怎么办?B上没有A的session呢?为了解决这个问题,我们需要将session保存到数据库中,所以每次保存这些session信息就是一个负担了,增加了服务器的存储压力。
token
token的意思是“令牌”,是服务端生成的一串加密字符串(服务器端并不进行保存),作为客户端进行请求的一个标识。当用户第一次登录后,服务器生成一个token并将此token返回给客户端浏览器,以后客户端只需带上这个token前来请求数据即可,无需再次带上用户名和密码。
浏览器会将接收到的token值存储在Local Storage中,浏览器再次访问时服务器端时,服务器对浏览器传来的token值进行解密,解密完成后进行用户数据的查询,如果查询成功,则通过认证,实现状态保持,所以,即使有了多台服务器,服务器也只是做了token的解密和用户数据的查询,它不需要在服务端去保留用户的认证信息或者会话信息,这就意味着基于token认证机制的应用不需要去考虑用户在哪一台服务器登录了,这就为应用的扩展提供了便利,同时服务器也不需要保存token,token的出现就解决了session的弊端,成为了session的替代品。
使用token进行用户认证的流程如下图: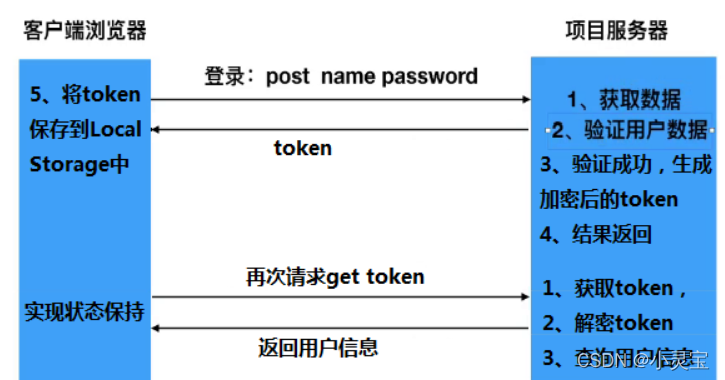
session与token的总结
token 是无状态的,后端不需要记录信息,每次请求过来进行解密就能得到对应信息。
session 是有状态的,需要后端每次去检索id的有效性。不同的session都需要进行保存,但也可以设置单点登录,减少保存的数据。
session与token的选择是空间与时间博弈,为什么这么说呢,是因为token不需要保存,不占存储空间,但每次访问都需要进行解密,消耗了一定的时间。
在一般的前后端分离项目中,token展现出了它的优势,成为了比session更好的选择
JWT
JWT其实就是一种被广泛使用的token,它的全称是JSON Web Token,它通过数字签名的方式,以JSON对象为载体,在不同的服务终端之间安全地传输信息。
JWT最常见的使用场景就是授权认证,一旦用户登录,后续每个请求都将包含JWT,系统在每次处理用户请求之前,都要先进行JWT安全校验,通过之后再进行处理。
JWT由3部分组成,用.拼接,如:
eyJhbGciOiJIUzI1NiIsInR5cCI6IkpXVCJ9.eyJzdWIiOiIxMjM0NTY3ODkwIiwibmFtZSI6IkpvaG4gRG9lIiwiYWRtaW4iOnRydWV9.TJVA95OrM7E2cBab30RMHrHDcEfxjoYZgeFONFh7HgQ
这三部分分别是:
- Header Header中保存了令牌类型type和所使用的的加密算法,例如:
{
  'typ': 'JWT',
  'alg': 'HS256'
}
- Payload Payload中包含的是请求体和其它一些数据,例如包含了和用户相关的一些信息
{
  "sub": "1234567890",
  "name": "John Doe",
  "admin": true
}
- Signature Signature签名属于jwt的第三部分。主要是把头部的base64UrlEncode与负载的base64UrlEncode拼接起来,再进行HMACSHA256加密等最终得到的结果作为签名部分。例如:
// javascriptvar encodedString =base64UrlEncode(header)+'.'+base64UrlEncode(payload);var signature =HMACSHA256(encodedString,'secret');// TJVA95OrM7E2cBab30RMHrHDcEfxjoYZgeFONFh7HgQ
登录及用户认证流程设计
假设我们要设计这样一个登录功能:用户输入用户名、密码以及图片验证码进行登录,用户认证功能则是对于用户的每次请求,都需要校验用户信息,若不正确,则拒绝请求
这里不同于最简单的用户名密码登录,加入了图片验证码,验证码是为了防止非正常用户伪造请求进行登录,是一个较为重要的功能。
根据我们之前对于token和JWT的介绍,我们知道,对于首次登录,浏览器是没有JWT信息的,用户需输入用户名、密码和验证码完成登录,后端对验证码、用户名、密码进行校验后,若校验成功,则返回JWT给前端,完成登录。登录后的每次请求,请求头都将携带Jwt进行身份认证,若认证成功则能访问后端接口
我们先来看首次登录,后端需要对验证码和用户信息进行校验,我们不妨先校验验证码,再校验用户名密码。
对于验证码的校验,我们知道一般的前后端分离使用token,不使用session,那么后台必须保证当前用户输入的验证码是用户开始请求页面时候的验证码,必须保证验证码的唯一性。举个例子:
A用户看到的验证码是:ABC;B用户看到的验证码是:DEF。后台存储了ABC和DEF这2个验证码,如果不限定A用户输入的验证码是ABC,那么当A用户碰巧输入DEF,然后用户名和密码也是正确的话,A用户也是可以登录系统的。
也就是说,每个用户的请求都需要对应一个唯一的验证码,这一切的麻烦都源于http本身是无状态协议,我们需要保存用户与验证码之间的对应关系,而现在我们又不能使用session,不能用SessionID的字段和验证码对应,那么我们该如何做呢?
有一种方式是前端生成一个随机数(UUID形式),保存在localstorage里,对应着某个用户,前端带上随机数参数访问后端接口,后端用加密算法加密该随机数rand,生成验证码,即verify_code = f(rand)。当用户提交验证码的时候,之前的随机数一起带过来,后端再通过之前的加密规则验证输入的验证码是否正确。也即构造了随机数和验证码的对应关系
其实上述做法有点类似于token的做法,不过这种做法有几个问题,一是验证码强行和一个前端给的一串随机数通过一个算法f产生了联系,前端的请求可以随意伪造,随机数参数也可以五花八门,可能会导致一些意想不到的bug发生,验证码应保持随机性和独立性,不应该和一个随机数强行通过函数f关联。二是采用这种方式,后端需要进行两次加密过程生成验证码,会造成不必要的时间开销。
我们采用另一种方式类似于session的做法来完成验证码校验过程,首先,我们还是得构造随机数(UUID形式,代表着某个用户),它和验证码一一对应。不过这次我们将随机数的生成把握在后端手里,毕竟老话说得好:作为一个后端,不要相信前端传过来的任何参数(手动狗头),把随机数的生成把握在后端手中,这种方式更加安全。我们仿照session的原理,牺牲一部分存储空间,将随机数和对应的验证码作为key-value键值对形式进行存储,然后将生成的随机数返回给前端,前端在登录请求时将该随机数以及用户输入的验证码传给后端,后端就能通过该随机数进行查询,校验输入的验证码和正确验证码是否一致。我们可以引入redis中间件来完成随机数和验证码的存储,因为一个验证码对应一个用户的一次登录过程,所以当验证成功时,我们将redis中存储的验证码和随机码删除,采用这种方式也不会消耗多少存储空间。
解决了令人头疼的验证码,登录流程就很清晰了,流程如下: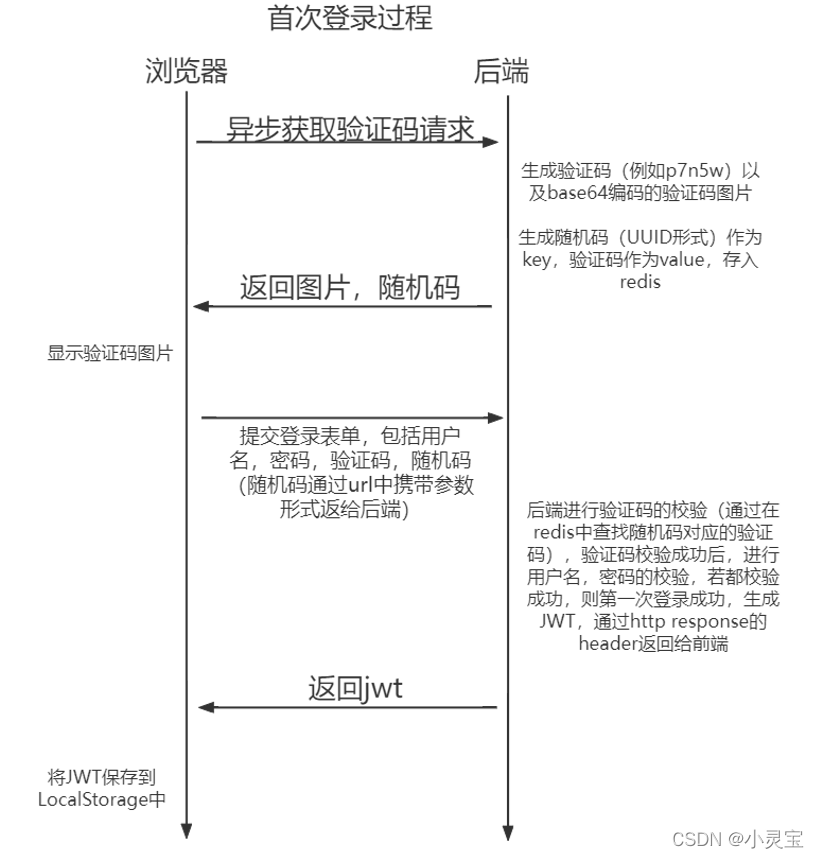
在首次登录过后,浏览器将保存jwt,在之后的所有请求中(包括再次登录请求),请求头都将携带Jwt进行身份认证,若认证成功则能访问后端接口。
弄清楚登录及用户认证流程后,接下来我们将使用SpringBoot整合Spring Security + JWT来实现上述流程,在使用Spring Security之前,我们先来看看它的基本原理,要不然用起来会很懵
前置知识:Spring Security
Spring Security是Spring家族中的安全框架,可以用来做用户验证和权限管理等。Spring Security是一款重型框架,不过功能十分强大。一般来说,如果项目中需要进行权限管理,具有多个角色和多种权限,我们可以使用Spring Security。如果是较为简单的项目,只需要控制一下某些接口只有登录后才能访问,则可以使用Shiro框架,Shiro也是一款安全框架,它是一款轻量级框架,功能没有Spring Security多,但使用起来要简单不少。
SpringSecurity 采用的是责任链的设计模式,是一堆过滤器链的组合,它有一条很长的过滤器链。 Spring Security 的执行流程图如下所示:
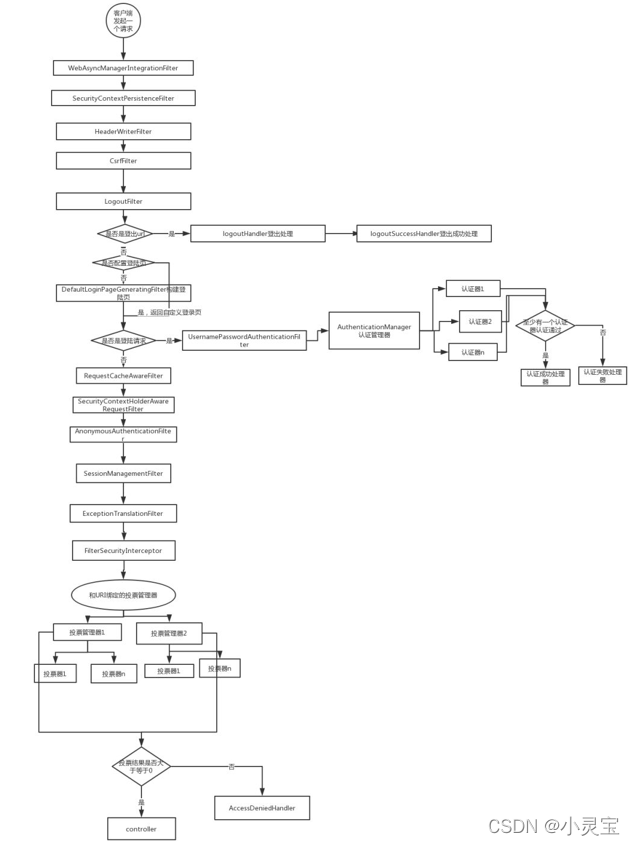
现在来一一解释每一个过滤器链的功能是什么:
- 1、WebAsyncManagerIntegrationFilter: 将 Security 上下文与 Spring Web 中用于处理异步请求映射的 WebAsyncManager 进行集成。
- 2、SecurityContextPersistenceFilter: 在每次请求处理之前将该请求相关的安全上下文信息加载到 SecurityContextHolder 中,然后在该次请求处理完成之后,将 SecurityContextHolder 中关于这次请求的信息存储到一个“仓储”中,然后将 SecurityContextHolder 中的信息清除,例如在Session中维护一个用户的安全信息就是这个过滤器处理的。
- 3、HeaderWriterFilter: 用于将头信息加入响应中。
- 4、CsrfFilter: 用于处理跨站请求伪造。
- 5、LogoutFilter: 用于处理退出登录。
- 6、UsernamePasswordAuthenticationFilter: 用于处理基于表单的登录请求,从表单中获取用户名和密码。默认情况下处理来自 /login 的请求。从表单中获取用户名和密码时,默认使用的表单 name 值为 username 和 password,这两个值可以通过设置这个过滤器的usernameParameter 和 passwordParameter 两个参数的值进行修改。
- 7、DefaultLoginPageGeneratingFilter: 如果没有配置登录页面,那系统初始化时就会配置这个过滤器,并且用于在需要进行登录时生成一个登录表单页面。
- 8、BasicAuthenticationFilter: 检测和处理 http basic 认证。
- 9、RequestCacheAwareFilter: 用来处理请求的缓存。
- 10、SecurityContextHolderAwareRequestFilter: 主要是包装请求对象request。
- 11、AnonymousAuthenticationFilter: 检测 SecurityContextHolder 中是否存在 Authentication 对象,如果不存在为其提供一个匿名 Authentication。
- 12、SessionManagementFilter: 管理 session 的过滤器
- 13、ExceptionTranslationFilter: 处理 AccessDeniedException 和 AuthenticationException 异常。
- 14、FilterSecurityInterceptor: 可以看做过滤器链的出口。
- 15、RememberMeAuthenticationFilter: 当用户没有登录而直接访问资源时, 从 cookie 里找出用户的信息, 如果 Spring Security 能够识别出用户提供的remember me cookie, 用户将不必填写用户名和密码, 而是直接登录进入系统,该过滤器默认不开启。
看到Spring Security这么复杂,我们可能已经崩溃了,但其实它并没有看上去那么吓人,因为Spring Security已经对很多过滤器部分提供了默认实现,程序员只需要按照自己项目的需求增加和修改少量代码即可。不过这么做也有个坏处,那就是不懂Spring Security原理的程序员,可能会看不懂代码中的登录逻辑,觉得莫名其妙就进行完用户验证了。
根据自己的项目需求实现SpringSecurity中的部分过滤器
我们可以根据自己的项目需求来设计一个security的认证方案,结合我们之前提到的登录和认证需求,可以得到这样一个流程: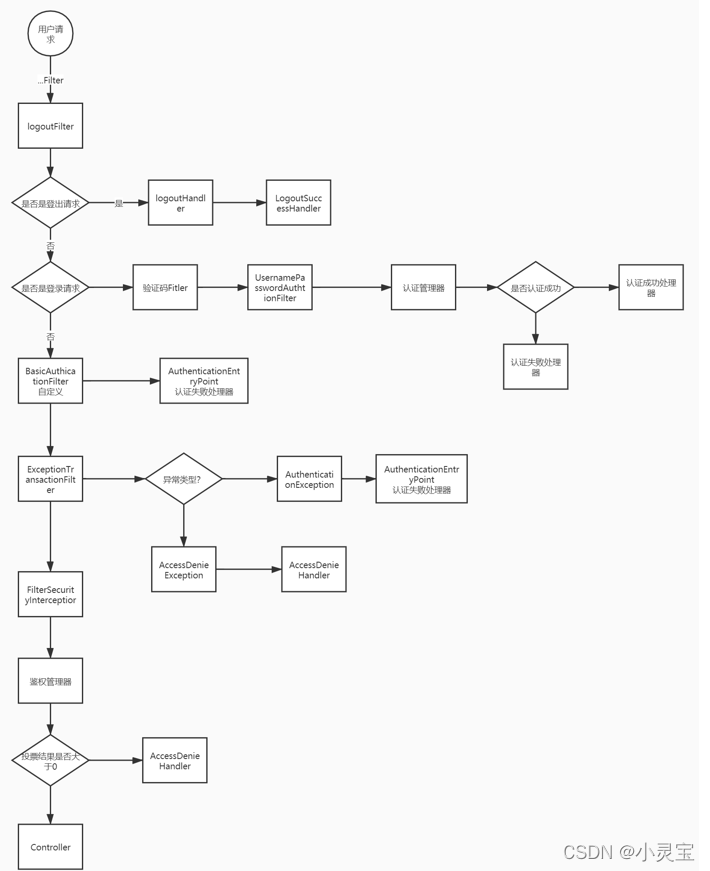
需要注意的是,SpringSecurity不提供图片验证码过滤器,因此我们在UsernamePasswordAuthenticationFilter前加入自定义的图片验证码过滤器
根据上述流程,我们列出需要自己实现的过滤器和处理器等:
- 1、LogoutSuccessHandler: 表示登出处理器
- 2、验证码过滤器Filter
- 3、登录认证成功、失败处理器
- 4、BasicAuthenticationFilter: 该过滤器用于普通http请求进行身份认证
- 5、AuthenticationEntryPoint: 表示认证失败处理器
- 6、AccessDenieHandler: 用户发起无权限访问请求的处理器
- 7、UserServiceDatils 接口: 该接口十分重要,用于从数据库中验证用户名密码
- 8、PasswordEncoder密码验证器
正式开始整合Spring Security和JWT
弄清了我们需要实现哪些代码,接下来我们就正式开始整合过程
pom.xml添加相应依赖
我们需添加Spring Security和JWT依赖,还需添加redis依赖,以及一些工具类,例如hutool,编码工具类,以及google的验证码工具类等:
<!-- springboot security --><dependency><groupId>org.springframework.boot</groupId><artifactId>spring-boot-starter-security</artifactId></dependency><dependency><groupId>org.springframework.boot</groupId><artifactId>spring-boot-starter-data-redis</artifactId></dependency><!-- jwt --><dependency><groupId>io.jsonwebtoken</groupId><artifactId>jjwt</artifactId><version>0.9.1</version></dependency><dependency><groupId>com.github.axet</groupId><artifactId>kaptcha</artifactId><version>0.0.9</version></dependency><!-- hutool工具类--><dependency><groupId>cn.hutool</groupId><artifactId>hutool-all</artifactId><version>5.3.3</version></dependency><dependency><groupId>org.apache.commons</groupId><artifactId>commons-lang3</artifactId><version>3.11</version></dependency><dependency><groupId>org.apache.commons</groupId><artifactId>commons-lang3</artifactId></dependency><dependency><groupId>commons-codec</groupId><artifactId>commons-codec</artifactId><version>1.15</version></dependency><dependency><groupId>org.springframework.boot</groupId><artifactId>spring-boot-starter-validation</artifactId></dependency>
写一个JWT工具类
我们需要写一个JWT工具类JwtUtils,该工具类需要有3个功能:生成JWT、解析JWT、判断JWT是否过期。直接上代码:
importio.jsonwebtoken.*;importlombok.Data;importorg.springframework.boot.context.properties.ConfigurationProperties;importorg.springframework.stereotype.Component;importjava.util.Date;@Data@Component@ConfigurationProperties(prefix ="xiaolinbao.jwt")publicclassJwtUtils{privatelong expire;privateString secret;privateString header;// 生成JWTpublicStringgenerateToken(String username){Date nowDate =newDate();Date expireDate =newDate(nowDate.getTime()+1000* expire);returnJwts.builder().setHeaderParam("typ","JWT").setSubject(username).setIssuedAt(nowDate).setExpiration(expireDate)// 7天过期.signWith(SignatureAlgorithm.HS512, secret).compact();}// 解析JWTpublicClaimsgetClaimsByToken(String jwt){try{returnJwts.parser().setSigningKey(secret).parseClaimsJws(jwt).getBody();}catch(Exception e){returnnull;}}// 判断JWT是否过期publicbooleanisTokenExpired(Claims claims){return claims.getExpiration().before(newDate());}}
我们可以配置JWT的有效时间和加密算法所需使用的秘钥,以及返回给前端时在Http response的Header中所叫的名字。这种配置项我们需写入application.yml中,然后使用@ConfigurationProperties注解接收,这样能便于我们日后修改配置。
使用@ConfigurationProperties注解可以读取配置文件中的信息,只要在 Bean 上添加上了这个注解,指定好配置文件中的前缀,那么对应的配置文件数据就会自动填充到 Bean 的属性中
application.yml中的配置如下:
xiaolinbao:jwt:header: Authorization
    expire:604800# 7天,s为单位secret: abcdefghabcdefghabcdefghabcdefgh
写登录认证成功、失败处理器LoginSuccessHandler、LoginFailureHandler
登录失败后,我们需要向前端发送错误信息,登录成功后,我们需要生成JWT,并将JWT返回给前端
我们先定义后端返回给前端的统一封装结果Result:
importlombok.Data;importjava.io.Serializable;@DatapublicclassResultimplementsSerializable{privateint code;privateString msg;privateObject data;publicstaticResultsucc(Object data){returnsucc(200,"操作成功", data);}publicstaticResultfail(String msg){returnfail(400, msg,null);}publicstaticResult succ (int code,String msg,Object data){Result result =newResult();
        result.setCode(code);
        result.setMsg(msg);
        result.setData(data);return result;}publicstaticResult fail (int code,String msg,Object data){Result result =newResult();
        result.setCode(code);
        result.setMsg(msg);
        result.setData(data);return result;}}
为什么要定义这个,以及为什么这么写,可以看我的这篇博客:SpringBoot + Vue前后端分离开发:全局异常处理及统一结果封装
接下来我们来写LoginSuccessHandler、LoginFailureHandler,直接上代码:
@ComponentpublicclassLoginSuccessHandlerimplementsAuthenticationSuccessHandler{@AutowiredJwtUtils jwtUtils;@OverridepublicvoidonAuthenticationSuccess(HttpServletRequest httpServletRequest,HttpServletResponse httpServletResponse,Authentication authentication)throwsIOException,ServletException{
        httpServletResponse.setContentType("application/json;charset=UTF-8");ServletOutputStream outputStream = httpServletResponse.getOutputStream();// 生成JWT,并放置到请求头中String jwt = jwtUtils.generateToken(authentication.getName());
        httpServletResponse.setHeader(jwtUtils.getHeader(), jwt);Result result =Result.succ("SuccessLogin");

        outputStream.write(JSONUtil.toJsonStr(result).getBytes(StandardCharsets.UTF_8));
        outputStream.flush();
        outputStream.close();}}
@ComponentpublicclassLoginFailureHandlerimplementsAuthenticationFailureHandler{@OverridepublicvoidonAuthenticationFailure(HttpServletRequest httpServletRequest,HttpServletResponse httpServletResponse,AuthenticationException e)throwsIOException,ServletException{
        httpServletResponse.setContentType("application/json;charset=UTF-8");ServletOutputStream outputStream = httpServletResponse.getOutputStream();String errorMessage ="用户名或密码错误";Result result;if(e instanceofCaptchaException){
            errorMessage ="验证码错误";
            result =Result.fail(errorMessage);}else{
            result =Result.fail(errorMessage);}
        outputStream.write(JSONUtil.toJsonStr(result).getBytes(StandardCharsets.UTF_8));
        outputStream.flush();
        outputStream.close();}}
LoginSuccessHandler、LoginFailureHandler分别需要实现AuthenticationSuccessHandler和AuthenticationFailureHandler接口,需分别重写接口的onAuthenticationSuccess、onAuthenticationFailure方法,onAuthenticationSuccess方法的参数为HttpServletRequest、HttpServletResponse以及Authentication,onAuthenticationFailure方法的第三个参数与其不同,是AuthenticationException,表示登录失败对应的异常
onAuthenticationFailure方法用于向前端返回错误信息,登录失败有可能是用户名密码错误,有可能是验证码错误,这里我们自定义了验证码错误的异常,它继承了Spring Security的AuthenticationException:
publicclassCaptchaExceptionextendsAuthenticationException{publicCaptchaException(String msg){super(msg);}}
SpringSecurity中的接口Authentication继承了接口Principal,Principal接口表示主体的抽象概念,可用于表示任何实体,例如个人、公司和登录 ID,一般用来表示用户认证相关信息,调用其getName方法可以获得用户名
写RedisUtil工具类以及验证码配置
RedisUtil工具类没什么好说的,网上有很多现成的
验证码生成使用的是谷歌的验证码工具类,配置类如下:
@ConfigurationpublicclassKaptchaConfig{@BeanDefaultKaptchaproducer(){Properties properties =newProperties();
        properties.put("kaptcha.border","no");
        properties.put("kaptcha.textproducer.font.color","black");
        properties.put("kaptcha.textproducer.char.space","4");
        properties.put("kaptcha.image.height","40");
        properties.put("kaptcha.image.width","120");
        properties.put("kaptcha.textproducer.font.size","30");Config config =newConfig(properties);DefaultKaptcha defaultKaptcha =newDefaultKaptcha();
        defaultKaptcha.setConfig(config);return defaultKaptcha;}}
DefaultKaptcha实现了Producer接口,Producer接口用于生成验证码,调用其createText()方法即可生成字符串验证码
后端写获取验证码接口
在前端渲染登录页面时,就会向后端请求获取验证码,该接口需将验证码图片用base64编码后传给前端,并将验证码对应的随机码也传给前端
直接上代码:
@AutowiredProducer producer;@GetMapping("/captcha")publicResultCaptcha()throwsIOException{String key = UUID.randomUUID().toString();String code = producer.createText();BufferedImage image = producer.createImage(code);ByteArrayOutputStream outputStream =newByteArrayOutputStream();ImageIO.write(image,"jpg", outputStream);BASE64Encoder encoder =newBASE64Encoder();String str ="data:image/jpeg;base64,";String base64Img = str + encoder.encode(outputStream.toByteArray());

        redisUtil.hset(Const.CAPTCHA_KEY, key, code,120);returnResult.succ(MapUtil.builder().put("userKey", key).put("captcherImg", base64Img).build());}
Const.CAPTCHA_KEY的值为"captcha",随机码作为key,验证码作为value,用hset存入redis的HASH数据结构中,有效期为120s
验证码过滤器CaptchaFilter
在验证码过滤器中,需要先判断请求是否是登录请求,若是登录请求,则进行验证码校验,从redis中通过userKey查找对应的验证码,看是否与前端所传验证码参数一致,当校验成功时,因为验证码是一次性使用的,一个验证码对应一个用户的一次登录过程,所以需用hdel将存储的HASH删除。当校验失败时,则交给登录认证失败处理器LoginFailureHandler进行处理
直接上代码:
@ComponentpublicclassCaptchaFilterextendsOncePerRequestFilter{@AutowiredRedisUtil redisUtil;@AutowiredLoginFailureHandler loginFailureHandler;@OverrideprotectedvoiddoFilterInternal(HttpServletRequest httpServletRequest,HttpServletResponse httpServletResponse,FilterChain filterChain)throwsServletException,IOException{String url = httpServletRequest.getRequestURI();if("/login".equals(url)&& httpServletRequest.getMethod().equals("POST")){// 校验验证码try{validate(httpServletRequest);}catch(CaptchaException e){// 交给认证失败处理器
                loginFailureHandler.onAuthenticationFailure(httpServletRequest, httpServletResponse, e);}}
        filterChain.doFilter(httpServletRequest, httpServletResponse);}// 校验验证码逻辑privatevoidvalidate(HttpServletRequest httpServletRequest){String code = httpServletRequest.getParameter("code");String key = httpServletRequest.getParameter("userKey");if(StringUtils.isBlank(code)||StringUtils.isBlank(key)){thrownewCaptchaException("验证码错误");}if(!code.equals(redisUtil.hget(Const.CAPTCHA_KEY, key))){thrownewCaptchaException("验证码错误");}// 若验证码正确,执行以下语句// 一次性使用
        redisUtil.hdel(Const.CAPTCHA_KEY, key);}}
CaptchaFilter继承了OncePerRequestFilter抽象类,该抽象类在每次请求时只执行一次过滤,即它的作用就是保证一次请求只通过一次filter,而不需要重复执行。CaptchaFilter需要重写其doFilterInternal方法来自定义处理逻辑
JWT过滤器JwtAuthenticationFilter
在首次登录成功后,LoginSuccessHandler将生成JWT,并返回给前端。在之后的所有请求中(包括再次登录请求),都会携带此JWT信息。我们需要写一个JWT过滤器JwtAuthenticationFilter,当前端发来的请求有JWT信息时,该过滤器将检验JWT是否正确以及是否过期,若检验成功,则获取JWT中的用户名信息,检索数据库获得用户实体类,并将用户信息告知Spring Security,后续我们就能调用security的接口获取到当前登录的用户信息。
若前端发的请求不含JWT,我们也不能拦截该请求,因为一般的项目都是允许匿名访问的,有的接口允许不登录就能访问,没有JWT也放行是安全的,因为我们可以通过Spring Security进行权限管理,设置一些接口需要权限才能访问,不允许匿名访问
直接上代码:
publicclassJwtAuthenticationFilterextendsBasicAuthenticationFilter{@AutowiredJwtUtils jwtUtils;@AutowiredUserDetailServiceImpl userDetailService;@AutowiredSysUserService sysUserService;publicJwtAuthenticationFilter(AuthenticationManager authenticationManager){super(authenticationManager);}@OverrideprotectedvoiddoFilterInternal(HttpServletRequest request,HttpServletResponse response,FilterChain chain)throwsIOException,ServletException{String jwt = request.getHeader(jwtUtils.getHeader());// 这里如果没有jwt,继续往后走,因为后面还有鉴权管理器等去判断是否拥有身份凭证,所以是可以放行的// 没有jwt相当于匿名访问,若有一些接口是需要权限的,则不能访问这些接口if(StrUtil.isBlankOrUndefined(jwt)){
            chain.doFilter(request, response);return;}Claims claim = jwtUtils.getClaimsByToken(jwt);if(claim ==null){thrownewJwtException("token 异常");}if(jwtUtils.isTokenExpired(claim)){thrownewJwtException("token 已过期");}String username = claim.getSubject();// 获取用户的权限等信息SysUser sysUser = sysUserService.getByUsername(username);// 构建UsernamePasswordAuthenticationToken,这里密码为null,是因为提供了正确的JWT,实现自动登录UsernamePasswordAuthenticationToken token =newUsernamePasswordAuthenticationToken(username,null, userDetailService.getUserAuthority(sysUser.getId()));SecurityContextHolder.getContext().setAuthentication(token);

        chain.doFilter(request, response);}}
JwtAuthenticationFilter继承了BasicAuthenticationFilter,该类用于普通http请求进行身份认证,该类有一个重要属性:AuthenticationManager,表示认证管理器,它是一个接口,它的默认实现类是ProviderManager,它与用户名密码认证息息相关,之后会详细解释。
若JWT验证成功,我们构建了一个
UsernamePasswordAuthenticationToken
对象,用于保存用户信息,之后将该对象交给SecurityContextHolder,set进它的context中,这样后续我们就能通过调用
SecurityContextHolder.getContext().getAuthentication().getPrincipal()
等方法获取到当前登录的用户信息了。
JWT认证失败处理器JwtAuthenticationEntryPoint
当BasicAuthenticationFilter认证失败的时候会进入AuthenticationEntryPoint,我们定义JWT认证失败处理器JwtAuthenticationEntryPoint,使其实现AuthenticationEntryPoint接口,该接口只有一个commence方法,表示认证失败的处理,我们重写该方法,向前端返回错误信息,不论是什么原因,JWT认证失败,我们就要求重新登录,所以返回的错误信息为请先登录
直接上代码:
@ComponentpublicclassJwtAuthenticationEntryPointimplementsAuthenticationEntryPoint{@Overridepublicvoidcommence(HttpServletRequest httpServletRequest,HttpServletResponse httpServletResponse,AuthenticationException e)throwsIOException,ServletException{

        httpServletResponse.setContentType("application/json;charset=UTF-8");
        httpServletResponse.setStatus(HttpServletResponse.SC_UNAUTHORIZED);ServletOutputStream outputStream = httpServletResponse.getOutputStream();Result result =Result.fail("请先登录");

        outputStream.write(JSONUtil.toJsonStr(result).getBytes(StandardCharsets.UTF_8));
        outputStream.flush();
        outputStream.close();}}
从数据库中验证用户名、密码:UserServiceDetails、AuthenticationManager、UserDetails
SpringSecurity中的认证管理器AuthenticationManager是一个抽象接口,用以提供各种认证方式。一般我们都使用从数据库中验证用户名、密码是否正确这种认证方式。
AuthenticationManager的默认实现类是ProviderManager,ProviderManager提供很多认证方式,DaoAuthenticationProvider是AuthenticationProvider的一种实现,可以通过实现UserDetailsService接口的方式来实现数据库查询方式登录。
UserDetailsService定义了loadUserByUsername方法,该方法通过用户名去查询出UserDetails并返回,UserDetails是一个接口,实际重写该方法时需要返回它的实现类
Spring Security在拿到UserDetails之后,会去对比Authentication(Authentication如何得到?我们使用的是默认的UsernamePasswordAuthenticationFilter,它会读取表单中的用户信息并生成Authentication),若密码正确,则Spring Secuity自动帮忙完成登录
上述类和接口的关系图如下: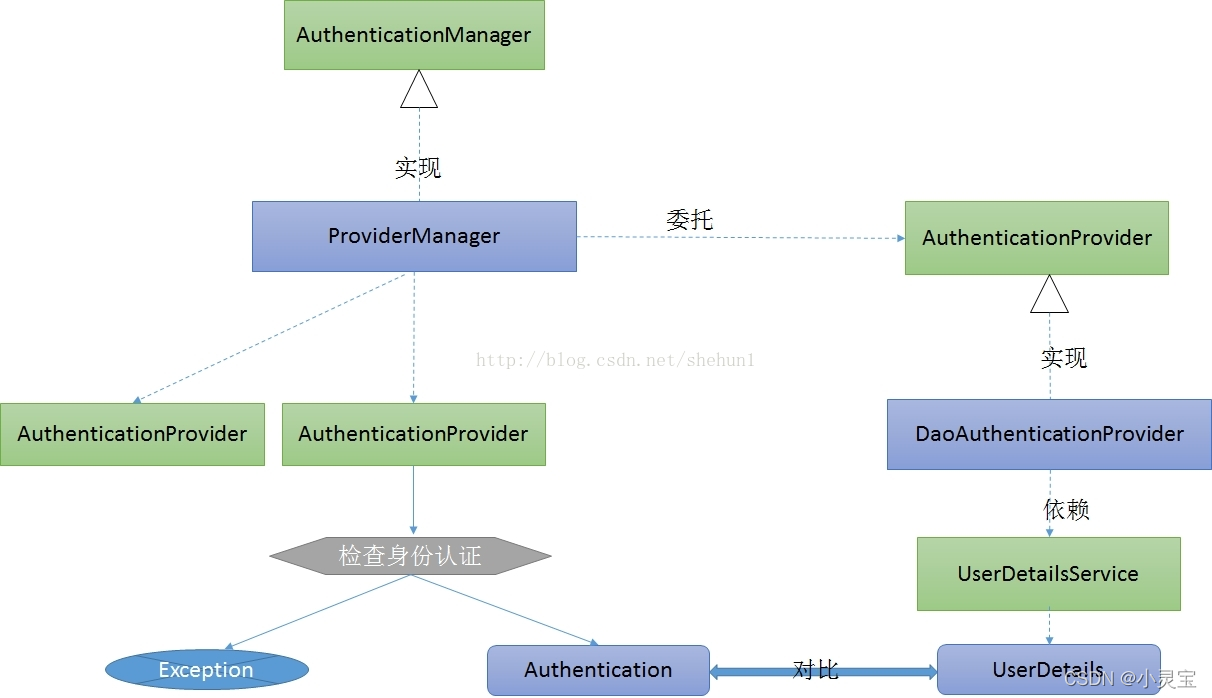
我们需定义一个UserDetails接口的实现类,称为AccountUser。该实现类需要实现UserDetails接口的所有方法,自由度较低,只能按框架规定的来,我们来看看UserDetails接口的所有方法: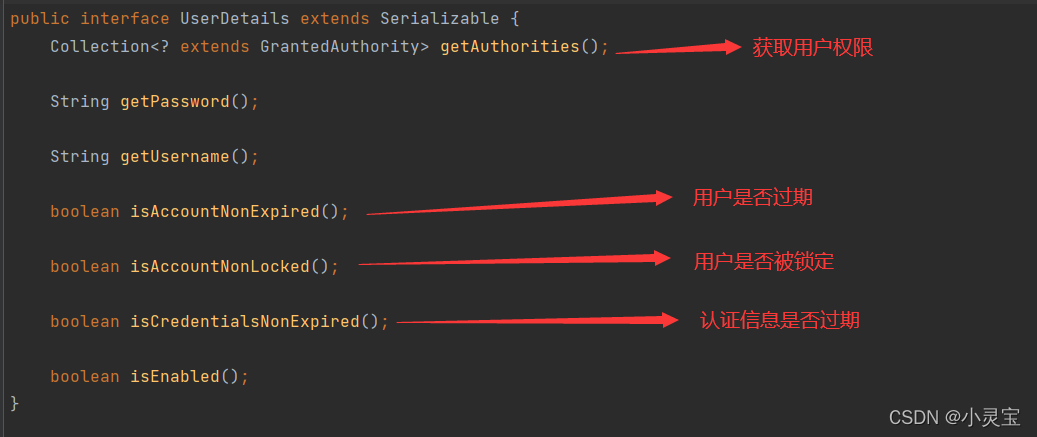
AccountUser的写法比较固定,主要包含权限、用户名、密码、是否过期、是否被锁定、认证信息是否过期、是否可用这几个属性,以及构造函数、重写的6个方法
直接上代码:
publicclassAccountUserimplementsUserDetails{privateLong userId;privatestaticfinallong serialVersionUID =540L;privatestaticfinalLog logger =LogFactory.getLog(User.class);privateString password;privatefinalString username;privatefinalCollection<?extendsGrantedAuthority> authorities;privatefinalboolean accountNonExpired;privatefinalboolean accountNonLocked;privatefinalboolean credentialsNonExpired;privatefinalboolean enabled;publicAccountUser(Long userId,String username,String password,Collection<?extendsGrantedAuthority> authorities){this(userId, username, password,true,true,true,true, authorities);}publicAccountUser(Long userId,String username,String password,boolean enabled,boolean accountNonExpired,boolean credentialsNonExpired,boolean accountNonLocked,Collection<?extendsGrantedAuthority> authorities){Assert.isTrue(username !=null&&!"".equals(username)&& password !=null,"Cannot pass null or empty values to constructor");this.userId = userId;this.username = username;this.password = password;this.enabled = enabled;this.accountNonExpired = accountNonExpired;this.credentialsNonExpired = credentialsNonExpired;this.accountNonLocked = accountNonLocked;this.authorities = authorities;}@OverridepublicCollection<?extendsGrantedAuthority>getAuthorities(){returnthis.authorities;}@OverridepublicStringgetPassword(){returnthis.password;}@OverridepublicStringgetUsername(){returnthis.username;}@OverridepublicbooleanisAccountNonExpired(){returnthis.accountNonExpired;}@OverridepublicbooleanisAccountNonLocked(){returnthis.accountNonLocked;}@OverridepublicbooleanisCredentialsNonExpired(){returnthis.credentialsNonExpired;}@OverridepublicbooleanisEnabled(){returnthis.enabled;}}
注意这里提供了两个构造函数,一是用户所有情况都正常,只需提供用户名、密码、权限、ID这几个参数,二是需提供所有参数的情况。一般我们都是使用第一种构造函数。
现在我们发现Spring Security是默认我们的项目有权限管理需求的,因此必须重写getAuthorities方法返回用户的权限,这里也可返回空,不过之后的代码也不好写。所以Spring Security其实是和权限管理功能绑定的,需要在数据库中设计用户表、菜单表、权限表等等。若我们的项目比较简单,不需要复杂的权限管理功能,那么可以直接用Shiro框架,否则使用Spring Security将比较麻烦。
定义了UserDetails接口的实现类,我们就需要定义UserDetailsService接口的实现类,重写其loadUserByUsername方法,该方法需使用用户名在数据库中查找用户信息返回,返回值需封装成UserDetails。直接上代码:
@ServicepublicclassUserDetailServiceImplimplementsUserDetailsService{@AutowiredSysUserService sysUserService;@OverridepublicUserDetailsloadUserByUsername(String username)throwsUsernameNotFoundException{SysUser sysUser = sysUserService.getByUsername(username);if(sysUser ==null){thrownewUsernameNotFoundException("用户名或密码错误");}returnnewAccountUser(sysUser.getId(), sysUser.getUsername(), sysUser.getPassword(),getUserAuthority(sysUser.getId()));}/**
     * 获取用户权限信息(角色、菜单权限)
     * @param userId
     * @return
     */publicList<GrantedAuthority>getUserAuthority(Long userId){// 实际怎么写以数据表结构为准,这里只是写个例子// 角色(比如ROLE_admin),菜单操作权限(比如sys:user:list)String authority = sysUserService.getUserAuthorityInfo(userId);// 比如ROLE_admin,ROLE_normal,sys:user:list,...returnAuthorityUtils.commaSeparatedStringToAuthorityList(authority);}}
实现了上述几个接口,从数据库中验证用户名、密码的过程将由框架帮我们完成,是封装隐藏了,所以不懂Spring Security的人可能会对登录过程有点懵,不知道是怎么判定用户名密码是否正确的。
无权限访问的处理:AccessDenieHandler
我们之前放行了匿名请求,但有的接口是需要权限的,当用户权限不足时,会进入AccessDenieHandler进行处理,我们定义JwtAccessDeniedHandler类来实现该接口,需重写其handle方法
当权限不足时,我们需要设置权限不足状态码403,并将错误信息返回给前端
直接上代码:
@ComponentpublicclassJwtAccessDeniedHandlerimplementsAccessDeniedHandler{@Overridepublicvoidhandle(HttpServletRequest httpServletRequest,HttpServletResponse httpServletResponse,AccessDeniedException e)throwsIOException,ServletException{
        httpServletResponse.setContentType("application/json;charset=UTF-8");
        httpServletResponse.setStatus(HttpServletResponse.SC_FORBIDDEN);ServletOutputStream outputStream = httpServletResponse.getOutputStream();Result result =Result.fail(e.getMessage());

        outputStream.write(JSONUtil.toJsonStr(result).getBytes(StandardCharsets.UTF_8));
        outputStream.flush();
        outputStream.close();}}
登出处理器LogoutSuccessHandler
在用户退出登录时,我们需将原来的JWT置为空返给前端,这样前端会将空字符串覆盖之前的jwt,JWT是无状态化的,销毁JWT是做不到的,JWT生成之后,只有等JWT过期之后,才会失效。因此我们采取置空策略来清除浏览器中保存的JWT。同时我们还要将我们之前置入SecurityContext中的用户信息进行清除,这可以通过创建SecurityContextLogoutHandler对象,调用它的logout方法完成
我们定义LogoutSuccessHandler接口的实现类JWTLogoutSuccessHandler,重写其onLogoutSuccess方法
直接上代码:
@ComponentpublicclassJWTLogoutSuccessHandlerimplementsLogoutSuccessHandler{@AutowiredJwtUtils jwtUtils;@OverridepublicvoidonLogoutSuccess(HttpServletRequest httpServletRequest,HttpServletResponse httpServletResponse,Authentication authentication)throwsIOException,ServletException{if(authentication !=null){newSecurityContextLogoutHandler().logout(httpServletRequest, httpServletResponse, authentication);}

        httpServletResponse.setContentType("application/json;charset=UTF-8");ServletOutputStream outputStream = httpServletResponse.getOutputStream();

        httpServletResponse.setHeader(jwtUtils.getHeader(),"");Result result =Result.succ("SuccessLogout");

        outputStream.write(JSONUtil.toJsonStr(result).getBytes(StandardCharsets.UTF_8));
        outputStream.flush();
        outputStream.close();}}
密码加密解密:PasswordEncoder
Spring Security所需的组件我们基本上都写得差不多了,还剩一个,那就是密码的加密解密,首先,在我们的数据库中,我们不可能存明文密码,这样非常不安全,因此Spring Security在拿到密码时,需要对密码进行解密加密过程,再和数据库中的密文进行比较。Spring Security拿到的密码也是密文,因为在前端的登录请求中,不可能将password字段设置成明文进行网络传输,这比数据库存明文更危险,因此,传到后端的password字段也是加密过的,于是,Spring Security需要先按前端的加密规则解密,再根据数据库的加密规则加密,最后和数据库中的密文进行比较
在这里我们设前端使用rsa对密码进行加密,后端使用BCrypt对密码进行加密
SpringSecurity提供了用于密码加密解密的工具类BCryptPasswordEncoder,不过我们需自定义PasswordEncoder类,并使其继承BCryptPasswordEncoder,因为security提供的该类并没有考虑前端加密的问题。我们需要重写其matches方法,该方法用于判断从前端接收的密码与数据库中的密码是否一致
直接上代码:
@NoArgsConstructorpublicclassPasswordEncoderextendsBCryptPasswordEncoder{@Overridepublicbooleanmatches(CharSequence rawPassword,String encodedPassword){// 接收到的前端的密码String pwd = rawPassword.toString();// 进行rsa解密try{
            pwd =RsaUtils.decryptByPrivateKey(RsaProperties.privateKey, pwd);}catch(Exception e){thrownewBadCredentialsException(e.getMessage());}if(encodedPassword !=null&& encodedPassword.length()!=0){returnBCrypt.checkpw(pwd, encodedPassword);}else{returnfalse;}}}
整合所有组件,进行Spring Security全局配置:SecurityConfig
到此为止,需要我们自己实现的过滤器和处理器等就都准备好了,接下来只需要进行Spring Security的全局配置了,我们定义SecurityConfig作为其配置,该类需要继承WebSecurityConfigurerAdapter(采用适配器模式,继承后SecurityConfig可以看做是WebSecurityConfigurer),SecurityConfig需要使用
@EnableGlobalMethodSecurity(prePostEnabled = true)
注解。
Spring Security默认是禁用注解的,要想开启注解,需要在继承WebSecurityConfigurerAdapter的类上加@EnableGlobalMethodSecurity注解,来判断用户对某个控制层的方法是否具有访问权限。
prePostEnabled = true
即可在方法前后进行权限检查
Security内置的权限注解如下:
@PreAuthorize:方法执行前进行权限检查
@PostAuthorize:方法执行后进行权限检查
@Secured:类似于 @PreAuthorize
可以在Controller的方法前添加这些注解表示接口需要什么权限。
配置类还需使用@EnableWebSecurity注解,该注解有两个作用:1. 加载了WebSecurityConfiguration配置类, 配置安全认证策略。2.加载了AuthenticationConfiguration, 配置了认证信息。AuthenticationConfiguration这个类的作用就是用来创建ProviderManager。
@EnableWebSecurity完成的工作便是加载了WebSecurityConfiguration,AuthenticationConfiguration这两个核心配置类,也就此将spring security的职责划分为了配置安全信息,配置认证信息两部分。
在SecurityConfig这个配置类中,我们需要将之前写的拦截器和处理器都autowire进来,并使用@Bean注解,声明JwtAuthenticationFilter和PasswordEncoder的构造函数。在JwtAuthenticationFilter的构造函数中,我们调用authenticationManager()方法给JwtAuthenticationFilter提供AuthenticationManager。
配置类需要重写configure方法进行配置,该方法有多种重载形式,我们使用其中的两种,其中一个用于配置url安全拦截配置,另一个用于AuthenticationManager配置UserDetailsService的实现类
直接上配置类代码:
@Configuration@EnableWebSecurity@RequiredArgsConstructor@EnableGlobalMethodSecurity(prePostEnabled =true)publicclassSecurityConfigextendsWebSecurityConfigurerAdapter{@AutowiredLoginFailureHandler loginFailureHandler;@AutowiredLoginSuccessHandler loginSuccessHandler;@AutowiredCaptchaFilter captchaFilter;@AutowiredJwtAuthenticationEntryPoint jwtAuthenticationEntryPoint;@AutowiredJwtAccessDeniedHandler jwtAccessDeniedHandler;@AutowiredUserDetailServiceImpl userDetailService;@AutowiredJWTLogoutSuccessHandler jwtLogoutSuccessHandler;@BeanJwtAuthenticationFilterjwtAuthenticationFilter()throwsException{JwtAuthenticationFilter jwtAuthenticationFilter =newJwtAuthenticationFilter(authenticationManager());return jwtAuthenticationFilter;}privatestaticfinalString[] URL_WHITELIST ={"/login","/logout","/captcha","/favicon.ico"};@BeanPasswordEncoderPasswordEncoder(){returnnewPasswordEncoder();}@Overrideprotectedvoidconfigure(HttpSecurity http)throwsException{
        http.cors().and().csrf().disable()// 登录配置.formLogin().successHandler(loginSuccessHandler).failureHandler(loginFailureHandler).and().logout().logoutSuccessHandler(jwtLogoutSuccessHandler)// 禁用session.and().sessionManagement().sessionCreationPolicy(SessionCreationPolicy.STATELESS)// 配置拦截规则.and().authorizeRequests().antMatchers(URL_WHITELIST).permitAll().anyRequest().authenticated()// 异常处理器.and().exceptionHandling().authenticationEntryPoint(jwtAuthenticationEntryPoint).accessDeniedHandler(jwtAccessDeniedHandler)// 配置自定义的过滤器.and().addFilter(jwtAuthenticationFilter())// 验证码过滤器放在UsernamePassword过滤器之前.addFilterBefore(captchaFilter,UsernamePasswordAuthenticationFilter.class);}@Overrideprotectedvoidconfigure(AuthenticationManagerBuilder auth)throwsException{
        auth.userDetailsService(userDetailService);}}
至此就大功告成了,SpringBoot整合Spring Security + JWT完毕
前端需要做什么
前端需要做两件事,一是登录成功后把JWT存到localStore里面,二是在每次请求之前,都在请求头中添加JWT
我们在store文件夹里创建index.js,将JWT定义为token,以及定义SET_TOKEN方法
Vue.use(Vuex)exportdefaultnewVuex.Store({
  state:{
    token:''},
  mutations:{SET_TOKEN:(state, token)=>{
      state.token = token
      localStorage.setItem("token", token)},},
  actions:{},
  modules:{}})
在登录成功时,接收后端传来的JWT并保存:
const jwt = res.headers['authorization']
this.$store.commit('SET_TOKEN', jwt)
在src文件夹下创建axios.js,进行axios配置,配置前置拦截器,为所有需要权限的请求装配上header的token信息:
const request = axios.create({
    timeout:5000,
    headers:{'Content-Type':"application/json; charset=utf-8"}})// 前置拦截,为所有需要权限的请求装配上header的token信息
request.interceptors.request.use(config=>{
    config.headers['Authorization']= localStorage.getItem("token")return config
})
最后说说SpringSecurity和Shiro的权限管理
之前提到了Security内置的权限注解,一般我们都是使用@PreAuthorize注解,在执行方法前判断是否具有相应权限,@PreAuthorize注解只有一个元素,就是value,表示需要哪种权限,使用例子如下:
@GetMapping("/list")@PreAuthorize("hasAuthority('sys:user:list')")publicResultlist(String username){Page<SysUser> pageData = sysUserService.page(getPage(),newQueryWrapper<SysUser>().like(StrUtil.isNotBlank(username),"username", username));
        pageData.getRecords().forEach(u ->{
            u.setSysRoles(sysRoleService.listRolesByUserId(u.getId()));});returnResult.succ(pageData);}
使用Spring Security,数据库一定要设计权限管理相应的表
而Shiro则比较简单,一般直接使用@RequiresAuthentication注解来区分需要登录才能访问的接口和匿名可访问接口,例如:
@RequiresAuthentication@GetMapping("/logout")publicResultlogout(){SecurityUtils.getSubject().logout();returnResult.succ(null);}
版权归原作者 小灵宝 所有, 如有侵权,请联系我们删除。