
前言
大家好,我是沐风晓月,本文首发于csdn 博客专栏【linux基本功-系统服务实战】,希望给想要学习架构的小伙伴打造一套系统的专栏,一起学习,共同进步。本文主要讲解nginx实现虚拟主机及访问认证
🏠个人主页:我是沐风晓月
🧑个人简介:大家好,我是沐风晓月,双一流院校计算机专业,阿里云博客专家
😉😉 💕 座右铭:先努力成长自己,再帮助更多的人,一起加油进步
🍺🍺🍺 💕欢迎大家:这里是CSDN,我总结知识的地方,喜欢的话请三连,有问题请私信
专栏持续更新中,欢迎关注,订阅:
文章目录
一. nginx配置文件
1.1 nginx常见的配置文件
主配置文件:
/usr/local/nginx/conf/nginx.conf
- 默认启动nginx时,使用的配置文件是:安装路径/conf/nginx.conf文件
- 可以在启动nginx时通过-c选项来指定要读取的配置文件
在conf路径下:
[root@mufeng41 conf]# pwd
/usr/local/nginx/conf
[root@mufeng41 conf]# ls
fastcgi.conf          fastcgi_params.default  mime.types          nginx.conf.default   uwsgi_params
fastcgi.conf.default  koi-utf                 mime.types.default  scgi_params          uwsgi_params.default
fastcgi_params        koi-win                 nginx.conf          scgi_params.default  win-utf
[root@mufeng41 conf]#
配置文件作用nginx.confnginx的基本配置文件mime.cnfMIME类型关联的扩展文件fastcgi.conf与fastcgi相关的配置proxy.conf与proxy相关的配置sites.conf配置nginx提供的网站,包括虚拟主机常见的配置文件及其作用
1.2 nginx主要的配置文件
主配置文件:
/usr/local/nginx/conf/nginx.conf
常用的配置如下:
[root@ mufeng ~]# cat /usr/local/nginx/conf/nginx.conf(1)user nginx;#配置运行nginx的用户(2)worker_processes 2;#初始的子进程数量(3)worker_connections 1024;#配置单个进程处理的最大请求连接数(4)server{#配置虚拟主机(5)listen #配置虚拟主机监听端口(6)server_name #配置服务器域名(7)location 匹配规则 {}#配置匹配特定的url(8)root #配置网站根目录(9)index #配置虚拟主机的默认首页(10)error_page 404 /404.html;#解释:当出现404的时候,要重定向到网站根目录下的404.html页面}
一个Nginx配置文件通常包含3个模块:
- 全局块:比如工作进程数,定义日志路径;
- Events块:设置处理轮询事件模型,每个工作进程最大连接数及http层的keep-alive超时时间;
- http块:路由匹配、静态文件服务器、反向代理、负载均衡等。
1.3 nginx配置文件示例
# 全局块
 user mufeng;
 worker_processes  2;## 默认1,一般建议设成CPU核数1-2倍
 error_log  logs/error.log;## 错误日志路径
 pid  logs/nginx.pid;## 进程id# Events块
 events {# 使用epoll的I/O 模型处理轮询事件。# 可以不设置,nginx会根据操作系统选择合适的模型
   use epoll;# 工作进程的最大连接数量, 默认1024个
   worker_connections  2048;# http层面的keep-alive超时时间
   keepalive_timeout 60;# 客户端请求头部的缓冲区大小
   client_header_buffer_size 2k;}# http块
 http {

   include mime.types;# 导入文件扩展名与文件类型映射表
   default_type application/octet-stream;# 默认文件类型# 日志格式及access日志路径
   log_format   main '$remote_addr - $remote_user [$time_local]  $status ''"$request" $body_bytes_sent "$http_referer" ''"$http_user_agent" "$http_x_forwarded_for"';
   access_log   logs/access.log  main;# 允许sendfile方式传输文件,默认为off。
   sendfile     on;
   tcp_nopush   on;# sendfile开启时才开启。# http server块# 简单反向代理
   server {
     listen       80;
     server_name  domain2.com www.domain2.com;
     access_log   logs/domain2.access.log  main;# 转发动态请求到web应用服务器
     location / {
       proxy_pass      http://127.0.0.1:8000;
       deny 192.24.40.8;# 拒绝的ip
       allow 192.24.40.6;# 允许的ip   }# 错误页面
     error_page   500502503504  /50x.html;
         location = /50x.html {
             root   html;}}# 负载均衡
   upstream backend_server {
     server 192.168.0.1:8000 weight=5;# weight越高,权重越大
     server 192.168.0.2:8000 weight=1;
     server 192.168.0.3:8000;
     server 192.168.0.4:8001 backup;# 热备}

   server {
     listen          80;
     server_name     big.server.com;
     access_log      logs/big.server.access.log main;

     charset utf-8;
     client_max_body_size 10M;# 限制用户上传文件大小,默认1M

     location / {# 使用proxy_pass转发请求到通过upstream定义的一组应用服务器
       proxy_pass      http://backend_server;
       proxy_set_header X-Forwarded-For $proxy_add_x_forwarded_for;
       proxy_set_header Host $http_host;
       proxy_redirect off;
       proxy_set_header X-Real-IP  $remote_addr;}}}
二. nginx虚拟主机配置
2.1 基于端口的虚拟主机
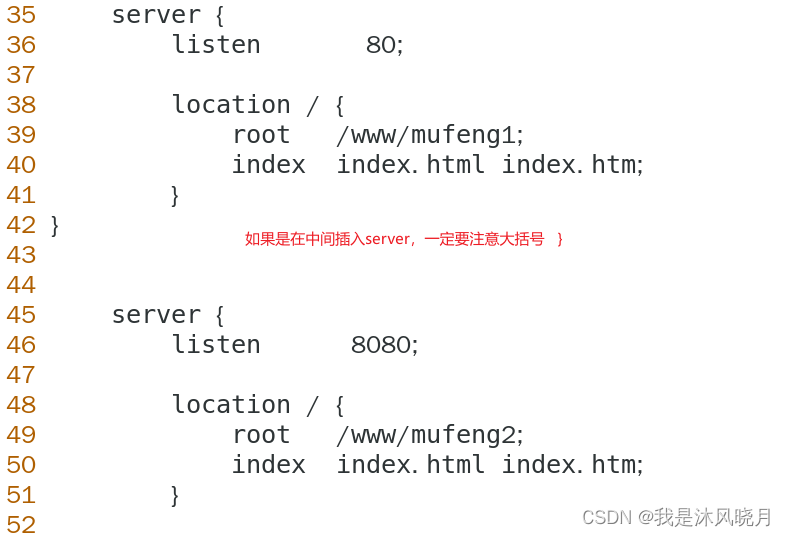
[root@mufeng41 conf]# vim nginx.conf
插入代码:
 server {
        listen       80;

        location / {
            root   /www/mufeng1;
            index  index.html index.htm;}}

    server {
        listen       8080;

        location / {
            root   /www/mufeng2;
            index  index.html index.htm;}}
[root@mufeng41 nginx-1.22.1]# nginx -t
nginx: the configuration file /usr/local/nginx/conf/nginx.conf syntax is ok
nginx: configuration file /usr/local/nginx/conf/nginx.conf test is successful
[root@mufeng41 nginx-1.22.1]#
- 重启服务
[root@mufeng41 nginx-1.22.1]# nginx -s reload
- 需要创建配置文件中提到的两个目录:
[root@mufeng41 conf]# mkdir -p /www/mufeng1 /www/mufeng2[root@mufeng41 conf]# touch /www/mufeng1/index.html[root@mufeng41 conf]# touch /www/mufeng2/index.html[root@mufeng41 conf]# echo "this is mufeng1" >> /www/mufeng1/index.html[root@mufeng41 conf]# echo "this is mufeng2" >> /www/mufeng2/index.html
- 测试:
[root@mufeng41 nginx-1.22.1]# curl 192.168.1.41:8080
this is mufeng2
[root@mufeng41 nginx-1.22.1]# curl 192.168.1.41:80
有时候你测试出来,显示的是默认访问html,删掉默认的html里的内容即可:
[root@mufeng41 html]# rm -rf ./*[root@mufeng41 html]# ls[root@mufeng41 html]# pwd
/usr/local/nginx/html
[root@mufeng41 html]# curl 192.168.1.41:80
this is mufeng1
2.2 基于ip的虚拟主机
- 修改ip地址
[root@mufeng41 html]# ifconfig |head  -3
ens32: flags=4163<UP,BROADCAST,RUNNING,MULTICAST>  mtu 1500
        inet 192.168.1.41  netmask 255.255.255.0  broadcast 192.168.1.255
        inet6 fe80::d524:3f3e:45ed:79c3  prefixlen 64  scopeid 0x20<link>[root@mufeng41 html]# ifconfig ens32:0 192.168.1.42/24[root@mufeng41 html]# ifconfig |grep inet
        inet 192.168.1.41  netmask 255.255.255.0  broadcast 192.168.1.255
        inet6 fe80::d524:3f3e:45ed:79c3  prefixlen 64  scopeid 0x20<link>
        inet 192.168.1.42  netmask 255.255.255.0  broadcast 192.168.1.255
        inet 127.0.0.1  netmask 255.0.0.0
        inet6 ::1  prefixlen 128  scopeid 0x10<host>
        inet 192.168.122.1  netmask 255.255.255.0  broadcast 192.168.122.255
[root@mufeng41 html]#
- 修改配置文件
[root@mufeng41 mufeng2]# cat /usr/local/nginx/conf/nginx.conf |tail -22#}

 server {
        listen       192.168.1.41:80;
    server_name  192.168.1.41;
        location / {
            root   /www/mufeng1;
            index  index.html index.htm;}}

    server {
        listen       192.168.1.42:80;
        server_name  192.168.1.42;
        location / {
            root   /www/mufeng2;
            index  index.html index.htm;}}}
- 修改hosts
[root@mufeng41 mufeng2]# cat /etc/hosts127.0.0.1   localhost localhost.localdomain localhost4 localhost4.localdomain4
::1         localhost localhost.localdomain localhost6 localhost6.localdomain6
192.168.1.41 mufeng41
192.168.1.42 mufeng41
- 重启nginx 需要注意的是: 有时候使用重新加载不生效
[root@mufeng41 mufeng2]# nginx -s stop[root@mufeng41 mufeng2]# nginx [root@mufeng41 mufeng2]# nginx -t
nginx: the configuration file /usr/local/nginx/conf/nginx.conf syntax is ok
nginx: configuration file /usr/local/nginx/conf/nginx.conf test is successful
- 测试:
[root@mufeng41 mufeng2]# curl 192.168.1.41
this is mufeng1
[root@mufeng41 mufeng2]# curl 192.168.1.42
this is mufeng2
2.3 基于域名的虚拟机主机
- 修改/etc/hosts
[root@mufeng41 mufeng2]# vim /etc/hosts[root@mufeng41 mufeng2]# cat !$cat /etc/hosts
127.0.0.1   localhost localhost.localdomain localhost4 localhost4.localdomain4
::1         localhost localhost.localdomain localhost6 localhost6.localdomain6
192.168.1.41 www.laoxin.com
192.168.1.41 www.itlaoxin.com
[root@mufeng41 mufeng2]#
- 修改配置文件
[root@mufeng41 mufeng2]# cat /usr/local/nginx/conf/nginx.conf |tail -22#}

 server {
        listen       80;
    server_name  www.laoxin.com;
        location / {
            root   /www/mufeng1;
            index  index.html index.htm;}}

    server {
        listen      80;
        server_name  www.itlaoxin.com;
        location / {
            root   /www/mufeng2;
            index  index.html index.htm;}}}[root@mufeng41 mufeng2]#
- 重新加载配置
root@mufeng41 mufeng2]# nginx -t
nginx: the configuration file /usr/local/nginx/conf/nginx.conf syntax is ok
nginx: configuration file /usr/local/nginx/conf/nginx.conf test is successful
[root@mufeng41 mufeng2]# nginx -s reload[root@mufeng41 mufeng2]#
- 测试
[root@mufeng41 mufeng2]# nginx -s stop[root@mufeng41 mufeng2]# nginx[root@mufeng41 mufeng2]# curl www.itlaoxin.com
this is mufeng2
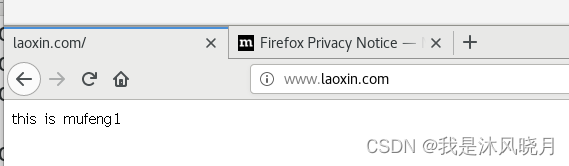
[root@mufeng41 mufeng2]# curl www.laoxin.com
this is mufeng1
[root@mufeng41 mufeng2
三. 访问认证配置
3.1 基于域名的访问
- 修改配置文件
[root@mufeng41 mufeng2]# cat /usr/local/nginx/conf/nginx.conf |tail -15
server {
listen 80;
server_name www.laoxin.com;
location / {
root /www/mufeng1;
index index.html index.htm;
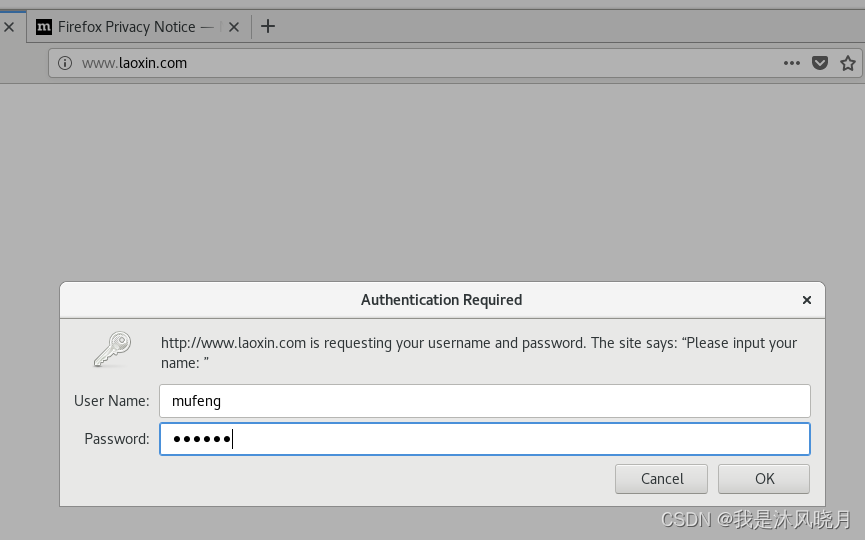
auth_basic "Please input your name: ";
auth_basic_user_file /usr/local/nginx/conf/nginxpasswd;}}}
- 添加用户和密码
[root@mufeng41 mufeng2]# useradd mufeng[root@mufeng41 mufeng2]# yum install http* -y &>/dev/null && echo "ok"
ok
[root@mufeng41 mufeng2]# htpasswd -c /usr/local/nginx/conf/nginxpasswd mufeng
New password:
Re-type new password:
Adding password for user mufeng
[root@mufeng41 mufeng2]#
- 重启服务
[root@mufeng41 mufeng2]# nginx -s stop[root@mufeng41 mufeng2]# nginx
- 测试
3.2 基于IP的访问控制
 server {
        listen       80;
        server_name  www.laoxin.com;
        location / {
            root   /www/mufeng1;
            index  index.html index.htm;
            allow 192.168.1.;#allow允许某个ip地址或者网段访问
            deny all; 拒绝某个ip或者网段访问
        }}#备注:优先级自上而下,优先匹配上面的规则,其次是下面的规则
总结
💕 好啦,这就是今天要分享给大家的全部内容了,我们下期再见!
💕 博客主页:mufeng.blog.csdn.net
💕 本文由沐风晓月原创,首发于CSDN博客
💕 全力以赴,持续学习,不负如来不负卿,喜欢的话记得点赞收藏哦
本文转载自: https://blog.csdn.net/wisdom_futrue/article/details/129701542
版权归原作者 我是沐风晓月 所有, 如有侵权,请联系我们删除。
版权归原作者 我是沐风晓月 所有, 如有侵权,请联系我们删除。