
认证与授权(Authentication and Authorization)
一般意义来说的应用访问安全性,都是围绕认证(Authentication)和授权(Authorization)这两个核心概念来展开的。
即:
- 首先需要确定用户身份,
- 再确定这个用户是否有访问指定资源的权限。
认证这块的解决方案很多,主流的有
CAS
、
SAML2
、
OAUTH2
等(不巧这几个都用过-_-),我们常说的单点登录方案(SSO)说的就是这块,
授权的话主流的就是spring security和shiro。
shiro比较轻量级,相比较而言spring security确实架构比较复杂。但是shiro与 ss,掌握一个即可。
这里尼恩给大家做一下系统化、体系化的梳理,供后面的小伙伴参考,提升大家的 3高 架构、设计、开发水平。
注:本文以 PDF 持续更新,最新尼恩 架构笔记、面试题 的PDF文件,请从下面的链接获取: 码云
什么是OAuth2 ?
OAuth2是一个关于授权的开放标准,核心思路是通过各类认证手段(具体什么手段OAuth2不关心)认证用户身份,
并颁发token(令牌),使得第三方应用可以使用该令牌在限定时间、限定范围访问指定资源。
主要涉及的RFC规范有【
RFC6749
(整体授权框架)】、【
RFC6750
(令牌使用)】、【
RFC6819
(威胁模型)】这几个,一般我们需要了解的就是
RFC6749
。
获取令牌的方式主要有四种,分别是
授权码模式
、
简单模式
、
密码模式
、
客户端模式
,
总之:OAuth2是一个授权(Authorization)协议。
认证(Authentication)证明的你是不是这个人,
而授权(Authorization)则是证明这个人有没有访问这个资源(Resource)的权限。
下面这张图来源于OAuth 2.0 authorization framework RFC Document,是OAuth2的一个抽象流程。
     +--------+                               +---------------+
     ||--(A)- Authorization Request ->|   Resource    ||||     Owner     |||<-(B)-- Authorization Grant ---||||                               +---------------+
     ||||                               +---------------+
     ||--(C)-- Authorization Grant -->| Authorization || Client ||     Server    |||<-(D)----- Access Token -------||||                               +---------------+
     ||||                               +---------------+
     ||--(E)----- Access Token ------>|    Resource   ||||     Server    |||<-(F)--- Protected Resource ---||
     +--------+                               +---------------+
先来解释一下上图的名词:
Resource Owner:资源所有者,即用户
Client:客户端应用程序(Application)
Authorization Server:授权服务器
Resource Server:资源服务器
再来解释一下上图的大致流程:
(A) 用户连接客户端应用程序以后,客户端应用程序要求用户给予授权
(B) 用户同意给予客户端应用程序授权
(C) 客户端应用程序使用上一步获得的授权(Grant),向授权服务器申请令牌
(D) 授权服务器对客户端应用程序的授权(Grant)进行验证后,确认无误,发放令牌
(E) 客户端应用程序使用令牌,向资源服务器申请获取资源
(F) 资源服务器确认令牌无误,同意向客户端应用程序开放资源
从上面的流程可以看出,如何获取授权(Grant)才是关键。
在OAuth2中有4种授权类型:
- Authorization Code(授权码模式):
功能最完整、流程最严密的授权模式。通过第三方应用程序服务器与认证服务器进行互动。广泛用于各种第三方认证。
- Implicit(简化模式):
不通过第三方应用程序服务器,直接在浏览器中向认证服务器申请令牌,更加适用于移动端的App及没有服务器端的第三方单页面应用。
- Resource Owner Password(密码模式):
用户向客户端服务器提供自己的用户名和密码,用户对客户端高度信任的情况下使用,比如公司、组织的内部系统,SSO。
- Client Credentials(客户端模式):
客户端服务器以自己的名义,而不是以用户的名义,向认证服务器进行认证。
下面主要讲最常用的(1)和(3)。此外,还有一个模式叫Refresh Token,也会在下面介绍。
Resource Owner Password(密码模式)
     +----------+
     | Resource ||  Owner   |||
     +----------+
          v|    Resource Owner
         (A) Password Credentials
          |v
     +---------+                                  +---------------+
     ||>--(B)---- Resource Owner ------->||||         Password Credentials     | Authorization || Client  ||     Server    |||<--(C)---- Access Token ---------<||||(w/ Optional Refresh Token)||
     +---------+                                  +---------------+

            Figure 5: Resource Owner Password Credentials Flow
它的步骤如下:
(A) 用户(Resource Owner)向客户端(Client)提供用户名和密码。
(B) 客户端将用户名和密码发给认证服务器(Authorization Server),向后者请求令牌。
(C) 认证服务器确认无误后,向客户端提供访问令牌。
Authorization Code(授权码模式)
     +----------+
     | Resource ||   Owner  |||
     +----------+
          ^
          |(B)
     +----|-----+          Client Identifier      +---------------+
     |         -+----(A)-- & Redirection URI ---->|||  User-   || Authorization ||  Agent  -+----(B)-- User authenticates --->|     Server    ||||||         -+----(C)-- Authorization Code ---<||
     +-|----|---+                                 +---------------+
       ||                                         ^      v(A)(C)||||||
       ^    v||
     +---------+                                      ||||>---(D)-- Authorization Code ---------'      |
     |  Client |          & Redirection URI                  |
     |         |                                             |
     |         |<---(E)----- Access Token -------------------'
     +---------+       (w/ Optional Refresh Token)

   Note: The lines illustrating steps (A), (B), and (C) are broken into
   two parts as they pass through the user-agent.
它的步骤如下:
(A) 用户(Resource Owner)通过用户代理(User-Agent)访问客户端(Client),客户端索要授权,并将用户导向认证服务器(Authorization Server)。
(B) 用户选择是否给予客户端授权。
(C) 假设用户给予授权,认证服务器将用户导向客户端事先指定的"重定向URI"(redirection URI),同时附上一个授权码。
(D) 客户端收到授权码,附上早先的"重定向URI",向认证服务器申请令牌。这一步是在客户端的后台的服务器上完成的,对用户不可见。
(E) 认证服务器核对了授权码和重定向URI,确认无误后,向客户端发送访问令牌(access token)和更新令牌(refresh token)。这一步也对用户不可见。
令牌刷新(refresh token)
  +--------+                                           +---------------+
  ||--(A)------- Authorization Grant --------->||||||||<-(B)----------- Access Token -------------||||& Refresh Token             ||||||||                            +----------+   ||||--(C)---- Access Token ---->||||||||||||<-(D)- Protected Resource --| Resource || Authorization || Client ||  Server  ||     Server    |||--(E)---- Access Token ---->||||||||||||<-(F)- Invalid Token Error -||||||                            +----------+   ||||||||--(G)----------- Refresh Token ----------->||||||||<-(H)----------- Access Token -------------||
  +--------+           & Optional Refresh Token        +---------------+
当我们申请token后,Authorization Server不仅给了我们Access Token,还有Refresh Token。
当Access Token过期后,我们用Refresh Token访问/refresh端点就可以拿到新的Access Token了。
我们要和Spring Security的认证(Authentication)区别开来,
什么是Spring Security?
Spring Security是一套安全框架,可以基于RBAC(基于角色的权限控制)对用户的访问权限进行控制,
核心思想是通过一系列的filter chain来进行拦截过滤,对用户的访问权限进行控制,
spring security 的核心功能主要包括:
- 认证 (你是谁)
- 授权 (你能干什么)
- 攻击防护 (防止伪造身份)
其核心就是一组过滤器链,项目启动后将会自动配置。最核心的就是 Basic Authentication Filter 用来认证用户的身份,一个在spring security中一种过滤器处理一种认证方式。
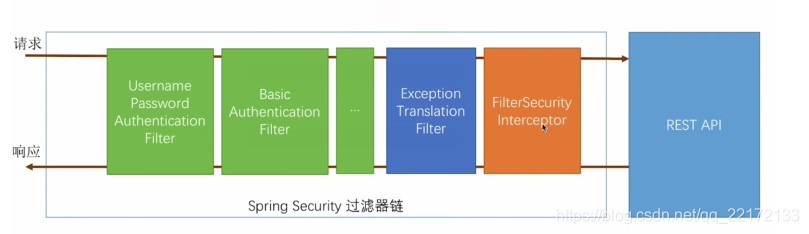
比如,对于username password认证过滤器来说,
会检查是否是一个登录请求;
是否包含username 和 password (也就是该过滤器需要的一些认证信息) ;
如果不满足则放行给下一个。
下一个按照自身职责判定是否是自身需要的信息,basic的特征就是在请求头中有 Authorization:Basic eHh4Onh4 的信息。中间可能还有更多的认证过滤器。最后一环是 FilterSecurityInterceptor,这里会判定该请求是否能进行访问rest服务,判断的依据是 BrowserSecurityConfig中的配置,如果被拒绝了就会抛出不同的异常(根据具体的原因)。Exception Translation Filter 会捕获抛出的错误,然后根据不同的认证方式进行信息的返回提示。
注意:绿色的过滤器可以配置是否生效,其他的都不能控制。
二、入门项目
首先创建spring boot项目HelloSecurity,其pom主要依赖如下:
<dependencies><dependency><groupId>org.springframework.boot</groupId><artifactId>spring-boot-starter-thymeleaf</artifactId></dependency><dependency><groupId>org.springframework.boot</groupId><artifactId>spring-boot-starter-test</artifactId><scope>test</scope></dependency><dependency><groupId>org.springframework.security</groupId><artifactId>spring-security-test</artifactId><scope>test</scope></dependency></dependencies>
然后在src/main/resources/templates/目录下创建页面:
home.html
<!DOCTYPEhtml><htmlxmlns="http://www.w3.org/1999/xhtml"xmlns:th="http://www.thymeleaf.org"xmlns:sec="http://www.thymeleaf.org/thymeleaf-extras-springsecurity3"><head><title>Spring Security Example</title></head><body><h1>Welcome!</h1><p>Click <ath:href="@{/hello}">here</a> to see a greeting.</p></body></html>
我们可以看到, 在这个简单的视图中包含了一个链接: “/hello”. 链接到了如下的页面,Thymeleaf模板如下:
hello.html
<!DOCTYPEhtml><htmlxmlns="http://www.w3.org/1999/xhtml"xmlns:th="http://www.thymeleaf.org"xmlns:sec="http://www.thymeleaf.org/thymeleaf-extras-springsecurity3"><head><title>Hello World!</title></head><body><h1>Hello world!</h1></body></html>
Web应用程序基于Spring MVC。 因此,你需要配置Spring MVC并设置视图控制器来暴露这些模板。 如下是一个典型的Spring MVC配置类。在src/main/java/hello目录下(所以java都在这里):
@ConfigurationpublicclassMvcConfigextendsWebMvcConfigurerAdapter{@OverridepublicvoidaddViewControllers(ViewControllerRegistry registry){
        registry.addViewController("/home").setViewName("home");
        registry.addViewController("/").setViewName("home");
        registry.addViewController("/hello").setViewName("hello");
        registry.addViewController("/login").setViewName("login");}}
addViewControllers()方法(覆盖WebMvcConfigurerAdapter中同名的方法)添加了四个视图控制器。 两个视图控制器引用名称为“home”的视图(在home.html中定义),另一个引用名为“hello”的视图(在hello.html中定义)。 第四个视图控制器引用另一个名为“login”的视图。 将在下一部分中创建该视图。此时,可以跳过来使应用程序可执行并运行应用程序,而无需登录任何内容。然后启动程序如下:
@SpringBootApplicationpublicclassApplication{publicstaticvoidmain(String[] args)throwsThrowable{SpringApplication.run(Application.class, args);}}
2、加入Spring Security
假设你希望防止未经授权的用户访问“/ hello”。 此时,如果用户点击主页上的链接,他们会看到问候语,请求被没有被拦截。 你需要添加一个障碍,使得用户在看到该页面之前登录。您可以通过在应用程序中配置Spring Security来实现。 如果Spring Security在类路径上,则Spring Boot会使用“Basic认证”来自动保护所有HTTP端点。 同时,你可以进一步自定义安全设置。首先在pom文件中引入:
<dependencies>
    ...
        <dependency><groupId>org.springframework.boot</groupId><artifactId>spring-boot-starter-security</artifactId></dependency>
    ...
</dependencies>
如下是安全配置,使得只有认证过的用户才可以访问到问候页面:
@Configuration@EnableWebSecuritypublicclassWebSecurityConfigextendsWebSecurityConfigurerAdapter{@Overrideprotectedvoidconfigure(HttpSecurity http)throwsException{
        http
            .authorizeRequests().antMatchers("/","/home").permitAll().anyRequest().authenticated().and().formLogin().loginPage("/login").permitAll().and().logout().permitAll();}@AutowiredpublicvoidconfigureGlobal(AuthenticationManagerBuilder auth)throwsException{
        auth
            .inMemoryAuthentication().withUser("user").password("password").roles("USER");}}
WebSecurityConfig类使用了@EnableWebSecurity注解 ,以启用Spring Security的Web安全支持,并提供Spring MVC集成。它还扩展了WebSecurityConfigurerAdapter,并覆盖了一些方法来设置Web安全配置的一些细节。
configure(HttpSecurity)方法定义了哪些URL路径应该被保护,哪些不应该。具体来说,“/”和“/ home”路径被配置为不需要任何身份验证。所有其他路径必须经过身份验证。
当用户成功登录时,它们将被重定向到先前请求的需要身份认证的页面。有一个由 loginPage()指定的自定义“/登录”页面,每个人都可以查看它。
对于configureGlobal(AuthenticationManagerBuilder) 方法,它将单个用户设置在内存中。该用户的用户名为“user”,密码为“password”,角色为“USER”。
现在我们需要创建登录页面。前面我们已经配置了“login”的视图控制器,因此现在只需要创建登录页面即可:
login.html
<!DOCTYPEhtml><htmlxmlns="http://www.w3.org/1999/xhtml"xmlns:th="http://www.thymeleaf.org"xmlns:sec="http://www.thymeleaf.org/thymeleaf-extras-springsecurity3"><head><title>Spring Security Example </title></head><body><divth:if="${param.error}">
            Invalid username and password.
        </div><divth:if="${param.logout}">
            You have been logged out.
        </div><formth:action="@{/login}"method="post"><div><label> User Name : <inputtype="text"name="username"/></label></div><div><label> Password: <inputtype="password"name="password"/></label></div><div><inputtype="submit"value="Sign In"/></div></form></body></html>
你可以看到,这个Thymeleaf模板只是提供一个表单来获取用户名和密码,并将它们提交到“/ login”。 根据配置,Spring Security提供了一个拦截该请求并验证用户的过滤器。 如果用户未通过认证,该页面将重定向到“/ login?error”,并在页面显示相应的错误消息。 注销成功后,我们的应用程序将发送到“/ login?logout”,我们的页面显示相应的登出成功消息。最后,我们需要向用户提供一个显示当前用户名和登出的方法。 更新hello.html 向当前用户打印一句hello,并包含一个“注销”表单,如下所示:
<!DOCTYPEhtml><htmlxmlns="http://www.w3.org/1999/xhtml"xmlns:th="http://www.thymeleaf.org"xmlns:sec="http://www.thymeleaf.org/thymeleaf-extras-springsecurity3"><head><title>Hello World!</title></head><body><h1th:inline="text">Hello [[${#httpServletRequest.remoteUser}]]!</h1><formth:action="@{/logout}"method="post"><inputtype="submit"value="Sign Out"/></form></body></html>
三、参数详解
1、注解 @EnableWebSecurity
在 Spring boot 应用中使用 Spring Security,用到了 @EnableWebSecurity注解,官方说明为,该注解和 @Configuration 注解一起使用, 注解 WebSecurityConfigurer 类型的类,或者利用@EnableWebSecurity 注解继承 WebSecurityConfigurerAdapter的类,这样就构成了 Spring Security 的配置。
2、抽象类 WebSecurityConfigurerAdapter
一般情况,会选择继承 WebSecurityConfigurerAdapter 类,其官方说明为:WebSecurityConfigurerAdapter 提供了一种便利的方式去创建 WebSecurityConfigurer的实例,只需要重写 WebSecurityConfigurerAdapter 的方法,即可配置拦截什么URL、设置什么权限等安全控制。
3、方法 configure(AuthenticationManagerBuilder auth) 和 configure(HttpSecurity http)
Demo 中重写了 WebSecurityConfigurerAdapter 的两个方法:
/**
     * 通过 {@link #authenticationManager()} 方法的默认实现尝试获取一个 {@link AuthenticationManager}.
     * 如果被复写, 应该使用{@link AuthenticationManagerBuilder} 来指定 {@link AuthenticationManager}.
     *
     * 例如, 可以使用以下配置在内存中进行注册公开内存的身份验证{@link UserDetailsService}:
     *
     * // 在内存中添加 user 和 admin 用户
     * @Override
     * protected void configure(AuthenticationManagerBuilder auth) {
     *     auth
     *       .inMemoryAuthentication().withUser("user").password("password").roles("USER").and()
     *         .withUser("admin").password("password").roles("USER", "ADMIN");
     * }
     *
     * // 将 UserDetailsService 显示为 Bean
     * @Bean
     * @Override
     * public UserDetailsService userDetailsServiceBean() throws Exception {
     *     return super.userDetailsServiceBean();
     * }
     *
     */protectedvoidconfigure(AuthenticationManagerBuilder auth)throwsException{this.disableLocalConfigureAuthenticationBldr =true;}/**
     * 复写这个方法来配置 {@link HttpSecurity}.
     * 通常,子类不能通过调用 super 来调用此方法,因为它可能会覆盖其配置。 默认配置为:
     *
     * http.authorizeRequests().anyRequest().authenticated().and().formLogin().and().httpBasic();
     *
     */protectedvoidconfigure(HttpSecurity http)throwsException{
    logger.debug("Using default configure(HttpSecurity). If subclassed this will potentially override subclass configure(HttpSecurity).");

    http
        .authorizeRequests().anyRequest().authenticated().and().formLogin().and().httpBasic();}
4、final 类 HttpSecurity
HttpSecurity 常用方法及说明:
方法说明
openidLogin()
用于基于 OpenId 的验证
headers()
将安全标头添加到响应
cors()
配置跨域资源共享( CORS )
sessionManagement()
允许配置会话管理
portMapper()
允许配置一个
PortMapper
(
HttpSecurity#(getSharedObject(class))
),其他提供
SecurityConfigurer
的对象使用
PortMapper
从 HTTP 重定向到 HTTPS 或者从 HTTPS 重定向到 HTTP。默认情况下,Spring Security使用一个
PortMapperImpl
映射 HTTP 端口8080到 HTTPS 端口8443,HTTP 端口80到 HTTPS 端口443
jee()
配置基于容器的预认证。 在这种情况下,认证由Servlet容器管理
x509()
配置基于x509的认证
rememberMe
允许配置“记住我”的验证
authorizeRequests()
允许基于使用
HttpServletRequest
限制访问
requestCache()
允许配置请求缓存
exceptionHandling()
允许配置错误处理
securityContext()
在
HttpServletRequests
之间的
SecurityContextHolder
上设置
SecurityContext
的管理。 当使用
WebSecurityConfigurerAdapter
时,这将自动应用
servletApi()
将
HttpServletRequest
方法与在其上找到的值集成到
SecurityContext
中。 当使用
WebSecurityConfigurerAdapter
时,这将自动应用
csrf()
添加 CSRF 支持,使用
WebSecurityConfigurerAdapter
时,默认启用
logout()
添加退出登录支持。当使用
WebSecurityConfigurerAdapter
时,这将自动应用。默认情况是,访问URL”/ logout”,使HTTP Session无效来清除用户,清除已配置的任何
#rememberMe()
身份验证,清除
SecurityContextHolder
,然后重定向到”/login?success”
anonymous()
允许配置匿名用户的表示方法。 当与
WebSecurityConfigurerAdapter
结合使用时,这将自动应用。 默认情况下,匿名用户将使用
org.springframework.security.authentication.AnonymousAuthenticationToken
表示,并包含角色 “ROLE_ANONYMOUS”
formLogin()
指定支持基于表单的身份验证。如果未指定
FormLoginConfigurer#loginPage(String)
,则将生成默认登录页面
oauth2Login()
根据外部OAuth 2.0或OpenID Connect 1.0提供程序配置身份验证
requiresChannel()
配置通道安全。为了使该配置有用,必须提供至少一个到所需信道的映射
httpBasic()
配置 Http Basic 验证
addFilterAt()
在指定的Filter类的位置添加过滤器
5、类 AuthenticationManagerBuilder
/**
* {@link SecurityBuilder} used to create an {@link AuthenticationManager}. Allows for
* easily building in memory authentication, LDAP authentication, JDBC based
* authentication, adding {@link UserDetailsService}, and adding
* {@link AuthenticationProvider}'s.
*/
意思是,AuthenticationManagerBuilder 用于创建一个 AuthenticationManager,让我能够轻松的实现内存验证、LADP验证、基于JDBC的验证、添加UserDetailsService、添加AuthenticationProvider。
使用yaml文件定义的用户名、密码登录
在application.yaml中定义用户名密码:
spring:security:user:name: root
      password: root
使用root/root登录,可以正常访问
/hello
。
使用代码中指定的用户名、密码登录
- 使用configure(AuthenticationManagerBuilder) 添加认证。
- 使用configure(httpSecurity) 添加权限
@ConfigurationpublicclassMySecurityConfigurationextendsWebSecurityConfigurerAdapter{@Overrideprotectedvoidconfigure(AuthenticationManagerBuilder auth)throwsException{
        auth
                .inMemoryAuthentication().withUser("admin")// 添加用户admin.password("{noop}admin")// 不设置密码加密.roles("ADMIN","USER")// 添加角色为admin,user.and().withUser("user")// 添加用户user.password("{noop}user").roles("USER").and().withUser("tmp")// 添加用户tmp.password("{noop}tmp").roles();// 没有角色}@Overrideprotectedvoidconfigure(HttpSecurity http)throwsException{
        http
                .authorizeRequests().antMatchers("/product/**").hasRole("USER")//添加/product/** 下的所有请求只能由user角色才能访问.antMatchers("/admin/**").hasRole("ADMIN")//添加/admin/** 下的所有请求只能由admin角色才能访问.anyRequest().authenticated()// 没有定义的请求,所有的角色都可以访问(tmp也可以)。.and().formLogin().and().httpBasic();}}
添加AdminController、ProductController
@RestController@RequestMapping("/admin")publicclassAdminController{@RequestMapping("/hello")publicStringhello(){return"admin hello";}}
@RestController@RequestMapping("/product")publicclassProductController{@RequestMapping("/hello")publicStringhello(){return"product hello";}}
通过上面的设置,访问http://localhost:8080/admin/hello只能由admin访问,http://localhost:8080/product/hello admin和user都可以访问,http://localhost:8080/hello 所有用户(包括tmp)都可以访问。
使用数据库的用户名、密码登录
添加依赖
<dependency><groupId>org.springframework.boot</groupId><artifactId>spring-boot-starter-data-jpa</artifactId></dependency><dependency><groupId>mysql</groupId><artifactId>mysql-connector-java</artifactId></dependency>
添加数据库配置
spring:datasource:url: jdbc:mysql://localhost:3306/demo?useUnicode=true&characterEncoding=utf8&serverTimezone=Asia/Shanghaiusername: root
    password: root
    driver-class-name: com.mysql.cj.jdbc.Driver
配置spring-security认证和授权
@ConfigurationpublicclassMySecurityConfigurationextendsWebSecurityConfigurerAdapter{@AutowiredprivateUserDetailsService userDetailsService;@Overrideprotectedvoidconfigure(AuthenticationManagerBuilder auth)throwsException{
        auth.userDetailsService(userDetailsService)// 设置自定义的userDetailsService.passwordEncoder(passwordEncoder());}@Overrideprotectedvoidconfigure(HttpSecurity http)throwsException{
        http
                .authorizeRequests().antMatchers("/product/**").hasRole("USER").antMatchers("/admin/**").hasRole("ADMIN").anyRequest().authenticated()//.and().formLogin().and().httpBasic().and().logout().logoutUrl("/logout");}@BeanpublicPasswordEncoderpasswordEncoder(){returnNoOpPasswordEncoder.getInstance();// 使用不使用加密算法保持密码//        return new BCryptPasswordEncoder();}}
如果需要使用
BCryptPasswordEncoder
,可以先在测试环境中加密后放到数据库中:
@Testvoidencode(){BCryptPasswordEncoder bCryptPasswordEncoder =newBCryptPasswordEncoder();String password = bCryptPasswordEncoder.encode("user");String password2 = bCryptPasswordEncoder.encode("admin");System.out.println(password);System.out.println(password2);}
配置自定义UserDetailsService来进行验证
@Component("userDetailsService")publicclassCustomUserDetailsServiceimplementsUserDetailsService{@AutowiredUserRepository userRepository;@OverridepublicUserDetailsloadUserByUsername(String login)throwsUsernameNotFoundException{// 1. 查询用户User userFromDatabase = userRepository.findOneByLogin(login);if(userFromDatabase ==null){//log.warn("User: {} not found", login);thrownewUsernameNotFoundException("User "+ login +" was not found in db");//这里找不到必须抛异常}// 2. 设置角色Collection<GrantedAuthority> grantedAuthorities =newArrayList<>();GrantedAuthority grantedAuthority =newSimpleGrantedAuthority(userFromDatabase.getRole());
      grantedAuthorities.add(grantedAuthority);returnneworg.springframework.security.core.userdetails.User(login,
            userFromDatabase.getPassword(), grantedAuthorities);}}
配置JPA中的UserRepository
@RepositorypublicinterfaceUserRepositoryextendsJpaRepository<User,Long>{UserfindOneByLogin(String login);}
添加数据库数据
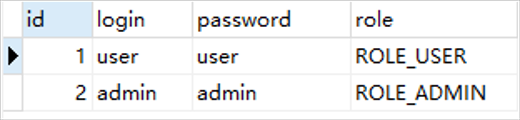
CREATETABLE`user`(`id`int(28)NOTNULL,`login`varchar(255)COLLATE utf8mb4_general_ci DEFAULTNULL,`password`varchar(255)COLLATE utf8mb4_general_ci DEFAULTNULL,`role`varchar(255)COLLATE utf8mb4_general_ci DEFAULTNULL,PRIMARYKEY(`id`))ENGINE=InnoDBDEFAULTCHARSET=utf8mb4 COLLATE=utf8mb4_general_ci;INSERTINTO`demo`.`user`(`id`,`login`,`password`,`role`)VALUES(1,'user','user','ROLE_USER');INSERTINTO`demo`.`user`(`id`,`login`,`password`,`role`)VALUES(2,'admin','admin','ROLE_ADMIN');
默认角色前缀必须是
ROLE_,因为spring-security会在授权的时候自动使用match中的角色加上
ROLE_后进行比较。
四:获取登录信息
@RequestMapping("/info")publicStringinfo(){String userDetails =null;Object principal =SecurityContextHolder.getContext().getAuthentication().getPrincipal();if(principal instanceofUserDetails){
        userDetails =((UserDetails)principal).getUsername();}else{
        userDetails = principal.toString();}return userDetails;}
使用
SecurityContextHolder.getContext().getAuthentication().getPrincipal();
获取当前的登录信息。
五: Spring Security 核心组件
SecurityContext
SecurityContext是安全的上下文,所有的数据都是保存到SecurityContext中。
可以通过
SecurityContext
获取的对象有:
- Authentication
SecurityContextHolder
SecurityContextHolder用来获取SecurityContext中保存的数据的工具。通过使用静态方法获取SecurityContext的相对应的数据。
SecurityContext context =SecurityContextHolder.getContext();
Authentication
Authentication表示当前的认证情况,可以获取的对象有:
UserDetails:获取用户信息,是否锁定等额外信息。
Credentials:获取密码。
isAuthenticated:获取是否已经认证过。
Principal:获取用户,如果没有认证,那么就是用户名,如果认证了,返回UserDetails。
UserDetails
publicinterfaceUserDetailsextendsSerializable{Collection<?extendsGrantedAuthority>getAuthorities();StringgetPassword();StringgetUsername();booleanisAccountNonExpired();booleanisAccountNonLocked();booleanisCredentialsNonExpired();booleanisEnabled();}
UserDetailsService
UserDetailsService可以通过loadUserByUsername获取UserDetails对象。该接口供spring security进行用户验证。
通常使用自定义一个CustomUserDetailsService来实现UserDetailsService接口,通过自定义查询UserDetails。
AuthenticationManager
AuthenticationManager用来进行验证,如果验证失败会抛出相对应的异常。
PasswordEncoder
密码加密器。通常是自定义指定。
BCryptPasswordEncoder:哈希算法加密
NoOpPasswordEncoder:不使用加密
六:spring security session 无状态支持权限控制(前后分离)
spring security会在默认的情况下将认证信息放到HttpSession中。
但是对于我们的前后端分离的情况,如app,小程序,web前后分离等,httpSession就没有用武之地了。这时我们可以通过
configure(httpSecurity)设置spring security是否使用httpSession。
@ConfigurationpublicclassMySecurityConfigurationextendsWebSecurityConfigurerAdapter{// code...@Overrideprotectedvoidconfigure(HttpSecurity http)throwsException{
        http
                .sessionManagement()//设置无状态,所有的值如下所示。.sessionCreationPolicy(SessionCreationPolicy.STATELESS)// code...}// code...}
共有四种值,其中默认的是ifRequired。
- always – a session will always be created if one doesn’t already exist,没有session就创建。
- ifRequired – a session will be created only if required (default),如果需要就创建(默认)。
- never – the framework will never create a session itself but it will use one if it already exists
- stateless – no session will be created or used by Spring Security 不创建不使用session
由于前后端不通过保存session和cookie来进行判断,所以为了保证spring security能够记录登录状态,所以需要传递一个值,让这个值能够自我验证来源,同时能够得到数据信息。选型我们选择JWT。对于java客户端我们选择使用jjwt。
添加依赖
<dependency><groupId>io.jsonwebtoken</groupId><artifactId>jjwt-api</artifactId><version>0.11.2</version></dependency><dependency><groupId>io.jsonwebtoken</groupId><artifactId>jjwt-impl</artifactId><version>0.11.2</version><scope>runtime</scope></dependency><dependency><groupId>io.jsonwebtoken</groupId><artifactId>jjwt-jackson</artifactId><!-- or jjwt-gson if Gson is preferred --><version>0.11.2</version><scope>runtime</scope></dependency>
创建工具类JWTProvider
JWTProvider需要至少提供两个方法,一个用来创建我们的token,另一个根据token获取Authentication。
provider需要保证Key密钥是唯一的,使用init()构建,否则会抛出异常。
@Component@Slf4jpublicclassJWTProvider{privateKey key;// 私钥privatelong tokenValidityInMilliseconds;// 有效时间privatelong tokenValidityInMillisecondsForRememberMe;// 记住我有效时间@AutowiredprivateJJWTProperties jjwtProperties;// jwt配置参数@AutowiredprivateUserRepository userRepository;@PostConstructpublicvoidinit(){byte[] keyBytes;String secret = jjwtProperties.getSecret();if(StringUtils.hasText(secret)){
            log.warn("Warning: the JWT key used is not Base64-encoded. "+"We recommend using the `jhipster.security.authentication.jwt.base64-secret` key for optimum security.");
            keyBytes = secret.getBytes(StandardCharsets.UTF_8);}else{
            log.debug("Using a Base64-encoded JWT secret key");
            keyBytes =Decoders.BASE64.decode(jjwtProperties.getBase64Secret());}this.key =Keys.hmacShaKeyFor(keyBytes);// 使用mac-sha算法的密钥this.tokenValidityInMilliseconds =1000* jjwtProperties.getTokenValidityInSeconds();this.tokenValidityInMillisecondsForRememberMe =1000* jjwtProperties.getTokenValidityInSecondsForRememberMe();}publicStringcreateToken(Authentication authentication,boolean rememberMe){long now =(newDate()).getTime();Date validity;if(rememberMe){
            validity =newDate(now +this.tokenValidityInMillisecondsForRememberMe);}else{
            validity =newDate(now +this.tokenValidityInMilliseconds);}User user = userRepository.findOneByLogin(authentication.getName());Map<String,Object> map =newHashMap<>();
        map.put("sub",authentication.getName());
        map.put("user",user);returnJwts.builder().setClaims(map)// 添加body.signWith(key,SignatureAlgorithm.HS512)// 指定摘要算法.setExpiration(validity)// 设置有效时间.compact();}publicAuthenticationgetAuthentication(String token){Claims claims =Jwts.parserBuilder().setSigningKey(key).build().parseClaimsJws(token).getBody();// 根据token获取bodyUser principal;Collection<?extendsGrantedAuthority> authorities;
        principal = userRepository.findOneByLogin(claims.getSubject());
        authorities = principal.getAuthorities();returnnewUsernamePasswordAuthenticationToken(principal, token, authorities);}}
注意这里我们创建的User需要实现UserDetails对象,这样我们可以根据
principal.getAuthorities()获取到权限,如果不实现UserDetails,那么需要自定义authorities并添加到UsernamePasswordAuthenticationToken中。
@Data@Entity@Table(name="user")publicclassUserimplementsUserDetails{@Id@ColumnprivateLong id;@ColumnprivateString login;@ColumnprivateString password;@ColumnprivateString role;@Override// 获取权限,这里就用简单的方法// 在spring security中,Authorities既可以是ROLE也可以是AuthoritiespublicCollection<?extendsGrantedAuthority>getAuthorities(){returnCollections.singleton(newSimpleGrantedAuthority(role));}@OverridepublicStringgetUsername(){return login;}@OverridepublicbooleanisAccountNonExpired(){returntrue;}@OverridepublicbooleanisAccountNonLocked(){returnfalse;}@OverridepublicbooleanisCredentialsNonExpired(){returntrue;}@OverridepublicbooleanisEnabled(){returntrue;}}
创建登录成功,登出成功处理器
登录成功后向前台发送jwt。
认证成功,返回jwt:
publicclassMyAuthenticationSuccessHandlerimplementsAuthenticationSuccessHandler{voidonAuthenticationSuccess(HttpServletRequest request,HttpServletResponse response,Authentication authentication)throwsIOException,ServletException{PrintWriter writer = response.getWriter();
        writer.println(jwtProvider.createToken(authentication,true));}}
登出成功:
publicclassMyLogoutSuccessHandlerimplementsLogoutSuccessHandler{voidonLogoutSuccess(HttpServletRequest var1,HttpServletResponse var2,Authentication var3)throwsIOException,ServletException{PrintWriter writer = response.getWriter();
        writer.println("logout success");
        writer.flush();}}
设置登录、登出、取消csrf防护
登出无法对token进行失效操作,可以使用数据库保存token,然后在登出时删除该token。
@ConfigurationpublicclassMySecurityConfigurationextendsWebSecurityConfigurerAdapter{// code...@Overrideprotectedvoidconfigure(HttpSecurity http)throwsException{
       http
           // code...// 添加登录处理器.formLogin().loginProcessingUrl("/login").successHandler((request, response, authentication)->{PrintWriter writer = response.getWriter();
           writer.println(jwtProvider.createToken(authentication,true));})// 取消csrf防护.and().csrf().disable()// code...// 添加登出处理器.and().logout().logoutUrl("/logout").logoutSuccessHandler((HttpServletRequest request,HttpServletResponse response,Authentication authentication)->{PrintWriter writer = response.getWriter();
           writer.println("logout success");
           writer.flush();})// code...}// code...}
使用JWT集成spring-security
添加Filter供spring-security解析token,并向securityContext中添加我们的用户信息。
在UsernamePasswordAuthenticationFilter.class之前我们需要执行根据token添加authentication。关键方法是从jwt中获取authentication,然后添加到securityContext中。
在SecurityConfiguration中需要设置Filter添加的位置。
创建自定义Filter,用于jwt获取authentication:
@Slf4jpublicclassJWTFilterextendsGenericFilterBean{privatefinalstaticString HEADER_AUTH_NAME ="auth";privateJWTProvider jwtProvider;publicJWTFilter(JWTProvider jwtProvider){this.jwtProvider = jwtProvider;}@OverridepublicvoiddoFilter(ServletRequest servletRequest,ServletResponse servletResponse,FilterChain filterChain)throwsIOException,ServletException{try{HttpServletRequest httpServletRequest =(HttpServletRequest) servletRequest;String authToken = httpServletRequest.getHeader(HEADER_AUTH_NAME);if(StringUtils.hasText(authToken)){// 从自定义tokenProvider中解析用户Authentication authentication =this.jwtProvider.getAuthentication(authToken);SecurityContextHolder.getContext().setAuthentication(authentication);}// 调用后续的Filter,如果上面的代码逻辑未能复原“session”,SecurityContext中没有想过信息,后面的流程会检测出"需要登录"
            filterChain.doFilter(servletRequest, servletResponse);}catch(Exception ex){thrownewRuntimeException(ex);}}}
向HttpSecurity添加Filter和设置Filter位置:
publicclassMySecurityConfigurationextendsWebSecurityConfigurerAdapter{// code...@Overrideprotectedvoidconfigure(HttpSecurity http)throwsException{
        http
                .sessionManagement()//设置添加Filter和位置.and().addFilterBefore(newJWTFilter(jwtProvider),UsernamePasswordAuthenticationFilter.class);// code...}// code...}
MySecurityConfiguration代码
@Configuration@EnableGlobalMethodSecurity(prePostEnabled =true)publicclassMySecurityConfigurationextendsWebSecurityConfigurerAdapter{@AutowiredprivateUserDetailsService userDetailsService;@AutowiredprivateJWTProvider jwtProvider;@Overrideprotectedvoidconfigure(AuthenticationManagerBuilder auth)throwsException{
        auth.userDetailsService(userDetailsService)// 设置自定义的userDetailsService.passwordEncoder(passwordEncoder());}@Overrideprotectedvoidconfigure(HttpSecurity http)throwsException{
        http
                .sessionManagement().sessionCreationPolicy(SessionCreationPolicy.STATELESS)//设置无状态.and().authorizeRequests()// 配置请求权限.antMatchers("/product/**").hasRole("USER")// 需要角色.antMatchers("/admin/**").hasRole("ADMIN").anyRequest().authenticated()// 所有的请求都需要登录.and()// 配置登录url,和登录成功处理器.formLogin().loginProcessingUrl("/login").successHandler((request, response, authentication)->{PrintWriter writer = response.getWriter();
                    writer.println(jwtProvider.createToken(authentication,true));})// 取消csrf防护.and().csrf().disable().httpBasic()// 配置登出url,和登出成功处理器.and().logout().logoutUrl("/logout").logoutSuccessHandler((HttpServletRequest request,HttpServletResponse response,Authentication authentication)->{PrintWriter writer = response.getWriter();
                    writer.println("logout success");
                    writer.flush();})// 在UsernamePasswordAuthenticationFilter之前执行我们添加的JWTFilter.and().addFilterBefore(newJWTFilter(jwtProvider),UsernamePasswordAuthenticationFilter.class);}@BeanpublicPasswordEncoderpasswordEncoder(){returnNoOpPasswordEncoder.getInstance();}@Overridepublicvoidconfigure(WebSecurity web){// 添加不做权限的URL
        web.ignoring().antMatchers("/swagger-resources/**").antMatchers("/swagger-ui.html").antMatchers("/webjars/**").antMatchers("/v2/**").antMatchers("/h2-console/**");}}
使用注解对方法进行权限管理
需要在
MySecurityConfiguration上添加
@EnableGlobalMethodSecurity(prePostEnabled = true)注解,prePostEnabled默认为false,需要设置为true后才能全局的注解权限控制。
prePostEnabled设置为true后,可以使用四个注解:
添加实体类School:
@DatapublicclassSchoolimplementsSerializable{privateLong id;privateString name;privateString address;}
- @PreAuthorize
在访问之前就进行权限判断
@RestControllerpublicclassAnnoController{@AutowiredprivateJWTProvider jwtProvider;@RequestMapping("/annotation")// @PreAuthorize("hasRole('ADMIN')")@PreAuthorize("hasAuthority('ROLE_ADMIN')")publicStringinfo(){return"拥有admin权限";}}
hasRole和hasAuthority都会对UserDetails中的getAuthorities进行判断区别是hasRole会对字段加上
ROLE_
后再进行判断,上例中使用了
hasRole('ADMIN')
,那么就会使用
ROLE_ADMIN
进行判断,如果是
hasAuthority('ADMIN')
,那么就使用
ADMIN
进行判断。
- @PostAuthorize
在请求之后进行判断,如果返回值不满足条件,会抛出异常,但是方法本身是已经执行过了的。
@RequestMapping("/postAuthorize")@PreAuthorize("hasRole('ADMIN')")@PostAuthorize("returnObject.id%2==0")publicSchoolpostAuthorize(Long id){School school =newSchool();
    school.setId(id);return school;}
returnObject是内置对象,引用的是方法的返回值。
如果
returnObject.id%2==0
为 true,那么返回方法值。如果为false,会返回403 Forbidden。
- @PreFilter
在方法执行之前,用于过滤集合中的值。
@RequestMapping("/preFilter")@PreAuthorize("hasRole('ADMIN')")@PreFilter("filterObject%2==0")publicList<Long>preFilter(@RequestParam("ids")List<Long> ids){return ids;}
filterObject
是内置对象,引用的是集合中的泛型类,如果有多个集合,需要指定
filterTarget
。
@PreFilter(filterTarget="ids", value="filterObject%2==0")publicList<Long>preFilter(@RequestParam("ids")List<Long> ids,@RequestParam("ids")List<User> users,){return ids;}
filterObject%2==0
会对集合中的值会进行过滤,为true的值会保留。
第一个例子返回的值在执行前过滤返回2,4。
- @PostFilter
会对返回的集合进行过滤。
@RequestMapping("/postFilter")@PreAuthorize("hasRole('ADMIN')")@PostFilter("filterObject.id%2==0")publicList<School>postFilter(){List<School> schools =newArrayList<School>();School school;for(int i =0; i <10; i++){
        school =newSchool();
        school.setId((long)i);
        schools.add(school);}return schools;}
上面的方法返回结果为:id为0,2,4,6,8的School对象。
七、原理讲解
1、校验流程图
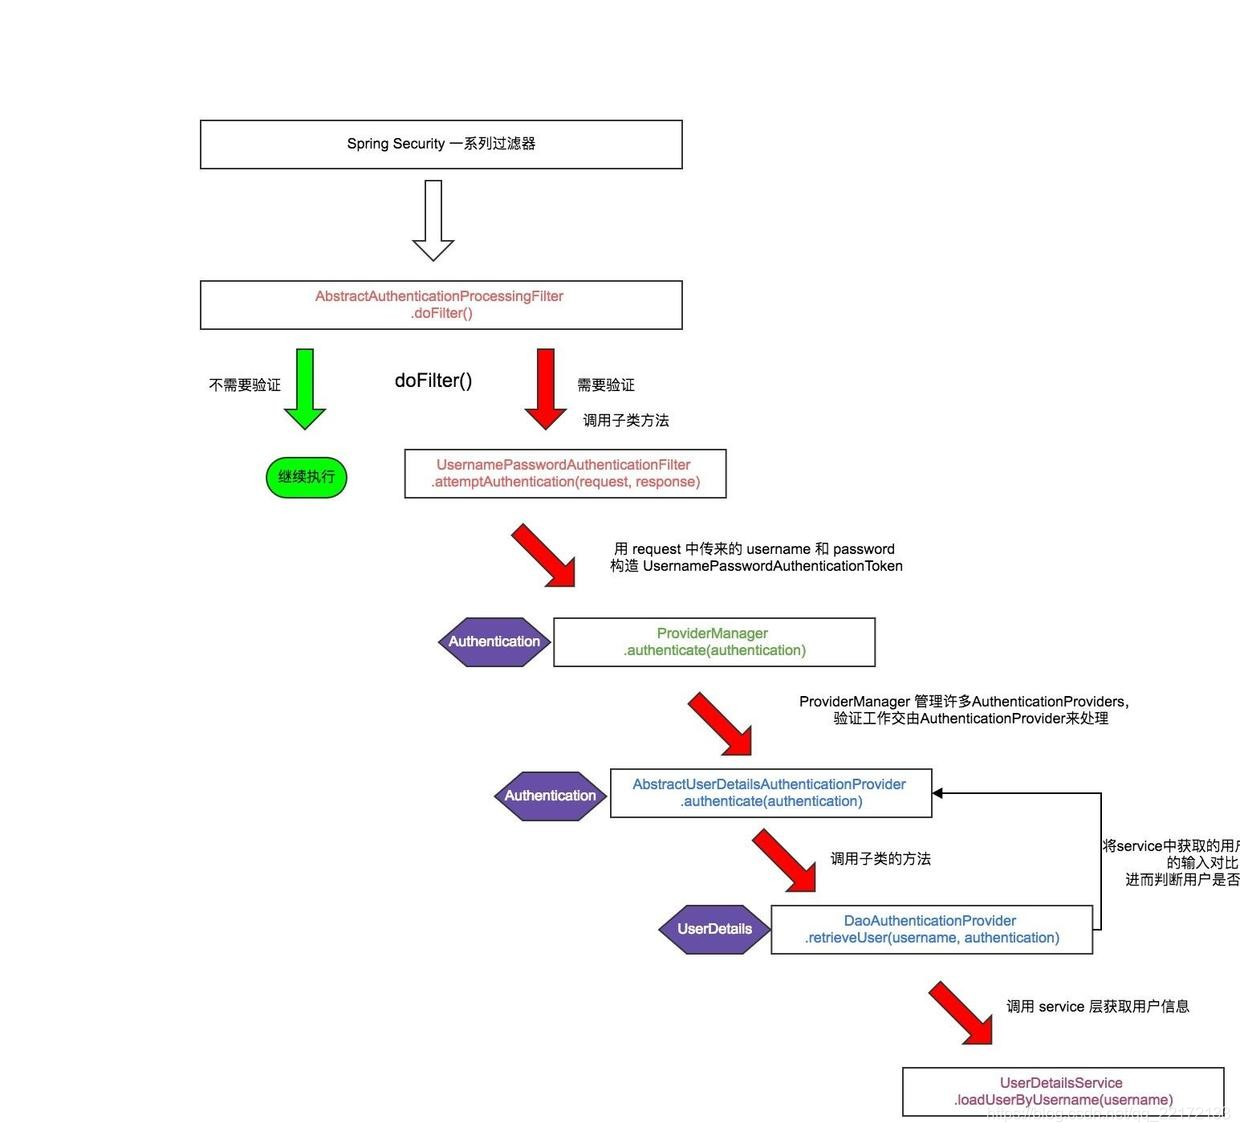
2、源码分析
- AbstractAuthenticationProcessingFilter 抽象类
publicvoiddoFilter(ServletRequest req,ServletResponse res,FilterChain chain)throwsIOException,ServletException{HttpServletRequest request =(HttpServletRequest) req;HttpServletResponse response =(HttpServletResponse) res;if(!requiresAuthentication(request, response)){
        chain.doFilter(request, response);return;}if(logger.isDebugEnabled()){
        logger.debug("Request is to process authentication");}Authentication authResult;try{
        authResult =attemptAuthentication(request, response);if(authResult ==null){// return immediately as subclass has indicated that it hasn't completed// authenticationreturn;}
        sessionStrategy.onAuthentication(authResult, request, response);}catch(InternalAuthenticationServiceException failed){
        logger.error("An internal error occurred while trying to authenticate the user.",
            failed);unsuccessfulAuthentication(request, response, failed);return;}catch(AuthenticationException failed){// Authentication failedunsuccessfulAuthentication(request, response, failed);return;}// Authentication successif(continueChainBeforeSuccessfulAuthentication){
        chain.doFilter(request, response);}successfulAuthentication(request, response, chain, authResult);}
调用 requiresAuthentication(HttpServletRequest, HttpServletResponse) 决定是否需要进行验证操作。如果需要验证,则会调用 attemptAuthentication(HttpServletRequest, HttpServletResponse) 方法,有三种结果:
- 返回一个 Authentication 对象。配置的 SessionAuthenticationStrategy` 将被调用,然后 然后调用 successfulAuthentication(HttpServletRequest,HttpServletResponse,FilterChain,Authentication) 方法。
- 验证时发生 AuthenticationException。unsuccessfulAuthentication(HttpServletRequest, HttpServletResponse, AuthenticationException) 方法将被调用。
- 返回Null,表示身份验证不完整。假设子类做了一些必要的工作(如重定向)来继续处理验证,方法将立即返回。假设后一个请求将被这种方法接收,其中返回的Authentication对象不为空。
- UsernamePasswordAuthenticationFilter(AbstractAuthenticationProcessingFilter的子类)
publicAuthenticationattemptAuthentication(HttpServletRequest request,HttpServletResponse response)throwsAuthenticationException{if(postOnly &&!request.getMethod().equals("POST")){thrownewAuthenticationServiceException("Authentication method not supported: "+ request.getMethod());}String username =obtainUsername(request);String password =obtainPassword(request);if(username ==null){
            username ="";}if(password ==null){
            password ="";}

        username = username.trim();UsernamePasswordAuthenticationToken authRequest =newUsernamePasswordAuthenticationToken(
                username, password);// Allow subclasses to set the "details" propertysetDetails(request, authRequest);returnthis.getAuthenticationManager().authenticate(authRequest);}
attemptAuthentication () 方法将 request 中的 username 和 password 生成 UsernamePasswordAuthenticationToken 对象,用于 AuthenticationManager 的验证(即 this.getAuthenticationManager().authenticate(authRequest) )。默认情况下注入 Spring 容器的 AuthenticationManager 是 ProviderManager。
- ProviderManager(AuthenticationManager的实现类)
publicAuthenticationauthenticate(Authentication authentication)throwsAuthenticationException{Class<?extendsAuthentication> toTest = authentication.getClass();AuthenticationException lastException =null;Authentication result =null;boolean debug = logger.isDebugEnabled();for(AuthenticationProvider provider :getProviders()){if(!provider.supports(toTest)){continue;}if(debug){
            logger.debug("Authentication attempt using "+ provider.getClass().getName());}try{
            result = provider.authenticate(authentication);if(result !=null){copyDetails(authentication, result);break;}}catch(AccountStatusException e){prepareException(e, authentication);// SEC-546: Avoid polling additional providers if auth failure is due to// invalid account statusthrow e;}catch(InternalAuthenticationServiceException e){prepareException(e, authentication);throw e;}catch(AuthenticationException e){
            lastException = e;}}if(result ==null&& parent !=null){// Allow the parent to try.try{
            result = parent.authenticate(authentication);}catch(ProviderNotFoundException e){// ignore as we will throw below if no other exception occurred prior to// calling parent and the parent// may throw ProviderNotFound even though a provider in the child already// handled the request}catch(AuthenticationException e){
            lastException = e;}}if(result !=null){if(eraseCredentialsAfterAuthentication
            &&(result instanceofCredentialsContainer)){// Authentication is complete. Remove credentials and other secret data// from authentication((CredentialsContainer) result).eraseCredentials();}

        eventPublisher.publishAuthenticationSuccess(result);return result;}// Parent was null, or didn't authenticate (or throw an exception).if(lastException ==null){
        lastException =newProviderNotFoundException(messages.getMessage("ProviderManager.providerNotFound",newObject[]{ toTest.getName()},"No AuthenticationProvider found for {0}"));}prepareException(lastException, authentication);throw lastException;}
尝试验证 Authentication 对象。AuthenticationProvider 列表将被连续尝试,直到 AuthenticationProvider 表示它能够认证传递的过来的Authentication 对象。然后将使用该 AuthenticationProvider 尝试身份验证。如果有多个 AuthenticationProvider 支持验证传递过来的Authentication 对象,那么由第一个来确定结果,覆盖早期支持AuthenticationProviders 所引发的任何可能的AuthenticationException。 成功验证后,将不会尝试后续的AuthenticationProvider。如果最后所有的 AuthenticationProviders 都没有成功验证 Authentication 对象,将抛出 AuthenticationException。从代码中不难看出,由 provider 来验证 authentication, 核心点方法是:
Authentication result = provider.authenticate(authentication);
此处的 provider 是 AbstractUserDetailsAuthenticationProvider,AbstractUserDetailsAuthenticationProvider 是AuthenticationProvider的实现,看看它的 authenticate(authentication) 方法:
// 验证 authenticationpublicAuthenticationauthenticate(Authentication authentication)throwsAuthenticationException{Assert.isInstanceOf(UsernamePasswordAuthenticationToken.class, authentication,
                        messages.getMessage("AbstractUserDetailsAuthenticationProvider.onlySupports","Only UsernamePasswordAuthenticationToken is supported"));// Determine usernameString username =(authentication.getPrincipal()==null)?"NONE_PROVIDED": authentication.getName();boolean cacheWasUsed =true;UserDetails user =this.userCache.getUserFromCache(username);if(user ==null){
        cacheWasUsed =false;try{
            user =retrieveUser(username,(UsernamePasswordAuthenticationToken) authentication);}catch(UsernameNotFoundException notFound){
            logger.debug("User '"+ username +"' not found");if(hideUserNotFoundExceptions){thrownewBadCredentialsException(messages.getMessage("AbstractUserDetailsAuthenticationProvider.badCredentials","Bad credentials"));}else{throw notFound;}}Assert.notNull(user,"retrieveUser returned null - a violation of the interface contract");}try{
        preAuthenticationChecks.check(user);additionalAuthenticationChecks(user,(UsernamePasswordAuthenticationToken) authentication);}catch(AuthenticationException exception){if(cacheWasUsed){// There was a problem, so try again after checking// we're using latest data (i.e. not from the cache)
            cacheWasUsed =false;
            user =retrieveUser(username,(UsernamePasswordAuthenticationToken) authentication);
            preAuthenticationChecks.check(user);additionalAuthenticationChecks(user,(UsernamePasswordAuthenticationToken) authentication);}else{throw exception;}}

    postAuthenticationChecks.check(user);if(!cacheWasUsed){this.userCache.putUserInCache(user);}Object principalToReturn = user;if(forcePrincipalAsString){
        principalToReturn = user.getUsername();}returncreateSuccessAuthentication(principalToReturn, authentication, user);}
AbstractUserDetailsAuthenticationProvider 内置了缓存机制,从缓存中获取不到的 UserDetails 信息的话,就调用如下方法获取用户信息,然后和 用户传来的信息进行对比来判断是否验证成功。
// 获取用户信息UserDetails user =retrieveUser(username,(UsernamePasswordAuthenticationToken) authentication);
retrieveUser() 方法在 DaoAuthenticationProvider 中实现,DaoAuthenticationProvider 是 AbstractUserDetailsAuthenticationProvider的子类。具体实现如下:
protectedfinalUserDetailsretrieveUser(String username,UsernamePasswordAuthenticationToken authentication)throwsAuthenticationException{UserDetails loadedUser;try{
        loadedUser =this.getUserDetailsService().loadUserByUsername(username);}catch(UsernameNotFoundException notFound){if(authentication.getCredentials()!=null){String presentedPassword = authentication.getCredentials().toString();
            passwordEncoder.isPasswordValid(userNotFoundEncodedPassword,
                                            presentedPassword,null);}throw notFound;}catch(Exception repositoryProblem){thrownewInternalAuthenticationServiceException(
            repositoryProblem.getMessage(), repositoryProblem);}if(loadedUser ==null){thrownewInternalAuthenticationServiceException("UserDetailsService returned null, which is an interface contract violation");}return loadedUser;}
可以看到此处的返回对象 userDetails 是由 UserDetailsService 的 #loadUserByUsername(username) 来获取的。
八、玩转自定义登录
1. form 登录的流程
下面是 form 登录的基本流程:

只要是 form 登录基本都能转化为上面的流程。接下来我们看看 Spring Security 是如何处理的。
3. Spring Security 中的登录
默认它提供了三种登录方式:
formLogin()普通表单登录oauth2Login()基于OAuth2.0认证/授权协议openidLogin()基于OpenID身份认证规范
以上三种方式统统是
AbstractAuthenticationFilterConfigurer
实现的,
4. HttpSecurity 中的 form 表单登录
启用表单登录通过两种方式一种是通过
HttpSecurity
的
apply(C configurer)
方法自己构造一个
AbstractAuthenticationFilterConfigurer
的实现,这种是比较高级的玩法。 另一种是我们常见的使用
HttpSecurity
的
formLogin()
方法来自定义
FormLoginConfigurer
。我们先搞一下比较常规的第二种。
4.1 FormLoginConfigurer
该类是 form 表单登录的配置类。它提供了一些我们常用的配置方法:
- loginPage(String loginPage) : 登录 页面而并不是接口,对于前后分离模式需要我们进行改造 默认为
/login。 - loginProcessingUrl(String loginProcessingUrl) 实际表单向后台提交用户信息的
Action,再由过滤器UsernamePasswordAuthenticationFilter拦截处理,该Action其实不会处理任何逻辑。 - usernameParameter(String usernameParameter) 用来自定义用户参数名,默认
username。 - passwordParameter(String passwordParameter) 用来自定义用户密码名,默认
password - failureUrl(String authenticationFailureUrl) 登录失败后会重定向到此路径, 一般前后分离不会使用它。
- failureForwardUrl(String forwardUrl) 登录失败会转发到此, 一般前后分离用到它。 可定义一个
Controller(控制器)来处理返回值,但是要注意RequestMethod。 - defaultSuccessUrl(String defaultSuccessUrl, boolean alwaysUse) 默认登陆成功后跳转到此 ,如果
alwaysUse为true只要进行认证流程而且成功,会一直跳转到此。一般推荐默认值false - successForwardUrl(String forwardUrl) 效果等同于上面
defaultSuccessUrl的alwaysUse为true但是要注意RequestMethod。 - successHandler(AuthenticationSuccessHandler successHandler) 自定义认证成功处理器,可替代上面所有的
success方式 - failureHandler(AuthenticationFailureHandler authenticationFailureHandler) 自定义失败成功处理器,可替代上面所有的
failure方式 - **permitAll(boolean permitAll)**form 表单登录是否放开
知道了这些我们就能来搞个定制化的登录了。
5. Spring Security 聚合登录 实战
接下来是我们最激动人心的实战登录操作。 有疑问的可认真阅读 Spring 实战 的一系列预热文章。
5.1 简单需求
我们的接口访问都要通过认证,登陆错误后返回错误信息(json),成功后前台可以获取到对应数据库用户信息(json)(实战中记得脱敏)。
我们定义处理成功失败的控制器:
@RestController@RequestMapping("/login")publicclassLoginController{@ResourceprivateSysUserService sysUserService;/**
      * 登录失败返回 401 以及提示信息.
      *
      * @return the rest
      */@PostMapping("/failure")publicRestloginFailure(){returnRestBody.failure(HttpStatus.UNAUTHORIZED.value(),"登录失败了,老哥");}/**
      * 登录成功后拿到个人信息.
      *
      * @return the rest
      */@PostMapping("/success")publicRestloginSuccess(){// 登录成功后用户的认证信息 UserDetails会存在 安全上下文寄存器 SecurityContextHolder 中User principal =(User)SecurityContextHolder.getContext().getAuthentication().getPrincipal();String username = principal.getUsername();SysUser sysUser = sysUserService.queryByUsername(username);// 脱敏
        sysUser.setEncodePassword("[PROTECT]");returnRestBody.okData(sysUser,"登录成功");}}
然后 我们自定义配置覆写
void configure(HttpSecurity http)
方法进行如下配置(这里需要禁用crsf):
@Configuration@ConditionalOnClass(WebSecurityConfigurerAdapter.class)@ConditionalOnWebApplication(type =ConditionalOnWebApplication.Type.SERVLET)publicclassCustomSpringBootWebSecurityConfiguration{@Configuration@Order(SecurityProperties.BASIC_AUTH_ORDER)staticclassDefaultConfigurerAdapterextendsWebSecurityConfigurerAdapter{@Overrideprotectedvoidconfigure(AuthenticationManagerBuilder auth)throwsException{super.configure(auth);}@Overridepublicvoidconfigure(WebSecurity web)throwsException{super.configure(web);}@Overrideprotectedvoidconfigure(HttpSecurity http)throwsException{
            http.csrf().disable().cors().and().authorizeRequests().anyRequest().authenticated().and().formLogin().loginProcessingUrl("/process").successForwardUrl("/login/success").failureForwardUrl("/login/failure");}}}
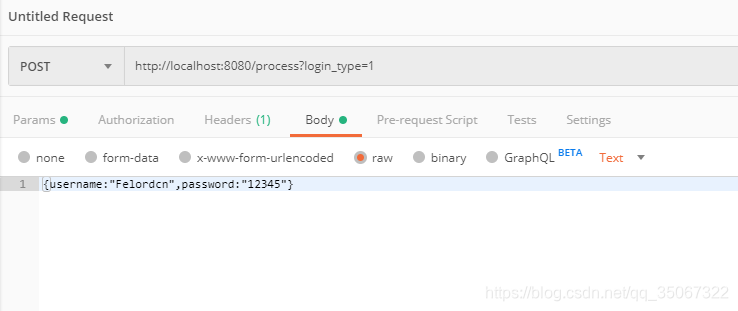
使用 Postman 或者其它工具进行 Post 方式的表单提交
http://localhost:8080/process?username=Felordcn&password=12345
会返回用户信息:
{"httpStatus":200,"data":{"userId":1,"username":"Felordcn","encodePassword":"[PROTECT]","age":18},"msg":"登录成功","identifier":""}
把密码修改为其它值再次请求认证失败后 :
{"httpStatus":401,"data":null,"msg":"登录失败了,老哥","identifier":"-9999"}
6. 多种登录方式的简单实现
就这么完了了么?现在登录的花样繁多。常规的就有短信、邮箱、扫码 ,第三方是以后我要讲的不在今天范围之内。 如何应对想法多的产品经理? 我们来搞一个可扩展各种姿势的登录方式。我们在上面 2. form 登录的流程 中的 用户 和 判定 之间增加一个适配器来适配即可。 我们知道这个所谓的 判定就是
UsernamePasswordAuthenticationFilter
。
我们只需要保证 uri 为上面配置的/process 并且能够通过 getParameter(String name) 获取用户名和密码即可 。
我突然觉得可以模仿
DelegatingPasswordEncoder
的搞法, 维护一个注册表执行不同的处理策略。当然我们要实现一个
GenericFilterBean
在
UsernamePasswordAuthenticationFilter
之前执行。同时制定登录的策略。
6.1 登录方式定义
定义登录方式枚举 ``。
publicenumLoginTypeEnum{/**
       * 原始登录方式.
       */
    FORM,/**
       * Json 提交.
       */
    JSON,/**
       * 验证码.
       */
    CAPTCHA

}
6.2 定义前置处理器接口
定义前置处理器接口用来处理接收的各种特色的登录参数 并处理具体的逻辑。这个借口其实有点随意 ,重要的是你要学会思路。我实现了一个 默认的
form' 表单登录 和 通过
RequestBody
放入
json` 的两种方式,篇幅限制这里就不展示了。具体的 DEMO 参见底部。
publicinterfaceLoginPostProcessor{/**
        * 获取 登录类型
        *
        * @return the type
        */LoginTypeEnumgetLoginTypeEnum();/**
        * 获取用户名
        *
        * @param request the request
        * @return the string
        */StringobtainUsername(ServletRequest request);/**
        * 获取密码
        *
        * @param request the request
        * @return the string
        */StringobtainPassword(ServletRequest request);}
6.3 实现登录前置处理过滤器
该过滤器维护了
LoginPostProcessor
映射表。 通过前端来判定登录方式进行策略上的预处理,最终还是会交给
UsernamePasswordAuthenticationFilter
。通过
HttpSecurity
的
addFilterBefore(preLoginFilter, UsernamePasswordAuthenticationFilter.class)
方法进行前置。
packagecn.felord.spring.security.filter;importcn.felord.spring.security.enumation.LoginTypeEnum;importorg.springframework.security.web.util.matcher.AntPathRequestMatcher;importorg.springframework.security.web.util.matcher.RequestMatcher;importorg.springframework.util.Assert;importorg.springframework.util.CollectionUtils;importorg.springframework.web.filter.GenericFilterBean;importjavax.servlet.FilterChain;importjavax.servlet.ServletException;importjavax.servlet.ServletRequest;importjavax.servlet.ServletResponse;importjavax.servlet.http.HttpServletRequest;importjava.io.IOException;importjava.util.Collection;importjava.util.HashMap;importjava.util.Map;importstaticorg.springframework.security.web.authentication.UsernamePasswordAuthenticationFilter.SPRING_SECURITY_FORM_PASSWORD_KEY;importstaticorg.springframework.security.web.authentication.UsernamePasswordAuthenticationFilter.SPRING_SECURITY_FORM_USERNAME_KEY;/**
  * 预登录控制器
  *
  * @author Felordcn
  * @since 16 :21 2019/10/17
  */publicclassPreLoginFilterextendsGenericFilterBean{privatestaticfinalString LOGIN_TYPE_KEY ="login_type";privateRequestMatcher requiresAuthenticationRequestMatcher;privateMap<LoginTypeEnum,LoginPostProcessor> processors =newHashMap<>();publicPreLoginFilter(String loginProcessingUrl,Collection<LoginPostProcessor> loginPostProcessors){Assert.notNull(loginProcessingUrl,"loginProcessingUrl must not be null");
        requiresAuthenticationRequestMatcher =newAntPathRequestMatcher(loginProcessingUrl,"POST");LoginPostProcessor loginPostProcessor =defaultLoginPostProcessor();
        processors.put(loginPostProcessor.getLoginTypeEnum(), loginPostProcessor);if(!CollectionUtils.isEmpty(loginPostProcessors)){
            loginPostProcessors.forEach(element -> processors.put(element.getLoginTypeEnum(), element));}}privateLoginTypeEnumgetTypeFromReq(ServletRequest request){String parameter = request.getParameter(LOGIN_TYPE_KEY);int i =Integer.parseInt(parameter);LoginTypeEnum[] values =LoginTypeEnum.values();return values[i];}/**
      * 默认还是Form .
      *
      * @return the login post processor
      */privateLoginPostProcessordefaultLoginPostProcessor(){returnnewLoginPostProcessor(){@OverridepublicLoginTypeEnumgetLoginTypeEnum(){returnLoginTypeEnum.FORM;}@OverridepublicStringobtainUsername(ServletRequest request){return request.getParameter(SPRING_SECURITY_FORM_USERNAME_KEY);}@OverridepublicStringobtainPassword(ServletRequest request){return request.getParameter(SPRING_SECURITY_FORM_PASSWORD_KEY);}};}@OverridepublicvoiddoFilter(ServletRequest request,ServletResponse response,FilterChain chain)throwsIOException,ServletException{ParameterRequestWrapper parameterRequestWrapper =newParameterRequestWrapper((HttpServletRequest) request);if(requiresAuthenticationRequestMatcher.matches((HttpServletRequest) request)){LoginTypeEnum typeFromReq =getTypeFromReq(request);LoginPostProcessor loginPostProcessor = processors.get(typeFromReq);String username = loginPostProcessor.obtainUsername(request);String password = loginPostProcessor.obtainPassword(request);

            parameterRequestWrapper.setAttribute(SPRING_SECURITY_FORM_USERNAME_KEY, username);
            parameterRequestWrapper.setAttribute(SPRING_SECURITY_FORM_PASSWORD_KEY, password);}

        chain.doFilter(parameterRequestWrapper, response);}}
6.4 验证
通过
POST
表单提交方式
http://localhost:8080/process?username=Felordcn&password=12345&login_type=0
可以请求成功。或者以下列方式也可以提交成功:
更多的方式 只需要实现接口
LoginPostProcessor
注入
PreLoginFilter
九 整合JWT做登录认证
JWT是JSON Web Token的缩写,是目前最流行的跨域认证解决方法。
互联网服务认证的一般流程是:
- 用户向服务器发送账号、密码
- 服务器验证通过后,将用户的角色、登录时间等信息保存到当前会话中
- 同时,服务器向用户返回一个session_id(一般保存在cookie里)
- 用户再次发送请求时,把含有session_id的cookie发送给服务器
- 服务器收到session_id,查找session,提取用户信息
上面的认证模式,存在以下缺点:
- cookie不允许跨域
- 因为每台服务器都必须保存session对象,所以扩展性不好
JWT认证原理是:
- 用户向服务器发送账号、密码
- 服务器验证通过后,生成token令牌返回给客户端(token可以包含用户信息)
- 用户再次请求时,把token放到请求头
Authorization里 - 服务器收到请求,验证token合法后放行请求
JWT token令牌可以包含用户身份、登录时间等信息,这样登录状态保持者由服务器端变为客户端,服务器变成无状态了;token放到请求头,实现了跨域
JWT的组成
eyJhbGciOiJIUzI1NiIsInR5cCI6IkpXVCJ9.eyJzdWIiOiIxMjM0NTY3ODkwIiwibmFtZSI6IkpvaG4gRG9lIiwiaWF0IjoxNTE2MjM5MDIyfQ.SflKxwRJSMeKKF2QT4fwpMeJf36POk6yJV_adQssw5c
JWT由三部分组成:
- Header(头部)
- Payload(负载)
- Signature(签名)
表现形式为:
Header.Payload.Signature
Header 部分是一个 JSON 对象,描述 JWT 的元数据,通常是下面的样子:
{"alg":"HS256","typ":"JWT"}
上面代码中,
alg
属性表示签名的算法(algorithm),默认是 HMAC SHA256(写成 HS256);
typ
属性表示这个令牌(token)的类型(type),JWT 令牌统一写为
JWT
。
上面的 JSON 对象使用 Base64URL 算法转成字符串
Payload
Payload 部分也是一个 JSON 对象,用来存放实际需要传递的数据。JWT 规定了7个官方字段:
- iss (issuer):签发人
- exp (expiration time):过期时间
- sub (subject):主题
- aud (audience):受众
- nbf (Not Before):生效时间
- iat (Issued At):签发时间
- jti (JWT ID):编号
当然,用户也可以定义私有字段。
这个 JSON 对象也要使用 Base64URL 算法转成字符串
Signature
Signature 部分是对前两部分的签名,防止数据篡改
签名算法如下:
HMACSHA256(base64UrlEncode(header)+"."+base64UrlEncode(payload),
  your-256-bit-secret
)
算出签名以后,把 Header、Payload、Signature 三个部分拼成一个字符串,每个部分之间用"."分隔
JWT认证和授权
Security是基于AOP和Servlet过滤器的安全框架,为了实现JWT要重写那些方法、自定义那些过滤器需要首先了解security自带的过滤器。security默认过滤器链如下:
- org.springframework.security.web.context.request.async.WebAsyncManagerIntegrationFilter
- org.springframework.security.web.context.SecurityContextPersistenceFilter
- org.springframework.security.web.header.HeaderWriterFilter
- org.springframework.security.web.authentication.logout.LogoutFilter
- org.springframework.security.web.authentication.UsernamePasswordAuthenticationFilter
- org.springframework.security.web.savedrequest.RequestCacheAwareFilter
- org.springframework.security.web.servletapi.SecurityContextHolderAwareRequestFilter
- org.springframework.security.web.authentication.AnonymousAuthenticationFilter
- org.springframework.security.web.session.SessionManagementFilter
- org.springframework.security.web.access.ExceptionTranslationFilter
- org.springframework.security.web.access.intercept.FilterSecurityInterceptor
SecurityContextPersistenceFilter
这个过滤器有两个作用:
- 用户发送请求时,从session对象提取用户信息,保存到SecurityContextHolder的securitycontext中
- 当前请求响应结束时,把SecurityContextHolder的securitycontext保存的用户信息放到session,便于下次请求时共享数据;同时将SecurityContextHolder的securitycontext清空
由于禁用session功能,所以该过滤器只剩一个作用即把SecurityContextHolder的securitycontext清空。举例来说明为何要清空securitycontext:用户1发送一个请求,由线程M处理,当响应完成线程M放回线程池;用户2发送一个请求,本次请求同样由线程M处理,由于securitycontext没有清空,理应储存用户2的信息但此时储存的是用户1的信息,造成用户信息不符
UsernamePasswordAuthenticationFilter
UsernamePasswordAuthenticationFilter
继承自
AbstractAuthenticationProcessingFilter
,处理逻辑在
doFilter
方法中:
- 当请求被
UsernamePasswordAuthenticationFilter拦截时,判断请求路径是否匹配登录URL,若不匹配继续执行下个过滤器;否则,执行步骤2 - 调用
attemptAuthentication方法进行认证。UsernamePasswordAuthenticationFilter重写了attemptAuthentication方法,负责读取表单登录参数,委托AuthenticationManager进行认证,返回一个认证过的token(null表示认证失败) - 判断token是否为null,非null表示认证成功,null表示认证失败
- 若认证成功,调用
successfulAuthentication。该方法把认证过的token放入securitycontext供后续请求授权,同时该方法预留一个扩展点(AuthenticationSuccessHandler.onAuthenticationSuccess方法),进行认证成功后的处理 - 若认证失败,同样可以扩展
uthenticationFailureHandler.onAuthenticationFailure进行认证失败后的处理 - 只要当前请求路径匹配登录URL,那么无论认证成功还是失败,当前请求都会响应完成,不再执行过滤器链
UsernamePasswordAuthenticationFilter
的
attemptAuthentication
方法,执行逻辑如下:
- 从请求中获取表单参数。因为使用
HttpServletRequest.getParameter方法获取参数,它只能处理Content-Type为application/x-www-form-urlencoded或multipart/form-data的请求,若是application/json则无法获取值 - 把步骤1获取的账号、密码封装成
UsernamePasswordAuthenticationToken对象,创建未认证的token。UsernamePasswordAuthenticationToken有两个重载的构造方法,其中public UsernamePasswordAuthenticationToken(Object principal, Object credentials)创建未经认证的token,public UsernamePasswordAuthenticationToken(Object principal, Object credentials, Collection<? extends GrantedAuthority> authorities)创建已认证的token - 获取认证管理器
AuthenticationManager,其缺省实现为ProviderManager,调用其authenticate进行认证 ProviderManager的authenticate是个模板方法,它遍历所有AuthenticationProvider,直至找到支持认证某类型token的AuthenticationProvider,调用AuthenticationProvider.authenticate方法认证,AuthenticationProvider.authenticate加载正确的账号、密码进行比较验证AuthenticationManager.authenticate方法返回一个已认证的token
AnonymousAuthenticationFilter
AnonymousAuthenticationFilter
负责创建匿名token:
publicvoiddoFilter(ServletRequest req,ServletResponse res,FilterChain chain)throwsIOException,ServletException{if(SecurityContextHolder.getContext().getAuthentication()==null){SecurityContextHolder.getContext().setAuthentication(this.createAuthentication((HttpServletRequest)req));if(this.logger.isTraceEnabled()){this.logger.trace(LogMessage.of(()->{return"Set SecurityContextHolder to "+SecurityContextHolder.getContext().getAuthentication();}));}else{this.logger.debug("Set SecurityContextHolder to anonymous SecurityContext");}}elseif(this.logger.isTraceEnabled()){this.logger.trace(LogMessage.of(()->{return"Did not set SecurityContextHolder since already authenticated "+SecurityContextHolder.getContext().getAuthentication();}));}

    chain.doFilter(req, res);}
如果当前用户没有认证,会创建一个匿名token,用户是否能读取资源交由
FilterSecurityInterceptor
过滤器委托给决策管理器判断是否有权限读取
实现思路
JWT认证思路:
- 利用Security原生的表单认证过滤器验证用户名、密码
- 验证通过后自定义
AuthenticationSuccessHandler认证成功处理器,由该处理器生成token令牌
JWT授权思路:
- 使用JWT目的是让服务器变成无状态,不用session共享数据,所以要禁用security的session功能(http.sessionManagement().sessionCreationPolicy(SessionCreationPolicy.STATELESS))
- token令牌数据结构设计时,payload部分要储存用户名、角色信息
- token令牌有两个作用: 1. 认证, 用户发送的token合法即代表认证成功2. 授权,令牌验证成功后提取角色信息,构造认证过的token,将其放到securitycontext,具体权限判断交给security框架处理
- 自己实现一个过滤器,拦截用户请求,实现(3)中所说的功能
代码实现 创建JWT工具类
<dependency>
    <groupId>com.auth0</groupId>
    <artifactId>java-jwt</artifactId>
    <version>3.12.0</version>
</dependency>
我们对java-jwt提供的API进行封装,便于创建、验证、提取claim
@Slf4jpublicclassJWTUtil{// 携带token的请求头名字publicfinalstaticString TOKEN_HEADER ="Authorization";//token的前缀publicfinalstaticString TOKEN_PREFIX ="Bearer ";// 默认密钥publicfinalstaticString DEFAULT_SECRET ="mySecret";// 用户身份privatefinalstaticString ROLES_CLAIM ="roles";// token有效期,单位分钟;privatefinalstaticlong EXPIRE_TIME =5*60*1000;// 设置Remember-me功能后的token有效期privatefinalstaticlong EXPIRE_TIME_REMEMBER =7*24*60*60*1000;// 创建tokenpublicstaticStringcreateToken(String username,List role,String secret,boolean rememberMe){Date expireDate = rememberMe ?newDate(System.currentTimeMillis()+ EXPIRE_TIME_REMEMBER):newDate(System.currentTimeMillis()+ EXPIRE_TIME);try{// 创建签名的算法实例Algorithm algorithm =Algorithm.HMAC256(secret);String token = JWT.create().withExpiresAt(expireDate).withClaim("username", username).withClaim(ROLES_CLAIM, role).sign(algorithm);return token;}catch(JWTCreationException jwtCreationException){
            log.warn("Token create failed");returnnull;}}// 验证tokenpublicstaticbooleanverifyToken(String token,String secret){try{Algorithm algorithm =Algorithm.HMAC256(secret);// 构建JWT验证器,token合法同时pyload必须含有私有字段username且值一致// token过期也会验证失败JWTVerifier verifier = JWT.require(algorithm).build();// 验证tokenDecodedJWT decodedJWT = verifier.verify(token);returntrue;}catch(JWTVerificationException jwtVerificationException){
            log.warn("token验证失败");returnfalse;}}// 获取usernamepublicstaticStringgetUsername(String token){try{// 因此获取载荷信息不需要密钥DecodedJWT jwt = JWT.decode(token);return jwt.getClaim("username").asString();}catch(JWTDecodeException jwtDecodeException){
            log.warn("提取用户姓名时,token解码失败");returnnull;}}publicstaticList<String>getRole(String token){try{// 因此获取载荷信息不需要密钥DecodedJWT jwt = JWT.decode(token);// asList方法需要指定容器元素的类型return jwt.getClaim(ROLES_CLAIM).asList(String.class);}catch(JWTDecodeException jwtDecodeException){
            log.warn("提取身份时,token解码失败");returnnull;}}}
代码实现认证
验证账号、密码交给
UsernamePasswordAuthenticationFilter
,不用修改代码
认证成功后,需要生成token返回给客户端,我们通过扩展
AuthenticationSuccessHandler.onAuthenticationSuccess方法
实现
@ComponentpublicclassJWTAuthenticationSuccessHandlerimplementsAuthenticationSuccessHandler{@OverridepublicvoidonAuthenticationSuccess(HttpServletRequest httpServletRequest,HttpServletResponse httpServletResponse,Authentication authentication)throwsIOException,ServletException{ResponseData responseData =newResponseData();
        responseData.setCode("200");
        responseData.setMessage("登录成功!");// 提取用户名,准备写入tokenString username = authentication.getName();// 提取角色,转为List<String>对象,写入tokenList<String> roles =newArrayList<>();Collection<?extendsGrantedAuthority> authorities = authentication.getAuthorities();for(GrantedAuthority authority : authorities){
            roles.add(authority.getAuthority());}// 创建tokenString token =JWTUtil.createToken(username, roles,JWTUtil.DEFAULT_SECRET,true);
        httpServletResponse.setCharacterEncoding("utf-8");// 为了跨域,把token放到响应头WWW-Authenticate里
        httpServletResponse.setHeader("WWW-Authenticate",JWTUtil.TOKEN_PREFIX + token);// 写入响应里ObjectMapper mapper =newObjectMapper();
        mapper.writeValue(httpServletResponse.getWriter(), responseData);}}
为了统一返回值,我们封装了一个
ResponseData
对象
代码实现 授权
自定义一个过滤器
JWTAuthorizationFilter
,验证token,token验证成功后认为认证成功
@Slf4jpublicclassJWTAuthorizationFilterextendsOncePerRequestFilter{@OverrideprotectedvoiddoFilterInternal(HttpServletRequest request,HttpServletResponse response,FilterChain chain)throwsIOException,ServletException{String token =getTokenFromRequestHeader(request);Authentication verifyResult =verefyToken(token,JWTUtil.DEFAULT_SECRET);if(verifyResult ==null){// 即便验证失败,也继续调用过滤链,匿名过滤器生成匿名令牌
            chain.doFilter(request, response);return;}else{
            log.info("token令牌验证成功");SecurityContextHolder.getContext().setAuthentication(verifyResult);
            chain.doFilter(request, response);}}// 从请求头获取tokenprivateStringgetTokenFromRequestHeader(HttpServletRequest request){String header = request.getHeader(JWTUtil.TOKEN_HEADER);if(header ==null||!header.startsWith(JWTUtil.TOKEN_PREFIX)){
            log.info("请求头不含JWT token, 调用下个过滤器");returnnull;}String token = header.split(" ")[1].trim();return token;}// 验证token,并生成认证后的tokenprivateUsernamePasswordAuthenticationTokenverefyToken(String token,String secret){if(token ==null){returnnull;}// 认证失败,返回nullif(!JWTUtil.verifyToken(token, secret)){returnnull;}// 提取用户名String username =JWTUtil.getUsername(token);// 定义权限列表List<GrantedAuthority> authorities =newArrayList<>();// 从token提取角色List<String> roles =JWTUtil.getRole(token);for(String role : roles){
            log.info("用户身份是:"+ role);
            authorities.add(newSimpleGrantedAuthority(role));}// 构建认证过的tokenreturnnewUsernamePasswordAuthenticationToken(username,null, authorities);}}OncePerRequestFilter`保证当前请求中,此过滤器只被调用一次,执行逻辑在`doFilterInternal
代码实现 security配置
@Configuration@EnableWebSecuritypublicclassWebSecurityConfigextendsWebSecurityConfigurerAdapter{@AutowiredprivateAjaxAuthenticationEntryPoint ajaxAuthenticationEntryPoint;@AutowiredprivateJWTAuthenticationSuccessHandler jwtAuthenticationSuccessHandler;@AutowiredprivateAjaxAuthenticationFailureHandler ajaxAuthenticationFailureHandler;@BeanpublicPasswordEncoderpasswordEncoder(){returnnewBCryptPasswordEncoder();}protectedvoidconfigure(HttpSecurity http)throwsException{
        http.csrf().disable().authorizeRequests().anyRequest().authenticated().and().formLogin().successHandler(jwtAuthenticationSuccessHandler).failureHandler(ajaxAuthenticationFailureHandler).permitAll().and().addFilterAfter(newJWTAuthorizationFilter(),UsernamePasswordAuthenticationFilter.class).sessionManagement().sessionCreationPolicy(SessionCreationPolicy.STATELESS).and().exceptionHandling().authenticationEntryPoint(ajaxAuthenticationEntryPoint);}}
配置里取消了session功能,把我们定义的过滤器添加到过滤链中;同时,定义
ajaxAuthenticationEntryPoint
处理未认证用户访问未授权资源时抛出的异常
@ComponentpublicclassAjaxAuthenticationEntryPointimplementsAuthenticationEntryPoint{@Overridepublicvoidcommence(HttpServletRequest httpServletRequest,HttpServletResponse httpServletResponse,AuthenticationException e)throwsIOException,ServletException{ResponseData responseData =newResponseData();
        responseData.setCode("401");
        responseData.setMessage("匿名用户,请先登录再访问!");

        httpServletResponse.setCharacterEncoding("utf-8");ObjectMapper mapper =newObjectMapper();
        mapper.writeValue(httpServletResponse.getWriter(), responseData);}}
过滤器链(filter chain)的介绍
上一节中,主要讲了Spring Security认证和授权的核心组件及核心方法。但是,什么时候调用这些方法呢?答案就是Filter和AOP。Spring Security在我们进行用户认证以及授予权限的时候,通过各种各样的拦截器来控制权限的访问。
对于基于HttpRequest的方式对端点进行保护,我们使用一个Filter Chain来保护;对于基于方法调用进行保护,我们使用AOP来保护。本篇重点讲Spring Security中过滤器链的种类及过滤器中如何实现的认证和授权。
Spring Security会默认为我们添加15个过滤器,我们可以从WebSecurity(WebSecurity是Spring Security加载的一个重要对象,将在下节具体讲述)的performBuild()方法中看到过滤器链SecurityFilterChain的构建过程,并交由FilterChainProxy对象代理。我们从SecurityFilterChain的默认实现类DefaultSecurityFilterChain中的log看出,Spring Security由以下过滤器组成了过滤器链:
Creating filter chain: any request, [
  org.springframework.security.web.context.request.async.WebAsyncManagerIntegrationFilter@7f353a0f,
  org.springframework.security.web.context.SecurityContextPersistenceFilter@4735d6e5,
  org.springframework.security.web.header.HeaderWriterFilter@314a31b0,
  org.springframework.security.web.csrf.CsrfFilter@4ef2ab73,
  org.springframework.security.web.authentication.logout.LogoutFilter@57efc6fd,
  org.springframework.security.web.authentication.UsernamePasswordAuthenticationFilter@d88f893,
  org.springframework.security.web.authentication.ui.DefaultLoginPageGeneratingFilter@2cd388f5,
  org.springframework.security.web.authentication.ui.DefaultLogoutPageGeneratingFilter@7ea2412c,
  org.springframework.security.web.authentication.www.BasicAuthenticationFilter@2091833,
  org.springframework.security.web.savedrequest.RequestCacheAwareFilter@4dad0eed,
  org.springframework.security.web.servletapi.SecurityContextHolderAwareRequestFilter@16132f21,
  org.springframework.security.web.authentication.AnonymousAuthenticationFilter@1c93b51e,
  org.springframework.security.web.session.SessionManagementFilter@59edb4f5,
  org.springframework.security.web.access.ExceptionTranslationFilter@104dc1a2,
  org.springframework.security.web.access.intercept.FilterSecurityInterceptor@1de0641b
]
下面就是各个过滤器的功能,
其中SecurityContextPersistenceFilter,UsernamePasswordAuthenticationFilter及FilterSecurityInterceptor分别对应了SecurityContext,AuthenticationManager,AccessDecisionManager的处理。
[WebAsyncManagerIntegrationFilter] (异步方式)提供了对securityContext和WebAsyncManager的集成。
方式是通过SecurityContextCallableProcessingInterceptor的beforeConcurrentHandling(NativeWebRequest, Callable)方法来将SecurityContext设置到Callable上。
其实就是把SecurityContext设置到异步线程中,使其也能获取到用户上下文认证信息。
[SecurityContextPersistenceFilter] (同步方式)在请求之前从SecurityContextRepository(默认实现是HttpSessionSecurityContextRepository)获取信息并填充SecurityContextHolder(如果没有,则创建一个新的ThreadLocal的SecurityContext),并在请求完成并清空SecurityContextHolder并更新SecurityContextRepository。
在Spring Security中,虽然安全上下文信息被存储于Session中,但实际的Filter中不应直接操作Session(过滤器一般负责核心的处理流程,而具体的业务实现,通常交给其中聚合的其他实体类),而是用如HttpSessionSecurityContextRepository中loadContext(),saveContext()来存取session。
[HeaderWriterFilter] 用来给http响应添加一些Header,比如X-Frame-Options,X-XSS-Protection*,X-Content-Type-Options。
[CsrfFilter] 默认开启,用于防止csrf攻击的过滤器
[LogoutFilter] 处理注销的过滤器
[UsernamePasswordAuthenticationFilter] 表单提交了username和password,被封装成UsernamePasswordAuthenticationToken对象进行一系列的认证,便是主要通过这个过滤器完成的,即调用AuthenticationManager.authenticate()。在表单认证的方法中,这是最最关键的过滤器。具体过程是:
(1)调用AbstractAuthenticationProcessingFilter.doFilter()方法执行过滤器
(2)调用UsernamePasswordAuthenticationFilter.attemptAuthentication()方法
(3)调用AuthenticationManager.authenticate()方法(实际上委托给AuthenticationProvider的实现类来处理)
[DefaultLoginPageGeneratingFilter] & [DefaultLogoutPageGeneratingFilter] 如果没有配置/login及login page, 系统则会自动配置这两个Filter。
[BasicAuthenticationFilter] Processes a HTTP request’s BASIC authorization headers, putting the result into the SecurityContextHolder.
[RequestCacheAwareFilter] 内部维护了一个RequestCache,用于缓存request请求
[SecurityContextHolderAwareRequestFilter] 此过滤器对ServletRequest进行了一次包装,使得request具有更加丰富的API(populates the ServletRequest with a request wrapper which implements servlet API security methods)
[AnonymousAuthenticationFilter] 匿名身份过滤器,spring security为了兼容未登录的访问,也走了一套认证流程,只不过是一个匿名的身份。它位于身份认证过滤器(e.g. UsernamePasswordAuthenticationFilter)之后,意味着只有在上述身份过滤器执行完毕后,SecurityContext依旧没有用户信息,AnonymousAuthenticationFilter该过滤器才会有意义。
[SessionManagementFilter] 和session相关的过滤器,内部维护了一个SessionAuthenticationStrategy来执行任何与session相关的活动,比如session-fixation protection mechanisms or checking for multiple concurrent logins。
[ExceptionTranslationFilter] 异常转换过滤器,这个过滤器本身不处理异常,而是将认证过程中出现的异常(AccessDeniedException and AuthenticationException)交给内部维护的一些类去处理。它
位于整个springSecurityFilterChain的后方,用来转换整个链路中出现的异常,将其转化,顾名思义,转化以意味本身并不处理。一般其只处理两大类异常:AccessDeniedException访问异常和AuthenticationException认证异常。
它将Java中的异常和HTTP的响应连接在了一起,这样在处理异常时,我们不用考虑密码错误该跳到什么页面,账号锁定该如何,只需要关注自己的业务逻辑,抛出相应的异常便可。如果该过滤器检测到AuthenticationException,则将会交给内部的AuthenticationEntryPoint去处理,如果检测到AccessDeniedException,需要先判断当前用户是不是匿名用户,如果是匿名访问,则和前面一样运行AuthenticationEntryPoint,否则会委托给AccessDeniedHandler去处理,而AccessDeniedHandler的默认实现,是AccessDeniedHandlerImpl。
[FilterSecurityInterceptor] 这个过滤器决定了访问特定路径应该具备的权限,这些受限的资源访需要什么权限或角色,这些判断和处理都是由该类进行的。
(1)调用FilterSecurityInterceptor.invoke()方法执行过滤器
(2)调用AbstractSecurityInterceptor.beforeInvocation()方法
(3)调用AccessDecisionManager.decide()方法决策判断是否有该权限
参考
JSON Web Token 入门教程
Spring Security-5-认证流程梳理
Spring Security3源码分析(5)-SecurityContextPersistenceFilter分析
Spring Security addFilter() 顺序问题
前后端联调之Form Data与Request Payload,你真的了解吗?
Spring Boot 2 + Spring Security 5 + JWT 的单页应用 Restful 解决方案
SpringBoot实战派-第十章源码
https://www.cnblogs.com/cjsblog/p/9184173.html
https://www.cnblogs.com/storml/p/10937486.html
技术自由的实现路径 PDF 获取:
实现你的 架构自由:
《吃透8图1模板,人人可以做架构》
《10Wqps评论中台,如何架构?B站是这么做的!!!》
《阿里二面:千万级、亿级数据,如何性能优化? 教科书级 答案来了》
《峰值21WQps、亿级DAU,小游戏《羊了个羊》是怎么架构的?》
《100亿级订单怎么调度,来一个大厂的极品方案》
《2个大厂 100亿级 超大流量 红包 架构方案》
… 更多架构文章,正在添加中
实现你的 响应式 自由:
《响应式圣经:10W字,实现Spring响应式编程自由》
这是老版本 《Flux、Mono、Reactor 实战(史上最全)》
实现你的 spring cloud 自由:
《Spring cloud Alibaba 学习圣经》 PDF
《分库分表 Sharding-JDBC 底层原理、核心实战(史上最全)》
《一文搞定:SpringBoot、SLF4j、Log4j、Logback、Netty之间混乱关系(史上最全)》
实现你的 linux 自由:
《Linux命令大全:2W多字,一次实现Linux自由》
实现你的 网络 自由:
《TCP协议详解 (史上最全)》
《网络三张表:ARP表, MAC表, 路由表,实现你的网络自由!!》
实现你的 分布式锁 自由:
《Redis分布式锁(图解 - 秒懂 - 史上最全)》
《Zookeeper 分布式锁 - 图解 - 秒懂》
实现你的 王者组件 自由:
《队列之王: Disruptor 原理、架构、源码 一文穿透》
《缓存之王:Caffeine 源码、架构、原理(史上最全,10W字 超级长文)》
《缓存之王:Caffeine 的使用(史上最全)》
《Java Agent 探针、字节码增强 ByteBuddy(史上最全)》
实现你的 面试题 自由:
4000页《尼恩Java面试宝典 》 40个专题
以上尼恩 架构笔记、面试题 的PDF文件更新,请到《技术自由圈》公号获取↓↓↓
版权归原作者 40岁资深老架构师尼恩 所有, 如有侵权,请联系我们删除。