Packet Tracer - 第 2 层安全
目标
· 将 Central 交换机指定为根网桥。
· 保护生成树参数的安全,以防止 STP 恶意操纵 攻击。
· 启用端口安全以防御 CAM 表泛洪攻击。
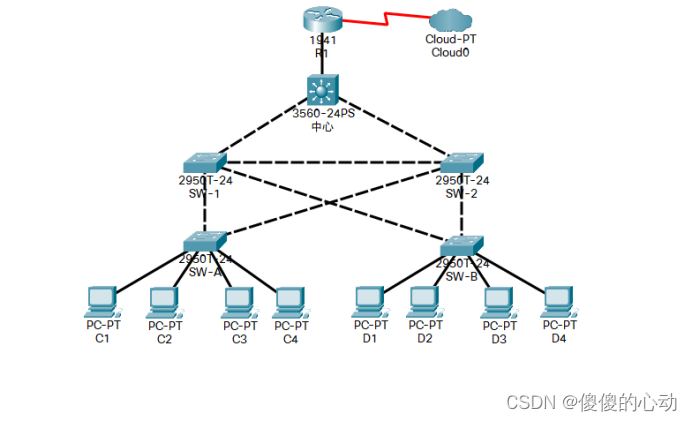
拓扑图

背景/ 场景
最近网络遭到了一些 攻击。出于此原因,网络管理员向您分配了 配置第 2 层安全的任务。
为实现最佳性能和安全性,管理员 希望确保根网桥为 3560 Central 交换机。为 防止生成树恶意操纵攻击,管理员希望确保 STP 参数是安全的。为防止 CAM 表溢出攻击, 网络管理员决定配置端口安全,以限制 每个交换机端口可以获知的 MAC 地址数量。如果 MAC 地址数量超过设置限制,管理员希望 关闭端口。
已使用 以下信息对所有交换机设备进行了预配置:
o 启用 密码:ciscoenpa55
o 控制台 密码:ciscoconpa55
o SSH 用户名和密码:SSHadmin/ciscosshpa55
第 1 部分:配置根 网桥
步骤 1:确定 当前根网桥。
从 Central 交换机,发出 show spanning-tree 命令,以确定当前根网桥,查看使用的端口 及其状态。
Central#show spanning-tree
VLAN0001
Spanning tree enabled protocol ieee
Root ID Priority 32769
Address 0009.7C61.9058
Cost 4
Port 25(GigabitEthernet0/1)
Hello Time 2 sec Max Age 20 sec Forward Delay 15 sec
Bridge ID Priority 32769 (priority 32768 sys-id-ext 1)
Address 00D0.D31C.634C
Hello Time 2 sec Max Age 20 sec Forward Delay 15 sec
Aging Time 20
Interface Role Sts Cost Prio.Nbr Type
Gi0/1 Root FWD 4 128.25 P2p
Gi0/2 Desg FWD 4 128.26 P2p
Fa0/1 Desg FWD 19 128.1 P2p
Central#
哪个交换机是当前的根网桥?
当前根目录为 SW-1。
根据当前的根桥, 生成树是什么?(绘制生成树拓扑。)
步骤 2:指定 Central 作为主要根网桥。
使用 spanning-tree vlan 1 root primary 命令,将 Central 指定为根网桥。
Central(config)#spanning-tree vlan 1 root primary
步骤 3:指定 SW-1 作为次根网桥
使用 spanning-tree 命令,将 SW-1指定为次根网桥。
SW-1(config)#spanning-tree vlan 1 root secondary
步骤 4:验证 生成树的配置。
发出 show spanning-tree 命令,验证 Central 是根网桥。
Central# show spanning-tree
VLAN0001
Spanning tree enabled protocol ieee
Root ID Priority 24577
        Address       00D0.D31C.634C

        This bridge is the root
Hello Time 2 sec Max Age 20 sec Forward Delay 15 sec
哪个交换机是当前的根网桥?
当前根是中****心
根据新的根网桥, 生成树是什么?(绘制生成树拓扑。)
第 2 部分:抵御 STP 攻击
保护 STP 参数的安全以防止 STP 操纵 攻击。
步骤 1:在所有接入端口上启用 PortFast。
在连接 单个工作站或服务器的接入端口上配置 PortFast,这使上述端口能够更快切换为活动状态。在 SW-A 和 SW-B 上的 连接接入端口上,使用 spanning-tree portfast 命令。
SW-A(config)#interface range f0/1-4
SW-A(config-if-range)#spanning-tree portfast
SW-B(config)#interface range f0/1-4
SW-B(config-if-range)#spanning-tree portfast
步骤 2:在所有接入端口上启用 BPDU 防护。
BPDU 防护功能有助于防止接入端口上出现非法 交换机和欺骗操作。在 SW-A 和 SW-B 接入端口上启用 BPDU 防护。
注意:在接口配置模式下使用 spanning-tree bpduguard enable 命令,或在 全局配置模式下使用 ****spanning-tree portfast bpduguard default ****命令,即可在 各个端口上启用生成树 BPDU 防护。为了便于对本练习进行评分, 请使用 spanning-tree bpduguard enable 命令。
SW-A(config)#interface range f0/1-4
SW-A(config-if-range)#spanning-tree bpduguard enable
SW-B(config)#interface range f0/1-4
SW-B(config-if-range)#spanning-tree bpduguard enable
步骤 3:启用根 防护。
可以在交换机上并非 根端口的所有端口上启用根防护。最好将根防护部署在连接其他非根 交换机的端口上。使用 show spanning-tree 命令确定各交换机上 根端口的位置。
在 SW-1 上,在端口 F0/23 和 F0/24 上启用根防护。 在 SW-2 上,在端口 F0/23 和 F0/24 上启用根防护。
SW-1(config)#interface range f0/23 - 24
SW-1(config-if-range)# spanning-tree guard root
SW-2(config)#interface range f0/23 - 24
SW-2(config-if-range)# spanning-tree guard root
第 3 部分:配置 端口安全并禁用未使用的端口
步骤 1:在连接到主机的所有端口上配置 基本端口安全。
应对 SW-A 和 SW-B 上的所有接入端口执行此操作程序。将获知的 MAC 地址的最大数量设置为 2, 允许动态获知 MAC 地址,并将违规操作设置为关闭。
SW-A(config)#interface range f0/1 - 22
SW-A(config-if-range)#switchport mode access
SW-A(config-if-range)#switchport port-security
SW-A(config-if-range)#switchport port-security maximum 2
SW-A(config-if-range)#switchport port-security violation shutdown
SW-A(config-if-range)#switchport port-security mac-address sticky
SW-B(config)#interface range f0/1-22
SW-B(config-if-range)#switchport mode access
SW-B(config-if-range)#switchport port-security max
SW-B(config-if-range)#switchport port-security maximum 2
SW-B(config-if-range)#switchport port-security violation shutdown
SW-B(config-if-range)#switchport port-security mac-address sticky
注意:交换机端口必须配置为接入 端口,才能启用端口安全功能。
为什么在连接 到其他交换机设备的端口上没有启用端口安全?
连接到其他交换机设备的端口具有为该单个端口学习的大量 MAC 地址。
限制可在这些端口上获知的 MAC 地址数量会显著影响网络功能。
步骤 2:验证端口 安全。
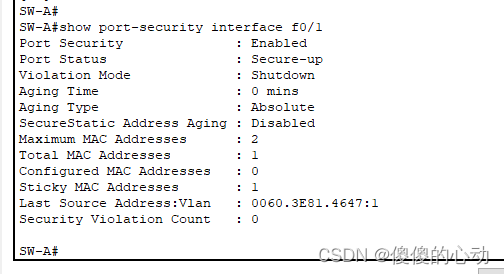
a. 在 SW-A 上,发出命令 show port-security interface f0/1 以验证是否配置了端口安全。
SW-A# show port-security interface f0/1
Port Security : Enabled
Port Status : Secure-up
Violation Mode : Shutdown
Aging Time : 0 mins
过期 类型 : Absolute
SecureStatic Address Aging : Disabled
Maximum MAC Addresses : 2
Total MAC Addresses : 0
Configured MAC Addresses : 0
Sticky MAC Addresses : 0
Last Source Address:Vlan : 0000.0000.0000:0
Security Violation Count : 0
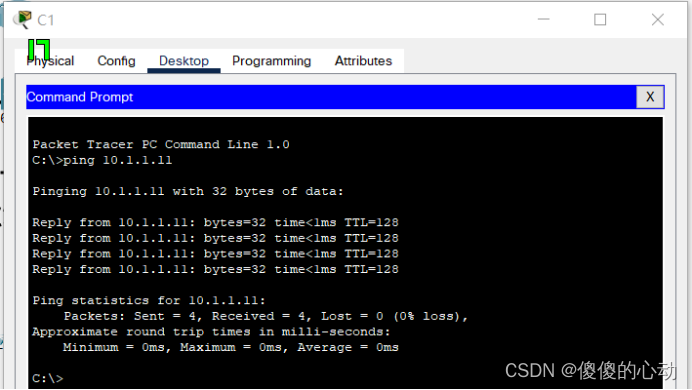
b. 从 C1 对 C2 执行 ping 操作,并再次发出命令 show port-security interface f0/1 以验证该交换机是否获知了 C1 的 MAC 地址。


步骤 3:禁用 未使用的端口。
禁用当前未使用的所有端口。
SW-A(config)#interface range f0/5 - 22
SW-A(config-if-range)#shutdown
SW-B(config)#interface range f0/5 - 22
SW-B(config-if-range)#shutdown
步骤 4:检查 结果。
完成比例应为 100%。点击 Check Results(检查结果)以查看反馈并验证已完成的所需 组件。
实验具体步骤:
Central****:
Central#conf

Configuring from terminal, memory, or network [terminal]?

Enter configuration commands, one per line. End with CNTL/Z.

Central(config)#spanning-tree vlan 1 root primary

Central(config)#end

Central#
SW-1****:
SW-1>en

Password:ciscoenpa55

SW-1#conf

Configuring from terminal, memory, or network [terminal]?

Enter configuration commands, one per line. End with CNTL/Z.

SW-1(config)#spanning-tree vlan 1 root secondary

SW-1(config)#interface range f0/23 - 24

SW-1(config-if-range)# spanning-tree guard root

SW-1(config-if-range)#end

SW-1#
SW-2:
SW-2>en

Password:ciscoenpa55

SW-2#conf t

Enter configuration commands, one per line. End with CNTL/Z.

SW-2(config)#interface range f0/23 - 24

SW-2(config-if-range)#spanning-tree guard root

SW-2(config-if-range)#end

SW-2#
SW-A:
SW-A>en

Password: ciscoenpa55

SW-A#conf t

Enter configuration commands, one per line. End with CNTL/Z.

SW-A(config)#int

SW-A(config)#interface r

SW-A(config)#interface range f0/1-4

SW-A(config-if-range)#spanning-tree bpduguard enable

SW-A(config-if-range)#spanning-tree portfast

SW-A(config-if-range)#exit

SW-A(config)#interface range f0/1 - 22

SW-A(config-if-range)#switchport mode access

SW-A(config-if-range)#switchport port-security

SW-A(config-if-range)#switchport port-security maximum 2

SW-A(config-if-range)#switchport port-security violation shutdown

SW-A(config-if-range)#switchport port-security mac-address sticky

SW-A(config-if-range)#exit

SW-A(config)#interface range f0/5 - 22

SW-A(config-if-range)#shutdown

SW-A(config-if-range)#end

SW-A#wr

Building configuration...

[OK]

SW-A#
SW-B:
SW-B>en

Password: ciscoenpa55

SW-B#conf t

Enter configuration commands, one per line. End with CNTL/Z.

SW-B(config)#interface range f0/1-4

SW-B(config-if-range)#spanning-tree bpduguard enable

SW-B(config-if-range)#spanning-tree portfast

SW-B(config-if-range)#exit

SW-B(config)#interface range f0/1-22

SW-B(config-if-range)#switchport mode access

SW-B(config-if-range)#switchport port-security

SW-B(config-if-range)#switchport port-security maximum 2

SW-B(config-if-range)#switchport port-security violation shutdown

SW-B(config-if-range)#switchport port-security mac-address sticky

SW-B(config-if-range)#exit

SW-B(config)#interface range f0/5 - 22

SW-B(config-if-range)#shutdown

SW-B(config-if-range)#end

SW-B#wr

Building configuration...

[OK]

SW-B#
实验脚本:
Central****:
conf t

spanning-tree vlan 1 root primary

end

write
SW-1****:
en

ciscoenpa55

conf t

spanning-tree vlan 1 root secondary

interface range f0/23 - 24

spanning-tree guard root

end

write
SW-2:
en

ciscoenpa55

conf t

interface range f0/23 - 24

spanning-tree guard root

end

write
SW-A:
en

ciscoenpa55

conf t

interface range f0/1-4

spanning-tree bpduguard enable

spanning-tree portfast

exit

interface range f0/1 - 22

switchport mode access

switchport port-security

switchport port-security maximum 2

switchport port-security violation shutdown

switchport port-security mac-address sticky

exit

interface range f0/5 - 22

shutdown

end

wr
SW-B:
en

ciscoenpa55

conf t

interface range f0/1-4

spanning-tree bpduguard enable

spanning-tree portfast

exit

interface range f0/1-22

switchport mode access

switchport port-security

switchport port-security maximum 2

switchport port-security violation shutdown

switchport port-security mac-address sticky

exit

interface range f0/5 - 22

shutdown

end

wr
实验链接:https://pan.baidu.com/s/1mALCOrNikB4_B9Lylc_tfQ?pwd=6312
提取码:6312
--来自百度网盘超级会员V2的分享
版权归原作者 傻傻的心动 所有, 如有侵权,请联系我们删除。