
开源库源码分析:OkHttp源码分析

导言
接下来就要开始分析一些常用开源库的源码了,作为最常用的网络请求库,OkHttp以其强大的功能深受Android开发者的喜爱(比如说我),还有对该库进行二次封装而成的热门库,比如说Retrofit。本文我们将从源码入手看看OkHttp是如何运作的。注意本文解析的是OkHttp3库,该库是用Kotlin写的,需要大家有一些Kotlin基础。
OkHttp的最佳使用
这个问题是在OkHttp3的
OkHttpClient
中的注释中发现的: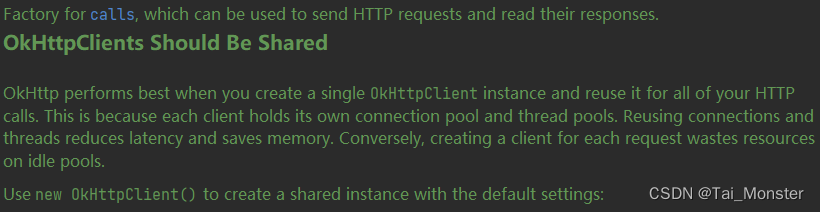
这段注释中提到了OkHttp最好是用单例的OkHttpClient来实现请求,我们可以对该单例进行复用。这是因为每一个OkHttpClient都会持有一个连接池和线程池,都称之为池了,那么其作用肯定就是为了复用。通过复用这些连接和线程我们可以显著地降低延迟和节约内存使用。
实际上这段注释中已经提到了OkHttp中的一些复用机制了,连接复用和线程复用。
调度类Dispatcher
调度类的线程池
OkHttp中核心类之一就是这个调度类
Dispatcher
,所有的网络请求类
Call
都需要通过这个调度类来执行任务。这个调度类是OkHttpClient类的成员变量,我们是在调度类中执行请求的,那我们就顺便再来介绍一下客户端类中的成员变量:
//调度类@get:JvmName("dispatcher")val dispatcher: Dispatcher = builder.dispatcher
//连接池@get:JvmName("connectionPool")val connectionPool: ConnectionPool = builder.connectionPool
//应用拦截器@get:JvmName("interceptors")val interceptors: List<Interceptor>= builder.interceptors.toImmutableList()//网络拦截器@get:JvmName("networkInterceptors")val networkInterceptors: List<Interceptor>=
      builder.networkInterceptors.toImmutableList()//事件监听工厂@get:JvmName("eventListenerFactory")val eventListenerFactory: EventListener.Factory =
      builder.eventListenerFactory
这几个应当是最核心的几个成员变量,我们将在后面再接触它们。回归正题,我们继续看调度类,既然要执行Call,那么这个调度器类就一定会有线程池,这个线程池有两个手段可以设置:
privatevar executorServiceOrNull: ExecutorService?=null//线程池@get:Synchronized//在调用get时设置线程池为一个默认线程池,类似于一个CachedPool@get:JvmName("executorService")val executorService: ExecutorService
    get(){if(executorServiceOrNull ==null){
        executorServiceOrNull =ThreadPoolExecutor(0, Int.MAX_VALUE,60, TimeUnit.SECONDS,SynchronousQueue(),threadFactory("$okHttpName Dispatcher",false))}return executorServiceOrNull!!}constructor(executorService: ExecutorService):this(){//通过构造方法设置线程池this.executorServiceOrNull = executorService
  }
可以看到,方法一是调用构造函数来设置线程池,第二个方法就是在调用get方法时会自动设置一个效果类似于
CachedPool
的线程池。
调度类执行请求
我们使用OkHttp时一般是两种方式,
同步请求execute
和
异步请求enqueue
,我们以异步请求为例来分析调度类是如何执行网络请求的。一般我们发送异步请求是这样的形式:
publicstaticvoidmain(String[] args){OkHttpClient client =newOkHttpClient();Request r =newRequest.Builder().build();Call call = client.newCall(r);
        call.enqueue(newCallback(){@OverridepublicvoidonFailure(@NonNullCall call,@NonNullIOException e){}@OverridepublicvoidonResponse(@NonNullCall call,@NonNullResponse response)throwsIOException{}});}
首先通过
RequestBuilder
类来构建了一个请求类,然后将该请求传入
newCall
方法中新创建出了一个
Call
:
overridefunnewCall(request: Request): Call =RealCall(this, request, forWebSocket =false)
可以看到返回的是
RealCall
类,该类实现了Call接口。接下来就从Call的
enqueue
方法入手,这里实际上是
RealCall
类中:
overridefunenqueue(responseCallback: Callback){check(executed.compareAndSet(false,true)){"Already Executed"}callStart()//开启事件监听
    client.dispatcher.enqueue(AsyncCall(responseCallback))//通过调度类入队}
这其中
callStart
方法会开启事件监听,我们先不管这个事件监听,看最后一句通过调度器来入队,这个
AsyncCall()
类是异步请求类,实现了
Runnable
接口,这里实际上就是将我们传入的实现了
Callback
的回调给包装成了AsyncCall。我们继续看Dispatcher中是如何入队的:
  internal fun enqueue(call:AsyncCall){synchronized(this){
      readyAsyncCalls.add(call)// Mutate the AsyncCall so that it shares the AtomicInteger of an existing running call to// the same host.if(!call.call.forWebSocket){
        val existingCall =findExistingCallWithHost(call.host)if(existingCall !=null) call.reuseCallsPerHostFrom(existingCall)}}promoteAndExecute()}
首先为了确保线程安全,调度器先将其上锁然后将之前包装成的
AsyncCall
加入到了
readyAsyncCall
就绪队列中。中间这一段判断是用于处理与主机(host)相关的异步调用复用。如果 call 不是用于 WebSocket 调用,它会尝试查找是否已经存在一个与相同主机(host)相关的异步调用任务。如果找到了已经存在的异步调用,它会尝试共享这两个异步调用任务之间的状态。这是为了复用已经建立的连接,以提高性能和减少资源消耗。
最后会调用
promoteAndExecute
方法执行,这个方法是执行请求的核心之一:
private fun promoteAndExecute():Boolean{this.assertThreadDoesntHoldLock()

    val executableCalls = mutableListOf<AsyncCall>()//可执行的Calls
    val isRunning:Booleansynchronized(this){
      val i = readyAsyncCalls.iterator()//获得一个迭代器while(i.hasNext()){//开始迭代
        val asyncCall = i.next()if(runningAsyncCalls.size >=this.maxRequests)break// Max capacity.if(asyncCall.callsPerHost.get()>=this.maxRequestsPerHost)continue// Host max capacity.

        i.remove()
        asyncCall.callsPerHost.incrementAndGet()
        executableCalls.add(asyncCall)
        runningAsyncCalls.add(asyncCall)}
      isRunning =runningCallsCount()>0}for(i in 0 until executableCalls.size){
      val asyncCall = executableCalls[i]
      asyncCall.executeOn(executorService)}return isRunning
  }
这段代码的核心逻辑就是while循环之中,这很显然是一个通过迭代器开始遍历就绪队列
readyAsyncCall
的过程,它会将就绪队列中的call移入到可执行队列
executableCalls
和正在执行异步队列
runningAsyncCalls
中。其中还有两句判断条件:
if(runningAsyncCalls.size >=this.maxRequests)break// Max capacity.if(asyncCall.callsPerHost.get()>=this.maxRequestsPerHost)continue// Host max capacity.
一句是判断正在运行队列没有超过最大Size,一句是判断每一句的最大执行数不超过最大值,这两个值在Dispatcher中都有定义。最后会跳入到for循环中并调用AsyncCall的
executeOn
方法,并将线程池传入,也就是接下来就是在线程池中执行该异步请求了。我们最后来看这个
executeOn
方法:
fun executeOn(executorService:ExecutorService){
      client.dispatcher.assertThreadDoesntHoldLock()var success =falsetry{
        executorService.execute(this)
        success =true}catch(e:RejectedExecutionException){
        val ioException =InterruptedIOException("executor rejected")
        ioException.initCause(e)noMoreExchanges(ioException)
        responseCallback.onFailure(this@RealCall, ioException)}finally{if(!success){
          client.dispatcher.finished(this)// This call is no longer running!}}}
这个方法真是开门见山。在try语句的第一句处就通过线程池执行了该任务,还记得这个AsyncCall是由我们传入的Call回调包装而成吗?接下来就会回调到我们的函数之中去了。众所周知,由于
executorService.execute(this)
这一句,线程池接下来会执行AsyncCall的
run
方法了:
overridefunrun(){threadName("OkHttp ${redactedUrl()}"){var signalledCallback =false
        timeout.enter()try{val response =getResponseWithInterceptorChain()//1--通过拦截器链来获得响应
          signalledCallback =true
          responseCallback.onResponse(this@RealCall, response)//2--请求成功,回调到我们传入的onResponse方法中}catch(e: IOException){if(signalledCallback){// Do not signal the callback twice!
            Platform.get().log("Callback failure for ${toLoggableString()}", Platform.INFO, e)}else{
            responseCallback.onFailure(this@RealCall, e)//3--请求失败,回调到我们传入的onFailure方法之中去}}catch(t: Throwable){cancel()if(!signalledCallback){val canceledException =IOException("canceled due to $t")
            canceledException.addSuppressed(t)
            responseCallback.onFailure(this@RealCall, canceledException)}throw t
        }finally{
          client.dispatcher.finished(this)//结束本次请求}}}
我已经在代码之中加入一些注释了,在注释一处会通过拦截器链来获得响应,这个拦截器机制我们之后再将,这里只要知道它在这里获得了响应即可。在注释二处我们就可以看到这里显然是调用了我们传入的Call回调了,请求成功调用
onResponse
回调,要是请求失败的话则回调到
onFailure
方法之中去。最后在finally块中将本次请求结束,实际上这个
finished
方法还会开启下一次循环:
internalfunfinished(call: AsyncCall){
    call.callsPerHost.decrementAndGet()finished(runningAsyncCalls, call)}privatefun<T>finished(calls: Deque<T>, call: T){val idleCallback: Runnable?synchronized(this){if(!calls.remove(call))throwAssertionError("Call wasn't in-flight!")
      idleCallback =this.idleCallback
    }val isRunning =promoteAndExecute()if(!isRunning && idleCallback !=null){
      idleCallback.run()}}
由第一个函数会调转到第二个函数,从第二个函数来看,它首先会将本次的call从
runningAsyncCalls
正在运行队列中移除,然后会继续调用我们之前提到过的
promoteAndExecute
方法开启下一次循环,如果没有任务了的话并且空闲处理程序不为空的话,还会执行空闲处理程序。
拦截器链
之前提到网络请求的相应是通过拦截器链获得的:
val response =getResponseWithInterceptorChain()
首先,什么是拦截器呢?
在计算机编程领域,拦截器(Interceptor)是一种常见的设计模式,用于在软件系统的不同组件之间添加或修改功能。拦截器的主要目的是拦截请求或操作,允许在请求进入目标组件之前或之后执行自定义逻辑。
简单来说就是有许多个拦截器,一个请求的执行需要经过这一整条拦截器链,在一个请求到达一个拦截器的时候我们就可以判断是否要拦截这个请求并进行处理,简单来说就是类似于旅行途中的设置关口。Android中这种模式也运用,比如说
广播
和
View的事件分发和处理
,这都是拦截器模式的运用。
好了,言归正传,我们继续回到上面的方法上:
internalfungetResponseWithInterceptorChain(): Response {// Build a full stack of interceptors.val interceptors = mutableListOf<Interceptor>()//创建拦截器集合
    interceptors += client.interceptors //添加用户设置的应用拦截器
    interceptors +=RetryAndFollowUpInterceptor(client)//负责重试和重定向
    interceptors +=BridgeInterceptor(client.cookieJar)//用于桥接应用层和网络层的请求数据
    interceptors +=CacheInterceptor(client.cache)//用于处理缓存
    interceptors += ConnectInterceptor //网络连接拦截器,用于获取一个链接if(!forWebSocket){//添加用户设置的网络拦截器
      interceptors += client.networkInterceptors
    }
    interceptors +=CallServerInterceptor(forWebSocket)//用于请求网络并获取网络响应//创建责任链val chain =RealInterceptorChain(
        call =this,
        interceptors = interceptors,
        index =0,
        exchange =null,
        request = originalRequest,
        connectTimeoutMillis = client.connectTimeoutMillis,
        readTimeoutMillis = client.readTimeoutMillis,
        writeTimeoutMillis = client.writeTimeoutMillis
    )var calledNoMoreExchanges =falsetry{//启动责任链val response = chain.proceed(originalRequest)if(isCanceled()){
        response.closeQuietly()throwIOException("Canceled")}return response
    }catch(e: IOException){
      calledNoMoreExchanges =truethrownoMoreExchanges(e)as Throwable
    }finally{if(!calledNoMoreExchanges){noMoreExchanges(null)}}}
具体代码的含义已经写在注释中了,首先要提醒大家上面的
+=
号是Kotlin的重载,就是相当于添加集合。其实把上面的方法切分一下的话主要就是做了两件事:创建和整理拦截器集合 和 创建并启动责任链。下面是一张从官方文档中截取的图片
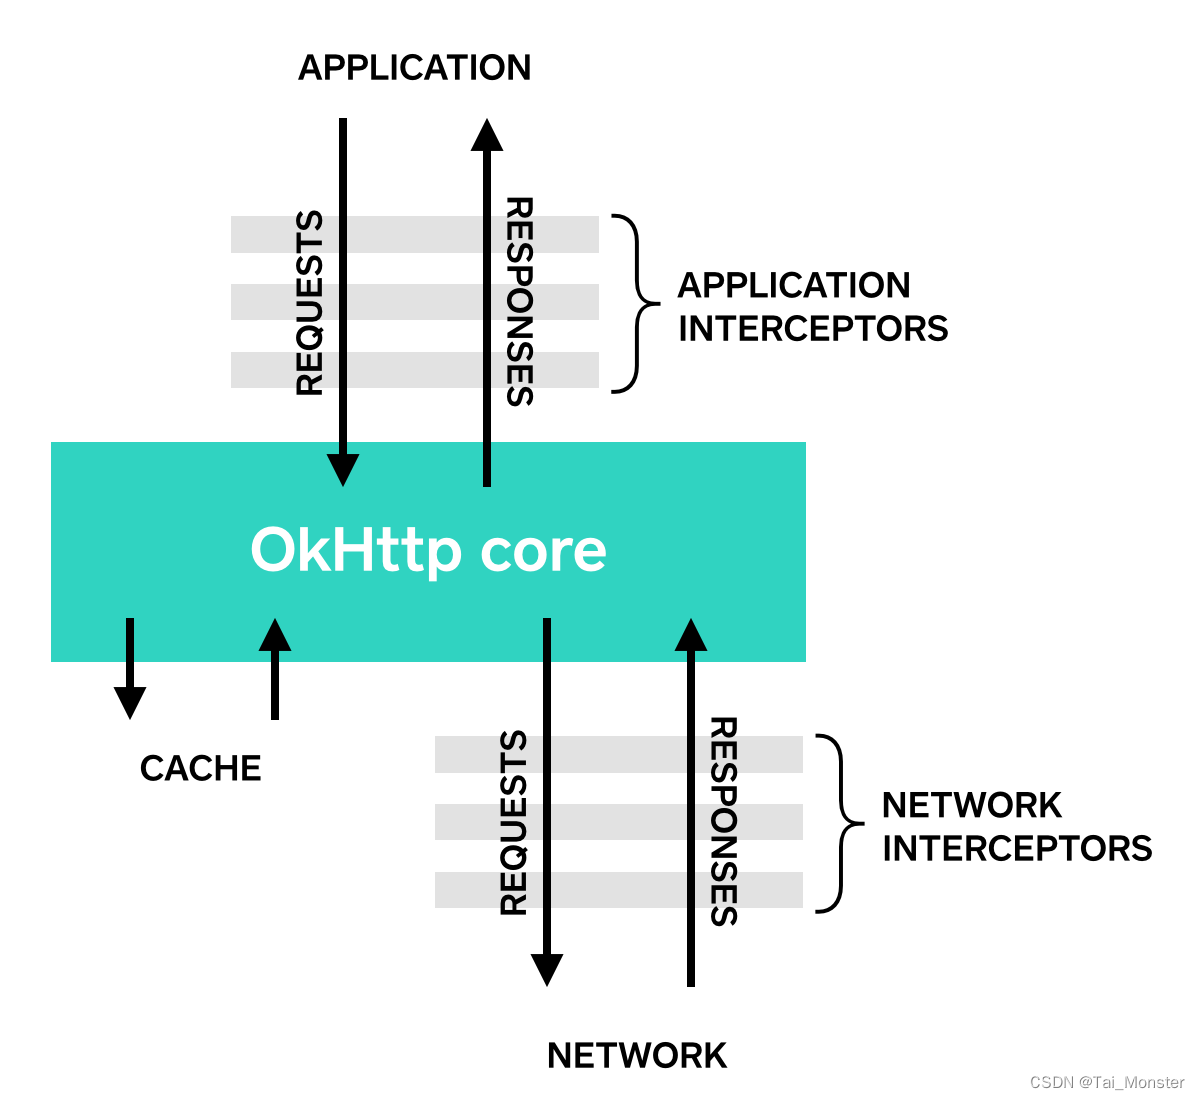
我们看右下部分就是说明网络响应是通过网络拦截器来层层向上传递的,并且拦截器是HTTP工作真正发生的地方。
下面再来介绍各个拦截器的作用:
- interceptor:应用拦截器,通过Client设置
- RetryAndFollowUpInterceptor:重试拦截器,负责网络请求中的重试和重定向。比如网络请求过程中出现异常的时候就需要进行重试。
- BridgeInterceptor:桥接拦截器,用于桥接应用层和网络层的数据。请求时将应用层的数据类型转化为网络层的数据类型,响应时则将网络层的数据类型转化为应用层的数据类型。
- CacheInterceptor:缓存拦截器,负责读取和更新缓存。可以配置自定义的缓存拦截器。
- ConnectInterceptor:网络连接拦截器,其内部会获取一个连接。
- networkInterceptor:网络拦截器,通过Client设置。
- CallServerInterceptor:请求服务拦截器。它是拦截器中处于末尾的拦截器,用于向服务端发送数据并获取响应。
我们回到上面的方法中,在try块中的第一句就是启动责任链
chain.proceed()
,这个方法将会启动责任链并获取响应:
overridefunproceed(request: Request): Response {check(index < interceptors.size)......// Call the next interceptor in the chain.val next =copy(index = index +1, request = request)val interceptor = interceptors[index]@Suppress("USELESS_ELVIS")val response = interceptor.intercept(next)?:throwNullPointerException("interceptor $interceptor returned null").......return response
  }
这里面的核心就是上面的这一小段,首先通过
copy
方法获得下一个拦截器:
internalfuncopy(
    index: Int =this.index,
    exchange: Exchange?=this.exchange,
    request: Request =this.request,
    connectTimeoutMillis: Int =this.connectTimeoutMillis,
    readTimeoutMillis: Int =this.readTimeoutMillis,
    writeTimeoutMillis: Int =this.writeTimeoutMillis
  )=RealInterceptorChain(call, interceptors, index, exchange, request, connectTimeoutMillis,
      readTimeoutMillis, writeTimeoutMillis)
这个copy本质还是调用了构造函数,这这里它调用更改的唯一参数就是
index
参数,它将原来的index+1,显然是想要达到遍历的效果,那么这个
index
参数到底会影响什么呢?我们再将其与一开始的构造相比较:
//创建责任链val chain =RealInterceptorChain(
        call =this,
        interceptors = interceptors,
        index =0,
        exchange =null,
        request = originalRequest,
        connectTimeoutMillis = client.connectTimeoutMillis,
        readTimeoutMillis = client.readTimeoutMillis,
        writeTimeoutMillis = client.writeTimeoutMillis
    )
一开始这个index的值是0,通过查找整个类可以发现唯一有意义的就是我们上面提到的
proceed
方法:
val interceptor = interceptors[index]val response = interceptor.intercept(next)?:throwNullPointerException("interceptor $interceptor returned null")
就是用来从拦截器集合中获取拦截器的。之后又会用我们获取到的拦截器调用其
intercept
方法,并将之前copy出来的对象传进去(也就是新的责任链,只不过index向后指了一格)。这个
intercept
方法是一个接口方法,实现该接口的类有很多,我们以比较简单的
ConnectInterceptor
类为例:
overridefunintercept(chain: Interceptor.Chain): Response {val realChain = chain as RealInterceptorChain
    val exchange = realChain.call.initExchange(chain)val connectedChain = realChain.copy(exchange = exchange)return connectedChain.proceed(realChain.request)}
这里它做的唯一就是初始化了一个
exchange
参数然后将其设置进了责任链中,最后又会调用新设置好的责任链的
proceed
方法中。这就又回到了之前的方法中。这样看来,这个责任链的大体行为模式还是很好懂的,首先启动责任链,责任链调用
proceed
方法启动,
proceed
方法中会获得下一个拦截器并且调用下一个拦截器中的
intercept
拦截方法,在这个拦截方法中首先会进行该拦截器的一些拦截逻辑,拦截逻辑完成之后会再次调用
proceed
方法继续获得下一个拦截器,然后再调用它的拦截器方法,以此类推直到整个拦截器链上的拦截器方法都执行一遍,最后返回出一个Response响应。整个过程差不多如下所示: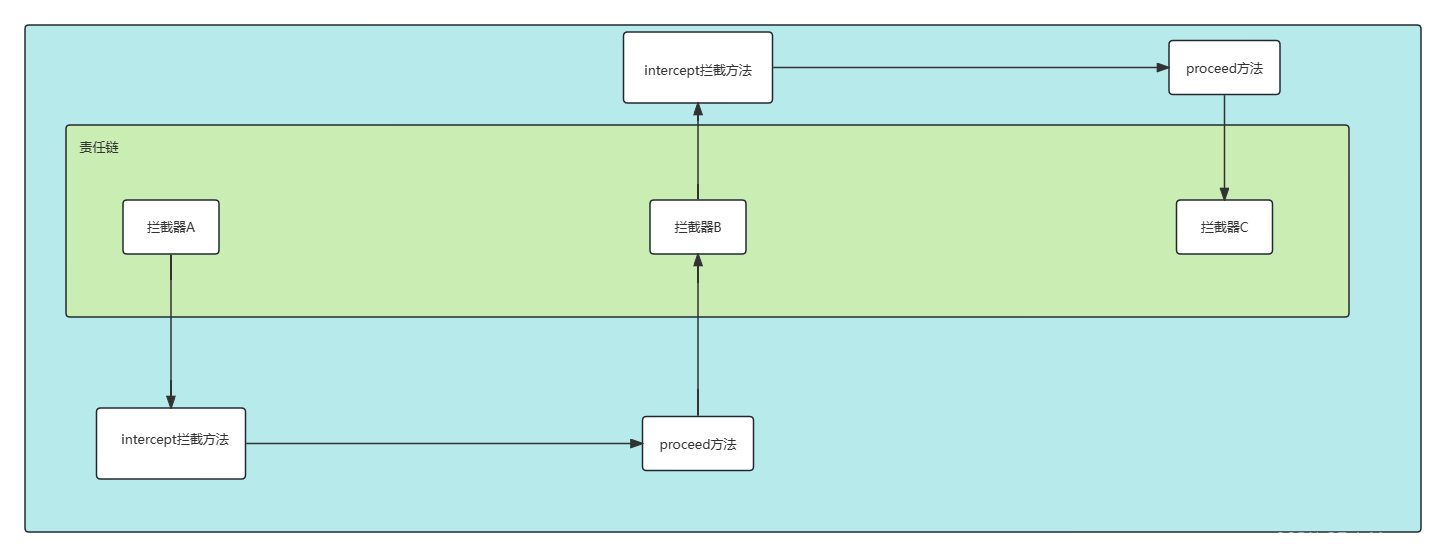
版权归原作者 Tai_Monster 所有, 如有侵权,请联系我们删除。