
JavaScript基础
1.关系
HTML控制着网页的结构,CSS控制着网页的外观,JaavaScript控制着网页的行为,如果将小人比作网页上他们的关系,他们之间的关系就像: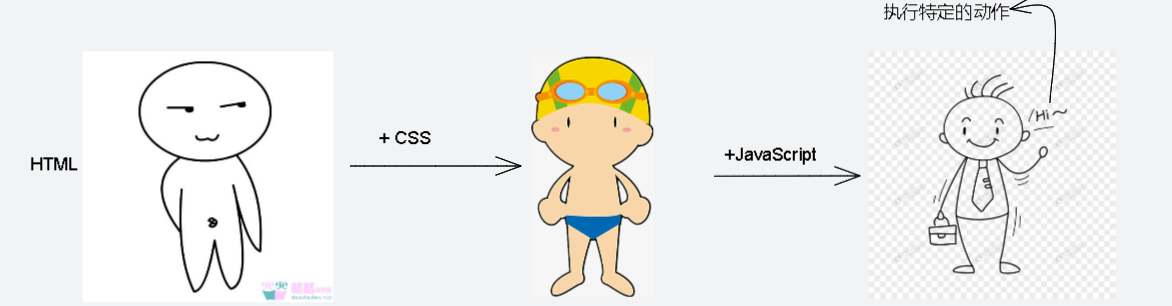
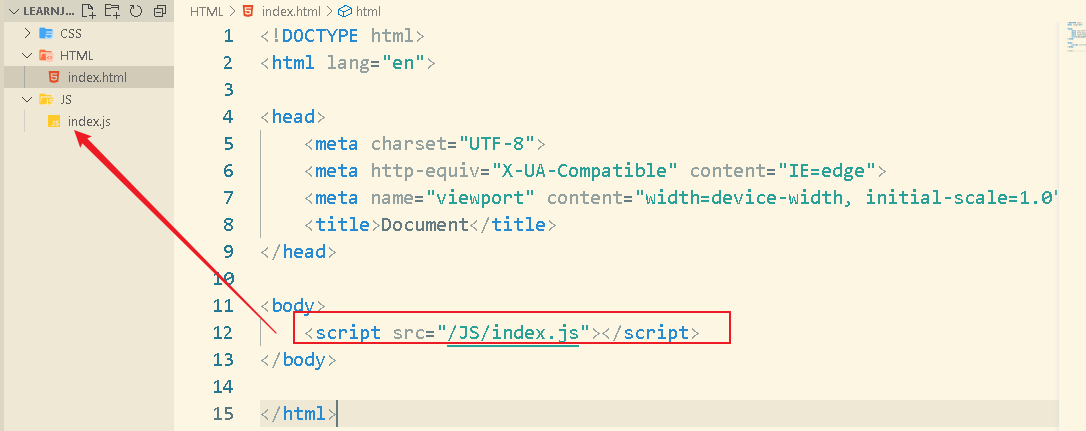
2.JavaScript的引入方式
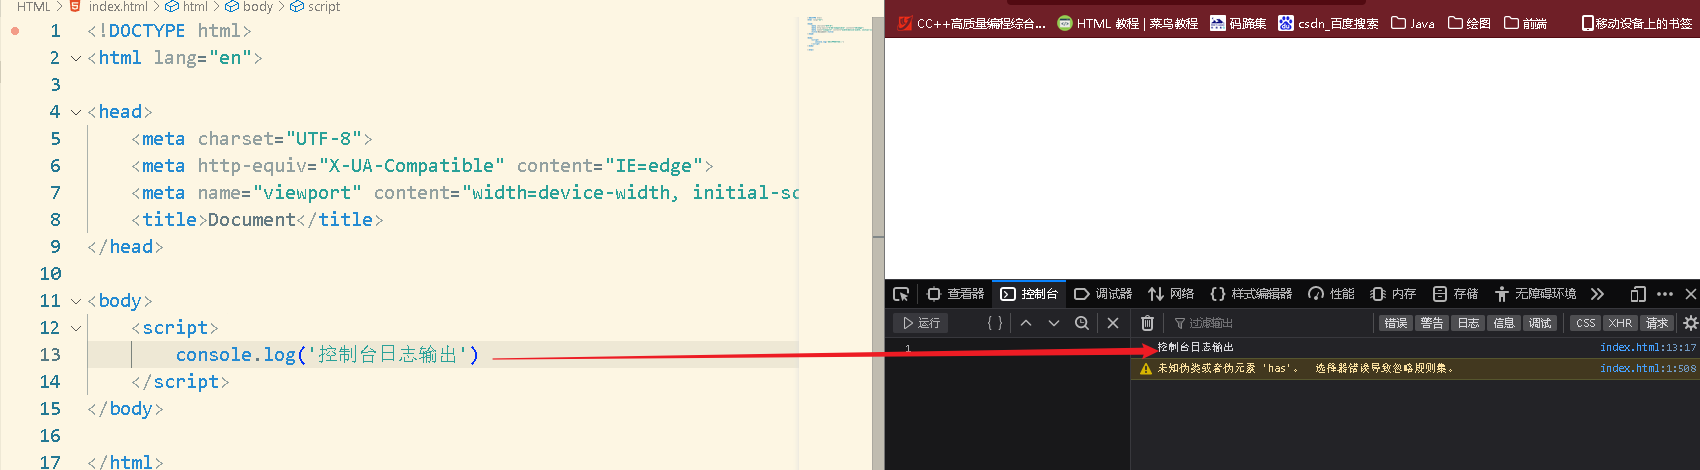
- 内部样式 在</body>的上方书写(网页的加载是从上至下的):
<!DOCTYPE html><html lang="en"><head> <meta charset="UTF-8"> <meta http-equiv="X-UA-Compatible" content="IE=edge"> <meta name="viewport" content="width=device-width, initial-scale=1.0"> <title>Document</title></head><body> <script> console.log("控制台的输出") //在控制台输出 alert("hello,js~") //弹出对话框 </script></body></html> - 外部样式 外部文件引入,当项目比较大时,可以实现结构、样式与行为的分离:
- 行内样式 记载行内书写Js代码,例如:
<button onclick="alert('开玩笑')">点击我月薪百万</button>
3.注释和结束符
- 注释分为单行注释和多行注释:- 单行注释://(ctrl + /)- 多行注释:/**/(shift + alt + a)
- 结束符:在JavaScript中,以分号作为语句的结束符。由于浏览器可以自动判定语句的结束为止,因此分号可写可不写。具体按照团队开发要求进行。
4.输入和输出语法
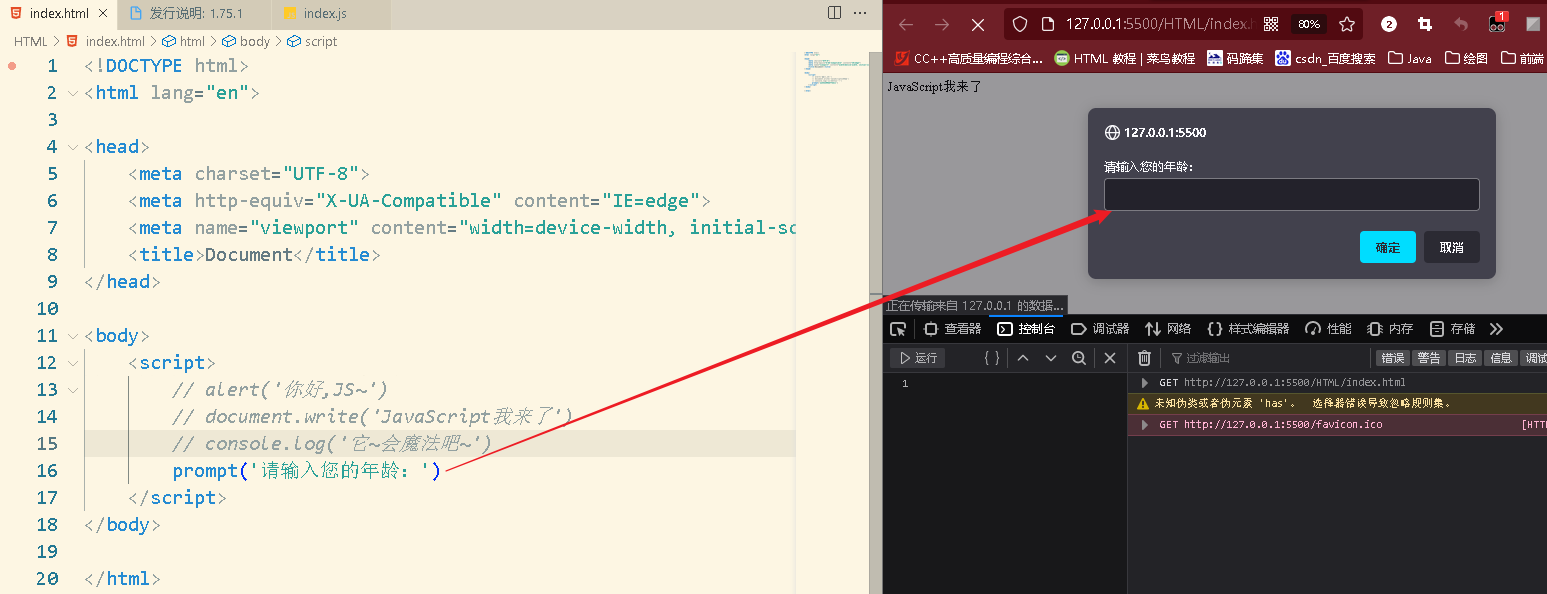
三种输出语法:
- document.write(' ') -向body标签内输出,可以解析标签

- alert(' ') -网页打开时弹出对话框输出
- console.log(' ') -控制台日志输出,供程序员调试使用
输入语法:
- prompt(' ') -弹出对话框请求用户输入
5.变量
变量的定义:
let 变量名 = 值
使用let还是使用var定义变量?
let的出现解决了var的一些问题(现任永远比前任优秀!)。let可以使未赋值仅声明的变量报错误;let可以使重复声明的变量报错;
变量的本质以及命名规则:
- 变量的本质是在内存中申请的一块用来存放数据的小空间。
- 命名规则: 不使用关键字;只能由下划线、字母、数字构成且数字不能开头;起名要有意义;遵循小驼峰命名法,类似Java规范。
6.数组(Array)
数组的声明:
let arr = [e1,e2,e3,...]
数组的使用:
- 通过索引(从0开始)下标输出数组的元素
- 数组中可以存储任意类型的数据元素,以下这种定义方式就是正确的:
let arr = ['hello', 0, false]
7.常量
常量的声明:
const PI = 3.14
8.数据类型
JavaScript中的基本数据类型包含:
- 数字类型(Number):包含整数、小数、整数、负数 NAN:计算结果错误
- 字符串类型(String):使用单引号,双引号,反引号(
- 布尔类型(Boolean)
- Undefined(未定义型):声明了变量但未赋值
- null(空类型)
引用数据类型有:object(对象类型)
null和undefined的区别:
null表示赋值了,但是内容为空;undefined表示没有赋值。通常null常做为尚未创建的对象使用,像将来某个变量中存放的是一个对象,但是该对象还么有创建好,可以先给这个变量赋值为null
检测数据类型:typeof 变量名
<script>
    let age = 18
    let name = '小白的白白'
    let isCool = false
    console.log(typeof age)
    console.log(typeof name)
    console.log(typeof isCool)
</script>

9.运算符
除法运算符:
与Java语言不通,JavaScript的除法包含小数位。
加号运算符:
数值相加,字符串相连(拼接字符串)
10.模板字符串
- 字符串用
- 在字符串内容中拼接变量时,用 ${ } 包裹变量 例如:
<script> let age = 20 document.write(`我今年${age}岁了`) //这种写法相当于:document.write('我今年' + age + '岁了')</script>
11.类型转换
JavaScript中的类型转换分为显示类型转换和隐式类型转换:
显示类型转换:
将字符串转换为数字:Number(string);parseInt(str);(只保留整数);parseFloat(str);(保留小数)。其中paeseInt和parseFloat遇到非数字就停止转换
console.log(Number('456.33'));    //456.33
console.log(parseInt('345.55'))   //345
console.log(parseFloat('345.55')) //345.55
console.log(parseInt('33.5px'))     //33
console.log(parseFloat('33.5px'))   //33.5
隐式类型转换:
使用‘+’可以将字符串转换为数字:
console.log(typeof (+'1223')) //number
此外,-,*,/ 在进行运算时,会先将字符串转换为数字再进行运算:
console.log(2 - '2')        //0
console.log(2 * '2')    //4
console.log(14 / '3')   //4.66666666...
12.运算符
其他常见的常用的运算符就不说了,在JavaScript中常用的有:
- 自增/自减运算符,并且在开发中通常都是使用后置自增自减,并且时单独使用的
- 区分比较运算符’==‘和‘===’:‘==’比较的是左右两边的值是否相等,‘===’比较的是左右两边的类型和值是否都相等,在实际开发中常用‘===’。例如:
console.log(3 === '3') //falseconsole.log(3 == '3') //trueconsole.log(NaN === NaN)//false
13.语句和运算符
语句:
- 单/多分支语句(if..else if..else..、switch..case..default)
- 循环语句(while,for)
运算符:
常见的运算符就不说了,以下为三目运算符的使用:
3 > 5 ? alert('3>5') : alert(3 < 5)
//3>5成立的话返回alert('3>5'),否则返回alert('3<5')
13.continue和break
continue: 跳过本次循环,继续循环的进行
break: 跳出循环结束循环
14.数组操作-新增和删除
新增:(单词可以增加多个)
数组头部新增:arr.unshift(e1,e2...)
数组尾部新增:arr.push(e1,e2...)
删除:(一次只能删除一个)
从数组头部删除:arr.shift()
从数组尾部删除:arr.pop()
指定下标删除:arr.splice(index_start,num);(从index_start开始,删除num个元素),再开发中使用最多,像抽奖等
15.函数
函数的注意事项:
- 函数定义时实参的声明不用使用使用关键字let
- 函数在定义时可以通过e = 0的方式指定参数的默认值,当函数的调用方没有传递过来参数时,就使用默认值进行函数的运算:

- 使用return可以返回函数执行的结果,return的结果不能换行写;return语句之后的语句不会在被执行
函数的定义:
function(e1,e2,e3...) {
    ...
}
- 匿名函数: 定义:
let fn = function(e1,e2...) {} //函数表达式//调用fn(e1,e2...) - 立即执行函数(引入JavaScript文件时会自动执行) 定义:
//实参:sc,形参:xc①(function(xc1,xc2...) {} (sc1,sc2...));②(function(xc1,xc2...){})(sc1,sc2...);立即执行函数在使用时需要在语句块末尾加上分号!
函数的使用案例:
- 输入秒数,转换为时分秒:
<script> function calc(second) { let hours = parseInt(second / 3600) let min = parseInt((second % 3600) / 60) let sec = second % 60 //在不大于10的位数上补零 hours = hours >= 10 ? hours : '0' + hours; min = min >= 10 ? min : '0' + min; sec = sec >= 10 ? sec : '0' + sec; return `${second}秒转换为时分秒的结果为: ${hours}时 ${min}分 ${sec}秒` } let second = +prompt('请输入秒数:') document.write(calc(second))</script>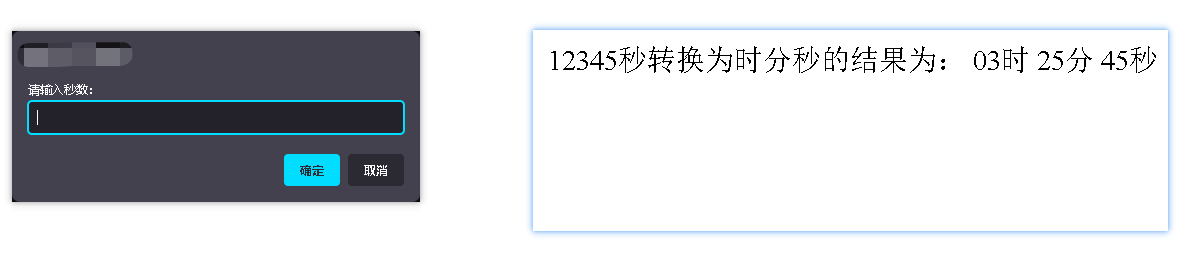
16.逻辑中断
逻辑终端常用于函数形参的默认赋值,例如:
function(a,b) {
    a = a || 0
    b = b || 0
    ...
}
逻辑与&&进行运算时,如果左表达式的值为true,就不再执行右表达式。同理,逻辑或 || 在左表达式的值为false时,就不再进行右表达式的判定。
' ',0,undefined,null,false,NaN转换为布尔值后都是false,其余都为true
17.对象
对象的定义:
let obj = {
    属性:值,
    属性:值,
    方法名:function() {},
    ...(最后一个属性/方法 结束不用加分号)
}
对象的增删改查:
//查①:
对象名.属性
//查②:⭐⭐
//改:对象名.['属性名']    //必须带引号
对象名.属性 = 值
//增:
对象名.新属性名 = 值
//删:
delete 对象名.属性
对象的遍历:
let dogs = {
    'dog-name': 'chick',
    age: 4,
    cry:function() {console.log('汪汪~')}
}
for(let key in dogs) {
    console.log(dogs[key])
}
- 对象遍历的注意事项: 对象遍历的fori n循环中取出的key值为字符串,因此不能通过dogs.key访问,会报undefined错误。应当通过dogs[key]的方式访问对象属性的值。
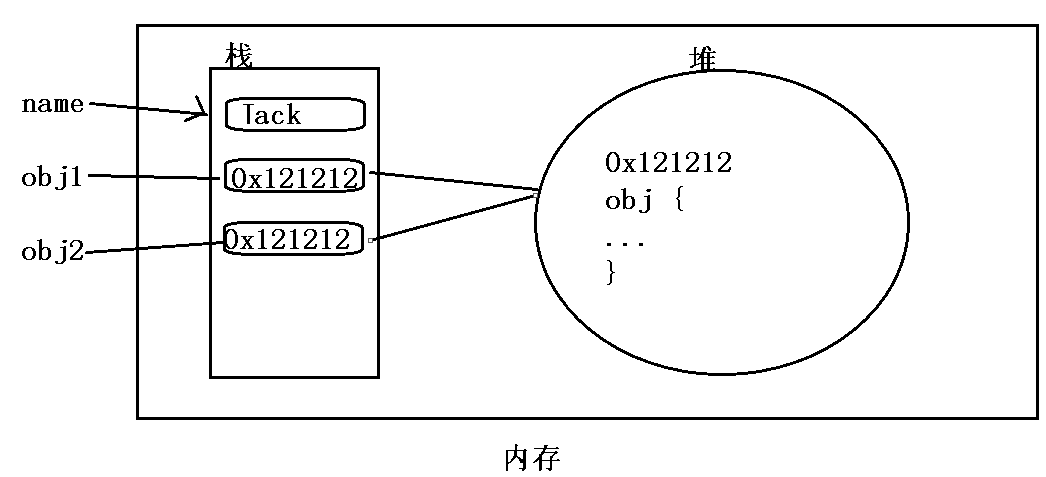
18.数据的存储
基本数据类型:在变量中存储的是值本身,因此也叫做数值类型。基本数据类型变量的值存放在内存的栈空间上
引用数据类型:在变量中保存的是对象的地址或者说是引用。对象及其属性保存在内存的堆空间上。
Web API阶段
19.DOM
19.1.获取DOM元素
- document.querySelector(' CSS选择器 ' ) 获取该页面中该选择器对应的第一个元素。
- docuemnt.querySelectorAll('CSS选择器') 获取该页面中该选择器对应的所有元素,返回的是一个伪数组。如果要访问数组中的每一个元素,则要通过遍历的方式。
19.2.操作元素的内容
- eleObj.innerHTML 可以解析标签
- eleObj.innerText 不能解析标签
19.3.操作元素的属性
- 操作简单属性
eleObj.属性 = '值' - 操作CSS样式属性,三种方式:-
//通过style.属性修改CSS的值eleObj.style.属性 = '值'注意事项:对于CSS中出现的带有 ‘-’ 的属性名称,在JS中采用小驼峰的书写方式。 body标签中在整个页面中只有一个,可以直接使用docuemnt.body得到该标签对象。-//通过类名的方式修改CSS属性eleObj.className = '新的类名'该方法是在css文件中穿件一个待使用的样式newCName,然后在js中设置该元素对象的类名为newCName实现修改元素css属性的目的;比较适用于css样式多的更改方案。 使用该方法的缺陷是新的类名可能会覆盖旧的类名使得一些属性失效 //通过classList操作类名修改CSS样式eleObj.classList.add('类名') //添加类名eleObj.classList.remove('类名') //删除类名eleObj.classList.toggle('类名') //修改类名:有则删除,无则添加⭐⭐这种方法也是在开发中使用较多的方法,可以很好的解决通过类名修改CSS属性而导致的类名覆盖问题。<!DOCTYPE html><html lang="en"><head> <meta charset="UTF-8"> <meta http-equiv="X-UA-Compatible" content="IE=edge"> <meta name="viewport" content="width=device-width, initial-scale=1.0"> <title>Document</title> <style> .nav { width: 200px; height: 200px; text-align: center; line-height: 200px; margin: 0 auto; background-color: #859900; } /* 将要在JavaScript使用的类名 */ .bgc { line-height: 100px; background-color: #d0bfd1; } </style></head><body> <div class="nav">加油努力干</div> <button type="button">切换</button> <script> const div = document.querySelector('.nav') const btn = document.querySelector('button') div.classList.add('bgc') btn.onclick = function () { div.classList.toggle('bgc') } // div.classList.remove('nav') 删除nav类名 </script></body></html>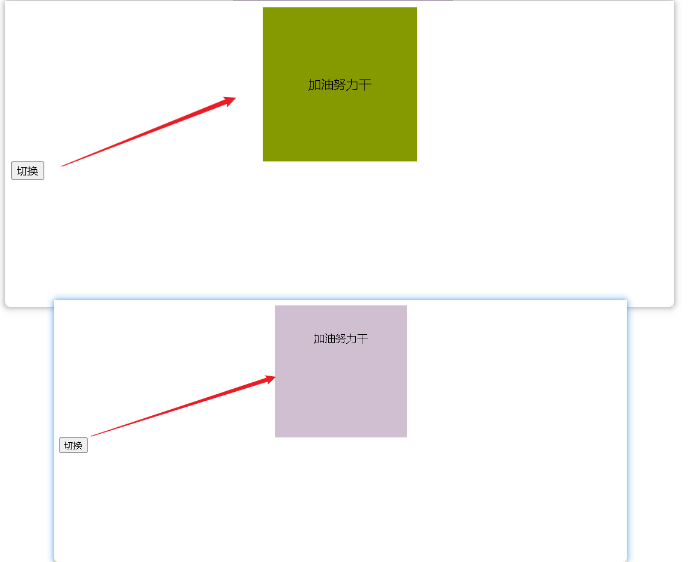
19.4.表单相关属性
- input.value:获取文本框中的内容
- input.type = 'type_':设置表单的种类
19.5.自定义属性
标签的自定义属性统一以data-开头,在JavaScript中获取时统一以eleObj.dataset.自定义属性名(去除data-)的方式获取自定义属性的值。
例如:
<body>
    <div data-id="10"></div>
    <script>
        let div = document.querySelector('div')
        console.log(div.dataset.id) //10
    </script>
</body>
19.6.计时器
计时器用来每隔一定间隔时间执行一次特定代码
//启动计时器
let n = setInterval(fn,时间间隔ms)

//停止计时器
clearInterval(n)
注意事项:
计时器中的函数在调用时只需要填写函数名不需要带( )。
例如:
//写法1
<script>
    let i = 0
    //每隔1 s输出一个数
    let n = setInterval(function () {
        console.log(++i)
    }, 1000);
</script>

//写法2
<script>
    let i = 0
    function fn() {
        console.log(++i)
    }
    let n = setInterval(fn,1000)
</script>
实例:实现阅读协议效果: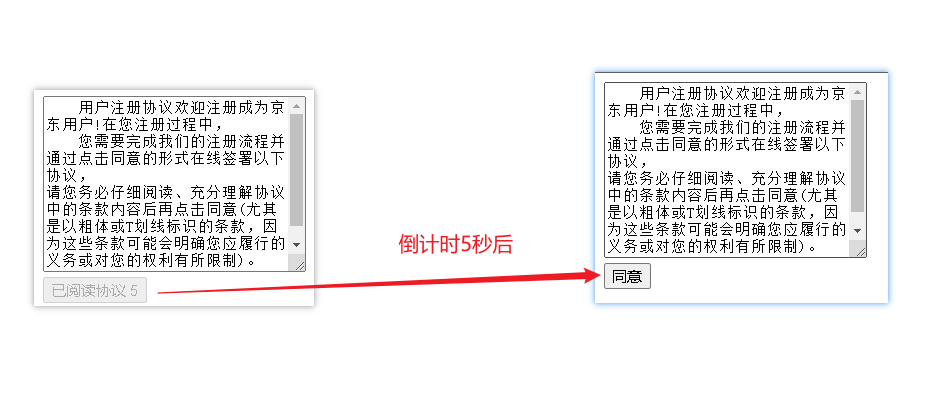
<!DOCTYPE html>
<html lang="en">

<head>
    <meta charset="UTF-8">
    <meta http-equiv="X-UA-Compatible" content="IE=edge">
    <meta name="viewport" content="width=device-width, initial-scale=1.0">
    <title>协议</title>
</head>

<body>
    <textarea name="" id="" cols="30" rows="10">
    用户注册协议欢迎注册成为京东用户!在您注册过程中,
    您需要完成我们的注册流程并通过点击同意的形式在线签署以下协议,
请您务必仔细阅读、充分理解协议中的条款内容后再点击同意(尤其是以粗体或T划线标识的条款,因为这些条款可能会明确您应履行的义务或对您的权利有所限制)。
    </textarea>
    <br>
    <button disabled></button>
    <script>
        const btn = document.querySelector('button')
        let i = 5
        let n = setInterval(() => {
            if (i === 0) {
                btn.innerHTML = '同意'
                btn.disabled = false
                clearInterval(n)
            } else {
                btn.innerHTML = `已阅读协议 ${i--}`
            }
        }, 1000);
    </script>
</body>

</html>
19.7.事件监听
事件监听三要素:
- 事件源:哪个DOM对象触发的事件
- 事件类型:如鼠标单击click,鼠标经过mouseover等
- 事件调用函数
为DOM对象添加事件:
eleObj.addEventListener('事件类型',事件函数)
19.8.常用事件
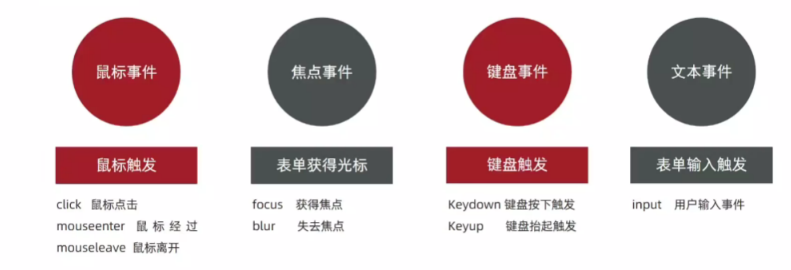
19.9.事件对象
当浏览器监听到事件执行事件处理函数时会向事件处理函数传递一个事件对象,该事件对象中包含触发该事件的许多属性,例如:
19.10.环境对象
讲讲环境对象this的指向:
可以简单记为:谁调用的函数。this就指向谁
详细的:
- 在非严格模式下,直接调用函数,this指向的WIndow
- 在严格模式下,事件监听函数下,this指向的是函数的调用者
- 括号函数没有 this
19.11.回调函数
当函数A作为参数传递给函数B时,则称函数A为回调函数
常见的使用场景: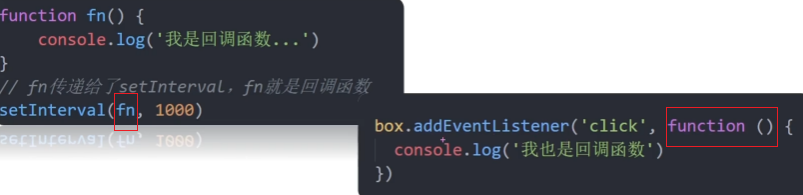
19.12.事件捕获和事件冒泡
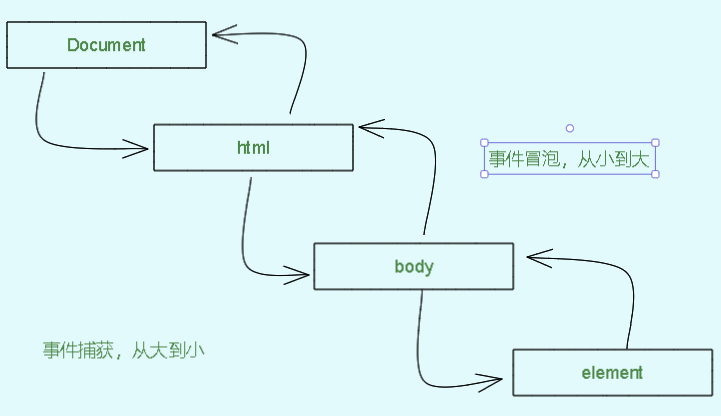
阻止事件冒泡和事件捕获:
e.stopPropagation()
默认情况下,为元素添加的事件都是事件冒泡的,例如:
<!DOCTYPE html>
<html lang="en">

<head>
    <meta charset="UTF-8">
    <meta http-equiv="X-UA-Compatible" content="IE=edge">
    <meta name="viewport" content="width=device-width, initial-scale=1.0">
    <title>Document</title>
    <style>
        .father {
            width: 400px;
            height: 400px;
            background-color: pink;
        }

        .son {
            width: 200px;
            height: 200px;
            background-color: royalblue;
        }
    </style>
</head>

<body>
    <div class="father">
        <div class="son"></div>
    </div>
    <script>
        const father = document.querySelector('.father')
        const son = document.querySelector('.son')
        document.addEventListener('click', () => {
            alert('我是爷爷')
        })
        father.addEventListener('click', () => {
            alert('我是爸爸')
        })
        son.addEventListener('click', () => {
            alert('我是儿子')
        })
    </script>
</body>

</html>
而有时候为了避免子元素触发事件时具有同名事件的父元素也出发事件,可以设置阻止子元素的事件冒泡,例如给上例中的son类元素设置禁止事件冒泡,此时点击son类元素即不会触发父类元素的同名事件:
<script>
    const father = document.querySelector('.father')
    const son = document.querySelector('.son')
    document.addEventListener('click', () => {
        alert('我是爷爷')
    })
    father.addEventListener('click', () => {
        alert('我是爸爸')
    })
    son.addEventListener('click', (e) => {
        alert('我是儿子')
        e.stopPropagation() //设置阻止事件冒泡和事件捕获
    })
</script>
19.13 .事件委托
事件委托能够有效减少注册次数,提高程序性能。例如,现有需求?:点击ul中的哪个li元素,哪个就变色,往常一般是采用for循环为每个li元素绑定事件,影响程序的性能。现在可以通过事件委托将li元素的点击事件委托给父元素ul,例如:
<script>
    //将li元素的点击事件委托给父元素ul,事件默认是冒泡的,因此点击li元素事件会冒泡给父元素ul
    const ul = document.querySelector('ul')
    ul.addEventListener('click', (e) => {
        e.target.style.color = 'red'    //点击哪个li元素,哪个li元素变色
    })
</script>
但是此时如果ul中的其他标签元素同样也会事件冒泡,此时可以通过元素类型核验避免除li元素外的其他元素事件冒泡:
//找到真正触发事件的元素   e.target.tagName
//可以使用console.dir(e.target)查看
<script>
    //将li元素的点击事件委托给父元素ul,事件默认是冒泡的,因此点击li元素事件会冒泡给父元素ul
    const ul = document.querySelector('ul')
    ul.addEventListener('click', (e) => {
        if (e.target.tagName === 'LI')    //检查点击的元素是否是li标签
            e.target.style.color = 'red'
    })
</script>
19.14.阻止默认行为
e.preventDefault()
例如 ,当表单收集到的数据不满足条件时,阻止表单的提交行为:
<body>
<form action="http://www.baidu.com">
    <button>提交</button>
</form>
<script>
    const form = document.querySelector('form')
    form.addEventListener('submit', (e) => {
        e.preventDefault()  //阻止表单的提交行为
        alert('格式不正确')
    })
</script>
</body>
19.15. 页面加载事件load和DomContentLoaded
页面加载事件记作"load",在JavaScript中表示整个页面加载完成后才被触发,例如,可以将js的script标签写在head标签中为window添加load事件,待页面加载完成后执行load事件中的js代码:
<head>
    <meta charset="UTF-8">
    <meta http-equiv="X-UA-Compatible" content="IE=edge">
    <meta name="viewport" content="width=device-width, initial-scale=1.0">
    <title>阻止默认行为</title>
    <script>
        window.addEventListener('load', function () {
            const form = document.querySelector('form')
            form.addEventListener('submit', (e) => {
                e.preventDefault()  //阻止表单的提交行为
                alert('格式不正确')
            })
        })
    </script>
</head>
有时候为了提高网页性能,可以使用DomContentLoaded事件,表示当Dom节点加载完成后就可以进行交互操作,即使当网页中的图片,表单没有加载出来: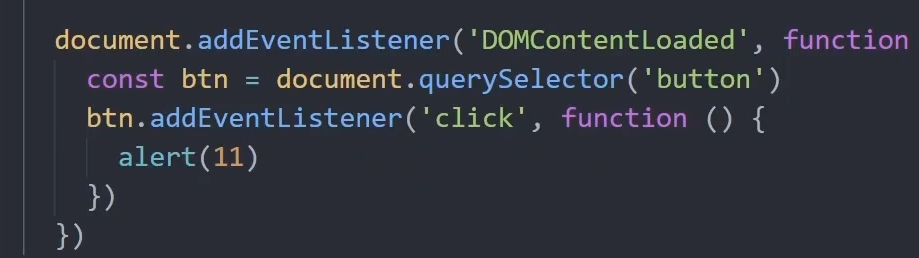
19.16.滚动事件scroll
在JavaScript中获取页面中的html标签的写法:
document.documentElement
页面中的滚动事件有两个属性,并且这两个属性是可以访问或者赋值的:
- element.scrollLeft 获取元素往左滚出去的看不到的距离
- element.scrollTop 获取元素往上滚出去的看不到的距离
19.17.client家族和offset家族
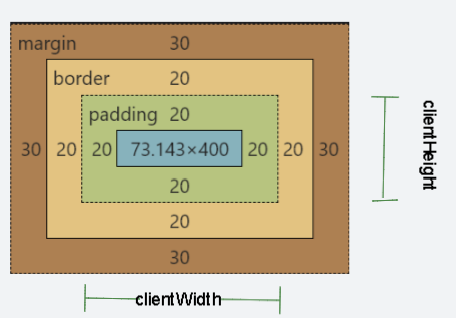
client-获取元素可见部分的宽高,不包含margin,边框,滚动条等,如果元素被隐藏,则获取出来的数值为0
- clentWidth:获取元素宽度
- clientHeight:获取元素高度
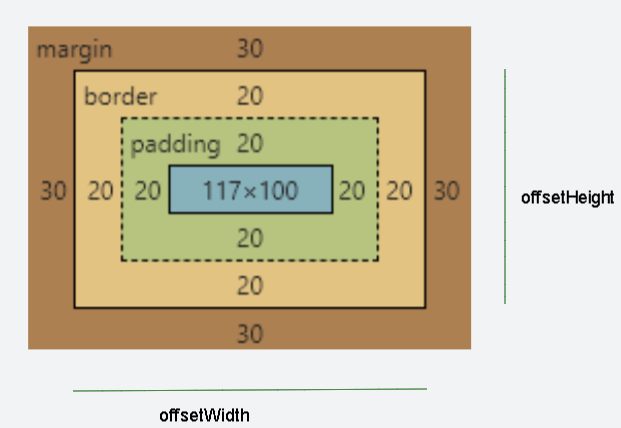
offset- 获取元素可视自身宽高,包含padding和border,不包含margi,如果盒子是隐藏的,获取到的数值为0:
- offsetWidth:获取元素自身宽度
- offsetHeight:获取元素自身高度
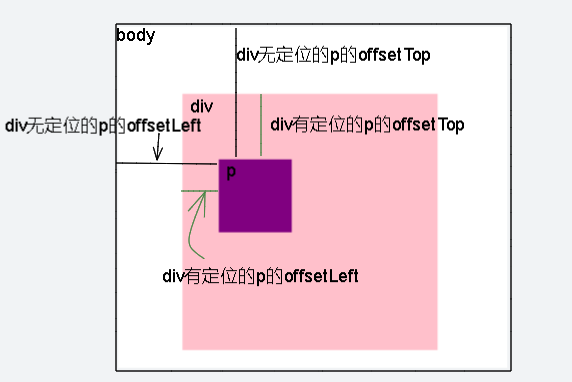
- offsetTop:获取元素距离自己定位的父级元素的顶部距离,从border算起(包含border)
- offsetLeft:获取元素距离自己定位的父级元素的左侧距离,从border算起(包含border)
19.18.日期对象
获得日期对象实例:
<script>
    const date = new date()
</script>
日期对象的方法: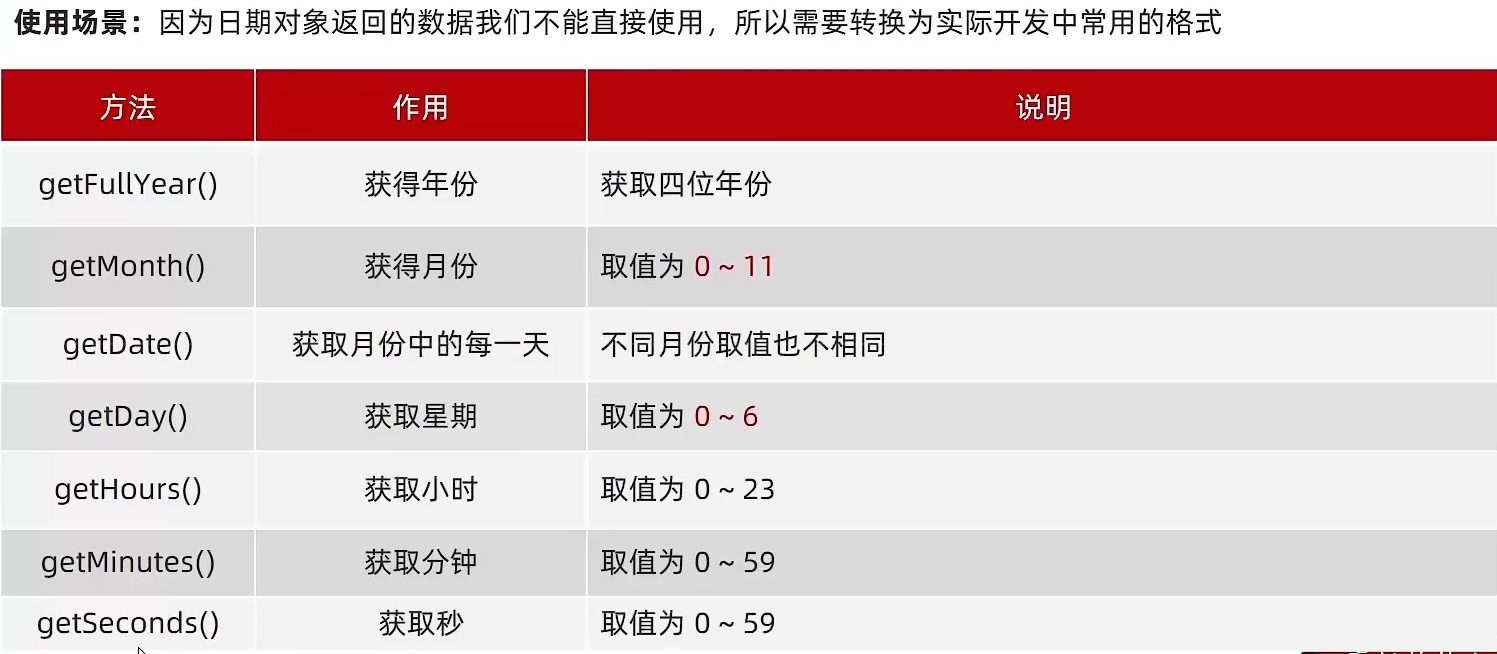
注意:日期对象方法得到的月份加1之后才是当前的月份;通过getDay获得的周日会被显示为0
让页面上的时间动起来:
<script>
    //得到当前时间
    function getMyDate() {
        const date = new Date()
        //返回指定时间
        const date1 = new Date('2022-05-01 08:45:00')
        const month = date.getMonth() <= 9 ? '0' + (date.getMonth() + 1) : date.getMonth() + 1
        const day = date.getDate() <= 9 ? '0' + date.getDate() : date.getDate()
        const hours = date.getHours() <= 9 ? '0' + date.getHours() : date.getHours()
        const minutes = date.getMinutes() <= 9 ? '0' + date.getMinutes() : date.getMinutes()
        const seconds = date.getSeconds() <= 9 ? '0' + date.getSeconds() : date.getSeconds()
        return `今天是:${date.getFullYear()}-${month}-${day} ${hours}:${minutes}:${seconds}`
    }
    const div = document.querySelector('div')
    div.innerHTML = getMyDate()
    n = setInterval(() => {
        div.innerHTML = getMyDate()
    }, 1000)
</script>
格式化日期对象方法:
- date.toLocalString() - 格式类似:2023/3/9 09:35:03
- date.toLocalDateString() - 格式类似:2023/3/9
- date.toLocalTimeString() - 格式类似:09:35:03
19.19.时间戳
时间戳通常用于制作倒计时效果,是指1970年01月01日起至现在的毫秒数。
使用详情见倒计时案例 ↓
19.20.DOM节点操作
创建节点:
document.createNode('标签名')
追加节点:
//在fatherNode的尾部追加节点
fatherNode.appendChild(节点对象)

//在fatherNode的某个元素前追加节点
fatherNode.insertBefore(待插入节点对象,插入到哪个节点的前面)
删除节点:
fatherNode.removeChild(元素节点)
查找节点:
- 查找父级节点:(找不到返回空)
子元素.parentNode
- 查找兄弟节点
//当前节点的下一个兄弟节点node.nextElementSibling//当前节点的上一个兄弟节点node.previousElementsibling
综合案例
广告实例
例如,实现弹出广告点击关闭的效果:
<!DOCTYPE html>
<html lang="en">

<head>
    <meta charset="UTF-8">
    <meta http-equiv="X-UA-Compatible" content="IE=edge">
    <meta name="viewport" content="width=device-width, initial-scale=1.0">
    <title>事件监听</title>
    <style>
        .adv {
            width: 400px;
            height: 200px;
            margin: 0 auto;
            text-align: center;
            line-height: 200px;
            background-color: #f1c7e0;
            position: relative;
        }

        .cur {
            display: inline-block;
            width: 10px;
            height: 10px;
            line-height: 10px;
            position: absolute;
            right: 10px;
            top: 10px;
            cursor: pointer;
            background-color: #fff;
            border-radius: 5px;
        }
    </style>
</head>

<body>
    <div class="adv">
        我是广告
        <span class="cur">×</span>
    </div>
    <script>
        const span = document.querySelector('.cur')
        span.addEventListener('click', () => {
            document.querySelector('.adv').style.display = 'none'
        })
    </script>
</body>

</html>

<!-- 优化后 -->
<!DOCTYPE html>
<html lang="en">

<head>
    <meta charset="UTF-8">
    <meta http-equiv="X-UA-Compatible" content="IE=edge">
    <meta name="viewport" content="width=device-width, initial-scale=1.0">
    <title>Document</title>
    <style>
        * {
            margin: 0;
            padding: 0;
        }

        .father {
            width: 250px;
            height: 200px;
            background-color: pink;
            margin: 0 auto;
            position: relative;
        }

        .father .son {
            display: inline-block;
            width: 15px;
            height: 15px;
            font-size: 12px;
            text-align: center;
            line-height: 15px;
            background-color: white;
            position: absolute;
            right: 0;
            top: 0;
            cursor: pointer;
        }
    </style>
</head>

<body>
    <div class="father">
        <div class="son">X</div>
    </div>
    <script>
        const closeUp = document.querySelector('.son')
        closeUp.addEventListener('click', function () {
            this.parentNode.style.display = 'none'
        })
    </script>
</body>

</html>
点名实例
例如,实现随机点名的效果:
<!DOCTYPE html>
<html lang="en">
<head>
<meta charset="UTF-8">
<meta http-equiv="X-UA-Compatible" content="IE=edge">
<meta name="viewport" content="width=device-width, initial-scale=1.0">
<title>随机点名</title>
<style>
.sheet {
width: 400px;
height: 200px;
position: relative;
background-color: #eed6e4;
margin: 0 auto;
border-radius: 40px;
}
.sheet span {
display: inline-block;
margin: 40px 0px 0px 10px;
font-size: 25px;
}
.sheet .btn {
position: absolute;
width: 50px;
height: 30px;
border: 10px;
background-color: #fff;
text-align: center;
line-height: 30px;
cursor: pointer;
font-weight: bold;
border-radius: 15px;
bottom: 10px;
}
.btn_start {
left: 70px;
}
.btn_end {
right: 70px;
}
</style>
</head>
<body>
<div class="sheet">
<span>即将选到:</span>
<div class="btn_start btn">开始</div>
<div class="btn_end btn">结束</div>
</div>
<script>
let arr = ['晟泽', '流星', '潘星', '程伟', '方覅']
const span = document.querySelector('.sheet span')
const btnStart = document.querySelector('.btn_start')
const btnEnd = document.querySelector('.btn_end')
let n
let i = 0
btnStart.addEventListener('click', () => {
clearInterval(n)
n = setInterval(() => {
span.innerHTML = `即将选到:${arr[i]}`
i = (i + 1) % arr.length
}, 100)
})
btnEnd.addEventListener('click', () => {
clearInterval(n)
span.innerHTML = `选到了:${arr[i]} 牛掰~~`
})
</script>
</body>
</html>
小米搜索框实例
<!DOCTYPE html>
<html lang="en">

<head>
    <meta charset="UTF-8">
    <meta http-equiv="X-UA-Compatible" content="IE=edge">
    <meta name="viewport" content="width=device-width, initial-scale=1.0">
    <title>小米搜索框</title>
    <style>
        * {
            margin: 0;
            padding: 0;
            text-decoration: none;
            list-style-type: none;
            color: black;

        }

        .container {
            width: 300px;
            height: 200px;
            margin: 0 auto;
            margin-top: 50px;
        }

        .ipt {
            width: 286px;
            height: 40px;
            /* opacity: 0.2; */
            border: 1px solid #dbdbdb;
            color: #dbdbdb;
            padding-left: 14px;
            font-size: 15px;
        }

        .ul_select {
            width: 300px;
            /* height: 300px; */
            border: 1px solid #e2bc53;
            border-top: none;
            overflow: hidden;
            display: none;
        }

        /* .ul_select li {
            padding: 10px 0 10px 15px;
        } */

        .ul_select li a {
            display: inline-block;
            width: 100%;
            padding: 10px 0px 10px 15px;
        }

        .ul_select li:hover {
            background-color: #ededed;
        }
    </style>
</head>

<body>
    <div class="container">
        <input type="text" class="ipt" value="小米笔记本">
        <ul class="ul_select">
            <li><a href="#">小米12s</a></li>
            <li><a href="#">RedMi</a></li>
            <li><a href="#">小米笔记本</a></li>
            <li><a href="#">黑鲨4</a></li>
            <li><a href="#">空调</a></li>
            <li><a href="#">油烟机</a></li>
        </ul>
    </div>
    <script>
        const ipt = document.querySelector('.ipt')
        const selectUl = document.querySelector('.ul_select')
        ipt.addEventListener('focus', function () {
            if (ipt.value === '小米笔记本') {
                ipt.value = ''
            }
            selectUl.style.display = 'block'
            ipt.style.color = 'black'
        })
        ipt.addEventListener('blur', () => {
            if (ipt.value === '') {
                ipt.value = '小米笔记本'
            }
            ipt.style.color = '#dbdbdb'
            selectUl.style.display = 'none'
        })
    </script>
</body>

</html>
B站评论区实例
<!DOCTYPE html>
<html lang="en">

<head>
    <meta charset="UTF-8">
    <meta http-equiv="X-UA-Compatible" content="IE=edge">
    <meta name="viewport" content="width=device-width, initial-scale=1.0">
    <title>comment</title>
    <style>
        * {
            text-decoration: none;
            list-style-type: none;
            margin: 0;
            padding: 0;
        }

        .container {
            width: 40%;
            margin: 0 auto;
            background-color: #fdf6e3;
            margin-top: 30px;
            overflow: hidden;
        }

        .wr_container {
            width: 70%;
            margin: 0 auto;
        }

        .wr_container .submit {
            width: 79px;
            height: 79px;
            background-color: #268bd2;
            border-radius: 8px;
            float: right;
            margin-right: 20px;
            text-align: center;
            line-height: 79px;
            margin-top: 10px;
            cursor: pointer;
            color: white;
            font-size: 14px;
        }

        .tx {
            height: 58px;
            border-radius: 8px;
            margin-top: 10px;
            width: 70%;
            padding: 10px 20px;
            resize: none;
            /*设置textarea禁止缩放*/
        }

        .wr_container span {
            float: right;
            margin-right: 120px;
            opacity: 0;
            transition: all .3s;
            font-size: 15px;
        }

        .comment {
            width: 70%;
            /* height: 40px; */
            margin: 0 auto;
            /* border: 1px solid black; */
            overflow: hidden;
        }

        .comment li {
            width: 74%;
            margin: 10px 0;
            padding: 10px 10px;
            background-color: #eee8d5;
            border-radius: 10px;
            font-size: 10px;
        }
    </style>
</head>

<body>
    <div class="container">
        <div class="wr_container">
            <textarea name="" id="" cols="40" rows="5" class="tx" placeholder="请输入评论"></textarea>
            <div class="submit">发布</div>
            <span>0/200</span>
        </div>
        <hr width="100%">
        <ul class="comment">

        </ul>
    </div>
    <script>
        const tx = document.querySelector('.tx')
        const sp = document.querySelector('.wr_container span')
        const sub = document.querySelector('.submit')
        const ul = document.querySelector('.comment')
        tx.addEventListener('focus', () => {
            sp.style.opacity = 1
        })
        tx.addEventListener('blur', () => {
            sp.style.opacity = 0
        })
        tx.addEventListener('input', () => {
            sp.innerHTML = `${tx.value.length}/200`
        })
        sub.addEventListener('click', () => {
            if ((tx.value).trim() !== '') {
                let li = document.createElement('li')
                li.innerHTML = tx.value
                ul.appendChild(li)
            } else {
                alert('不能发送空的内容')
            }
            tx.value = ''
        })
        tx.addEventListener('keyup', (e) => {
            if (e.key === 'Enter') {
                if ((tx.value).trim() !== '') {
                    let li = document.createElement('li')
                    li.innerHTML = tx.value
                    ul.appendChild(li)
                } else {
                    alert('不能发送空的内容')
                }
                tx.value = ''

            }
        })
    </script>
</body>

</html>
复选框全选/取消全选实例
<!DOCTYPE html>
<html lang="en">

<head>
    <meta charset="UTF-8">
    <meta http-equiv="X-UA-Compatible" content="IE=edge">
    <meta name="viewport" content="width=device-width, initial-scale=1.0">
    <title>全选/取消全选案例</title>
    <style>
        table {
            margin: 0 auto;
            border-collapse: collapse;
        }

        table td {
            border: 1px solid black;
            text-align: center;
            padding: 20px 40px;
        }

        table tr:nth-child(1) {
            background-color: #429fc9;
            border: 1px solid black;
        }

        table tr:nth-child(1) td {
            border: none;
            padding: 6px;
        }

        input {
            cursor: pointer;
        }
    </style>
</head>

<body>
    <table>
        <tr>
            <td><input type="checkbox" id="ckall">全选</td>
            <td>商品</td>
            <td>商家</td>
            <td>价格</td>
        </tr>
        <tr>
            <td><input type="checkbox" class="ck"></td>
            <td>小米手机</td>
            <td>小米</td>
            <td>1999</td>
        </tr>
        <tr>
            <td><input type="checkbox" class="ck" class="ck"></td>
            <td>小米净水器</td>
            <td>小米</td>
            <td>4999</td>
        </tr>
        <tr>
            <td><input type="checkbox" class="ck"></td>
            <td>小米电视</td>
            <td>小米</td>
            <td>5999</td>
        </tr>
    </table>
    <script>
        const cks = document.querySelectorAll('.ck')
        const ckall = document.querySelector('#ckall')
        ckall.addEventListener('click', function () {
            for (let i = 0; i < cks.length; i++) {
                cks[i].checked = this.checked
            }
        })
        for (let i = 0; i < cks.length; i++) {
            cks[i].addEventListener('click', function () {
                //使用复选框选择器,选出所有被选中的子框的数量
                ckall.checked = (document.querySelectorAll('.ck:checked').length === cks.length)
            })
        }
    </script>
</body>

</html>
京东动态购物栏实例
<!DOCTYPE html>
<html lang="en">

<head>
    <meta charset="UTF-8">
    <meta http-equiv="X-UA-Compatible" content="IE=edge">
    <meta name="viewport" content="width=device-width, initial-scale=1.0">
    <title>Tab栏切换</title>
    <style>
        * {
            margin: 0;
            padding: 0;
            text-decoration: none;
            list-style-type: none;
            color: black;
        }

        .header {
            width: 612px;
            background-color: #fdf6e3;
            margin: 0 auto;
        }

        .header ul {
            overflow: hidden;
            margin-top: 20px;
        }

        .header ul li {
            float: left;
            padding: 9px 60px;
            cursor: pointer;
        }

        .header ul li a {
            display: inline-block;
            padding: 3px 0;
        }

        .content_list {
            margin: 0 auto;
            width: 612px;
        }

        .item {
            width: 608px;
            height: 400px;
            text-align: center;
            line-height: 400px;
            display: none;
            font-size: 35px;
            border: 2px dashed pink;
        }

        .active {
            display: block;
            color: pink;
        }
    </style>
</head>

<body>
    <div class="header">
        <ul>
            <li><a href="#" class="active">蔬菜</a></li>
            <li><a href="#">水果</a></li>
            <li><a href="#">手机</a></li>
            <li><a href="#">花卉</a></li>
        </ul>
    </div>
    <div class="content_list">
        <div class="item active">蔬菜栏</div>
        <div class="item">水果栏</div>
        <div class="item">手机栏</div>
        <div class="item">花卉栏</div>
    </div>
    <script>
        const as = document.querySelectorAll('.header a')
        const divs = document.querySelectorAll('.content_list div')
        for (let i = 0; i < as.length; i++) {
            as[i].addEventListener('mouseenter', function () {
                document.querySelector('.header .active').classList.remove('active')
                document.querySelector('.content_list .active').classList.remove('active')
                this.classList.add('active')
                divs[i].classList.add('active')
            })
        }
    </script>
</body>

</html>
京东动态购物栏实例(优化后)
使用事件委托优化后:
<!DOCTYPE html>
<html lang="en">

<head>
    <meta charset="UTF-8">
    <meta http-equiv="X-UA-Compatible" content="IE=edge">
    <meta name="viewport" content="width=device-width, initial-scale=1.0">
    <title>事件委托优化的tab商品表</title>
    <style>
        * {
            margin: 0;
            padding: 0;
            text-decoration: none;
            list-style-type: none;
            color: black;
        }

        .container {
            width: 800px;
            height: 400px;
            background-color: #fdf6e3;
            margin: 0 auto;
            overflow: hidden;
        }

        .nav ul {
            width: 800px;
            overflow: hidden;
        }

        .nav ul li {
            float: left;
            width: 200px;
            height: 40px;
            line-height: 40px;
            text-align: center;
            border-bottom: 1px dashed black;
        }

        .nav ul li a {
            display: inline-block;
            width: 100%;
            height: 100%;
        }

        .container .box_shopping {
            width: 800px;
            height: 360px;
            font-size: 30px;
            text-align: center;
            line-height: 360px;
            display: none;
        }

        .container .native {
            display: block;
            background-color: pink;
        }
    </style>
</head>

<body>
    <div class="container">
        <div class="nav">
            <ul>
                <li><a href="javascript:" class="native" data-id="0">水果</a></li>
                <li><a href="javascript:" data-id="1">蔬菜</a></li>
                <li><a href="javascript:" data-id="2">运动</a></li>
                <li><a href="javascript:" data-id="3">养生</a></li>
            </ul>
        </div>
        <div class="content">
            <div class="box_shopping native">水果</div>
            <div class="box_shopping">蔬菜</div>
            <div class="box_shopping">运动</div>
            <div class="box_shopping">养生</div>
        </div>
    </div>
    <script>
        const ul = document.querySelector('.container .nav ul')
        ul.addEventListener('click', (e) => {
            if (e.target.tagName === 'A') {
                document.querySelector('.nav .native').classList.remove('native')
                document.querySelector('.content .native').classList.remove('native')
                e.target.classList.add('native')
                const i = +e.target.dataset.id    //为导航栏的a元素添加自定义属性,通过添加的自定义属性获取待显示的div模块
                document.querySelector(`.content div:nth-child(${i + 1})`).classList.add('native')
            }
        })
    </script>
</body>

</html>
滚动事件案例-侧边栏的显示和隐藏
<!DOCTYPE html>
<html lang="en">

<head>
    <meta charset="UTF-8">
    <meta http-equiv="X-UA-Compatible" content="IE=edge">
    <meta name="viewport" content="width=device-width, initial-scale=1.0">
    <title>侧边栏的显示和隐藏</title>
    <style>
        * {
            margin: 0;
            padding: 0;
            text-decoration: none;
            list-style-type: none;
        }

        .container {
            width: 80%;
            height: 3000px;
            background-color: #fdf6e3;
            margin: 0 auto;
            text-align: center;
            font-size: 50px;
        }

        .nav ul {
            position: fixed;
            overflow: hidden;
            right: 1%;
            top: 500px;
            border-radius: 10px;
            background-color: #72a79a;
            font-size: 15px;
            display: none;
        }

        .nav ul li {
            height: 40px;
            width: 40px;
            text-align: center;
            line-height: 20px;
            padding: 10px;
            border-bottom: 1px solid black;
            cursor: pointer;
        }

        .nav ul li:nth-child(3) {
            line-height: 40px;
            border: none;
        }
    </style>
</head>

<body>
    <div class="container">
        顶部
        <div class="nav">
            <ul>
                <li>为你推荐</li>
                <li>回到顶部</li>
                <li>反馈</li>
            </ul>
        </div>
    </div>

    <script>
        const nav = document.querySelector('.nav ul')
        const toTop = document.querySelector('.nav ul li:nth-child(2)')
        // 页面滚动超过300px就显示导航栏,小于300就隐藏
        window.addEventListener('scroll', function () {
            const n = document.documentElement.scrollTop
            console.log(n)
            if (n >= 500) {
                nav.style.display = 'block'
            } else if (n < 500) {
                nav.style.display = 'none'
            }
        })
        toTop.addEventListener('click', () => {
            document.documentElement.scrollTop = 0
        })
    </script>
</body>

</html>
offset实例-仿京东头部导航条的显示隐藏
<!DOCTYPE html>
<html lang="en">

<head>
    <meta charset="UTF-8">
    <meta http-equiv="X-UA-Compatible" content="IE=edge">
    <meta name="viewport" content="width=device-width, initial-scale=1.0">
    <title>显示隐藏</title>
    <style>
        * {
            margin: 0;
            padding: 0;
        }

        .container {
            width: 60%;
            margin: 0 auto;
            height: 3000px;
            background-color: pink;
            /* position: relative; */
        }

        .nav {
            position: fixed;
            width: 60%;
            height: 40px;
            left: 20%;
            top: -40px;
            background-color: #73e0e4;
            text-align: center;
            line-height: 40px;
            transition: all .5s;
        }

        .show {
            height: 200px;
        }

        .main_page {
            height: 200px;
            background-color: #f7ea78;
            text-align: center;
            line-height: 200px;
        }
    </style>
</head>

<body>
    <div class="nav">
        顶部导航条
    </div>
    <div class="container">
        <div class="show"></div>
        <div class="main_page">页面滚动到这里顶部导航条出现</div>
    </div>
    <script>
        const mainPage = document.querySelector('.main_page')
        const nav = document.querySelector('.nav')
        window.addEventListener('scroll', function () {
            nav.style.top = document.documentElement.scrollTop >= mainPage.offsetTop ? 0 : -40 + 'px'
        })
    </script>
</body>

</html>
offset实例-bilibili导航条动画效果

<!DOCTYPE html>
<html lang="en">

<head>
    <meta charset="UTF-8">
    <meta http-equiv="X-UA-Compatible" content="IE=edge">
    <meta name="viewport" content="width=device-width, initial-scale=1.0">
    <title>滑动导航条</title>
    <style>
        * {
            margin: 0;
            padding: 0;
            list-style-type: none;
            text-decoration: none;
        }

        ul {
            width: 320px;
            margin: 0 auto;
            overflow: hidden;
            border-bottom: 1px solid rgb(224, 218, 218);
            position: relative;
        }

        ul li {
            float: left;
            width: 80px;
            height: 40px;
            line-height: 40px;
            text-align: center;
        }

        ul li a {
            display: inline-block;
            width: 38px;
            text-align: center;
            color: black;
        }

        .line {
            width: 38px;
            height: 2px;
            background-color: pink;
            margin: 38px 0 0 21px;
            transition: all .3s;
        }
    </style>
</head>

<body>
    <ul>
        <li><a href="#">喜剧</a></li>
        <li><a href="#">动画</a></li>
        <li><a href="#">学习</a></li>
        <li><a href="#">搞笑</a></li>
        <div class="line"></div>
    </ul>
    <script>
        const line = document.querySelector('.line')
        const ul = document.querySelector('ul')
        ul.addEventListener('click', (e) => {
            if (e.target.tagName === 'A') {
                line.style.transform = `translateX(${e.target.offsetLeft - 21}px)`
            }
        })
    </script>
</body>

</html>
效果:
时间戳-倒计时案例
思路:用指定时间的时间戳减去当前时间的时间戳在转换为时分秒渲染到页面显示,转换时分秒的方法: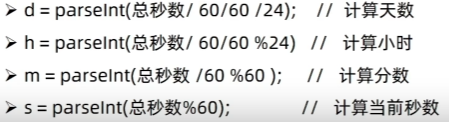
效果图:

<!DOCTYPE html>
<html lang="en">

<head>
    <meta charset="UTF-8">
    <meta http-equiv="X-UA-Compatible" content="IE=edge">
    <meta name="viewport" content="width=device-width, initial-scale=1.0">
    <title>倒计时</title>
    <style>
        * {
            margin: 0;
            padding: 0;
            text-decoration: none;
            list-style-type: none;
        }

        .container {
            width: 280px;
            height: 400px;
            background-color: #9d2b2a;
            margin: 0 auto;
            position: relative;
            border-radius: 15px;
            margin-top: 200px;
        }

        .title {
            height: 50px;
            text-align: center;
            font-size: 18px;
            color: white;
            padding: 10px;
            line-height: 50px;
        }

        .com {
            font-size: 30px;
            padding: 20px 10px;
        }

        .container ul {
            padding: 40px;
            overflow: hidden;
            margin: 0 auto;
            width: 52.3%;

        }

        .container ul li {
            float: left;
            width: 35px;
            height: 35px;
            text-align: center;
            line-height: 35px;
            background-color: black;
            color: white;
            font-size: 24px;
            border-radius: 6px;
        }

        .container ul .colon {
            width: 20px;
            background-color: #9d2b2a;
        }

        .footer_ {
            position: absolute;
            width: 260px;
            bottom: 10px;
            font-size: 24px;
        }
    </style>
</head>

<body>
    <div class="container">
        <p class="title"></p>
        <p class="title com">距离Java上课</p>
        <ul>
            <li></li>
            <li class="colon">:</li>
            <li></li>
            <li class="colon">:</li>
            <li></li>
        </ul>
        <p class="title footer_">18:45:00上课</p>
    </div>
    <script>
        const p = document.querySelector('.container .title')
        const date = new Date()
        let temp, millisecond
        const lis = document.querySelectorAll('.container ul li')
        p.innerHTML = `今天是${date.getFullYear()}年${date.getMonth() + 1}月${date.getDate()}日`
        //在计时器开始前先加载一次,优化计时器带来的1s延迟
        millisecond = (+new Date('2023-03-09 18:45:00') - +new Date()) / 1000
        lis[0].innerHTML = (temp = parseInt(millisecond / 60 / 60)) <= 9 ? '0' + temp : temp
        lis[2].innerHTML = (temp = parseInt(millisecond / 60 % 60)) <= 9 ? '0' + temp : temp
        lis[4].innerHTML = (temp = parseInt(millisecond % 60)) <= 9 ? '0' + temp : temp
        let n = setInterval(() => {
            millisecond = (+new Date('2023-03-09 18:45:00') - +new Date()) / 1000
            lis[0].innerHTML = (temp = parseInt(millisecond / 60 / 60)) <= 9 ? '0' + temp : temp
            lis[2].innerHTML = (temp = parseInt(millisecond / 60 % 60)) <= 9 ? '0' + temp : temp
            lis[4].innerHTML = (temp = parseInt(millisecond % 60)) <= 9 ? '0' + temp : temp
        }, 1000);
    </script>
</body>

</html>
版权归原作者 小白的白白 所有, 如有侵权,请联系我们删除。