==>😉博主:初映CY的前说(前端领域) ,📒本文核心:setup()概念、 reactive()的使用
【前言】vue3作为vue2的升级版,有着很多的新特性,其中就包括了组合式API,也就是是 Composition API。学习组合式API有什么优点呢?之前的vue2中结构不是挺不错的吗?那么接下来的事件,我将带着你从浅到深分析为什么我们需要学习组合式API以及我们的setup()函数作为入口函数的一个基本的使用方式。
目录
⭐一、组合式API对比vue2项目结构
在vue2当中
- 1.优点:易于学习和使用,写代码的位置已经约定好。
- 2.缺点:对于大型项目,不利于代码的复用、不利于管理和维护。
- 3.解释:同一功能的数据和业务逻辑分散在同一个文件的 N 个地方,随着业务复杂度的上升,我们需要经常在类似于data()以及methods中进行来回的处理
在vue3当中
- 1.优点:可以把同一功能的数据和业务逻辑组织到一起,方便复用和维护。
- 2.缺点:需要有良好的代码组织和拆分能力,相对没有 Vue2 容易上手。
- 3.解释:注意:为了能让大家较好的过渡到 Vue3.0 版本,目前也是支持 Vue2.x 选项 API 的写法。

⭐二、setup()函数的使用
2.1setup()函数的基础概念
Vue3 中的 setup() 是 Vue3 新增的组件配置项,用于替代 Vue2 中的 data()、methods()、computed() 等配置项。setup() 提供了更简洁的编写方式,且能够更好地利用 Vue3 提供的 Composition API。setup() 函数接受两个参数,分别是 props 和 context。其中,props 是组件接收的属性值,context 包含了一些组件的配置信息。
- 1.是什么:setup 是 Vue3 中新增的组件配置项,作为组合 API 的入口函数。
- 2.执行时机:实例创建前调用,甚至早于 Vue2 中的 beforeCreate。
- 3.注意点:由于执行 setup 的时候实例还没有 created,所以在 setup 中是不能直接使用 data 和 methods 中的数据的,所以 Vue3 setup 中的 this 也被绑定为了 undefined。
虽然 Vue2 中的 data 和 methods 配置项虽然在 Vue3 中也能使用,但不建议了,建议数据和方法都写在 setup 函数中,并通过 return 进行返回可在模版中直接使用(一般情况下 setup 不能为异步函数)。
2.2.setup()初体验
App.vue
<template><h1 @click="say()">{{ msg }}</h1></template><script>exportdefault{setup(){const msg ='Hello Vue3'constsay=()=>{
                console.log(msg)}return{ msg, say }},}</script>
效果查看:
注意:酷似于vue2中的data()与methods都是需要写在return才可作为结果进行调用。
【小小面试题补充】setup 中 return 的一定只能是一个对象吗?(setup 也可以返回一个渲染函数)
App.vue
<script>import{ h }from'vue'exportdefault{name:'App',setup(){return()=>h('h2','Hello Vue3')},}</script>
控制台则是打印出了h2标签的Hello Vue3。
2.3.reactive()函数
使用 reactive 函数包装数组为响应式数据。reactive 是一个函数,用来将普通对象/数组包装成响应式式数据使用,无法直接处理基本数据类型(因为它是基于 Proxy 的,而 Proxy 只能代理的是对象)。
比如当我有一个需求:点击删除当前行信息
App.vue
<template><ul><li v-for="(item, index) in arr":key="item" @click="removeItem(index)">{{ item }}</li></ul></template><script>exportdefault{name:'App',setup(){const arr =['a','b','c']constremoveItem=(index)=>{
                arr.splice(index,1)}return{
                arr,
                removeItem,}},}</script>
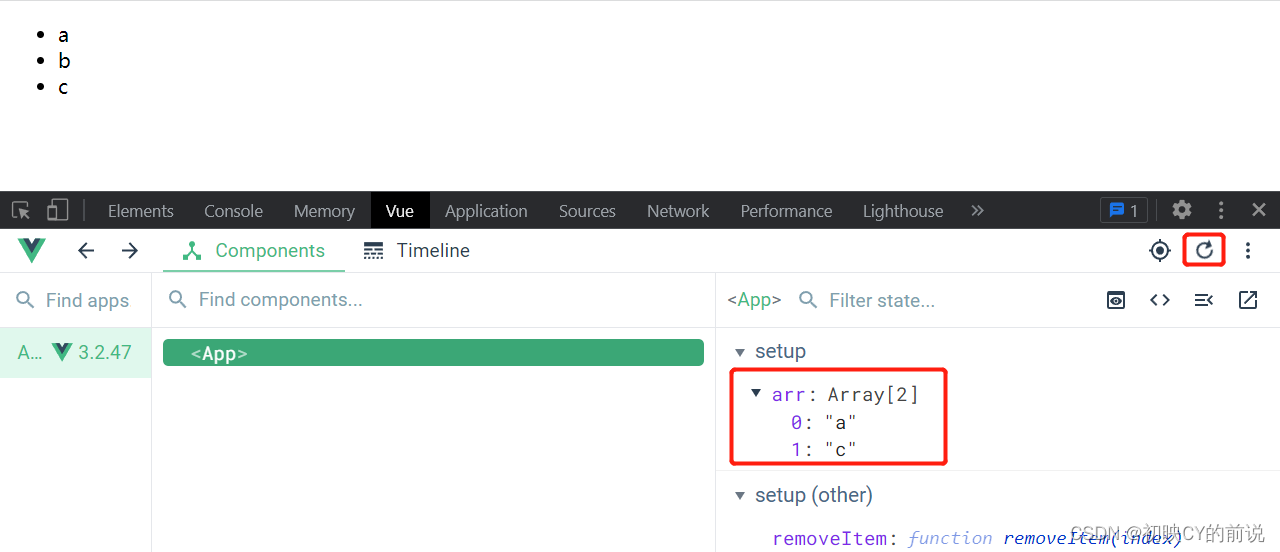
通过vueTools查看,我点击过后数据是被删除了,但页面上并没有事实的渲染出来
此时,使用 reactive()包装数组使变成响应式数据,别忘了导入
<template><ul><li v-for="(item, index) in arr":key="item" @click="removeItem(index)">{{ item }}</li></ul></template><script>import{ reactive }from'vue'exportdefault{name:'App',setup(){const arr =reactive(['a','b','c'])constremoveItem=(index)=>{
                arr.splice(index,1)}return{
                arr,
                removeItem,}},}</script>

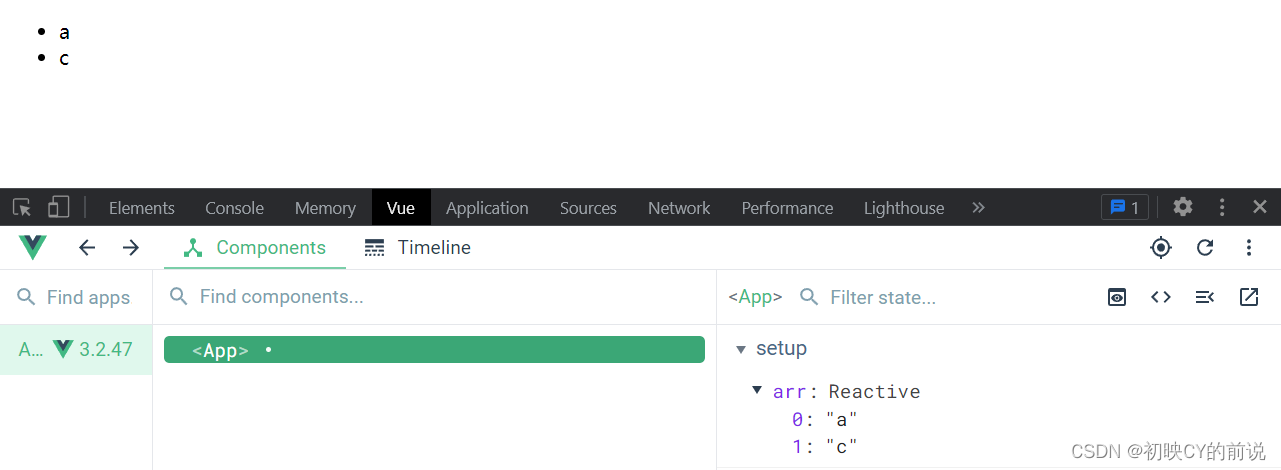
此刻页面也就具有了响应式,点击时删除,页面则是响应式的
同理:我们用reactive()来包裹我们的对象来使用
<template><form @submit.prevent="handleSubmit"><input type="text" v-model="user.id"/><input type="text" v-model="user.name"/><input type="submit"/></form><ul><li v-for="(item, index) in state.arr":key="item.id" @click="removeItem(index)">{{ item.name }}</li></ul></template><script>import{ reactive }from'vue'exportdefault{name:'App',setup(){const state =reactive({arr:[{id:0,name:'ifer',},{id:1,name:'elser',},{id:2,name:'xxx',},],})constremoveItem=(index)=>{// 默认是递归监听的,对象里面任何一个数据的变化都是响应式的
                state.arr.splice(index,1)}const user =reactive({id:'',name:'',})consthandleSubmit=()=>{
                state.arr.push({id: user.id,name: user.name,})
                user.id =''
                user.name =''}return{
                state,
                removeItem,
                user,
                handleSubmit,}},}</script>

上述代码的解意:
我定义了输入框,定义了删除、添加事件的操作,通过v-model打到双向绑定数据来完成对我的数据进行增加与删除。
到目前你是不是对setup()的使用有了更加清晰的认识呢?下面再来简化一下我们的写法。
2.3.1reactive()的进一步抽离
优化:将同一功能的数据和业务逻辑抽离为一个函数,代码更易读,更容易复用。
<template><form @submit.prevent="handleSubmit"><input type="text" v-model="user.id"/><input type="text" v-model="user.name"/><input type="submit"/></form><ul><li v-for="(item, index) in state.arr":key="item.id" @click="removeItem(index)">{{ item.name }}</li></ul></template><script>import{ reactive }from'vue'functionuseRemoveItem(){const state =reactive({arr:[{id:0,name:'ifer',},{id:1,name:'elser',},{id:2,name:'xxx',},],})constremoveItem=(index)=>{
            state.arr.splice(index,1)}return{ state, removeItem }}functionuseAddItem(state){const user =reactive({id:'',name:'',})consthandleSubmit=()=>{
            state.arr.push({id: user.id,name: user.name,})
            user.id =''
            user.name =''}return{
            user,
            handleSubmit,}}exportdefault{name:'App',setup(){const{ state, removeItem }=useRemoveItem()const{ user, handleSubmit }=useAddItem(state)return{
                state,
                removeItem,
                user,
                handleSubmit,}},}</script>
将方法抽离出来,用类似于导入的方式进行一个抽离,将数据与方法放在一起,便于我们的统一管理。
2.3.2reactive()再进行进一步文件拆分并且引入

App.vue
<template><form ><input type="text" v-model="user.id"/><input type="text" v-model="user.name"/><button type="submit" @click.prevent="submit">提交</button></form><ul><li v-for="(item, index) in state.arr":key="item.id" @click="removeItem(index)">{{ item.name }}</li></ul></template><script>import{useRemoveItem,handleSubmit}from'./hooks'exportdefault{name:'App',setup(){const{ state, removeItem }=useRemoveItem()const{ user, submit }=handleSubmit(state)return{
              state,removeItem,user,submit
          }},}</script>
hooks/index.js
import{ reactive }from'vue'exportconstuseRemoveItem=()=>{const state=reactive({arr:[{id:0,name:'ifer',},{id:1,name:'elser',},{id:2,name:'xxx',},]})constremoveItem=(index)=>{
      state.arr.splice(index,1)
            console.log(state.arr);}return{ state, removeItem }}exportconsthandleSubmit=(state)=>{const user =reactive({id:'',name:'',})
            console.log(1);constsubmit=()=>{
       state.arr.push({...user
       })
       user.id =''
       user.name =''}return{ user, submit }}
至此本文结束,愿你有所收获!
期待大家的关注与支持! 你的肯定是我更新的最大动力!!!
版权归原作者 初映CY的前说 所有, 如有侵权,请联系我们删除。