
许多二分类任务并不是每个类别都有相同数量的数据,存在着数据分布不平衡的情况。
一个常用的例子是成人收入数据集,它涉及到社交关系、教育水平等个人数据,以此来预测成人的收入水平,判断其是否拥有5万美元/年的个人收入。数据集中个人收入低于5万美元的数据比高于5万美元的数据要明显多一些,存在着一定程度的分布不平衡。
针对这一数据集,可以使用很多不平衡分类的相关算法完成分类任务。
在本教程中,您将了解如何为数据分布不平衡的成人收入数据集开发分类模型并对其进行评估。
学习本教程后,您将知道:
- 如何加载和分析数据集,并对如何进行数据预处理和模型选择有一定启发。
- 如何使用一个稳健的测试工具系统地评估机器学习模型的效能。
- 如何拟合最终模型并使用它预测特定情况所对应的类标签。
针对成人收入不平衡分类的具体内容如下:
教程大纲
本教程主要分为了以下五个部分:
- 成人收入数据集介绍
- 数据集分析
- 基础模型和性能评价
- 模型评价
- 对新输入数据进行预测
成人收入数据集介绍
在这个教程中,我们将使用一个数据分布不平衡的机器学习常用数据集,称为“成人收入”或简称“成人”数据集。
该数据集归Ronny Kohavi和Barry Becker所有,取自1994年美国人口普查局的数据,包含有教育水平等个人详细数据,用于预测个人年收入是否超过或低于50000美元。
数据集提供14个输入变量,这些变量数据的类型有标签数据、序列数据、连续数据。变量的完整列表如下:
- 年龄。
- 阶级。
- 最终重量。
- 教育程度。
- 教育年限。
- 婚姻状况。
- 职业。
- 社交。
- 种族。
- 性别。
- 资本收益。
- 资本损失。
- 每周工作小时数。
- 国籍。
总共有48842行数据,3620行含有缺失数据,45222行具有完整的数据,其中缺失值用
?
标记。
有'>50K'和'<=50K'两类标签数据,也就是说它是一个二分类任务。同时这些标签数据分布不平衡,'<=50K'类标签比重更大。
考虑到标签数据分布不平衡的情况并不严重,并且两个标签同等重要,本教程采用常见的分类准确度或分类误差来反映此数据集上的相关模型性能。
分析数据集
成人数据集是一个广泛使用的标准机器学习数据集,用于探索和演示许多一般性的或专门为不平衡分类设计的机器学习算法。
首先,下载数据集并将其保存在当前工作目录中,命名为“adult-all.csv”.
接下来让我们考察一下该数据集。文件的前几行如下:
39,State-gov,77516,Bachelors,13,Never-married,Adm-clerical,Not-in-family,White,Male,2174,0,40,United-States,<=50K
50,Self-emp-not-inc,83311,Bachelors,13,Married-civ-spouse,Exec-managerial,Husband,White,Male,0,0,13,United-States,<=50K
38,Private,215646,HS-grad,9,Divorced,Handlers-cleaners,Not-in-family,White,Male,0,0,40,United-States,<=50K
53,Private,234721,11th,7,Married-civ-spouse,Handlers-cleaners,Husband,Black,Male,0,0,40,United-States,<=50K
28,Private,338409,Bachelors,13,Married-civ-spouse,Prof-specialty,Wife,Black,Female,0,0,40,Cuba,<=50K
...
我们可以看到,输入变量包含有连续数据、标签数据以及序号数据,对于标签数据需要进行二进制或者独热编码。同时也需要注意到,目标变量是用字符串表示的,而对于二分类问题,需要用0/1进行标签编码,因此对于占比多的多数标签编码为0,而占比较少的少数标签则编码为1。缺失的数据用
?
表示,通常可以估算这些值,也可以直接从数据集中删除这些行。
具体的载入数据集方法可使用
read_csv()
这一Pandas包的内置函数,只需要指定文件名、是否读入标题行以及缺失值的对应符号(本数据为
?
,缺失值会被处理为
NaN
数据):
# define the dataset location
filename = 'adult-all.csv'
# load the csv file as a data frame
dataframe = read_csv(filename, header=None, na_values='?')
成功加载数据集后,我们需要移除缺失数据所在的行,并统计数据大小:
# drop rows with missing
dataframe = dataframe.dropna()
# summarize the shape of the dataset
print(dataframe.shape)
通过
Counter
函数我们可以统计数据集分布情况:
# summarize the class distribution
target = dataframe.values[:,-1]
counter = Counter(target)
for k,v in counter.items():
    per = v / len(target) * 100
print('Class=%s, Count=%d, Percentage=%.3f%%' % (k, v, per))
上述函数集合到一起,就实现了数据加载和相关统计工作。完整代码如下:
# load and summarize the dataset
from pandas import read_csv
from collections import Counter
# define the dataset location
filename = 'adult-all.csv'
# load the csv file as a data frame
dataframe = read_csv(filename, header=None, na_values='?')
# drop rows with missing
dataframe = dataframe.dropna()
# summarize the shape of the dataset
print(dataframe.shape)
# summarize the class distribution
target = dataframe.values[:,-1]
counter = Counter(target)
for k,v in counter.items():
    per = v / len(target) * 100
    print('Class=%s, Count=%d, Percentage=%.3f%%' % (k, v, per))
运行结果如下:
(45222, 15)
Class= <=50K,Count=34014,Percentage=75.216%
Class= >50K, Count=11208, Percentage=24.784%
在上述代码中,首先我们加载了数据集,并确认了行和列的数量,即45222行,15列(14个输入变量和一个目标变量)。然后分析了数据分布情况,发现数据分布是不平衡的,大约75%的数据都是(<=50K),而只有大约25%的数据是(>50K)。
通过创建直方图,我们可以更直观地看到数据分布情况。具体做法如下:
首先,调用
select_dtypes
函数选取数值型数据。
...
# select columns with numerical data types
num_ix = df.select_dtypes(include=['int64', 'float64']).columns
# select a subset of the dataframe with the chosen columns
subset = df[num_ix]
然后通过
matplotlib
绘图包进行显示。
# create histograms of numeric input variables
from pandas import read_csv
from matplotlib import pyplot
# define the dataset location
filename = 'adult-all.csv'
# load the csv file as a data frame
df = read_csv(filename, header=None, na_values='?')
# drop rows with missing
df = df.dropna()
# select columns with numerical data types
num_ix = df.select_dtypes(include=['int64', 'float64']).columns
# select a subset of the dataframe with the chosen columns
subset = df[num_ix]
# create a histogram plot of each numeric variable
subset.hist()
pyplot.show()
运行上述代码,将为数据集中的六个输入变量分别创建一个直方图。
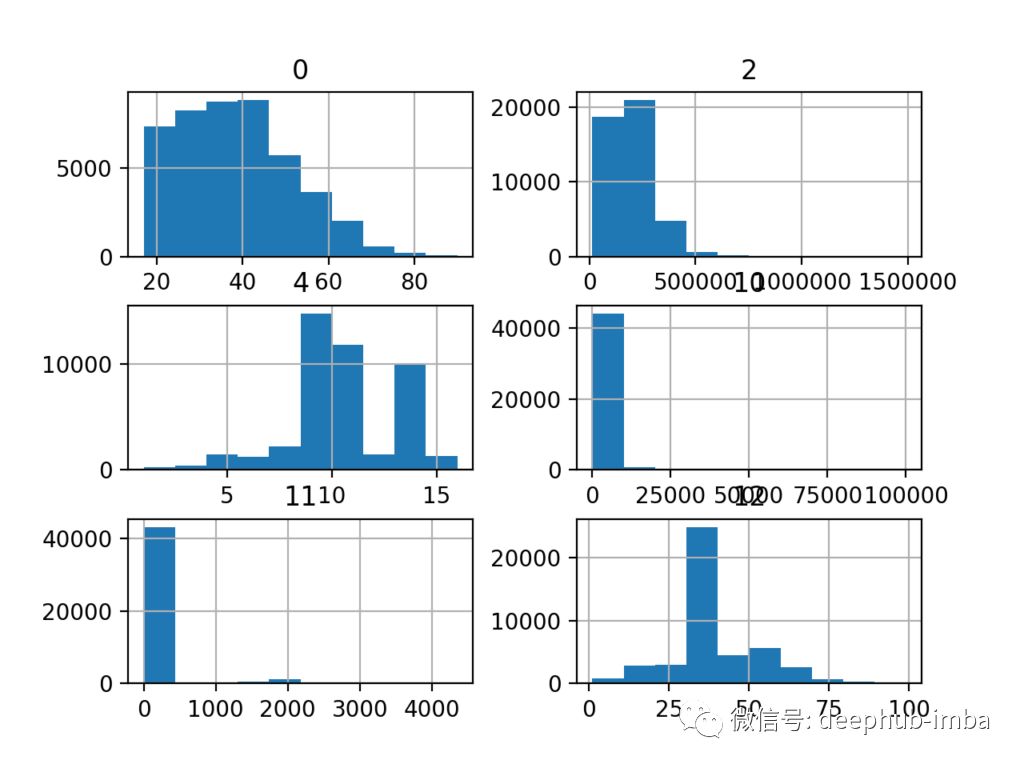
我们可以看到它们有着不同的分布情况,有些是高斯分布,有些是指数分布或离散分布。同样可以看出,他们的变化范围差异较大。而为了得到较好的算法效果,我们通常需要将数据分布缩放到相同的范围,因此需要进行相应的幂变换。
基础模型和性能评价
k-fold交叉验证方法能够较好估计模型的性能。在这里我们将使用k=10的重复分层k-fold交叉验证方法来评估相关模型,这意味着每个折叠将包含约
45222/10=4522
个数据。而分层表示每一个折叠将包含相同的混合比例(即每个折叠中指标数据都具有75%-25%的分布特征)。重复表示评估过程将被多次执行,以避免偶然结果和更好地捕获所选模型的方差,本教程中,我们将重复三次。这意味着将对单个模型进行
10×3=30
次拟合和评估,并记录每次运行结果的平均值和标准差。
上述方法可以通过scikit-learn包里面的
RepeatedStratifiedKFold
函数实现。
具体代码如下:
# evaluate a model
defevaluate_model(X, y, model):
# define evaluation procedure
    cv = RepeatedStratifiedKFold(n_splits=10, n_repeats=3, random_state=1)
# evaluate model
    scores = cross_val_score(model, X, y, scoring='accuracy', cv=cv, n_jobs=-1)
return scores
通过
evaluate_model()
函数我们实现了获取加载的数据集和定义的模型,使用重复分层k-fold交叉验证对其进行评估,然后返回一个准确度列表。
而如何生成X、Y数据呢?我们可以定义一个函数来加载数据集并对目标列进行编码,然后返回所需数据。具体代码如下:
# load the dataset
defload_dataset(full_path):
# load the dataset as a numpy array
    dataframe = read_csv(full_path, header=None, na_values='?')
# drop rows with missing
    dataframe = dataframe.dropna()
# split into inputs and outputs
    last_ix = len(dataframe.columns) - 1
    X, y = dataframe.drop(last_ix, axis=1), dataframe[last_ix]
# select categorical and numerical features
    cat_ix = X.select_dtypes(include=['object', 'bool']).columns
    num_ix = X.select_dtypes(include=['int64', 'float64']).columns
# label encode the target variable to have the classes 0 and 1
    y = LabelEncoder().fit_transform(y)
return X.values, y, cat_ix, num_ix
通过以上步骤,我们就可以使用这个测试工具评估数据集的相关模型了。
为了更好地评估若干模型之间的差距,我们可以通过scikit库里面的
DummyClassifier
类建立一个基准模型。相关代码如下:
# define the reference model
model = DummyClassifier(strategy='most_frequent')
# evaluate the model
scores = evaluate_model(X, y, model)
# summarize performance
print('Mean Accuracy: %.3f (%.3f)' % (mean(scores), std(scores)))
上述函数集合到一起,就实现了一个基准算法对于数据集的预测分类和评价。完整代码如下:
# test harness and baseline model evaluation for the adult dataset
from collections import Counter
from numpy import mean
from numpy import std
from numpy import hstack
from pandas import read_csv
from sklearn.preprocessing import LabelEncoder
from sklearn.model_selection import cross_val_score
from sklearn.model_selection import RepeatedStratifiedKFold
from sklearn.dummy import DummyClassifier

# load the dataset
defload_dataset(full_path):
# load the dataset as a numpy array
    dataframe = read_csv(full_path, header=None, na_values='?')
# drop rows with missing
    dataframe = dataframe.dropna()
# split into inputs and outputs
    last_ix = len(dataframe.columns) - 1
    X, y = dataframe.drop(last_ix, axis=1), dataframe[last_ix]
# select categorical and numerical features
    cat_ix = X.select_dtypes(include=['object', 'bool']).columns
    num_ix = X.select_dtypes(include=['int64', 'float64']).columns
# label encode the target variable to have the classes 0 and 1
    y = LabelEncoder().fit_transform(y)
return X.values, y, cat_ix, num_ix

# evaluate a model
defevaluate_model(X, y, model):
# define evaluation procedure
    cv = RepeatedStratifiedKFold(n_splits=10, n_repeats=3, random_state=1)
# evaluate model
    scores = cross_val_score(model, X, y, scoring='accuracy', cv=cv, n_jobs=-1)
return scores

# define the location of the dataset
full_path = 'adult-all.csv'
# load the dataset
X, y, cat_ix, num_ix = load_dataset(full_path)
# summarize the loaded dataset
print(X.shape, y.shape, Counter(y))
# define the reference model
model = DummyClassifier(strategy='most_frequent')
# evaluate the model
scores = evaluate_model(X, y, model)
# summarize performance
print('Mean Accuracy: %.3f (%.3f)' % (mean(scores), std(scores)))
运行结果如下:
(45222, 14) (45222,) Counter({0: 34014, 1: 11208})
Mean Accuracy: 0.752 (0.000)
通过上述代码,我们首先加载数据并进行预处理。然后通过
DummyClassifier()
进行分类,并通过
RepeatedStratifiedKFold()
进行评价。可以看到,基准算法达到了约75.2%的准确度。这一结果指出了相关模型的准确度下限;任何平均准确度高于75.2%的模型都可被视为有效模型,而低于75.2%则通常被认为是无效的。
模型评价
在上一节中,我们看到,基准算法的性能良好,但还有很大的优化空间。
在本节中,我们将使用上一节中所描述的评价方法评估作用于同一数据集的不同算法。
目的是演示如何系统地解决问题,以及某些为不平衡分类问题设计的算法。
不同的机器学习算法
在这里,我们选取一系列非线性算法来进行具体的评价,如:
- 决策树(CART,Decision Tree)
- 支持向量机(SVM,Support Vector Machine)
- 袋装决策树(BAG,Bagged Decision Trees)
- 随机森林(RF,Random Forest)
- 爬坡机(GBM,Gradient Boosting Machine)
首先定义一个列表,依次定义每个模型并将它们添加到列表中,以便于后面将运算的结果进行列表显示。代码如下:
# define models to test
defget_models():
    models, names = list(), list()
# CART
    models.append(DecisionTreeClassifier())
    names.append('CART')
# SVM
    models.append(SVC(gamma='scale'))
    names.append('SVM')
# Bagging
    models.append(BaggingClassifier(n_estimators=100))
    names.append('BAG')
# RF
    models.append(RandomForestClassifier(n_estimators=100))
    names.append('RF')
# GBM
    models.append(GradientBoostingClassifier(n_estimators=100))
    names.append('GBM')
return models, names
针对每一个算法,我们将主要使用默认的模型超参数。对标签变量进行独热编码,对连续型数据变量通过
MinMaxScaler
进行规范化处理。具体的,建立一个Pipeline,其中第一步使用
ColumnTransformer()
函数;第二步使用
OneHotEncoder()
函数;第三步使用
MinMaxScaler
函数。相关代码如下:
...
# define steps
steps = [('c',OneHotEncoder(handle_unknown='ignore'),cat_ix), ('n',MinMaxScaler(),num_ix)]
# one hot encode categorical, normalize numerical
ct = ColumnTransformer(steps)
# wrap the model i a pipeline
pipeline = Pipeline(steps=[('t',ct),('m',models[i])])
# evaluate the model and store results
scores = evaluate_model(X, y, pipeline)
# summarize performance
print('>%s %.3f (%.3f)' % (names[i], mean(scores), std(scores)))
同时,我们可以通过作图进行直观的比较:
...
# plot the results
pyplot.boxplot(results, labels=names, showmeans=True)
pyplot.show()
上述代码集合到一起,我们就实现了对于若干算法性能的对比。完整代码如下:
# spot check machine learning algorithms on the adult imbalanced dataset
from numpy import mean
from numpy import std
from pandas import read_csv
from matplotlib import pyplot
from sklearn.preprocessing import LabelEncoder
from sklearn.preprocessing import OneHotEncoder
from sklearn.preprocessing import MinMaxScaler
from sklearn.pipeline import Pipeline
from sklearn.compose import ColumnTransformer
from sklearn.model_selection import cross_val_score
from sklearn.model_selection import RepeatedStratifiedKFold
from sklearn.tree import DecisionTreeClassifier
from sklearn.svm import SVC
from sklearn.ensemble import RandomForestClassifier
from sklearn.ensemble import GradientBoostingClassifier
from sklearn.ensemble import BaggingClassifier

# load the dataset
defload_dataset(full_path):
# load the dataset as a numpy array
    dataframe = read_csv(full_path, header=None, na_values='?')
# drop rows with missing
    dataframe = dataframe.dropna()
# split into inputs and outputs
    last_ix = len(dataframe.columns) - 1
    X, y = dataframe.drop(last_ix, axis=1), dataframe[last_ix]
# select categorical and numerical features
    cat_ix = X.select_dtypes(include=['object', 'bool']).columns
    num_ix = X.select_dtypes(include=['int64', 'float64']).columns
# label encode the target variable to have the classes 0 and 1
    y = LabelEncoder().fit_transform(y)
return X.values, y, cat_ix, num_ix

# evaluate a model
defevaluate_model(X, y, model):
# define evaluation procedure
    cv = RepeatedStratifiedKFold(n_splits=10, n_repeats=3, random_state=1)
# evaluate model
    scores = cross_val_score(model, X, y, scoring='accuracy', cv=cv, n_jobs=-1)
return scores

# define models to test
defget_models():
    models, names = list(), list()
# CART
    models.append(DecisionTreeClassifier())
    names.append('CART')
# SVM
    models.append(SVC(gamma='scale'))
    names.append('SVM')
# Bagging
    models.append(BaggingClassifier(n_estimators=100))
    names.append('BAG')
# RF
    models.append(RandomForestClassifier(n_estimators=100))
    names.append('RF')
# GBM
    models.append(GradientBoostingClassifier(n_estimators=100))
    names.append('GBM')
return models, names

# define the location of the dataset
full_path = 'adult-all.csv'
# load the dataset
X, y, cat_ix, num_ix = load_dataset(full_path)
# define models
models, names = get_models()
results = list()
# evaluate each model
for i in range(len(models)):
# define steps
    steps = [('c',OneHotEncoder(handle_unknown='ignore'),cat_ix), ('n',MinMaxScaler(),num_ix)]
# one hot encode categorical, normalize numerical
    ct = ColumnTransformer(steps)
# wrap the model i a pipeline
    pipeline = Pipeline(steps=[('t',ct),('m',models[i])])
# evaluate the model and store results
    scores = evaluate_model(X, y, pipeline)
    results.append(scores)
# summarize performance
    print('>%s %.3f (%.3f)' % (names[i], mean(scores), std(scores)))
# plot the results
pyplot.boxplot(results, labels=names, showmeans=True)
pyplot.show()
运行结果如下:
>CART 0.812 (0.005)
>SVM 0.837 (0.005)
>BAG 0.852 (0.004)
>RF 0.849 (0.004)
>GBM 0.863 (0.004)
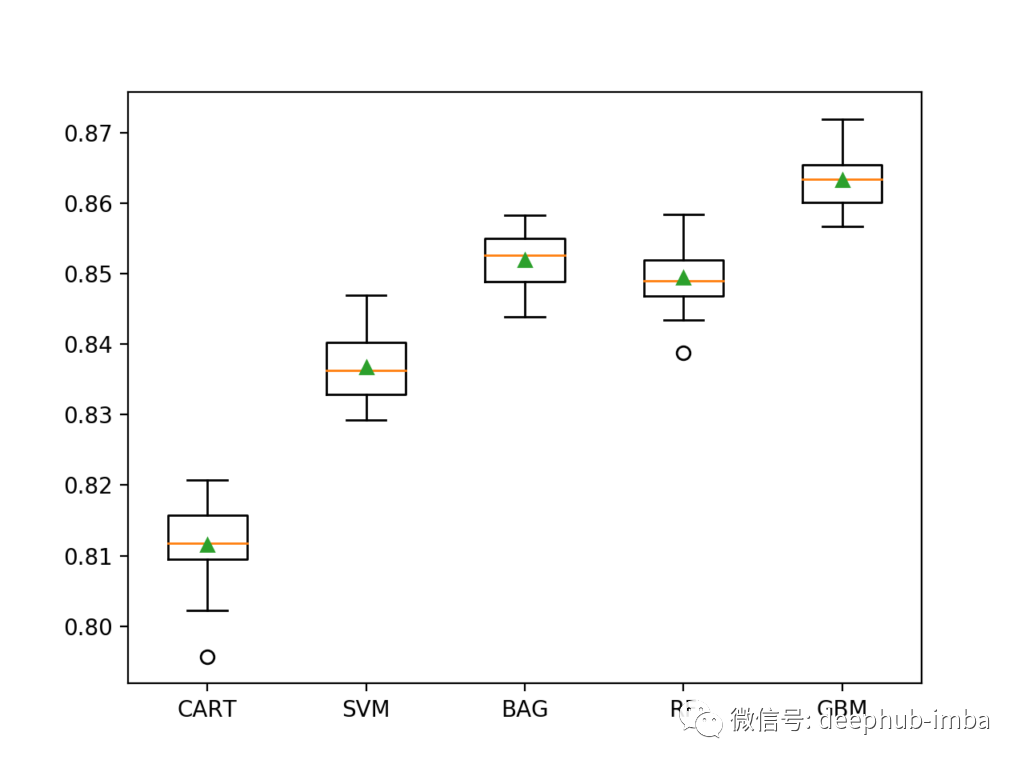
我们可以看到所选择的所有算法都达到了75.2%以上的分类准确度。其中GBM算法表现最好,分类准确度约为86.3%。这一结果只是略好于基准算法的结果。而图中虽然存在一些异常值(图上的圆圈),但每个算法的结果都高于75%的基线。每个算法的分布看起来也很紧凑,中位数和平均值基本持平,这表明算法在这个数据集上是相当稳定的。这突出表明,重要的不仅仅是模型性能的综合趋势,更应该考虑的是对于少数类别的分类结果准确度(这在少数民族的相关例子中尤为重要)。
对新输入数据进行预测
本节中,我们将使用
GradientBoostingClassfier
分类模型用于新输入数据的预测。拟合这个模型需要定义
ColumnTransformer
来对标签数据变量进行编码并缩放连续数据变量,并且在拟合模型之前在训练集上构造一个Pipeline来执行这些变换。具体代码如下:
...
# define model to evaluate
model = GradientBoostingClassifier(n_estimators=100)
# one hot encode categorical, normalize numerical
ct = ColumnTransformer([('c',OneHotEncoder(),cat_ix), ('n',MinMaxScaler(),num_ix)])
# scale, then oversample, then fit model
pipeline = Pipeline(steps=[('t',ct), ('m',model)])
函数定义完成后,我们就可以调用该函数进行参数拟合了:
...
# fit the model
pipeline.fit(X, y)
拟合阶段过后,通过
predict()
函数进行预测,返回输入数据对应的标签是“<=50K”还是“>50K”:
...
# define a row of data
row = [...]
# make prediction
yhat = pipeline.predict([row])
通过
GradientBoostingClassfier
分类模型进行预测的完整代码如下:
# fit a model and make predictions for the on the adult dataset
from pandas import read_csv
from sklearn.preprocessing import LabelEncoder
from sklearn.preprocessing import OneHotEncoder
from sklearn.preprocessing import MinMaxScaler
from sklearn.compose import ColumnTransformer
from sklearn.ensemble import GradientBoostingClassifier
from imblearn.pipeline import Pipeline

# load the dataset
defload_dataset(full_path):
# load the dataset as a numpy array
    dataframe = read_csv(full_path, header=None, na_values='?')
# drop rows with missing
    dataframe = dataframe.dropna()
# split into inputs and outputs
    last_ix = len(dataframe.columns) - 1
    X, y = dataframe.drop(last_ix, axis=1), dataframe[last_ix]
# select categorical and numerical features
    cat_ix = X.select_dtypes(include=['object', 'bool']).columns
    num_ix = X.select_dtypes(include=['int64', 'float64']).columns
# label encode the target variable to have the classes 0 and 1
    y = LabelEncoder().fit_transform(y)
return X.values, y, cat_ix, num_ix

# define the location of the dataset
full_path = 'adult-all.csv'
# load the dataset
X, y, cat_ix, num_ix = load_dataset(full_path)
# define model to evaluate
model = GradientBoostingClassifier(n_estimators=100)
# one hot encode categorical, normalize numerical
ct = ColumnTransformer([('c',OneHotEncoder(),cat_ix), ('n',MinMaxScaler(),num_ix)])
# scale, then oversample, then fit model
pipeline = Pipeline(steps=[('t',ct), ('m',model)])
# fit the model
pipeline.fit(X, y)
# evaluate on some <=50K cases (known class 0)
print('<=50K cases:')
data = [[24, 'Private', 161198, 'Bachelors', 13, 'Never-married', 'Prof-specialty', 'Not-in-family', 'White', 'Male', 0, 0, 25, 'United-States'],
    [23, 'Private', 214542, 'Some-college', 10, 'Never-married', 'Farming-fishing', 'Own-child', 'White', 'Male', 0, 0, 40, 'United-States'],
    [38, 'Private', 309122, '10th', 6, 'Divorced', 'Machine-op-inspct', 'Not-in-family', 'White', 'Female', 0, 0, 40, 'United-States']]
for row in data:
# make prediction
    yhat = pipeline.predict([row])
# get the label
    label = yhat[0]
# summarize
    print('>Predicted=%d (expected 0)' % (label))
# evaluate on some >50K cases (known class 1)
print('>50K cases:')
data = [[55, 'Local-gov', 107308, 'Masters', 14, 'Married-civ-spouse', 'Prof-specialty', 'Husband', 'White', 'Male', 0, 0, 40, 'United-States'],
    [53, 'Self-emp-not-inc', 145419, '1st-4th', 2, 'Married-civ-spouse', 'Exec-managerial', 'Husband', 'White', 'Male', 7688, 0, 67, 'Italy'],
    [44, 'Local-gov', 193425, 'Masters', 14, 'Married-civ-spouse', 'Prof-specialty', 'Wife', 'White', 'Female', 4386, 0, 40, 'United-States']]
for row in data:
# make prediction
    yhat = pipeline.predict([row])
# get the label
    label = yhat[0]
# summarize
    print('>Predicted=%d (expected 1)' % (label))
运行结果如下:
<=50K cases:
>Predicted=0 (expected 0)
>Predicted=0 (expected 0)
>Predicted=0 (expected 0)
>50K cases:
>Predicted=1 (expected 1)
>Predicted=1 (expected 1)
>Predicted=1 (expected 1)
运行该代码,我们首先实现了模型在训练数据集上的训练,然后针对新的输入数据进行预测。可以看到,预测值和真实值是一致的,说明模型具有很好的预测功能。