
1、源码分析流程:
初窥门径之JUnit源码分析中提到源码分析建议按如下步骤进行:
1、了解框架架构图
2、了解各个package包所包含的功能点
3、选择需要关注/感兴趣/待解决问题的功能点入手
4、了解 数据流和控制流
5、绘制 类图和时序图
6、复盘
有前人经验,本文换个版本权当练习。
2、JUnit架构详解:
2.1 包功能概述
先通过某种渠道下载到JUnit的jar包,然后使用jar包分析工具jadx查看其包结构,或者直接在开发工具IDE里通过类跳转到JUnit源代码中。
在jadx中的视图: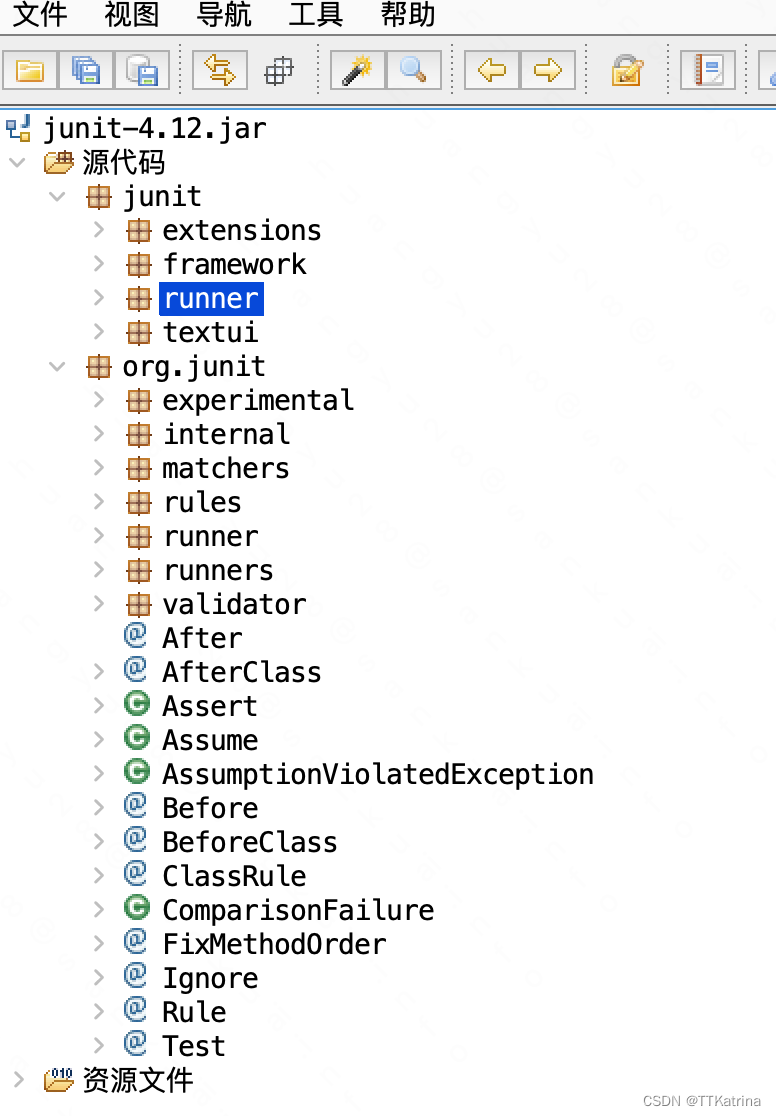
在4.12版本,JUnit 源码分到 junit 和 org.junit 两个包下, junit 包分为4个包,分别为:junit.extensions、junit.framework、junit.runner、junit.textui,可以看到相比于3.8.1版本junit.awtui、junit.swingui被砍掉了,可能是功能舍弃或者合并到junit.textui包下了。从命名看,junit.textui 代表JUnit运行时的入口程序以及运行结果显示界面,junit.runner 包含支持单元测试运行的一些基础类以及类加载器,junit.framework 包含编写一般JUnit 单元测试类的基础组件,junit.extensions 是对framework包在功能上的一些必要功能点扩展。
从 JUnitCore.runClasses(XxxTestJunit.class) 从执行的入口函数看,4.12版本的核心代码已经转移到org.junit包下,包含7个子包:org.junit.experimental、org.junit.internal、org.junit.matchers、org.junit.rules、org.junit.runner、org.junit.runners、org.junit.validator。不需要看完全部,挑重点流程去跟代码。
在Android Studio里的视图: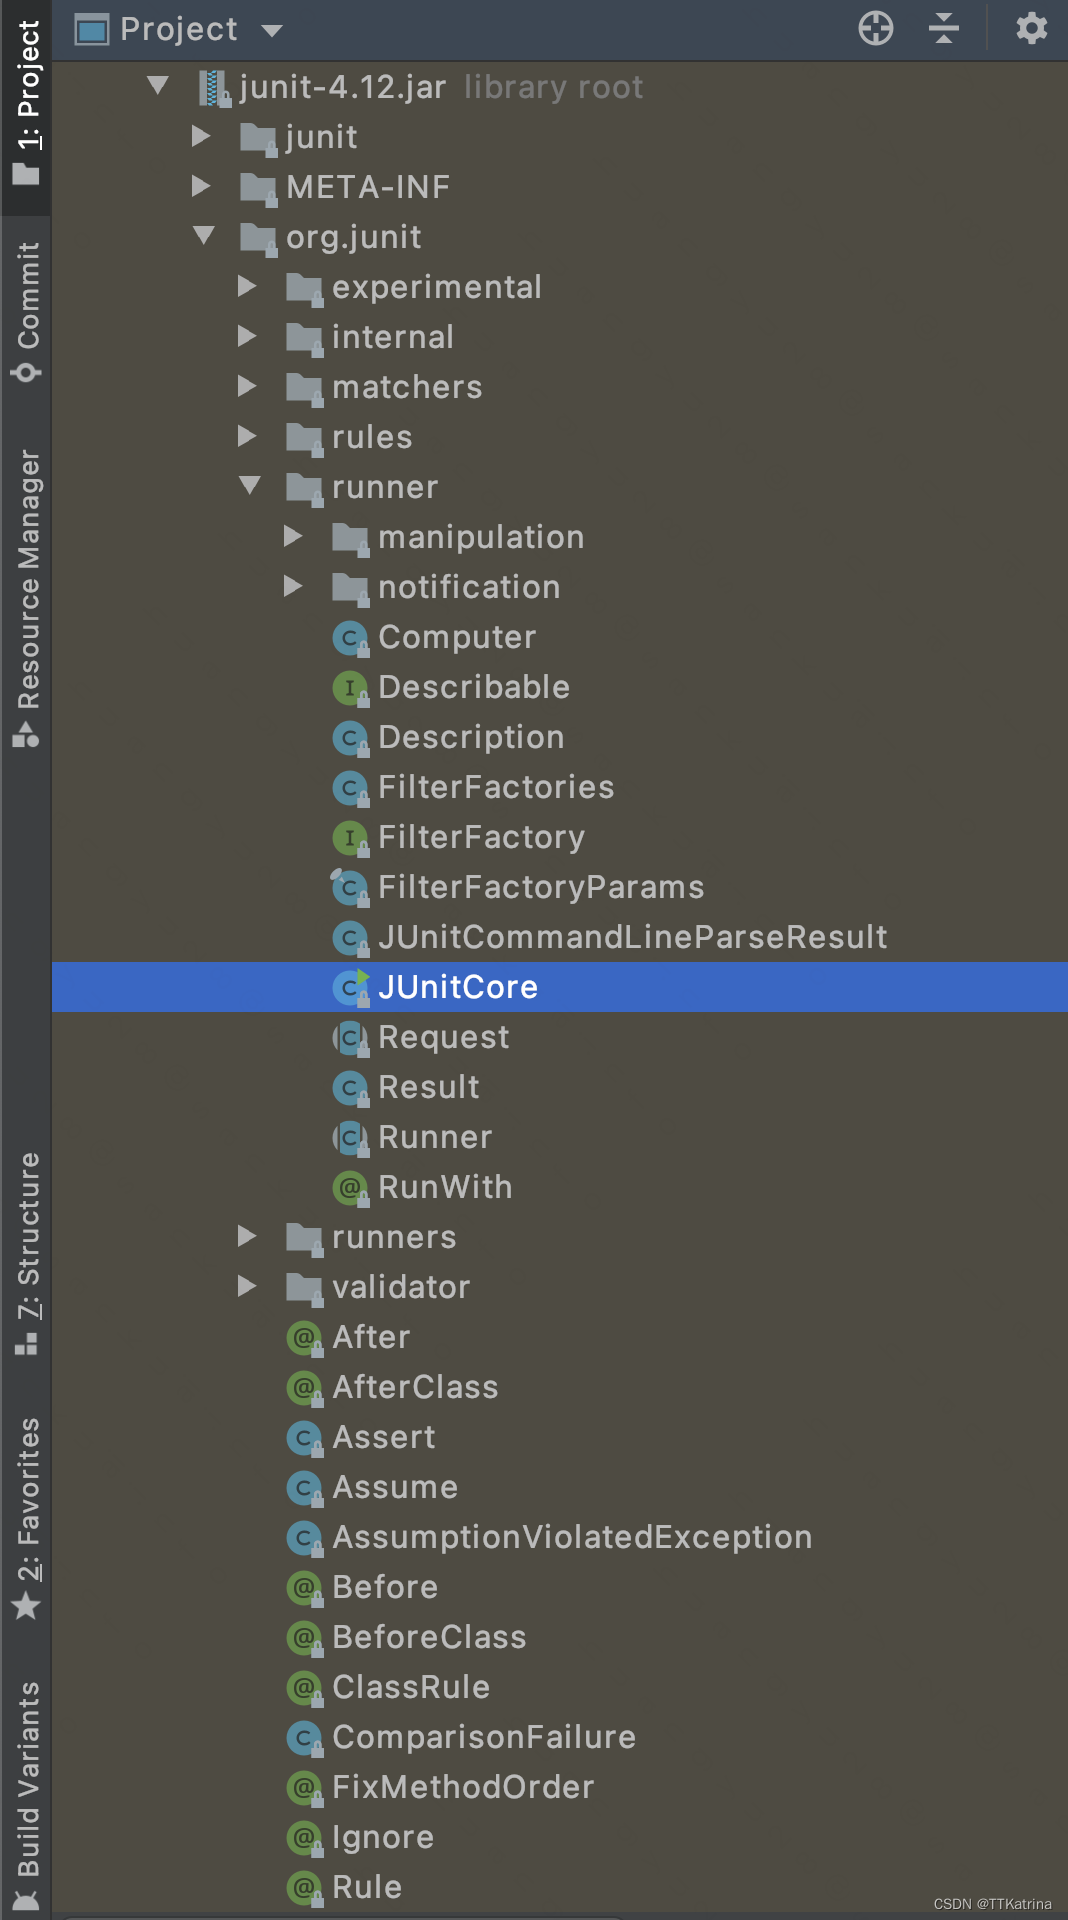
2.2 JUnitCore分析
2.2.1 JUnitCore相关类图
参考 Junit源码阅读笔记一(从JunitCore开始) 的模块关系图(org.junit.runner) 修改如下: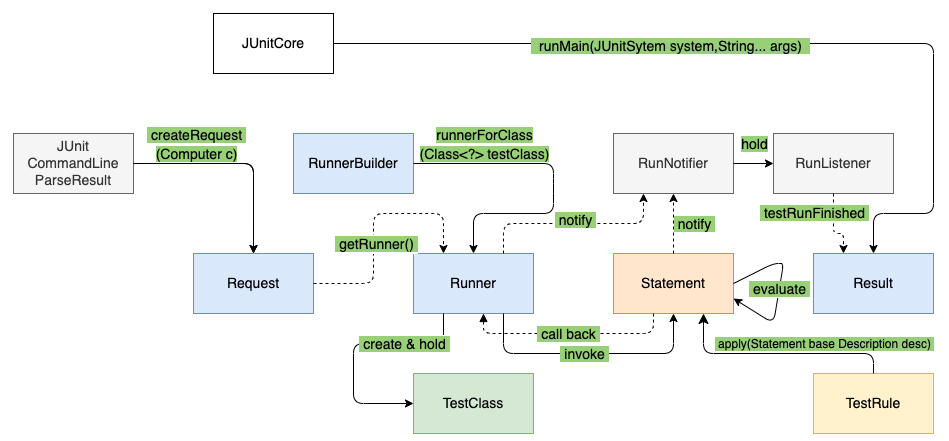
(原图链接)
提前做一些说明:
- Request 是对请求的抽象
- Result 是对结果的抽象
- Runner 表示JUnit对整个测试的抽象,是运行器 - Runner实现了Describable接口,Describable接口中唯一的函数getDescription()返回了Description对象,记录着测试的信息。
- Statement 是一个抽象类,其 evaluate()函数代表着在测试中将被执行的方法。
- RunnerBuilder 是生产Runner的构造器 - 通过 AllDefaultPossibilitiesBuilder 分发策略- 通过@RunWith注解自定义Runner实现,如使用@RunWith(Suite.class)标注的类需要使用Suite- 被@Ignore标注的类需要使用IgnoreClassRunner- 默认情况是使用BlockJUnit4ClassRunner执行单测
- TestClass 是对被测试的类的封装。
- RunNotifier 负责触发事件、通知结果更新。
- RunListener 是各类监听器。
在JUnit4中,ParentRunner会继承自Runner,ParentRunner有两个子类:
BlockJUnit4ClassRunner 用来运行单个测试类,Suite用来一起运行多个测试类
ParentRunner 会解析测试类创建TestClass对象
BlockJUnit4ClassRunner解析测试方法使用了@Before,@After,@Test,@Rule等注解的场景。
ParentRunner解析测试类使用了@BeforeClass,@AfterClass,@ClassRule注解的场景。
BlockJUnit4ClassRunner对象创建一个Statement对象,使用RunBefores和RunAfters装饰此对象并执行(执行所有的测试方法)。
实际上都是BlockJUnit4ClassRunner做的,ParentRunner是父类。
这里Statement和TestRule的关系还不理解(见2.3 节注解解析),以及evaluate怎么执行出来结果,什么是有效的结果。
一份框架的类图和运行时序图有点像红楼梦里贾、史、王、薛四家的关系,看起来错综复杂,你中有我、我中有你,那是因为他们可能存在继承或依赖引用的关系,有的是上下游,比如从request到result,有的是依附关系,比如listener、notifier这些。
2.2.2 JUnitCore相关代码
从JUnitCore开始分析,入口是JUnitCore的main函数: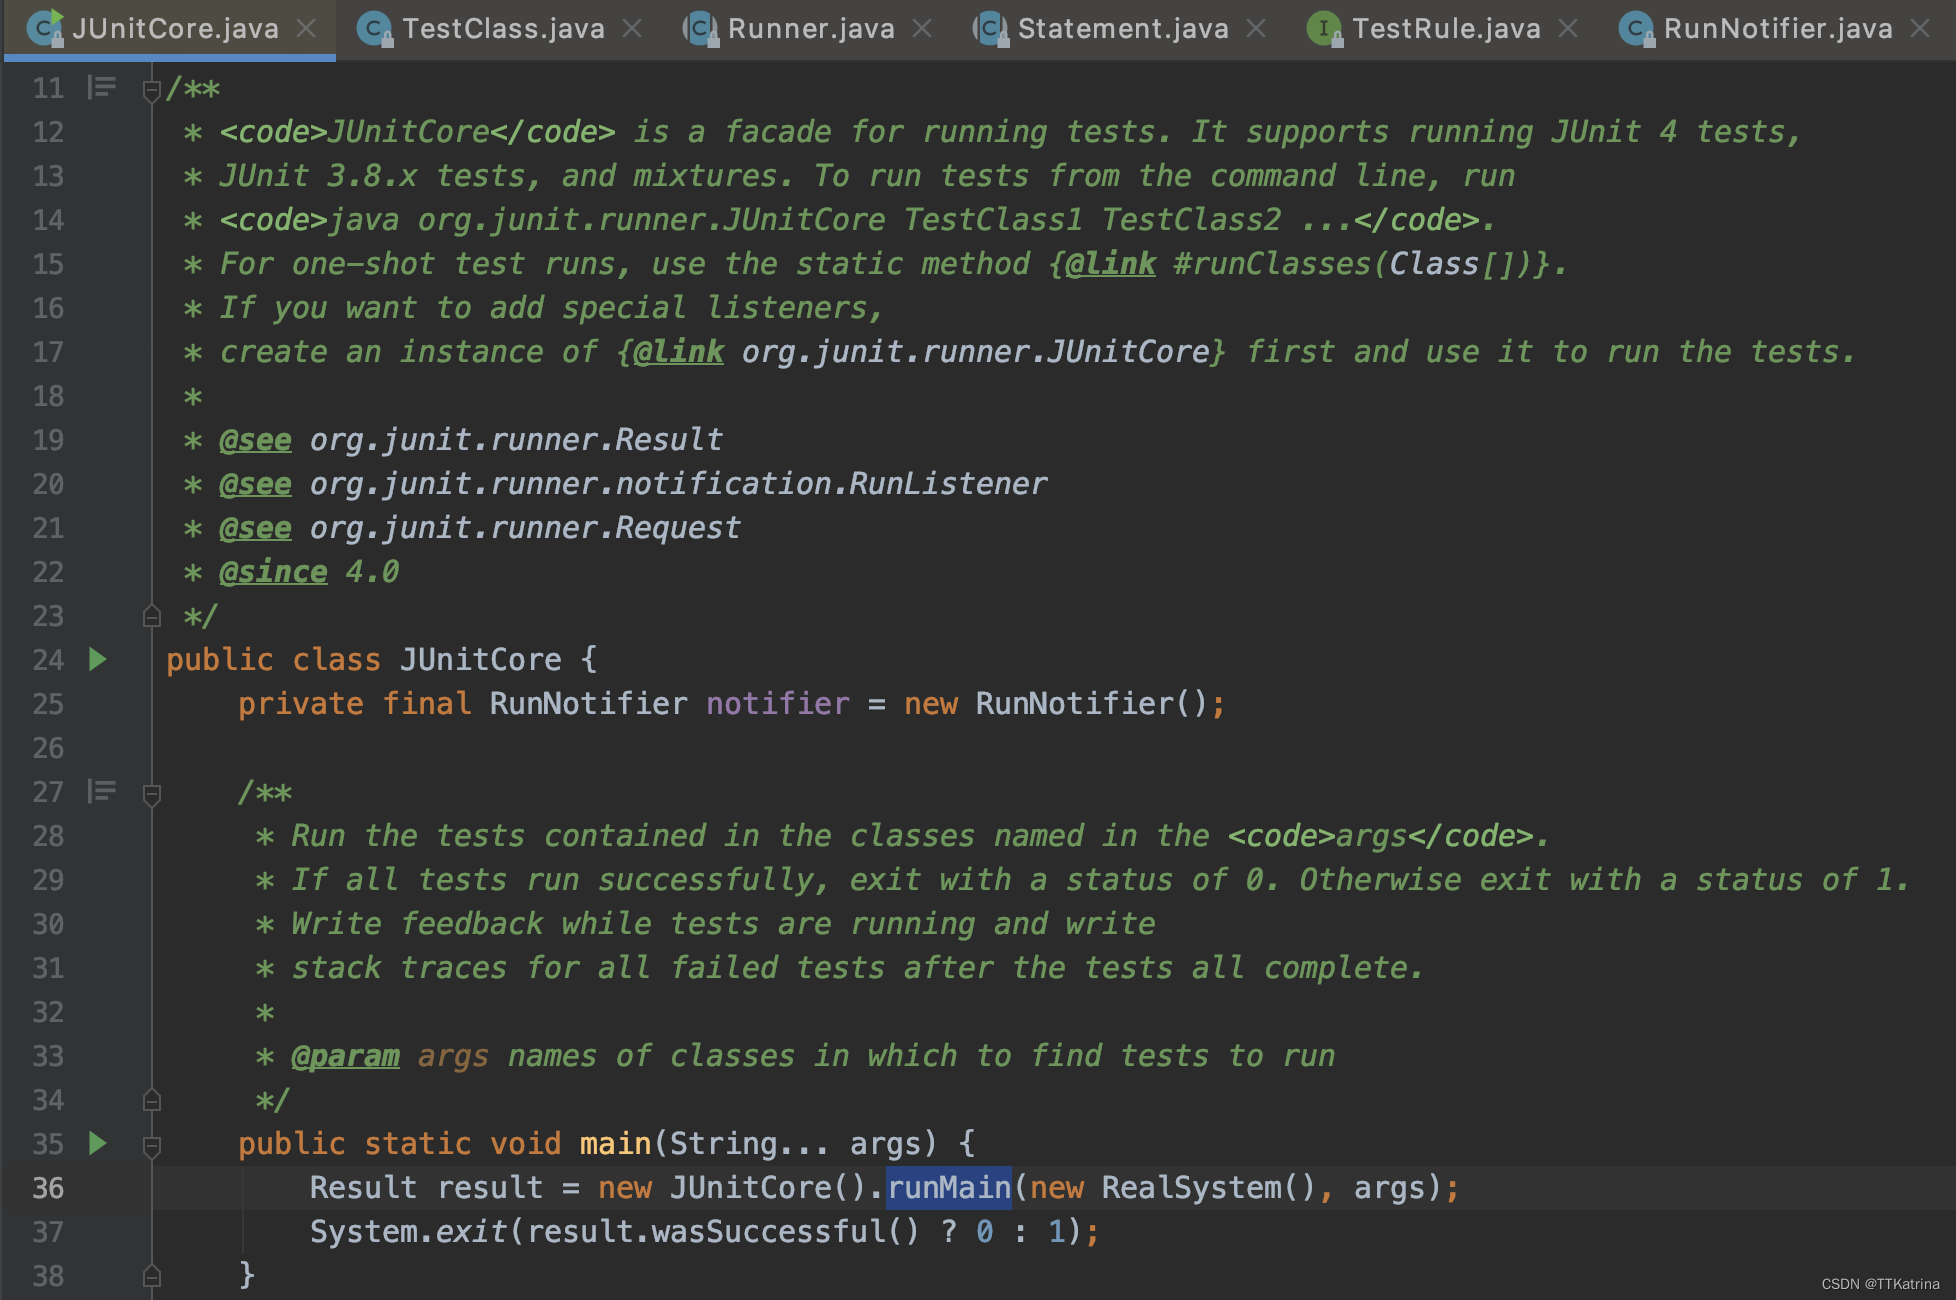
这里创建了JUnitCore实例,并运行runMain方法,RealSystem是封装打印输出流,测试运行成功时正常退出,失败时非正常退出。
runMain方法中,解析参数并获得解析结果,创建并添加一个监听器,创建请求、运行并返回运行结果。关注 run(jUnitCommandLineParseResult.createRequest(defaultComputer())) 这一句。
2.2.1.1 生成request
JUnitCommandLineParseResult.createRequest => Request.classes。Request.classes 方法里生成了request,applyFilterSpecs方法里new了一个FilterRequest,采用装饰者模式,对原有的Request进行加工,增加了过滤功能。
Request.classes 方法内部,关注 Runner suite = computer.getSuite(builder, classes); 如何得到runner。
runner(suite)这里再把runner封装起来,new一个Request返回。
2.2.1.2 执行run方法
回到 run(jUnitCommandLineParseResult.createRequest(defaultComputer())) 的run方法,是从 run request转移到run runner,这里runner是在上文创建request过程中,在Request.classes方法中生成的,Runner suite = computer.getSuite(builder, classes);。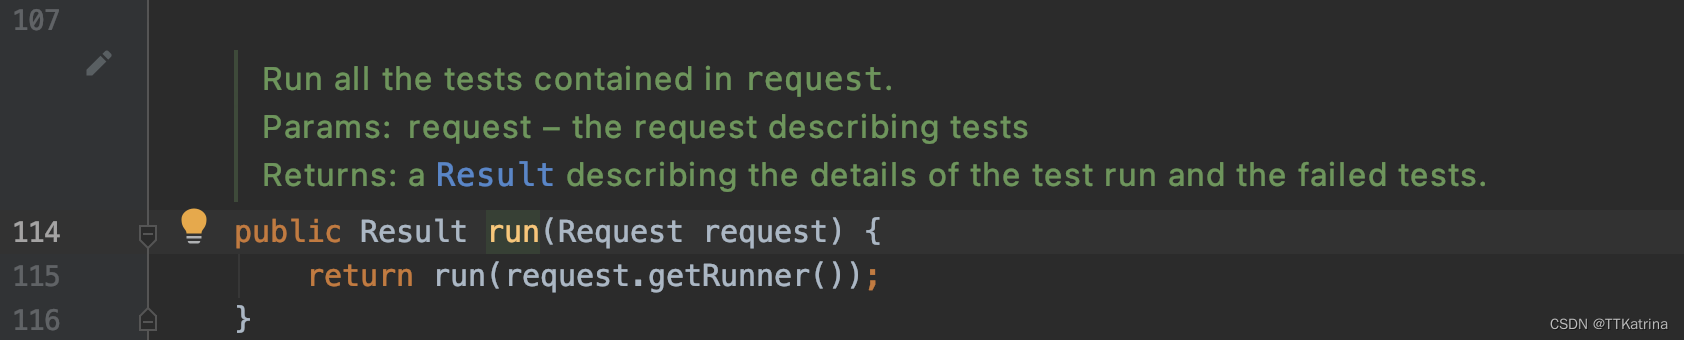
回头再去关注下runner怎么得来的:
把classes参数设置给suite,再封装一个RunnerBuilder,看起来外层的 AllDefaultPossibilitiesBuilder 是被包装的类,而runner是针对每个class的。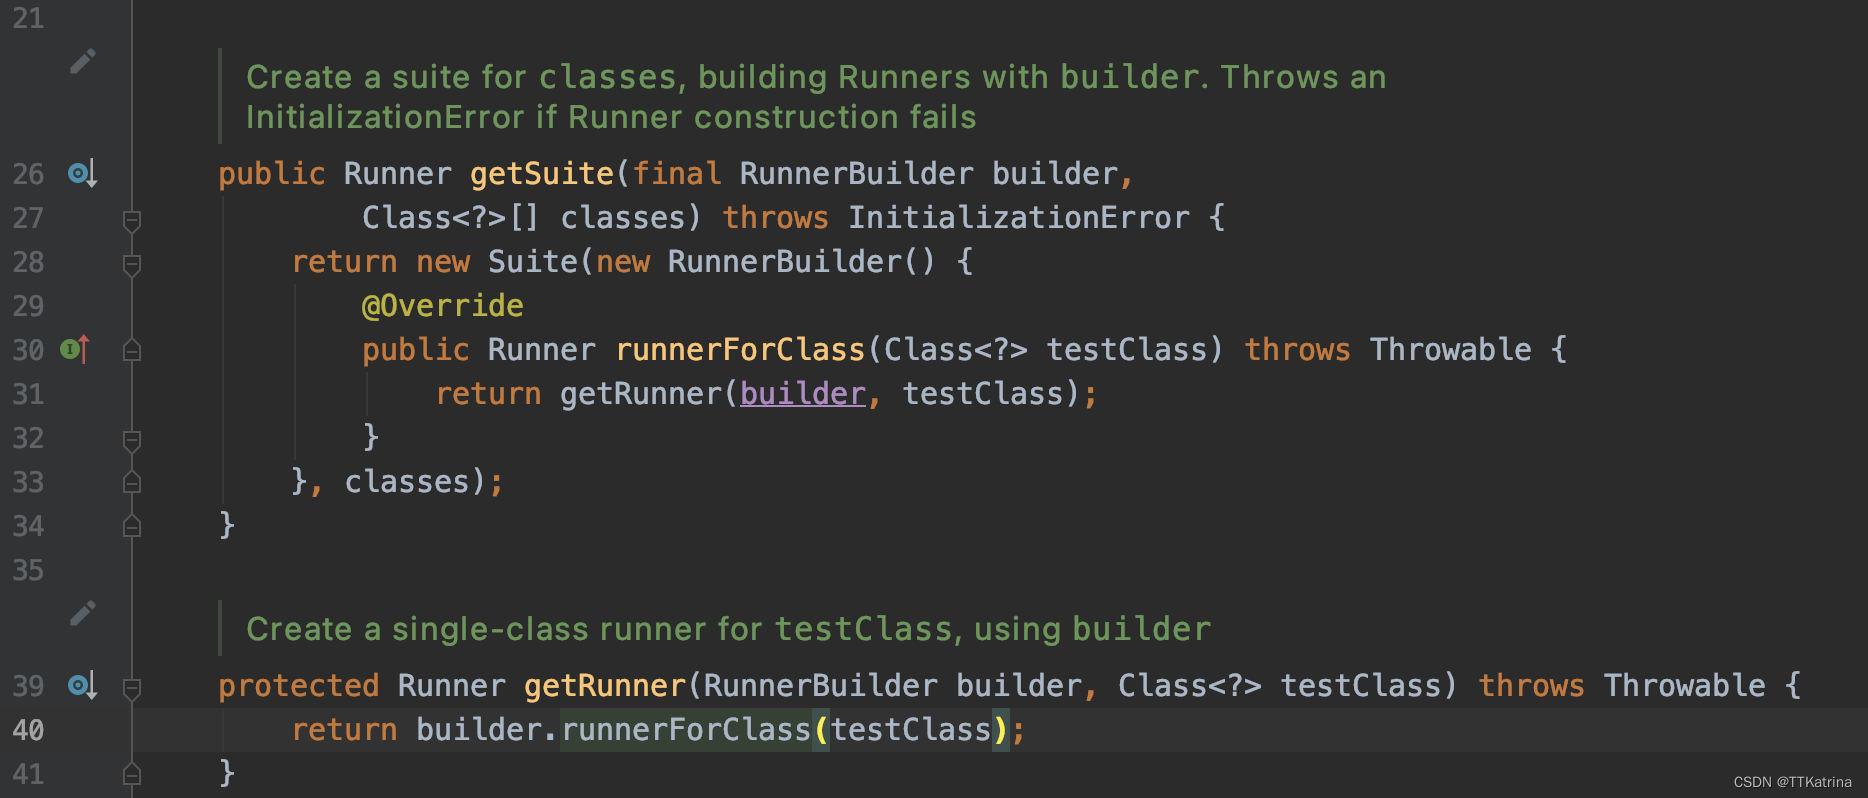
来看看 runnerForClass 的实现,从几种典型的builder里尝试获取runner,按列表顺序先到先得: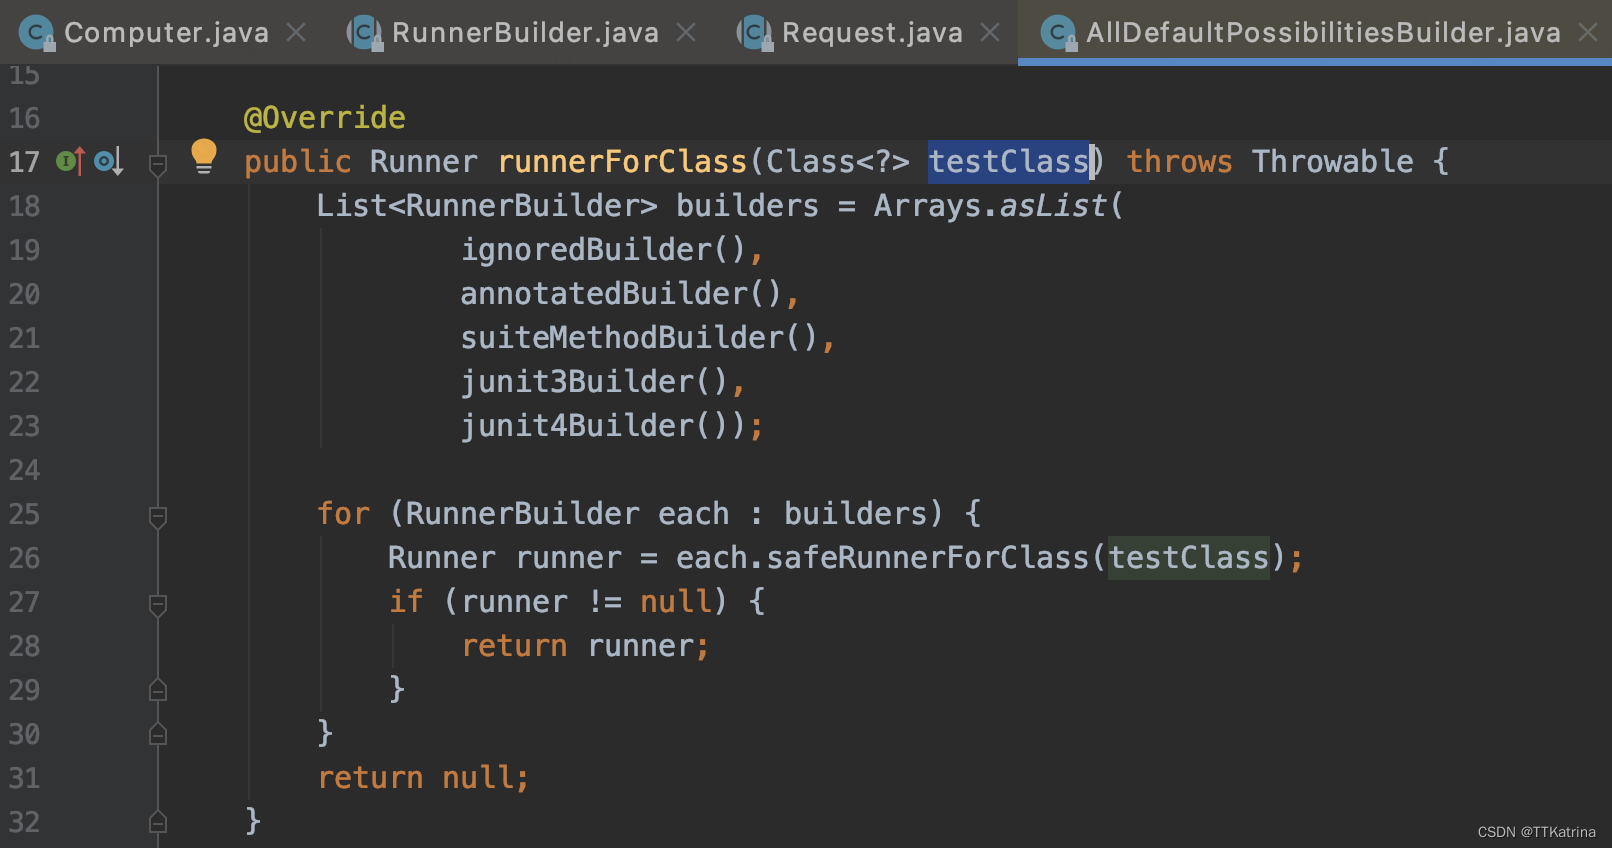
再来看看run runner中做的事情,包括 构建运行结果、创建并添加运行结果监听、通知监听器开始运行测试、开始执行、通知监听器测试运行结束、移除监听器。重点是runner.run。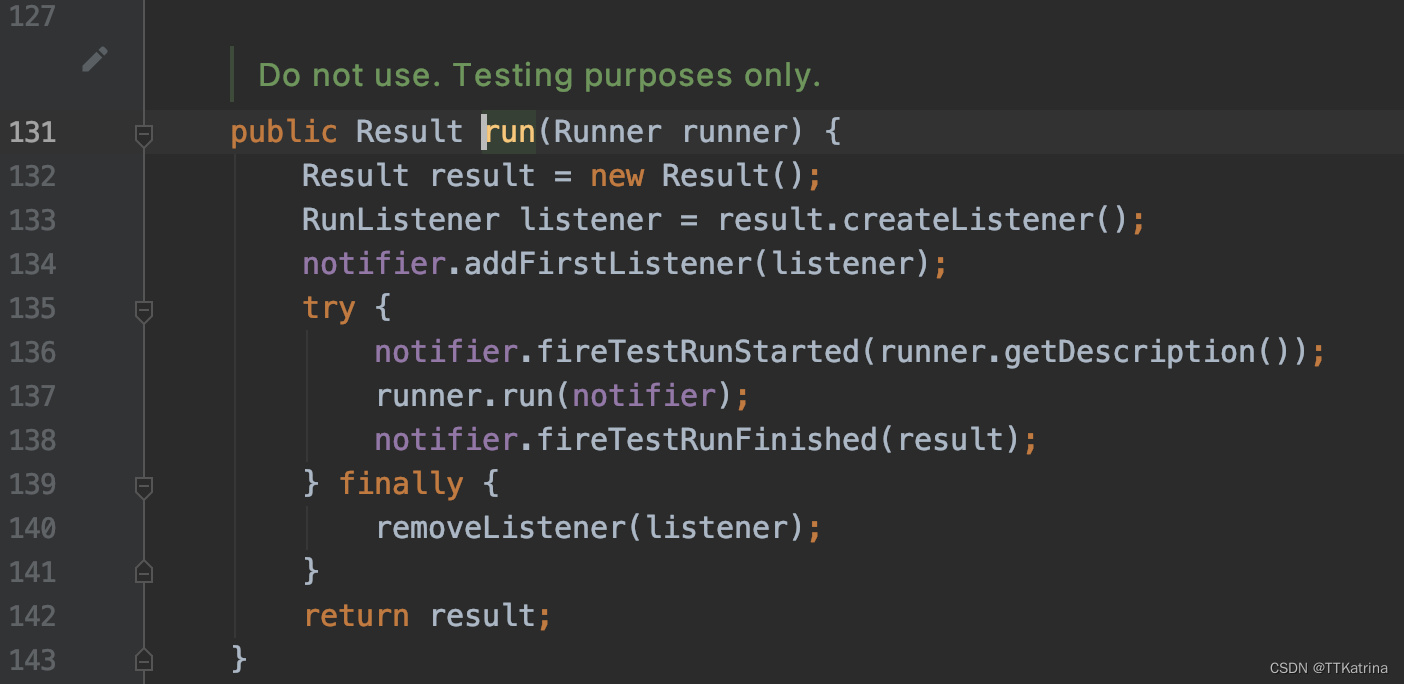
进入runner.run方法,调用的是Runner的抽象run方法,真正的执行是由具体的实现来执行的。以JUnit4ClassRunner的run方法实现为例,会遍历执行invokeTestMethod。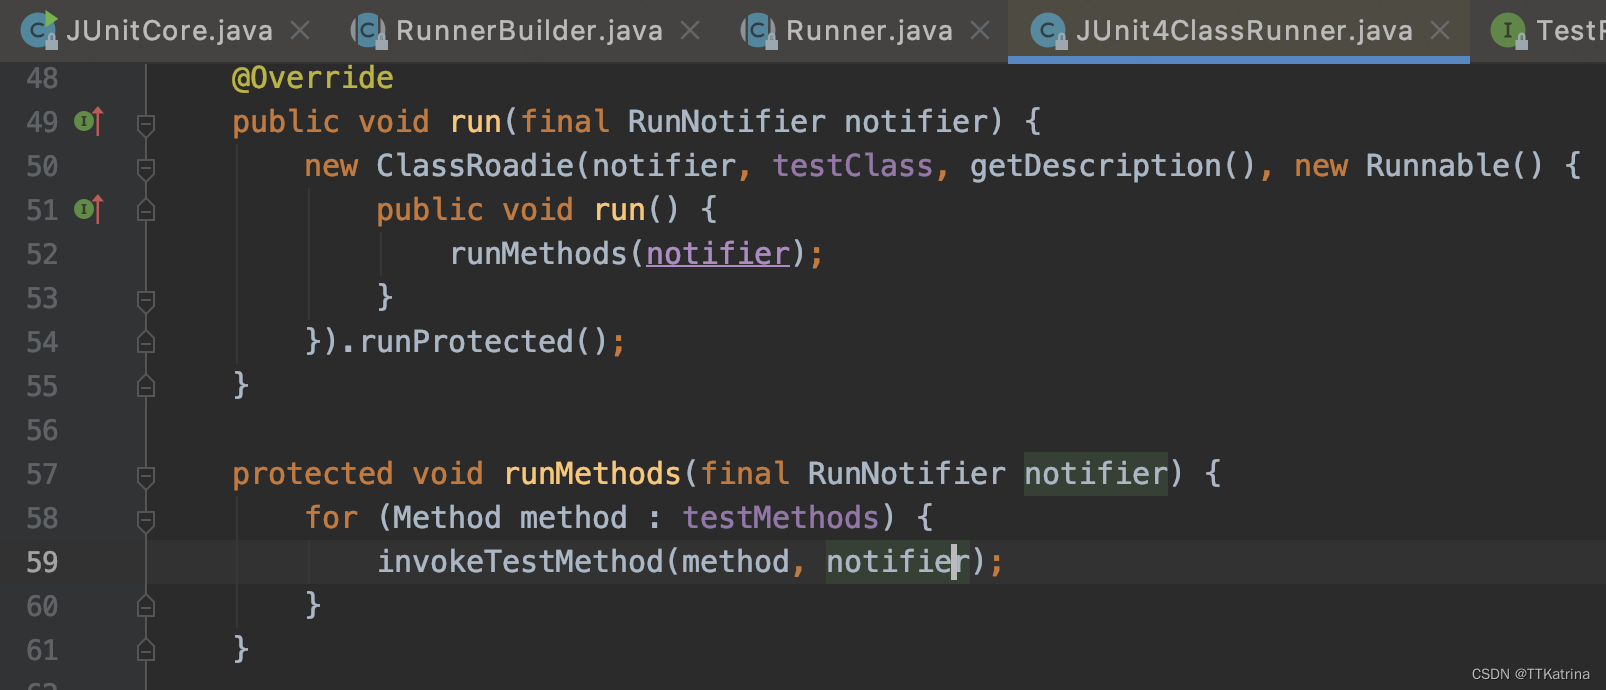
最后会在MethodRoadie里通过反射去执行测试方法。
JUnitCore中的run方法:
publicResultrun(Request request){returnrun(request.getRunner());}/**
     * Do not use. Testing purposes only.
     */publicResultrun(Runner runner){Result result =newResult();RunListener listener = result.createListener();
        notifier.addFirstListener(listener);try{
            notifier.fireTestRunStarted(runner.getDescription());
            runner.run(notifier);
            notifier.fireTestRunFinished(result);}finally{removeListener(listener);}return result;}
博客1中说是从Request实例中(如果设置了过滤器,则是FilterRequest实例)调用getRunner()方法,获取Suite实例,真正运行的是Suite中的run()方法。(FilterRequest 中的getRunner方法会过滤掉实现了Filterable并满足过滤条件的Runner)
之前更新我有这样的质疑:
有些说法不准确,Suite中没有 run方法,它是通过RunnerBuilder桥接了class和runner,RunnerBuilder的核心方法是runnerForClass,最终run方法干什么、怎么遍历测试方法,还得看具体的Runner实现类怎么实现。
后来走读完TestSuite的代码,发现Suite是有run方法的。Suite有的是runChild,交给下游去执行。
@OverrideprotectedvoidrunChild(Runner runner,finalRunNotifier notifier){
        runner.run(notifier);}
还是看JUnit4ClassRunner内部实现:
protectedvoidinvokeTestMethod(Method method,RunNotifier notifier){Description description =methodDescription(method);Object test;try{
            test =createTest();}catch(InvocationTargetException e){testAborted(notifier, description, e.getCause());return;}catch(Exception e){testAborted(notifier, description, e);return;}TestMethod testMethod =wrapMethod(method);newMethodRoadie(test, testMethod, notifier, description).run();}//这里应该能通过反射拿到TestCase,或者说TestSuiteprotectedObjectcreateTest()throwsException{returngetTestClass().getConstructor().newInstance();}
再看 new MethodRoadie(test, testMethod, notifier, description).run(); 这一句,把关键要素都攒在一起,去执行run。
publicvoidrun(){if(testMethod.isIgnored()){
            notifier.fireTestIgnored(description);return;}
        notifier.fireTestStarted(description);try{long timeout = testMethod.getTimeout();if(timeout >0){runWithTimeout(timeout);}else{runTest();}}finally{
            notifier.fireTestFinished(description);}}publicvoidrunTest(){runBeforesThenTestThenAfters(newRunnable(){publicvoidrun(){runTestMethod();}});}
从runTest会再走到runTestMethod,最终是通过 testMethod.invoke(test) 反射调用test的。这么看MethodRoadie人如其名,是妥妥的路由呀。
protectedvoidrunTestMethod(){try{
            testMethod.invoke(test);if(testMethod.expectsException()){addFailure(newAssertionError("Expected exception: "+ testMethod.getExpectedException().getName()));}}catch(InvocationTargetException e){Throwable actual = e.getTargetException();if(actual instanceofAssumptionViolatedException){return;}elseif(!testMethod.expectsException()){addFailure(actual);}elseif(testMethod.isUnexpected(actual)){String message ="Unexpected exception, expected<"+ testMethod.getExpectedException().getName()+"> but was<"+ actual.getClass().getName()+">";addFailure(newException(message, actual));}}catch(Throwable e){addFailure(e);}}//TestMethod 解除一层包装publicvoidinvoke(Object test)throwsIllegalArgumentException,IllegalAccessException,InvocationTargetException{
        method.invoke(test);}
到这里第二节的JUnitCore和第三节的TestRunner算是串通了,很多时候搞不明白关系,是不是因为反射呢,互相之间不是直接显式调用。
其实…还是有地方没明白,这里是调用测试方法的method的各种test方法,他们是怎么和TestCase那一套联通起来呢,这里就是注解的功效了,@Test做了什么,怎么把实际待执行的测试方法和测试框架中的TestCase关联绑定的? 再来学习下这些注解吧!
2.2.3 JUnitCore调用时序
直接借用他人的成果: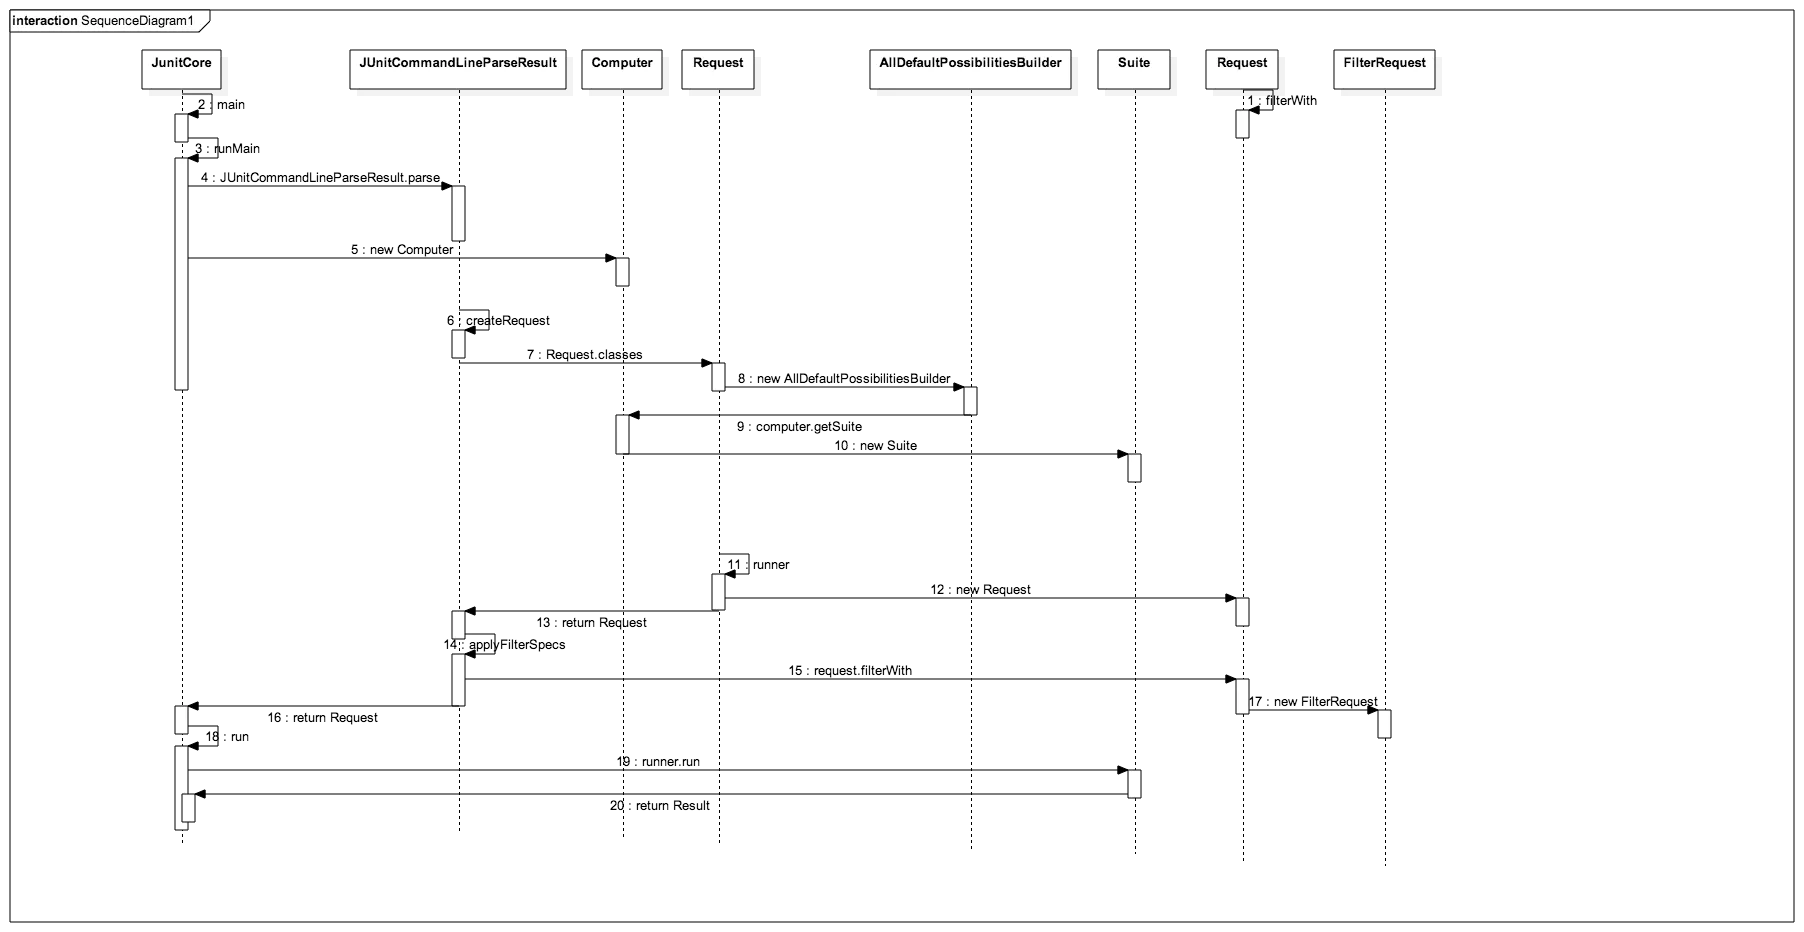
(原图见:https://www.jianshu.com/p/205946b4aa20)
2.3 注解@Test 分析
幸运的发现 单元测试云心原理探究 这篇博客,讲解的太清楚了!!而且行文不拖沓,简洁明了。作者是Java后端开发视角,除了分析JUnit的运行原理,还附加了几节Spring、SpringBoot、maven仓库的拓展,我从客户端的视角,准备在其基础上追加一下Mockito对应TestRunner的分析,预计和Spring的@RunWith用法是同理的。
先把原博客的小结摘录如下(非常有学习参考价值):
- 通过IDEA直接运行单测时,会通过JUnitStarter的main方法作为入口,最终调用Junit运行单元测试。
- Junit4将@Before、@Test、@After这些注解打标的方法都抽象成了Statement,整个单测的运行过程,实际上就是一系列Statement的运行过程。方法的调用是通过反射的方式实现的。
- 借助于@RunWith(SpringRunner.class)注解,测试框架会运行SpringRunner实例的run方法,通过TestContextManager创建TestContext,并启动Spring容器。SpringRunner和SpringJUnit4ClassRunner实际上是等价的。
- 借助于@SpringBootTest和@BootstrapWith(SpringBootTestContextBootstrapper.class)注解,测试框架通过SpringBootTestContextBootstrapper增强了TestContext,达到了启动SpringBoot应用的目的。
- Maven通过运行maven-surefire-plugin:2.12.4:test启动单元测试,其核心是通过JUnit4Provider调用了JUnit框架的代码。
2.3.1 当在IDEA中Run单元测试时发生了什么
当我们之间通过IDEA运行单元测试用例时,IDEA帮忙做了这些事情: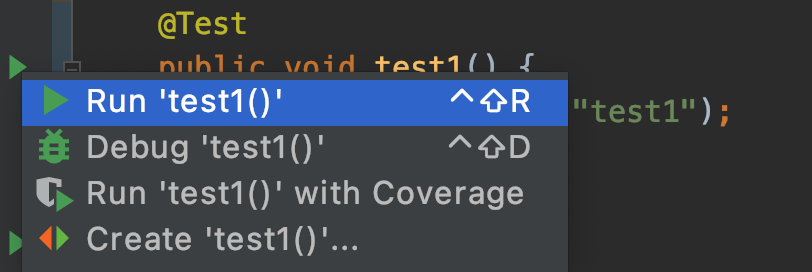
1、将工程源码和测试源码进行编译,输出到了target目录
2、通过java命令运行com.intellij.rt.junit.JUnitStarter,参数中指定了junit的版本以及单测用例名称
java com.intellij.rt.junit.JUnitStarter -ideVersion5 -junit4 com.demo.AppTest,test1
这里我们着重追下JUnitStarter的代码,该类在IDEA提供的junit-rt.jar插件包中,因为我本地的开发工具是AS,具体目录:/Applications/Android Studio.app/Contents/plugins/junit/lib/junit-rt.jar。可以将这个包引入到我们自己的工程项目中,方便阅读源码。AS似乎不能直接引入,用IntelliJ IDEA可以。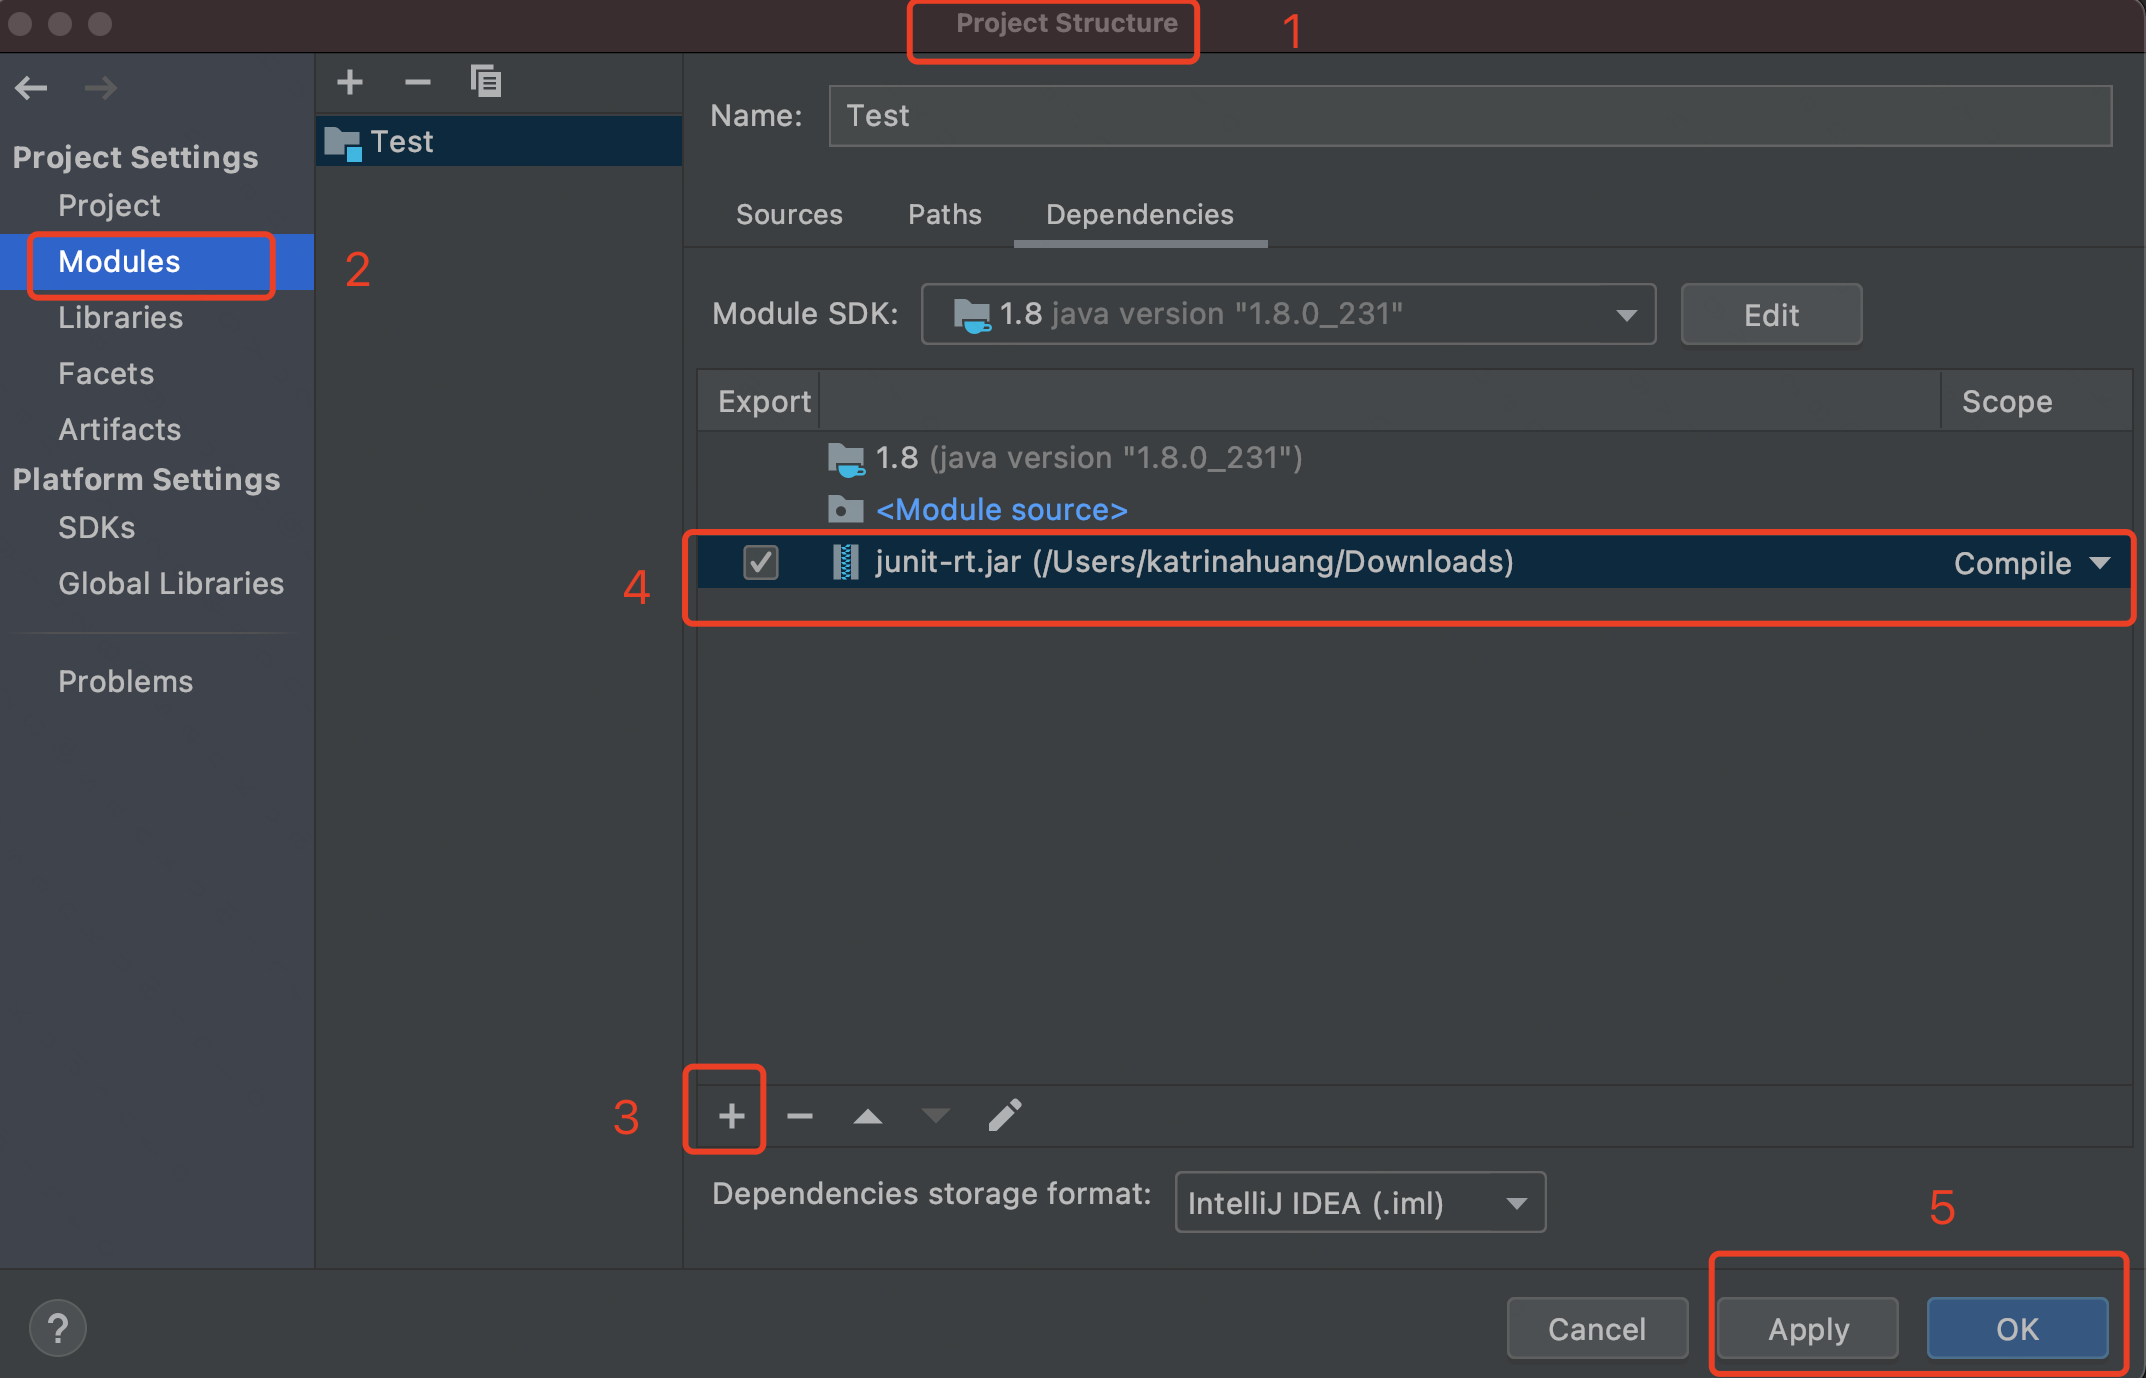
上图3的加号➕那里选择1 JARs or directories: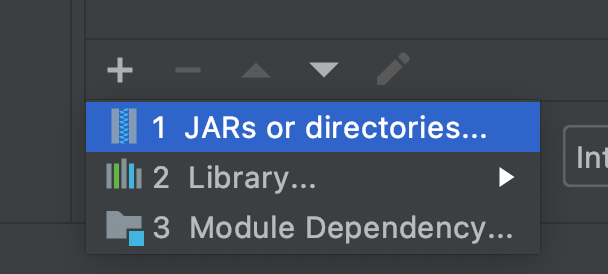
然后看到JUnitStarter的main方法的源码: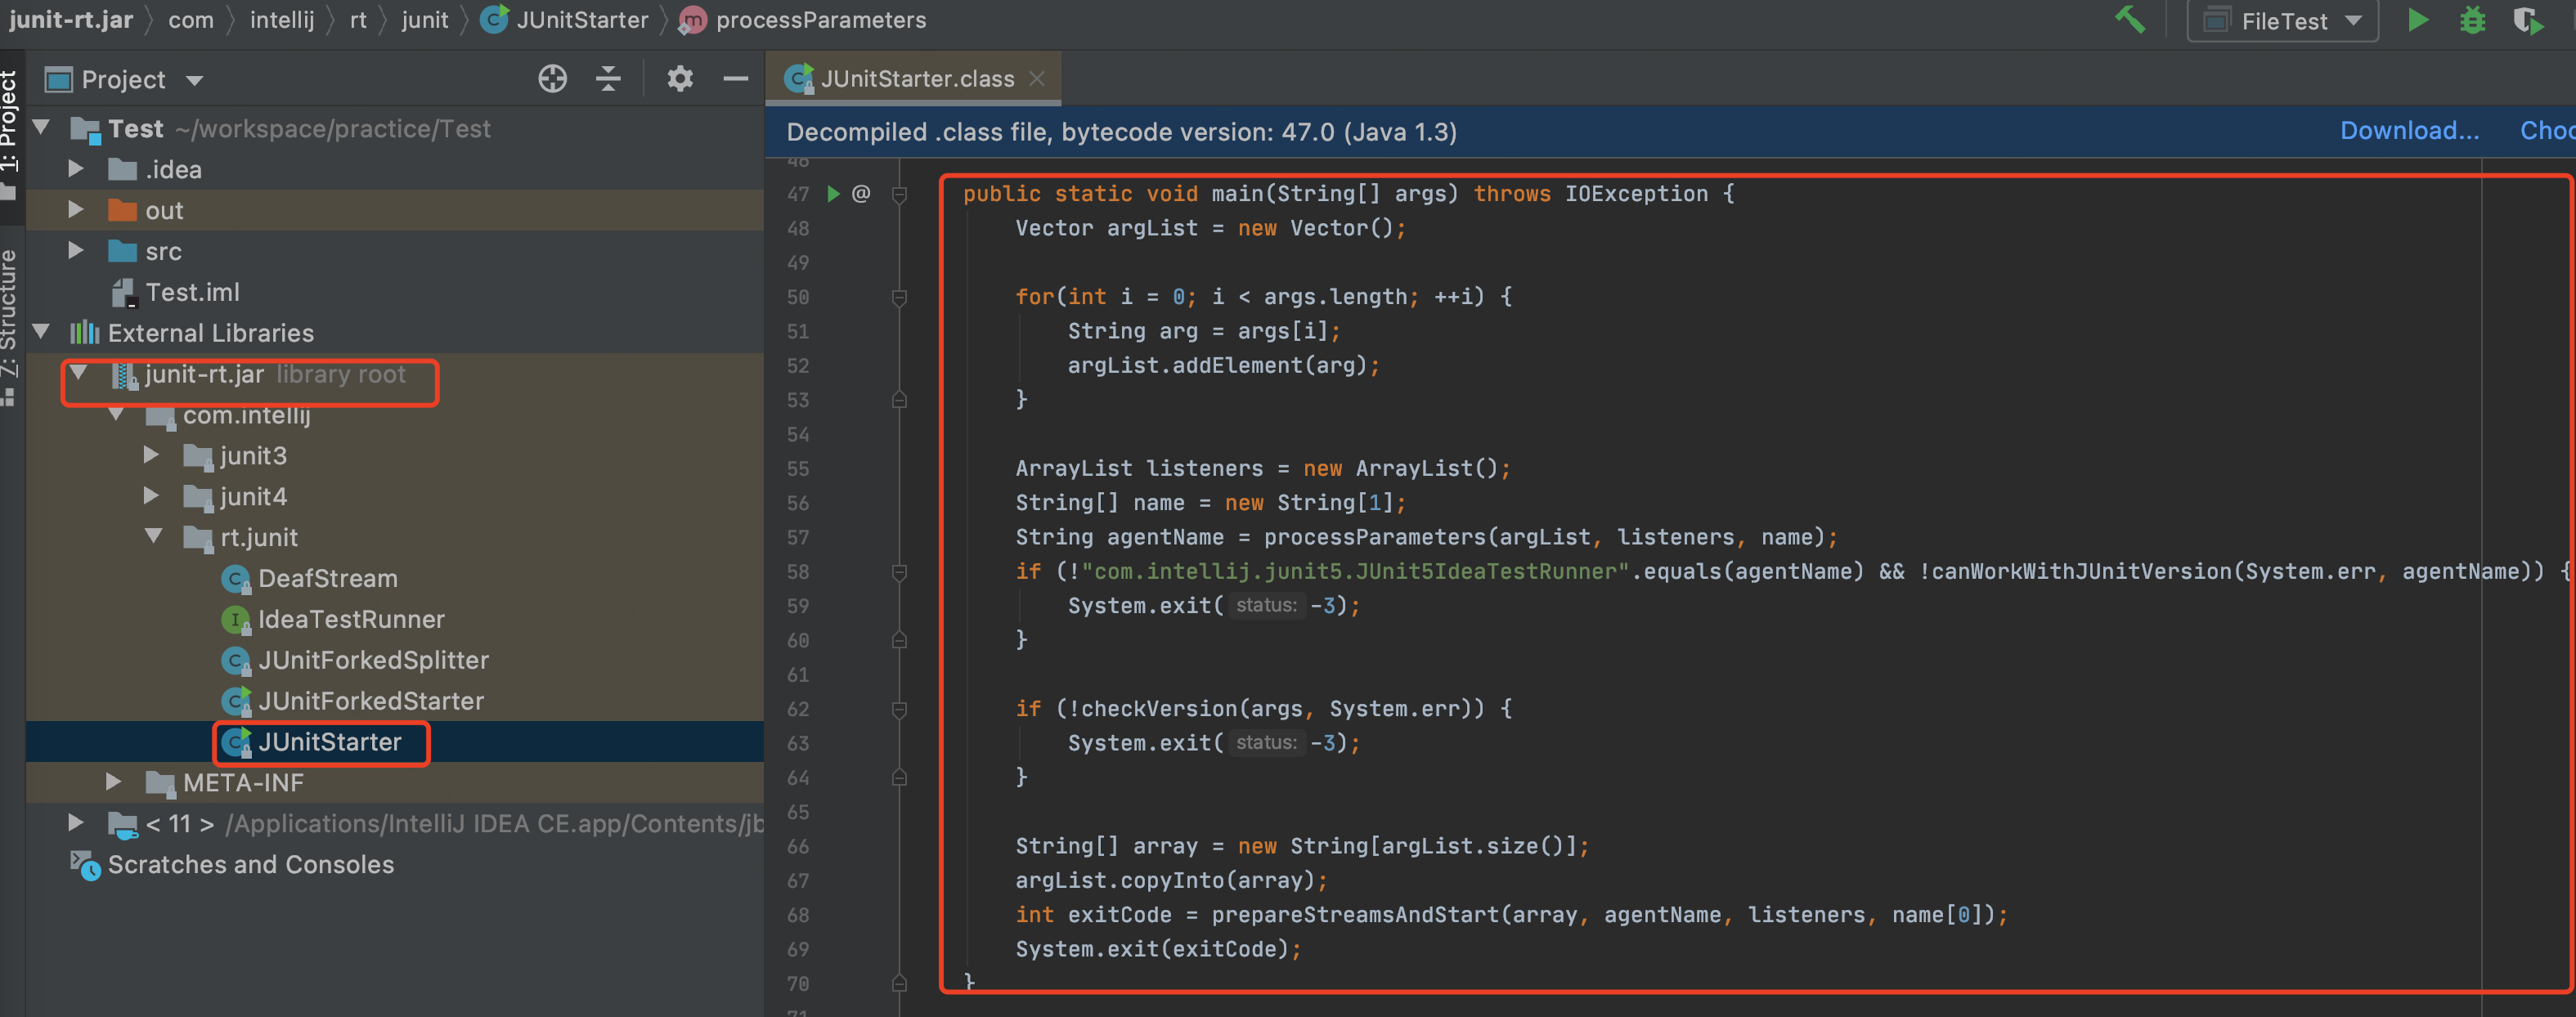
关注如下两个核心方法:
// 处理参数,主要用来确定使用哪个版本的junit框架,同时根据入参填充listenersString agentName =processParameters(argList, listeners, name);...// 启动测试int exitCode =prepareStreamsAndStart(array, agentName, listeners, name[0]);...
前方高能预警,processParameters 中通过全路径名决定用什么类型的TestRunner,在 com.intellij.junit4.JUnit4IdeaTestRunner 的代理类型下,还check了一下 org.junit.Test 能不能反射调用到,而这个Test就是Test注解!
//JUnitStarterprivatestaticStringprocessParameters(Vector args,List listeners,String[] params){String agentName =isJUnit5Preferred()?"com.intellij.junit5.JUnit5IdeaTestRunner":"com.intellij.junit4.JUnit4IdeaTestRunner";Vector result =newVector(args.size());int i;String arg;for(i =0; i < args.size();++i){
            arg =(String)args.get(i);if(!arg.startsWith("-ideVersion")){if(arg.equals("-junit3")){
                    agentName ="com.intellij.junit3.JUnit3IdeaTestRunner";}elseif(arg.equals("-junit4")){
                    agentName ="com.intellij.junit4.JUnit4IdeaTestRunner";}elseif(arg.equals("-junit5")){
                    agentName ="com.intellij.junit5.JUnit5IdeaTestRunner";}elseif(arg.startsWith("@name")){
                    params[0]= arg.substring("@name".length());}elseif(arg.startsWith("@w@")){
                    ourWorkingDirs = arg.substring(3);}else{int port;if(arg.startsWith("@@@")){
                        port = arg.indexOf(44);
                        ourForkMode = arg.substring(3, port);
                        ourCommandFileName = arg.substring(port +1);}elseif(arg.startsWith("@@")){if((newFile(arg.substring(2))).exists()){try{BufferedReader reader =newBufferedReader(newFileReader(arg.substring(2)));String line;while((line = reader.readLine())!=null){
                                    listeners.add(line);}}catch(Exception var22){
                                var22.printStackTrace();}}}elseif(arg.startsWith("-socket")){
                        port =Integer.parseInt(arg.substring("-socket".length()));try{Socket socket =newSocket(InetAddress.getByName("127.0.0.1"), port);DataInputStream os =newDataInputStream(socket.getInputStream());try{
                                os.readBoolean();}finally{
                                os.close();}}catch(IOException var21){
                            var21.printStackTrace();}}else{
                        port =RepeatCount.getCount(arg);if(port !=0){
                            ourRepeatCount = arg;
                            ourCount = port;}else{
                            result.addElement(arg);}}}}}

        args.removeAllElements();for(i =0; i < result.size();++i){
            arg =(String)result.get(i);
            args.addElement(arg);}if("com.intellij.junit3.JUnit3IdeaTestRunner".equals(agentName)){try{Class.forName("org.junit.runner.Computer");
                agentName ="com.intellij.junit4.JUnit4IdeaTestRunner";}catch(ClassNotFoundException var19){return"com.intellij.junit3.JUnit3IdeaTestRunner";}}if("com.intellij.junit4.JUnit4IdeaTestRunner".equals(agentName)){try{Class.forName("org.junit.Test");}catch(ClassNotFoundException var18){return"com.intellij.junit3.JUnit3IdeaTestRunner";}}try{String forceJUnit3 =System.getProperty("idea.force.junit3");if(forceJUnit3 !=null&&Boolean.valueOf(forceJUnit3)){return"com.intellij.junit3.JUnit3IdeaTestRunner";}}catch(SecurityException var17){}return agentName;}
processParameters 是准备参数,prepareStreamsAndStart 是干活。
//JUnitStarterprivatestaticintprepareStreamsAndStart(String[] args,String agentName,ArrayList listeners,String name){try{IdeaTestRunner testRunner =(IdeaTestRunner)getAgentClass(agentName).newInstance();if(ourCommandFileName ==null||"none".equals(ourForkMode)&&(ourWorkingDirs ==null||(newFile(ourWorkingDirs)).length()<=0L)){returnRepeater.startRunnerWithArgs(testRunner, args, listeners, name, ourCount,true);}else{List newArgs =newArrayList();
                newArgs.add(agentName);
                newArgs.addAll(listeners);return(newJUnitForkedSplitter(ourWorkingDirs, ourForkMode, newArgs)).startSplitting(args, name, ourCommandFileName, ourRepeatCount);}}catch(Exception var6){
            var6.printStackTrace(System.err);return-2;}}//IdeaTestRunnerpublicstaticclassRepeater{publicRepeater(){}publicstaticintstartRunnerWithArgs(IdeaTestRunner testRunner,String[] args,ArrayList listeners,String name,int count,boolean sendTree){
            testRunner.createListeners(listeners, count);if(count ==1){return testRunner.startRunnerWithArgs(args, name, count, sendTree);}else{boolean success;int result;if(count >0){
                    success =true;for(result =0; result++< count; sendTree =false){int result = testRunner.startRunnerWithArgs(args, name, count, sendTree);if(result ==-2){return result;}

                        success &= result ==0;}return success ?0:-1;}else{
                    success =true;do{
                        result = testRunner.startRunnerWithArgs(args, name, count, sendTree);if(result ==-2){return-1;}

                        success &= result ==0;}while(count !=-2|| success);return-1;}}}}//JUnit4IdeaTestRunnerpublicintstartRunnerWithArgs(String[] args,String name,int count,boolean sendTree){try{Request request =JUnit4TestRunnerUtil.buildRequest(args, name, sendTree);if(request ==null){return-2;}else{Runner testRunner = request.getRunner();Description description =getDescription(request, testRunner);if(description ==null){return-2;}else{if(sendTree){do{this.myTestsListener.sendTree(description);--count;}while(count >0);}JUnitCore runner =newJUnitCore();
                    runner.addListener(this.myTestsListener);Iterator iterator =this.myListeners.iterator();while(iterator.hasNext()){IDEAJUnitListener junitListener =(IDEAJUnitListener)Class.forName((String)iterator.next()).newInstance();
                        runner.addListener(newJUnit4IdeaTestRunner.MyCustomRunListenerWrapper(junitListener, description.getDisplayName()));}Result result = runner.run(testRunner);return result.wasSuccessful()?0:-1;}}}catch(Exception var11){
            var11.printStackTrace(System.err);return-2;}}
敲黑板,敲重点,我们看到 JUnit4IdeaTestRunner 的 startRunnerWithArgs 中出现了熟悉的身影——JUnitCore!最后通过 Result result = runner.run(testRunner); 拿到结果。
所以 org.junit.runner.JUnitCore 中有 run 方法。
// JUnit4IdeaTestRunnerRunner testRunner = request.getRunner();JUnitCore runner =newJUnitCore();
                    runner.addListener(this.myTestsListener);Iterator iterator =this.myListeners.iterator();while(iterator.hasNext()){IDEAJUnitListener junitListener =(IDEAJUnitListener)Class.forName((String)iterator.next()).newInstance();
                        runner.addListener(newJUnit4IdeaTestRunner.MyCustomRunListenerWrapper(junitListener, description.getDisplayName()));}Result result = runner.run(testRunner);return result.wasSuccessful()?0:-1;
再来温故一下 JUnitCore 的run方法:
// JUnitCorepublicResultrun(Runner runner){Result result =newResult();RunListener listener = result.createListener();
        notifier.addFirstListener(listener);try{
            notifier.fireTestRunStarted(runner.getDescription());
            runner.run(notifier);
            notifier.fireTestRunFinished(result);}finally{removeListener(listener);}return result;}
直接使用原博客的时序图如下: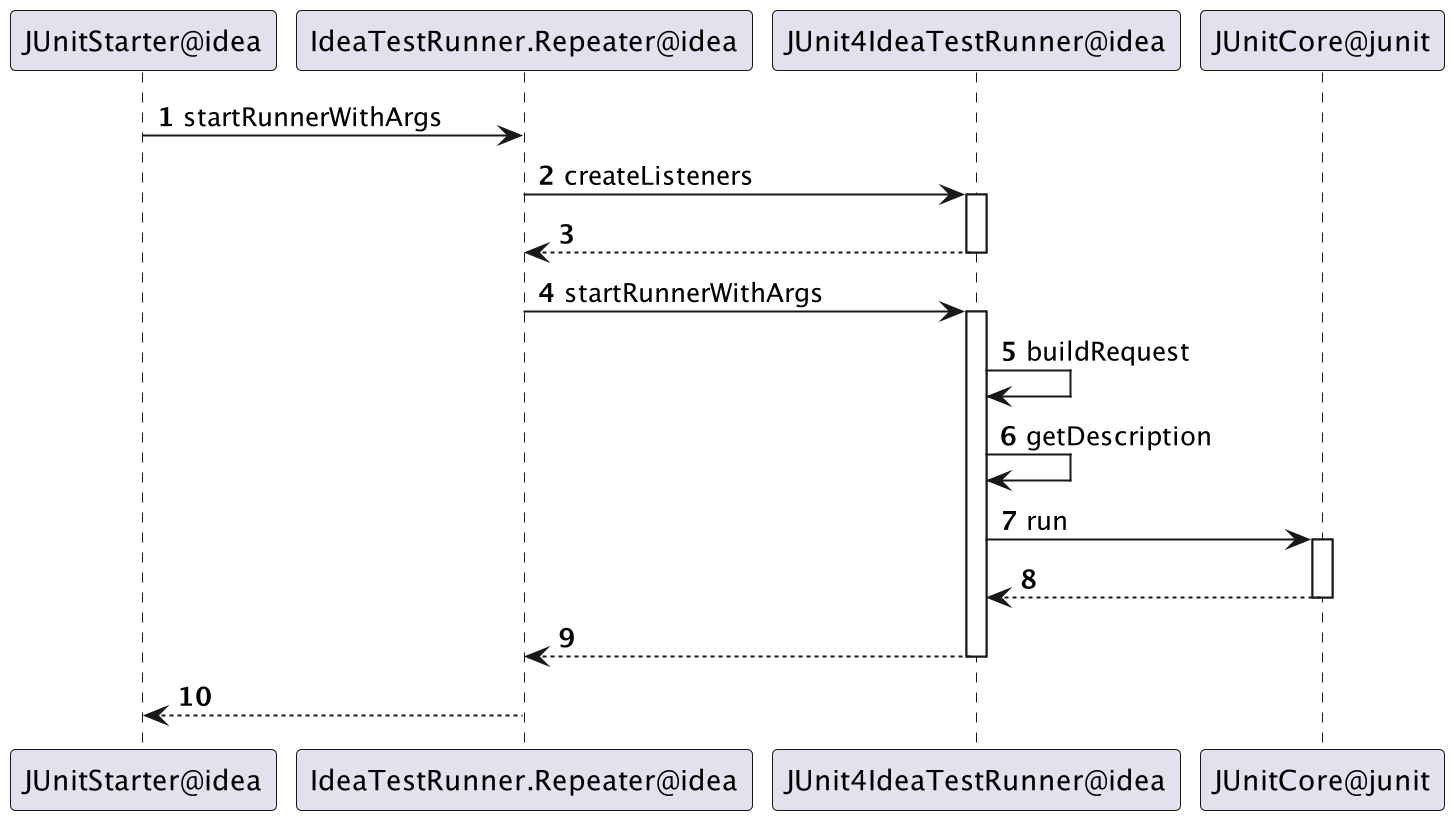
“当IDEA确认好要启动的框架版本后,会通过类的全限定名称反射创建IdeaTestRunner的实例。这里以JUnit4为例,IDEA会实例化com.intellij.junit4.JUnit4IdeaTestRunner类对象并调用其startRunnerWithArgs方法,在该方法中会通过buildRequest方法构建org.junit.runner.Request,通过getDescription方法获取org.junit.runner.Description,最后创建org.junit.runner.JUnitCore实例并调用其run方法。
简而言之就是,IDEA最终会借助Junit4框架的能力启动并运行单测用例,所以接下来有必要对Junit4框架的源码做些深入的探究。”(原文很好,直接引用了)
除了通过IDE启动单测,还可以通过gradle执行gradle test运行测试,实际上是在一个线程中执行SuiteTestClassProcessor的processTestClass方法来进行启动。
其源码可以查看https://github.com/gradle/gradle/blob/master/subprojects/testing-base/src/main/java/org/gradle/api/internal/tasks/testing/SuiteTestClassProcessor.java
Ref:https://blog.saymagic.cn/2016/09/30/understand-Junit.html
第三方工具为我们提供了便捷方式,最终都会走到JUnit提供的JUnitCore入口类来运行测试用例。
2.3.2 Runner是如何分配的
借用 理解JUnit 这篇博客中的流程图,分析和理解 Runner、TestClass、Statement:
承接上一节代码,在IDE中查看 runner.run(notifier); 被调用的地方: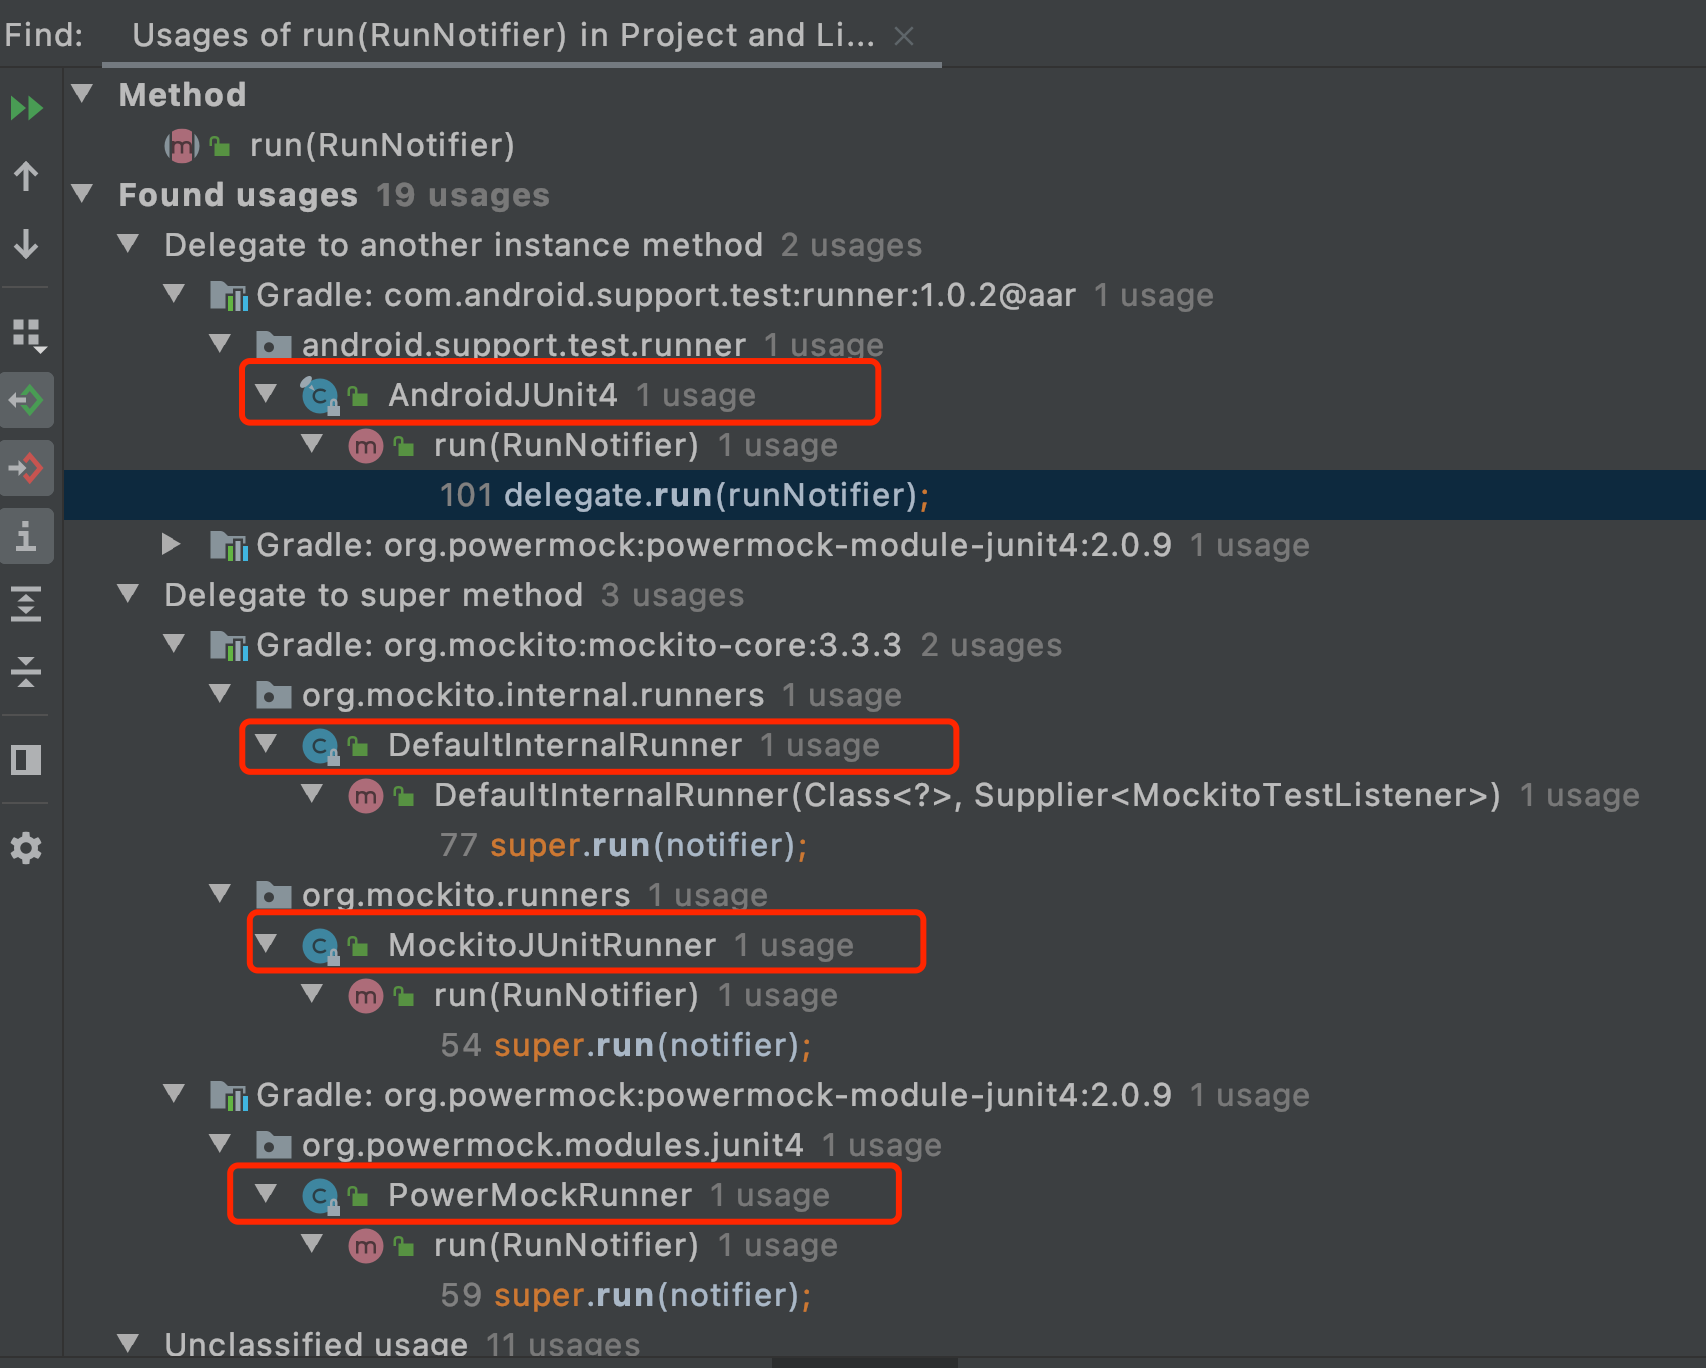
或者直接看Runner接口的run方法的实现类,有这么多处: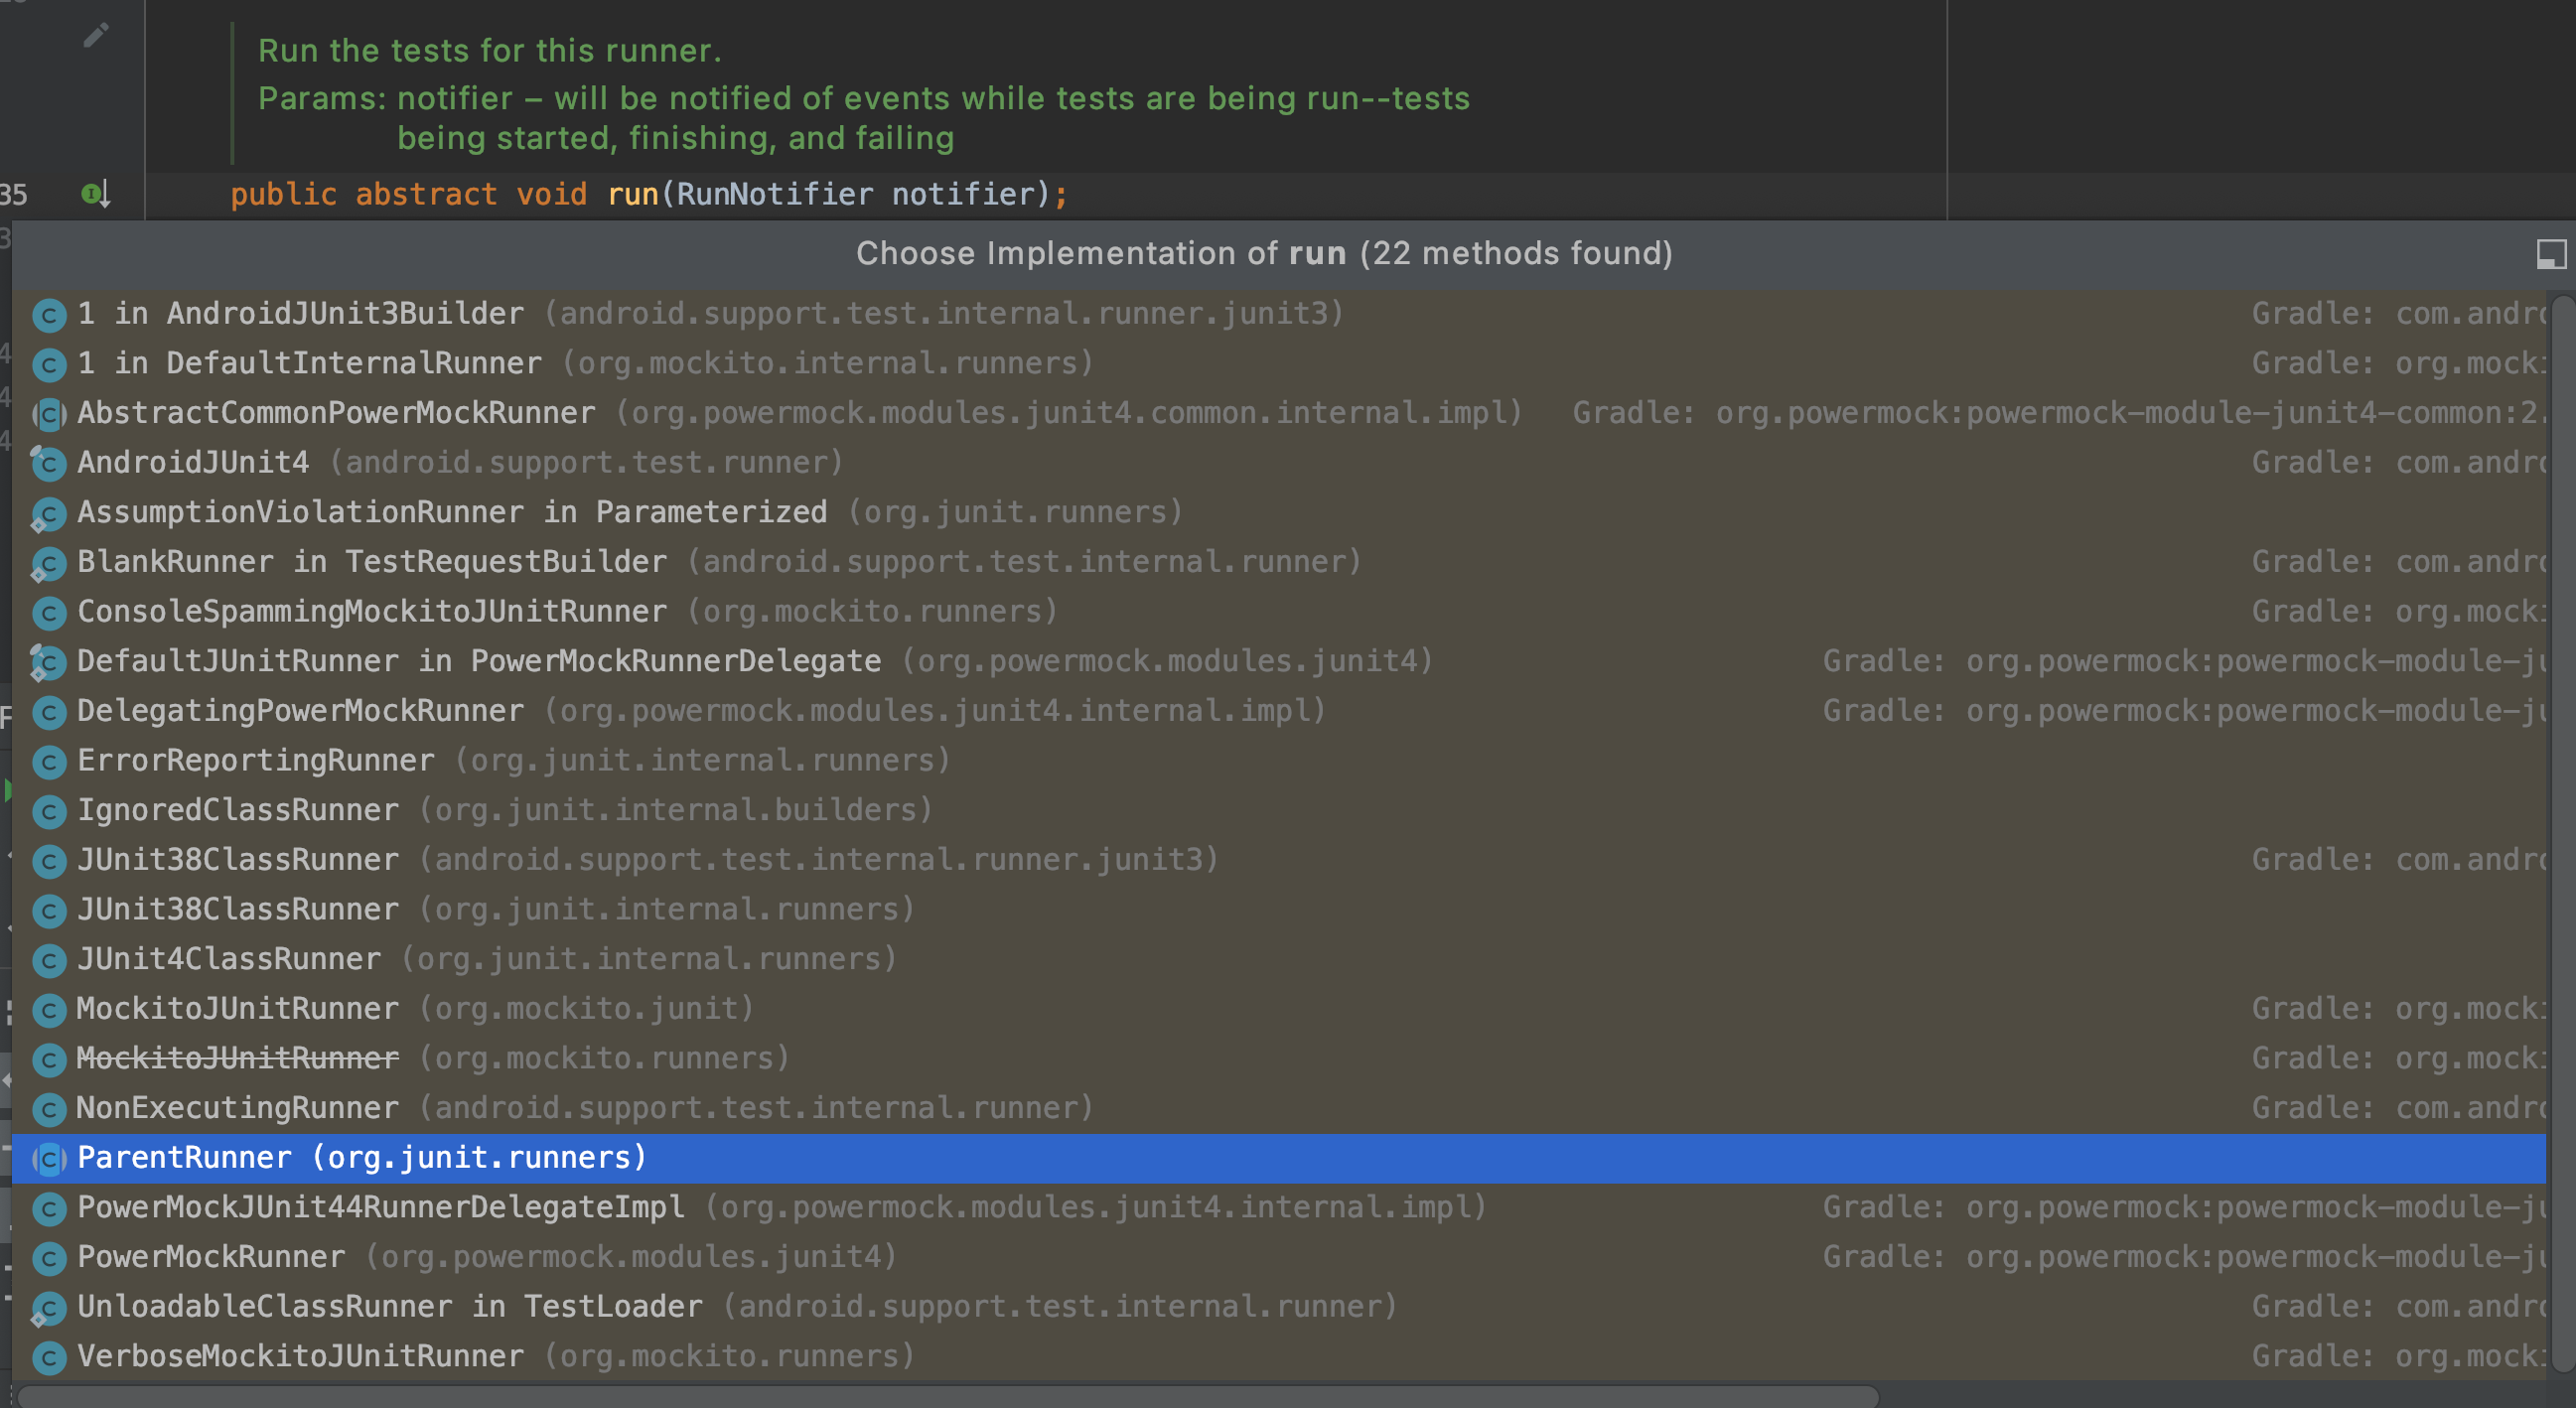
可以看到最终运行哪种类型的测试流程取决于传入的runner实例,即不同的Runner决定了不同的运行流程,通过实现类的名字可以大概猜一猜,JUnit4ClassRunner应该是JUnit4基本的测试流程,MockitoJUnitRunner应该是引入了Mockito的能力。
回过头来看看runner.run(request.getRunner())中request.getRunner()的代码,在 ClassRequest 这个Request的实现类里,看到:
// ClassRequest@OverridepublicRunnergetRunner(){if(runner ==null){synchronized(runnerLock){if(runner ==null){
                    runner =newAllDefaultPossibilitiesBuilder(canUseSuiteMethod).safeRunnerForClass(fTestClass);}}}return runner;}
在 RunnerBuilder 的实现类 AllDefaultPossibilitiesBuilder 里看到:
//RunnerBuilderpublicRunnersafeRunnerForClass(Class<?> testClass){try{returnrunnerForClass(testClass);}catch(Throwable e){returnnewErrorReportingRunner(testClass, e);}}// AllDefaultPossibilitiesBuilder@OverridepublicRunnerrunnerForClass(Class<?> testClass)throwsThrowable{List<RunnerBuilder> builders =Arrays.asList(ignoredBuilder(),annotatedBuilder(),suiteMethodBuilder(),junit3Builder(),junit4Builder());for(RunnerBuilder each : builders){Runner runner = each.safeRunnerForClass(testClass);if(runner !=null){return runner;}}returnnull;}
这是个列表,是有序的,会按顺序遍历。
Runner是基于传入的测试类(testClass)的信息选择的,这里的规则如下:
- 如果解析失败了,则返回ErrorReportingRunner
- 如果测试类上有@Ignore注解,则返回IgnoredClassRunner
- 如果测试类上有@RunWith注解,则使用@RunWith的值实例化一个Runner返回(用AnnotatedBuilder 来构建Runner)
- 如果canUseSuiteMethod=true,则返回SuiteMethod,其继承自JUnit38ClassRunner,是比较早期的JUnit版本了(SuiteMethodBuilder的runnerForClass对应产出SuiteMethod)
- 如果JUnit版本在4之前,则返回JUnit38ClassRunner (JUnit3Builder的runnerForClass对应JUnit38ClassRunner)
- 如果上面都不满足,则返回BlockJUnit4ClassRunner,其表示的是一个标准的JUnit4测试模型(JUnit4Builder的runnerForClass对应产出BlockJUnit4ClassRunner)
读这一段就很顺畅了,像喝琼浆。因为对@RunWith注解感兴趣,跑进去再看一眼 AnnotatedBuilder 对应的 runnerForClass 方法怎么做的:
//AnnotatedBuilder@OverridepublicRunnerrunnerForClass(Class<?> testClass)throwsException{for(Class<?> currentTestClass = testClass; currentTestClass !=null;
             currentTestClass =getEnclosingClassForNonStaticMemberClass(currentTestClass)){RunWith annotation = currentTestClass.getAnnotation(RunWith.class);if(annotation !=null){returnbuildRunner(annotation.value(), testClass);}}returnnull;}publicRunnerbuildRunner(Class<?extendsRunner> runnerClass,Class<?> testClass)throwsException{try{return runnerClass.getConstructor(Class.class).newInstance(testClass);}catch(NoSuchMethodException e){try{return runnerClass.getConstructor(Class.class,RunnerBuilder.class).newInstance(testClass, suiteBuilder);}catch(NoSuchMethodException e2){String simpleName = runnerClass.getSimpleName();thrownewInitializationError(String.format(CONSTRUCTOR_ERROR_FORMAT, simpleName, simpleName));}}}
2.3.3 BlockJUnit4ClassRunner 源码探究
先来看看 BlockJUnit4ClassRunner 的父类和兄弟: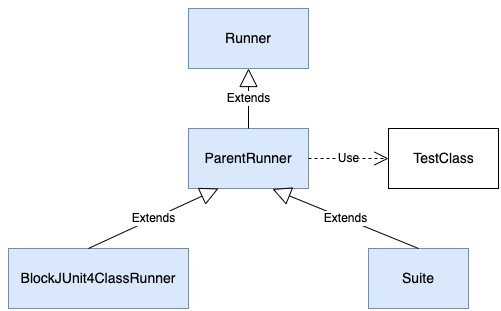
ParentRunner构造方法中的TestClass
TestClass 是在哪里创建的:
//ParentRunnerprotectedParentRunner(Class<?> testClass)throwsInitializationError{this.testClass =createTestClass(testClass);validate();}protectedTestClasscreateTestClass(Class<?> testClass){returnnewTestClass(testClass);}
进入createTestClass方法来查看其如何将class对象转换为TestClass。具体的逻辑都写在TestClass的内部。可以看到,整个构造函数大致都在做一些验证和初始化的工作,需要引起我们注意的应该是scanAnnotatedMembers方法。整个函数的作用就是扫描class中方法和变量上的注解,并将其根据注解的类型进行分类,缓存在methodsForAnnotations与fieldsForAnnotations当中。
//TestClasspublicTestClass(Class<?> clazz){this.clazz = clazz;if(clazz !=null&& clazz.getConstructors().length >1){thrownewIllegalArgumentException("Test class can only have one constructor");}Map<Class<?extendsAnnotation>,List<FrameworkMethod>> methodsForAnnotations =newLinkedHashMap<Class<?extendsAnnotation>,List<FrameworkMethod>>();Map<Class<?extendsAnnotation>,List<FrameworkField>> fieldsForAnnotations =newLinkedHashMap<Class<?extendsAnnotation>,List<FrameworkField>>();scanAnnotatedMembers(methodsForAnnotations, fieldsForAnnotations);this.methodsForAnnotations =makeDeeplyUnmodifiable(methodsForAnnotations);this.fieldsForAnnotations =makeDeeplyUnmodifiable(fieldsForAnnotations);}protectedvoidscanAnnotatedMembers(Map<Class<?extendsAnnotation>,List<FrameworkMethod>> methodsForAnnotations,Map<Class<?extendsAnnotation>,List<FrameworkField>> fieldsForAnnotations){for(Class<?> eachClass :getSuperClasses(clazz)){for(Method eachMethod :MethodSorter.getDeclaredMethods(eachClass)){addToAnnotationLists(newFrameworkMethod(eachMethod), methodsForAnnotations);}// ensuring fields are sorted to make sure that entries are inserted// and read from fieldForAnnotations in a deterministic orderfor(Field eachField :getSortedDeclaredFields(eachClass)){addToAnnotationLists(newFrameworkField(eachField), fieldsForAnnotations);}}}
需要注意的是,JUnit对方法和变量分别封装为FrameworkMethod与FrameworkField,它们都继承自FrameworkMember,这样就为方法和变量进行了统一抽象。
BlockJUnit4ClassRunner 的run方法
以BlockJUnit4ClassRunner为例,看下它的run方法是怎么执行的吧。
首先会先走到其父类ParentRunner中的run方法,其中比较关键的代码是classBlock函数将notifier转换为Statement。
// ParentRunner@Overridepublicvoidrun(finalRunNotifier notifier){EachTestNotifier testNotifier =newEachTestNotifier(notifier,getDescription());try{Statement statement =classBlock(notifier);
            statement.evaluate();}catch(AssumptionViolatedException e){
            testNotifier.addFailedAssumption(e);}catch(StoppedByUserException e){throw e;}catch(Throwable e){
            testNotifier.addFailure(e);}}// 构建 Statement,把 RunNotifier 转变为 StatementprotectedStatementclassBlock(finalRunNotifier notifier){Statement statement =childrenInvoker(notifier);if(!areAllChildrenIgnored()){
            statement =withBeforeClasses(statement);
            statement =withAfterClasses(statement);
            statement =withClassRules(statement);}return statement;}
啊呀,Statement终于出现了。
Statement statement = classBlock(notifier); 和 statement.evaluate(); 是核心代码。
Statement 官方的解释是:
Represents one or more actions to be taken at runtime in the course of running a JUnit test suite.
Statement可以简单理解为对可执行方法的封装和抽象,如RunBefores就是一个Statement,它封装了所有标记了@BeforeClass注解的方法,在运行单例类的用例之前会执行这些方法,运行完后RunBefores还会通过next.evaluate()运行后续的Statement。这里列举一下常见的Statement:
• RunBefores,会先运行befores里封装的方法(一般是标记了@BeforeClass或@Before),再运行next.evaluate()
• RunAfters,会先运行next.evaluate(),再运行afters里封装的方法(一般是标记了@AfterClass或@After)
• InvokeMethod,直接运行testMethod中封装的方法。
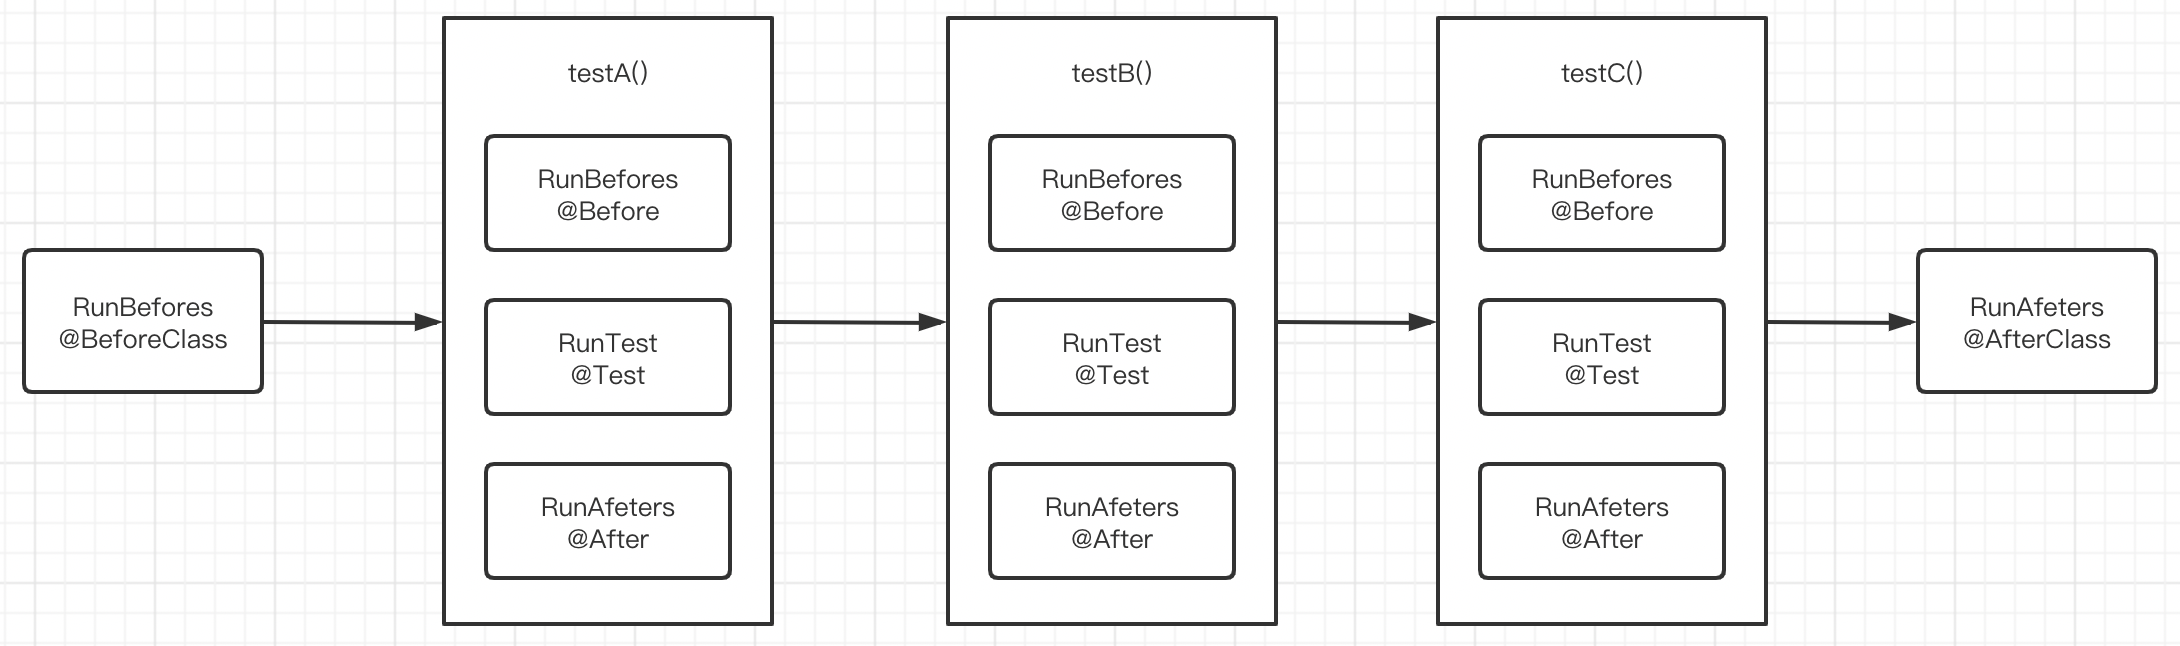
由此可见,整个单测的运行过程,实际上就是一系列Statement的运行过程,一个包含3个测试方法的单测类的Statement的执行过程大致可以概况如下:
这里RunTest的标注应该更新为 InvokeMethod
run的遍历 childrenInvoker
childrenInvoker返回的是一个Statement,看它的evaluate方法,其调用的是runChildren方法,这也是ParentRunner中非常重要的一个函数。
⭐️⭐️⭐️
runChildren 方法内泛型 T 的使用体现了抽象的重要性,泛型 T 在ParentRunner的每个实现类中各不相同。
在 BlockJUnit4ClassRunner 中 T 表示FrameworkMethod,具体到这个函数来讲getFilteredChildren 拿到的是被 @Test 注解标注的FrameworkMethod,而在Suite中,T为Runner。
在ParentRunner.this.runChild(each, notifier);这句的中的runChild(each, notifier)方法依旧是个抽象方法。
Ref: https://blog.saymagic.cn/2016/09/30/understand-Junit.html
从 runChildren => runChild 颇像Android里View遍历的方式,从Suite到BlockJUnit4ClassRunner,也是一种遍历。
// ------------ ParentRunner ------------ // 构造 Statement, 通过 runChildren(notifier); 遍历执行测试方法protectedStatementchildrenInvoker(finalRunNotifier notifier){returnnewStatement(){@Overridepublicvoidevaluate(){runChildren(notifier);}};}privatevoidrunChildren(finalRunNotifier notifier){finalRunnerScheduler currentScheduler = scheduler;try{for(finalT each :getFilteredChildren()){
                currentScheduler.schedule(newRunnable(){publicvoidrun(){ParentRunner.this.runChild(each, notifier);}});}}finally{
            currentScheduler.finished();}}// ------------ BlockJUnit4ClassRunner ------------ // getFilteredChildren 中会调用 getChildren@OverrideprotectedList<FrameworkMethod>getChildren(){returncomputeTestMethods();}// computeTestMethods 中会得到 使用了@Test注解的测试方法protectedList<FrameworkMethod>computeTestMethods(){returngetTestClass().getAnnotatedMethods(Test.class);}
我们先看BlockJUnit4ClassRunner中runChild的实现,isIgnored方法判断了method方法是否被@Ignore注解标识,如果是的话则直接通知notifier触发ignored事件,否则,执行runLeaf方法, runLeaf的第一个参数是Statement,所以,BlockJUnit4ClassRunner通过methodBlock方法将method转换为Statement。
// BlockJUnit4ClassRunner 中的 runChild 实现@OverrideprotectedvoidrunChild(finalFrameworkMethod method,RunNotifier notifier){Description description =describeChild(method);if(isIgnored(method)){
            notifier.fireTestIgnored(description);}else{runLeaf(methodBlock(method), description, notifier);}}// ParentRunnerprotectedfinalvoidrunLeaf(Statement statement,Description description,RunNotifier notifier){EachTestNotifier eachNotifier =newEachTestNotifier(notifier, description);
        eachNotifier.fireTestStarted();try{
            statement.evaluate();}catch(AssumptionViolatedException e){
            eachNotifier.addFailedAssumption(e);}catch(Throwable e){
            eachNotifier.addFailure(e);}finally{
            eachNotifier.fireTestFinished();}}
重点是 runLeaf(methodBlock(method), description, notifier);:
//BlockJUnit4ClassRunnerprotectedStatementmethodBlock(FrameworkMethod method){Object test;//生成test 对象,test对象的类型则是我们待测试的classtry{
            test =newReflectiveCallable(){@OverrideprotectedObjectrunReflectiveCall()throwsThrowable{returncreateTest();}}.run();}catch(Throwable e){returnnewFail(e);}Statement statement =methodInvoker(method, test);
        statement =possiblyExpectingExceptions(method, test, statement);//处理Test.class注解
        statement =withPotentialTimeout(method, test, statement);//处理Test.class注解
        statement =withBefores(method, test, statement);//处理Before.class注解
        statement =withAfters(method, test, statement);//处理After.class注解
        statement =withRules(method, test, statement);//处理Rule.class注解return statement;}protectedObjectcreateTest()throwsException{returngetTestClass().getOnlyConstructor().newInstance();}
接下来看 methodInvoker,生成的Statement实例为InvokeMethod,我们看下其evaluate方法:
//BlockJUnit4ClassRunnerprotectedStatementmethodInvoker(FrameworkMethod method,Object test){returnnewInvokeMethod(method, test);}//InvokeMethod@Overridepublicvoidevaluate()throwsThrowable{
        testMethod.invokeExplosively(target);}// FrameworkMethodpublicObjectinvokeExplosively(finalObject target,finalObject... params)throwsThrowable{returnnewReflectiveCallable(){@OverrideprotectedObjectrunReflectiveCall()throwsThrowable{return method.invoke(target, params);}}.run();}
实际被测试方法是如何被运行的呢?答案是反射调用。invokeExplosively函数做的事情就是对target对象调用testMethod方法。而前面我们说过,这个testMethod在BlockJUnit4ClassRunner中就是被@Test所标注的方法,此时,我们终于找到了@Test方法是在哪里被调用的了。
注意到 在注解解析上,都用到了invokeExplosively。
@Test、@Rule、@Ignore、@Before、@After
接着刚才的函数继续分析:
//BlockJUnit4ClassRunnerStatement statement =methodInvoker(method, test);
        statement =possiblyExpectingExceptions(method, test, statement);
        statement =withPotentialTimeout(method, test, statement);
        statement =withBefores(method, test, statement);
        statement =withAfters(method, test, statement);
        statement =withRules(method, test, statement);
我们可以看到,statement不断的在变形,而通过withBefores,withRules这些函数的名字我们可以很容易猜到,这里就是在处理@Before,@Rule等注解的地方。以withBefores为例,这个函数里首先拿到了所有被@Before标注的方法,将其封装为RunBefores,我们看下其构造函数和 evaluate 实现。
//BlockJUnit4ClassRunnerprotectedStatementwithBefores(FrameworkMethod method,Object target,Statement statement){List<FrameworkMethod> befores =getTestClass().getAnnotatedMethods(Before.class);return befores.isEmpty()? statement :newRunBefores(statement,
                befores, target);}// RunBeforespublicclassRunBeforesextendsStatement{privatefinalStatement next;privatefinalObject target;privatefinalList<FrameworkMethod> befores;publicRunBefores(Statement next,List<FrameworkMethod> befores,Object target){this.next = next;this.befores = befores;this.target = target;}@Overridepublicvoidevaluate()throwsThrowable{for(FrameworkMethod before : befores){
            before.invokeExplosively(target);}
        next.evaluate();}}
evaluate执行时,首先将before方法全部invoke来执行,然后才调用原始statement的evaluate方法。其余几个函数与此类似。
@BeforeClass、@AfterClass、@ClassRule
childrenInvoker的作用就是将所有需要执行的测试用例用一个Statement封装起来。进而
点燃
这个Statement,就会触发所有的测试用例。(这个用语形象 ,炸弹的引线)
回到 classBlock 方法里,说完 childrenInvoker 和 方法内注解,还有类级别的注解。Statement还在被不断的转换,但此时是在类的层面,withBeforeClasses函数操作的就是@BeforeClass注解。
//ParentRunnerprotectedStatementclassBlock(finalRunNotifier notifier){Statement statement =childrenInvoker(notifier);if(!areAllChildrenIgnored()){
            statement =withBeforeClasses(statement);
            statement =withAfterClasses(statement);
            statement =withClassRules(statement);}return statement;}
ParentRunner 中源码如下:withBeforeClasses、withAfterClasses 是处理 @BeforeClass、@AfterClass。
需要注意的是这回RunBefores的第三个参数为null,说明被@BeforeClass注解的方法只能是static的。
这里Statement和TestRule存在关联:
(第一遍走代码时候走偏了,以为withClassRules是执行测试方法,实际上是childrenInvoker,但殊途同归,最终总会看到反射调用测试方法的逻辑)
RunBefores、RunAfters 源码
附上 RunBefores、RunAfters 这两个 Statement 实现类的源码供理解。RunAfters 的 evaluate() 方法真的有一行 next.evaluate(); 来帮助循环执行下一个Statement,这是典型的链表结构呀。
publicclassRunBeforesextendsStatement{privatefinalStatement next;privatefinalObject target;privatefinalList<FrameworkMethod> befores;publicRunBefores(Statement next,List<FrameworkMethod> befores,Object target){this.next = next;this.befores = befores;this.target = target;}@Overridepublicvoidevaluate()throwsThrowable{for(FrameworkMethod before : befores){invokeMethod(before);}
        next.evaluate();}/**
     * @since 4.13
     */protectedvoidinvokeMethod(FrameworkMethod method)throwsThrowable{
        method.invokeExplosively(target);}}publicclassRunAftersextendsStatement{privatefinalStatement next;privatefinalObject target;privatefinalList<FrameworkMethod> afters;publicRunAfters(Statement next,List<FrameworkMethod> afters,Object target){this.next = next;this.afters = afters;this.target = target;}@Overridepublicvoidevaluate()throwsThrowable{List<Throwable> errors =newArrayList<Throwable>();try{
            next.evaluate();}catch(Throwable e){
            errors.add(e);}finally{for(FrameworkMethod each : afters){try{invokeMethod(each);}catch(Throwable e){
                    errors.add(e);}}}MultipleFailureException.assertEmpty(errors);}/**
     * @since 4.13
     */protectedvoidinvokeMethod(FrameworkMethod method)throwsThrowable{
        method.invokeExplosively(target);}}
如上,我们分析了BlockJUnit4ClassRunner的运行流程,也就是说当测试类为一个的时候JUnit是如何工作的。前文也提到过,ParentRunner还有一个子类Suite,表示需要运行一组测试,BlockJUnit4ClassRunner的一个运行单元为FrameworkMethod,而Suite的一个运行单元为Runner,我们看其runChild方法:
// Suite@OverrideprotectedvoidrunChild(Runner runner,finalRunNotifier notifier){
        runner.run(notifier);}
如果这个runner的实例仍然是Suite,则会继续向里运行,如果这个runner为BlockJUnit4ClassRunner,这执行我们前面分析的逻辑。这个runner是如何生成的呢?这就要看Suite的构造函数,前面说过 AllDefaultPossibilitiesBuilder 的职责就是为每个类生找到对应的Runner。
// SuiteprotectedSuite(Class<?> klass,Class<?>[] suiteClasses)throwsInitializationError{this(newAllDefaultPossibilitiesBuilder(true), klass, suiteClasses);}
至此一个标准Junit4的单测用例的执行过程就分析完了。
2.3.4 Mockito/Powermock 单测的探究
关注org.mockito.junit.MockitoJUnitRunner 和org.powermock.modules.junit4.PowerMockRunner 两个 org.junit.runner.Runner 的实现类。它们分别在 org.mockito:mockito-core:3.3.3 和 org.powermock:powermock-module-junit4:2.0.9 两个jar包中。
他们是如何使用的呢?给个例子:
@RunWith(PowerMockRunner.class)@PrepareForTest({UserController.class,FileHelper.class})//@ExtendWith(MockitoExtension.class)@PowerMockIgnore("javax.management.*")publicclassUserControllerTest{@MockprivateUserService userService;@InjectMocksprivateUserController uc;@TestpublicvoidtestAddUser()throwsException{UserDto ud =newUserDto();PowerMockito.when(userService.addUser(ud)).thenReturn(1);// can not stub like this//         PowerMockito.doReturn(1).when(userService.addUser(ud));boolean result = uc.addUser(ud);Assert.assertTrue(result);PowerMockito.when(userService.addUser(ud)).thenReturn(-1);
        result = uc.addUser(ud);Assert.assertFalse(result);}}
是通过 @RunWith 注解设置上的,走的是上文中 annotatedBuilder() 的分支逻辑。会去读注解里的value,设置的什么Runner、就用什么Runner。
运行单测时发生了什么。首先,@RunWith注解了该测试类,例如 设置的Runner是 PowerMockRunner.class,所以Junit框架会先用UserControllerTest.class作为参数创建PowerMockRunner的实例,然后调用PowerMockRunner的run方法运行测试。该方法中会启动Mockito框架,同时也会处理@Mock和@InjectMocks注解为UserControllerTest的实例分别注入userService和uc,最后运行testAddUser()测试用例。
简言之就是先通过PowerMockRunner启动Mockito框架,然后运行测试方法。
2.3.4.1 MockitoJUnitRunner
MockitoJUnitRunner内部run方法是交给包装在内部的另外一个Runner去执行,接口是InternalRunner,实现类是 new RunnerFactory().createStrict(klass) 通过反射构造的runner——org.mockito.internal.runners.DefaultInternalRunner。而 DefaultInternalRunner 内部又封装了一层 BlockJUnit4ClassRunner,最终还是 Junit4在执行单测。
从 MockitoJUnitRunner 的构造方法看起:
// MockitoJUnitRunnerprivatefinalInternalRunner runner;MockitoJUnitRunner(InternalRunner runner)throwsInvocationTargetException{this.runner = runner;}publicMockitoJUnitRunner(Class<?> klass)throwsInvocationTargetException{//by default, StrictRunner is used. We can change that potentially based on feedback from usersthis(newStrictRunner(newRunnerFactory().createStrict(klass), klass));}@Overridepublicvoidrun(finalRunNotifier notifier){
        runner.run(notifier);}//StrictRunner 在StrictRunner的run方法中会启用 Mockito 的框架:Mockito.framework()。DefaultMockitoFramework 默认构造方法,它只是用作为承接监听器、设置标记 InlineMockMaker,没有实质的初始化动作。publicvoidrun(RunNotifier notifier){//TODO need to be able to opt in for full stack trace instead of just relying on the stack trace filterUnnecessaryStubbingsReporter reporter =newUnnecessaryStubbingsReporter();FailureDetector listener =newFailureDetector();Mockito.framework().addListener(reporter);try{// add listener that detects test failures
            notifier.addListener(listener);
            runner.run(notifier);}finally{Mockito.framework().removeListener(reporter);}if(!filterRequested && listener.isSuccessful()){//only report when://1. if all tests from given test have ran (filter requested is false)//   Otherwise we would report unnecessary stubs even if the user runs just single test from the class//2. tests are successful (we don't want to add an extra failure on top of any existing failure, to avoid confusion)
            reporter.validateUnusedStubs(testClass, notifier);}}//RunnerFactorypublicInternalRunnercreateStrict(Class<?> klass)throwsInvocationTargetException{returncreate(klass,newSupplier<MockitoTestListener>(){publicMockitoTestListenerget(){returnnewMismatchReportingTestListener(Plugins.getMockitoLogger());}});}publicInternalRunnercreate(Class<?> klass,Supplier<MockitoTestListener> listenerSupplier)throwsInvocationTargetException{try{String runnerClassName ="org.mockito.internal.runners.DefaultInternalRunner";//Warning: I'm using String literal on purpose!//When JUnit is not on classpath, we want the code to throw exception here so that we can catch it//If we statically link the class, we will get Error when class is loadedreturnnewRunnerProvider().newInstance(runnerClassName, klass, listenerSupplier);}catch(InvocationTargetException e){if(!hasTestMethods(klass)){thrownewMockitoException("\n"+"\n"+"No tests found in "+ klass.getSimpleName()+"\n"+"Is the method annotated with @Test?\n"+"Is the method public?\n", e);}throw e;}catch(Throwable t){thrownewMockitoException("\n"+"\n"+"MockitoRunner can only be used with JUnit 4.5 or higher.\n"+"You can upgrade your JUnit version or write your own Runner (please consider contributing your runner to the Mockito community).\n"+"Bear in mind that you can still enjoy all features of the framework without using runners (they are completely optional).\n"+"If you get this error despite using JUnit 4.5 or higher then please report this error to the mockito mailing list.\n", t);}}
DefaultInternalRunner 包了一层,还是干了一些事情,比如重写 withBefores、run两个方法。在 withBefores 里初始化了MockitoAnnotations,还给 Mockito 框架加了监听器。
//代码片段// get new test listener and add it to the framework
    mockitoTestListener = listenerSupplier.get();Mockito.framework().addListener(mockitoTestListener);// init annotated mocks before testsMockitoAnnotations.initMocks(target);// 如下是 DefaultInternalRunner 完整构造方法publicDefaultInternalRunner(Class<?> testClass,finalSupplier<MockitoTestListener> listenerSupplier)throwsInitializationError{
        runner =newBlockJUnit4ClassRunner(testClass){publicObject target;privateMockitoTestListener mockitoTestListener;protectedStatementwithBefores(FrameworkMethod method,finalObject target,Statement statement){this.target = target;finalStatement base =super.withBefores(method, target, statement);returnnewStatement(){@Overridepublicvoidevaluate()throwsThrowable{if(mockitoTestListener ==null){// get new test listener and add it to the framework
                            mockitoTestListener = listenerSupplier.get();Mockito.framework().addListener(mockitoTestListener);// init annotated mocks before testsMockitoAnnotations.initMocks(target);}
                        base.evaluate();}};}publicvoidrun(finalRunNotifier notifier){RunListener listener =newRunListener(){Throwable failure;@OverridepublicvoidtestFailure(Failure failure)throwsException{this.failure = failure.getException();}@OverridepublicvoidtestFinished(Description description)throwsException{try{if(mockitoTestListener !=null){Mockito.framework().removeListener(mockitoTestListener);
                                mockitoTestListener.testFinished(newDefaultTestFinishedEvent(target, description.getMethodName(), failure));
                                mockitoTestListener =null;}Mockito.validateMockitoUsage();}catch(Throwable t){//In order to produce clean exception to the user we need to fire test failure with the right description//Otherwise JUnit framework will report failure with some generic test name
                            notifier.fireTestFailure(newFailure(description, t));}}};
                notifier.addListener(listener);super.run(notifier);}};}
MockitoJUnitRunner 多层封装了BlockJUnit4ClassRunner,而BlockJUnit4ClassRunner 运行的是一个标准的JUnit4测试模型,MockitoJUnitRunner是在此基础上做了一些扩展。Mockito是Mockito框架的入口。
Mockito 的mock、when等核心功能操作是通过 MockitoCore 去具体实现。乒乒乓乓的,仅看了下createMock,链路挺长的,暂不做更多代码追溯,后续再研究。
//Mockito@CheckReturnValuepublicstatic<T>Tmock(Class<T> classToMock){returnmock(classToMock,withSettings());}@CheckReturnValuepublicstatic<T>Tmock(Class<T> classToMock,MockSettings mockSettings){returnMOCKITO_CORE.mock(classToMock, mockSettings);}//MockitoCorepublic<T>Tmock(Class<T> typeToMock,MockSettings settings){if(!MockSettingsImpl.class.isInstance(settings)){thrownewIllegalArgumentException("Unexpected implementation of '"+ settings.getClass().getCanonicalName()+"'\n"+"At the moment, you cannot provide your own implementations of that class.");}MockSettingsImpl impl =MockSettingsImpl.class.cast(settings);MockCreationSettings<T> creationSettings = impl.build(typeToMock);T mock =createMock(creationSettings);mockingProgress().mockingStarted(mock, creationSettings);return mock;}//MockUtilpublicstatic<T>TcreateMock(MockCreationSettings<T> settings){MockHandler mockHandler =createMockHandler(settings);T mock = mockMaker.createMock(settings, mockHandler);Object spiedInstance = settings.getSpiedInstance();if(spiedInstance !=null){newLenientCopyTool().copyToMock(spiedInstance, mock);}return mock;}//PowerMockMaker@Overridepublic<T>TcreateMock(MockCreationSettings<T> settings,MockHandler handler){return mockMaker.createMock(settings, handler);}//ByteBuddyMockMaker@Overridepublic<T>Class<?extendsT>createMockType(MockCreationSettings<T> creationSettings){return defaultByteBuddyMockMaker.createMockType(creationSettings);}//SubclassByteBuddyMockMaker@Overridepublic<T>TcreateMock(MockCreationSettings<T> settings,MockHandler handler){Class<?extendsT> mockedProxyType =createMockType(settings);Instantiator instantiator =Plugins.getInstantiatorProvider().getInstantiator(settings);T mockInstance =null;try{
            mockInstance = instantiator.newInstance(mockedProxyType);MockAccess mockAccess =(MockAccess) mockInstance;
            mockAccess.setMockitoInterceptor(newMockMethodInterceptor(handler, settings));returnensureMockIsAssignableToMockedType(settings, mockInstance);}catch(ClassCastException cce){thrownewMockitoException(join("ClassCastException occurred while creating the mockito mock :","  class to mock : "+describeClass(settings.getTypeToMock()),"  created class : "+describeClass(mockedProxyType),"  proxy instance class : "+describeClass(mockInstance),"  instance creation by : "+ instantiator.getClass().getSimpleName(),"","You might experience classloading issues, please ask the mockito mailing-list.",""), cce);}catch(org.mockito.creation.instance.InstantiationException e){thrownewMockitoException("Unable to create mock instance of type '"+ mockedProxyType.getSuperclass().getSimpleName()+"'", e);}}
2.3.4.2 PowerMockRunner
目前在单元测试编写中,使用 PowerMock 框架更多,PowerMock 是基于Mockito 的,入口类是 PowerMockito。在mock 静态方法和私有方法方面,PowerMock 有优势,可选用。
PowerMockito extends Mockito functionality with several new features such as mocking static and private methods and more. Use PowerMock instead of Mockito where applicable.
拉回来看 PowerMockRunner 的run方法实现:
// PowerMockRunner 把 run 交给父类publicclassPowerMockRunnerextendsAbstractCommonPowerMockRunner{@Overridepublicvoidrun(RunNotifier notifier){Description description =getDescription();try{super.run(notifier);}finally{Whitebox.setInternalState(description,"fAnnotations",newAnnotation[]{});}}}// 父类 AbstractCommonPowerMockRunner 交给 JUnit4TestSuiteChunker 的实现类 JUnit4TestSuiteChunkerImpl 去干活publicabstractclassAbstractCommonPowerMockRunnerextendsRunnerimplementsFilterable,Sortable{@Overridepublicvoidrun(RunNotifier notifier){try{
            suiteChunker.run(notifier);}finally{// To avoid out of memory errors!
            suiteChunker =null;}}}
PowerMockRunner 把 run 交给父类,父类 AbstractCommonPowerMockRunner 再交给 JUnit4TestSuiteChunker 的实现类 JUnit4TestSuiteChunkerImpl 去干活,内部再给 PowerMockJUnitRunnerDelegate 去 run:
//JUnit4TestSuiteChunkerImpl@Overridepublicvoidrun(RunNotifier notifier){List<TestChunk> chunkEntries =getTestChunks();Iterator<TestChunk> iterator = chunkEntries.iterator();if(delegates.size()!=getChunkSize()){thrownewIllegalStateException("Internal error: There must be an equal number of suites and delegates.");}finalClass<?> testClass =getTestClasses()[0];finalPowerMockTestListener[] powerMockTestListeners =(PowerMockTestListener[])getPowerMockTestListenersLoadedByASpecificClassLoader(
                testClass,this.getClass().getClassLoader());finalSet<Method> allMethods =newLinkedHashSet<Method>();for(TestChunk testChunk :getTestChunks()){
            allMethods.addAll(testChunk.getTestMethodsToBeExecutedByThisClassloader());}finalMethod[] allMethodsAsArray = allMethods.toArray(newMethod[allMethods.size()]);finalPowerMockTestNotifier powerMockTestNotifier =newPowerMockTestNotifierImpl(powerMockTestListeners);
        powerMockTestNotifier.notifyBeforeTestSuiteStarted(testClass, allMethodsAsArray);int failureCount =0;int successCount =0;int ignoreCount =0;for(PowerMockJUnitRunnerDelegate delegate : delegates){TestChunk next = iterator.next();finalClassLoader key = next.getClassLoader();PowerMockJUnit4RunListener powerMockListener =newPowerMockJUnit4RunListener(key, powerMockTestNotifier);
            notifier.addListener(powerMockListener);finalClassLoader originalClassLoader =Thread.currentThread().getContextClassLoader();Thread.currentThread().setContextClassLoader(key);try{
                delegate.run(notifier);}finally{Thread.currentThread().setContextClassLoader(originalClassLoader);}finalint failureCountForThisPowerMockListener = powerMockListener.getFailureCount();finalint ignoreCountForThisPowerMockListener = powerMockListener.getIgnoreCount();
            failureCount += failureCountForThisPowerMockListener;
            ignoreCount += ignoreCountForThisPowerMockListener;
            successCount += delegate.getTestCount()- failureCountForThisPowerMockListener
                    - ignoreCountForThisPowerMockListener;
            notifier.removeListener(powerMockListener);}finalTestSuiteResult testSuiteResult =newTestSuiteResultImpl(failureCount, successCount,getTestCount(),
                ignoreCount);
        powerMockTestNotifier.notifyAfterTestSuiteEnded(testClass, allMethodsAsArray, testSuiteResult);}// delegates 在 AbstractTestSuiteChunkerImpl 抽象类里边创建和添加publicfinalvoidcreateTestDelegators(Class<?> testClass,List<TestChunk> chunks)throwsException{for(TestChunk chunk : chunks){ClassLoader classLoader = chunk.getClassLoader();List<Method> methodsToTest = chunk.getTestMethodsToBeExecutedByThisClassloader();T runnerDelegator =createDelegatorFromClassloader(classLoader, testClass, methodsToTest);
            delegates.add(runnerDelegator);}
        delegatesCreatedForTheseClasses.add(testClass);}// 又回到 JUnit4TestSuiteChunkerImpl 的 createDelegatorFromClassloader 方法,它创建的是 PowerMockJUnitRunnerDelegate,具体是哪个实现要看 runnerDelegateImplementationType@OverrideprotectedPowerMockJUnitRunnerDelegatecreateDelegatorFromClassloader(ClassLoader classLoader,Class<?> testClass,finalList<Method> methodsToTest)throwsException{Set<String> methodNames =newHashSet<String>();for(Method method : methodsToTest){
            methodNames.add(method.getName());}finalClass<?> testClassLoadedByMockedClassLoader =Class.forName(testClass.getName(),false, classLoader);/*
         * Array classes cannot be loaded be classloader.loadClass(..) in JDK 6.
         * See http://bugs.sun.com/bugdatabase/view_bug.do?bug_id=6500212.
         */finalClass<?> powerMockTestListenerArrayType =Class.forName(PowerMockTestListener[].class.getName(),false,
                classLoader);finalClass<?> delegateClass =Class.forName(runnerDelegateImplementationType.getName(),false, classLoader);Constructor<?> con = delegateClass.getConstructor(Class.class,String[].class,
                powerMockTestListenerArrayType);return(PowerMockJUnitRunnerDelegate) con.newInstance(
                testClassLoadedByMockedClassLoader, methodNames.toArray(newString[methodNames.size()]),getPowerMockTestListenersLoadedByASpecificClassLoader(testClass, classLoader));}//然后折回到 PowerMockRunner ,命运早已暗中标好了价格,可选项分别是 DelegatingPowerMockRunner、PowerMockJUnit44RunnerDelegateImpl、PowerMockJUnit49RunnerDelegateImpl、PowerMockJUnit47RunnerDelegateImpl,由于当前JUnit版本是4.12,那么用的是 4.9这个版本了publicPowerMockRunner(Class<?> klass)throwsException{super(klass,getRunnerDelegateImplClass(klass));}privatestaticClass<?extendsPowerMockJUnitRunnerDelegate>getRunnerDelegateImplClass(Class<?> klass){if(klass.isAnnotationPresent(PowerMockRunnerDelegate.class)||Boolean.getBoolean("powermock.implicitDelegateAnnotation")){returnDelegatingPowerMockRunner.class;}Class<?extendsPowerMockJUnitRunnerDelegate> concreteClass =PowerMockJUnit44RunnerDelegateImpl.class;if(JUnitVersion.isGreaterThanOrEqualTo("4.9")){
                   concreteClass =PowerMockJUnit49RunnerDelegateImpl.class;}elseif(JUnitVersion.isGreaterThanOrEqualTo("4.7")){
            concreteClass =PowerMockJUnit47RunnerDelegateImpl.class;}return concreteClass;}
PowerMockJUnitRunnerDelegate是个接口,具体是哪个实现要看 runnerDelegateImplementationType,然后折回到 PowerMockRunner ,可选项分别是 DelegatingPowerMockRunner、PowerMockJUnit44RunnerDelegateImpl、PowerMockJUnit49RunnerDelegateImpl、PowerMockJUnit47RunnerDelegateImpl,由于当前JUnit版本是4.12,那么用的是 4.9这个版本了,结果PowerMockJUnit49RunnerDelegateImpl里牙根没有run方法,原来他们是随着时间变迁不断拓展功能、处理异常啥的,最终爷爷类 PowerMockJUnit44RunnerDelegateImpl 里看到了run方法,又看到了熟悉的方法命名:
// PowerMockJUnit44RunnerDelegateImpl@Overridepublicvoidrun(finalRunNotifier notifier){newClassRoadie(notifier, testClass,getDescription(),newRunnable(){@Overridepublicvoidrun(){runMethods(notifier);}}).runProtected();}// ClassRoadie,这已经到了org.junit.internal.runners 的地界了publicvoidrunProtected(){try{runBefores();runUnprotected();}catch(FailedBefore e){}finally{runAfters();}}protectedvoidrunUnprotected(){
        runnable.run();}
ClassRoadie是个路由转发器的样子,熟悉的抛包袱方式,抗责任的实现方法是 runMethods(notifier)。
// PowerMockJUnit44RunnerDelegateImplprotectedvoidrunMethods(finalRunNotifier notifier){finalStaticConstructorSuppressExtractorImpl staticConstructorSuppressExtractorImpl =newStaticConstructorSuppressExtractorImpl();Class<?> testType =getTestClass();finalClassLoader thisClassLoader =getClass().getClassLoader();if(!thisClassLoader.equals(testType.getClassLoader())){/*
             * The test is loaded from another classloader, this means that we
             * cannot get the correct annotations if we don't load the class
             * from the correct class loader
             */try{
                testType = thisClassLoader.loadClass(testType.getName());}catch(ClassNotFoundException e){// This should never happenthrownewRuntimeException("Internal error in PowerMock", e);}}for(Method method : testMethods){if(staticConstructorSuppressExtractorImpl.getTestClasses(method)==null){
                staticConstructorSuppressExtractorImpl.getTestClasses(testType);}invokeTestMethod(method, notifier);}}protectedvoidinvokeTestMethod(finalMethod method,RunNotifier notifier){Description description =methodDescription(method);finalObject testInstance;try{
            testInstance =createTest();}catch(InvocationTargetException e){testAborted(notifier, description, e.getTargetException());return;}catch(Exception e){testAborted(notifier, description, e);return;}// Check if we extend from TestClass, in that case we must run the setUp// and tearDown methods.finalboolean extendsFromTestCase =TestCase.class.isAssignableFrom(testClass.getJavaClass());finalTestMethod testMethod =wrapMethod(method);createPowerMockRunner(testInstance, testMethod, notifier, description, extendsFromTestCase).run();}
着重看:
finalTestMethod testMethod =wrapMethod(method);createPowerMockRunner(testInstance, testMethod, notifier, description, extendsFromTestCase).run();
这里 createPowerMockRunner创建了一个PowerMockJUnit44MethodRunner, 它是个内部类,它继承了juint 框架的MethodRoadie,所以通过 PowerMockJUnit44MethodRunner 调用的run方法直接调了 MethodRoadie 的run。 所以 PowerMock 往 JUnit 框架靠的方式和 Mockito 略有不同,MockitoJUnitRunner 直接封装 BlockJUnit4ClassRunner,而 PowerMockRunner 是通过 MethodRoadie 中转过去的,会再走一下 AllDefaultPossibilitiesBuilder 的那一段在 runnerForClass中列表遍历的流程。
// PowerMockJUnit44RunnerDelegateImplprotectedPowerMockJUnit44MethodRunnercreatePowerMockRunner(finalObject testInstance,finalTestMethod testMethod,RunNotifier notifier,Description description,finalboolean extendsFromTestCase){returnnewPowerMockJUnit44MethodRunner(testInstance, testMethod, notifier, description, extendsFromTestCase);}// MethodRoadiepublicvoidrun(){if(testMethod.isIgnored()){
            notifier.fireTestIgnored(description);return;}
        notifier.fireTestStarted(description);try{long timeout = testMethod.getTimeout();if(timeout >0){runWithTimeout(timeout);}else{runTest();}}finally{
            notifier.fireTestFinished(description);}}
关于如何mock,Powermock怎么拓展功能,这里也不做深入学习了,之后如果有空另外开辟一篇。
3 TestRunner 运行流程
第2节中讲解的基本都是 org.junit.runner 那一趴的源码,单测框架如何把结果显示到控制台这些主要在 原来的 junit 部分,junit.framework 、junit.runner 和 junit.textui。
junit.framework类图关系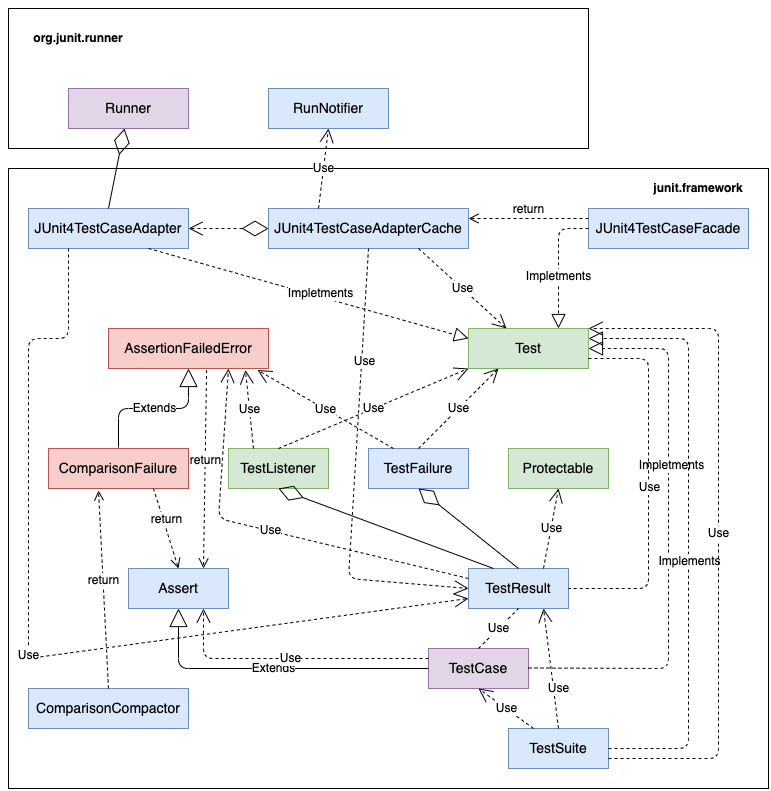
3.1 时序图
Test运行时序图(参考博客1链接中的时序图)。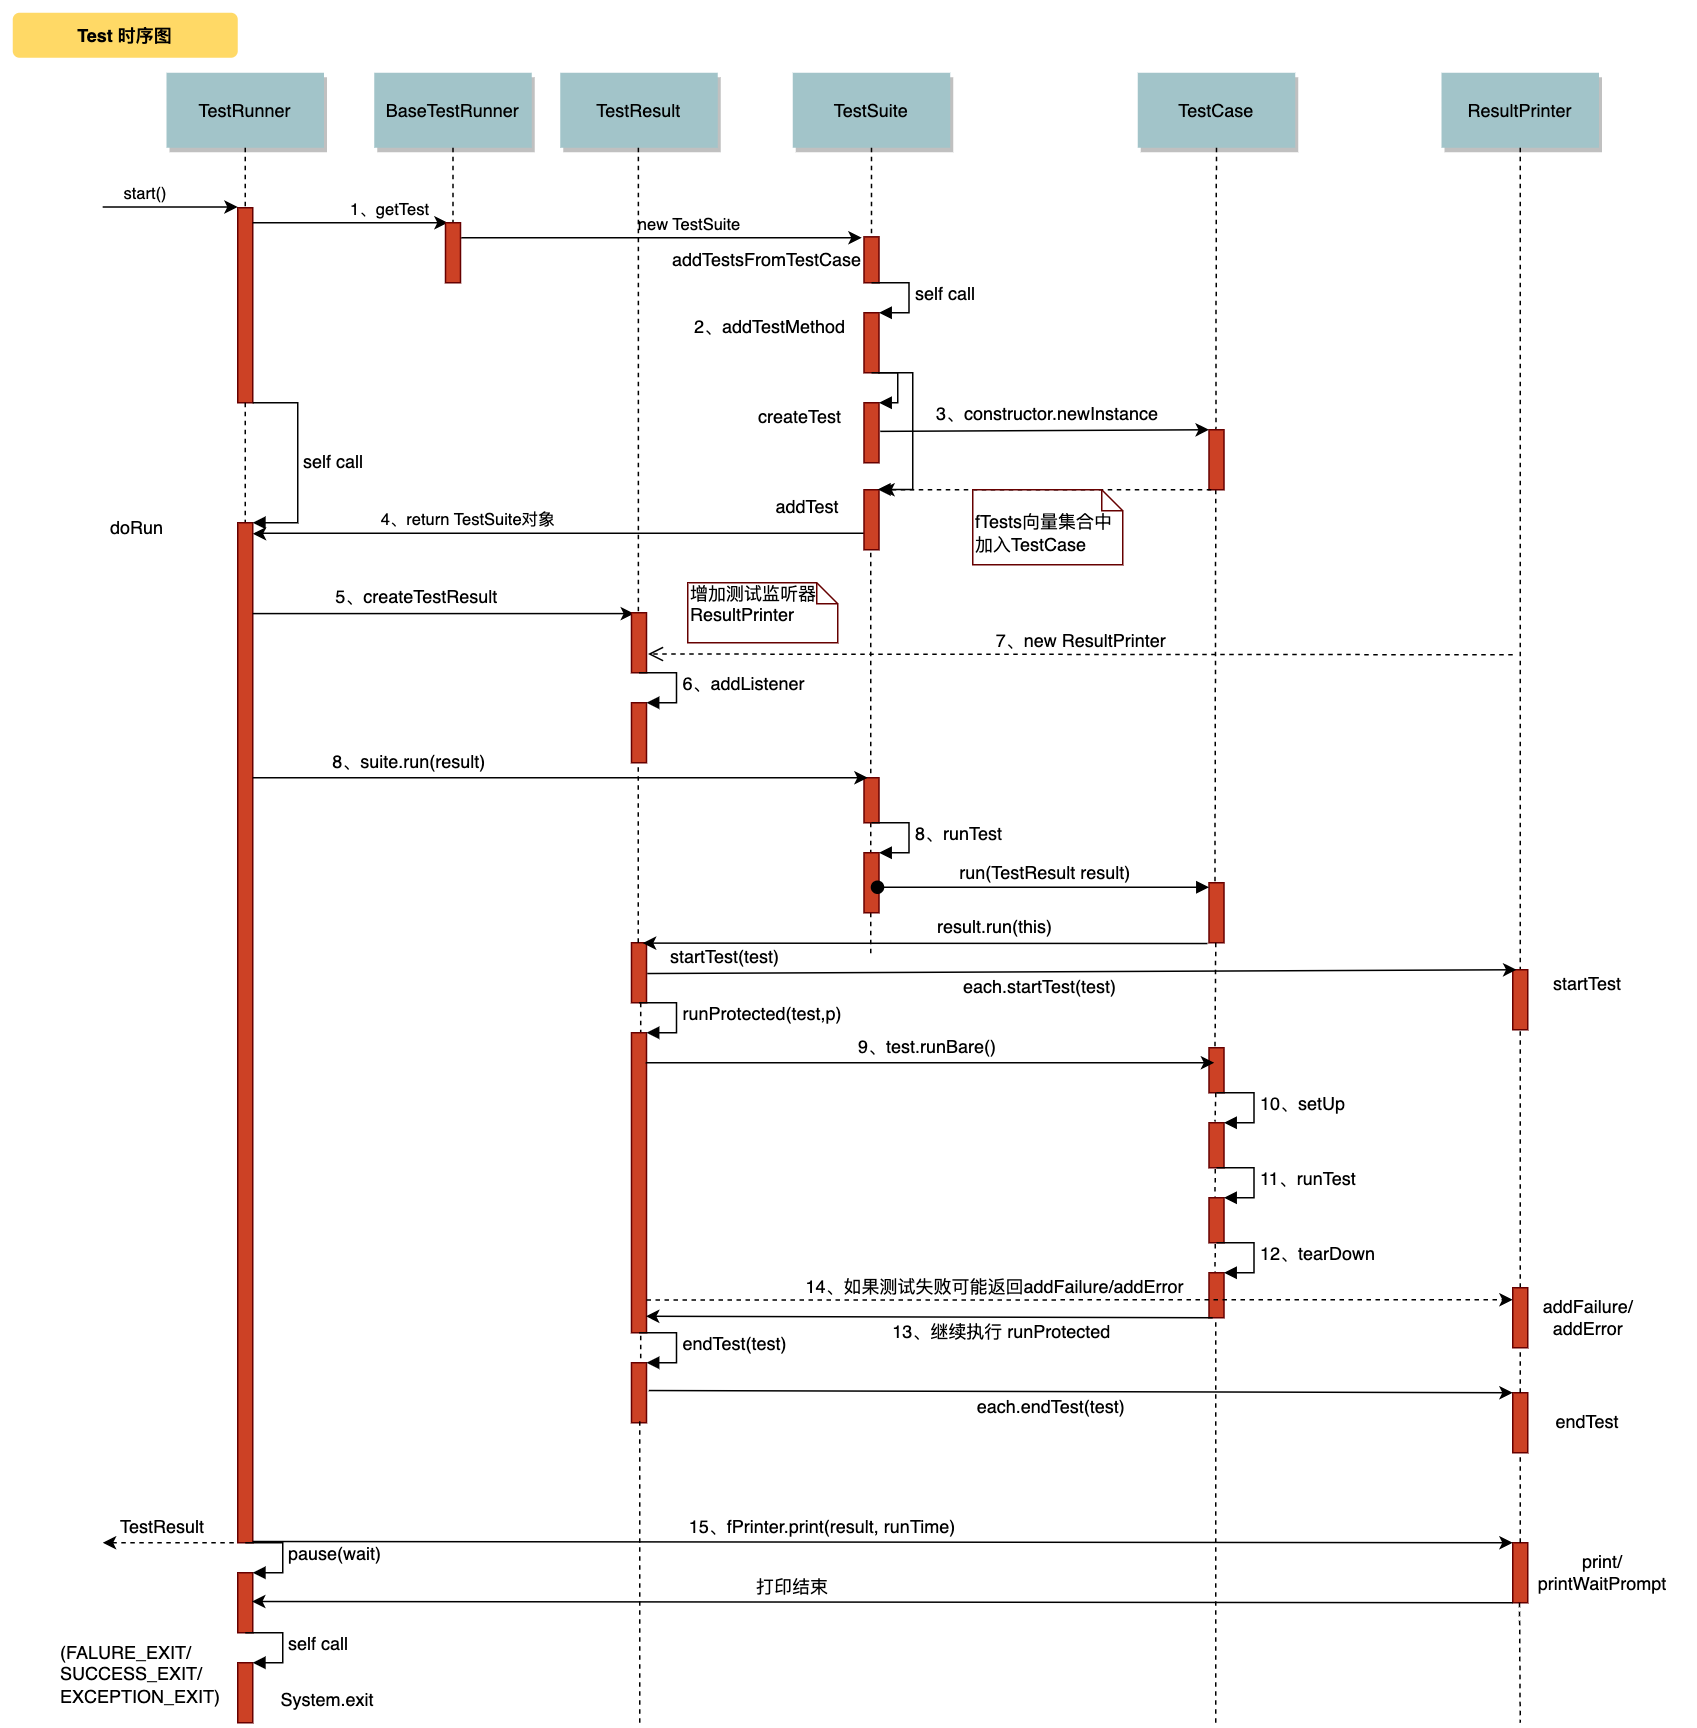
再来一张与时序图关联类较详细的类图: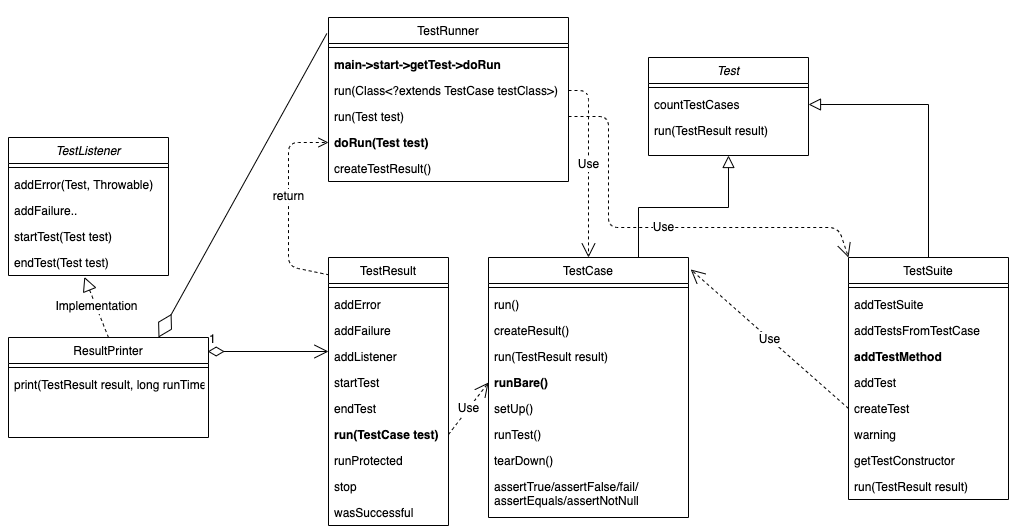
3.2 生命周期
JUnit的完整生命周期分为3个阶段:初始化阶段、运行阶段、 结果捕捉阶段。
3.2.1 初始化阶段
1.初始化阶段:(getTest) 通过分析源码,可以看到JUnit的入口点在 junit.textui.TestRunner 的 main 方法,在这个方法中,首先创建一个 TestRunner 实例 aTestRunner ,然后 main 函数中主体工作函数为 TestResult r = aTestRunner.start(args)。TestRunner在创建时会默认构建一个 ResultPrinter。
publicTestRunner(){this(System.out);}publicTestRunner(PrintStream writer){this(newResultPrinter(writer));}
start方法的返回值是TestResult,TestResult 用于展示最终结果,在 start() 方法中解析完args参数会 初始化一个TestSuite对象 Test suite= getTest(testCase); 该测试组件包含了多个 TestCase测试方法用例。
/**
     * Starts a test run. Analyzes the command line arguments and runs the given
     * test suite.
     */publicTestResultstart(String args[])throwsException{String testCase ="";String method ="";boolean wait =false;for(int i =0; i < args.length; i++){if(args[i].equals("-wait")){
                wait =true;}elseif(args[i].equals("-c")){
                testCase =extractClassName(args[++i]);}elseif(args[i].equals("-m")){String arg = args[++i];int lastIndex = arg.lastIndexOf('.');
                testCase = arg.substring(0, lastIndex);
                method = arg.substring(lastIndex +1);}elseif(args[i].equals("-v")){System.err.println("JUnit "+Version.id()+" by Kent Beck and Erich Gamma");}else{
                testCase = args[i];}}if(testCase.equals("")){thrownewException("Usage: TestRunner [-wait] testCaseName, where name is the name of the TestCase class");}try{if(!method.equals("")){returnrunSingleMethod(testCase, method, wait);}Test suite =getTest(testCase);returndoRun(suite, wait);}catch(Exception e){thrownewException("Could not create and run test suite: "+ e);}}
在 getTest方法中,通过 new TestSuite(testClass)创建对象。
/**
     * Returns the Test corresponding to the given suite. This is
     * a template method, subclasses override runFailed(), clearStatus().
     */publicTestgetTest(String suiteClassName){if(suiteClassName.length()<=0){clearStatus();returnnull;}Class<?> testClass =null;try{
            testClass =loadSuiteClass(suiteClassName);}catch(ClassNotFoundException e){String clazz = e.getMessage();if(clazz ==null){
                clazz = suiteClassName;}runFailed("Class not found \""+ clazz +"\"");returnnull;}catch(Exception e){runFailed("Error: "+ e.toString());returnnull;}Method suiteMethod =null;try{
            suiteMethod = testClass.getMethod(SUITE_METHODNAME);}catch(Exception e){// try to extract a test suite automaticallyclearStatus();returnnewTestSuite(testClass);}if(!Modifier.isStatic(suiteMethod.getModifiers())){runFailed("Suite() method must be static");returnnull;}Test test =null;try{
            test =(Test) suiteMethod.invoke(null);// static methodif(test ==null){return test;}}catch(InvocationTargetException e){runFailed("Failed to invoke suite():"+ e.getTargetException().toString());returnnull;}catch(IllegalAccessException e){runFailed("Failed to invoke suite():"+ e.toString());returnnull;}clearStatus();return test;}
进入TestSuite构造器主要是一些参数和方法的校验,为每个测试方法创建 TestCase, 并存入 Vector fTests 向量集合中。关键性代码在 addTestMethod(methods[i], names, theClass),通过addTest(createTest(theClass, name)) 最终添加进入 fTests 集合。
/**
     * Constructs a TestSuite from the given class. Adds all the methods
     * starting with "test" as test cases to the suite.
     * Parts of this method were written at 2337 meters in the Hueffihuette,
     * Kanton Uri
     */publicTestSuite(finalClass<?> theClass){addTestsFromTestCase(theClass);}privatevoidaddTestsFromTestCase(finalClass<?> theClass){
        fName = theClass.getName();try{getTestConstructor(theClass);// Avoid generating multiple error messages}catch(NoSuchMethodException e){addTest(warning("Class "+ theClass.getName()+" has no public constructor TestCase(String name) or TestCase()"));return;}if(!Modifier.isPublic(theClass.getModifiers())){addTest(warning("Class "+ theClass.getName()+" is not public"));return;}Class<?> superClass = theClass;List<String> names =newArrayList<String>();while(Test.class.isAssignableFrom(superClass)){for(Method each :MethodSorter.getDeclaredMethods(superClass)){addTestMethod(each, names, theClass);}
            superClass = superClass.getSuperclass();}if(fTests.size()==0){addTest(warning("No tests found in "+ theClass.getName()));}}privatevoidaddTestMethod(Method m,List<String> names,Class<?> theClass){String name = m.getName();if(names.contains(name)){return;}if(!isPublicTestMethod(m)){if(isTestMethod(m)){addTest(warning("Test method isn't public: "+ m.getName()+"("+ theClass.getCanonicalName()+")"));}return;}
        names.add(name);addTest(createTest(theClass, name));}/**
     * Adds a test to the suite.
     */publicvoidaddTest(Test test){
        fTests.add(test);}
其中 createTest 是通过反射构造TestCase,所以 Vector fTests 里存的都是 TestCase,TestSuite是TestCase的套件。
/**
     * ...as the moon sets over the early morning Merlin, Oregon
     * mountains, our intrepid adventurers type...
     */staticpublicTestcreateTest(Class<?> theClass,String name){Constructor<?> constructor;try{
            constructor =getTestConstructor(theClass);}catch(NoSuchMethodException e){returnwarning("Class "+ theClass.getName()+" has no public constructor TestCase(String name) or TestCase()");}Object test;try{if(constructor.getParameterTypes().length ==0){
                test = constructor.newInstance(newObject[0]);if(test instanceofTestCase){((TestCase) test).setName(name);}}else{
                test = constructor.newInstance(newObject[]{name});}}catch(InstantiationException e){return(warning("Cannot instantiate test case: "+ name +" ("+exceptionToString(e)+")"));}catch(InvocationTargetException e){return(warning("Exception in constructor: "+ name +" ("+exceptionToString(e.getTargetException())+")"));}catch(IllegalAccessException e){return(warning("Cannot access test case: "+ name +" ("+exceptionToString(e)+")"));}return(Test) test;}/**
     * Gets a constructor which takes a single String as
     * its argument or a no arg constructor.
     */publicstaticConstructor<?>getTestConstructor(Class<?> theClass)throwsNoSuchMethodException{try{return theClass.getConstructor(String.class);}catch(NoSuchMethodException e){// fall through}return theClass.getConstructor();}
3.2.2 测试运行阶段
2.测试运行阶段:(doRun) 在 TestRunner 中的 start() 方法中,是通过调用 doRun() 方法开始执行测试。
publicTestResultdoRun(Test suite,boolean wait){TestResult result =createTestResult();
        result.addListener(fPrinter);long startTime =System.currentTimeMillis();
        suite.run(result);long endTime =System.currentTimeMillis();long runTime = endTime - startTime;
        fPrinter.print(result, runTime);pause(wait);return result;}
首先是利用 createTestResult()方法生成一个 TestResult 实例,然后将 junit.textui.TestRunner 的监听器 fPrinter 加入到result 的监听器列表中。其中, fPrinter 是 junit.textui.ResultPrinter 类的实例,该类提供了向控制台输出测试结果的一系列功能接口,输出的格式在类中定义。 ResultPrinter 类实现了 TestListener 接口,具体实现了addError 、 addFailure 、 endTest 和 startTest 四个重要的方法,这种设计体现了Observer设计模式。而将 ResultPrinter 对象加入到 TestResult 对象的监听器列表中,因此实质上 TestResult 对象可以有多个监听器显示测试结果。(本地文本描述直接摘自: https://nicky-chin.cn/2018/07/16/junit-codeanalysis/)
接下来查看 suite.run(result); ,这里存在方法的各种跳转,在时序图中有体现,从TestRunner中跳到TestSuite,再跳到TestCase去run,又扔给TestResult去遍历调用监听器的方法,然后实际执行时又把执行的操作给到TestCase。实际执行在TestResult的runProtected->TestCase的runBare,然后是setUp、runTest、tearDown三连跳。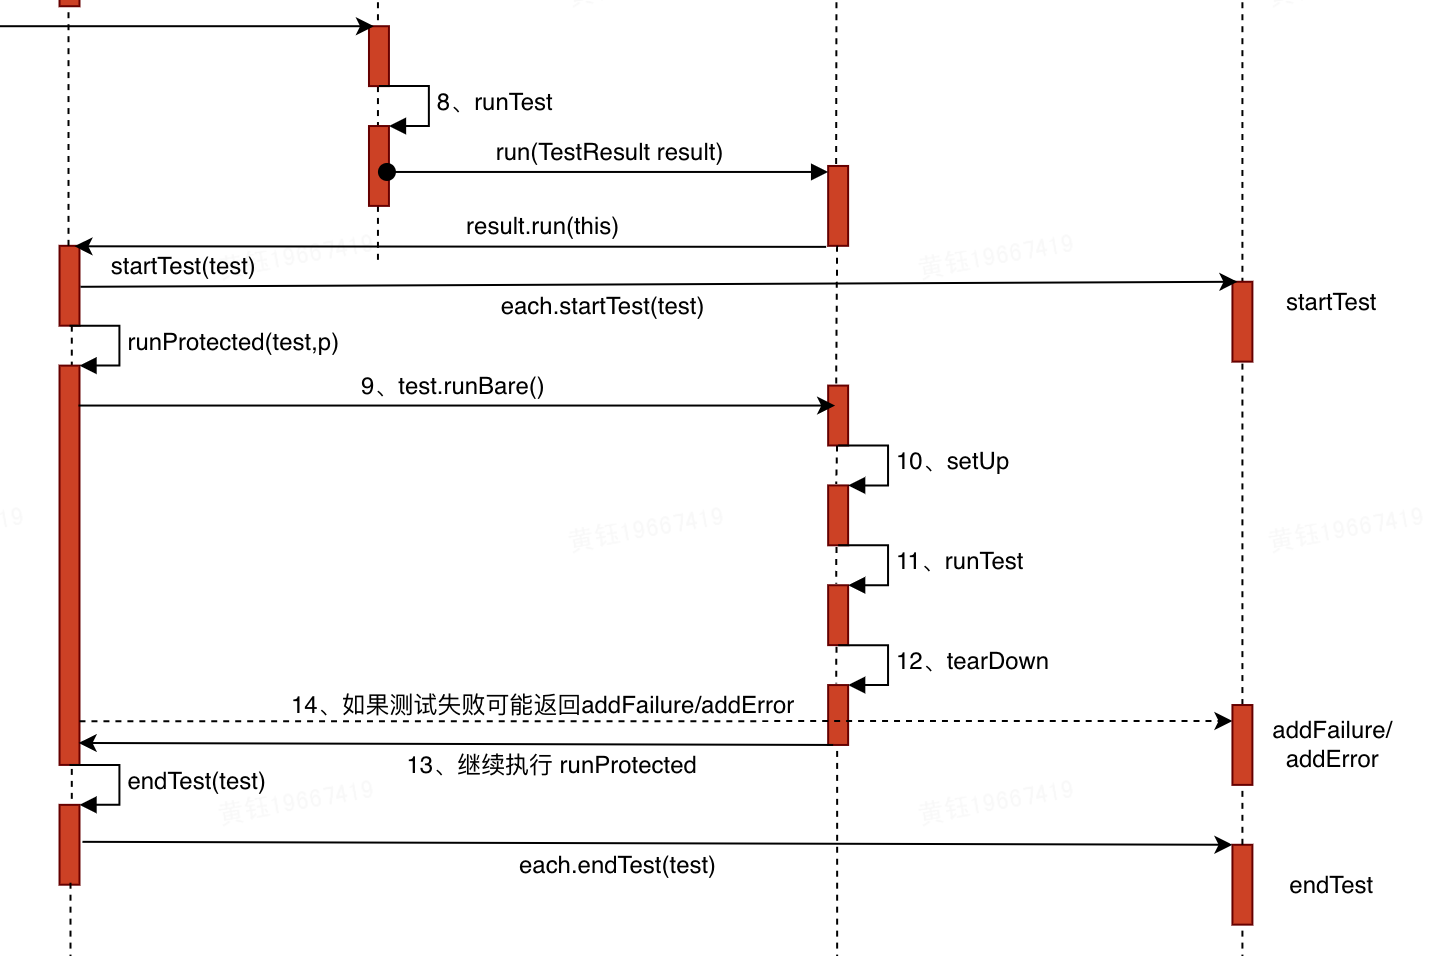
参考前人博客中的简化代码:
//TestSuitepublicvoidrun(TestResult result){for(Enumeration e=tests(); e.hasMoreElements();){//遍历测试方法if(result.shouldStop())//是否停止继续运行break;Test test=(Test)e.nextElement();runTest(test, result);//运行具体测试用例方法TestCase}}//TestResultprotectedvoidrun(finalTestCase test){startTest(test);Protectable p=newProtectable(){publicvoidprotect()throwsThrowable{
                test.runBare();}};runProtected(test, p);//执行test方法endTest(test);}//TestCasepublicvoidrunBare()throwsThrowable{setUp();//运行setuptry{runTest();//运行具体测试方法}finally{tearDown();}}
首先它会运行setUp方法, 然后 runTest() 具体跑一个方法 ,该方法首先会通过反射创建一个无参构造器,然后实例化对象,最后获取当前TestCase对象中的测试方法名去获取Method对象,然后runMethod.invoke(this, new Class[0])执行该方法,完成测试。
3.2.3 测试结果捕捉阶段
3.测试结果捕捉阶段:(舞台交给ResultPrinter) 运行已经完成,日志输出阶段。TestResult对象中有三个观察者对象。如果测试结果与 Assert断言结果不一样,会进入addFailure(test, e)方法,其他未知异常会捕获进入addError(test, e)记录错误信息,然后存入 fErrors 向量集合中。最后通过 ResultPrinter 打印结果,最终显示在控制台。(TestRunner初始化的时候,通过 new ResultPrinter(System.out) 已经默认把控制台输出作为输出方式了)。
protectedList<TestFailure> fFailures;//观察者 失败信息 TestFailure对象 protectedList<TestFailure> fErrors;//观察者 错误信息 TestFailure 对象protectedList<TestListener> fListeners;//观察者 监听器列表 TestListener//TestResultpublicvoidrunProtected(finalTest test,Protectable p){try{
            p.protect();}catch(AssertionFailedError e){addFailure(test, e);//如果计算结果和assert预期结果不一样,则出现这个错误}catch(ThreadDeath e){// don't catch ThreadDeath by accidentthrow e;}catch(Throwable e){addError(test, e);}}
如果断言的预期结果和实际结果不一致,首先会打印一个“F”表示有错误信息,当所有方法执行完,会执行fPrinter.print(result, runTime)方法输出 同步答应、耗时、异常信息、断言错误信息、统计结果等信息。
/* API for use by textui.TestRunner */synchronizedvoidprint(TestResult result,long runTime){printHeader(runTime);printErrors(result);printFailures(result);printFooter(result);}
4 总结
本文前后花了3-4天的时间分别参考不同的博客读源码,逐步明确了几个模块的关系,还需要深入学习,认知有误的地方请不吝赐教。行文排版略微混乱,可能整体读完才能理解。这里有几层递进,先是读懂junit框架中怎么执行测试、怎么输出/打印结果(主要在junit.framework,junit.runner,junit.textui的代码中,TestRunner比较核心,放到第三节了),然后是IDE工具触发单测是怎么衔接上的(主要在org.junit.runner中,入口是JUnitCore,放在第二节了)以及怎么从Request到Result,再是各个注解标注的测试方法怎么追踪到的,这里由 BlockJUnit4ClassRunner 通过一己之力把Statement和各类注解串联到一起了(深入到了junit具体实现),最后因为实际工作中用Powermock比较多,仿照前人博客SpringRunner的分析,追加了Mockito和Powermock如何嫁接到JUnit框架上。整体对JUnit框架原理有了全面的了解,趁热打铁分享在此。模块关系、类图可能还需要修缮,后续再做调整。
再说一些心得,在源码分析的过程中,我们可能并不知道什么是重点,而前人总结的侧重点又不同,到底谁才是原理解析的真身呢?实际可能大家都是正儿八经的原理解析,只是侧重点略微不同,有的是五花肉排骨、有的是猪大腿,是对某个局部放大进行分析,如果搞不定就一篇篇看过去,跟着走代码,到后期解决了一个个疑惑后,在头脑中就形成了完整的轮廓了,但若要你要整个轮廓画出来,放到一篇大杂烩里,肯定也是有侧重的,不可能什么都兼顾到,所以除了抓住主干,紧着解决当前的困惑就行。多读、多看、多练,次数多了读的也会更快一些,头脑里的节点多了连成片就更容易一些了。
(完)
参考文档:
- Junit源码阅读笔记一(从JunitCore开始),https://www.jianshu.com/p/205946b4aa20,2017.07.31
- 初窥门径之JUnit源码分析(基于JUnit 3.8.1版本),https://nicky-chin.cn/2018/07/16/junit-codeanalysis/,2018-07-16
- 单元测试运行原理探究,https://developer.aliyun.com/article/1035004,022-09-26
- JUnit源码解析(基于JUnit 4.12版本),https://blog.saymagic.cn/2016/09/30/understand-Junit.html,2016-9-30
- 单元测试框架之Junit使用及原理分析,https://www.cnblogs.com/strongmore/p/16290681.html,2022-06-05
其他学习文档:
- 译文:JUnit 4 与 TestNG 对比,https://blog.csdn.net/hotdust/article/details/53406086,原文:JUnit 4 Vs TestNG – Comparison,https://mkyong.com/unittest/junit-4-vs-testng-comparison/,2013-5-30
- Github:lisenEI/UnitTesting 单元测试介绍,https://github.com/lisenEI/UnitTesting,2018-12-19
- JUnit 5 教程,https://dnocm.com/articles/cherry/junit-5-info/,2020-01-16
- JUnit 5 教程 之 基础篇,https://www.jianshu.com/p/3183fb69fd74
- JUnit 5 教程 之 扩展篇,https://www.jianshu.com/p/1626dc9c63e7,2020.09.07
不得不说,前人总结的太好了,就看愿不愿意学啦。
#2023-2-3#
版权归原作者 TTKatrina 所有, 如有侵权,请联系我们删除。