
先说下我的功能需求:
通过画布,自定义一个区域大小,在这个区域内:添加背景图片、图中图叠加、画内外边框、设置文字(文字的字体和大小颜色)
效果图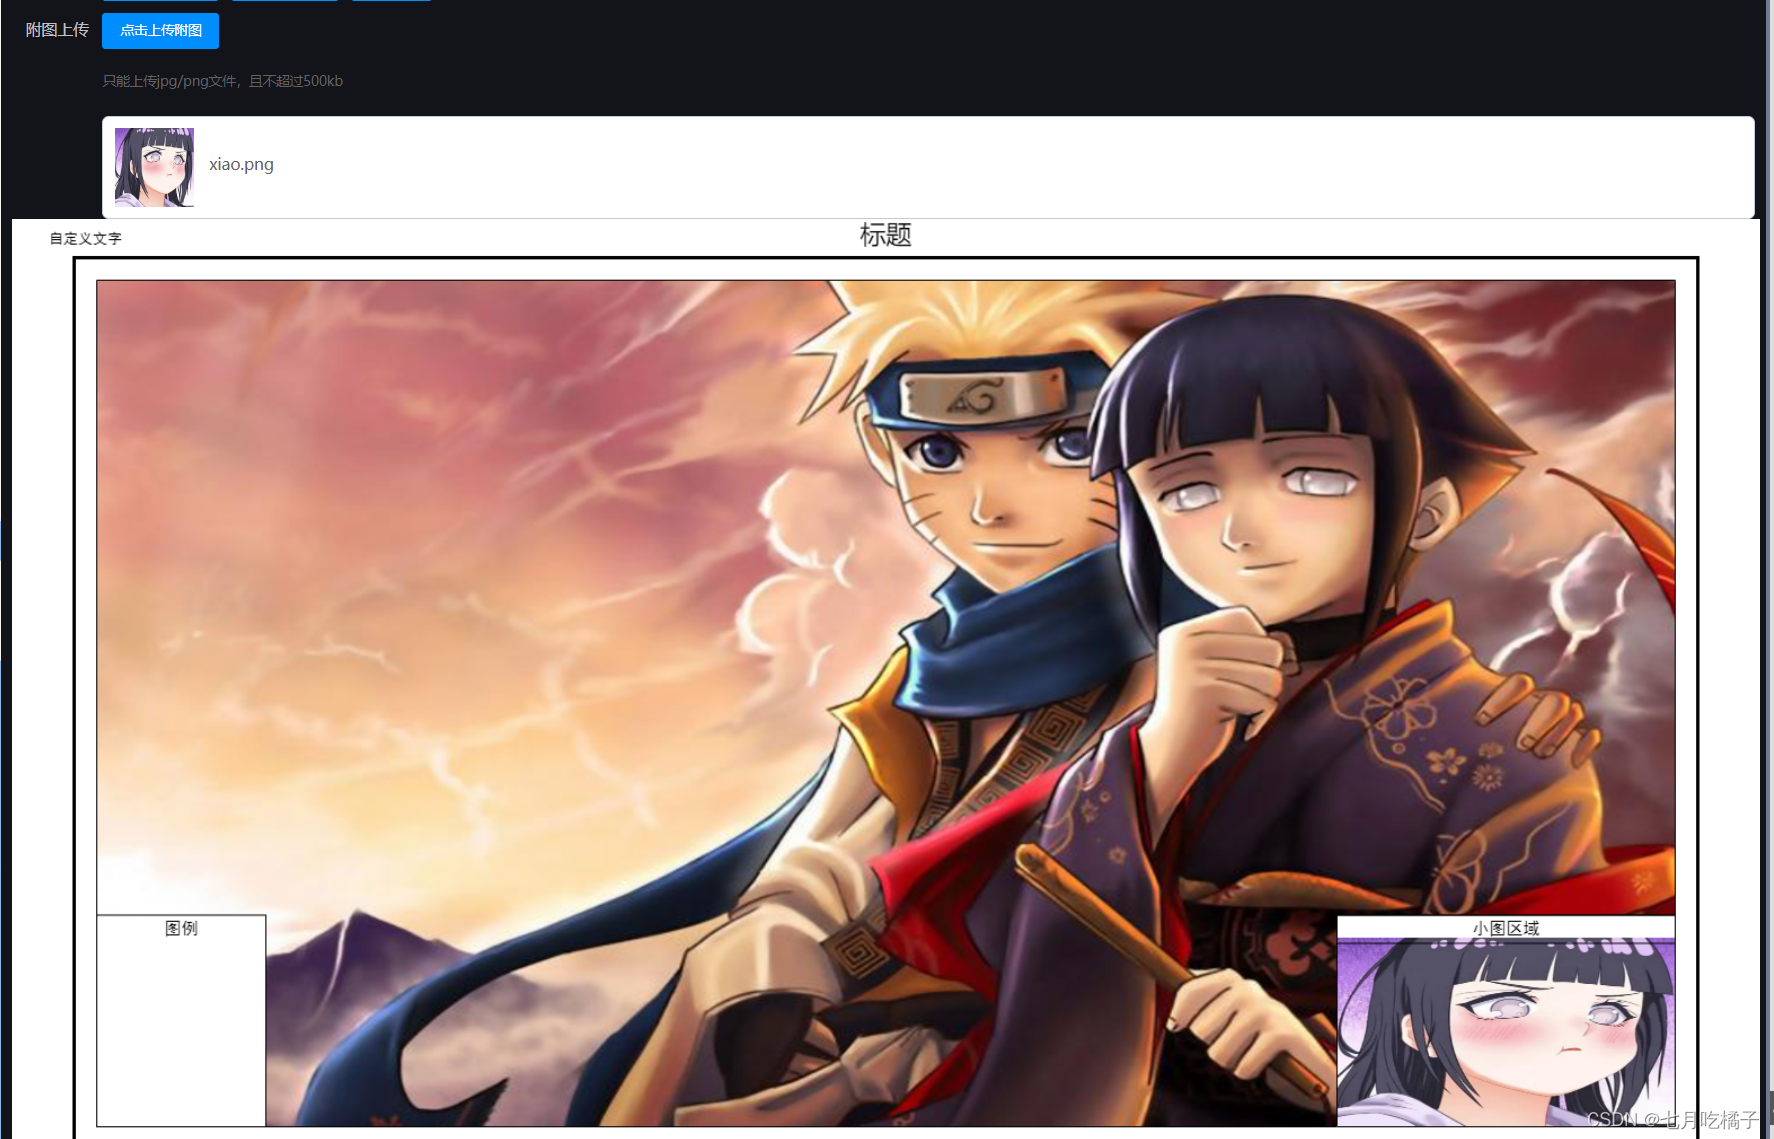
背景图片就是鸣人和雏田,右下角的属于图中图叠加效果,左下和右下都是分别画的两个区域框
不需要用到上传图片功能的,这一步可以略过,直接看下面 canvasdiv() 方法
1.右下角的小图,我做的是上传图片,上面有个附图上传的按钮,这个用的是element-ui,代码我贴下面了,也可以不选择上传,自己从本地获取一张图片也可以
<el-form-item label="附图上传" prop="dh"><div><el-upload class="upload-demo" action="":on-preview="handlePreview":on-remove="handleRemove":before-remove="beforeRemove":on-change="uploadTU":auto-upload="false":limit="1"
              list-type="picture":on-exceed="handleExceed":file-list="fileList"><el-button size="small" type="primary">点击上传附图</el-button><div slot="tip"class="el-upload__tip">只能上传jpg/png文件,且不超过500kb</div></el-upload></div></el-form-item>
//附图上传调用的方法,这里主要是获取了图片的地址,//这里这个 this.futuimage 会在做附图的时候用到,所以我这里要保存一下这个图片地址uploadTU(file, filelist){this.futuimage = file.url
},
画布上图、自定义文字、画线
1.先定义一个canvas容器
<div id="div"><canvas id="canvas"></canvas></div>
2.这个方法自己写个点击事件触发,我是用按钮触发的,按钮代码我就不写了
//图片生成pdn的方法canvasdiv(dataUrl){var canvas = document.getElementById("canvas");
            canvas.width =1545;
            canvas.height =855;var ctx = canvas.getContext("2d");//这里就是背景图,我获取的是本地图片var image =newImage();//这里可以放png图片,也可以放图片的base64
            image.src ='./img/beijingtu.png';//图例图片var tuli =newImage();
            tuli.src ='./img/xiao.png';//附图图片var futu =newImage();
            futu.src =this.futuimage;//这个我放的是图片的base64,主要给大家说明一下可以放这种类型数据//从这一步开始,就开始画布了,在画布里设置图片呀 文字呀 边框呀
            image.onload=function(){var imgwidth =1400;//背景图宽度var imgheight =750;//背景图高度var left =(canvas.width - imgwidth)/2;var top =(canvas.height - imgheight)/2;//第一个参数image就是我读取的本地png图片,这里我试过放base64 也可以//第二个参数left 就是 x坐标,第三个参数top就是 y坐标 ,坐标轴懂吧 x和y//第四个和第五个参数就是背景图的宽和高,单位是像素px//多说一句第一个参数 image 看你自己需求放什么,但是我发现base64图片不能自适应
                ctx.drawImage(image, left, top, imgwidth, imgheight);//背景图上图到画布//外框
                ctx.moveTo(left -20, top -20);//将画笔移动到坐标 x和y
                ctx.lineTo(left + imgwidth +20, top -20);//从画笔位置绘制直线到坐标 x和y
                ctx.lineTo(left + imgwidth +20, top + imgheight +20);//从当前位置绘制直线到
                ctx.lineTo(left -20, top + imgheight +20);//.从当前位置...
                ctx.closePath();//闭合线条
                ctx.lineWidth =3;//线宽
                ctx.strokeStyle ='black';//描边颜色
                ctx.stroke();//渲染直线(描边)//最内的框
                ctx.moveTo(left, top);//将画笔移动到坐标
                ctx.lineTo(left + imgwidth, top);//从画笔位置绘制直线到坐标
                ctx.lineTo(left + imgwidth, top + imgheight);//从当前位置绘制直线到
                ctx.lineTo(left, top + imgheight);// 从当前位置
                ctx.closePath();//闭合线条
                ctx.lineWidth =1;//线宽
                ctx.strokeStyle ='black';//描边颜色
                ctx.stroke();//渲染直线(描边)//看一下效果图左下角有个图例,背景色是白色,主要是填充区域颜色需要加这一行代码
                ctx.beginPath();//开启路径绘制,不加它无法填充区域颜色,
                ctx.moveTo(left, imgheight /4*3+ top);//将画笔移动到坐标
                ctx.lineTo(left +this.tuli_width, imgheight /4*3+ top);//从画笔位置绘制直线到坐标
                ctx.lineTo(left +this.tuli_width, imgheight + top);//从当前位置绘制直线到
                ctx.lineTo(left, imgheight + top);//.从当前位置
                ctx.closePath();//闭合线条
                ctx.fillStyle ='white';
                ctx.fill();//设置封闭图形填充
                ctx.lineWidth =1;//线宽
                ctx.strokeStyle ='black';//描边颜色
                ctx.stroke();//渲染直线(描边)//附图
                ctx.beginPath();//开启路径绘制,不加它无法填充区域颜色
                ctx.moveTo(imgwidth -300+ left, imgheight /4*3+ top);//将画笔移动到坐标
                ctx.lineTo(left + imgwidth, imgheight /4*3+ top);//从画笔位置绘制直线到坐标
                ctx.lineTo(left + imgwidth, imgheight + top);//从当前位置绘制直线到
                ctx.lineTo(imgwidth -300+ left, imgheight + top);//.从当前位置
                ctx.lineWidth =1;//线宽
                ctx.strokeStyle ='black';//描边颜色
                ctx.fillStyle ='white';
                ctx.fill();//设置封闭图形填充
                ctx.stroke();//渲染直线(描边)
                ctx.closePath();//闭合线条
                ctx.drawImage(futu, imgwidth -300+ left, imgheight /4*3+ top +20,300, imgheight /4-20);//添加附图图片//附图俩字下面的横线
                ctx.moveTo(imgwidth -300+ left, imgheight /4*3+ top +25);//将画笔移动到坐标
                ctx.lineTo(left + imgwidth, imgheight /4*3+ top +25);
                ctx.lineWidth =1;//线宽
                ctx.strokeStyle ='black';//描边颜色
                ctx.stroke();//渲染直线(描边)// 绘制文字(文本内容,x坐标,y坐标)
                ctx.font ="13px serif";//文字大小
                ctx.fillStyle ="black";//文字颜色
                ctx.textAlign ="center";//文字居中

                ctx.font ="23px 宋简体"
                ctx.fillText("标题", canvas.width /2, canvas.height -835);

                ctx.font ="15px 黑体"
                ctx.fillText("图例", left +75, imgheight /4*3+ top +17);
                ctx.fillText("小图区域", imgwidth -150+ left, imgheight /4*3+ top +17);

                ctx.font ="13px 黑体"
                ctx.fillText("自定义文字", left -10, canvas.height -835);
                ctx.fillText("1:50000", canvas.width /2, canvas.height -12);
                ctx.fillText(that.getCurrentTime(), left + imgwidth -20, canvas.height -12);
                ctx.fillText("XXX", left -10, canvas.height -12);//展示生成后的图片效果--第二张图var base64 = canvas.toDataURL();
                document.getElementById("base64Img").src = base64;const download = document.getElementById("download");var ba64 = canvas.toDataURL("image/png");// 点击图片下载// canvas.onclick = function () {//     //download.click();//     var input1 = document.getElementById("upload");//     if (typeof FileReader === 'undefined') {//         alert("抱歉,你的浏览器不支持 FileReader");//         input1.setAttribute('disabled', 'disabled');//     } else {//         // console.log(typeof FileReader);//         input1.addEventListener('change', that.readFile(), false);//         /*input1.addEventListener('change',function (e){//       // console.log(e.target.files[0]);//       console.log(this.files[0]);//       },false); *///     }// };}},
本文转载自: https://blog.csdn.net/li836779537/article/details/129730990
版权归原作者 七月吃橘子 所有, 如有侵权,请联系我们删除。
版权归原作者 七月吃橘子 所有, 如有侵权,请联系我们删除。