简介
单元测试是对软件中的最小可测试单元进行测试。(最小可测试单元是要有结果产出的。例如某个方法,单独的某个操作)
单元测试其实是伴随着敏捷开发,它是对更快开发的一种追求。早发现错误比晚发现错误会更好,保证自己的代码符合要求
一: 搭建基于 jest 的 vue 单元测试环境 零配置开箱即用 https://jestjs.io/zh-Hans/docs/getting-started
二: 使用 vue-test-util 提高测试编码效率 https://v1.test-utils.vuejs.org/zh/guides/
(一) 手动搭建
编写 jest 配置文件
// jest.conf.jsconst path =require('path');

module.exports ={rootDir: path.resolve(__dirname,'../../'),// 类似 webpack.contextmoduleFileExtensions:[// 类似 webpack.resolve.extensions'js','json','vue',],moduleNameMapper:{'^@/(.*)$':'<rootDir>/src/$1',// 类似 webpack.resolve.alias},transform:{// 类似 webpack.module.rules'^.+\\.js$':'<rootDir>/node_modules/babel-jest','.*\\.(vue)$':'<rootDir>/node_modules/vue-jest',},setupFiles:['<rootDir>/test/unit/setup'],// 类似 webpack.entrycoverageDirectory:'<rootDir>/test/unit/coverage',// 类似 webpack.outputcollectCoverageFrom:[// 类似 webpack 的 rule.include'src/**/*.{js,vue}','!src/main.js','!src/router/index.js','!**/node_modules/**',],};
eslintrc.js
//
module.exports ={env:{browser:true,es6:true,jest:true},parserOptions:{sourceType:'module'},}
(二) 通过vue-cli5脚手架创建
vue-cli5
npm install -g @vue/cli

vue create 项目名
我们选择 手动配置
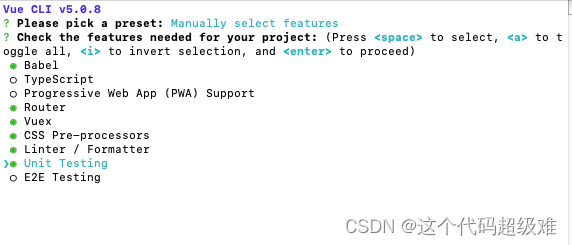
上下键控制 空格选择 这里选择Babel转码器 Router Unit Testing 单元测试勾选上
? Check the features needed for your project:(Press <space> to select,<a> to toggle all,<i> to invert selection)>() Babel //转码器,可以将ES6代码转为ES5代码,从而在现有环境执行。() TypeScript// TypeScript是一个JavaScript(后缀.js)的超集(后缀.ts)包含并扩展了 JavaScript 的语法,需要被编译输出为 JavaScript在浏览器运行,目前较少人再用() Progressive Web App (PWA) Support// 渐进式Web应用程序() Router // vue-router(vue路由)() Vuex // vuex(vue的状态管理模式)() CSS Pre-processors // CSS 预处理器(如:less、sass)() Linter / Formatter // 代码风格检查和格式化(如:ESlint)() Unit Testing // 单元测试(unit tests)() E2E Testing // e2e(end to end) 测试

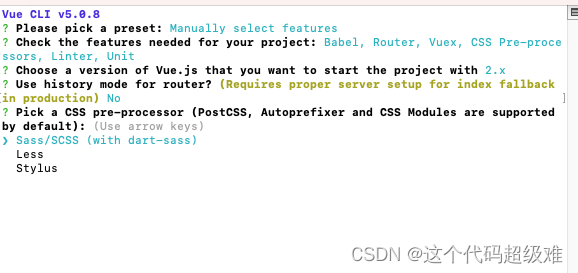
选择版本 2.x
是否开启history模式 选择否
选择样式预处理
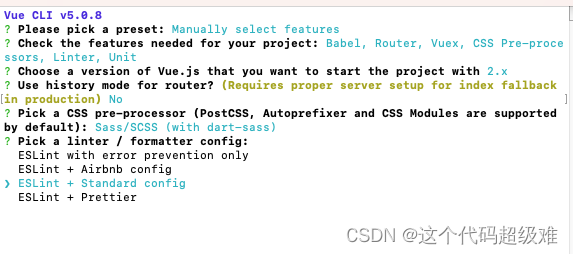
语法检测工具,这里我选择ESLint + Standard config
Please pick a preset: Manually select features
 Check the features needed for your project: Router, Vuex, CSS Pre-processors, Linter, Unit
 Pick a CSS pre-processor (PostCSS, Autoprefixer and CSS Modules are supported by default): Stylus
 Pick a linter / formatter config:(Use arrow keys)
 ESLint with error prevention only
 ESLint + Airbnb config
> ESLint + Standard config
 ESLint + Prettier

选择语法检查方式,这里我选择fix和commit时候检查检测
 Please pick a preset: Manually select features
 Check the features needed for your project: Router, Vuex, CSS Pre-processors, Linter, Unit
 Pick a CSS pre-processor (PostCSS, Autoprefixer and CSS Modules are supported by default): Stylus
 Pick a linter / formatter config: Prettier
 Pick additional lint features:(Press <space> to select,<a> to toggle all,<i> to invert selection)() Lint on save // 保存就检测>() Lint and fix on commit // fix和commit时候检查
Unit Testing 勾选后 jest 回车安装
? Please pick a preset: Manually select features
? Check the features needed for your project: Babel, Router, Vuex, CSS Pre-proce
ssors, Linter, Unit
? Choose a version of Vue.js that you want to start the project with 2.x
? Use history mode for router?(Requires proper server setup for index fallback
in production) No
? Pick a CSS pre-processor (PostCSS, Autoprefixer and CSS Modules are supported
by default): Sass/SCSS (with dart-sass)? Pick a linter / formatter config: Standard
? Pick additional lint features: Lint on save
? Pick a unit testing solution:(Use arrow keys)
❯ Jest
  Mocha + Chai
接下来会问你把babel,postcss,eslint这些配置文件放哪,这里随便选,我选择放在放package.json里
Vue CLI v5.0.8? Please pick a preset: Manually select features
? Check the features needed for your project: Babel, Router, Vuex, CSS Pre-proce
ssors, Linter, Unit
? Choose a version of Vue.js that you want to start the project with 2.x
? Use history mode for router?(Requires proper server setup for index fallback
in production) No
? Pick a CSS pre-processor (PostCSS, Autoprefixer and CSS Modules are supported
by default): Sass/SCSS (with dart-sass)? Pick a linter / formatter config: Standard
? Pick additional lint features: Lint on save
? Pick a unit testing solution: Jest
? Where do you prefer placing config for Babel, ESLint, etc.?(Use arrow keys)
❯ In dedicated config files  // 独立文件放
  In package.json  // 放package.json里? Save this as a preset for future projects?(y/N)// 是否记录一下以便下次继续使用这套配置。
等待安装完成
100 packages are looking for funding
  run `npm fund` for details

🚀  Invoking generators...
📦  Installing additional dependencies...

added 145 packages from 105 contributors in9.016s

139 packages are looking for funding
  run `npm fund` for details

⚓  Running completion hooks...

📄  Generating README.md...

🎉  Successfully created project vue-test-util-02.
👉  Get started with the following commands:

 $ cd vue-test-util-02
 $ npm run serve
运行成功 接下来就 开始编写我们的单元测试组件
找到 tests/unit 目录
example.spec.js
import { shallowMount } from "@vue/test-utils";// 可以通过 shallowMount 方法来创建包裹器
import HelloWorld from "@/components/HelloWorld.vue";describe("HelloWorld.vue",()=>{it("renders props.msg when passed",()=>{
    const msg ="new message zyj";// 现在挂载组件,你便得到了这个包裹器
    const wrapper =shallowMount(HelloWorld,{
      propsData:{ msg },});expect(wrapper.text()).toMatch(msg);});});
describe块允许我们对相关的测试进行分组。当我们运行测试时,我们将看到控制台中输出的describe块的名称。
describe()接受一个字符串作为组件的名称,并接受一个函数作为测试的参数。其实,如果我们只有一个测试,我们不需要将它包装在一个describe块中。但是当我们有多个测试时,用这种方式组织它们是有帮助的。
断言的期望
在 Jest 中,我们使用断言来确定我们期望测试返回的内容是否与实际返回的内容相匹配。具体来说,我们使用 Jest 的 expect() 方法来实现这一点,该方法使我们能够访问许多 “匹配器” ,帮助我们将实际结果与预期结果进行匹配。
断言的语法基本上是这样的:
expect(theResult).toBe(true)// expect(wrapper.text()).toMatch(msg);
在expect()方法内部,我们将要测试的结果本身放入。然后,我们使用匹配器(matcher)来确定结果是否是我们预期的那样。因此,在这里,我们使用通用的 Jest 匹配器toBe() 来说明:我们期望结果为真。
在编写测试时,首先编写一个您知道肯定会通过(或肯定会失败)的测试是有帮助的。例如,如果我们说: expect(true).toBe(true) 我们知道这一定会通过。传递给expect()的结果是true,我们说我们期望这个结果是toBetrue 。所以如果我们运行这些测试,我们知道它们一定会通过,因为 true == true。
现在已经有了测试的分组,可以开始编写这些单独的测试(individual tests)
跑所有测试用例:运行npm run test:uni
npm run test:unit 测试文件名
我们这边使用 npm run test:unit example.spec.js

版权归原作者 这个代码超级难 所有, 如有侵权,请联系我们删除。