
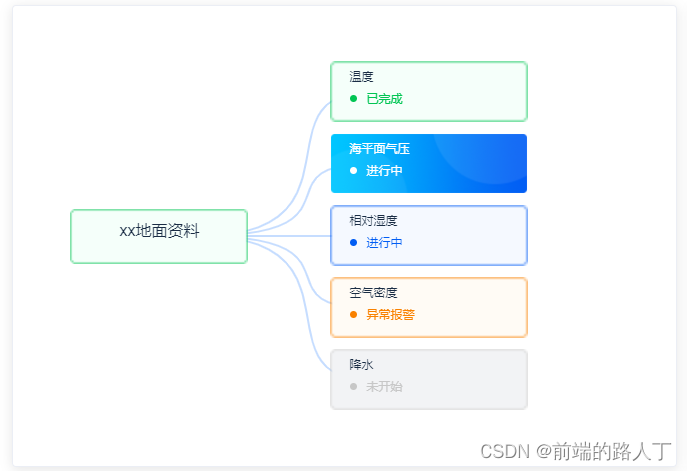
需求:实现流程图功能,根据状态不同显示不同的颜色,点击有对应的点击颜色
思想:根据jsmind构建思维导图,改变节点背景颜色,获取点击节点事件当点击节点是设置节点选中背景图片。
注意:由于jsmind更新各版本api都有很大改动,所以我使用的都是官方文档注明的基于各版本都支持的api
效果:
这里的要素是根据接口返回的,具体接口数据如下:
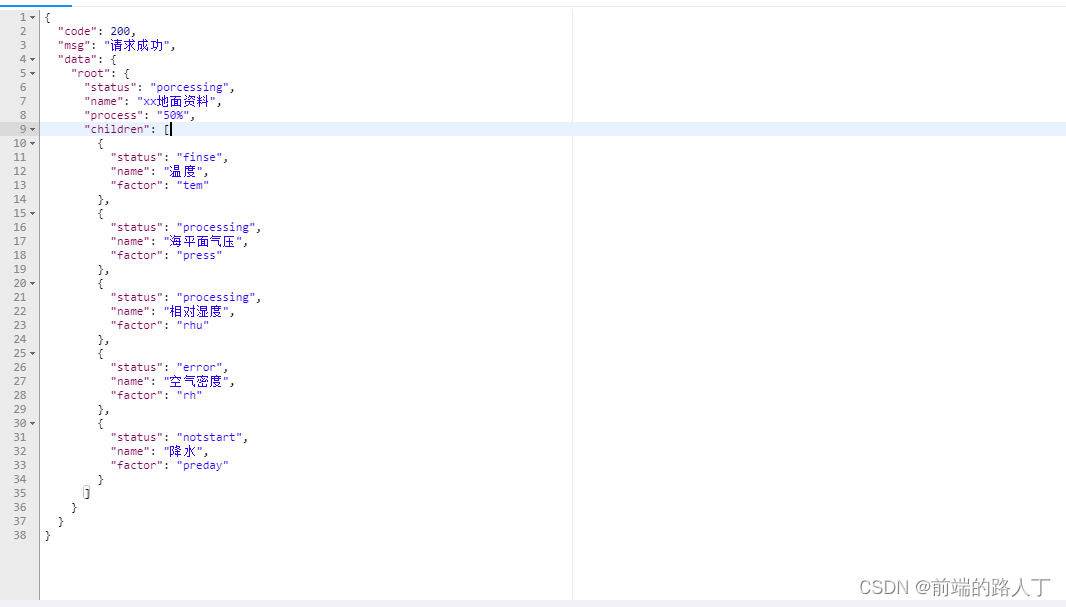
root是根节点,chrldren是子要素,可以根据自己的需求自行改造
代码:
先引入jsmind库(我引入的最新版本0.5)
npm install jsmind@latest --save
找到刚才引入vue中的jsmind的npm包,可以看到jsmind.css,在这里可以修改我们想要的样式,但是如果在这里修改是不会更新到git版本里面去,所以我们需要在src->style文件夹内新scss文件,这样我们改动样式可以更新到git版本控制中。

新建一个scss文件内容如下:(自己新建了一个主题名字为034,可以自行更改)
/**
 * @license BSD
 * @copyright 2014-2023 [email protected]
 *
 * Project Home:
 *   https://github.com/hizzgdev/jsmind/
 */

/* important section */
.jsmind-inner {
    position: relative;
    overflow: auto;
    width: 100%;
    height: 100%;
    outline: none;
}

/*box-shadow:0 0 2px #000;*/
.jsmind-inner {
    moz-user-select: -moz-none;
    -moz-user-select: none;
    -o-user-select: none;
    -khtml-user-select: none;
    -webkit-user-select: none;
    -ms-user-select: none;
    user-select: none;
}

.jsmind-inner canvas {
    position: absolute;
}

/* z-index:1 */
svg.jsmind {
    position: absolute;
    z-index: 1;
}

canvas.jsmind {
    position: absolute;
    z-index: 1;
}

/* z-index:2 */
jmnodes {
    position: absolute;
    z-index: 2;
    background-color: rgba(0, 0, 0, 0);
    width: 100% !important;
    right: 40px;
}

/*background color is necessary*/
jmnode {
    position: absolute;
    cursor: default;
    max-width: 400px;
    box-shadow: 0;
}

/* 自定义自己的主题 */
jmnodes.theme-034 jmnode {
    width: 200px;
    height: 62px;
    text-align: left;
    color: #192C44;
    background-repeat: no-repeat;
    background-size: cover;
    padding: 7px 20px;
    font-size: 13px;
    border-radius: 4px;
}

/* 节点样式 */
jmnodes.theme-034 jmnode:hover {}

/* 鼠标悬停的节点样式 */
jmnodes.theme-034 jmnode.selected {
    color: #192C44;
    background-color: transparent;
}

jmnodes.theme-034 .topicbody {
    pointer-events: none;

    .title {
        font-size: 12px;
    }

    .body {
        display: flex;
        align-items: center;
        margin-top: 6px;

        .left {
            width: 7px;
            height: 7px;
            border-radius: 50%;
            margin-right: 10px;
        }

        .right {
            font-size: 12px;
        }
    }
}

jmnodes.theme-034 .acitve {
    pointer-events: none;

    .title {
        font-size: 12px;
        color: white;
    }

    .body {
        display: flex;
        align-items: center;
        margin-top: 6px;
        color: white !important;

        .left {
            width: 7px;
            height: 7px;
            background-color: #fff !important;
            border-radius: 50%;
            margin-right: 10px;
        }

        .right {
            font-size: 12px;
            color: white !important;
        }
    }
}

/* 选中的节点样式 */
jmnodes.theme-034 jmnode.root {
    width: 180px;
    height: 55px;
    text-align: center;
    padding: 10px;
    font-size: 16px;
}

jmnodes.theme-034 jmnode.root.selected {
    color: #192C44;
}

/* 根节点样式 */
jmnodes.theme-034 jmexpander {}

/* 展开/关闭节点的控制点样式 */
jmnodes.theme-034 jmexpander:hover {}
vue文件代码如下:
<template>
  <div class="jsmind">
    <el-card>
      <div class="content" id="jsmind_container"></div>
    </el-card>
  </div>
</template>

<script>
import JSMind from "jsmind";
import "@/style/jsmind.scss";
import { nest034getJsmind } from "@/api/datapretreatment";
export default {
  components: {},
  data() {
    return {
      mindData: "", //jsmind相关配置
      jm: "", //jsmind对象
      curcodeInfo: null, //当前选中节点信息
    };
  },
  created() {},
  mounted() {
    this.handleMind();
  },
  watch: {
    curcodeInfo: {
      handler() {},
    },
  },
  computed: {},
  methods: {
    // 初始化jsmind-----主题需要去jsmind的style里面去修改自定义主题样式
    initjsmind() {
      // 初始化配置
      var options = {
        container: "jsmind_container",
        theme: "034",
        editable: false,
        view: {
          engine: "canvas", // 思维导图各节点之间线条的绘制引擎
          hmargin: 10, // 思维导图距容器外框的最小水平距离
          vmargin: 20, // 思维导图距容器外框的最小垂直距离
          line_width: 2, // 思维导图线条的粗细
          line_color: "#C6DDFFFF", // 思维导图线条的颜色
        },
        layout: {
          hspace: 80, // 节点之间的水平间距
          vspace: 10, // 节点之间的垂直间距
          pspace: 10, // 节点与连接线之间的水平间距(用于容纳节点收缩/展开控制器)
        },
      };
      this.jm = new JSMind(options);
      const mind = {
        /* 元数据,定义思维导图的名称、作者、版本等信息 */
        meta: {
          name: "流程图",
          author: "dingguowei",
          version: "0.2",
        },
        /* 数据格式声明 */
        format: "node_tree",
        /* 数据内容 */
        data: this.mindData,
      };
      this.jm.show(mind);
      var that = this;
      // 增加监听点击节点事件,获取当前选中的节点
      this.jm.add_event_listener(function (type, node) {
        if (that.jm.get_selected_node() !== null) {
          // 设置curcodeInfo属性,监听节点是否为根节点,根节点不会改变curcodeInfo也就不会查询右侧日志,只有子节点会改变topic
          if (that.jm.get_selected_node().isroot === false) {
            // 恢复上一个节点的状态
            if (that.curcodeInfo !== null) {
              that.curcodeInfo.topic.className = "topicbody";
            }

            // 不为根节点
            that.curcodeInfo = that.jm.get_selected_node();
            // 更新节点背景颜色
            that.curcodeInfo.topic.className = "acitve";
            that.jm.update_node(that.curcodeInfo.id);
            that.refresh(that.curcodeInfo);
          }
        }
      });
    },
    // 配置mind信息
    async handleMind() {
      var that = this;
      await nest034getJsmind().then((res) => {
        let mindData = {
          id: res.data.root.name,
          topic: res.data.root.name,
          "background-image": that.getbgcimg(res.data.root.status),
          children: [],
        };
        res.data.root.children.map((item) => {
          mindData.children.push({
            id: item.name,
            topic: this.gethtml(item),
            "background-image": that.getbgcimg(item.status),
            activeimg: that.getbgcimg(item.status, true),
            noacitveimg: that.getbgcimg(item.status),
          });
        });
        that.mindData = mindData;
        that.initjsmind();
      });
      //  获取节点 ID
      var node_id = this.jm.get_node("温度").id;
      // 选中节点
      this.jm.select_node(node_id);
    },
    // 获取背景图片
    getbgcimg(val, acitve) {
      let url = "";
      if (acitve) {
        switch (val) {
          case "processing":
            url = "./img/jsmind/curprocessing.png";
            break;
          case "error":
            url = "./img/jsmind/curerror.png";
            break;
          case "finse":
            url = "./img/jsmind/curfinse.png";
            break;
          case "notstart":
            url = "./img/jsmind/curnotstart.png";
            break;
          default:
            url = "./img/jsmind/curfinse.png";
            break;
        }
        return url;
      } else {
        switch (val) {
          case "processing":
            url = "./img/jsmind/processing.png";
            break;
          case "error":
            url = "./img/jsmind/error.png";
            break;
          case "finse":
            url = "./img/jsmind/finse.png";
            break;
          case "notstart":
            url = "./img/jsmind/notstart.png";
            break;
          default:
            url = "./img/jsmind/finse.png";
            break;
        }
        return url;
      }
    },
    // 生成html
    gethtml(val) {
      let divObj = document.createElement("div");
      divObj.className = "topicbody";
      // 要素名称
      let title = document.createElement("div");
      title.className = "title";
      title.innerHTML = val.name;
      divObj.appendChild(title);
      // 要素状态
      let body = document.createElement("div");
      body.className = "body";
      let left = document.createElement("div");
      left.className = "left";
      left.style.backgroundColor = {
        processing: "#015DF3FF",
        finse: "#00C553FF",
        notstart: "#C7C7C7FF",
        error: "#F98100FF",
      }[val.status];
      body.appendChild(left);
      let right = document.createElement("div");
      right.className = "right";
      right.innerHTML = {
        processing: "进行中",
        finse: "已完成",
        notstart: "未开始",
        error: "异常报警",
      }[val.status];
      right.style.color = {
        processing: "#015DF3FF",
        finse: "#00C553FF",
        notstart: "#C7C7C7FF",
        error: "#F98100FF",
      }[val.status];
      body.appendChild(right);
      divObj.appendChild(body);
      return divObj;
    },
    // 更新视图
    refresh(node) {
      this.mindData.children.map((item) => {
        if (item.id === node.id) {
          item["background-image"] = item["activeimg"];
        } else {
          item["background-image"] = item["noacitveimg"];
        }
      });
      const mind = {
        /* 元数据,定义思维导图的名称、作者、版本等信息 */
        meta: {
          name: "流程图",
          author: "dingguowei",
          version: "0.2",
        },
        /* 数据格式声明 */
        format: "node_tree",
        /* 数据内容 */
        data: this.mindData,
      };
      this.jm.show(mind);
    },
  },
};
</script>
<style lang="scss" scoped>
.jsmind {
  width: 100%;
  //   height: 460px;
  .content {
    height: 420px;
    width: 100%;
  }
}
</style>
标签:
流程图
本文转载自: https://blog.csdn.net/yinzisang/article/details/129947240
版权归原作者 前端的路人丁 所有, 如有侵权,请联系我们删除。
版权归原作者 前端的路人丁 所有, 如有侵权,请联系我们删除。