
实践环境:Windows11
flutter_rust_bridge官方文档
Flutter环境配置教程 | Rust环境配置教程
新建一个全新的Flutter项目并运行:
flutter create example && cd example && flutter run

在Flutter项目根目录新建一个Rust项目:
cargo new native --lib
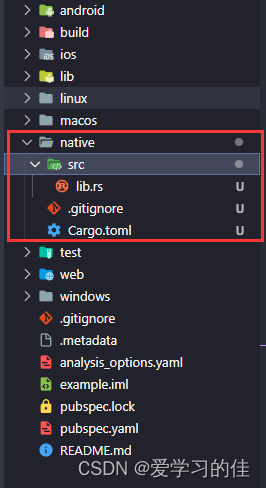
目录结构大概是这样的:
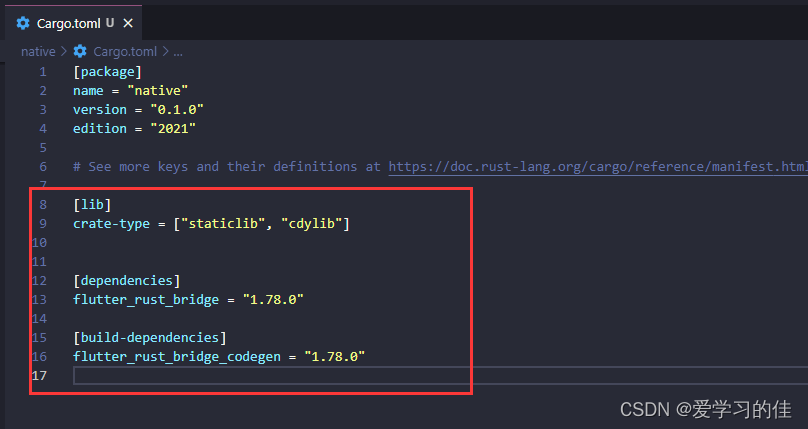
接下来,将这两行添加到
Cargo.toml
:
[lib]
crate-type = ["staticlib", "cdylib"]

[dependencies]
flutter_rust_bridge = "1.78.0"

[build-dependencies]
flutter_rust_bridge_codegen = "1.78.0"
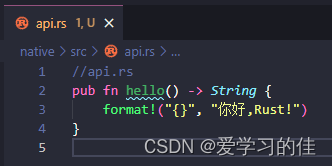
在native/src目录新建一个api.rs
添加以下示例代码:
//api.rs
pub fn hello() -> String {
    format!("{}", "你好,Rust!")
}
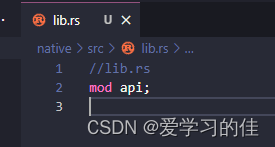
lib.rs
//lib.rs
mod api;
安装flutter_rust_bridge_codegen:
cargo install flutter_rust_bridge_codegen
修改Flutter项目的
pubspec.yaml配置文件
:
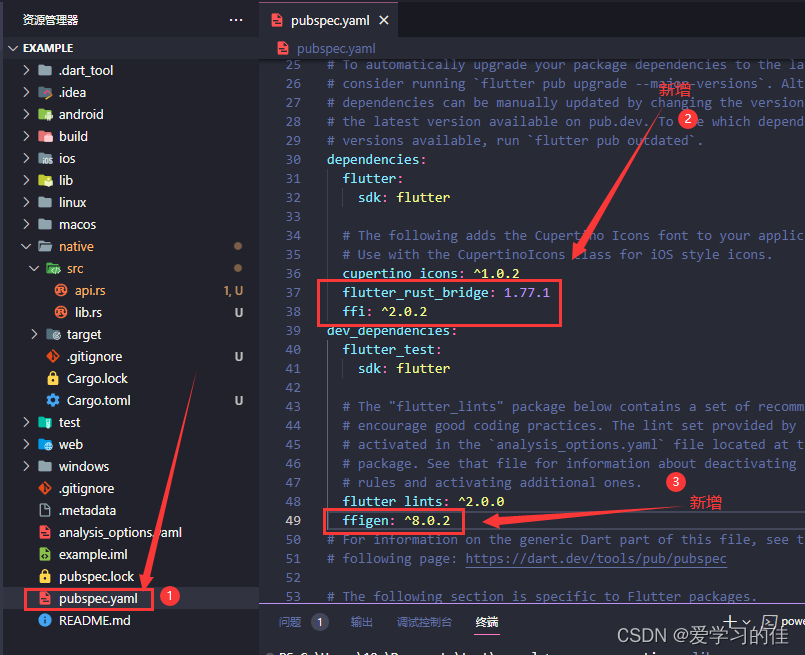
** **
**pubspec.yaml** 配置文件完整代码:
name: mobile
description: A new Flutter project.
# The following line prevents the package from being accidentally published to
# pub.dev using `flutter pub publish`. This is preferred for private packages.
publish_to: "none" # Remove this line if you wish to publish to pub.dev

# The following defines the version and build number for your application.
# A version number is three numbers separated by dots, like 1.2.43
# followed by an optional build number separated by a +.
# Both the version and the builder number may be overridden in flutter
# build by specifying --build-name and --build-number, respectively.
# In Android, build-name is used as versionName while build-number used as versionCode.
# Read more about Android versioning at https://developer.android.com/studio/publish/versioning
# In iOS, build-name is used as CFBundleShortVersionString while build-number is used as CFBundleVersion.
# Read more about iOS versioning at
# https://developer.apple.com/library/archive/documentation/General/Reference/InfoPlistKeyReference/Articles/CoreFoundationKeys.html
# In Windows, build-name is used as the major, minor, and patch parts
# of the product and file versions while build-number is used as the build suffix.
version: 1.0.0+1

environment:
  sdk: ">=3.0.5 <4.0.0"

# Dependencies specify other packages that your package needs in order to work.
# To automatically upgrade your package dependencies to the latest versions
# consider running `flutter pub upgrade --major-versions`. Alternatively,
# dependencies can be manually updated by changing the version numbers below to
# the latest version available on pub.dev. To see which dependencies have newer
# versions available, run `flutter pub outdated`.
dependencies:
  flutter:
    sdk: flutter

  # The following adds the Cupertino Icons font to your application.
  # Use with the CupertinoIcons class for iOS style icons.
  cupertino_icons: ^1.0.2
  flutter_rust_bridge: 1.77.1
  ffi: ^2.0.2

dev_dependencies:
  flutter_test:
    sdk: flutter

  # The "flutter_lints" package below contains a set of recommended lints to
  # encourage good coding practices. The lint set provided by the package is
  # activated in the `analysis_options.yaml` file located at the root of your
  # package. See that file for information about deactivating specific lint
  # rules and activating additional ones.
  flutter_lints: ^2.0.0
  ffigen: ^8.0.2
# For information on the generic Dart part of this file, see the
# following page: https://dart.dev/tools/pub/pubspec

# The following section is specific to Flutter packages.
flutter:
  # The following line ensures that the Material Icons font is
  # included with your application, so that you can use the icons in
  # the material Icons class.
  uses-material-design: true

  # To add assets to your application, add an assets section, like this:
  # assets:
  #   - images/a_dot_burr.jpeg
  #   - images/a_dot_ham.jpeg

  # An image asset can refer to one or more resolution-specific "variants", see
  # https://flutter.dev/assets-and-images/#resolution-aware

  # For details regarding adding assets from package dependencies, see
  # https://flutter.dev/assets-and-images/#from-packages

  # To add custom fonts to your application, add a fonts section here,
  # in this "flutter" section. Each entry in this list should have a
  # "family" key with the font family name, and a "fonts" key with a
  # list giving the asset and other descriptors for the font. For
  # example:
  # fonts:
  #   - family: Schyler
  #     fonts:
  #       - asset: fonts/Schyler-Regular.ttf
  #       - asset: fonts/Schyler-Italic.ttf
  #         style: italic
  #   - family: Trajan Pro
  #     fonts:
  #       - asset: fonts/TrajanPro.ttf
  #       - asset: fonts/TrajanPro_Bold.ttf
  #         weight: 700
  #
  # For details regarding fonts from package dependencies,
  # see https://flutter.dev/custom-fonts/#from-packages
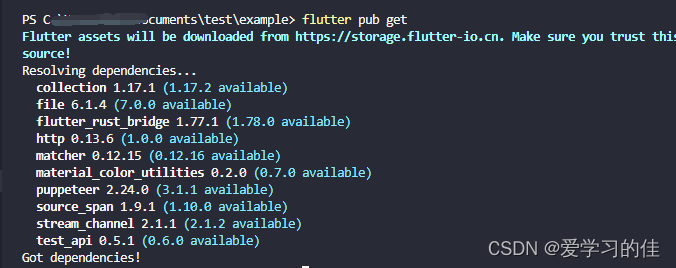
运行:
flutter pub get
安装 LLVM (不安装使用生成器的时候会报错):
ubuntu/linux:
sudo apt-get install libclang-dev
Windows:
- 安装具有 C++ 开发支持的 Visual Studio。
- 安装 LLVM 或使用命令:winget install -e --id LLVM.LLVM
MacOS:
- Install Xcode.
- Install LLVM -
brew install llvm.
切换到flutter项目根目录,运行以下命令,使用flutter_rust_bridge生成器生成代码:
flutter_rust_bridge_codegen -r native/src/api.rs -d lib/ffi/rust_ffi.dart -c ios/Runner/bridge_generated.h
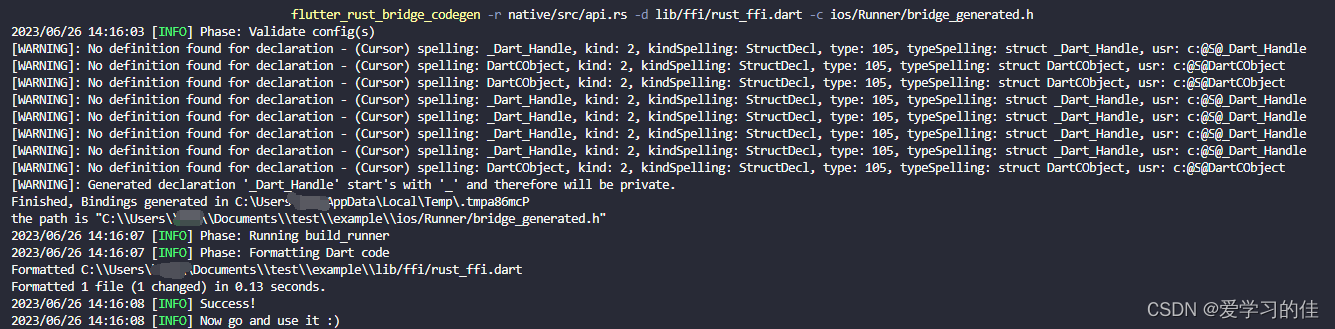
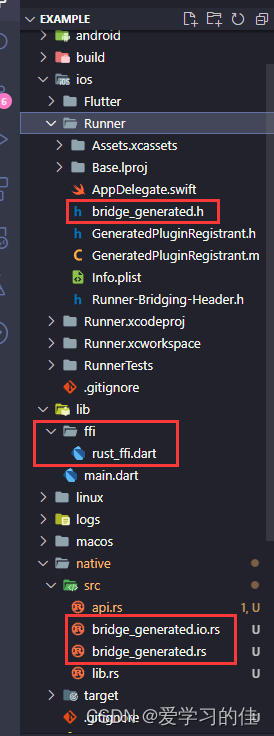
现在我们可以看到多了这些文件:
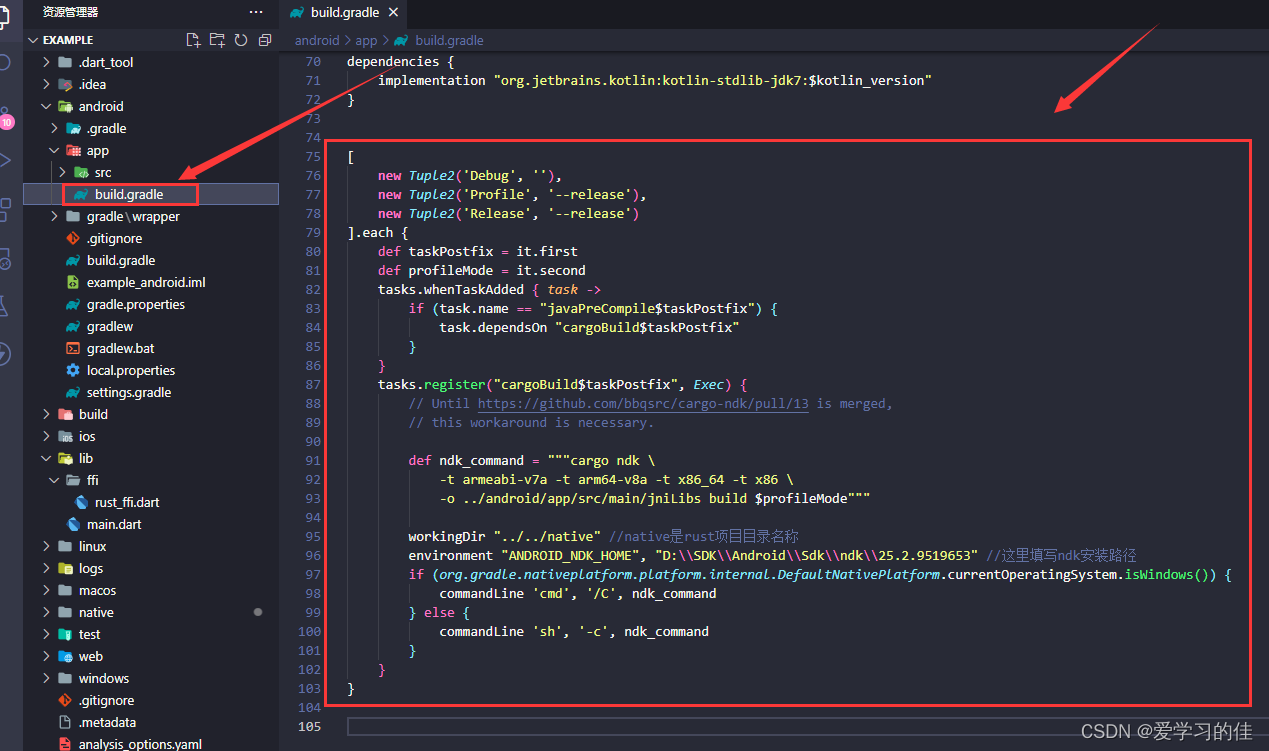
接下来在
**android/app/build.gradle** 最底部插入以下代码:
[
    new Tuple2('Debug', ''),
    new Tuple2('Profile', '--release'),
    new Tuple2('Release', '--release')
].each {
    def taskPostfix = it.first
    def profileMode = it.second
    tasks.whenTaskAdded { task ->
        if (task.name == "javaPreCompile$taskPostfix") {
            task.dependsOn "cargoBuild$taskPostfix"
        }
    }
    tasks.register("cargoBuild$taskPostfix", Exec) {
        // Until https://github.com/bbqsrc/cargo-ndk/pull/13 is merged,
        // this workaround is necessary.

        def ndk_command = """cargo ndk \
            -t armeabi-v7a -t arm64-v8a -t x86_64 -t x86 \
            -o ../android/app/src/main/jniLibs build $profileMode"""

        workingDir "../../native" //native是rust项目目录名称
        environment "ANDROID_NDK_HOME", "D:\\SDK\\Android\\Sdk\\ndk\\25.2.9519653" //这里填写ndk安装路径
        if (org.gradle.nativeplatform.platform.internal.DefaultNativePlatform.currentOperatingSystem.isWindows()) {
            commandLine 'cmd', '/C', ndk_command
        } else {
            commandLine 'sh', '-c', ndk_command
        }
    }
}
Android设置:
运行以下代码安装cargo-ndk
cargo install cargo-ndk

添加工具链:
rustup target add aarch64-linux-android armv7-linux-androideabi x86_64-linux-android i686-linux-android
我这里已经添加过了

进入Rust项目的根目录:
cd native
运行以下命令进行交叉编译:
cargo ndk -t  armeabi-v7a  -o ./jniLibs build --release
cargo ndk -t  arm64-v8a  -o ./jniLibs build --release
cargo ndk -t  x86_64  -o ./jniLibs build --release
cargo ndk -t  x86  -o ./jniLibs build --release
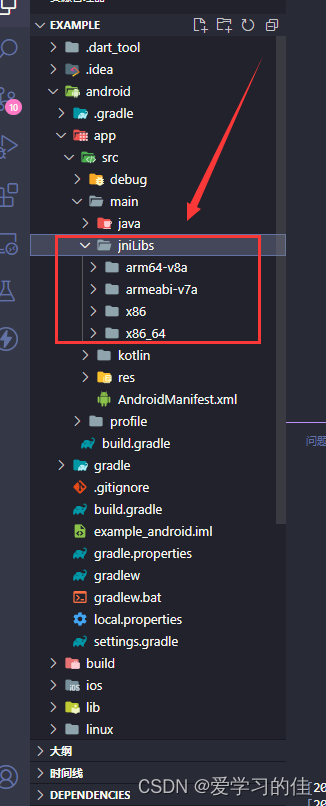
复制Rust项目里的jniLibs目录
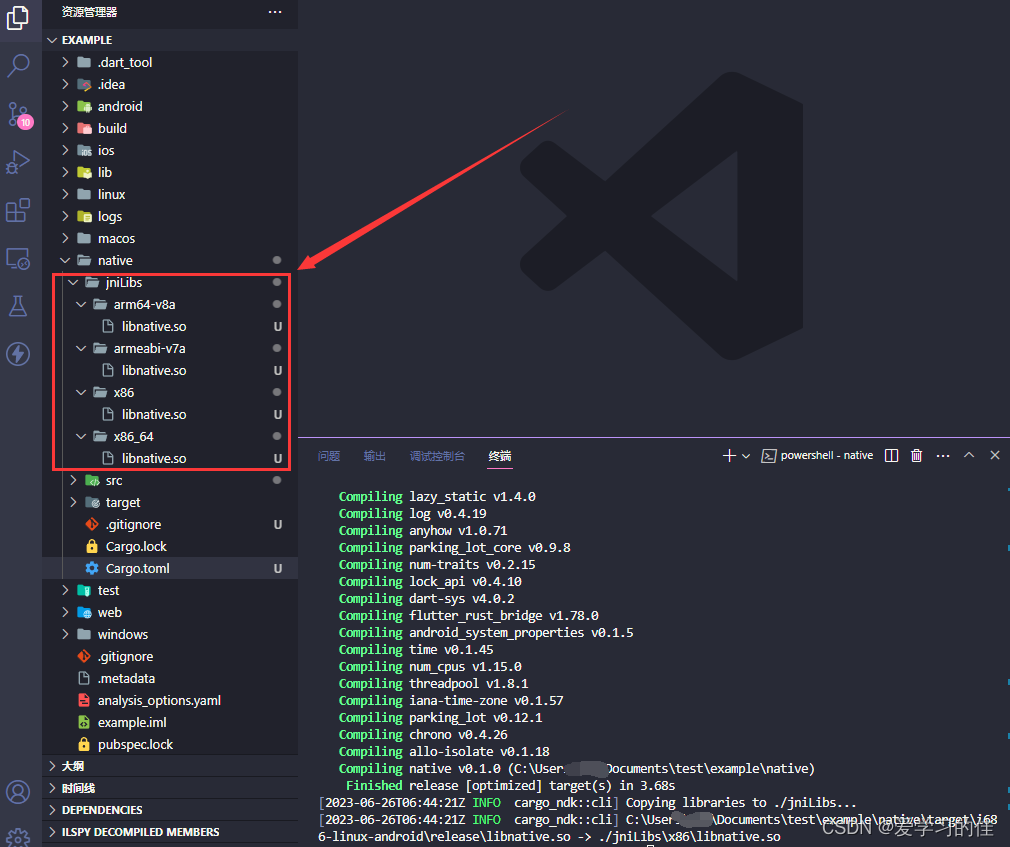
粘贴到**flutter **项目 android/app/main目录
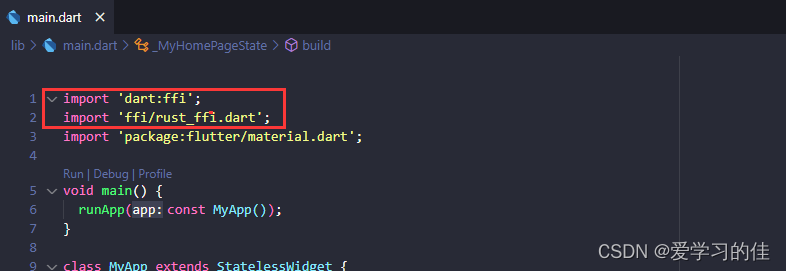
编辑flutter项目lib/main.dart文件
import 'dart:ffi';
import 'ffi/rust_ffi.dart';
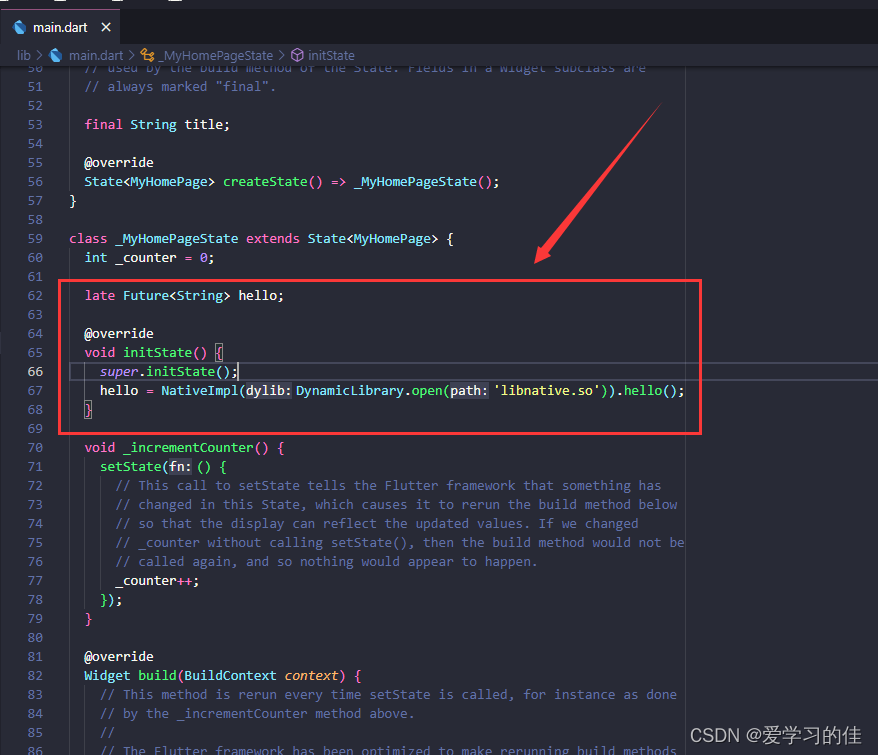
找到_MyHomePageState,加入以下代码
 late Future<String> hello;

  @override
  void initState() {
    super.initState();
    hello = NativeImpl(DynamicLibrary.open('libnative.so')).hello();
  }
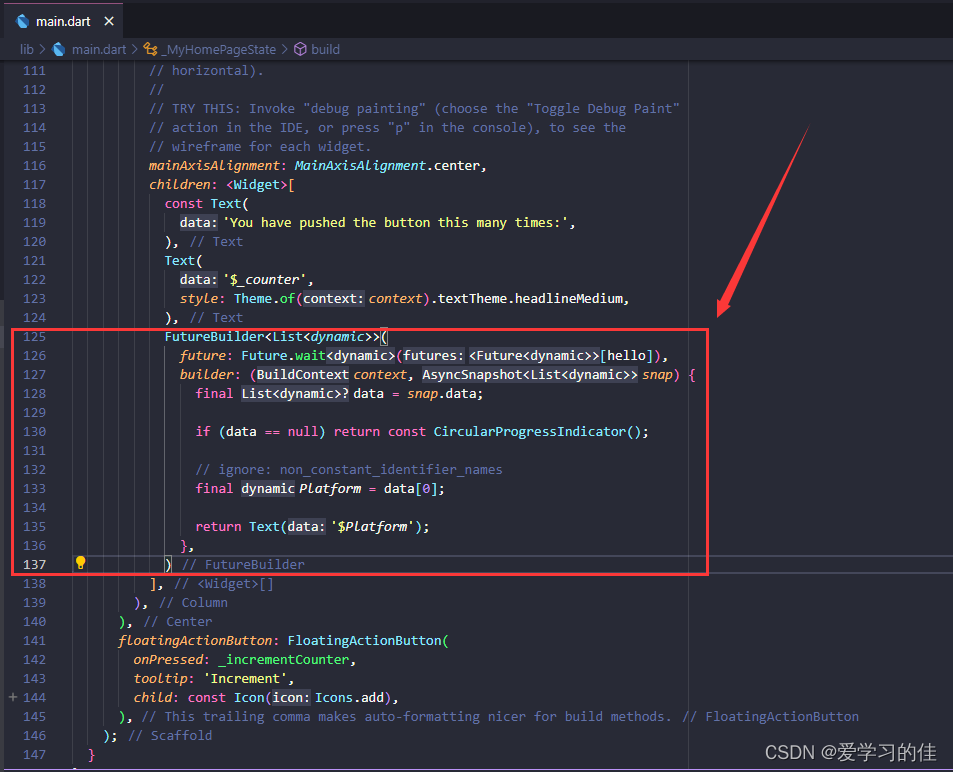
调用:
            FutureBuilder<List<dynamic>>(
              future: Future.wait([hello]),
              builder: (context, snap) {
                final data = snap.data;

                if (data == null) return const CircularProgressIndicator();

                // ignore: non_constant_identifier_names
                final Platform = data[0];

                return Text('$Platform');
              },
            )
main.dart完整代码:
import 'package:flutter/material.dart';
import 'dart:ffi';
import 'ffi/rust_ffi.dart';

void main() {
  runApp(const MyApp());
}

class MyApp extends StatelessWidget {
  const MyApp({super.key});

  // This widget is the root of your application.
  @override
  Widget build(BuildContext context) {
    return MaterialApp(
      title: 'Flutter Demo',
      theme: ThemeData(
        // This is the theme of your application.
        //
        // TRY THIS: Try running your application with "flutter run". You'll see
        // the application has a blue toolbar. Then, without quitting the app,
        // try changing the seedColor in the colorScheme below to Colors.green
        // and then invoke "hot reload" (save your changes or press the "hot
        // reload" button in a Flutter-supported IDE, or press "r" if you used
        // the command line to start the app).
        //
        // Notice that the counter didn't reset back to zero; the application
        // state is not lost during the reload. To reset the state, use hot
        // restart instead.
        //
        // This works for code too, not just values: Most code changes can be
        // tested with just a hot reload.
        colorScheme: ColorScheme.fromSeed(seedColor: Colors.deepPurple),
        useMaterial3: true,
      ),
      home: const MyHomePage(title: 'Flutter Demo Home Page'),
    );
  }
}

class MyHomePage extends StatefulWidget {
  const MyHomePage({super.key, required this.title});

  // This widget is the home page of your application. It is stateful, meaning
  // that it has a State object (defined below) that contains fields that affect
  // how it looks.

  // This class is the configuration for the state. It holds the values (in this
  // case the title) provided by the parent (in this case the App widget) and
  // used by the build method of the State. Fields in a Widget subclass are
  // always marked "final".

  final String title;

  @override
  State<MyHomePage> createState() => _MyHomePageState();
}

class _MyHomePageState extends State<MyHomePage> {
  int _counter = 0;

  late Future<String> hello;

  @override
  void initState() {
    super.initState();
    hello = NativeImpl(DynamicLibrary.open('libnative.so')).hello();
  }

  void _incrementCounter() {
    setState(() {
      // This call to setState tells the Flutter framework that something has
      // changed in this State, which causes it to rerun the build method below
      // so that the display can reflect the updated values. If we changed
      // _counter without calling setState(), then the build method would not be
      // called again, and so nothing would appear to happen.
      _counter++;
    });
  }

  @override
  Widget build(BuildContext context) {
    // This method is rerun every time setState is called, for instance as done
    // by the _incrementCounter method above.
    //
    // The Flutter framework has been optimized to make rerunning build methods
    // fast, so that you can just rebuild anything that needs updating rather
    // than having to individually change instances of widgets.
    return Scaffold(
      appBar: AppBar(
        // TRY THIS: Try changing the color here to a specific color (to
        // Colors.amber, perhaps?) and trigger a hot reload to see the AppBar
        // change color while the other colors stay the same.
        backgroundColor: Theme.of(context).colorScheme.inversePrimary,
        // Here we take the value from the MyHomePage object that was created by
        // the App.build method, and use it to set our appbar title.
        title: Text(widget.title),
      ),
      body: Center(
        // Center is a layout widget. It takes a single child and positions it
        // in the middle of the parent.
        child: Column(
          // Column is also a layout widget. It takes a list of children and
          // arranges them vertically. By default, it sizes itself to fit its
          // children horizontally, and tries to be as tall as its parent.
          //
          // Column has various properties to control how it sizes itself and
          // how it positions its children. Here we use mainAxisAlignment to
          // center the children vertically; the main axis here is the vertical
          // axis because Columns are vertical (the cross axis would be
          // horizontal).
          //
          // TRY THIS: Invoke "debug painting" (choose the "Toggle Debug Paint"
          // action in the IDE, or press "p" in the console), to see the
          // wireframe for each widget.
          mainAxisAlignment: MainAxisAlignment.center,
          children: <Widget>[
            const Text(
              'You have pushed the button this many times:',
            ),
            Text(
              '$_counter',
              style: Theme.of(context).textTheme.headlineMedium,
            ),
            FutureBuilder<List<dynamic>>(
              future: Future.wait([hello]),
              builder: (context, snap) {
                final data = snap.data;

                if (data == null) return const CircularProgressIndicator();

                // ignore: non_constant_identifier_names
                final Platform = data[0];

                return Text('$Platform');
              },
            )
          ],
        ),
      ),
      floatingActionButton: FloatingActionButton(
        onPressed: _incrementCounter,
        tooltip: 'Increment',
        child: const Icon(Icons.add),
      ), // This trailing comma makes auto-formatting nicer for build methods.
    );
  }
}
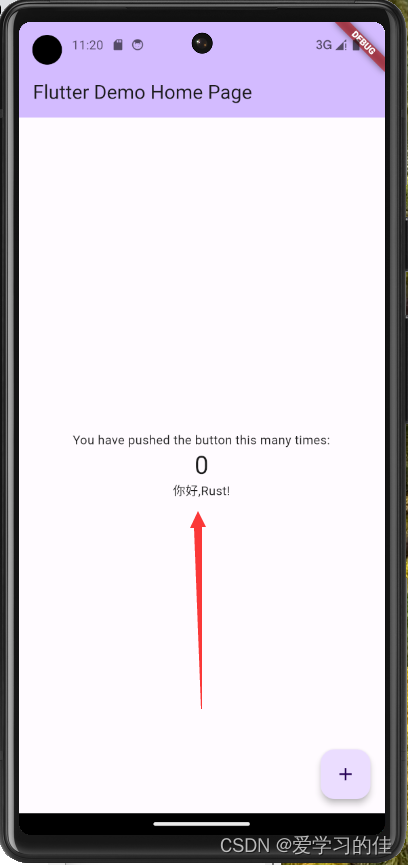
大功告成,现在重新运行项目:
flutter run
本文转载自: https://blog.csdn.net/love906897406/article/details/131395483
版权归原作者 爱学习的佳 所有, 如有侵权,请联系我们删除。
版权归原作者 爱学习的佳 所有, 如有侵权,请联系我们删除。