
在本教程中,我们将替换 StarGAN V2 模型中的自适应实例归一化(AdaIN)层,并在分辨率为 512x512 像素的图像上对其进行训练。
为什么是 StarGAN V2?
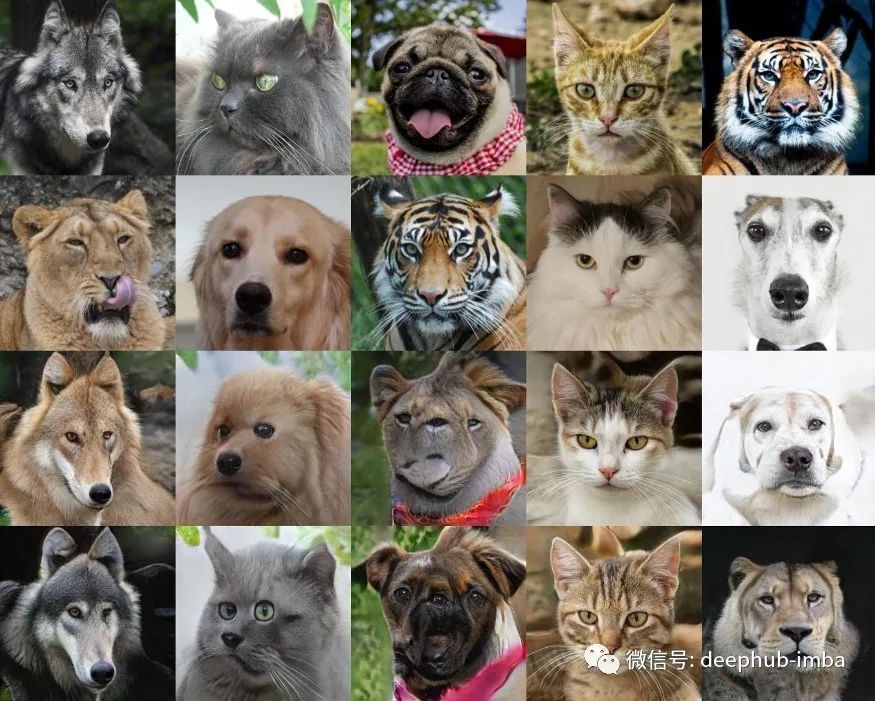
今天,有许多模型可以生成高质量的图像。具体来说,对于属性交换任务(2021 年),最好的质量是由 StyleGAN 的进一步发展的模型提供的,或者是通过对其进行提炼而获得的,这需要大量的计算时间来训练新的数据域。在单个 Google Colab GPU 上从头开始训练 24 小时后,所提出的模型会生成文章开头所示的图像。
StarGAN V2 架构
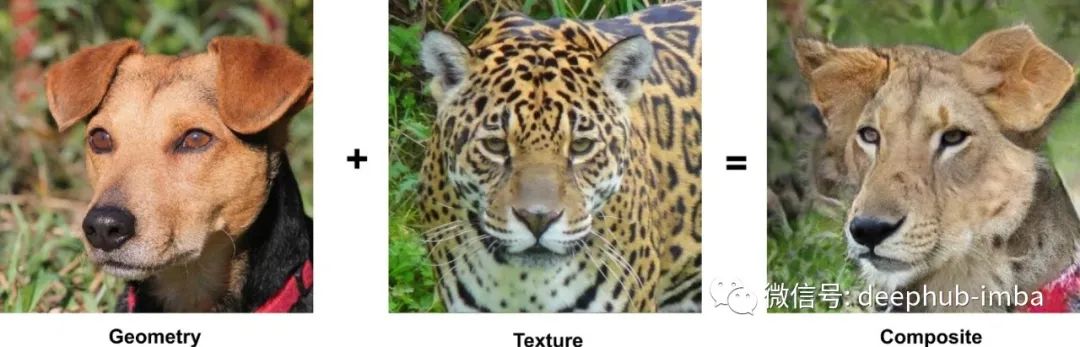
StarGAN V2[1] 是一个图像到图像模型,它使用由条件编码器管理的 AdaIN 层来传输图像风格。它分别使用有关对象结构及其纹理的信息,从而允许用户获得组合图像。
StarGAN 与图像生成相关的部分如下图所示。它们包括 ResNet-like[2] 编码器——用绿色标记,解码器带有 AdainResBlk 模块(将在下面描述)——紫色,以及一组具有共享头层的条件相关样式信息编码器(灰蓝色)——用绿松石标记。
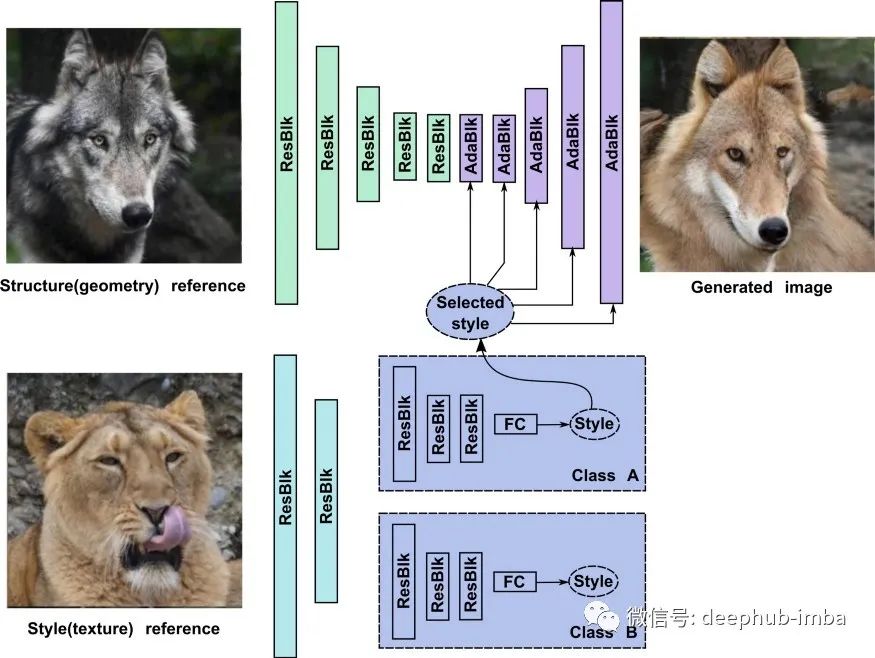
StarGAN 的工作原理如下。一开始,风格编码器从图像中提取低级特征。然后生成器编码对象的几何信息并将其提供给 AdainResBlk 模块的金字塔。
每个 AdainResBlk 块都包含 StyleGAN 的自适应实例归一化(AdaIN)模块 [3],它通过从样式编码器接收到的信息来调制抽象对象的几何表示。
让我们开始我们的项目,用来自 StyleGAN 2[4] 的调制卷积替换 AdaIN 归一化。
StarGAN 修改
首先,我们需要原始 StarGAN 的 repo:git clone https://github.com/clovaai/stargan-v2.git。
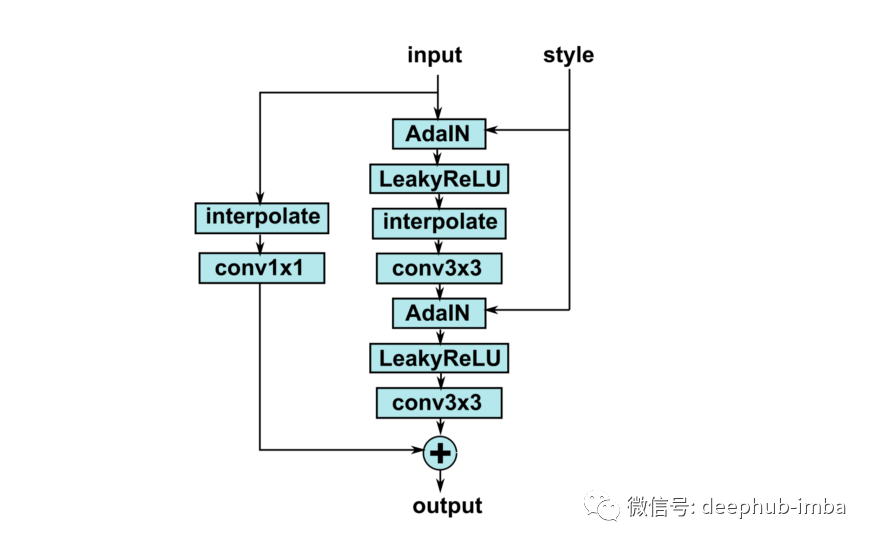
AdainResBlk 的源代码位于 core/model.py 文件中。代码如下所示。
 class AdainResBlk(nn.Module):
     def __init__(self, dim_in, dim_out, style_dim=64, w_hpf=0,
                  actv=nn.LeakyReLU(0.2), upsample=False):
         # ...

     def _build_weights(self, dim_in, dim_out, style_dim=64):
         self.conv1 = nn.Conv2d(dim_in, dim_out, 3, 1, 1)
         self.conv2 = nn.Conv2d(dim_out, dim_out, 3, 1, 1)
         self.norm1 = AdaIN(style_dim, dim_in)
         self.norm2 = AdaIN(style_dim, dim_out)
         if self.learned_sc:
             self.conv1x1 = nn.Conv2d(dim_in, dim_out, 1, 1, 0, bias=False)

     def _shortcut(self, x):
         if self.upsample:
             x = F.interpolate(x, scale_factor=2, mode='nearest')
         if self.learned_sc:
             x = self.conv1x1(x)
         return x

     def _residual(self, x, s):
         x = self.norm1(x, s)
         x = self.actv(x)
         if self.upsample:
             x = F.interpolate(x, scale_factor=2, mode='nearest')
         x = self.conv1(x)
         x = self.norm2(x, s)
         x = self.actv(x)
         x = self.conv2(x)
         return x

     def forward(self, x, s):
         out = self._residual(x, s)
         if self.w_hpf == 0:
             out = (out + self._shortcut(x)) / math.sqrt(2)
         return out
现在,我们用 lucidrains StyleGAN 2 模块 [5] 替换了 AdainResBlk。类似于 AdainResBlk 的功能在 GeneratorBlock 类(文件 stylegan2_pytorch.py)中实现。让我们将这个类及其依赖项——Conv2DMod、Blur 和 RGBBlock 复制到我们的仓库中。
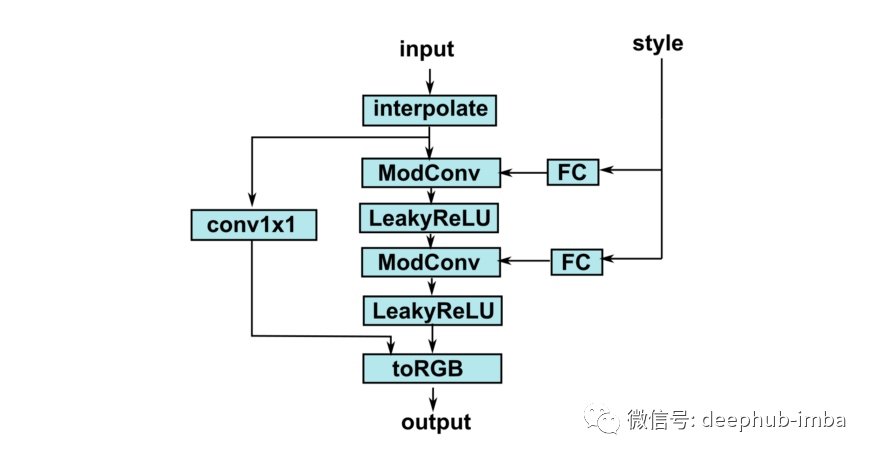
生成器块的最终版本如下所示。
 from modulated_convolution import Conv2DMod, RGBBlock

 class GenResBlk(nn.Module):
     def __init__(self, dim_in, dim_out, style_dim=64, fade_num_channels=4, fade_num_hidden=32,
                  actv=nn.LeakyReLU(0.2), upsample=False):
         super().__init__()
         self.actv = actv
         self.upsample = upsample
         self.needSkipConvolution = dim_in != dim_out
         self.conv1 = Conv2DMod(dim_in, dim_out, 3, stride=1, dilation=1)
         self.conv2 = Conv2DMod(dim_out, dim_out, 3, stride=1, dilation=1)
         self.style1 = nn.Linear(style_dim, dim_in)
         self.style2 = nn.Linear(style_dim, dim_out)
         if self.needSkipConvolution:
             self.conv1x1 = nn.Conv2d(dim_in, dim_out, 1, 1, 0, bias=False)
         self.toRGB = RGBBlock(style_dim, dim_out, upsample, 3)

     def forward(self, x, rgb, s):
         if self.upsample:
             x = F.interpolate(x, scale_factor=2, mode='bilinear', align_corners=False)
         if self.needSkipConvolution:
             x_ = self.conv1x1(x)
         else:
             x_ = x
         s1 = self.style1(s)
         x = self.conv1(x, s1)
         x = self.actv(x)
         s2 = self.style2(s)
         x = self.conv2(x, s2)
         x = self.actv(x + x_)
         rgb = self.toRGB(x, rgb, s)
         return x, rgb
为简单起见,我们不会改变 StyleGAN 使用两个流——特征流和 RGB 图像流的原始概念,因此有必要修改生成器的前向方法。
替换最近的几行:
 def forward(self, x, s, masks=None):
     x = self.from_rgb(x)
     cache = {}
     for block in self.encode:
         if (masks is not None) and (x.size(2) in [32, 64, 128]):
             cache[x.size(2)] = x
         x = block(x)
     for block in self.decode:
         x = block(x, s)
         if (masks is not None) and (x.size(2) in [32, 64, 128]):
             mask = masks[0] if x.size(2) in [32] else masks[1]
             mask = F.interpolate(mask, size=x.size(2), mode='bilinear')
             x = x + self.hpf(mask * cache[x.size(2)])
     return self.to_rgb(x)
使用下一个代码块:
 def forward(self, x, s, masks=None):
     x = self.from_rgb(x)
     cache = {}
     for block in self.encode:
         if (masks is not None) and (x.size(2) in [32, 64, 128]):
             cache[x.size(2)] = x
         x = block(x)
     rgb = None
     for block in self.decode:
         x, rgb = block(x, rgb, s)
         if (masks is not None) and (x.size(2) in [32, 64, 128]):
             mask = masks[0] if x.size(2) in [32] else masks[1]
             mask = F.interpolate(mask, size=x.size(2), mode='bilinear')
             x = x + self.hpf(mask * cache[x.size(2)])
     return rgb
为避免测试调用时出现 OOM,请在 debug_image 函数(文件 utils.py)中注释“潜在引导图像合成”和“参考引导图像合成”块。
对于 512x512 图像的训练模型,我们必须将批量大小减少到 1。为了稳定训练过程,我们将使用假图像缓冲区(来自 pytorch-CycleGAN-and-pix2pix repo),它允许我们使用以下方法更新鉴别器的权重 生成数据的历史记录,而不是最新的假输出。
使用 Colab 的注意事项
如果您将在 Colab 环境中训练模型,您可以修改 _save_checkpoint 和 _load_checkpoint 函数中的步骤参数(在任何情况下,记得Google Drive 创建备份)并在将当前模型复制到 Drive 的训练函数中添加下一行:
 # save model checkpoints
 if (i+1) % args.save_every == 0:
     self._save_checkpoint(step=i+1)
     print("Saving on GDrive...")
     import subprocess
     subprocess.run(f"cp --force -R ./expr/ /content/drive/MyDrive/stargan_animals_expr/", shell=True, check=True)
模型训练
将 AFHQ 放入 data/ 文件夹后,我们就可以开始训练了。
可以通过以下方式开始对大小为 256x256 的图像进行训练:
 python main.py --img_size 256 --resume_iter 100 --mode train --num_domains 3 --w_hpf 0 \
   --lambda_reg 1 --lambda_sty 1 --lambda_ds 2 --lambda_cyc 1 \
   --train_img_dir data/afhq/train --val_img_dir data/afhq/val \
   --batch_size 4 --sample_every 100 --save_every 500
要在 512x512px 分辨率上进行训练,请运行:
 python main.py --img_size 256 --resume_iter 100 --mode train --num_domains 3 --w_hpf 0 \
   --lambda_reg 1 --lambda_sty 1 --lambda_ds 2 --lambda_cyc 1 \
   --train_img_dir data/afhq/train --val_img_dir data/afhq/val \
   --batch_size 4 --sample_every 100 --save_every 500
本文的源代码:https://github.com/Hramchenko/modulated_stargan
引用
 Yunjey Choi, Youngjung Uh, Jaejun Yoo, Jung-Woo Ha, StarGAN v2: Diverse Image Synthesis for Multiple Domains.
 Kaiming He, Xiangyu Zhang, Shaoqing Ren, Jian Sun, Deep Residual Learning for Image Recognition
 Tero Karras, Samuli Laine, Timo Aila, A Style-Based Generator Architecture for Generative Adversarial Networks.
 Tero Karras, Samuli Laine, Miika Aittala, Janne Hellsten, Jaakko Lehtinen, Timo Aila, Analyzing and Improving the Image Quality of StyleGAN
 https://github.com/lucidrains/stylegan2-pytorch/
本文作者:Vitaliy Hramchenko