
文章目录
12.Windows窗体应用程序
WinForm
是
Windows Form
的简称,是基于
.NET Framework
平台的客户端(PC软件)开发技术,一般使用C#编程。Windows应用程序与Windows操作系统的界面类似,每个界面都是由窗体构成的,并且能通过鼠标单击、键盘输入等操作完成相应的功能。
12.1 创建Windows窗体应用程序
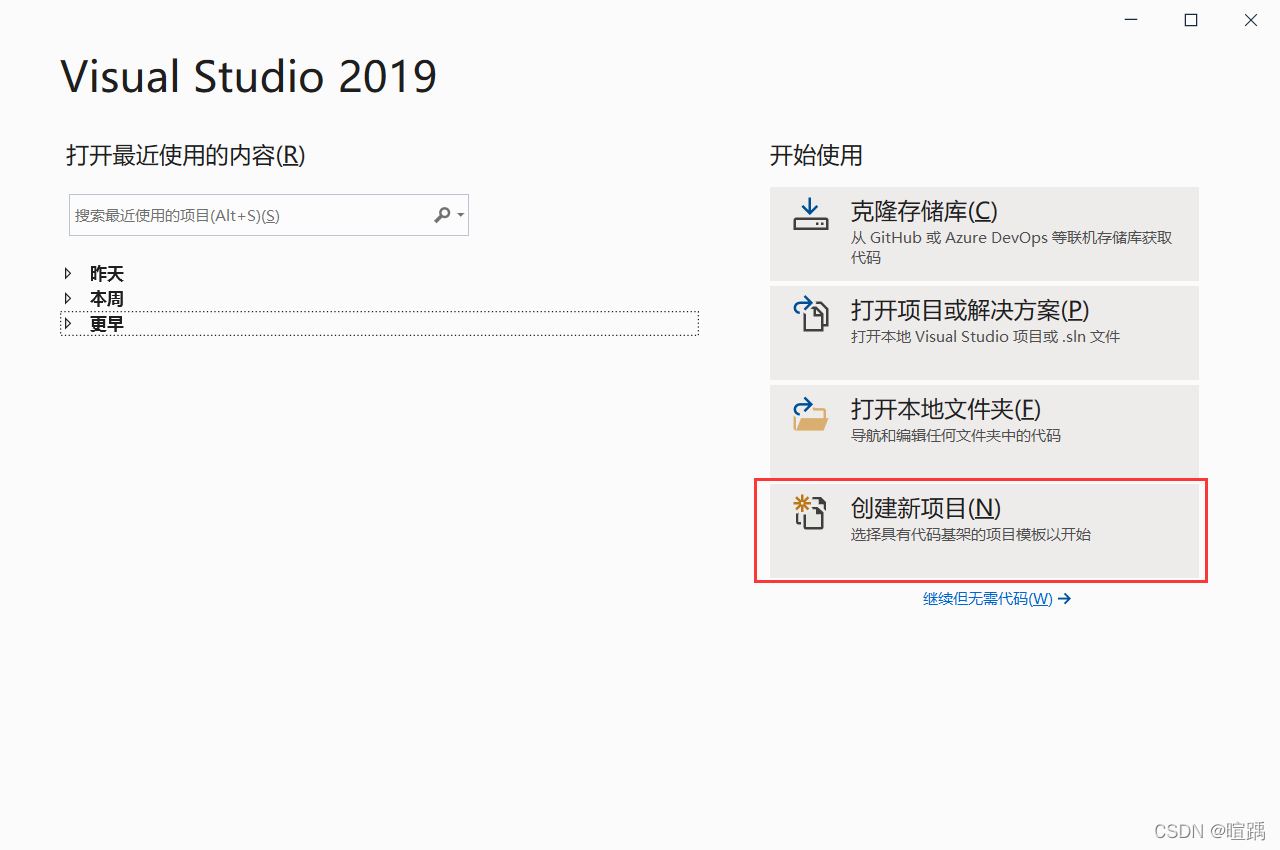
- 在Visual Studio 2019软件中,点击创建新项目。
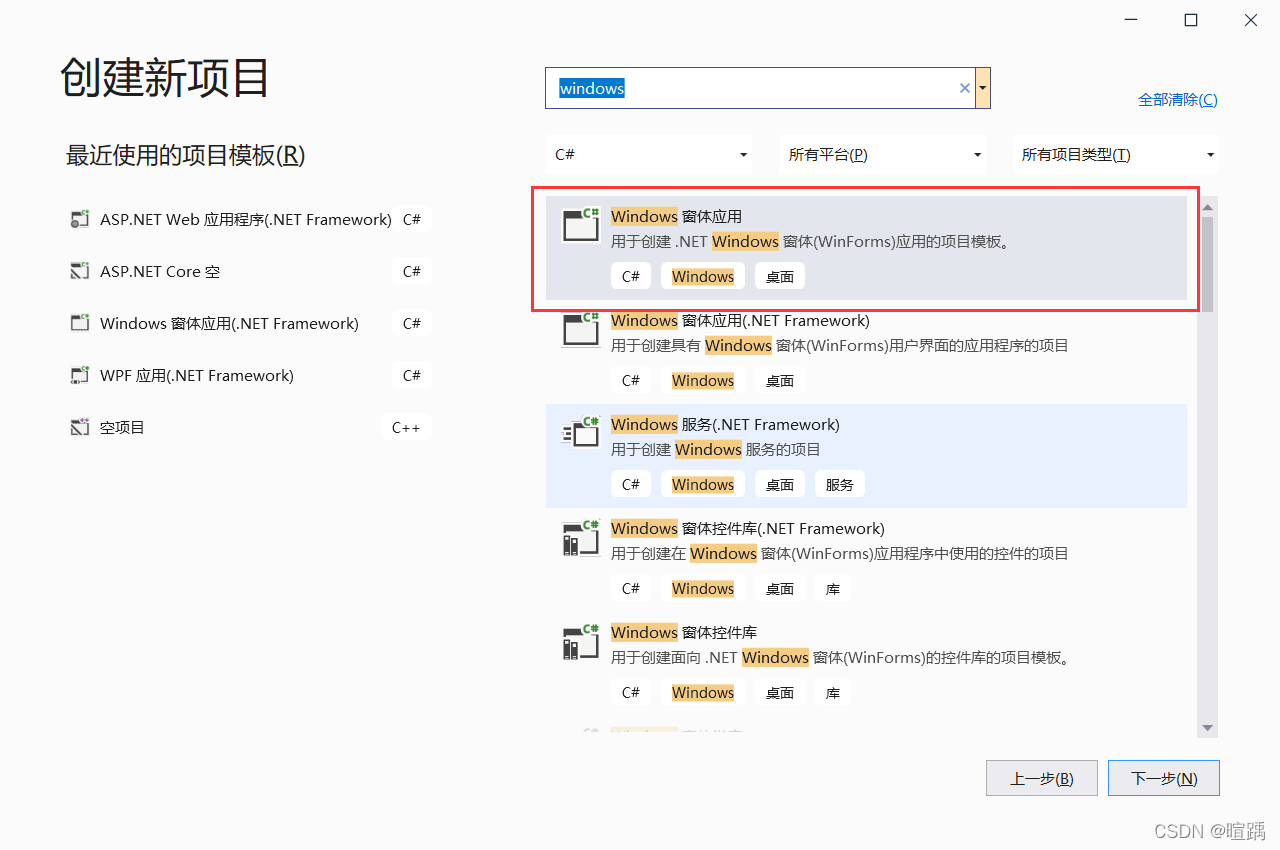
- 选择Windows窗体应用,点击下一步。
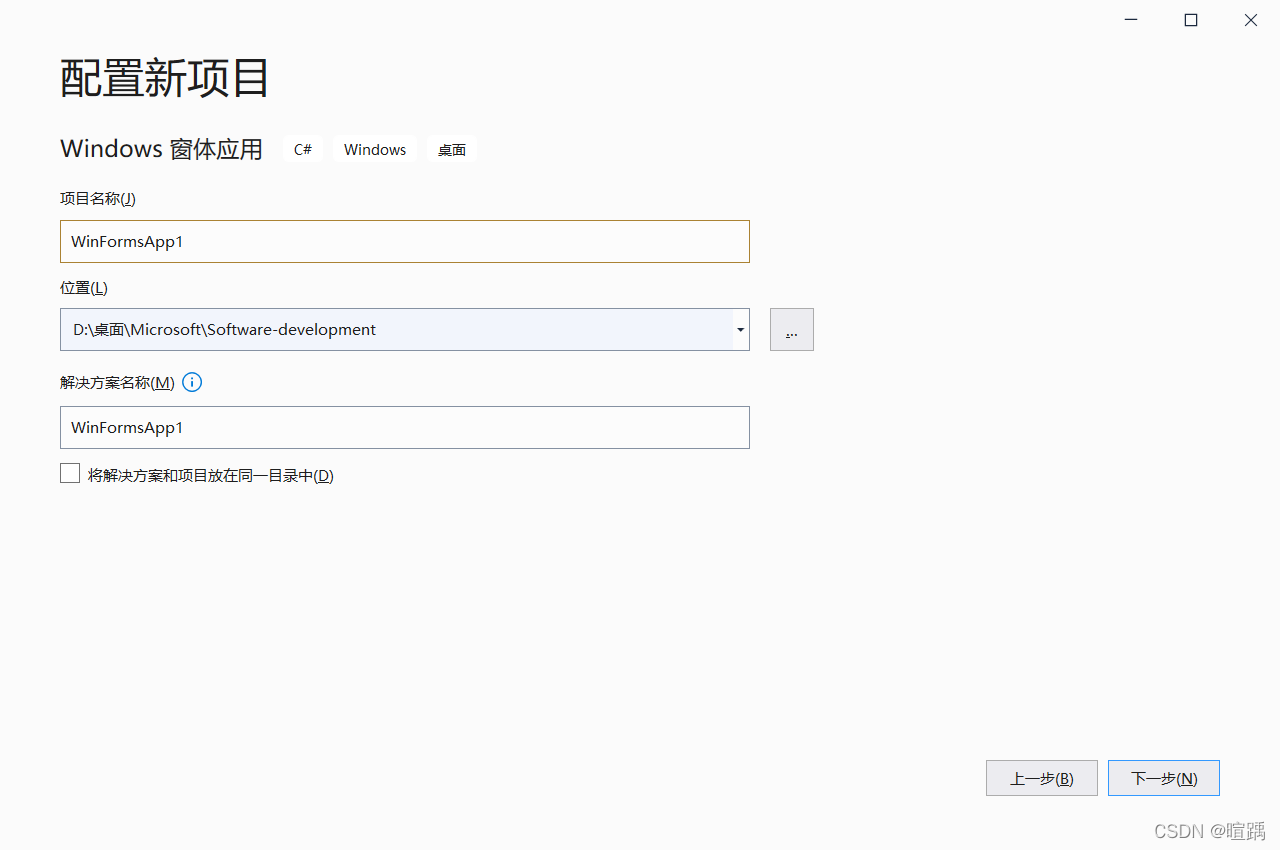
- 设置配置信息后点击下一步。
- 默认选择目标框架
.NET Core 3.1后可完成Windows窗体应用程序的创建。
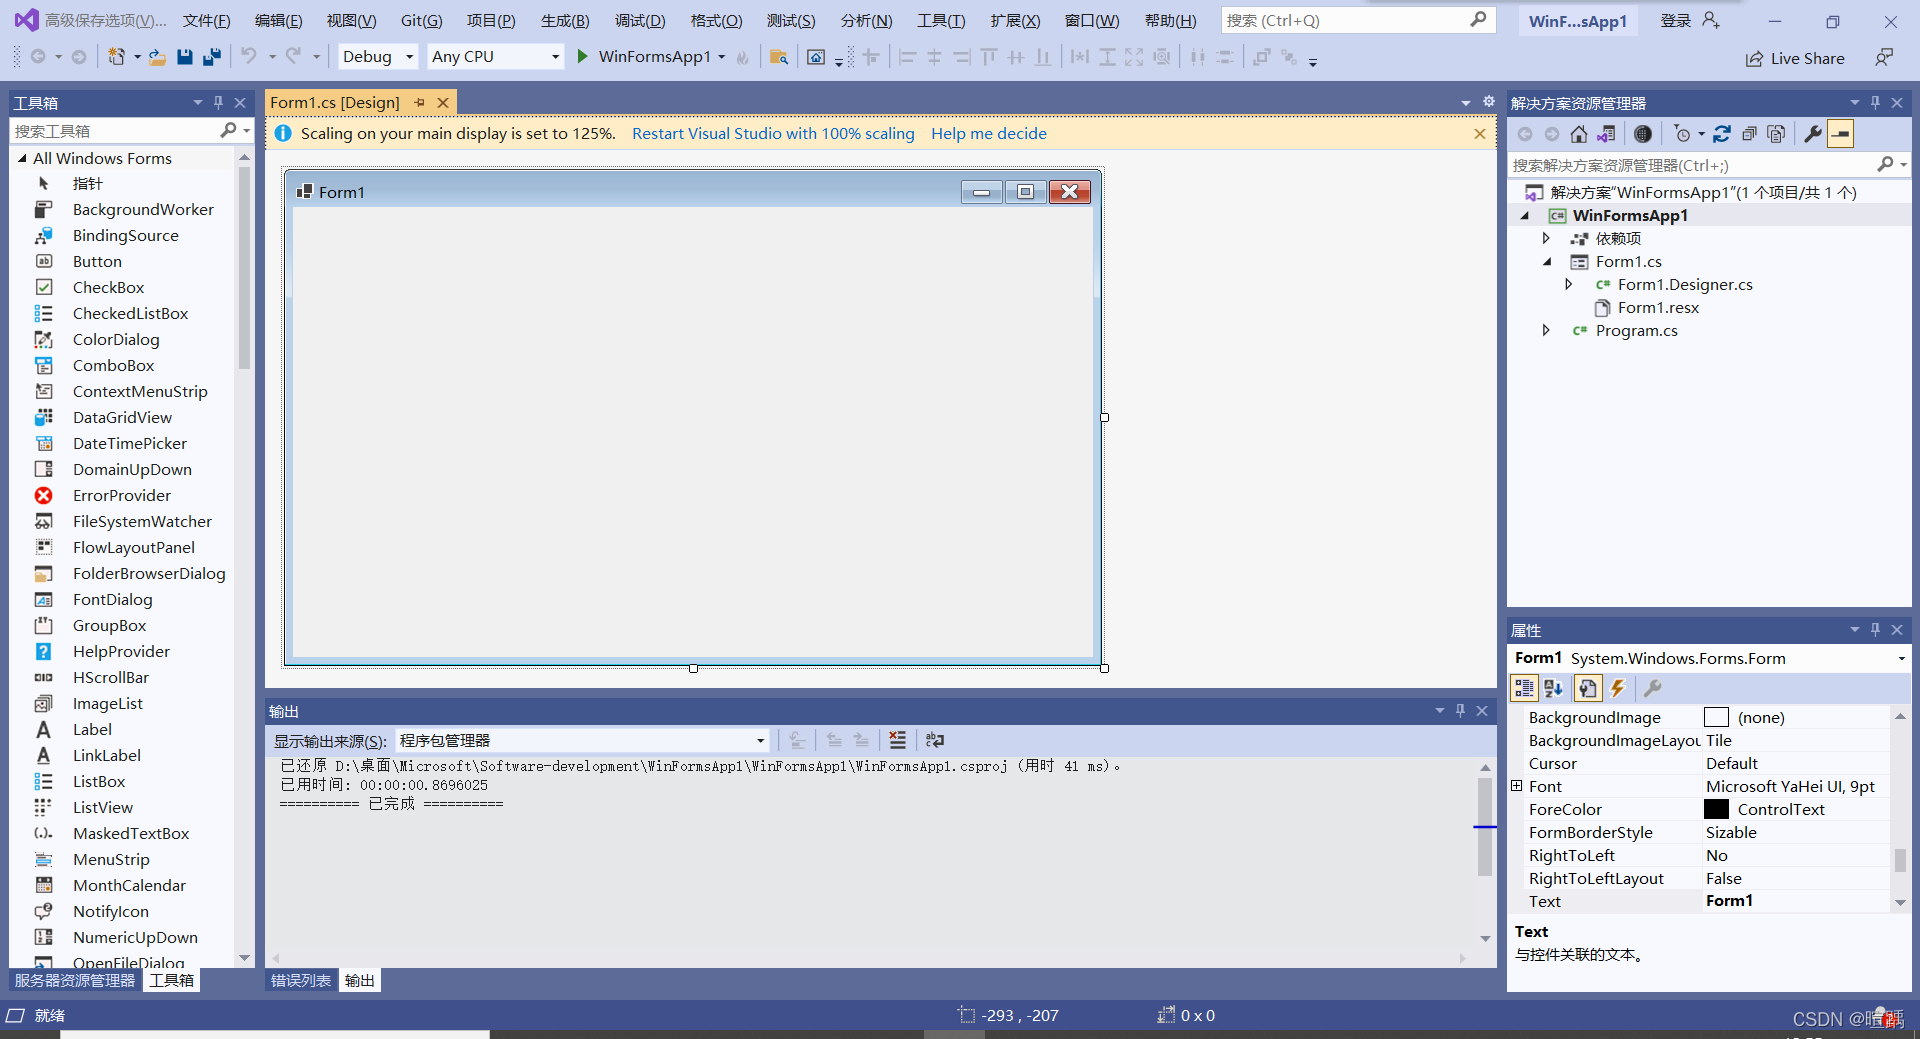
在每一个Windows窗体应用程序的项目文件夹中,都会有一个默认的窗体程序Form1.cs,并且在项目的Program.cs文件中指定要运行的窗体。
Program.cs 文件的代码如下。
using System;
using System.Collections.Generic;
using System.Linq;
using System.Threading.Tasks;
using System.Windows.Forms;

namespace WinFormsApp1
{
    static class Program
    {
        /// <summary>
        ///  The main entry point for the application.
        /// </summary>
        [STAThread]
        static void Main()
        {
            Application.SetHighDpiMode(HighDpiMode.SystemAware);
            // 用于启动应用程序中可视的样式,如果控件和操作系统支持,那么 控件的绘制就能根据显不风格来实现
            Application.EnableVisualStyles();
            // 控件支持UseCompatibleTextRenderingproperty属性,该方法将此属性设置为默认值
            Application.SetCompatibleTextRenderingDefault(false);
            // 用于设置在当前项目中要启动的窗体,new Form1()即为要启动的窗体
            Application.Run(new Form1());
        }
    }
}
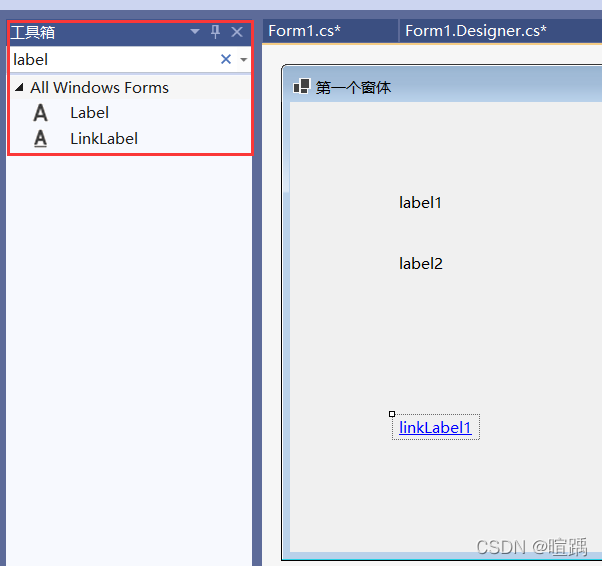
在Windows窗体应用程序中界面是由不同类型的控件构成的,系统中默认的控件全部存放到工具箱中,工具箱在视图选项卡下,如下图所示。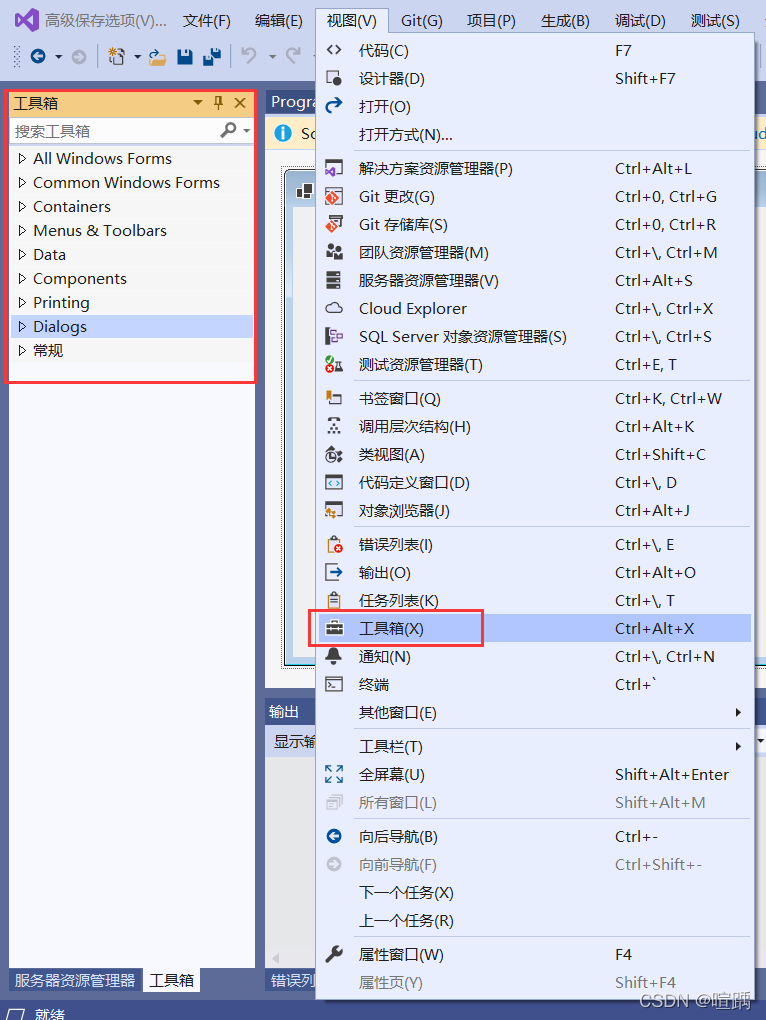
在工具箱中将控件划分为公共控件、容器、菜单和工具栏、数据、组件、打印、对话框等。
12.2 窗体属性
每一个Windows窗体应用程序都是由若干个窗体构成的,窗体中的属性主要用于设置窗体的外观。
在Windows窗体应用程序中右击窗体,在弹出的右键菜单中选择
属性
,弹出如下图所示的属性面板。
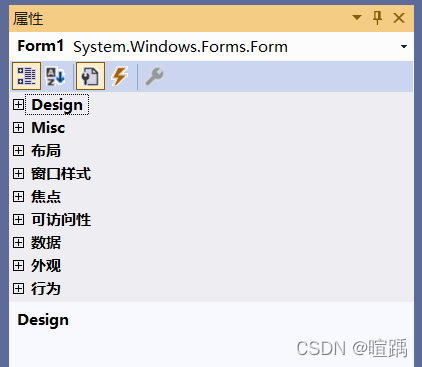
窗体的常用属性如下表所示。
属性作用
Design
:Name用来获取或设置窗体的名称
布局
:WindowState获取或设置窗体的初始可视状态,取值有3种,即Normal(正常)、Minimized(最小化)、Maximized(最大化),默认为Normal,即正常显示
布局
:StartPosition获取或设置窗体第一次出现时的位置,取值有5种,即Manual(窗体位置由Location属性决定)、CenterScreen(屏幕居中)、WindowsDefaultLocation( Windows默认位置)、WindowsDefaultBounds(Windows默认位置,边界由Windows决定)、CenterParent(在父窗体中居中),默认为WindowsDefaultLocation
窗口样式
:Icon获取或设置窗体上显示的图标
窗口样式
:MaximizeBox获取或设置窗体标题栏右上角是否有最大化按钮,默认为True
窗口样式
:MinimizeBox获取或设置窗体标题栏右上角是否有最小化按钮,默认为True
外观
:Text获取或设置窗口标题栏中的文字
外观
:BackColor获取或设置窗体的背景色
外观
:BackgroundImage获取或设置窗体的背景图像
外观
:BackgroundImageLayout获取或设置图像布局,取值有 5 种,即None(图片居左显示)、Tile(图像重复,默认值)、Stretch(拉伸)、Center(居中)、Zoom(按比例放大到合适大小)
外观
:Font获取或设置窗体上文字的字体
外观
:ForeColor获取或设置窗体上文字的颜色
行为
:Enabled获取或设置窗体是否可用
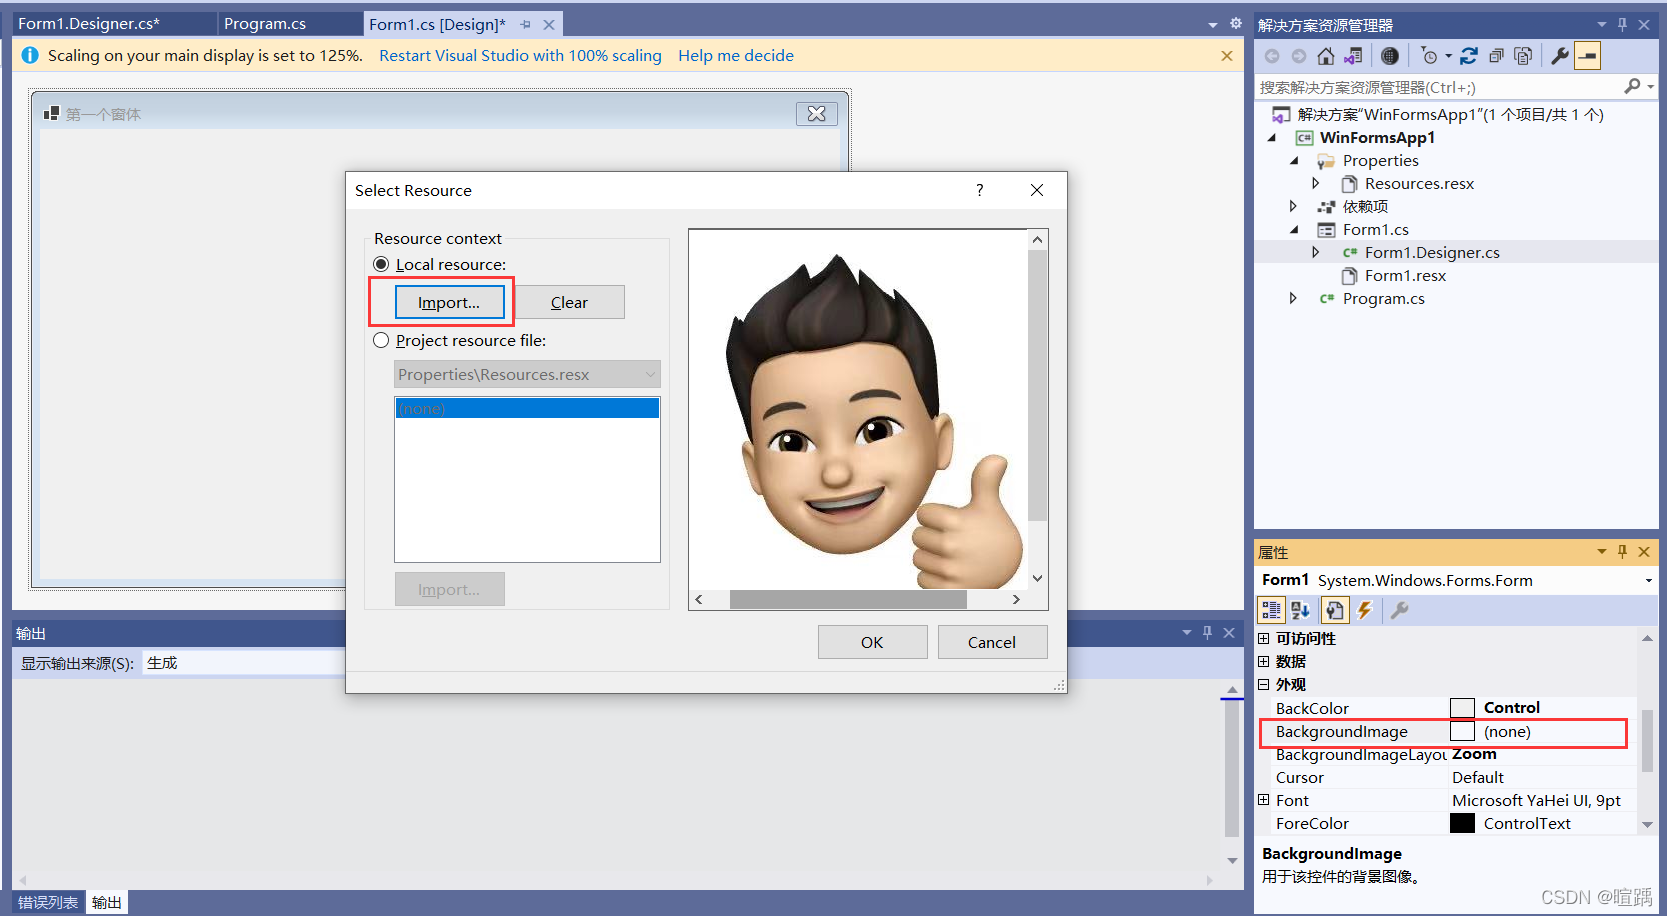
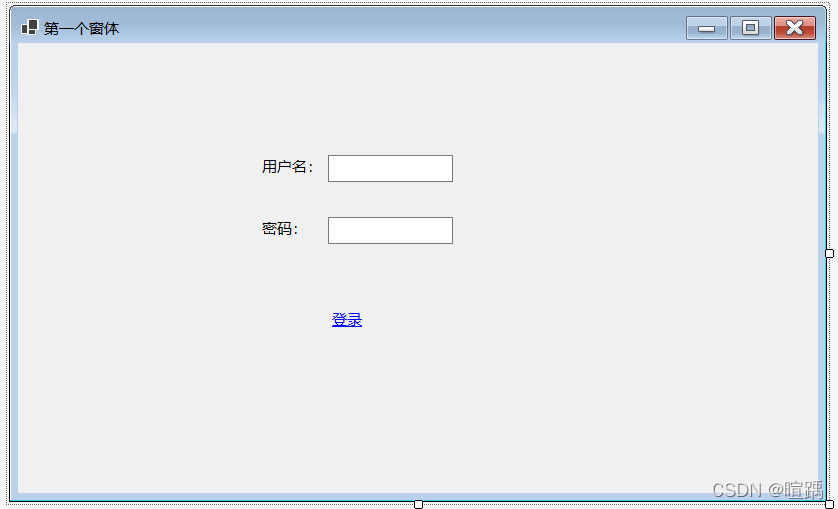
下面实现一个简单的Windows窗体应用程序,部分属性取值如下。
属性属性值NameForm1StartPositionCenterScreenText第一个窗体MaximizeBoxFalseMinimizeBoxFalseBackgroundimageexample.jpgBackgroundlmageLayoutStretch
在上述属性中除了背景图片 (Backgroundimage) 属性以外,其他属性直接添加上表中对应的属性值即可。设置背景图片属性 (Backgroimdlmage)的方法是单击Backgroundimage属性后的按钮,在弹出的对话框中单击“导入”按钮。
每一个Windows窗体应用程序在运行时仅能指定一个启动窗体,设置启动窗体的方式是在项目的Program.cs文件中指定。具体的代码如下。
using System;
using System.Collections.Generic;
using System.Linq;
using System.Threading.Tasks;
using System.Windows.Forms;

namespace WinFormsApp1
{
    static class Program
    {
        /// <summary>
        ///  The main entry point for the application.
        /// </summary>
        [STAThread]
        static void Main()
        {
            Application.SetHighDpiMode(HighDpiMode.SystemAware);
            Application.EnableVisualStyles();
            Application.SetCompatibleTextRenderingDefault(false);
            Application.Run(new Form1());
        }
    }
}
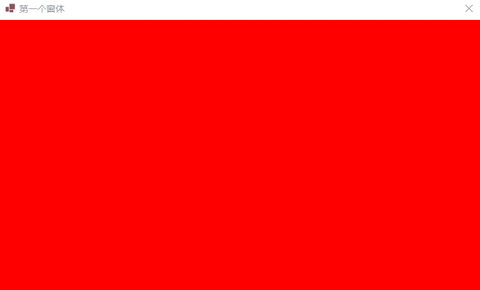
最后按
Ctrl+F5
键运行程序,效果如下图所示。

12.3 窗体事件
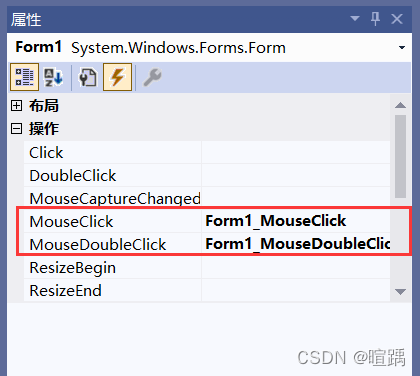
在窗体属性面板中单击闪电图标即可查看到窗体中的事件,如下图所示。
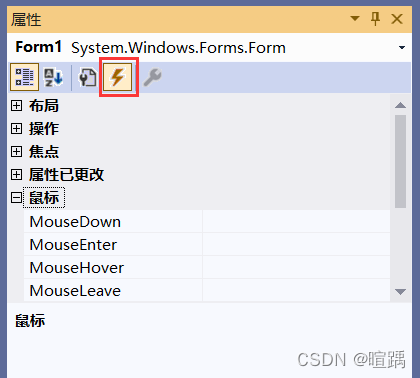
事件作用
行为
:Load窗体加载事件,在运行窗体时即可执行该事件
操作
:MouseClick鼠标单击事件
操作
:MouseDoubleClick鼠标双击事件
鼠标
:MouseMove鼠标移动事件
钥匙
:KeyDown键盘按下事件
钥匙
:KeyUp键盘释放事件
行为
:FormClosing窗体关闭事件,关闭窗体时发生
行为
:FormClosed窗体关闭事件,关闭窗体后发生
下面的例子通过事件操作改变窗体背景颜色。
- 在事件界面中选中需要创建的事件,并双击该事件右侧的单元格,系统会自动为其生成对应事件的处理方法。
- 设置好事件后会在窗体对应的代码文件中自动生成与事件对应的4个方法,代码如下。
using System;
using System.Collections.Generic;
using System.ComponentModel;
using System.Data;
using System.Drawing;
using System.Linq;
using System.Text;
using System.Threading.Tasks;
using System.Windows.Forms;
namespace WinFormsApp1
{
    public partial class Form1 : Form
    {
        public Form1()
        {
            InitializeComponent();
        }

        private void Form1_MouseClick(object sender, MouseEventArgs e)
        {

        }

        private void Form1_MouseDoubleClick(object sender, MouseEventArgs e)
        {

        }

        private void Form1_Load(object sender, EventArgs e)
        {

        }
    }
}
- 添加事件处理代码,除了可以在属性面板中设置外,使用代码设置的方式是使用this关键字代表当前窗体的实例。、
using System;
using System.Collections.Generic;
using System.ComponentModel;
using System.Data;
using System.Drawing;
using System.Linq;
using System.Text;
using System.Threading.Tasks;
using System.Windows.Forms;

namespace WinFormsApp1
{
    public partial class Form1 : Form
    {
        public Form1()
        {
            InitializeComponent();
        }

        private void Form1_MouseClick(object sender, MouseEventArgs e)
        {
            //设置窗体背景颜色为黑色
            this.BackColor = Color.Black;
        }

        private void Form1_MouseDoubleClick(object sender, MouseEventArgs e)
        {
            //设置窗体背景颜色为蓝色
            this.BackColor = Color.Blue;
        }

        private void Form1_Load(object sender, EventArgs e)
        {
            //设置窗体颜色为红色
            this.BackColor = Color.Red;
        }
    }
}
- 设置启动窗体,在
Program.cs类中将Form1窗体设置为启动窗体。
using System;
using System.Collections.Generic;
using System.Linq;
using System.Threading.Tasks;
using System.Windows.Forms;

namespace WinFormsApp1
{
    static class Program
    {
        /// <summary>
        ///  The main entry point for the application.
        /// </summary>
        [STAThread]
        static void Main()
        {
            Application.SetHighDpiMode(HighDpiMode.SystemAware);
            Application.EnableVisualStyles();
            Application.SetCompatibleTextRenderingDefault(false);
            // 设置启动窗体
            Application.Run(new Form1());
        }
    }
}
12.4 窗体方法
自定义的窗体都继承自
System.Windows.Form
类,能使用Form类中已有的成员,包括属性、方法、事件等。
方法作用void Show()显示窗体void Hide()隐藏窗体DialogResult ShowDialog()以对话框模式显示窗体void CenterToParent()使窗体在父窗体边界内居中void CenterToScreen()使窗体在当前屏幕上居中void Activate()激活窗体并给予它焦点void Close()关闭窗体
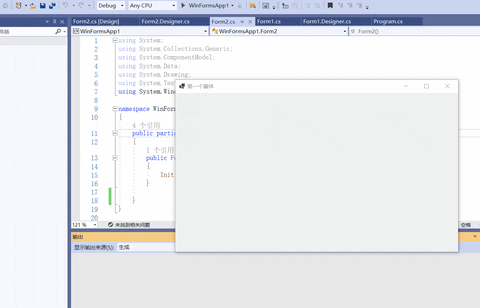
下面的例子实现在一个窗体中打开另外一个窗体。
- 在项目中创建两个窗体。
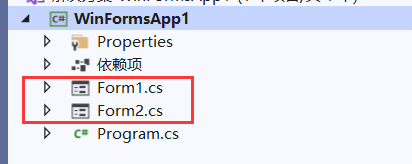
- 设置Form1窗体的事件。
using System;
using System.Collections.Generic;
using System.ComponentModel;
using System.Data;
using System.Drawing;
using System.Linq;
using System.Text;
using System.Threading.Tasks;
using System.Windows.Forms;

namespace WinFormsApp1
{
    public partial class Form1 : Form
    {
        public Form1()
        {
            InitializeComponent();
        }

        private void Form1_MouseClick(object sender, MouseEventArgs e)
        {
            //创建Form2窗体实例
            Form2 form2 = new Form2();
            //打开form2窗体
            form2.Show();
        }
    }
}
- 设置Form2窗体的事件。
using System;
using System.Collections.Generic;
using System.ComponentModel;
using System.Data;
using System.Drawing;
using System.Text;
using System.Windows.Forms;

namespace WinFormsApp1
{
    public partial class Form2 : Form
    {
        public Form2()
        {
            InitializeComponent();
        }

        private void Form2_MouseClick(object sender, MouseEventArgs e)
        {
            //将窗体居中
            this.CenterToScreen();
        }

        private void Form2_MouseDoubleClick(object sender, MouseEventArgs e)
        {
            //关闭窗体
            this.Close();
        }
    }
}
- 将Form1窗体设置为启动窗体。
using System;
using System.Collections.Generic;
using System.Linq;
using System.Threading.Tasks;
using System.Windows.Forms;

namespace WinFormsApp1
{
    static class Program
    {
        /// <summary>
        ///  The main entry point for the application.
        /// </summary>
        [STAThread]
        static void Main()
        {
            Application.SetHighDpiMode(HighDpiMode.SystemAware);
            Application.EnableVisualStyles();
            Application.SetCompatibleTextRenderingDefault(false);
            //设置启动窗体
            Application.Run(new Form1());
        }
    }
}
在使用窗体中的方法时需要注意,如果是当前窗体需要调用方法直接使用
this
关键字代表当前窗体,通过
this.方法名(参数列表)
的方式调用即可。如果要操作其他窗体,则需要用窗体的实例来调用方法。
12.5 McssageBox:消息框
在Windows窗体应用程序中向用户提示操作时采用消息框弹出的形式。消息框是通过
McssageBox
类来实现的,定义了 Show 的多个重载方法,该方法的作用就是弹出一个消息框。由于Show方法是一个静态的方法,因此调用该方法只需要使用
MessageBox.Show(参数)
的形式即可弹出消息框。
方法说明DialogResult Show(string text)指定消息框中显示的文本(text)DialogResult Show(string text, string caption)指定消息框中显示的文本(text)以及消息框的标题(caption)DialogResult Show(string text, string caption, MessageBoxButtons buttons)指定消息框中显示的文本(text)、消息框的 标题(caption)以及消息框中显示的按钮 (buttons)DialogResult Show(string text, string caption, MessageBoxButtons buttons, MessageBoxIcon icon)指定消息框中显示的文本(text)、消息框的 标题(caption )、消息框中显示的按钮 (buttons)以及消息框中显示的图标(icon)
在上面所列出方法的参数中涉及两个枚举类型MessageBoxButtons和MessageBoxIcon。
MessageBoxButtons枚举类型主要用于设置消息框中显示的按钮,具体的枚举值如下:
- OK:在消息框中显示“确定”按钮。
- OKCancel:在消息框中显示“确定”和“取消”按钮。
- AbortRetryIgnore:在消息框中显示“中止” “重试”和“忽略”按钮。
- YesNoCancel:在消息框中显示“是” “否”和“取消”按钮。
- YesNo:在消息框中显示“是”和“否”按钮。
- RetryCancel:在消息框中显示“重试”和“取消”按钮。
MessageBoxIcon枚举类型主要用于设置消息框中显示的图标,具体的枚举值如下。
- None:在消息框中不显示任何图标。
- Hand、Stop、Error:在消息框中显示由一个红色背景的圆圈及其中的白色X组成 的图标。
- Question:在消息框中显示由圆圈和其中的一个问号组成的图标。
- Exclamation、Warning:在消息框中显示由一个黄色背景的三角形及其中的一个感叹号组成的图标。
- Asterisk、Information:在消息框中显示由一个圆圈及其中的小写字母
i组成的图标。
调用 MessageBox 类中的Show方法将返回一个DialogResult类型的值。DialogResult也是一个枚举类型,是消息框的返回值,通过单击消息框中不同的按钮得到不同的消息框返回值。具体值如下。
- None:消息框没有返回值,表明有消息框继续运行。
- OK:消息框的返回值是0K(通常从标签为“确定”的按钮发送)。
- Cancel:消息框的返回值是Cancel(通常从标签为“取消”的按钮发送)。
- Abort:消息框的返回值是Abort(通常从标签为“中止”的按钮发送)。
- Retry:消息框的返回值是Retry(通常从标签为“重试”的按钮发送)。
- Ignore:消息框的返回值是Ignore(通常从标签为“忽略“的按钮发送)。
- Yes:消息框的返回值是Yes(通常从标签为“是“的按钮发送)。
- No:消息框的返回值是No(通常从标签为“否“的按钮发送)。
下面的例子实现通过消息框提示打开新窗体。
- 在项目中创建两个窗体。
- 设置Form1窗体的事件。
using System;
using System.Collections.Generic;
using System.ComponentModel;
using System.Data;
using System.Drawing;
using System.Linq;
using System.Text;
using System.Threading.Tasks;
using System.Windows.Forms;

namespace WinFormsApp1
{
    public partial class Form1 : Form
    {
        public Form1()
        {
            InitializeComponent();
        }

        private void Form1_MouseClick(object sender, MouseEventArgs e)
        {
            //弹出消息框,并获取消息框的返回值
            DialogResult dr = MessageBox.Show("是否打开新窗体?", "提示", MessageBoxButtons.YesNo, MessageBoxIcon.Warning);
            //如果消息框返回值是Yes,显示新窗体
            if (dr == DialogResult.Yes)
            {
                Form2 form2 = new Form2();
                form2.Show();
            }
            //如果消息框返回值是No,关闭当前窗体
            else if (dr == DialogResult.No)
            {
                //关闭当前窗体
                this.Close();
            }
        }
    }
}
- 设置项目的启动窗体Form1。
12.6 控件
在Windows窗体应用程序中每个窗体都是由若干个控件构成的。控件就是指能输入文本的位置、能选择的位置、能单击的位置、图片显示的位置等。其中:
- 能输入文本的位置对应于Windows窗体应用程序中的文本框、多行文本框等。
- 能选择的位置对应于Windows窗体应用程序中的复选框、单选按钮、下拉列表框。
- 能单击的位置对应于Windows窗体应用程序中的按钮、超链接标签、菜单栏、工具栏等。
- 图片显示的位置对应于Windows窗体应用程序中的图片控件。
12.7 Label和LinkLabel:标签控件
通常使用标签控件来显示文本,标签控件王要分为普通的标签(Label)和超链接形式的标签(LinkLabel) 。
属性名作用Name标签对象的名称,区别不同标签唯一标志Text标签对象上显示的文本Font标签中显示文本的样式ForeColor标签中显示文本的颜色BackColor标签的背景颜色Image标签中显示的图片AutoSize标签的大小是否根据内容自动调整,True为自动调整,False为用户自定义大小Size指定标签控件的大小Visible标签是否可见,True 为可见,False 为不可见
普通标签控件(Label)中的事件与窗体的事件类似,常用的事件主要有鼠标单击事件、 鼠标双击事件、标签上文本改变的事件等。
超链接标签控件(LinkLabel)也具有相同的属性和事件,主要应用的事件是鼠标单击事件。
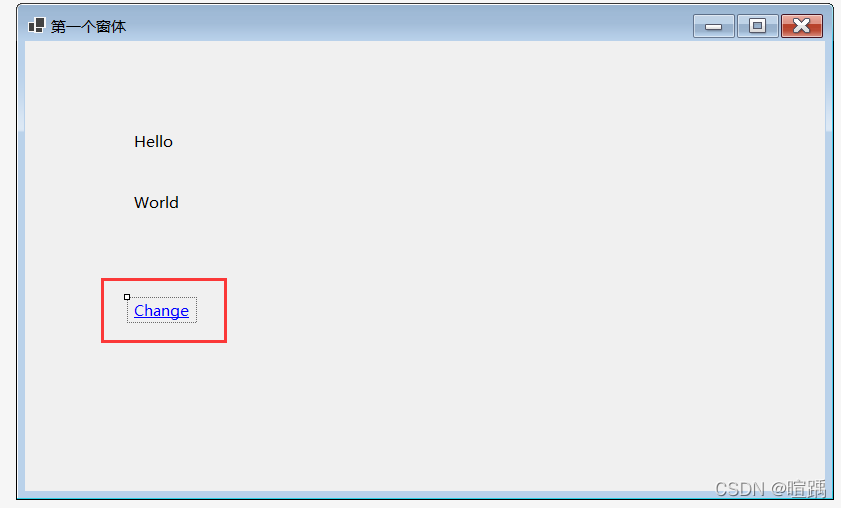
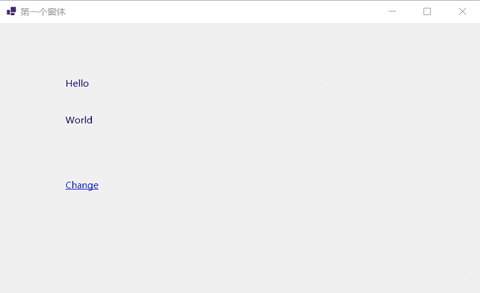
下面的例子实现通过超链接单击事件交换两个普通标签的文本信息。
- 在工具箱中设置控件并修改文本信息。
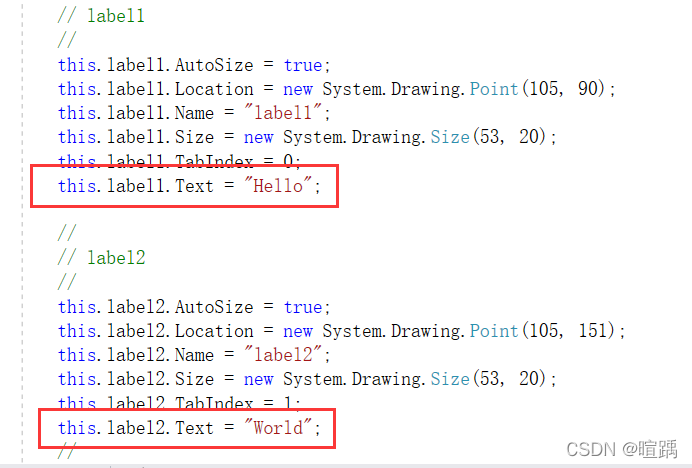
- 双击超链接文本创建点击事件。
using System;
using System.Collections.Generic;
using System.ComponentModel;
using System.Data;
using System.Drawing;
using System.Linq;
using System.Text;
using System.Threading.Tasks;
using System.Windows.Forms;

namespace WinFormsApp1
{
    public partial class Form1 : Form
    {
        public Form1()
        {
            InitializeComponent();
        }
        // 超链接点击事件
        private void linkLabel1_LinkClicked(object sender, LinkLabelLinkClickedEventArgs e)
        {
            //交换标签上的信息。
            string temp = label1.Text;
            label1.Text = label2.Text;
            label2.Text = temp;
        }
    }
}
12.8 TextBox:文本框控件
文本框(TextBox)是在窗体中输入信息时最常用的控件,通过设置文本框属性可以实现多行文本框、密码框等。
属性名作用Text文本框对象中显示的文本MaxLength在文本框中最多输入的文本的字符个数WordWrap文本框中的文本是否自动换行,如果是True,则自动换行,如果是False,则不能自动换行PasswordChar将文本框中出现的字符使用指定的字符替换,通常会使用
*
字符Multiline指定文本框是否为多行文本框,如果为True,则为多行文本框,如果为False,则为单行文本框ReadOnly指定文本框中的文本是否可以更改,如果为True,则不能更改,即只读文本框,如果为False,则允许更改文本框中的文本Lines指定文本框中文本的行数ScrollBars指定文本框中是否有滚动条,如果为True,则有滚动条,如果为False, 则没有滚动条
文本框控件最常使用的事件是文本改变事件(TextChange),即在文本框控件中的内容改变时触发该事件。
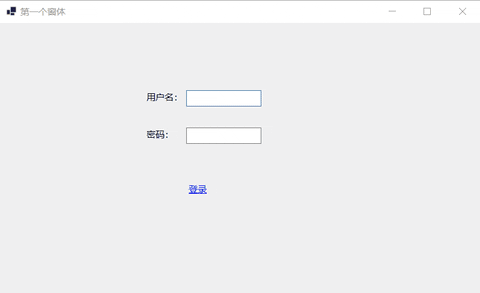
下面的例子实现简单的登录窗体。
- 设置控件信息。
            // textBox1
            //
            this.textBox1.Location = new System.Drawing.Point(310, 112);
            this.textBox1.Name = "textBox1";
            this.textBox1.Size = new System.Drawing.Size(125, 27);
            this.textBox1.TabIndex = 0;
            //
            // textBox2
            //
            this.textBox2.Location = new System.Drawing.Point(310, 174);
            this.textBox2.Name = "textBox2";
            // 密码框,将用户输入的密码用*替代
            this.textBox2.PasswordChar = '*';
            this.textBox2.Size = new System.Drawing.Size(125, 27);
            this.textBox2.TabIndex = 1;
            //
            // label1
            //
            this.label1.AutoSize = true;
            this.label1.Location = new System.Drawing.Point(240, 113);
            this.label1.Name = "label1";
            this.label1.Size = new System.Drawing.Size(69, 20);
            this.label1.TabIndex = 2;
            this.label1.Text = "用户名:";
            //
            // label2
            //
            this.label2.AutoSize = true;
            this.label2.Location = new System.Drawing.Point(240, 175);
            this.label2.Name = "label2";
            this.label2.Size = new System.Drawing.Size(54, 20);
            this.label2.TabIndex = 3;
            this.label2.Text = "密码:";
            //
            // linkLabel1
            //
            this.linkLabel1.AutoSize = true;
            this.linkLabel1.Location = new System.Drawing.Point(310, 266);
            this.linkLabel1.Name = "linkLabel1";
            this.linkLabel1.Size = new System.Drawing.Size(39, 20);
            this.linkLabel1.TabIndex = 4;
            this.linkLabel1.TabStop = true;
            this.linkLabel1.Text = "登录";
            this.linkLabel1.LinkClicked += new System.Windows.Forms.LinkLabelLinkClickedEventHandler(this.linkLabel1_LinkClicked);
- 设置超链接点击事件。
using System;
using System.Collections.Generic;
using System.ComponentModel;
using System.Data;
using System.Drawing;
using System.Linq;
using System.Text;
using System.Threading.Tasks;
using System.Windows.Forms;

namespace WinFormsApp1
{
    public partial class Form1 : Form
    {
        public Form1()
        {
            InitializeComponent();
        }

        private void linkLabel1_LinkClicked(object sender, LinkLabelLinkClickedEventArgs e)
        {
            //获取用户名
            string username = textBox1.Text;
            //获取密码
            string password = textBox2.Text;
            //判断用户名密码是否正确
            if ("Kint".Equals(username) && "1111".Equals(password))
            {
                MessageBox.Show("登录成功!");
            }
            else
            {
                MessageBox.Show("登录失败!");
            }
        }
    }
}
12.9 Button:按钮控件
按钮主要用于提交页面的内容,或者是确认某种操作等。常用的属性包括在按钮中显示的文字 (Text) 以及按钮外观设置的属性,最常用的事件是单击事件。
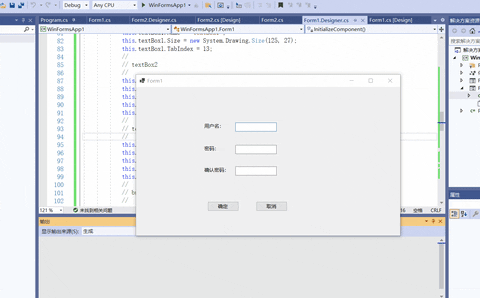
下面的例子实现一个简单的用户注册功能,并将提交的注册信息显示在新窗体的文本框中。
- 设置Form1控件和Form2控件


- 在注册时判断用户名和密码不能为空,并且要求两次输入的密码一致,设置Form1中的按钮代码如下。
using System;
using System.Collections.Generic;
using System.ComponentModel;
using System.Data;
using System.Drawing;
using System.Linq;
using System.Text;
using System.Threading.Tasks;
using System.Windows.Forms;

namespace WinFormsApp1
{
    public partial class Form1 : Form
    {
        public Form1()
        {
            InitializeComponent();
        }
        //“确定”按钮的单击事件,用于判断注册信息并跳转到新窗口显示注册信息
        private void button1_Click(object sender, EventArgs e)
        {
            string name = textBox1.Text;
            string pwd = textBox2.Text;
            string repwd = textBox3.Text;
            if (string.IsNullOrEmpty(name))
            {
                MessageBox.Show("用户名不能为空!");
                return;
            }
            else if (string.IsNullOrEmpty(textBox2.Text))
            {
                MessageBox.Show("密码不能为空!");
                return;
            }
            else if (!textBox2.Text.Equals(textBox3.Text))
            {
                MessageBox.Show("两次输入的密码不一致!");
                return;
            }
            //将用户名和密码传递到Form2中
            Form2 form2 = new Form2(name, pwd);
            form2.Show();
        }
        //“取消”按钮的事件,用于关闭窗体
        private void button2_Click(object sender, EventArgs e)
        {
            //关闭窗体
            this.Close();
        }
    }
}
- 设置Form2中的代码。
using System;
using System.Collections.Generic;
using System.ComponentModel;
using System.Data;
using System.Drawing;
using System.Text;
using System.Windows.Forms;

namespace WinFormsApp1
{
    public partial class Form2 : Form
    {
        public Form2(string name, string pwd)
        {
            InitializeComponent();
            label2.Text = "用户名:" + name;
            label3.Text = "密  码:" + pwd;
        }
    }
}
12.10 RadioButton:单选按钮控件
RadioButton是单选按钮控件,多个RadioButton控件可以为一组,这一组内的RadioButton控件只能有一个被选中。
下面通过一个例子使用单选按钮控件。
- 设置控件。
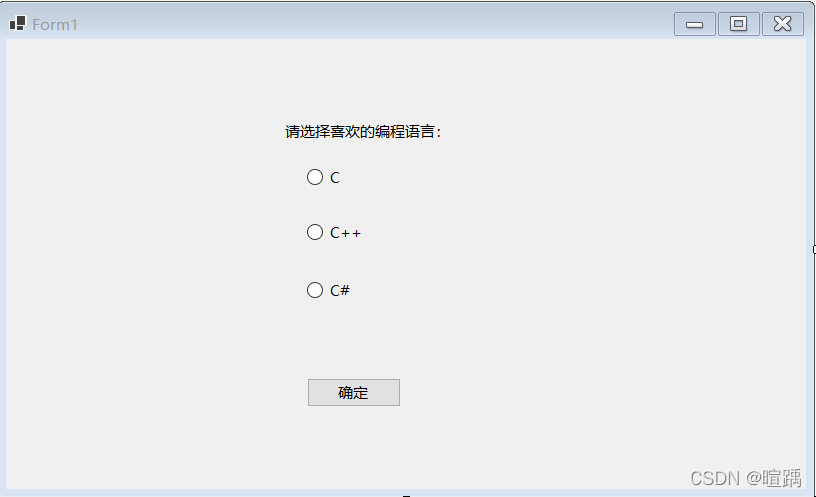
- 设置确认按钮点击事件。
using System;
using System.Collections.Generic;
using System.ComponentModel;
using System.Data;
using System.Drawing;
using System.Linq;
using System.Text;
using System.Threading.Tasks;
using System.Windows.Forms;

namespace WinFormsApp1
{
    public partial class Form1 : Form
    {
        public Form1()
        {
            InitializeComponent();
        }
        // 单击“确定”按钮的事件
        private void button1_Click(object sender, EventArgs e)
        {
            string msg = "";
            if (radioButton1.Checked)
            {
                msg = radioButton1.Text;
            }
            else if (radioButton2.Checked)
            {
                msg = radioButton2.Text;
            }
            else if (radioButton3.Checked)
            {
                msg = radioButton3.Text;
            }
            MessageBox.Show("您喜欢的编程语言是:" + msg, "提示");
        }
    }
}
Checked
属性可用于判断单选按钮是否被选中。如果该属性的返回值为True,则代表选中;如果返回值为False,则表示未选中。

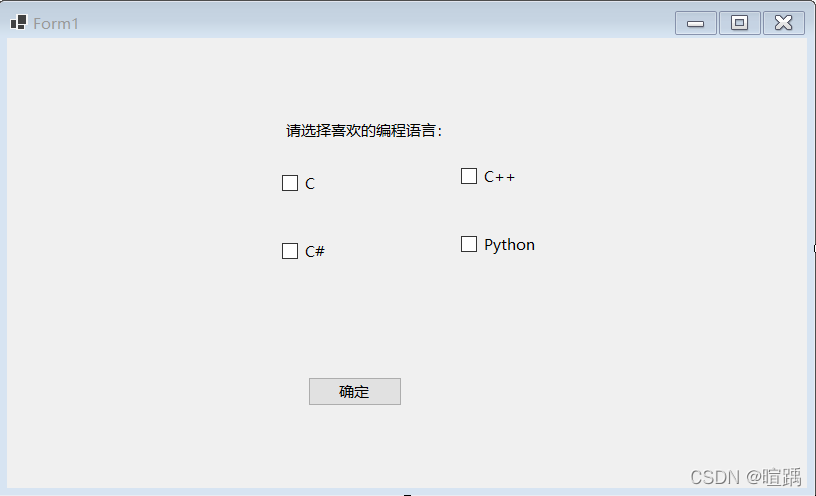
12.11 CheckBox:复选框控件
复选框主要的属性有:
- Name:表示这个组件的名称;
- Text:表示这个组件的标题;
- Checked:表示这个组件是否已经选中。
主要的事件就是
CheckedChanged
事件。
下面通过一个例子使用复选框控件。
- 设置控件。
- 设置点击事件。
using System;
using System.Collections.Generic;
using System.ComponentModel;
using System.Data;
using System.Drawing;
using System.Linq;
using System.Text;
using System.Threading.Tasks;
using System.Windows.Forms;
namespace WinFormsApp1
{
public partial class Form1 : Form
{
public Form1()
{
InitializeComponent();
}
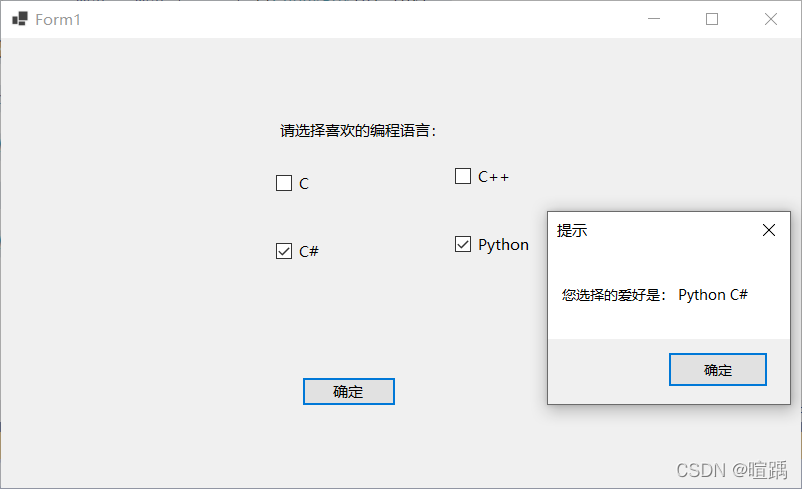
private void button1_Click(object sender, EventArgs e)
{
string msg = "";
// 界面上的每一个控件都继承自Control类
foreach (Control c in Controls)
{
//判断控件是否为复选框控件
if (c is CheckBox)
{
if (((CheckBox)c).Checked)
{
msg = msg + " " + ((CheckBox)c).Text;
}
}
}
if (msg != "")
{
MessageBox.Show("您选择的爱好是:" + msg, "提示");
}
else
{
MessageBox.Show("您没有选择爱好", "提示");
}
}
}
}
12.12 CheckedListBox:复选列表框控件
复选列表框显示的效果与复选框类似,但在选择多个选项时操作比一般的复选框更方便。
下面通过一个例子使用复选列表框控件。
- 设置控件。

            // checkedListBox1
            //
            this.checkedListBox1.FormattingEnabled = true;
            // 设置可选项
            this.checkedListBox1.Items.AddRange(new object[] {
            "苹果",
            "香蕉",
            "梨"});
            this.checkedListBox1.Location = new System.Drawing.Point(275, 135);
            this.checkedListBox1.Name = "checkedListBox1";
            this.checkedListBox1.Size = new System.Drawing.Size(165, 136);
            this.checkedListBox1.TabIndex = 18;
            //
- 设置按钮点击事件。
using System;
using System.Collections.Generic;
using System.ComponentModel;
using System.Data;
using System.Drawing;
using System.Linq;
using System.Text;
using System.Threading.Tasks;
using System.Windows.Forms;
namespace WinFormsApp1
{
    public partial class Form1 : Form
    {
        public Form1()
        {
            InitializeComponent();
        }
        private void button1_Click(object sender, EventArgs e)
        {
            string msg = "";
            for (int i = 0; i < checkedListBox1.CheckedItems.Count; i++)
            {
                msg = msg + " " + checkedListBox1.CheckedItems[i].ToString();
            }
            if (msg != "")
            {
                MessageBox.Show("您购买的水果有:" + msg, "提示");
            }
            else
            {
                MessageBox.Show("您没有选购水果!", "提示");
            }
        }
    }
}
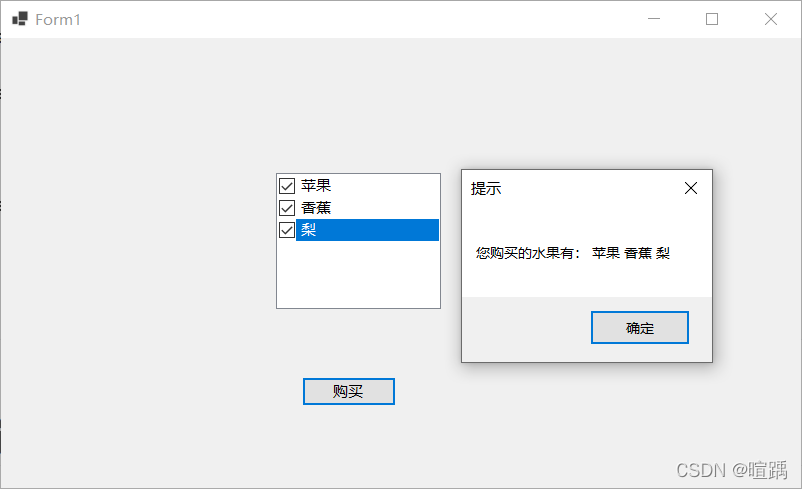
在使用复选列表框控件时需要注意获取列表中的项使用的是
Checkedltems
属性,获取当前选中的文本(上图中蓝色的区域)使用的是
Selectedltem
属性。
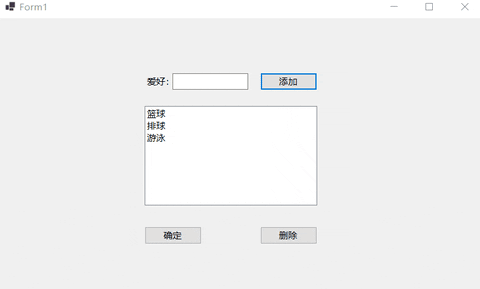
12.13 ListBox:列表框控件
列表框 (ListBox) 将所提供的内容以列表的形式显示出来,可以选择其中的一项或多项内容。
属性名作用MultiColumn获取或设置列表框是否支持多列,如果设置为 True,则表示支持多列; 如果设置为 False,则表示不支持多列,默认为 FalseItems获取或设置列表框控件中的值SelectedItems获取列表框中所有选中项的集合SelectedItem获取列表框中当前选中的项SelectedIndex获取列表框中当前选中项的索引,索引从 0 开始SelectionMode获取或设置列表框中选择的模式,当值为 One 时,代表只能选中一项, 当值为 MultiSimple 时,代表能选择多项,当值为 None 时,代表不能选 择,当值为 MultiExtended 时,代表能选择多项,但要在按下 Shift 键后 再选择列表框中的项
列表框还提供了一些方法来操作列表框中的选项,由于列表框中的选项是一个集合形式的,列表项的操作都是用Items属性进行的。
Items.Add方法用于向列表框中添加项;Items.Insert方法用于向列表框中的指定位置添加项;Items.Remove方法用于移除列表框中的项。
下面通过一个例子使用列表框控件。
- 设置控件。
            // listBox1
            //
            this.listBox1.FormattingEnabled = true;
            this.listBox1.ItemHeight = 20;
            this.listBox1.Location = new System.Drawing.Point(241, 145);
            this.listBox1.Name = "listBox1";
            this.listBox1.Size = new System.Drawing.Size(285, 164);
            this.listBox1.TabIndex = 18;
            this.listBox1.Items.AddRange(new object[] {"篮球","排球","游泳" });
            //
- 设置相应事件。
using System;
using System.Collections.Generic;
using System.ComponentModel;
using System.Data;
using System.Drawing;
using System.Linq;
using System.Text;
using System.Threading.Tasks;
using System.Windows.Forms;

namespace WinFormsApp1
{
    public partial class Form1 : Form
    {
        public Form1()
        {
            InitializeComponent();
        }
        // 将文本框中的值添加到列表框中
        private void button1_Click(object sender, EventArgs e)
        {
            // 当文本框中的值不为空时将其添加到列表框中
            if (textBox1.Text != "")
            {
                listBox1.Items.Add(textBox1.Text);
            }
            else
            {
                MessageBox.Show("请添加爱好!");
            }
        }
        // 将列表框中的选中项删除
        private void button3_Click(object sender, EventArgs e)
        {
            // 由于列表框控件中允许多选所以需要循环删除所有已选项
            int count = listBox1.SelectedItems.Count;
            List<string> itemValues = new List<string>();
            if (count != 0)
            {
                for (int i = 0; i < count; i++)
                {
                    itemValues.Add(listBox1.SelectedItems[i].ToString());
                }
                foreach (string item in itemValues)
                {
                    listBox1.Items.Remove(item);
                }
            }
            else
            {
                MessageBox.Show("请选择需要删除的爱好!");
            }
        }
    }
}
版权归原作者 暄踽 所有, 如有侵权,请联系我们删除。