
地址分配表

场景
网络管理员要求您准备RTA 和SW1用于部署。在连接到网络之前,必须启用 安全措施。
说明
步骤 1:在路由器上 配置基本安全策略
打开命令提示符
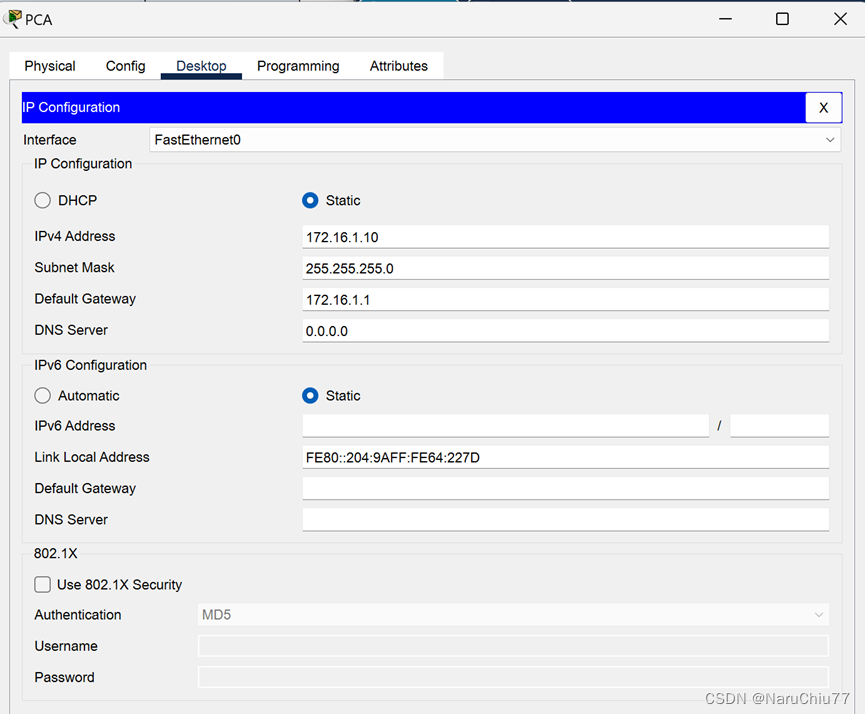
a.根据地址分配表在PCA上配置 IP 编址。
关闭命令提示符
打开配置窗口
b.从 PCA 上的终端,通过 控制台连接到RTA。
c. 将主机名配置为 RTA。
d.在 RTA 上 配置 IP 编址,并启用接口。
e. 加密所有的明文密码。
RTA(config)# service password-encryption
f.将最低密码长度 设置为 10 个字符。
R1(config)# security passwords min-length 10
g. 设置您选择的强加密密码。注意:选择您能够记住的 密码,否则如果您被锁定在设备之外,您 就需要重置活动。
h. 禁用 DNS 解析。
RTA(config)# no ip domain-lookup
i.将域名 设置为 CCNA.com(在 PT 中,评分是区分大小写的)。
RTA(config)# ip domain-name CCNA.com
j.使用强加密密码 创建您选择的用户。
RTA(config)# username any_user secret any_password
k. 生成 1024 位 RSA 密钥。
注意:在 Packet Tracer 中,输入 crypto key generate rsa 命令,然后按 回车键继续。
RTA(config)# crypto key generate rsa
The name for the keys will be: RTA.CCNA.com
Choose the size of the key modulus in the range of 360 to 2048 for your
General Purpose Keys. Choosing a key modulus greater than 512 may take
a few minutes.
How many bits in the modulus [512]: 1024
l. 两分钟内四次登录失败的用户,登录 受限三分钟。
RTA(config)# login block-for 180 attempts 4 within 120
m. 配置所有 VTY 线路使用 SSH 访问并通过本地用户配置文件进行 认证。
RTA(config)# line vty 0 4
RTA(config-line)# transport input ssh
RTA(config-line)# login local
n. 将 VTY 线路上的EXEC模式超时值设置为 6 分钟。
RTA(config-line)# exec-timeout 6
o. 把配置保存到NVRAM。
关闭配置窗口
先点击RTA,再点击CLI,输入代码,代码如下:

RTA>enable

RTA#conf t

Enter configuration commands, one per line. End with CNTL/Z.

RTA(config)#service password-encryption

RTA(config)#security passwords min-length 10

RTA(config)#ip domain-name CCNA.com

RTA(config)#no ip domain-lookup

RTA(config)#hostname RTA

RTA(config)#interface GigabitEthernet0/0/0

%Invalid interface type and number

RTA(config)#ip address 172.16.1.1 255.255.255.0

^

% Invalid input detected at '^' marker.

RTA(config)#no shutdown

^

% Invalid input detected at '^' marker.

RTA(config)#enable secret any_password

RTA(config)#username any_user secret any_password

RTA(config)#crypto key generate rsa

% You already have RSA keys defined named RTA.netsec.com .

% Do you really want to replace them? [yes/no]: yes

The name for the keys will be: RTA.netsec.com

Choose the size of the key modulus in the range of 360 to 4096 for your

General Purpose Keys. Choosing a key modulus greater than 512 may take

a few minutes.

How many bits in the modulus [512]: 1024

% Generating 1024 bit RSA keys, keys will be non-exportable...[OK]

RTA(config)#login block-for 180 attempts 4 within 120

*Mar 1 13:18:17.119: %SSH-5-ENABLED: SSH 1.99 has been enabled

RTA(config)#line vty 0 4

RTA(config-line)#transport input ssh

RTA(config-line)#login local

RTA(config-line)#exec-timeout 6

RTA(config-line)#end

RTA#

%SYS-5-CONFIG_I: Configured from console by console

RTA#copy running-config startup-config

Destination filename [startup-config]?

Building configuration...

[OK]

RTA#
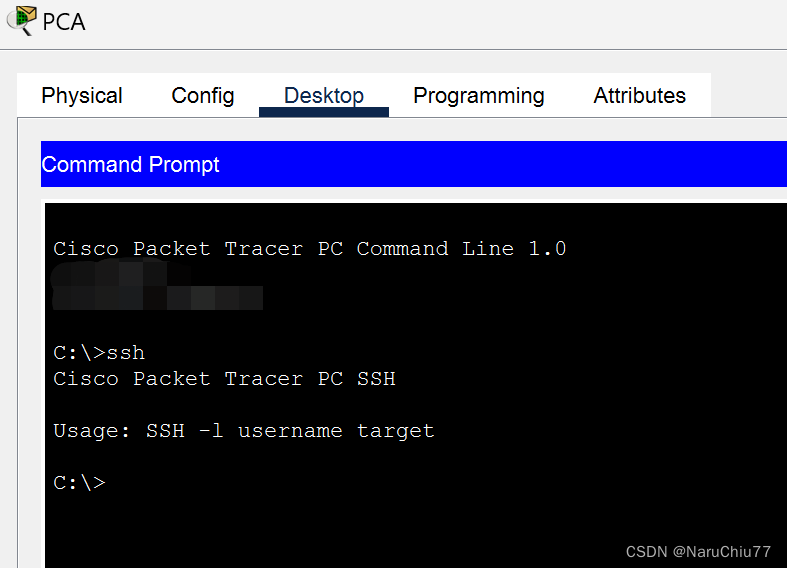
p. 访问 PCA 桌面上的命令提示符,以建立到 RTA 的 SSH 连接。
打开命令提示符:
C:> ssh /?
Packet Tracer PC SSH
Usage: SSH -l username target
C:\ >
关闭命令提示符
先点击PCA,再点击Desktop,最后点击Command Prompt,输入以下的代码:
C:\>ssh
Cisco Packet Tracer PC SSH

Usage: SSH -l username target
截图如下:
步骤2:在 交换机
上配置基本安全策略
使用相应的安全 策略配置交换机 SW1。如果您需要额外 帮助,请参阅路由器上的配置步骤。
a. 点击SW1然后选择 CLI 选项卡。
打开配置窗口
b. 将主机名配置为 SW1。
c.在SW1的 VLAN1 上 配置 IP 编址,并启用接口。
d. 配置默认网关地址。
e. 禁用所有未使用的端口。
注意:在交换机上, 禁用未使用的端口是一种很好的安全做法。这样做的一种方法就是使用 “shutdown” 命令关闭每个端口 。这将需要单独访问每个端口 。有一种快捷方法是通过使用interface range 命令同时修改多个 端口。在 SW1 上,除了FastEthernet0/1 和 GigabitEthernet0/1 之外, 所有 端口都可以通过以 下命令关闭:
SW1(config)# interface range F0/2-24, G0/2
SW1(config-if-range)# shutdown
%LINK-5-CHANGED: Interface FastEthernet0/2, changed state to administratively down
%LINK-5-CHANGED: Interface FastEthernet0/3, changed state to administratively down
%LINK-5-CHANGED: Interface FastEthernet0/24, changed state to administratively down
%LINK-5-CHANGED: Interface GigabitEthernet0/2, changed state to administratively down
该命令作用于端口范围为 2-24 的 快速以太网端口,和一个单独的端口范围,即端口GigabitEthernet0/2。
f. 加密所有的明文密码。
g. 设置您选择的强加密密码。
h. 禁用 DNS 解析。
i.将域名 设置为 CCNA.com(在 PT 评分中区分大小写)。
j.使用强加密密码 创建您选择的用户。
k. 生成 1024 位 RSA 密钥。
l. 配置所有 VTY 线路使用 SSH 访问并通过本地用户配置文件进行 认证。
m. 将所有 VTY 线路上的EXEC模式超时值设置为 6 分钟。
n.把 配置保存到NVRAM。
最后点击SW1,点击CLI,输入代码如下:
SW1>enable
SW1#conf t
Enter configuration commands, one per line. End with CNTL/Z.
SW1(config)#interface range F0/2-24, G0/2
SW1(config-if-range)#shutdown
SW1(config-if-range)# shutdown
SW1(config-if-range)#exit
SW1(config)#exit
SW1#
%SYS-5-CONFIG_I: Configured from console by console

SW1#conf t
Enter configuration commands, one per line. End with CNTL/Z.
SW1(config)#hostname SW1
SW1(config)#service password-encryption
SW1(config)#enable secret my_password
SW1(config)#no ip domain-lookup
SW1(config)#ip domain-name CCNA.com
SW1(config)#username my_user secret my_password
SW1(config)#interface range fastethernet0/2 /24, gigabitethernet 0/2
^
% Invalid input detected at '^' marker.
SW1(config)#
SW1(config)#interface range fastethernet0/2-24, gigabitethernet 0/2
SW1(config-if-range)#shutdown
SW1(config-if-range)#interface Vlan1
SW1(config-if)#ip address 172.16.1.2 255.255.255.0
SW1(config-if)#no shutdown
SW1(config-if)#ip default-gateway 172.16.1.1
SW1(config)#line vty 0 15
SW1(config-line)#exec-timeout 6
SW1(config-line)#login local
SW1(config-line)#transport input ssh
SW1(config-line)#end
SW1#
%SYS-5-CONFIG_I: Configured from console by console

SW1#copy running-config startup-config
Destination filename [startup-config]?
Building configuration...
[OK]
版权归原作者 NaruChiu77 所有, 如有侵权,请联系我们删除。