
文章目录
前言
大家好,又见面了,我是沐风晓月,本文是专栏【运维系列-架构与服务】专栏中的[linux基本功-系统服务实战篇],主要讲解nginx的编译安装和yum安装的方式
此专栏是沐风晓月对Linux常见的服务和架构进行总结,希望能够加深自己的印象,以及帮助到其他的小伙伴😉😉。
如果文章有什么需要改进的地方还请大佬不吝赐教👏👏。
🏠个人主页:我是沐风晓月
🧑个人简介:大家好,我是沐风晓月,双一流院校计算机专业,阿里云社区专家博主😉😉
💕 座右铭: 先努力成长自己,再帮助更多的人 ,一起加油进步🍺🍺🍺
💕欢迎大家:这里是CSDN,我总结知识的地方,喜欢的话请三连,有问题请私信😘
一. 实验环境
本次的实验环境见下表:
操作系统服务器IPhostnamecentos7.6192.168.1.41mufengrow41
如何查看相应的参数:
- 查看操作系统:
[root@mufenggrow ~]# cat /etc/redhat-release
CentOS Linux release 7.6.1810(Core)
- 查看ip
[root@mufenggrow41 ~]# ifconfig |grep inet |awk 'NR==1{print $2}'192.168.1.56
二. 使用yum安装nginx
2.1 添加yum源
nginx不在的默认的yum源中, 可以使用epel或者官网提供的yum源来安装。
以下两种方法,选择任意一种即可,也就是2.1.1和2.1.2两个小节的内容,任选其一:
2.1.1 使用官网提供的源地址(方法一)
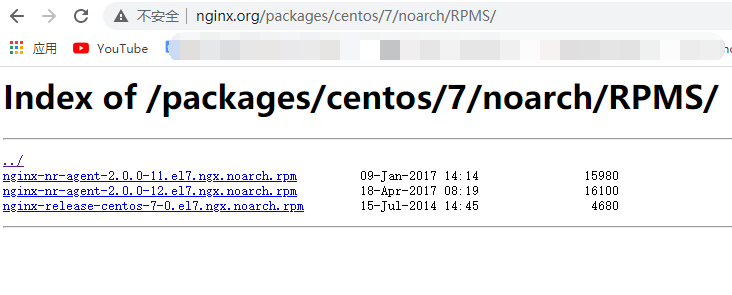
- 找到官网的源
官网提供的源地址:http://nginx.org/packages/centos/7/noarch/RPMS/nginx-release-centos-7-0.el7.ngx.noarch.rpm
- 使用rpm -ivh 进行安装
[root@mufeng ~]# rpm -ivh http://nginx.org/packages/centos/7/noarch/RPMS/nginx-release-centos-7-0.el7.ngx.noarch.rpm
获取http://nginx.org/packages/centos/7/noarch/RPMS/nginx-release-centos-7-0.el7.ngx.noarch.rpm
警告:/var/tmp/rpm-tmp.DRyoO4: 头V4 RSA/SHA1 Signature, 密钥 ID 7bd9bf62: NOKEY
准备中...                          ################################# [100%]
正在升级/安装...
   1:nginx-release-centos-7-0.el7.ngx ################################# [100%]
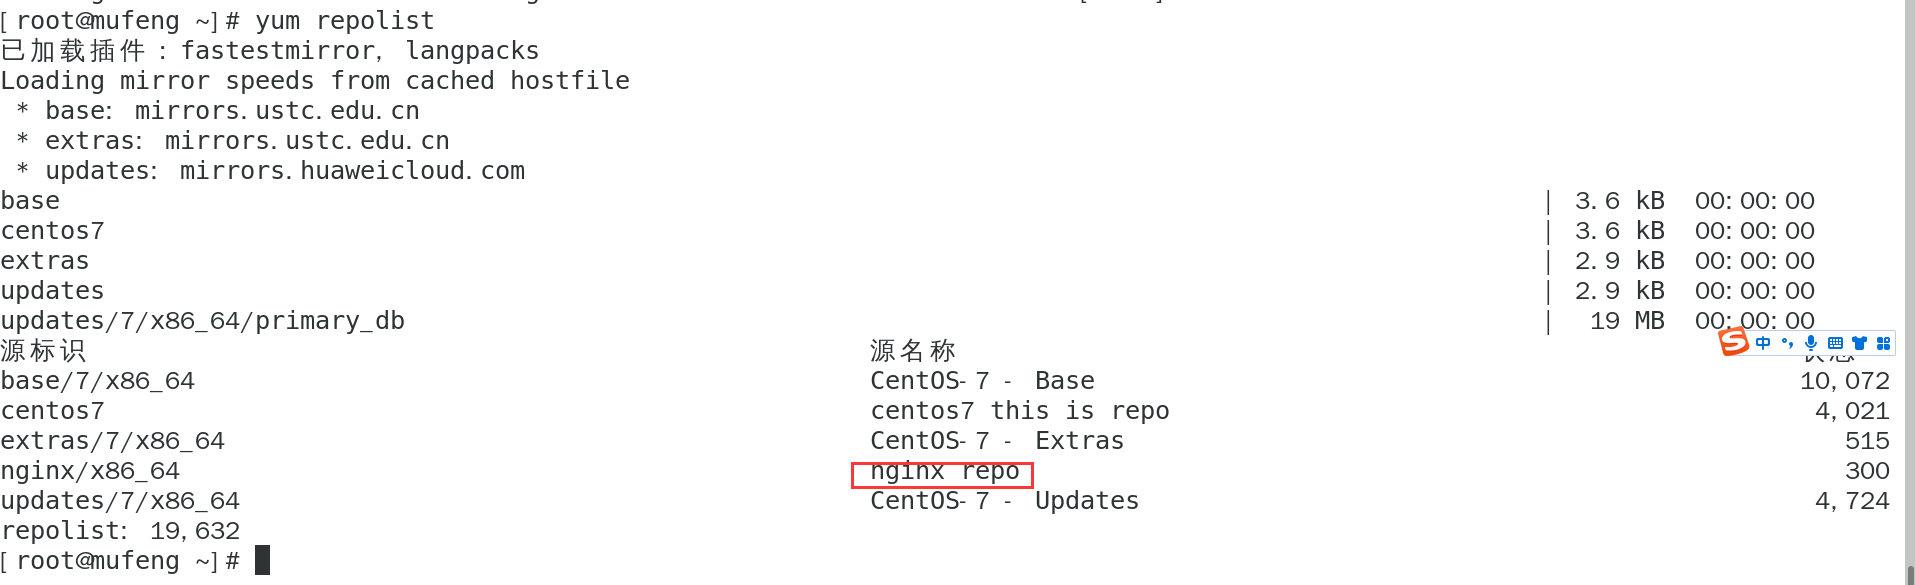
- 安装完成之后查看源:
2.1.2 使用epel的方式进行安装(方法二)
- 先安装epel
[root@mufeng ~]# sudo yum install yum-utils
- 安装完成后,查看安装的epel包即可
yum install epel
2.2 开始安装nginx
上面的两个方法不管选择哪个,都可以使用yum进行安装:
[root@mufeng ~]# yum install nginx
2.3 启动并进行测试
# 查看nginx版本[root@mufeng ~]# nginx -v
nginx version: nginx/1.22.1
# 设置开机自启动[root@mufeng ~]# systemctl enable nginx
Created symlink from /etc/systemd/system/multi-user.target.wants/nginx.service to /usr/lib/systemd/system/nginx.service.

# 启动nginx[root@mufeng ~]# systemctl start nginx[root@mufeng ~]#
测试 :
直接访问IP即可:
2.4 其他的一些用法:
- 停止服务:
systemctl restart nginx
- 重新加载nginx
systemctl reload nginx
- 打开防火墙的80端口:
[root@mufeng ~]# firewall-cmd --zone=public --permanent --add-service=http
success
[root@mufeng ~]# firewall-cmd --reload
success
[root@mufeng ~]#
命令的作用是将 http 服务添加到 public 区域的永久规则中,即允许通过防火墙访问 http 服务。
其中,
–zone=public 指定了作用的区域为 public
–permanent 表示该规则将被永久保存
–add-service=http 指定添加的服务为 http
三. 编译方式安装nginx
3.1 下载所需要的包
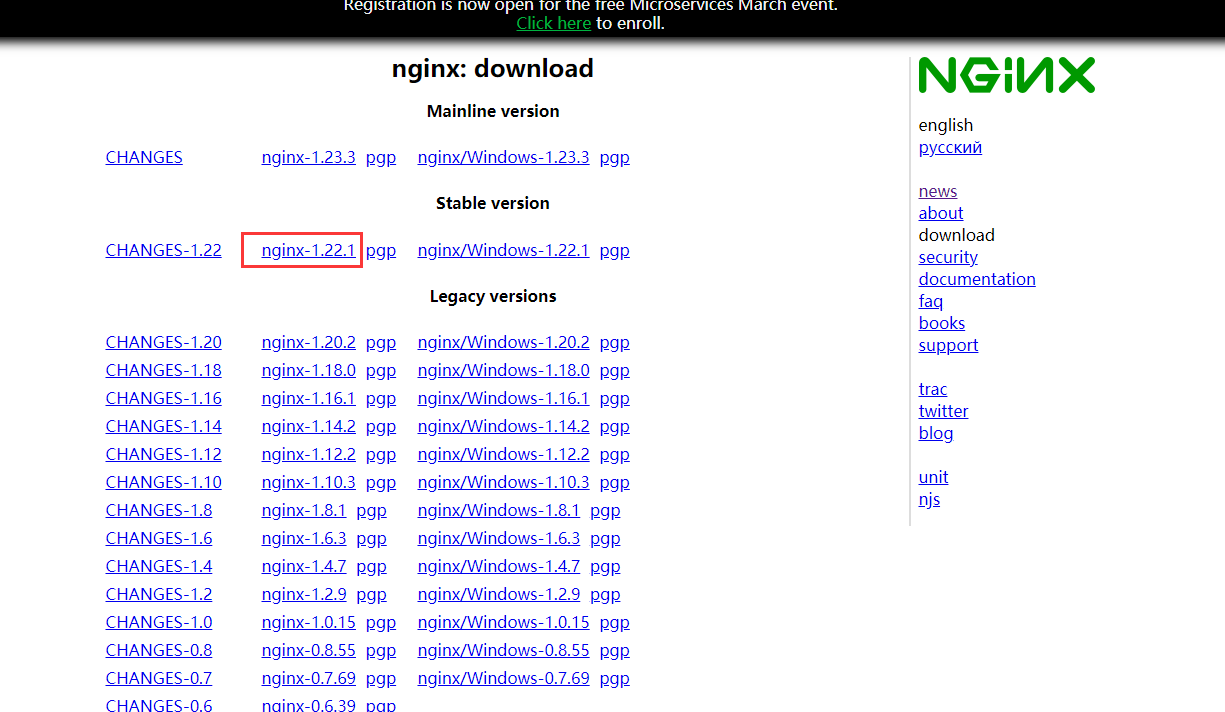
nginx 包下载地址: http://nginx.org/en/download.html
[root@mufeng ~]# wget http://nginx.org/download/nginx-1.22.1.tar.gz
3.2 创建目录并解压nginx包
root@mufeng ~]# ls
anaconda-ks.cfg  initial-setup-ks.cfg  nginx-1.22.1.tar.gz  公共  模板  视频  图片  文档  下载  音乐  桌面
[root@mufeng ~]# mkdir tools[root@mufeng ~]# mv nginx-1.22.1.tar.gz tools/[root@mufeng ~]# cd tools/[root@mufeng tools]# tar xf nginx-1.22.1.tar.gz [root@mufeng tools]# ls
nginx-1.22.1  nginx-1.22.1.tar.gz
[root@mufeng tools]# cd nginx-1.22.1/[root@mufeng nginx-1.22.1]# ls
auto  CHANGES  CHANGES.ru  conf  configure  contrib  html  LICENSE  man  README  src
[root@mufeng nginx-1.22.1]#
3.3 安装编译需要的包
一般编译都需要gcc,如果没有会报错
root@mufeng nginx-1.22.1]# make && make install
./configure --prefix=/usr/local/nginx --with-http_ssl_module --with-http_stub_status_module --with-pcre
这里指定了 nginx 的安装路径为 /usr/local/nginx,同时启用了 SSL 和状态监控模块。
在编译 Nginx 时,可以使用 ./configure --help 命令来查看可以使用的编译选项
3.4 安装并测试
使用make和make install进行安装
[root@mufeng nginx-1.22.1]# make && make install
开始测试:浏览器输入IP:

3.5 简化默认的启动方式
默认的操作方式,比如查看配置文件是否正确:
[root@mufeng nginx-1.22.1]# /usr/local/nginx/sbin/nginx -t
nginx: the configuration file /usr/local/nginx/conf/nginx.conf syntax is ok
nginx: configuration file /usr/local/nginx/conf/nginx.conf test is successful
我们使用软链接或者alias的形式来简化,这里我们使用软链接:
[root@mufeng nginx-1.22.1]# ln -s /usr/local/nginx/sbin/nginx /usr/bin/nginx[root@mufeng nginx-1.22.1]# nginx -t
nginx: the configuration file /usr/local/nginx/conf/nginx.conf syntax is ok
nginx: configuration file /usr/local/nginx/conf/nginx.conf test is successful
[root@mufeng nginx-1.22.1]#
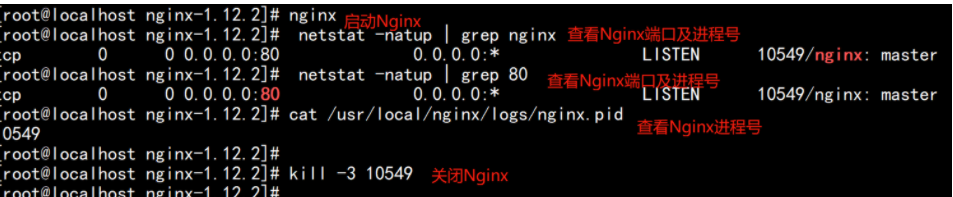
启动方式:
[root@mufeng nginx-1.22.1]# nginx
重新加载方式:
[root@mufeng nginx-1.22.1]# nginx -s reload
关闭的话只能通过杀死进程了:
四. 拓展内容
4.1 编译安装完nginx的配置文件位置
- conf: /usr/local/nginx , 存放 nginx 的配置文件,nginx.conf 是 nginx 服务最核心最主要的配置文件。
- html:/usr/local/nginx,保存 ningx 服务器的 web 文件。也可以更改为其他目录保存 web 文件。
- logs: /var/logs/nginx,保存 ningx 服务器的访问日志、错误日志等日志。
- sbin: /usr/local/nginx,保存 nginx 二进制启动脚本。可以接受不同参数以实现不同的功能。

如果启动或者重启的过程中报错,可以查看logs中的日志。
4.2 配置访问状态统计
我们在编译的时候添加了 –with-http_stub_status_module这个模块,你可以使用nginx -V查看是否包含这个模块。
然后修改配置文件:
[root@mufeng nginx]# vim /usr/local/nginx/conf/nginx.conf
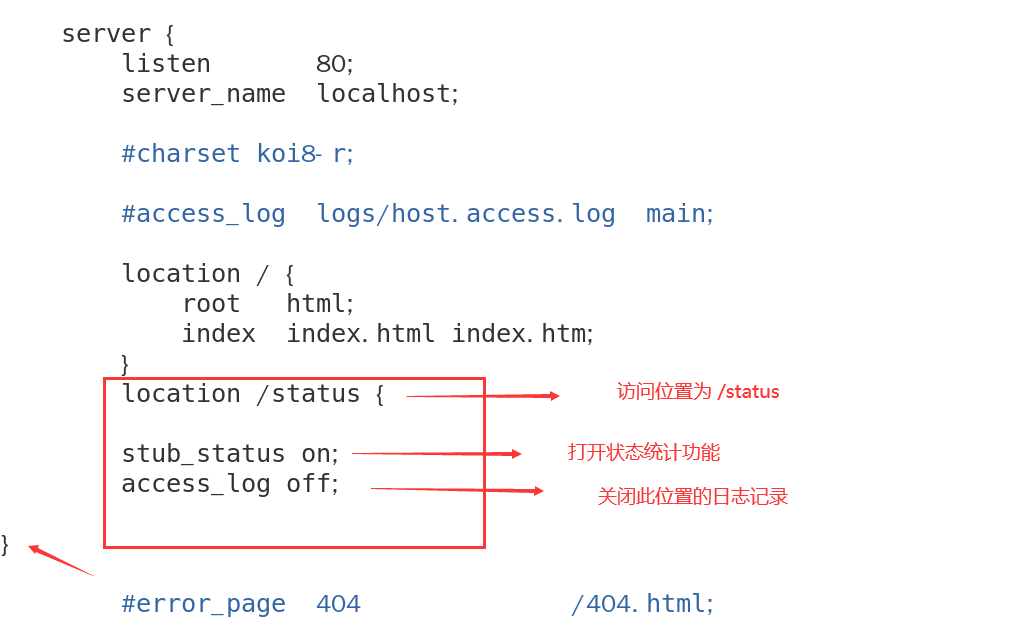
代码如下:
 location / {
            root   html;
            index  index.html index.htm;}
location /status {

    stub_status on;
    access_log off;}
查看配置文件是否正确
[root@mufeng nginx]# nginx -t
nginx: the configuration file /usr/local/nginx/conf/nginx.conf syntax is ok
nginx: configuration file /usr/local/nginx/conf/nginx.conf test is successful
重启:
nginx -s reload
测试:
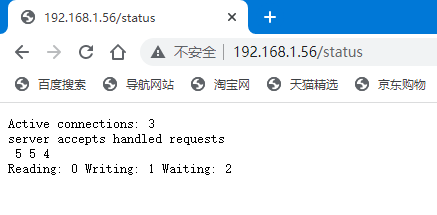
可以看到: 当前的活动连接数为3个
554 表示: 已处理的连接数为5, 成功的TCP握手次数为5, 已处理的请求数为1
总结
以上就是使用centos7操作系统安装nginx实战,欢迎点赞收藏哦。
💕💕💕 好啦,这就是今天要分享给大家的全部内容了,我们下期再见!✨ ✨ ✨
🍻🍻🍻如果你喜欢的话,就不要吝惜你的一键三连了~
版权归原作者 我是沐风晓月 所有, 如有侵权,请联系我们删除。