
1 、安装Jenkins 。本文采用Linux 部署war包形式。
Jenkins下载地址:(https://get.jenkins.io/war-stable/2.346.2/jenkins.war)
Tomcat:https://mirrors.cloud.tencent.com/apache/tomcat/tomcat-9/v9.0.65/bin/ (选版本)
2 Linux需要安装git maven。
2.1 安装git :yum -y install git
验证git git --version
2.2 安装maven
wget https://archive.apache.org/dist/maven/maven-3/3.6.0/binaries/apache-maven-3.6.0-bin.tar.gz
tar -zxvf apache-maven-3.6.0-bin.tar.gz -C/usr/local
cd /usr/local
mv apache-maven-3.6.0 maven
vim /etc/profile
配置maven环境变量
MAVEN_HOME=/usr/local/maven
PATH=$MAVEN_HOME/bin:$PATH
刷新环境变量配置
source /etc/profile
mkdir -p /usr/local/maven/repository
vim /usr/local/maven/conf/settings.xml
<?xml version="1.0" encoding="UTF-8"?><settings xmlns="http://maven.apache.org/SETTINGS/1.2.0"
    xmlns:xsi="http://www.w3.org/2001/XMLSchema-instance" xsi:schemaLocation="http://maven.apache.org/SETTINGS/1.2.0 https://maven.apache.org/xsd/settings-1.2.0.xsd"><localRepository>/usr/local/maven/repository</localRepository><pluginGroups><!-- pluginGroup
     |Specifies a further group identifier tousefor plugin lookup.<pluginGroup>com.your.plugins</pluginGroup>--></pluginGroups><!-- proxies
   |This is a list of proxies which can be used on this machine toconnecttothe network.|Unless otherwise specified (by system property or command-line switch), the first proxy
   | specification in this list marked as active will be used.|--><proxies><!-- proxy
     |Specificationfor one proxy,tobe used in connecting tothe network.|<proxy><id>optional</id><active>true</active><protocol>http</protocol><username>proxyuser</username><password>proxypass</password><host>proxy.host.net</host><port>80</port><nonProxyHosts>local.net|some.host.com</nonProxyHosts></proxy>--></proxies><!-- servers
   |This is a list of authentication profiles, keyed by the server-id used within the system.|Authentication profiles can be used whenever maven must make a connection toa remote server.|--><servers><!-- server
     |Specifies the authentication information touse when connecting toa particular server, identified by
     | a unique name within the system (referred toby the 'id' attribute below).|| NOTE:You should either specify username/password OR privateKey/passphrase, since these pairings are
     |       used together.|<server><id>deploymentRepo</id><username>repouser</username><password>repopwd</password></server>--><!--Another sample, using keys toauthenticate.<server><id>siteServer</id><privateKey>/path/to/private/key</privateKey><passphrase>optional; leave empty if not used.</passphrase></server>--></servers><!-- mirrors
   |This is a list of mirrors tobe used in downloading artifacts from remote repositories.||It works like this: a POM may declare a repository touse in resolving certain artifacts.|However,this repository may have problems withheavy traffic at times, so people have mirrored
   | it toseveral places.||That repository definition will have a unique id, so we can create a mirror reference for that
   | repository,tobe used as an alternate download site. The mirror site will be the preferred
   | server for that repository.|--><mirrors><!-- mirror
     |Specifies a repository mirror site touse instead of a given repository. The repository that
     |this mirror serves has an ID that matches the mirrorOf element of thismirror. IDs are used
     |for inheritance and direct lookup purposes, and must be unique across the set of mirrors.|<mirror><id>mirrorId</id><mirrorOf>repositoryId</mirrorOf><name>HumanReadableNameforthisMirror.</name><url>http://my.repository.com/repo/path</url></mirror>--><mirror><id>aliyunmaven</id><mirrorOf>*</mirrorOf><name>阿里云公共仓库</name><url>https://maven.aliyun.com/repository/public</url></mirror></mirrors><!-- profiles
   |This is a list of profiles which can be activated in a variety of ways, and which can modify
   | the build process. Profiles provided in the settings.xml are intended toprovide local machine-| specific paths and repository locations which allow the build towork in the local environment.||For example,if you have an integration testing plugin - like cactus - that needs toknow where
   | your Tomcat instance is installed, you can provide a variable here such that the variable is
   | dereferenced during the build process toconfigure the cactus plugin.||As noted above, profiles can be activated in a variety of ways. One way - the activeProfiles
   | section of this document (settings.xml)- will be discussed later. Another way essentially
   | relies on the detection of a system property, either matching a particular value for the property,| or merely testing its existence. Profiles can also be activated by JDK version prefix, where a
   | value of '1.4' might activate a profile when the build is executed on a JDK version of '1.4.2_07'.|Finally, the list of active profiles can be specified directly from the command line.|| NOTE:For profiles defined in the settings.xml, you are restricted tospecifying only artifact
   |       repositories, plugin repositories, and free-form properties tobe used as configuration
   |       variables for plugins in the POM.||--><profiles><!-- profile
     |Specifies a set of introductions tothe build process,tobe activated using one or more of the
     | mechanisms described above. For inheritance purposes, and toactivate profiles via <activatedProfiles/>| or the command line, profiles have tohave an ID that is unique.||An encouraged best practice for profile identification is touse a consistent naming convention
     |for profiles, such as 'env-dev', 'env-test', 'env-production', 'user-jdcasey', 'user-brett', etc.|This will make it more intuitive tounderstand what the set of introduced profiles is attempting
     |toaccomplish, particularly when you only have a list of profile id's for debug.||This profile example usesthe JDK version totrigger activation, and providesa JDK-specific repo.<profile><id>jdk-1.4</id><activation><jdk>1.4</jdk></activation><repositories><repository><id>jdk14</id><name>Repositoryfor JDK 1.4 builds</name><url>http://www.myhost.com/maven/jdk14</url><layout>default</layout><snapshotPolicy>always</snapshotPolicy></repository></repositories></profile>--><profile><id>jdk-1.8</id><activation><activeByDefault>true</activeByDefault><jdk>1.8</jdk></activation><properties><maven.compiler.source>1.8</maven.compiler.source><maven.compiler.target>1.8</maven.compiler.target><maven.compiler.compilerVersion>1.8</maven.compiler.compilerVersion></properties><repositories><repository><id>spring</id><url>https://maven.aliyun.com/repository/spring</url><releases><enabled>true</enabled></releases><snapshots><enabled>true</enabled></snapshots></repository></repositories></profile><!--|Here is another profile, activated by the system property 'target-env' witha value of 'dev',| which providesa specific path totheTomcatinstance. To use this, your plugin configuration
     | might hypothetically look like:||...|<plugin>|<groupId>org.myco.myplugins</groupId>|<artifactId>myplugin</artifactId>||<configuration>|<tomcatLocation>${tomcatPath}</tomcatLocation>|</configuration>|</plugin>|...|| NOTE:If you just wanted toinjectthis configuration whenever someone set 'target-env' to|       anything, you could just leave off the <value/> inside the activation-property.|<profile><id>env-dev</id><activation><property><name>target-env</name><value>dev</value></property></activation><properties><tomcatPath>/path/to/tomcat/instance</tomcatPath></properties></profile>--></profiles><!-- activeProfiles
   |List of profiles that are active for all builds.|<activeProfiles><activeProfile>alwaysActiveProfile</activeProfile><activeProfile>anotherAlwaysActiveProfile</activeProfile></activeProfiles>--></settings>
开始部署Jenkins
把下载的Jenkins部署到tomcat目录下的webapps
然后到bin目录下运行
启动命令 sh startup.sh
停止命令 sh shutdown.sh
*如无法执行则执行 chmod 755 .sh(需在bin目录下执行)
然后浏览器访问对应服务器的地址。
http://127.0.0.1:8080/jenkins
初始化会比较慢。需等待一小会
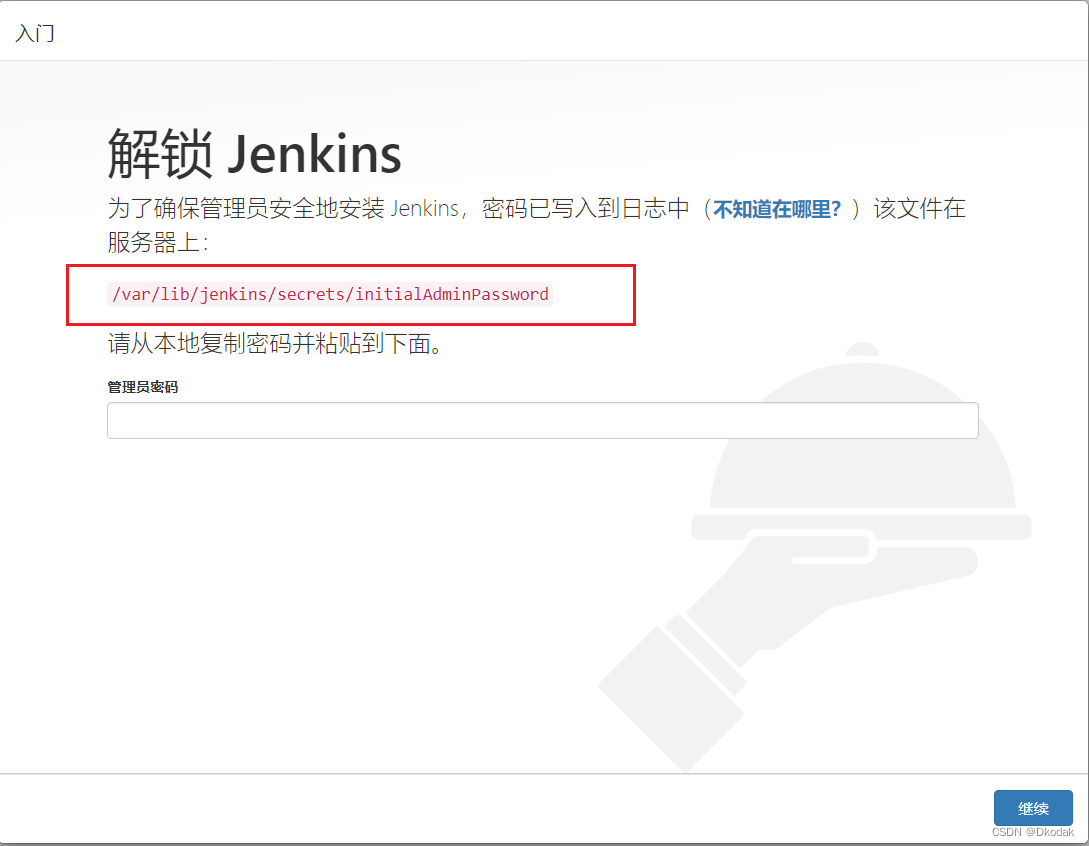
通过 cat 查看该文件的密码输入(这里还会让你下载一些插件,直接跳过即可)
然后创建对应的用户登录即可。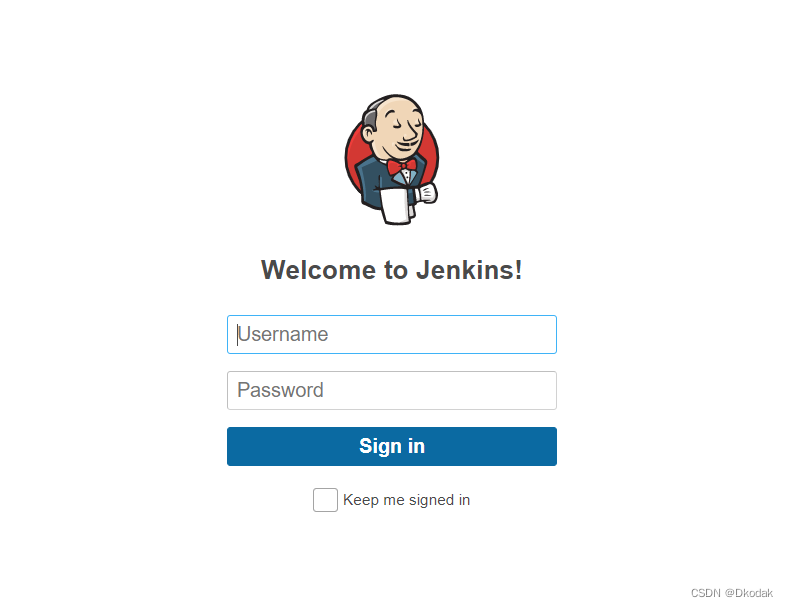
然后配置镜像文件。需要目录下执行
/root/.jenkins/updates(对应Jenkins的目录)
sed -i 's/https:\/\/updates.jenkins.io\/download/http:\/\/mirrors.tuna.tsinghua.edu.cn\/jenkins/g' default.json & sed -i 's/www.google.com/www.baidu.com/g' default.json
修改成功后
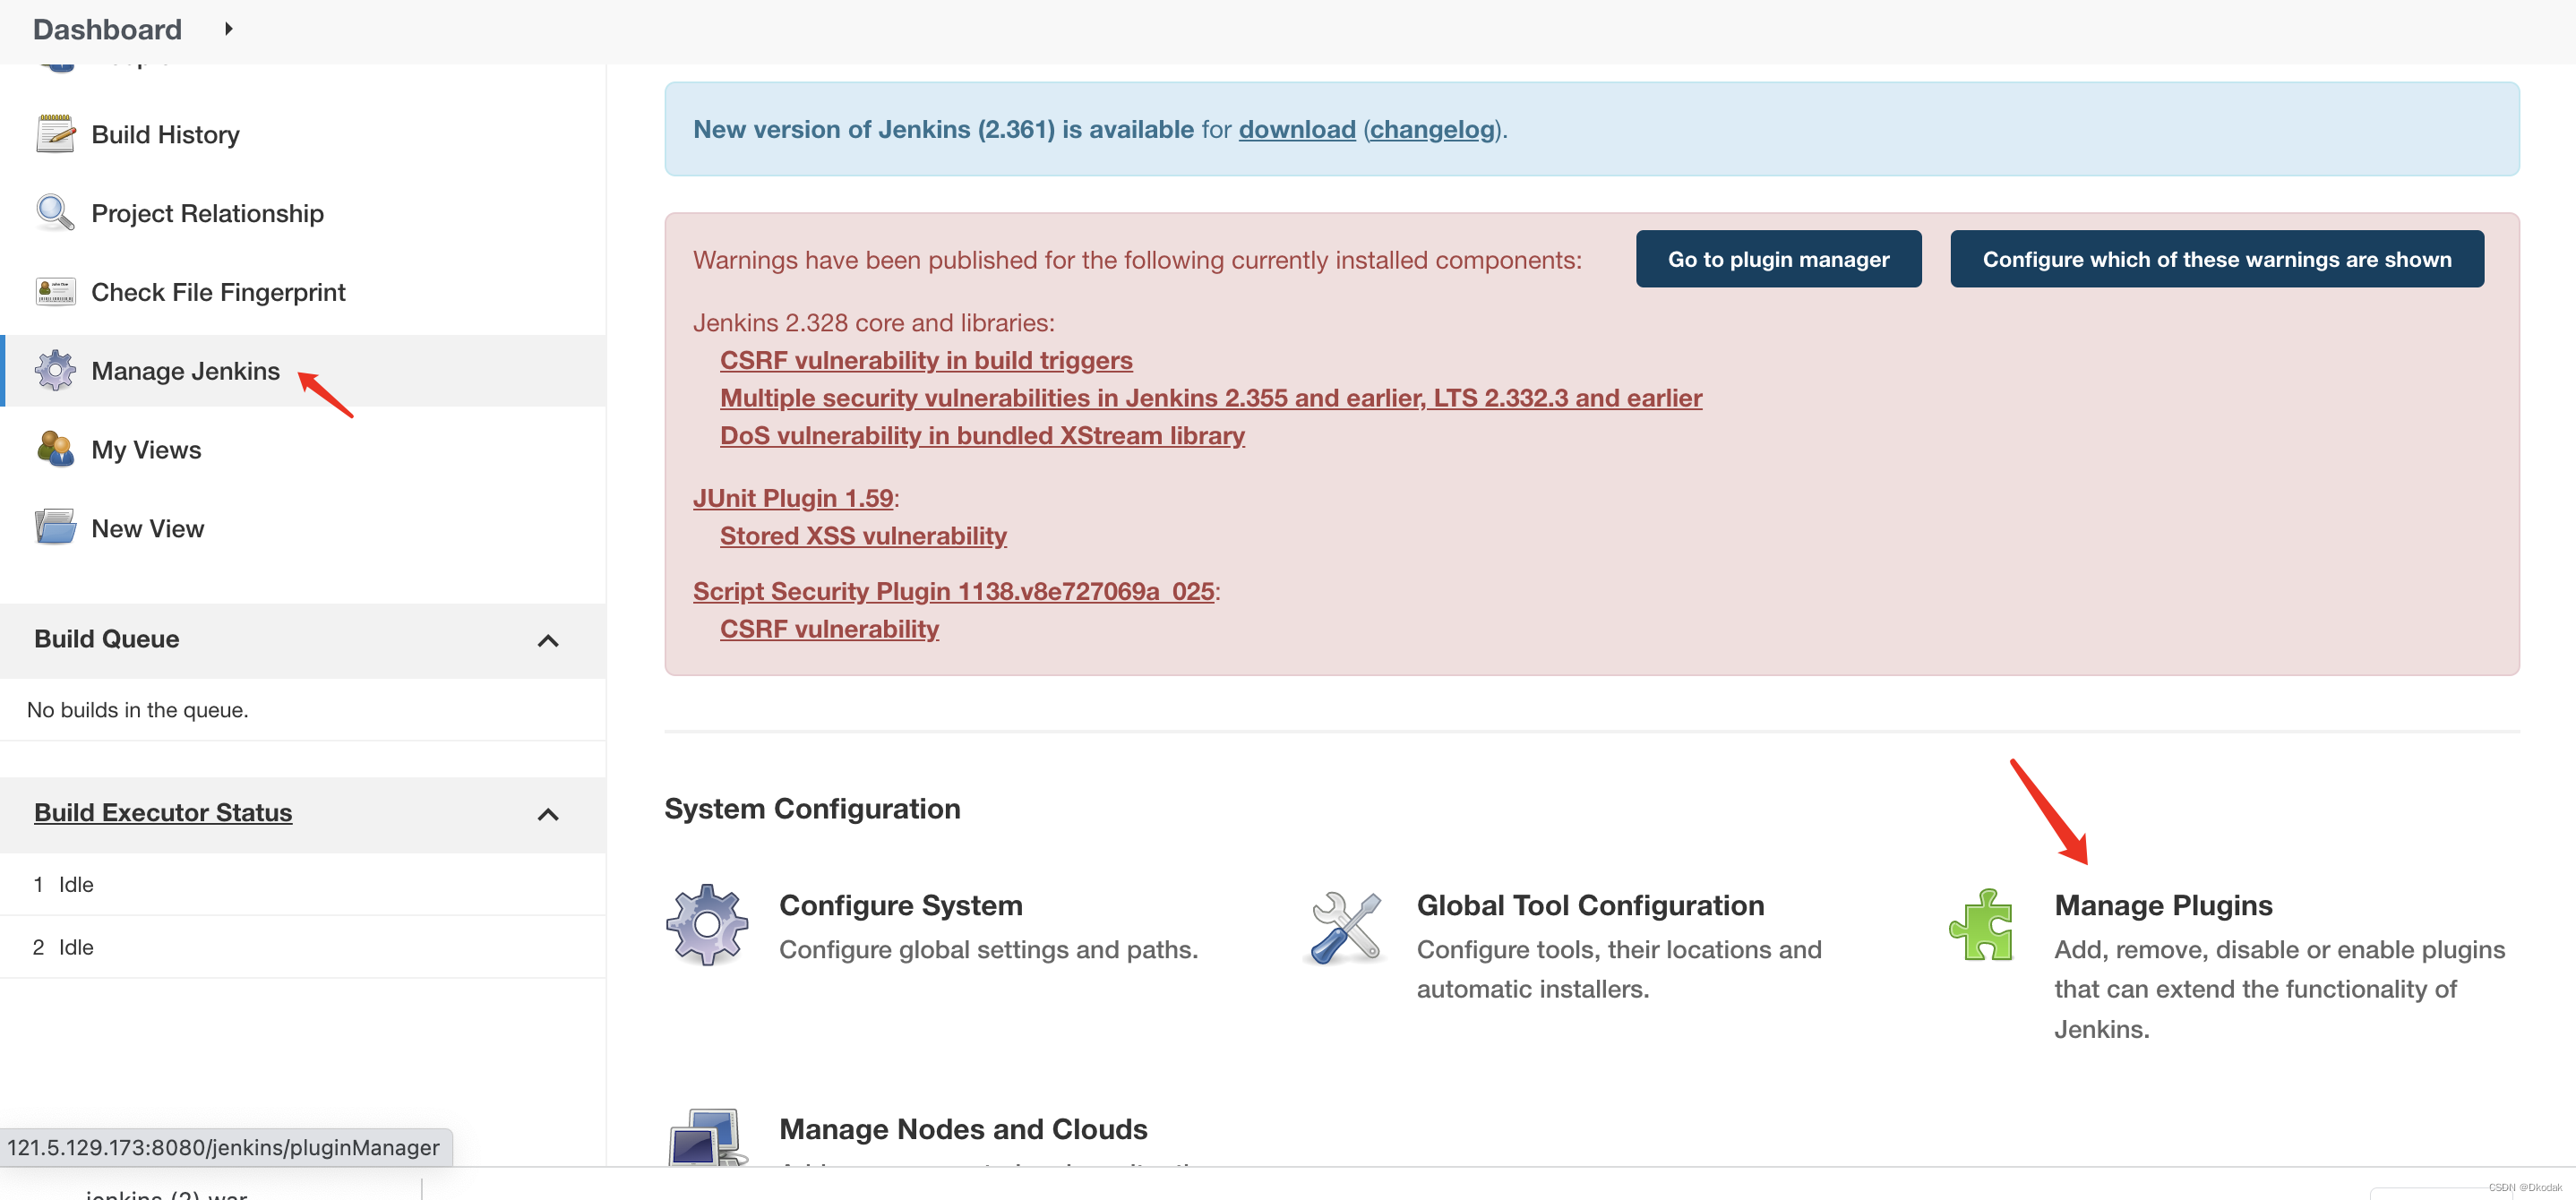
安装的插件有 git、maven、git Parameter
安装3个插件完成后点击即重启Jenkins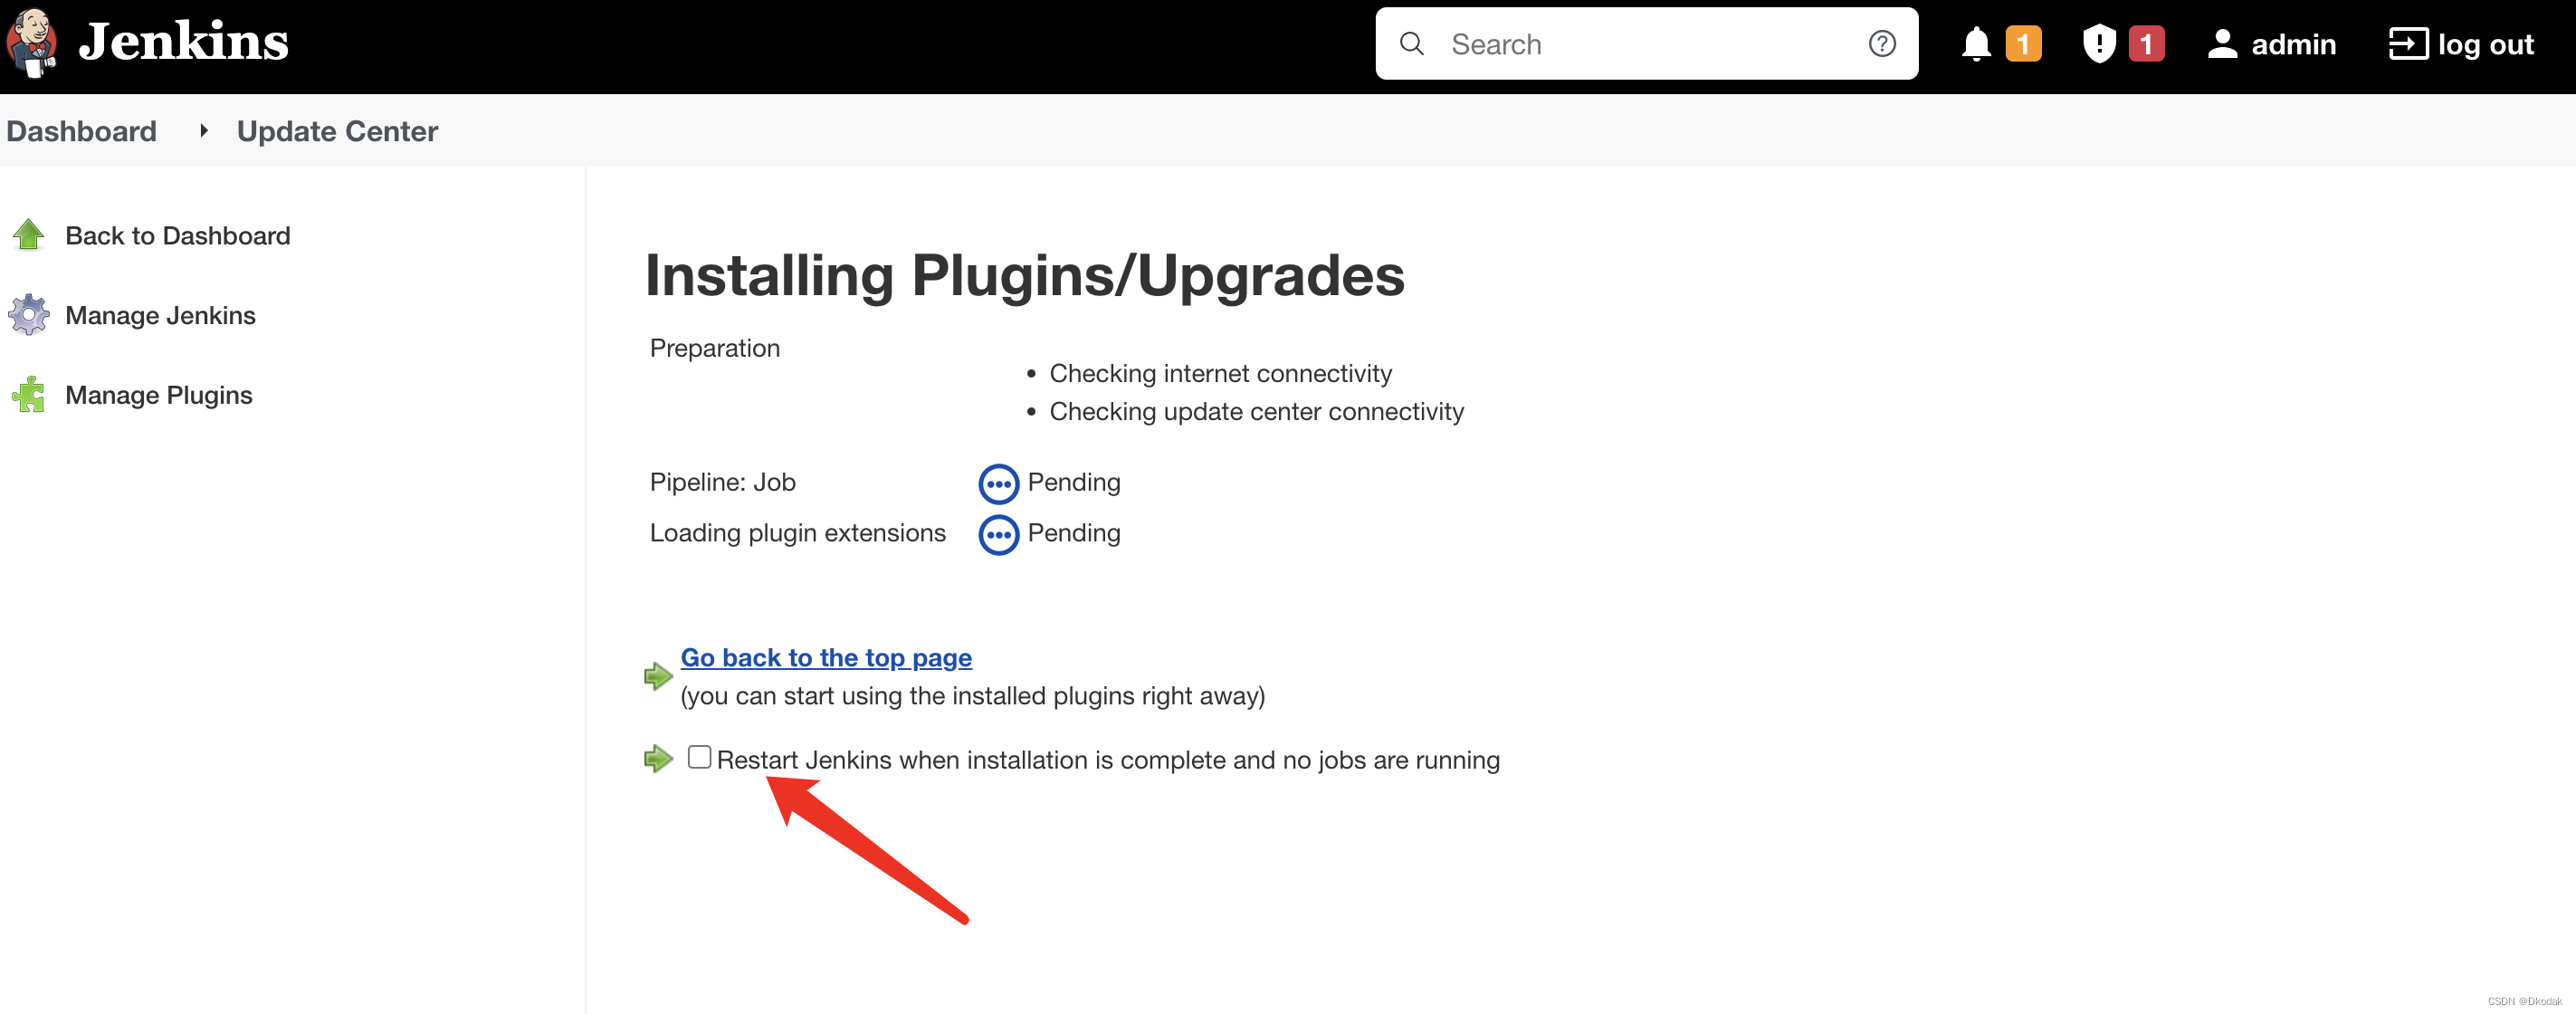
然后开始配置项目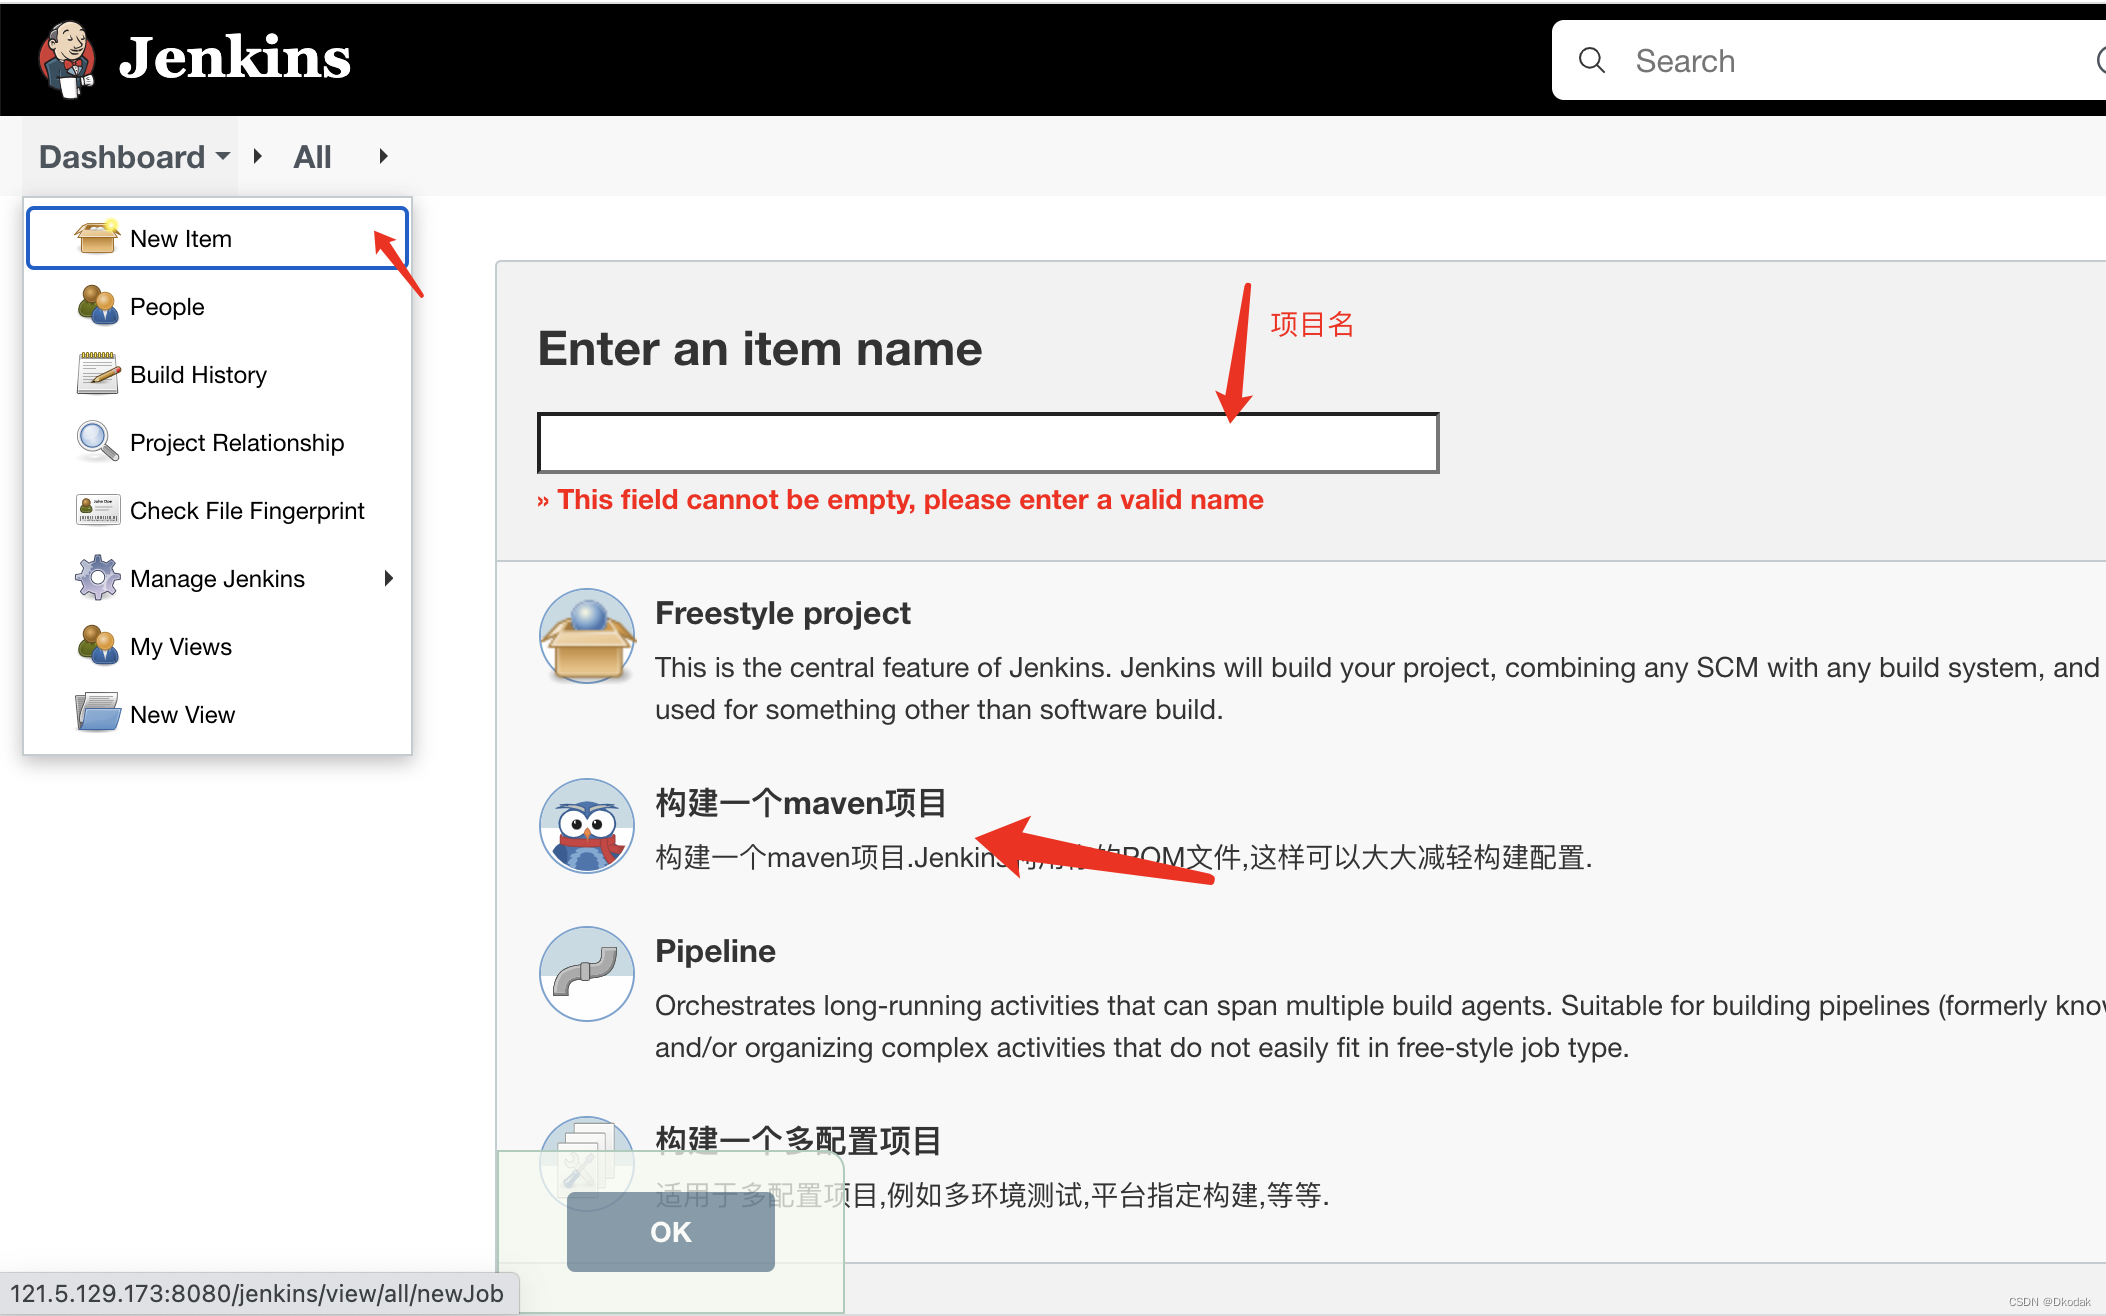
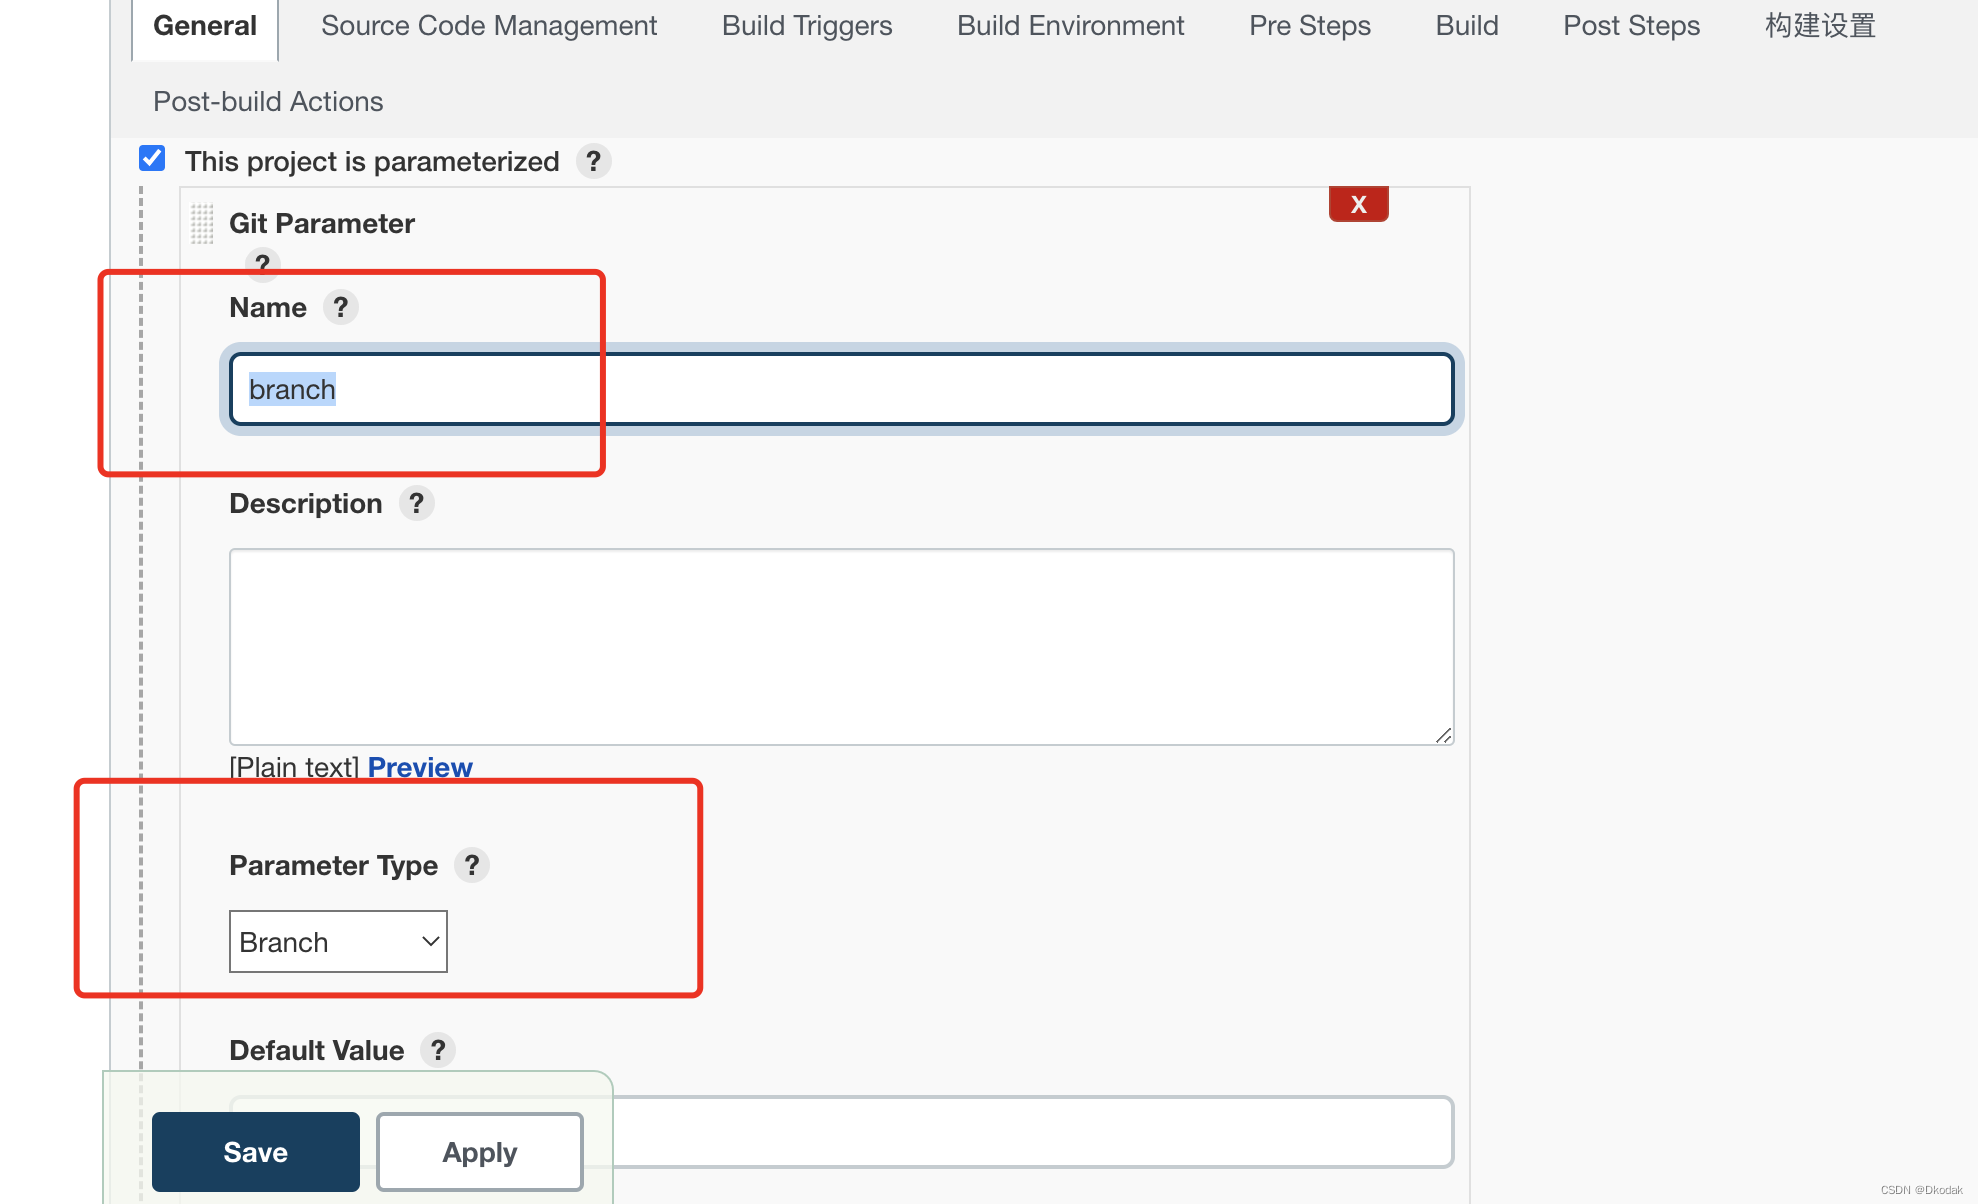
该项需安装git Parameter (动态选择分支)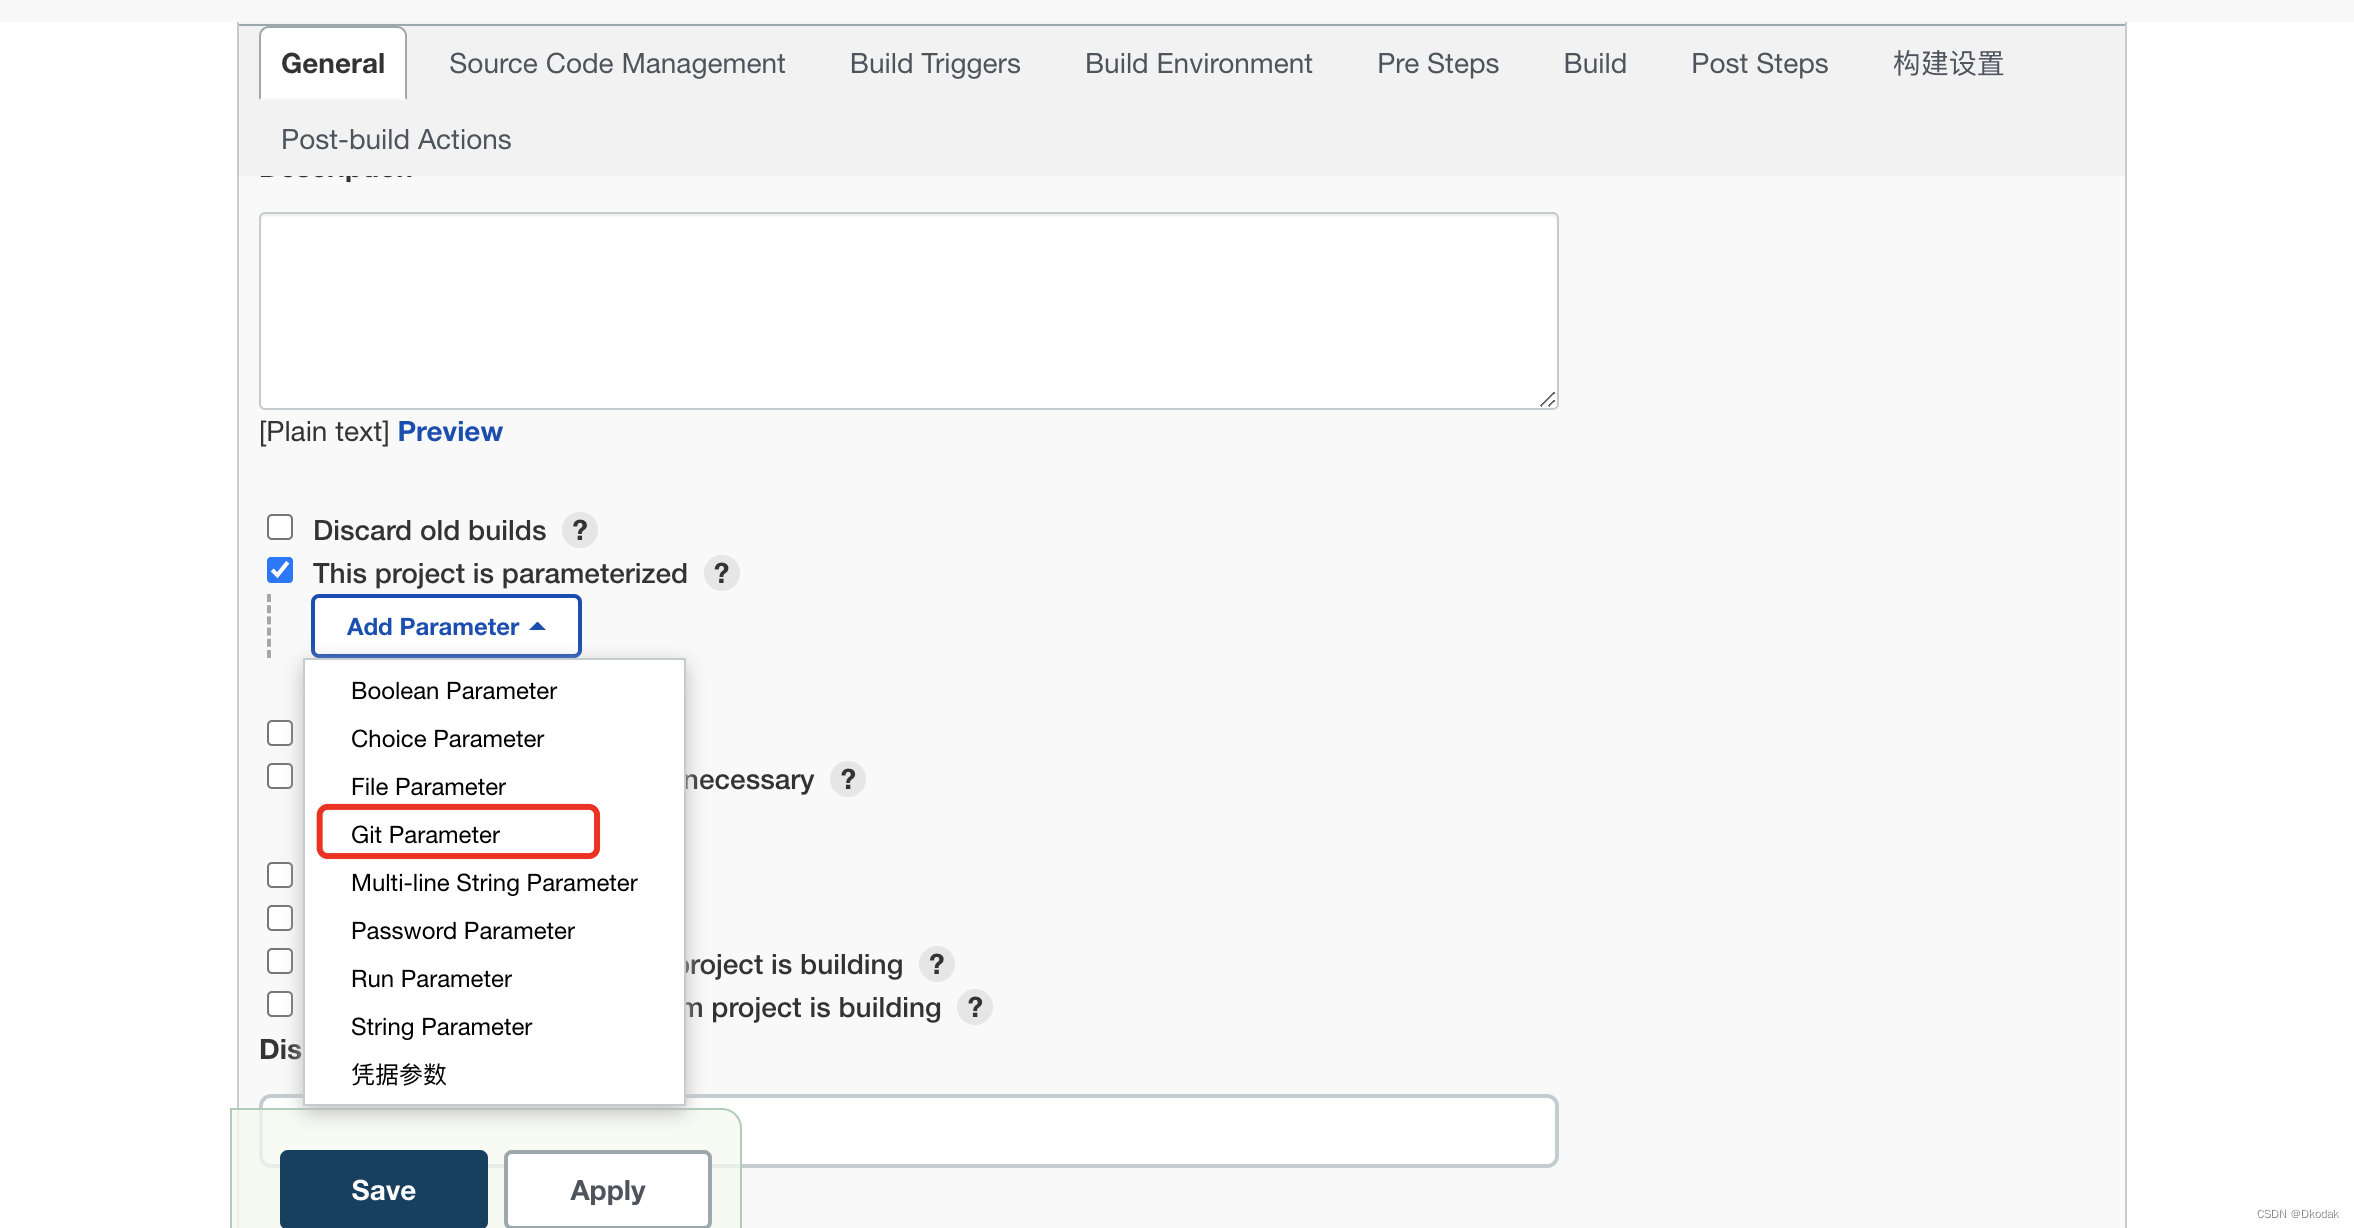
配置git项目地址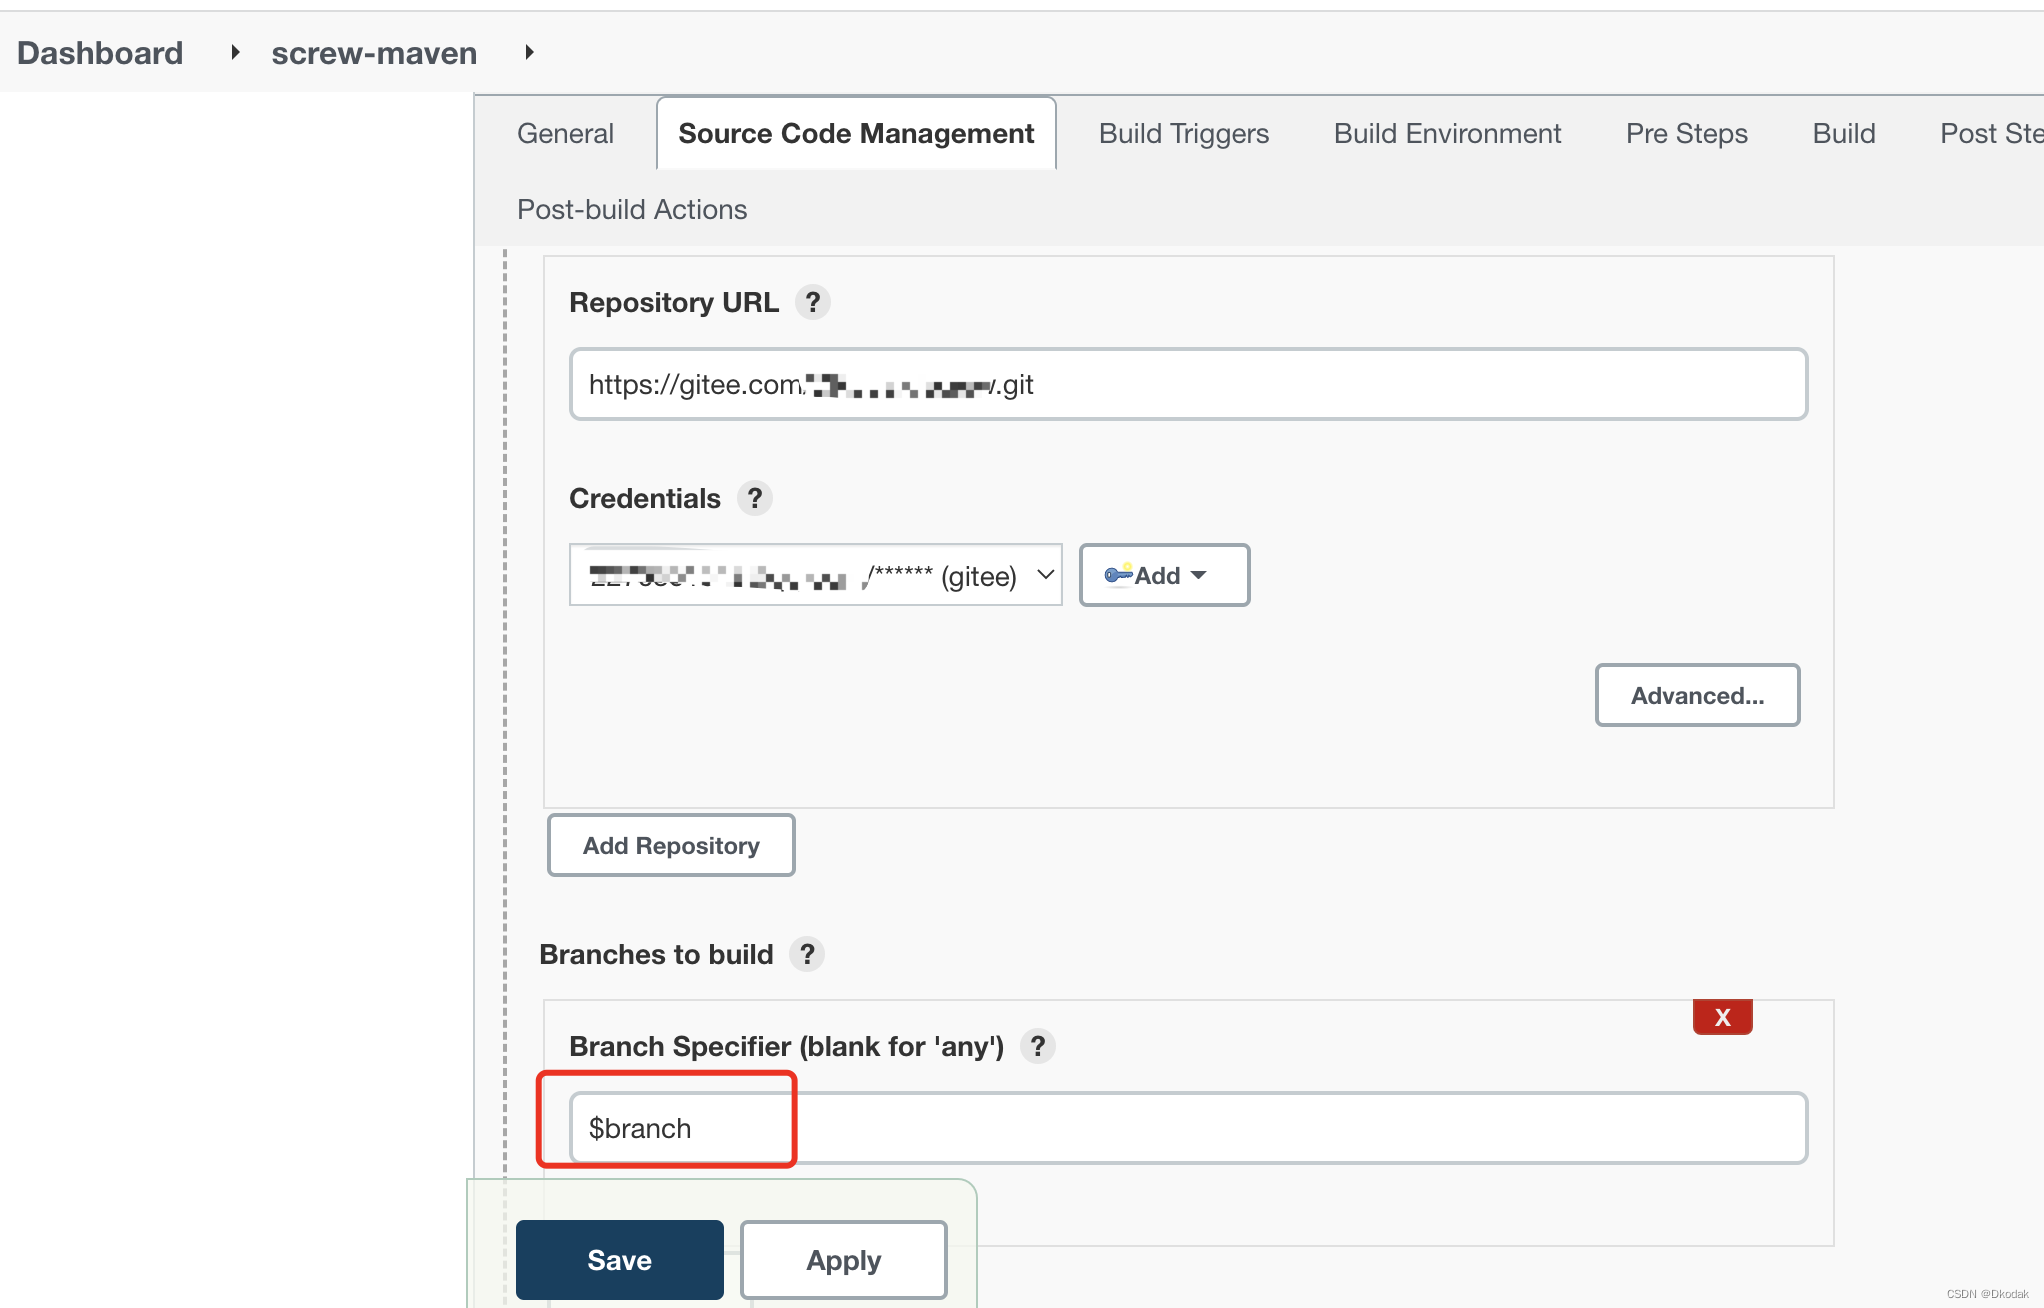
执行maven命令 clear install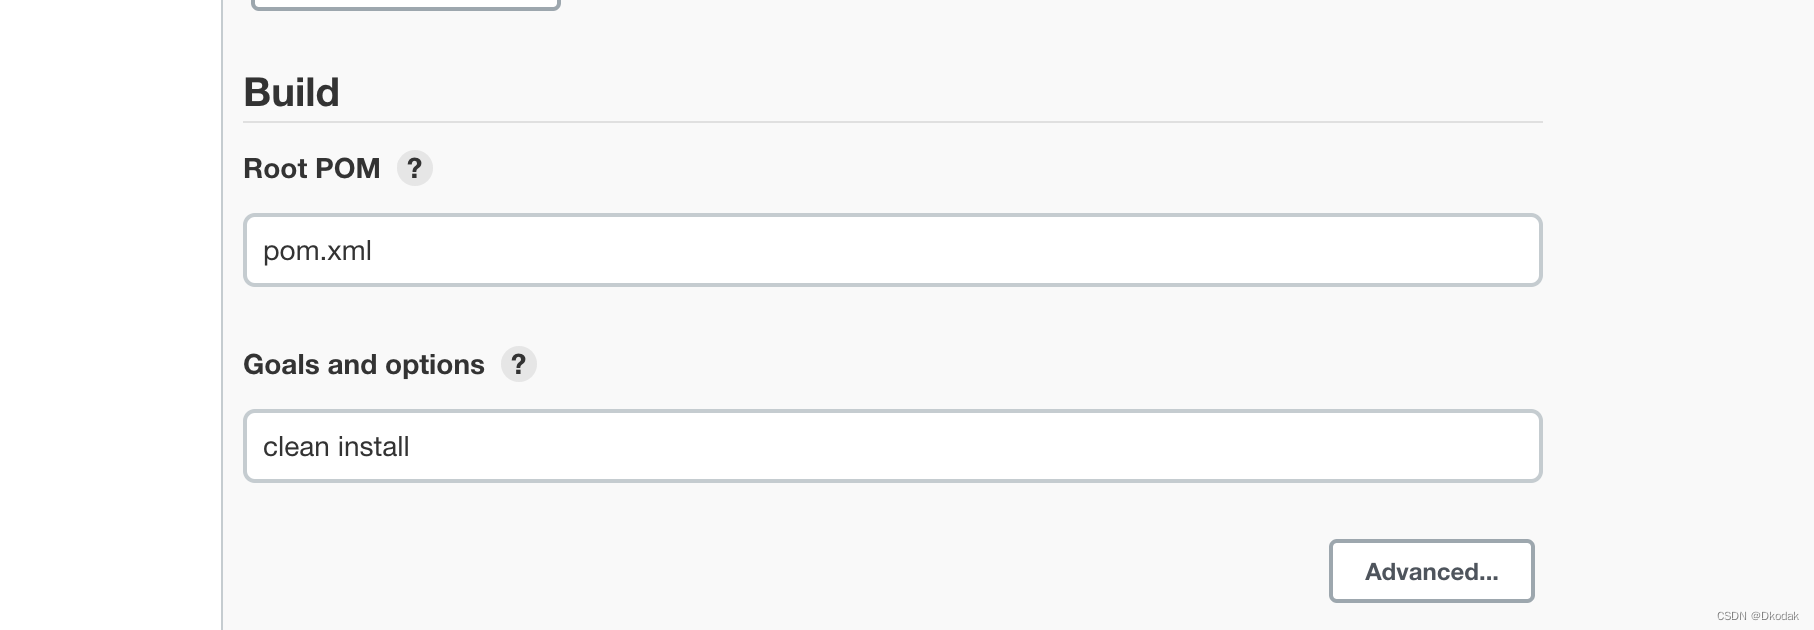
添加shell脚本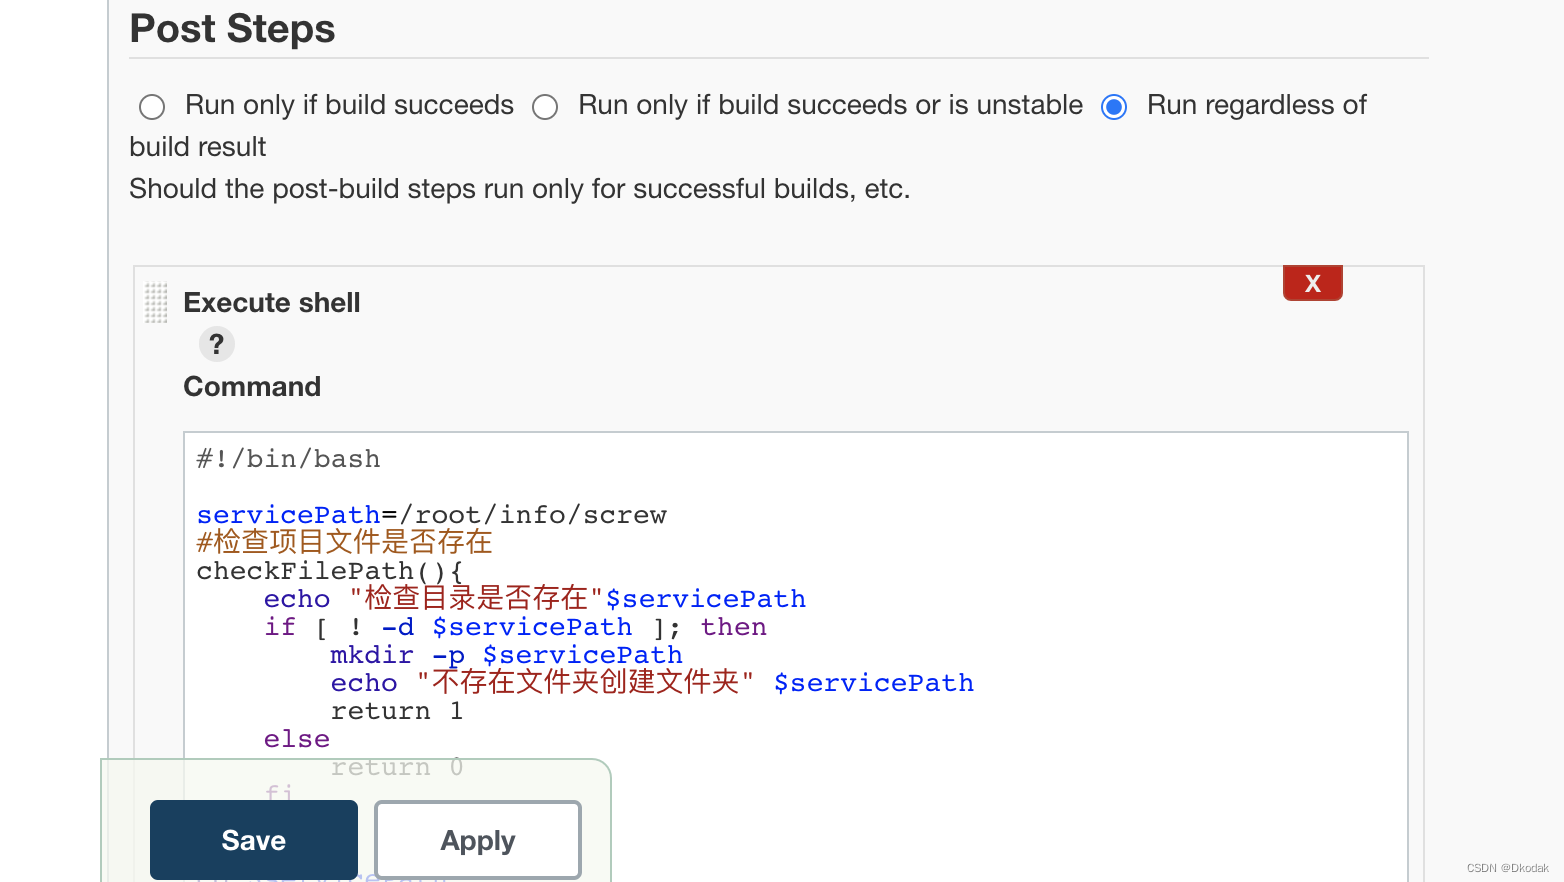
脚本内容:
#!/bin/bash#项目根目录
servicePath=/root/info/screw
#检查项目文件是否存在
checkFilePath(){echo"检查目录是否存在"$servicePathif[!-d $servicePath]; then
        mkdir -p $servicePathecho"不存在文件夹创建文件夹"$servicePathreturn 1
    elsereturn 0
    fi
}

cd $servicePath
checkFilePath $servicePath
sh $servicePath/stop &
echo"杀死服务"sleep 1s
time=$(date "+%Y%m%d%H%M%S")echo"当前时间"$timecp demo-0.0.1-SNAPSHOT.jar $servicePath/bak/
servicePath=$servicePath/bak/
echo"改变后"$servicePath
checkFilePath $servicePath/
cd $servicePathmv demo-0.0.1-SNAPSHOT.jar demo-0.0.1-SNAPSHOT$time.jar
servicePath=/root/info/screw
echo"再次变更$servicePath"
cd $servicePathcp/root/.jenkins/workspace/screw-maven/target/demo-0.0.1-SNAPSHOT.jar $servicePath
sh $servicePath/start &
echo"发布成功 ---》demo-0.0.1-SNAPSHOT.jar"
start脚本都需要给权限(chmod 755 start)
nohup java -agentlib:jdwp=transport=dt_socket,server=y,suspend=n,address=7774 -Xms512m -Xmx1024m -XX:+HeapDumpOnOutOfMemoryError -XX:HeapDumpPath=/root/info/dump/ -jar demo-0.0.1-SNAPSHOT.jar > /dev/null 2>&1 &
echo"screw  starting..."
stop 脚本都需要给权限(chmod 755 start)
#!/bin/sh
ID=`ps-ef| grep 'demo-0.0.1-SNAPSHOT.jar'|grep -v 'grep'|awk '{print $2}'`
for pid in $IDdokill-9 $pidecho"kill demo-0.0.1-SNAPSHOT.jar pid:$pid"
done
保存后即可Build。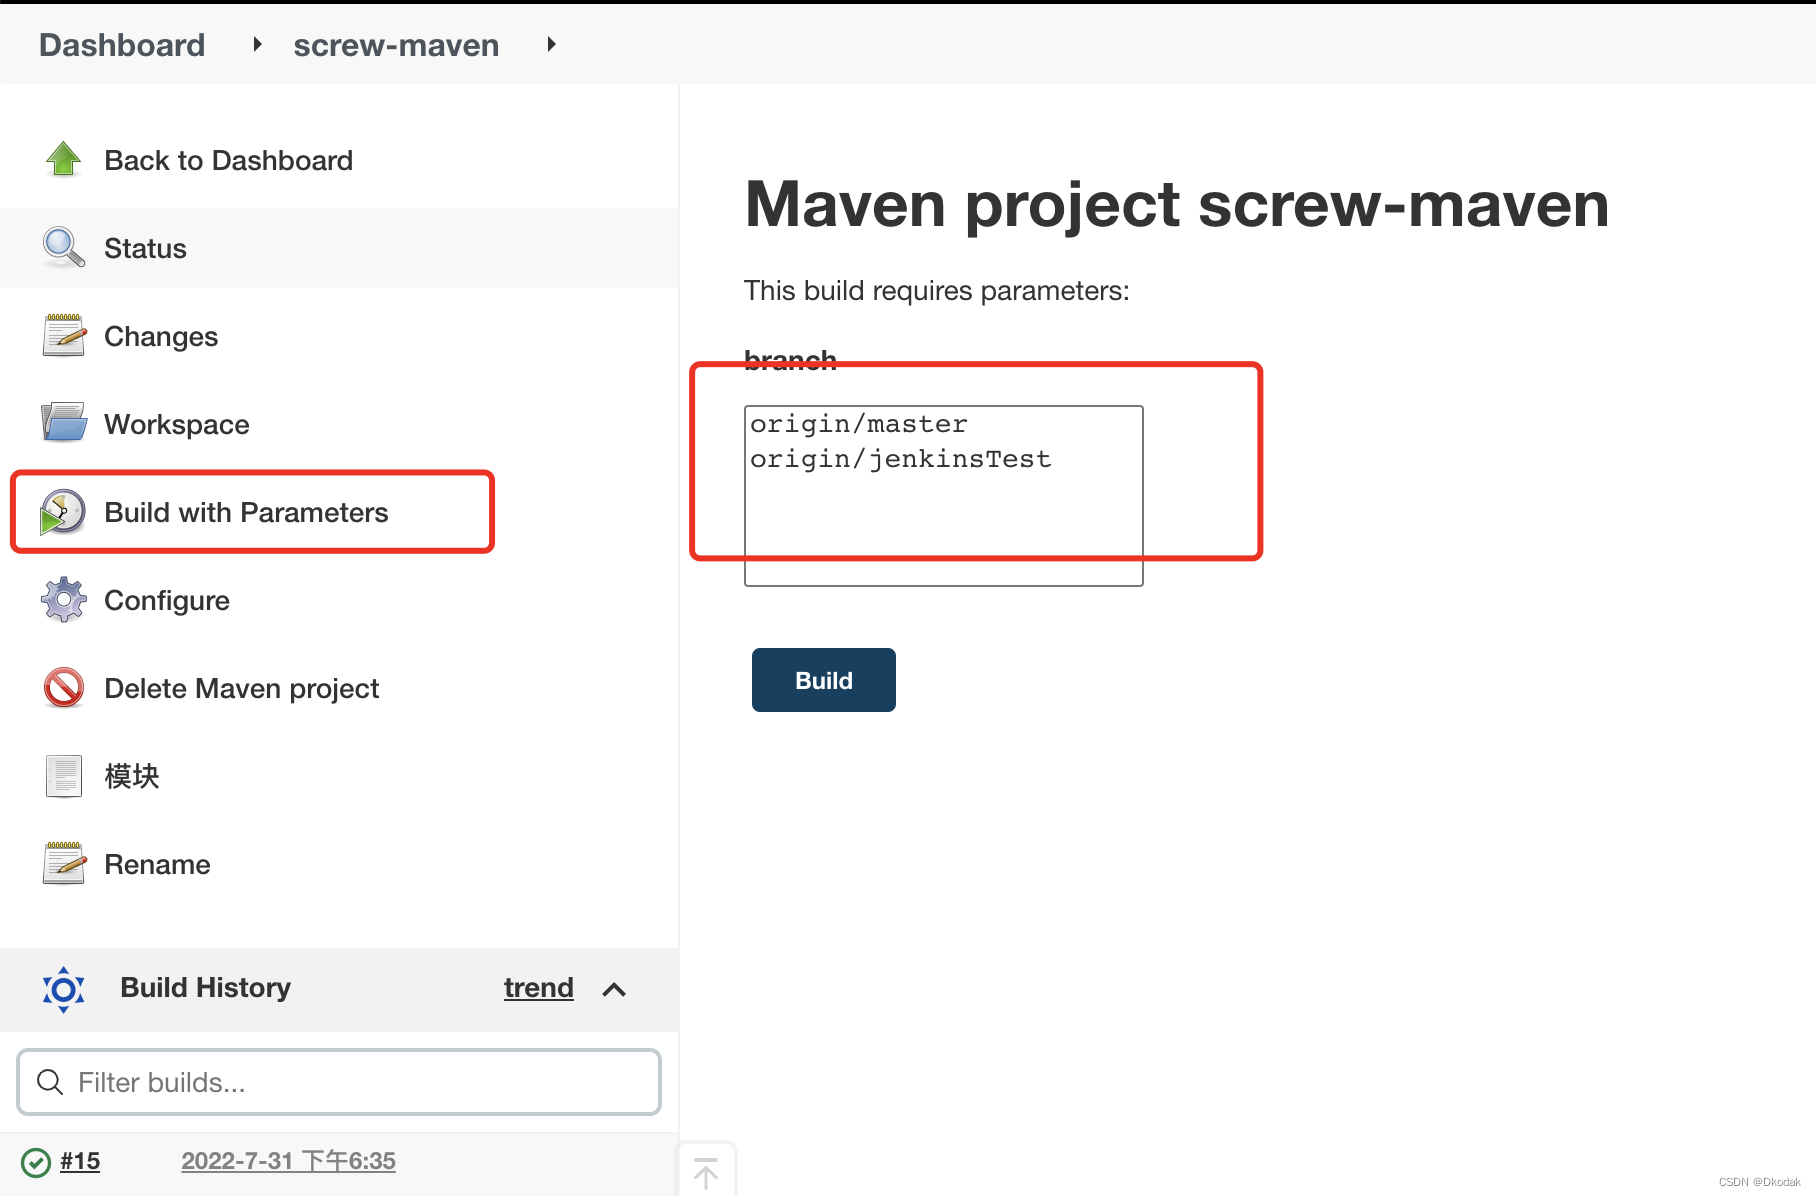
注意:
在使用jenkins进行自动化部署服务的过程中,发现调用服务器的shell命令无法正常启动tomcat,但是构建日志显示是成功执行的,而手动在服务器却是可以正常启动tomcat。
原因:jenkins默认在build结束后会kill掉所有的衍生进程
所以还需要在Tomcat的bin目录下修改catalina.sh
JAVA_OPTS="$JAVA_OPTS -Dhudson.util.ProcessTree.disable=true";
其它方案可参考该文章(https://www.cnblogs.com/qianjinyan/p/11239984.html)
至此已完结!
版权归原作者 Dkodak 所有, 如有侵权,请联系我们删除。