
一、rabbitmq是什么?
1、MQ定义
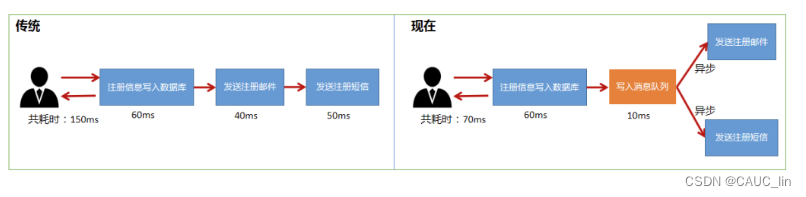
MQ(Message Queue)消息队列 主要解决:异步处理、应用解耦、流量削峰等问题,是分布式系统的重要组件,从而实现高性能,高可用,可伸缩和最终一致性的架构,rabbitmq 是 消息队列中的一种。
1.1 异步
通过消息队列,生产者无需等待消费者完成处理即可继续执行其他任务,从而提高系统响应速度和吞吐量。例如,在用户下单后,订单系统可以将订单信息发送到消息队列,然后立即返回给用户确认信息,而物流系统或库存系统则在后台异步地从队列中获取并处理订单。
1.2 解耦
不同应用程序之间通过消息队列通信,不再直接依赖对方的接口调用,当某一方进行升级或重构时,不会影响其他系统的运行。例如,一个支付系统可以向消息队列发布支付成功的通知,而积分系统、仓库系统等分别订阅这些消息来更新各自的业务状态,彼此独立工作。

1.3 削峰
当短时间内有大量的请求涌入系统时,消息队列可以作为缓冲区存储这些请求,以恒定的速度分发给下游服务,避免了因为瞬间高峰导致的服务崩溃。

2、技术背景
2.1 AMQP高级消息队列协议
Advanced Message Queuing Protocol 是一个开放标准的消息中间件协议,它定义了消息代理和应用程序之间的交互方式。RabbitMQ即是基于AMQP协议实现的消息队列产品,提供了一种标准化的方式来保证跨语言和平台的可靠消息传输。
2.2 JMS
- Java Message Server,Java消息服务应用程序接口,一种规范,和JDBC担任的角色类似
- 是一个Java平台中关于面向消息中间件的API,用于在两个应用程序之间,或分布式系统中发送消 息,进行异步通信
2.3 联系
- JMS是定义了统一接口,统一消息操作;AMQP通过协议统一数据交互格式
- JMS必须是java语言;AMQP只是协议,与语言无关
2.4 Erlang语言
RabbitMQ服务器端是使用Erlang语言编写的,Erlang以其高并发、容错性和分布式计算能力闻名,非常适合用于构建像RabbitMQ这样需要高度稳定和可扩展的消息中间件。
3、为什么使用rabbitmq
可靠性:RabbitMQ提供了多种机制保证消息投递的可靠性,包括持久化消息、消息确认机制等。
灵活性:通过Exchange、Queue和Routing Key等组件,RabbitMQ支持灵活的消息路由策略,包括发布订阅、路由模式、主题模式等多种模式。
扩展性:通过集群和镜像队列等功能,RabbitMQ可以轻松实现水平扩展,满足高可用及高性能的需求。
广泛支持:RabbitMQ拥有丰富的客户端库,几乎支持所有主流开发语言,便于开发者快速集成。
使用简单方便:安装部署简单,上手门槛低,有强大的WEB管理页面。
4、rabbitmq的各组件功能
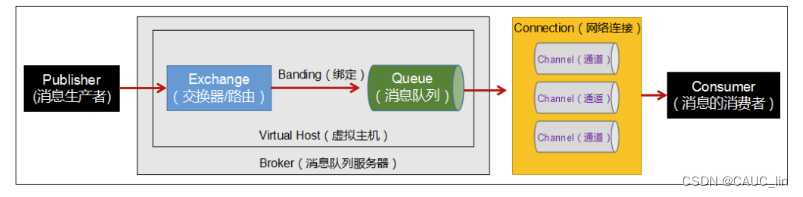
- Broker:消息队列服务器实体
- Virtual Host:虚拟主机,是一种逻辑隔离单位,可以在单个RabbitMQ Broker实例上创建多个vhost,每个vhost内部有自己的交换机、队列和权限管理,实现不同项目或租户间资源的隔离。
- Publisher(生产者):负责生成和发布消息到RabbitMQ服务器,可以选择目标交换机并将消息附带特定的路由键。
- Consumer(消费者):从RabbitMQ中接收并消费消息的程序,可以从绑定到特定交换机和路由键的队列中取出消息进行处理。
- Exchange(交换机):根据预定义的类型和路由规则,接收生产者发布的消息,并将其转发到相应的队列。常见的交换机类型有直连(Direct)、主题(Topic)、头部(Headers)和扇出(Fanout)等。
- Queue(队列):存储消息的容器,实际的消息载体,消息会按照路由规则存放在队列中等待消费者消费。
- Banding:绑定,用于消息队列和交换机之间的关联。
- Channel:通道(信道) - 多路复用连接中的一条独立的双向数据流通道。- 信道是建立在真实的TCP连接内的 虚拟链接。- AMQP命令都是通过信道发出去的,不管是发布消息、订阅队列还是接收消息,都是通过信道完成的。- 因为对于操作系统来说,建立和销毁TCP连接都是非常昂贵的开销,所以引入了信道的概念,用来复用TCP连接。
- Routing key:生产者在发布消息时指定的一个标识符,用于决定消息如何被交换机路由到相应的队列。
二、rabbitmq 的使用
1、Linux虚拟机设置
- rabbitmq的安装通常涉及到如下两个步骤,可以参考博文Linux安装RabbitMQ详细教程(最详细的图文教程)-CSDN博客:- 安装Erlang:由于RabbitMQ是用Erlang编写的,首先需要在Linux系统中安装Erlang运行环境。 - 安装RabbitMQ:可以通过官方提供的apt或yum仓库进行安装,或者下载源码自行编译安装。
- 启动后台管理插件
[root@localhost opt]# rabbitmq-plugins enable rabbitmq_management
- 启动、查看状态、重启、关闭 rabbitmq
[root@localhost opt]# systemctl start rabbitmq-server.service[root@localhost opt]# systemctl status rabbitmq-server.service[root@localhost opt]# systemctl restart rabbitmq-server.service[root@localhost opt]# systemctl stop rabbitmq-server.service - 查看进程
[root@localhost opt]# ps -ef | grep rabbitmq - 测试- 关闭防火墙: systemctl stop firewalld- 浏览器输入:http://ip:15672- 默认帐号密码:guest,guest用户默认不允许远程连接- 创建账号
[root@localhost opt]# rabbitmqctl add_user 你的用户名 你的密码- 设置用户角色[root@localhost opt]# rabbitmqctl set_user_tags 你的用户名 administrator- 设置用户权限[root@localhost opt]# rabbitmqctl set_permissions -p "/" 你的用户名 ".*" ".*"".*"- 查看当前用户和角色[root@localhost opt]# rabbitmqctl list_users- 修改用户密码[root@localhost opt]# rabbitmqctl change_password 你的用户名 新的密码 - web界面介绍:
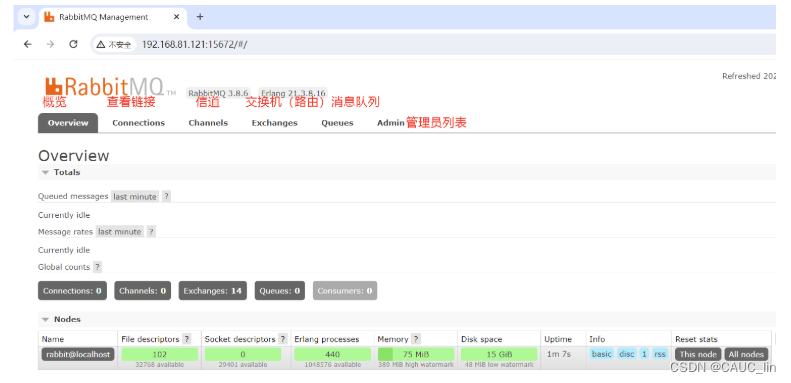 端口:5672:RabbitMQ提供给编程语言客户端链接的端口15672:RabbitMQ管理界面的端口25672:RabbitMQ集群的端口
2、java使用rabbitmq
2.1 快速入门
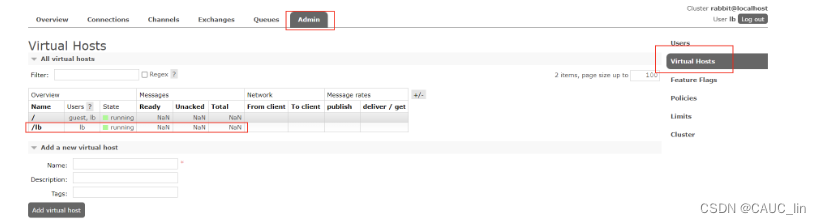
- 远程登录创建的账号,在Admin下添加了用户
- pom依赖
<dependencies><dependency><groupId>com.rabbitmq</groupId><artifactId>amqp-client</artifactId><version>5.7.3</version></dependency><dependency><groupId>org.slf4j</groupId><artifactId>slf4j-log4j12</artifactId><version>1.7.25</version><scope>compile</scope></dependency><dependency><groupId>org.apache.commons</groupId><artifactId>commons-lang3</artifactId><version>3.9</version></dependency></dependencies> - 创建连接工具类
packageutils;importcom.rabbitmq.client.Connection;importcom.rabbitmq.client.ConnectionFactory;publicclassConnectionUtil{publicstaticConnectiongetConnection()throwsException{//1、创建连接工厂ConnectionFactory factory =newConnectionFactory();//2、在工厂对象中设置MQ的连接信息(ip、port、vhost、username、password) factory.setHost("192.168.81.121"); factory.setPort(5672); factory.setVirtualHost("/lb"); factory.setUsername("lb"); factory.setPassword("123123");//3、通过工厂获得与MQ的连接Connection connection = factory.newConnection();return connection;}publicstaticvoidmain(String[] args)throwsException{Connection connection =getConnection();System.out.println("connection = "+ connection); connection.close();}} - 运行测试结果
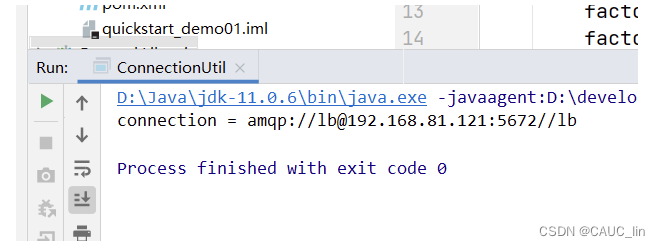
2.2 RabbitMQ模式
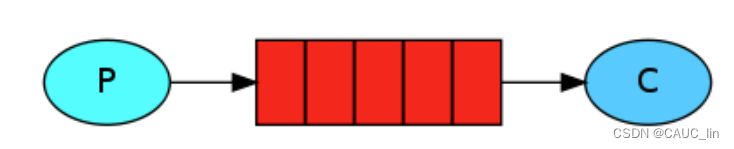
5种消息模型,大体分为两类:点对点、发布订阅模式(一对多)
- 点对点: - 包含三部分:消息队列(queue),发送者(sender),接收者(receiver)- 每个消息发送到一个特定的队列中,接收者从中获得消息,队列中保留这些消息,直到他们被消费或超时- 每个消息一个消费者- 消费者不需要运行,发送者发送的消息可以被直接保存在队列内- 简单模式和工作队列模式属于这种类型
- 发布订阅: - 发布订阅多了一部分,交换机,起到将消息路由分发到各个订阅者的作用- 每个消息可以有多个订阅者- 消费者需要先订阅,订阅者发布的消息才能被消费- 消费者需要保持运行状态,才能消费消息- 发布订阅模式、路由模式、通配符(主题)模式属于这种类型
2.2.1 简单模式
- 生产者
packagesimplest;importcom.rabbitmq.client.Channel;importcom.rabbitmq.client.Connection;importutils.ConnectionUtil;publicclassSender{publicstaticvoidmain(String[] args)throwsException{String msg ="Hello world!";//1、获取连接Connection connection =ConnectionUtil.getConnection();//2、在连接中创建通道(信道)Channel channel = connection.createChannel();/*3、创建消息队列 参数1、队列中的名称 参数2、队列的数据是否持久化 参数3、是否排外(是否支持扩展,当前队列只能自己用,不能给别人用) 参数4、是否自动删除(当队列的连接数为0时,队列会销毁,不管队列是否还存保存数据) 参数5、队列参数(没有参数为null) * * */ channel.queueDeclare("queue1",false,false,false,null);/*4、向指定队列发送消息 参数1、交换机名称,简单模式没有交换机,所以名称为"" 参数2、目标队列的名称 参数3、设置消息的属性(没有属性为null) 参数4、消息的内容(只接受字节数组) */ channel.basicPublish("","queue1",null, msg.getBytes());System.out.println("发送:"+ msg);//5、释放资源 channel.close(); connection.close();}} - 消费者
packagesimplest;importcom.rabbitmq.client.*;importutils.ConnectionUtil;importjava.io.IOException;publicclassReceiver{publicstaticvoidmain(String[] args)throwsException{//1、获得连接Connection connection =ConnectionUtil.getConnection();//2、获得通道(信道)Channel channel = connection.createChannel();//3、从信道获得消息DefaultConsumer consumer =newDefaultConsumer(channel){@OverridepublicvoidhandleDelivery(String consumerTag,Envelope envelope,AMQP.BasicProperties properties,byte[] body)throwsIOException{/* 交付处理 参数1:收件人信息 参数2:包裹上的快递标签 参数3:协议的配置 参数4:消息 */String s =newString(body);System.out.println("接收到的消息:"+ s);}};//4、监听队列 true:自动消息确认 channel.basicConsume("queue1",true, consumer);}} - 测试结果- 先运行sender,此时Queue中存入一个消息:
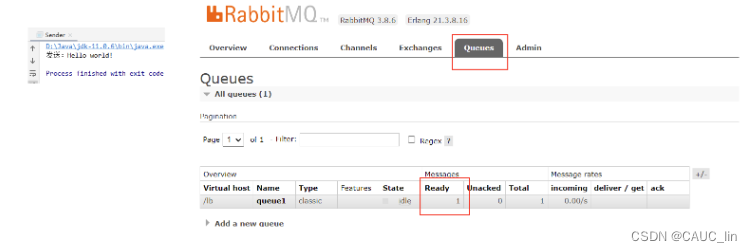 - 再运行receiver,此时Queue中的消息被消费:
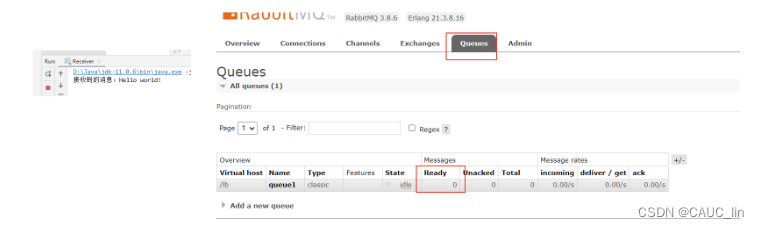
- 消息确认机制消息可以设置手动确认,这样可以保证:- 消费者接收到消息处理时未发生异常再确认,消息才被删除;- 发生异常,不确认,消息就不会被删除,防止消息丢失。修改消费者代码:
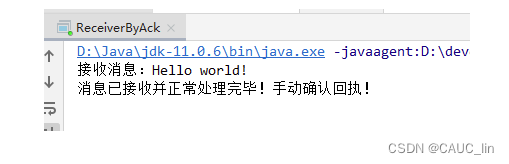
packagesimplest;importcom.rabbitmq.client.*;importutils.ConnectionUtil;importjava.io.IOException;publicclassReceiverByAck{publicstaticvoidmain(String[] args)throwsException{//1、获得连接Connection connection =ConnectionUtil.getConnection();//2、获得通道Channel channel = connection.createChannel();//3、从channel中获取消息DefaultConsumer consumer =newDefaultConsumer(channel){@OverridepublicvoidhandleDelivery(String consumerTag,Envelope envelope,AMQP.BasicProperties properties,byte[] body)throwsIOException{//body就是从队列中获取的消息String s =newString(body);System.out.println("接收消息:"+ s);//手动确认(收件人信息,是否同时确认多个消息)System.out.println("消息已接收并正常处理完毕!手动确认回执!"); channel.basicAck(envelope.getDeliveryTag(),false);}};//4、设置手动确认 channel.basicConsume("queue1",false, consumer);}} - 再次运行sender和receiver测试结果:
2.2.2 工作队列模式
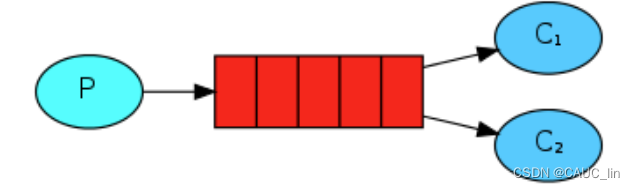
如图,此种模式区别于简单模式主要是多个消费者共同消费消息,但注意,仍然是一个消息对应一个消费者。
- 生产者代码类似简单模式,只是循环发了多条消息
packagework;importcom.rabbitmq.client.Channel;importcom.rabbitmq.client.Connection;importutils.ConnectionUtil;publicclassSender{publicstaticvoidmain(String[] args)throwsException{Connection connection =ConnectionUtil.getConnection();Channel channel = connection.createChannel(); channel.queueDeclare("test_work_queue",false,false,false,null);for(int i =0; i <100; i++){String msg ="产生的消息====>>>"+ i; channel.basicPublish("","test_work_queue",null, msg.getBytes());System.out.println(msg);} channel.close(); connection.close();}} - 消费者同样声明了消息队列,这样可以提前开启监听消息队列;同时,消费者1延时300ms,消费者2延时1000ms,便于观察;- 消费者1
packagework;importcom.rabbitmq.client.*;importutils.ConnectionUtil;importjava.io.IOException;publicclassReceiver1{staticint num =1;//统计消费的消息数目publicstaticvoidmain(String[] args)throwsException{Connection connection =ConnectionUtil.getConnection();finalChannel channel = connection.createChannel();//queueDeclare() 此方法有双重作用,如果队列不存在,就创建;如果队列存在,则获取// 使用此方法可以保证先启动消费者不会报错 channel.queueDeclare("test_work_queue",false,false,false,null);DefaultConsumer consumer =newDefaultConsumer(channel){@OverridepublicvoidhandleDelivery(String consumerTag,Envelope envelope,AMQP.BasicProperties properties,byte[] body)throwsIOException{String s =newString(body);System.out.println("Receiver1 消费了"+ s +"! 总共消费了"+ num+++"条消息!");//延迟时间try{Thread.sleep(300);}catch(InterruptedException e){ e.printStackTrace();}//手动确认 channel.basicAck(envelope.getDeliveryTag(),false);}};//设置监听 channel.basicConsume("test_work_queue",false, consumer);}}- 消费者2packagework;importcom.rabbitmq.client.*;importutils.ConnectionUtil;importjava.io.IOException;publicclassReceiver2{staticint num =1;//统计消费的消息数目publicstaticvoidmain(String[] args)throwsException{Connection connection =ConnectionUtil.getConnection();finalChannel channel = connection.createChannel();//queueDeclare() 此方法有双重作用,如果队列不存在,就创建;如果队列存在,则获取// 使用此方法可以保证先启动消费者不会报错 channel.queueDeclare("test_work_queue",false,false,false,null);DefaultConsumer consumer =newDefaultConsumer(channel){@OverridepublicvoidhandleDelivery(String consumerTag,Envelope envelope,AMQP.BasicProperties properties,byte[] body)throwsIOException{String s =newString(body);System.out.println("Receiver2 消费了"+ s +"! 总共消费了"+ num+++"条消息!");//延迟时间try{Thread.sleep(1000);}catch(InterruptedException e){ e.printStackTrace();}//手动确认 channel.basicAck(envelope.getDeliveryTag(),false);}};//设置监听 channel.basicConsume("test_work_queue",false, consumer);}} - 测试结果:- 先开启消费者,后台就存在了相应队列:
 - 再运行生产者:
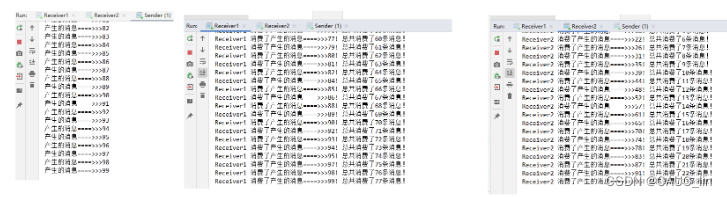
- 可以看到消费者1消费消息的效率高,但仍然只消费50个,说明生产者的消息是完全均匀分配的,这不符合正常的需求,我们想按照效率分配,需添加如下代码:
channel.basicQos(1);修改后的消费者代码:- 消费者1packagework;importcom.rabbitmq.client.*;importutils.ConnectionUtil;importjava.io.IOException;publicclassReceiver1{staticint num =1;//统计消费的消息数目publicstaticvoidmain(String[] args)throwsException{Connection connection =ConnectionUtil.getConnection();finalChannel channel = connection.createChannel();//queueDeclare() 此方法有双重作用,如果队列不存在,就创建;如果队列存在,则获取// 使用此方法可以保证先启动消费者不会报错 channel.queueDeclare("test_work_queue",false,false,false,null); channel.basicQos(1);DefaultConsumer consumer =newDefaultConsumer(channel){@OverridepublicvoidhandleDelivery(String consumerTag,Envelope envelope,AMQP.BasicProperties properties,byte[] body)throwsIOException{String s =newString(body);System.out.println("Receiver1 消费了"+ s +"! 总共消费了"+ num+++"条消息!");//延迟时间try{Thread.sleep(300);}catch(InterruptedException e){ e.printStackTrace();}//手动确认 channel.basicAck(envelope.getDeliveryTag(),false);}};//设置监听 channel.basicConsume("test_work_queue",false, consumer);}}- 消费者2packagework;importcom.rabbitmq.client.*;importutils.ConnectionUtil;importjava.io.IOException;publicclassReceiver2{staticint num =1;//统计消费的消息数目publicstaticvoidmain(String[] args)throwsException{Connection connection =ConnectionUtil.getConnection();finalChannel channel = connection.createChannel();//queueDeclare() 此方法有双重作用,如果队列不存在,就创建;如果队列存在,则获取// 使用此方法可以保证先启动消费者不会报错 channel.queueDeclare("test_work_queue",false,false,false,null); channel.basicQos(1);DefaultConsumer consumer =newDefaultConsumer(channel){@OverridepublicvoidhandleDelivery(String consumerTag,Envelope envelope,AMQP.BasicProperties properties,byte[] body)throwsIOException{String s =newString(body);System.out.println("Receiver2 消费了"+ s +"! 总共消费了"+ num+++"条消息!");//延迟时间try{Thread.sleep(1000);}catch(InterruptedException e){ e.printStackTrace();}//手动确认 channel.basicAck(envelope.getDeliveryTag(),false);}};//设置监听 channel.basicConsume("test_work_queue",false, consumer);}} - 先开启消费者,再运行生产者,测试结果:
注意:能者多劳必须要配合手动的ACK机制才生效
2.2.3 发布订阅模式
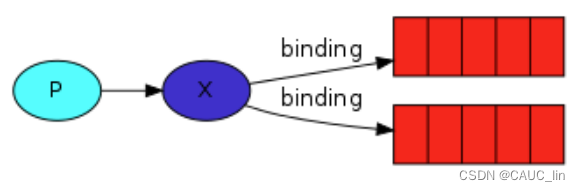
发布订阅模式添加了 X(交换机 Exchange),该角色主要实现消息的分发,当多个消息队列绑定了该交换机时,该交换机会把消息广播到所有绑定到它的队列,所以所有订阅了相应队列的消费者都会收到相同的消息。
- 生产者
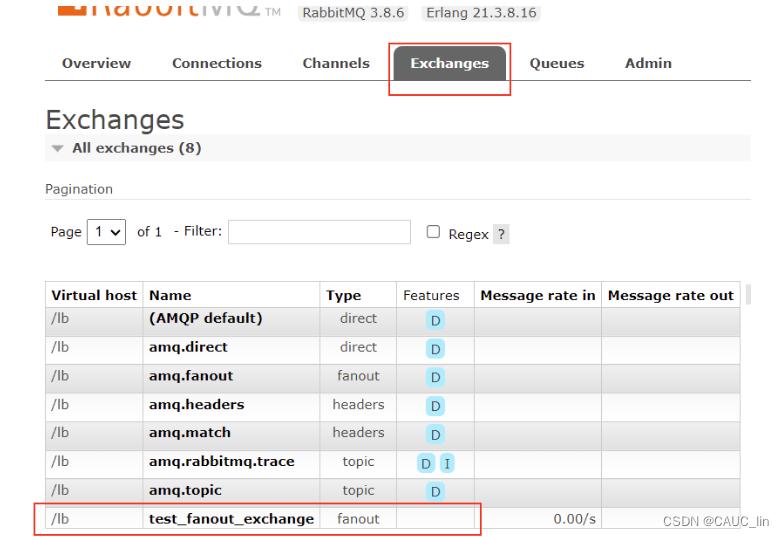
packagefanout;importcom.rabbitmq.client.Channel;importcom.rabbitmq.client.Connection;importutils.ConnectionUtil;publicclassSender{publicstaticvoidmain(String[] args)throwsException{Connection connection =ConnectionUtil.getConnection();Channel channel = connection.createChannel();// 声明路由(路由名,路由类型)// fanout:不处理路由键(只需要将队列绑定到路由上,发送到路由的消息都会被转发到与该路由绑定的所有队列上) channel.exchangeDeclare("test_fanout_exchange","fanout");String msg ="hello,everyone!"; channel.basicPublish("test_fanout_exchange","",null, msg.getBytes());System.out.println("生产者:"+ msg); channel.close(); connection.close();}} - 消费者- 消费者1
packagefanout;importcom.rabbitmq.client.*;importutils.ConnectionUtil;importjava.io.IOException;publicclassReceiver1{publicstaticvoidmain(String[] args)throwsException{Connection connection =ConnectionUtil.getConnection();Channel channel = connection.createChannel();//声明队列 channel.queueDeclare("test_fanout_queue1",false,false,false,null);//绑定路由 channel.queueBind("test_fanout_queue1","test_fanout_exchange","");DefaultConsumer consumer =newDefaultConsumer(channel){@OverridepublicvoidhandleDelivery(String consumerTag,Envelope envelope,AMQP.BasicProperties properties,byte[] body)throwsIOException{String s =newString(body);System.out.println("消费者1: "+ s); channel.basicAck(envelope.getDeliveryTag(),false);}};//监听队列 channel.basicConsume("test_fanout_queue1",false, consumer);}}- 消费者2packagefanout;importcom.rabbitmq.client.*;importutils.ConnectionUtil;importjava.io.IOException;publicclassReceiver2{publicstaticvoidmain(String[] args)throwsException{Connection connection =ConnectionUtil.getConnection();Channel channel = connection.createChannel();//声明队列 channel.queueDeclare("test_fanout_queue2",false,false,false,null);//绑定路由 channel.queueBind("test_fanout_queue2","test_fanout_exchange","");DefaultConsumer consumer =newDefaultConsumer(channel){@OverridepublicvoidhandleDelivery(String consumerTag,Envelope envelope,AMQP.BasicProperties properties,byte[] body)throwsIOException{String s =newString(body);System.out.println("消费者2: "+ s); channel.basicAck(envelope.getDeliveryTag(),false);}};//监听队列 channel.basicConsume("test_fanout_queue2",false, consumer);}} - 测试:- 先运行生产者,因为需要先创建交换机,此步的消息忽略。
 - 再运行消费者,消费者的队列绑定交换机。- 最后运行生产者。
2.2.4 路由模式
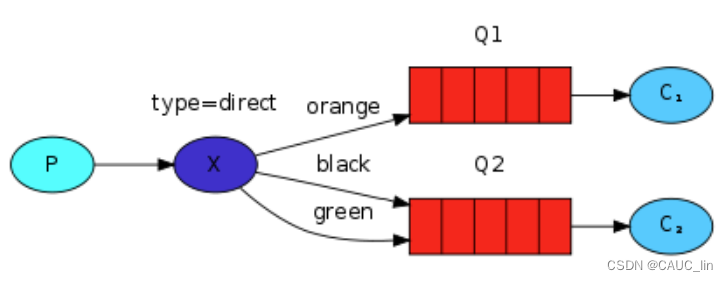
路由模式可以定向分发消息给不同的队列,区别于发布订阅模式,主要是由 路由key区分了消息的种类,根据不同的消息种类分别分发给对应的消息队列。
- 生产者,发布消息时需要声明绑定哪种key
packagedirect;importcom.rabbitmq.client.Channel;importcom.rabbitmq.client.Connection;importutils.ConnectionUtil;publicclassSender{publicstaticvoidmain(String[] args)throwsException{Connection connection =ConnectionUtil.getConnection();Channel channel = connection.createChannel();//声明路由// direct:根据路由键进行定向分发消息 channel.exchangeDeclare("test_direct_exchange","direct");String msg ="用户注册,【userid=100】"; channel.basicPublish("test_direct_exchange","insert",null, msg.getBytes()); msg ="用户查询,【userid=200】"; channel.basicPublish("test_direct_exchange","select",null, msg.getBytes()); channel.close(); connection.close();}} - 消费者,一个绑定增删改的路由key,另一个绑定查询的路由key- 消费者1
packagedirect;importcom.rabbitmq.client.*;importutils.ConnectionUtil;importjava.io.IOException;publicclassReceiver1{publicstaticvoidmain(String[] args)throwsException{Connection connection =ConnectionUtil.getConnection();Channel channel = connection.createChannel();//声明队列 channel.queueDeclare("test_direct_queue1",false,false,false,null);//队列绑定 channel.queueBind("test_direct_queue1","test_direct_exchange","insert"); channel.queueBind("test_direct_queue1","test_direct_exchange","delete"); channel.queueBind("test_direct_queue1","test_direct_exchange","update");DefaultConsumer consumer =newDefaultConsumer(channel){@OverridepublicvoidhandleDelivery(String consumerTag,Envelope envelope,AMQP.BasicProperties properties,byte[] body)throwsIOException{String s =newString(body);System.out.println("消费者1:"+ s); channel.basicAck(envelope.getDeliveryTag(),false);}};//监听队列 channel.basicConsume("test_direct_queue1",false, consumer);}}- 消费者2packagedirect;importcom.rabbitmq.client.*;importutils.ConnectionUtil;importjava.io.IOException;publicclassReceiver2{publicstaticvoidmain(String[] args)throwsException{Connection connection =ConnectionUtil.getConnection();Channel channel = connection.createChannel();//声明队列 channel.queueDeclare("test_direct_queue2",false,false,false,null);//队列绑定 channel.queueBind("test_direct_queue2","test_direct_exchange","select");DefaultConsumer consumer =newDefaultConsumer(channel){@OverridepublicvoidhandleDelivery(String consumerTag,Envelope envelope,AMQP.BasicProperties properties,byte[] body)throwsIOException{String s =newString(body);System.out.println("消费者2:"+ s); channel.basicAck(envelope.getDeliveryTag(),false);}};//监听队列 channel.basicConsume("test_direct_queue2",false, consumer);}} - 测试:- 先运行生产者,因为需要先创建交换机,此步的消息忽略。
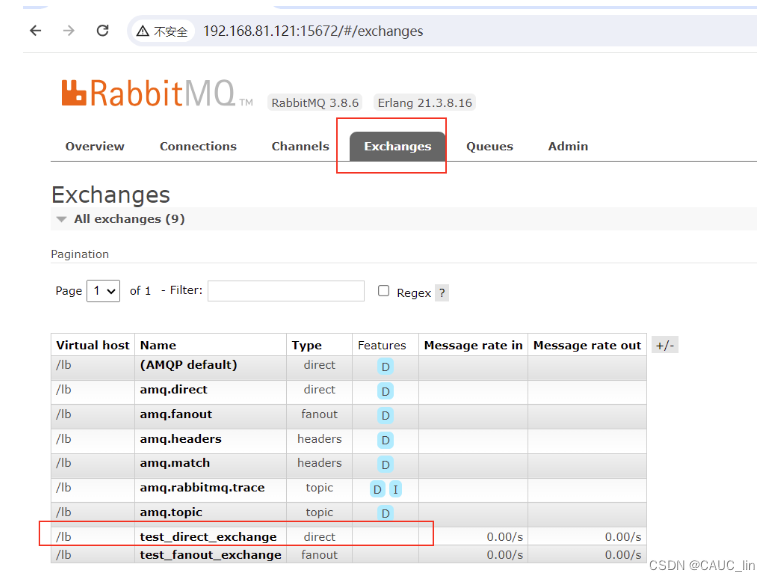 - 再运行消费者,消费者的队列绑定交换机。
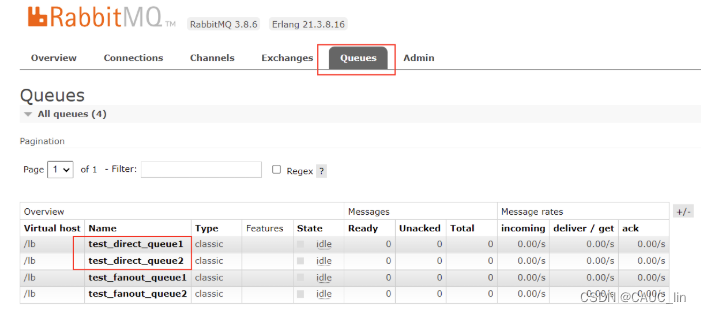 - 最后运行生产者。
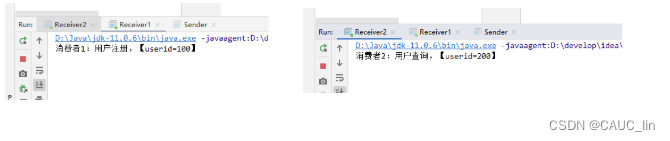
注意:是 队列和路由键 进行绑定,当队列绑定了路由键,消费者再监听该队列时,所有的队列信息都能拿到。通常,每个消费者 只监听自己的消费队列。
2.2.5 通配符模式
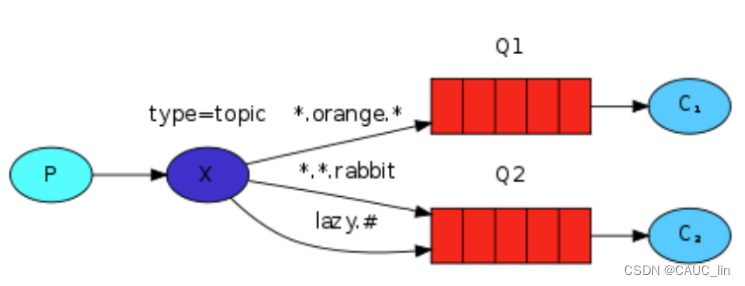
通配符模式 和 路由模式的区别:
- 路由键支持模糊匹配
匹配符号:
- *:只能匹配一个词(正好一个词,多一个不行,少一个也不行)
- #:匹配0个或更多个词
- 生产者
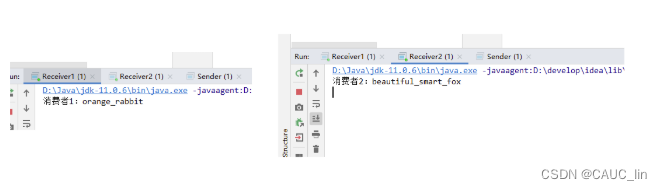
packagetopic;importcom.rabbitmq.client.Channel;importcom.rabbitmq.client.Connection;importutils.ConnectionUtil;publicclassSender{publicstaticvoidmain(String[] args)throwsException{Connection connection =ConnectionUtil.getConnection();Channel channel = connection.createChannel(); channel.exchangeDeclare("test_topic_exchange","topic");String msg ="orange_rabbit"; channel.basicPublish("test_topic_exchange","orange.rabbit",null, msg.getBytes()); msg ="beautiful_smart_fox"; channel.basicPublish("test_topic_exchange","beautiful.smart.fox#.fox",null, msg.getBytes()); channel.close(); connection.close();}} - 消费者- 消费者1
packagetopic;importcom.rabbitmq.client.*;importutils.ConnectionUtil;importjava.io.IOException;publicclassReceiver1{publicstaticvoidmain(String[] args)throwsException{Connection connection =ConnectionUtil.getConnection();Channel channel = connection.createChannel();//声明队列 channel.queueDeclare("test_topic_queue1",false,false,false,null);//绑定队列 channel.queueBind("test_topic_queue1","test_topic_exchange","orange.*");DefaultConsumer consumer =newDefaultConsumer(channel){@OverridepublicvoidhandleDelivery(String consumerTag,Envelope envelope,AMQP.BasicProperties properties,byte[] body)throwsIOException{String s =newString(body);System.out.println("消费者1:"+ s); channel.basicAck(envelope.getDeliveryTag(),false);}};//监听队列 channel.basicConsume("test_topic_queue1",false, consumer);}}- 消费者2packagetopic;importcom.rabbitmq.client.*;importutils.ConnectionUtil;importjava.io.IOException;publicclassReceiver2{publicstaticvoidmain(String[] args)throwsException{Connection connection =ConnectionUtil.getConnection();Channel channel = connection.createChannel();//声明队列 channel.queueDeclare("test_topic_queue2",false,false,false,null);//绑定队列 channel.queueBind("test_topic_queue2","test_topic_exchange","#.fox");DefaultConsumer consumer =newDefaultConsumer(channel){@OverridepublicvoidhandleDelivery(String consumerTag,Envelope envelope,AMQP.BasicProperties properties,byte[] body)throwsIOException{String s =newString(body);System.out.println("消费者2:"+ s); channel.basicAck(envelope.getDeliveryTag(),false);}};//监听队列 channel.basicConsume("test_topic_queue2",false, consumer);}} - 测试:- 先运行生产者,因为需要先创建交换机,此步的消息忽略。- 再运行消费者,消费者的队列绑定交换机。- 最后运行生产者。
2.3 消息的持久化
消息丢失:
- 消费者发生异常,丢失消息 --> 解决方案:手动ack
- 服务器发生宕机 --> 解决方案:持久化
基于通配符模式代码修改
- 生产者修改
packagepersistence.topic;importcom.rabbitmq.client.Channel;importcom.rabbitmq.client.Connection;importcom.rabbitmq.client.MessageProperties;importutils.ConnectionUtil;publicclassSender{publicstaticvoidmain(String[] args)throwsException{Connection connection =ConnectionUtil.getConnection();Channel channel = connection.createChannel();// 声明路由(路由名,路由类型,持久化) channel.exchangeDeclare("test_topic_exchange2","topic",true);String msg ="orange_rabbit"; channel.basicPublish("test_topic_exchange","orange.rabbit",null, msg.getBytes()); msg ="beautiful_smart_fox";//第三个参数可以让消息持久化 channel.basicPublish("test_topic_exchange","beautiful.smart.fox#.fox",MessageProperties.PERSISTENT_TEXT_PLAIN, msg.getBytes()); channel.close(); connection.close();}} - 消费者- 消费者1
packagepersistence.topic;importcom.rabbitmq.client.*;importutils.ConnectionUtil;importjava.io.IOException;publicclassReceiver1{publicstaticvoidmain(String[] args)throwsException{Connection connection =ConnectionUtil.getConnection();Channel channel = connection.createChannel();//声明队列,第二个参数为true:支持持久化 channel.queueDeclare("test_topic_queue1",true,false,false,null);//绑定队列 channel.queueBind("test_topic_queue1","test_topic_exchange","orange.*");DefaultConsumer consumer =newDefaultConsumer(channel){@OverridepublicvoidhandleDelivery(String consumerTag,Envelope envelope,AMQP.BasicProperties properties,byte[] body)throwsIOException{String s =newString(body);System.out.println("消费者1:"+ s); channel.basicAck(envelope.getDeliveryTag(),false);}};//监听队列 channel.basicConsume("test_topic_queue1",false, consumer);}}- 消费者2packagepersistence.topic;importcom.rabbitmq.client.*;importutils.ConnectionUtil;importjava.io.IOException;publicclassReceiver2{publicstaticvoidmain(String[] args)throwsException{Connection connection =ConnectionUtil.getConnection();Channel channel = connection.createChannel();//声明队列,第二个参数为true:支持持久化 channel.queueDeclare("test_topic_queue2",false,false,false,null);//绑定队列 channel.queueBind("test_topic_queue2","test_topic_exchange","#.fox");DefaultConsumer consumer =newDefaultConsumer(channel){@OverridepublicvoidhandleDelivery(String consumerTag,Envelope envelope,AMQP.BasicProperties properties,byte[] body)throwsIOException{String s =newString(body);System.out.println("消费者2:"+ s); channel.basicAck(envelope.getDeliveryTag(),false);}};//监听队列 channel.basicConsume("test_topic_queue2",false, consumer);}}
版权归原作者 码进未来 所有, 如有侵权,请联系我们删除。