机缘
最近帮一个后端朋友处理一个前端问题,elementUI 中calendar日历组件内容进行自定义显示,实现类似通知事项的日历效果,感觉还挺有意思,在这做简单的分享
问题描述
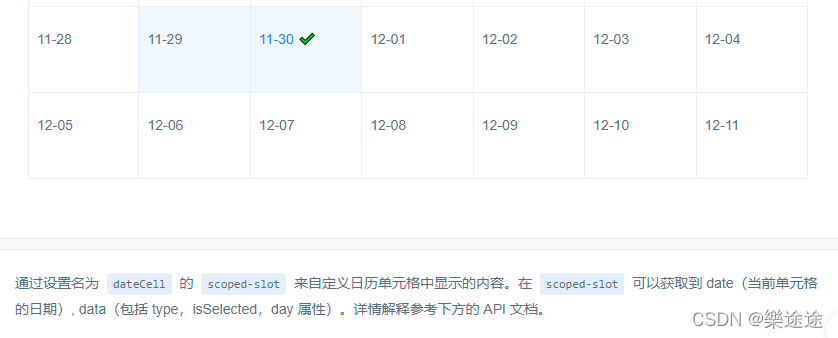
提示:elementUI组件中针对calendar日历组件其实可以实现自定义内容的效果。下图,官网自定义效果。
不过对刚接触的或者后端同学不太友好,可能知道有这么个东西,但是不知道怎么去根据自己的项目需求去修改以达到真正自定义的的效果,然后就会稍有迷茫,不知所措。不过不要紧,这里我会根据这次的实现做相对详细的步骤描述,不详尽之处,欢迎补充交流。
通知事项日历复现效果:

内容
下面是具体的代码结构,copy时还辛苦大佬动动小手点个赞

结构部分:
  <div class="dashboard-container">
    <!-- 日历 -->
    <el-calendar v-model="value">
      <template slot="dateCell" slot-scope="{ data }">
        <p :class="data.isSelected ? 'is-selected' : ''">
          {{ data.day.split("-").slice(2).join("-") }}
          {{ data.isSelected ? "✔️" : "" }}
        </p>
        <div
          style="width: 100%"
          v-for="(item, index) in scheduleData"
          :key="index"
        >
          <!-- 方法一:
            为了避免渲染本应该被隐藏的列表 (比如 v-for="(content, index) in item.content" v-if="item.workingDay.indexOf(data.day) != -1")。
            这种情形下,请将 v-if 移动至容器元素上 (比如 div)。
        -->
          <div v-if="item.workingDay.indexOf(data.day) != -1">
            <ul v-for="(content, index) in item.content" :key="index">
              <li
                :class="
                  content.type === 'important' ? 'importantSty' : 'secondarySty'
                "
              >
                {{ content.notice }}
              </li>
            </ul>
          </div>
          <!-- 方法二:
               可以使用 <template> 标签和 v-for 来包装 <li> 元素
        -->
          <!-- <ul v-if="item.workingDay.indexOf(data.day) != -1">
            <template v-for="(content, inde) in item.content">
              <li
                :key="inde"
                :class="
                  content.type === 'important' ? 'importantSty' : 'secondarySty'
                "
              >
                {{ content.notice }}
              </li>
            </template>
          </ul> -->
        </div>
      </template>
    </el-calendar>
  </div>
数据部分:这个只是我根据朋友需求,模拟的基础数据结构,仅供参考,具体的数据要求可能需要你通过接口获取,根据要求进行一定的数据结构处理以达到预期的效果
    scheduleData: [
        {
          workingDay: "2022-04-02",
          content: [
            {
              notice: "这是紧急事项",
              type: "important",
            },
            {
              notice: "这是次要的事项",
              type: "secondarySty",
            },
            {
              notice: "记得点个赞",
              type: "important",
            },
          ],
        },
        {
          workingDay: "2022-04-25",
          content: [
            {
              notice: "这件事很重要很重要",
              type: "important",
            },
            {
              notice: "记得点个赞",
              type: "secondary",
            },
          ],
        },
        {
          workingDay: "2022-05-02",
          content: [
            {
              notice: "记得点个赞",
              type: "important",
            },
          ],
        },
        {
          workingDay: "2022-05-08",
          content: [
            {
              notice: "记得点个赞",
              type: "important",
            },
          ],
        },
      ],
样式部分:
具体样式可能就需要你根据项目需求来做对应的修改了,不过这里要强调一下,(.el-calendar-table .el-calendar-day) 的高度一定要自适应,因为组件默认有高度,当然也要根据自己项目来定。
.dashboard-container {
  .is-selected {
    color: #1989fa;
  }

  p {
    margin: 10px auto;
  }

  ul {
    list-style: none;
    padding: 0;
  }

  .importantSty {
    color: red;
    // background-color: rgba(235, 22, 22, 0.5);
  }

  .secondarySty {
    color: tan;
    // background-color: rgba(235, 150, 22, 0.5);
  }

  ::v-deep .el-calendar-table {
    .el-calendar-day {
      height: auto;
    }
  }
}
注意点
1、自定义内容可以根据需要<template >中自己构建想要的结构效果;
2、结构构建前一定要先把逻辑数据梳理清楚,防止后期返工;
3、组件中的data.day数据结构是"2022-04-24",具体的展示你可以通过split、slice、join等方法进行数据处理
(1)data.day.split("-").slice(2).join("-") 处理结果 "24"
(1)data.day.split("-").slice(1).join("-") 处理结果 "04-24"
4、注意如果想要通知事项匹配到对应的日期,一定只要对日期数据进行匹配,这里我我建议一定要匹配到年月日,这样才能保障长久使用中不论你是切换年月日导致日历变化,数据都能匹配
这一步在自定义内容中很关键
上述结构代码中,这里就是对数据的检索,当满足时才会在对应日期下展示相应的事项
<div v-if="item.workingDay.indexOf(data.day) != -1">
5、当处于同一节点,
v-if
的优先级比
v-for
更高,不建议一起使用,你可以根据我在结构代码中备注的方式择一即可;
ps:第二种方法template上使用v-for 并绑定key报错 ,是因为key需要绑定在真实的元素上
解决办法(已处理,看上面代码结构部分):
1、将template标签替换成别的标签;(就是上述结构部分中方法一)
2、将key绑定值写在别的元素上;
6、这里使用的是sass,所以在修改组件本身样式时可能不生效,你可以通过深度作用选择器::v-deep来实现,具体使用情况可参考下列相关链接(也是我本人的一些总结,相对详细一些);
希望对你有所帮助,有问题欢迎交流……
相关内容链接:
深度作用选择器::v-deep
v-for 与 v-if 一同使用
版权归原作者 樂途途 所有, 如有侵权,请联系我们删除。